parking brake MERCEDES-BENZ GLK-Class 2014 X204 Workshop Manual
[x] Cancel search | Manufacturer: MERCEDES-BENZ, Model Year: 2014, Model line: GLK-Class, Model: MERCEDES-BENZ GLK-Class 2014 X204Pages: 382, PDF Size: 4.36 MB
Page 213 of 382

This function is available in the range between
40 mph and 120 mph (60 km/h and
200 km/h).
A lane-correcting brake application can only
be made after driving over a solid,
recognizable lane marking. Before this, a
warning must be given by means of
intermittent vibration in the steering wheel.
In addition, a lane with lane markings on both
sides must be recognized. The brake
application also slightly reduces vehicle
speed.
If a lane-correcting brake application occurs,
the following, for example, appears in the
multifunction display: i
A further lane-correcting brake
application can only occur after your
vehicle has returned to the original lane.
No lane-correcting brake application occurs
if:
R you clearly and actively steer, brake or
accelerate.
R you cut the corner on a sharp bend.
R you switch on the turn signals.
R a driving safety system intervenes, e.g.
ESP ®
, PRE-SAFE ®
Brake or Active Blind
Spot Assist.
R you have adopted a sporty driving style with
high cornering speeds or high rates of
acceleration.
R on vehicles with a trailer tow hitch, the
electrical connection to the trailer has been
correctly established.
R ESP ®
is switched off. R
the transmission is not in position D.
R the off-road program is activated.
R a loss of tire pressure or a defective tire has
been detected and displayed.
Active Lane Keeping Assist does not detect
traffic situations or road users. An
inappropriate brake application may be
interrupted at any time if you:
R steer slightly in the opposite direction
R use a turn signal
R clearly brake or accelerate
A lane-correcting brake application is
interrupted automatically if:
R a driving safety system intervenes, e.g.
ESP ®
, PRE-SAFE ®
Brake or Active Blind
Spot Assist.
R lane markings can no longer be recognized.
Switching on Active Lane Keeping Assist
X Switch on Active Lane Keeping Assist using
the on-board computer; to do so, select
Standard Standard orAdaptive
Adaptive (Ypage 229).
If you drive at speeds above 40 mph
(60 km/h) and lane markings are detected,
the lines in the assistance graphics display
(Y page 228) are shown in green. Lane
Keeping Assist is ready for use.
If Standard Standard is selected, no warning
vibration occurs if:
R you have switched on the turn signals. In
this event, the warnings are suppressed
for a certain period of time.
R a driving safety system intervenes, such
as ABS, BAS or ESP ®
.
When Adaptive Adaptive is selected, no warning
vibration occurs if:
R you have switched on the turn signals. In
this event, the warnings are suppressed
for a certain period of time.
R a driving safety system intervenes, e.g.
ABS, BAS or ESP ®
.
R you accelerate hard, e.g. kickdown.
R you brake hard. Driving systems
211Driving and parking Z
Page 215 of 382
General notes
R
Do not exceed the legally prescribed
maximum speed for vehicle/trailer
combinations in the relevant country.
This lowers the risk of an accident.
R Only install an approved trailer coupling on
your vehicle.
Further information on availability and on
installation is available from any authorized
Mercedes-Benz Center.
R The bumpers of your vehicle are not
suitable for installing detachable trailer
couplings.
R Do not install hired trailer couplings or
other detachable trailer couplings on the
bumpers of your vehicle.
R To reduce the risk of damage to the ball
coupling, remove it from the ball coupling
recess when not in use.
i When towing a trailer, set the tire
pressure on the rear axle of the towing
vehicle for a maximum load; see the tire
pressure table in the fuel filler flap
(Y page 351).
Please note that when towing a trailer,
PARKTRONIC (Y page 185) is only available
with limitations or not at all.
i On vehicles without level control, the
height of the ball coupling will alter
according to the load placed on the vehicle.
If necessary, use a trailer with a height-
adjustable drawbar.
You will find installing dimensions and loads
under "Technical data" (Y page 376).
Driving tips i
Observe the notes on ESP ®
trailer
stabilization (Y page 71).
The maximum permissible speed for vehicle/
trailer combinations depends on the type of
trailer. Before beginning the journey, check
the trailer's documents to see what the
maximum permissible speed is. Observe the legally prescribed maximum speed in the
relevant country.
For certain Mercedes-Benz vehicles, the
maximum permissible rear axle load is
increased when towing a trailer. Refer to the
"Technical data" section to find out whether
this applies to your vehicle.
If you utilize any of the added maximum rear
axle load when towing a trailer, the vehicle/
trailer combination may not exceed a
maximum speed of 60 mph (100 km/h) for
reasons concerning the operating permit.
This also applies in countries in which the
permissible maximum speed for vehicle/
trailer combinations is above 60 mph
(100 km/h).
When towing a trailer, your vehicle's handling
characteristics will be different in comparison
with when driving without a trailer.
Use the left-hand paddle shifter to shift into
a lower gear in good time on long and steep
downhill gradients.
i
This also applies if you have activated
cruise control.
This will use the braking effect of the engine,
so that less braking will be required to
maintain the speed. This relieves the load on
the brake system and prevents the brakes
from overheating and wearing too quickly. If
you need additional braking, depress the
brake pedal repeatedly rather than
continuously.
Driving tips R
Maintain a greater distance from the
vehicle in front than when driving without a
trailer.
R Avoid braking abruptly. If possible, brake
gently at first to allow the trailer to run on.
Then, increase the braking force rapidly.
R The values given for gradient-climbing
capabilities from a standstill refer to sea
level. When driving in mountainous areas,
note that the power output of the engine
and, consequently, the vehicle's gradient- Towing a trailer
213Driving and parking Z
Page 216 of 382

climbing capability, decreases with
increasing altitude.
If the trailer swings from side to side:
X Do not accelerate.
X Do not counter-steer.
X Brake if necessary. Installing the ball coupling
G
WARNING
If the ball coupling is not installed and secured
correctly the trailer may come loose. There is
a risk of an accident.
Install and secure the ball coupling as
described in the ball coupling installation
instructions. Make sure that the ball coupling
is installed and secured correctly before every
journey.
! Mercedes-Benz recommends that you
only use ball couplings that have been
tested and approved by Mercedes-Benz.
This helps to avoid damage to the vehicle. Cover cap
X
Pull protective cap 0043in the direction of the
arrow, out of ball coupling recess 0044.
X Store protective cap 0043in a safe place.
X Observe the manufacturer's installation
instructions. G
WARNING
If the ball coupling is not installed and secured
correctly it can become detached while the vehicle is in motion and fall onto the road.
There is a risk of an accident and injury.
Install and secure the ball coupling as
described in the ball coupling installation
instructions. Make sure that the ball coupling
is installed and secured correctly before every
journey.
Coupling up a trailer
Observe the maximum permissible trailer
dimensions (width and length).
Most U.S. states and all Canadian provinces
require by law:
R safety chains between the towing vehicle
and the trailer. The chains should be cross-
wound under the trailer drawbar. They must
be fastened to the vehicle's trailer
coupling, not to the bumper or the axle.
Leave enough play in the chains to make
tight cornering possible.
R a separate brake system for certain types
of trailer.
R a safety switch for braked trailers. Check
the specific legal requirements applicable
to your state.
If the trailer detaches from the towing
vehicle, the safety switch applies the
trailer's brakes.
! Do not connect the trailer's brake system
(if featured) to the hydraulic brake system
of the towing vehicle, as the latter is
equipped with an anti-lock brake system.
Doing so will result in a loss of function of
the brake systems of both the vehicle and
the trailer.
i The vehicle's wiring harness features a
connection to the brake indicator lamp.
X Make sure that the automatic transmission
is set to position P.
X Apply the vehicle's parking brake.
X Close all doors and the tailgate. 214
Towing a trailerDriving and parking
Page 217 of 382
X
Couple up the trailer.
X Establish all electrical connections. Towing a trailer
There are numerous legal requirements
concerning the towing of a trailer, e.g. speed
restrictions. Make sure that your car/trailer
combination complies with the local
regulations:
R in your place of residence
R in the location to which you are driving
The police and local authorities can provide
reliable information.
Observe the following when towing a trailer:
R To gain driving experience and to become
accustomed to the new handling
characteristics, you should practice the
following in a traffic-free location:
- cornering
- stopping
- backing up
R Before driving, check:
-the trailer tow hitch
- the safety switch for braked trailers
- the safety chains
- electrical connections
- the lights
- the wheels
R Adjust the exterior mirrors to provide an
unobstructed view of the rear section of the
trailer.
R If the trailer has electronically controlled
brakes, pull away carefully. Brake manually
using the brake controller and check
whether the brakes function correctly.
R Secure any objects on the trailer to prevent
the cargo from slipping when the vehicle is
in motion.
R When you couple up a trailer, check at
regular intervals that the load is firmly
secured. If the trailer is equipped with trailer lights and brakes, check the trailer
to ensure that these are working.
R Bear in mind that the handling will be less
stable when towing a trailer than when
driving without one. Avoid sudden steering
movements.
R The vehicle/trailer combination is heavier,
accelerates more slowly, has a decreased
gradient climbing capability and a longer
braking distance.
It is more susceptible to side winds and
requires more careful steering.
R If possible, avoid abrupt braking. Depress
the brake pedal moderately at first, so that
the trailer can activate its own brakes. Then
increase the pressure on the brake pedal.
R If the automatic transmission repeatedly
shifts between gears on uphill or downhill
gradients, shift to a lower gear using the
left-hand steering wheel paddle shifter.
A lower gear and lower speed reduce the
risk of engine failure.
R When driving downhill, shift to a lower gear
to utilize the engine's braking effect.
Avoid continuous brake application as this
may overheat the vehicle brakes and, if
installed, the trailer brakes.
R If the coolant temperature increases
dramatically while the air-conditioning
system is switched on, switch off the air-
conditioning system.
Coolant heat can additionally be dissipated
by opening the windows and by setting the
blower fan and the interior temperature to
maximum.
R When overtaking, pay particular attention
to the extended length of your vehicle/
trailer combination.
Due to the length of the vehicle/trailer
combination, you require additional road
space in relation to the vehicle you are
overtaking, before you can change back to
the original lane. Towing a trailer
215Driving and parking Z
Page 218 of 382
Decoupling a trailer
G
WARNING
If you uncouple a trailer with the overrun
brake engaged, you could trap your hand
between the vehicle and the trailer drawbar.
There is a risk of injury.
Do not uncouple a trailer if the overrun brake
is engaged.
! Do not disconnect a trailer with an
engaged overrun brake. Otherwise, your
vehicle could be damaged by the
rebounding of the overrun brake.
X Make sure that the automatic transmission
is set to position P.
X Apply the vehicle's parking brake.
X Close all doors and the tailgate.
X Apply the trailer's parking brake.
X Remove the trailer cable and decouple the
trailer. Permissible trailer loads and drawbar
loads
Weight specifications The gross trailer weight is calculated by
adding the weight of the trailer to the weight
of the load and equipment on the trailer.
You will find installing dimensions and loads
under "Technical data" (
Ypage 376).
Loading a trailer R
When loading the trailer, make sure that
neither the permissible gross weight of the
trailer nor the gross vehicle weight is
exceeded. The permissible gross vehicle
weight is indicated on the identification
plate on the B-pillar on the driver's side of
the vehicle.
You can find the maximum permissible
values on the type plates of your vehicle
and the trailer. When calculating how much
weight the vehicle and trailer may carry, pay attention to the respective lowest
values.
R The trailer drawbar load on the ball coupling
must be added to the rear axle load to avoid
exceeding the permissible gross axle
weight. The permissible gross vehicle
weight is indicated on the identification
plate on the B-pillar on the driver's side of
the vehicle.
i Mercedes-Benz recommends a trailer
load where the trailer drawbar noseweight
accounts for 8% to 15% of the trailer's
permissible gross weight.
i The weight of other accessories,
passengers and loads reduces:
R the permissible trailer load
R the permissible noseweight that your
vehicle can tow
Checking the vehicle and trailer weight R
To ensure compliance of the weight of the
towing vehicle and the trailer with the
maximum permissible values, have the
vehicle/trailer combination (towing vehicle
including driver, passenger, load and fully
laden trailer) weighed on a calibrated
weighbridge.
R Check the gross axle weight rating of the
front and rear axles, the gross weight of the
trailer and trailer drawbar load. Removing the ball coupling
X Observe the manufacturer's installation
instructions.
X Press the protective cap into the ball
coupling recess.
X Make sure that the protective cap is firmly
in place. 216
Towing a trailerDriving and pa
rking
Page 219 of 382
Storing the ball coupling
G
WARNING
Do not carry the ball coupling in the vehicle
interior if it is not secured.
Otherwise, you and others could be injured by
the ball coupling being thrown around if you:
R brake sharply
R change direction suddenly
R are involved in an accident
X Observe the manufacturer's installation
instructions. Trailer power supply
The trailer socket of your vehicle is equipped
at the factory with a permanent power supply.
The permanent power supply is supplied via
trailer socket pin 4.
! You can connect accessories with a
maximum power consumption of 240 Wto
the permanent power supply.
You must not charge a trailer battery using
the power supply.
The trailer's permanent power supply is
switched off in the event of low vehicle supply
voltage and after six hours at the latest.
A qualified specialist workshop can provide
more information about installing the trailer
electrics. Towing a trailer
217Driving and parking Z
Page 239 of 382
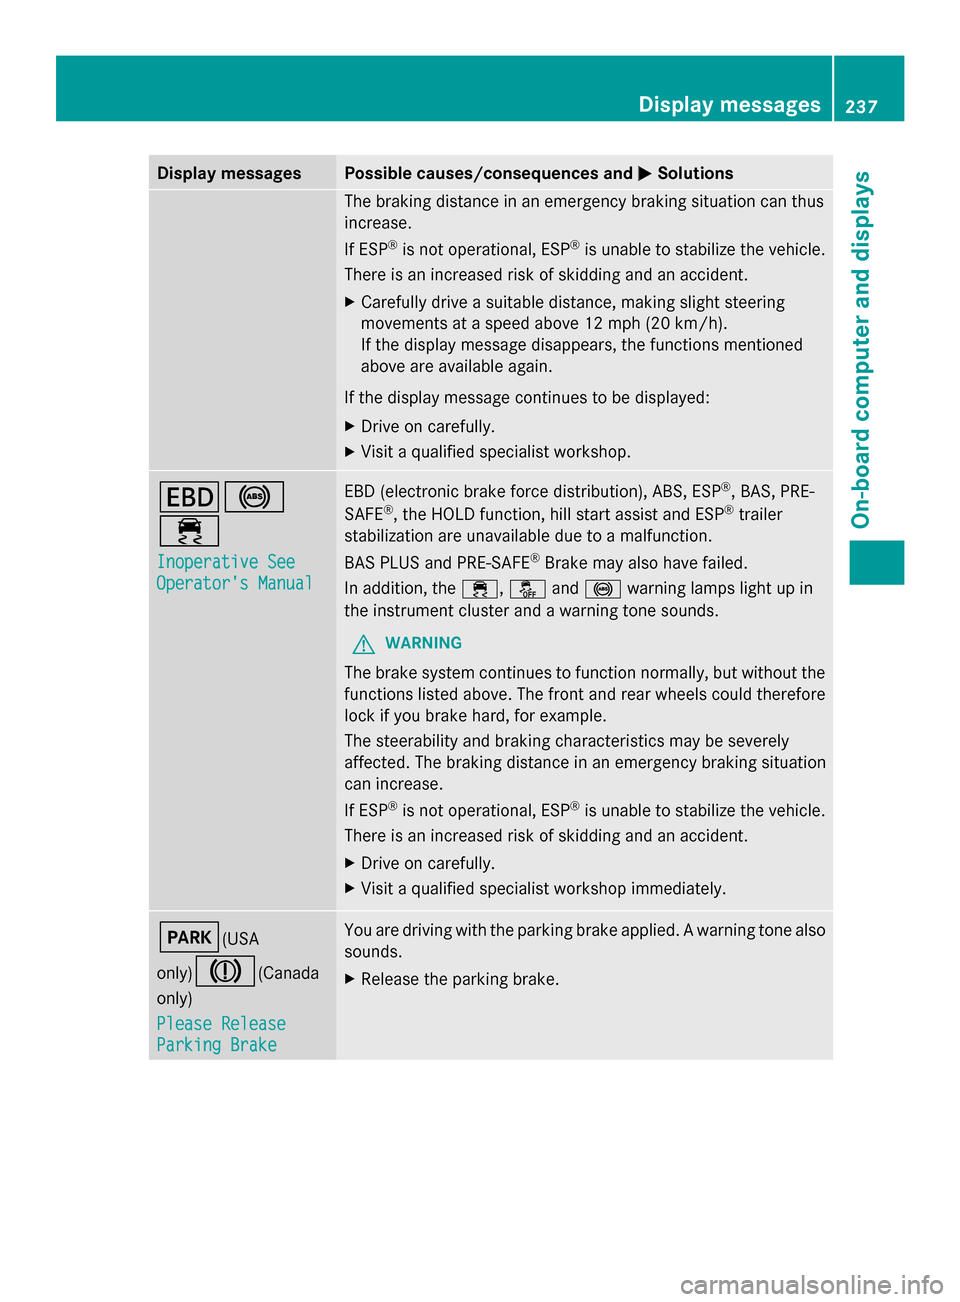
Display messages Possible causes/consequences and
0050
0050Solutions The braking distance in an emergency braking situation can thus
increase.
If ESP
®
is not operational, ESP ®
is unable to stabilize the vehicle.
There is an increased risk of skidding and an accident.
X Carefully drive a suitable distance, making slight steering
movements at a speed above 12 mph (20 km/h).
If the display message disappears, the functions mentioned
above are available again.
If the display message continues to be displayed:
X Drive on carefully.
X Visit a qualified specialist workshop. 007A0025
00E5
Inoperative See Inoperative See
Operator's Manual Operator's Manual EBD (electronic brake force distribution), ABS, ESP
®
, BAS, PRE-
SAFE ®
, the HOLD function, hill start assist and ESP ®
trailer
stabilization are unavailable due to a malfunction.
BAS PLUS and PRE-SAFE ®
Brake may also have failed.
In addition, the 00E5,00BBand0025 warning lamps light up in
the instrument cluster and a warning tone sounds.
G WARNING
The brake system continues to function normally, but without the
functions listed above. The front and rear wheels could therefore
lock if you brake hard, for example.
The steerability and braking characteristics may be severely
affected. The braking distance in an emergency braking situation
can increase.
If ESP ®
is not operational, ESP ®
is unable to stabilize the vehicle.
There is an increased risk of skidding and an accident.
X Drive on carefully.
X Visit a qualified specialist workshop immediately. 0049(USA
only)
004D(Canada
only)
Please Release Please Release
Parking Brake Parking Brake You are driving with the parking brake applied. A warning tone also
sounds.
X
Release the parking brake. Display
messages
237On-board computer and displays Z
Page 323 of 382

R
Only use jumper cables which have a sufficient cross-section and insulated terminal clamps.
R If the battery is fully discharged, leave the battery that is being used to jump-start connected
for a few minutes before attempting to start. This charges the battery slightly.
R Make sure that the two vehicles do not touch.
Make sure that:
R the jumper cables are not damaged.
R bare parts of the terminal clamp do not come into contact with other metal parts while the
jumper cables are connected to the battery.
R the jumper cables cannot come into contact with parts such as the V-belt pulley or the fan.
These parts move when the engine is started and while it is running.
X Apply the parking brake firmly.
X Shift the automatic transmission to position P.
X Switch off all electrical consumers, e.g. rear window defroster, lighting, etc.
X Open the hood. Position number
0084identifies the charged battery of the other vehicle or an equivalent jump-
starting device.
X Slide cover 0043of positive terminal 0044in the direction of the arrow.
X Connect positive terminal 0044on your vehicle to positive terminal 0087of donor battery 0084
using the jumper cable, beginning with your own battery.
X Start the engine of the donor vehicle and run it at idling speed.
X Connect negative terminal 0085of donor battery 0084to ground point 0083of your vehicle using
the jumper cable, connecting the jumper cable to battery of other vehicle 0084first.
X Start the engine.
X Before disconnecting the jumper cables, let the engine run for several minutes. Jump-starting
321Breakdown assistance Z
Page 326 of 382
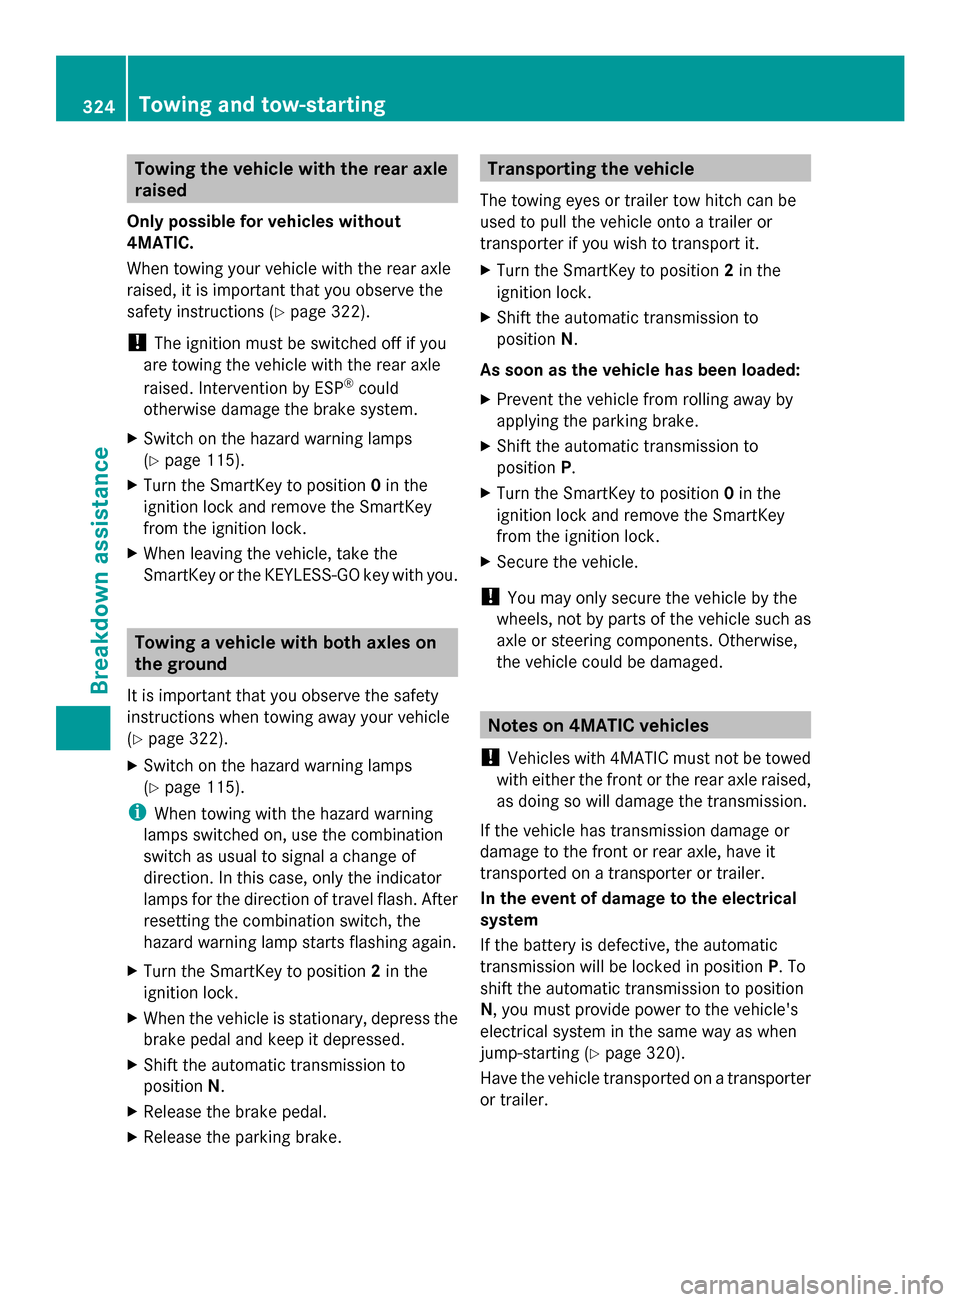
Towing the vehicle with the rear axle
raised
Only possible for vehicles without
4MATIC.
When towing your vehicle with the rear axle
raised, it is important that you observe the
safety instructions ( Ypage 322).
! The ignition must be switched off if you
are towing the vehicle with the rear axle
raised. Intervention by ESP ®
could
otherwise damage the brake system.
X Switch on the hazard warning lamps
(Y page 115).
X Turn the SmartKey to position 0in the
ignition lock and remove the SmartKey
from the ignition lock.
X When leaving the vehicle, take the
SmartKey or the KEYLESS-GO key with you. Towing a vehicle with both axles on
the ground
It is important that you observe the safety
instructions when towing away your vehicle
(Y page 322).
X Switch on the hazard warning lamps
(Y page 115).
i When towing with the hazard warning
lamps switched on, use the combination
switch as usual to signal a change of
direction. In this case, only the indicator
lamps for the direction of travel flash. After
resetting the combination switch, the
hazard warning lamp starts flashing again.
X Turn the SmartKey to position 2in the
ignition lock.
X When the vehicle is stationary, depress the
brake pedal and keep it depressed.
X Shift the automatic transmission to
position N.
X Release the brake pedal.
X Release the parking brake. Transporting the vehicle
The towing eyes or trailer tow hitch can be
used to pull the vehicle onto a trailer or
transporter if you wish to transport it.
X Turn the SmartKey to position 2in the
ignition lock.
X Shift the automatic transmission to
position N.
As soon as the vehicle has been loaded:
X Prevent the vehicle from rolling away by
applying the parking brake.
X Shift the automatic transmission to
position P.
X Turn the SmartKey to position 0in the
ignition lock and remove the SmartKey
from the ignition lock.
X Secure the vehicle.
! You may only secure the vehicle by the
wheels, not by parts of the vehicle such as
axle or steering components. Otherwise,
the vehicle could be damaged. Notes on 4MATIC vehicles
! Vehicles with 4MATIC must not be towed
with either the front or the rear axle raised,
as doing so will damage the transmission.
If the vehicle has transmission damage or
damage to the front or rear axle, have it
transported on a transporter or trailer.
In the event of damage to the electrical
system
If the battery is defective, the automatic
transmission will be locked in position P. To
shift the automatic transmission to position
N, you must provide power to the vehicle's
electrical system in the same way as when
jump-starting (Y page 320).
Have the vehicle transported on a transporter
or trailer. 324
Towing and tow-startingBreakdown assistance
Page 357 of 382

Storing wheels
Store wheels that are not being used in a cool,
dry and preferably dark place. Protect the
tires from oil, grease, gasoline and diesel. Cleaning the wheels
G
WARNING
The water jet from a circular jet nozzle (dirt
blasters) can cause invisible exterior damage
to the tires or chassis components.
Components damaged in this way may fail
unexpectedly. There is a risk of an accident.
Do not use power washers with circular jet
nozzles to clean the vehicle. Have damaged
tires or chassis components replaced
immediately. Mounting a wheel
Preparing the vehicle
X Stop the vehicle on solid, non-slippery and
level ground.
X Apply the parking brake.
X Bring the front wheels into the straight-
ahead position.
X Move the selector lever to position P.
X Switch off the engine.
X Vehicles without KEYLESS-GO: remove
the SmartKey from the ignition lock.
X Vehicles with KEYLESS-GO: open the
driver's door.
The on-board electronics have status 0,
which is the same as the SmartKey having
been removed.
X Vehicles with KEYLESS-GO: remove the
Start/Stop button from the ignition lock
(Y page 145).
X If included in the vehicle equipment,
remove the tire-change tool kit from the
vehicle. X
Secure the vehicle to prevent it from rolling
away. Securing the vehicle to prevent it
from rolling away
If your vehicle is equipped with a wheel chock,
it can be found in the tire-change tool kit
(Y
page 314).
The folding wheel chock is an additional
safety measure to prevent the vehicle from
rolling away, for example when changing a
wheel.
X Fold both plates upwards 0043.
X Fold out lower plate 0044.
X Guide the lugs on the lower plate fully into
the openings in base plate 0087. Securing the vehicle on level ground
X
On level ground: place chocks or other
suitable items under the front and rear of
the wheel that is diagonally opposite the
wheel you wish to change. Mounting a wheel
355Wheels and tires Z