window MERCEDES-BENZ GLK-Class 2015 X204 Owner's Guide
[x] Cancel search | Manufacturer: MERCEDES-BENZ, Model Year: 2015, Model line: GLK-Class, Model: MERCEDES-BENZ GLK-Class 2015 X204Pages: 386, PDF Size: 7.16 MB
Page 94 of 386
available for up to five minutes or until the
driver's or front-passenger door is opened. Convenience opening
You can ventilate the vehicle before you start driving. To do this, the SmartKey is used to
carry out the following functions simultane-
ously:
R unlock the vehicle
R open the side windows
R open the panorama roof with power tilt/
sliding panel and the roller sunblinds
i The convenience opening feature can
only be operated using the SmartKey. The
SmartKey must be close to the driver's
door handle.
X Point the tip of the SmartKey at the driver's
door handle.
X Press and hold the 0036button until the
side windows and the panorama roof with
power tilt/sliding panel are in the desired
position.
If the roller sunblinds of the panorama roof
with power tilt/sliding panel are closed, the
roller sunblinds are opened first.
X Press and hold the 0036button again until
the panorama roof with power tilt/sliding
panel is in the desired position.
X To interrupt convenience opening:
release the 0036button. Convenience closing feature
General notes When you lock the vehicle, you can simulta-
neously:
R close the side windows
R close the panorama roof with power tilt/
sliding panel
On vehicles with a panorama roof with power tilt/sliding panel, you can then close the
roller sunblinds. G
WARNING
When the convenience closing feature is oper- ating, parts of the body could become trapped
in the closing area of the side window and the
sliding sunroof. There is a risk of injury.
Observe the complete closing procedure
when the convenience closing feature is oper-
ating. Make sure that no body parts are in
close proximity during the closing procedure.
Proceed as follows if someone is trapped:
With the SmartKey:
R release the 0037button.
R press and hold the 0036button until the
side windows and the sliding sunroof or the
panorama roof with power tilt/sliding
panel open again.
Using KEYLESS-GO:
R release the sensor surface on the door han-
dle.
R pull the door handle immediately and hold
it.
The side windows and the sliding sunroof or the panorama roof with power tilt/sliding
panel open.
Using the SmartKey i
The SmartKey must be close to the driv-
er's door handle.
X Point the tip of the SmartKey at the driver's
door handle.
X Press and hold the 0037button until the
side windows and the panorama roof with
power tilt/sliding panel are fully closed.
X Make sure that all the side windows and the
panorama roof with power tilt/sliding
panel are closed.
On vehicles with a panorama roof with power
tilt/sliding panel:
X Press and hold the 0037button again until
the roller sunblinds of the panorama roof
with power tilt/sliding panel close. 92
Side windowsOpening and closing
Page 95 of 386
X
To interrupt convenience closing:
release the 0037button.
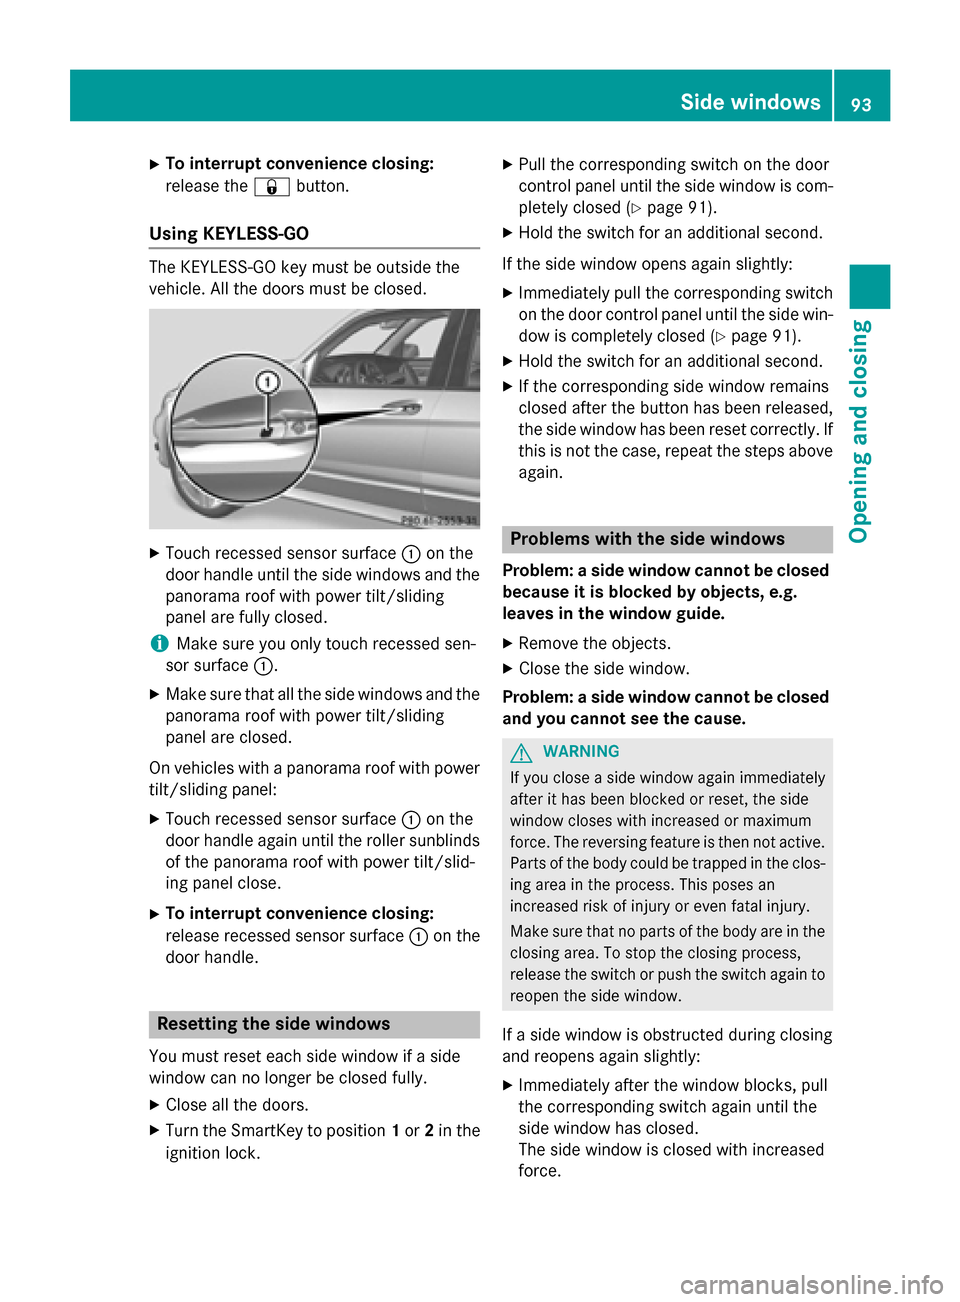
Using KEYLESS-GO The KEYLESS-GO key must be outside the
vehicle. All the doors must be closed. X
Touch recessed sensor surface 0043on the
door handle until the side windows and the panorama roof with power tilt/sliding
panel are fully closed.
i Make sure you only touch recessed sen-
sor surface 0043.
X Make sure that all the side windows and the
panorama roof with power tilt/sliding
panel are closed.
On vehicles with a panorama roof with power tilt/sliding panel:
X Touch recessed sensor surface 0043on the
door handle again until the roller sunblinds of the panorama roof with power tilt/slid-
ing panel close.
X To interrupt convenience closing:
release recessed sensor surface 0043on the
door handle. Resetting the side windows
You must reset each side window if a side
window can no longer be closed fully. X Close all the doors.
X Turn the SmartKey to position 1or 2in the
ignition lock. X
Pull the corresponding switch on the door
control panel until the side window is com-
pletely closed (Y page 91).
X Hold the switch for an additional second.
If the side window opens again slightly: X Immediately pull the corresponding switch
on the door control panel until the side win-
dow is completely closed (Y page 91).
X Hold the switch for an additional second.
X If the corresponding side window remains
closed after the button has been released,
the side window has been reset correctly. If
this is not the case, repeat the steps aboveagain. Problems with the side windows
Problem: a side window cannot be closed
because it is blocked by objects, e.g.
leaves in the window guide.
X Remove the objects.
X Close the side window.
Problem: a side window cannot be closed
and you cannot see the cause. G
WARNING
If you close a side window again immediately
after it has been blocked or reset, the side
window closes with increased or maximum
force. The reversing feature is then not active. Parts of the body could be trapped in the clos-
ing area in the process. This poses an
increased risk of injury or even fatal injury.
Make sure that no parts of the body are in the closing area. To stop the closing process,
release the switch or push the switch again toreopen the side window.
If a side window is obstructed during closing
and reopens again slightly: X Immediately after the window blocks, pull
the corresponding switch again until the
side window has closed.
The side window is closed with increased
force. Side windows
93Opening and closing Z
Page 96 of 386
If a side window is obstructed again during
closing and reopens again slightly:
X Immediately after the window blocks, pull
the corresponding switch again until the
side window has closed.
The side window is closed without the anti-
entrapment feature. Sliding sunroof
Important safety notes
In the following section, the term "sliding sun-
roof" refers to the panorama roof with power tilt/sliding panel. G
WARNING
While opening and closing the sliding sunroof, body parts in close proximity could become
trapped. There is a risk of injury.
Make sure that no body parts are in close
proximity during the opening and closing pro- cedures.
If somebody becomes trapped:
R release the switch immediately, or
R during automatic operation, push the
switch briefly in any direction
The opening or closing procedure will be stop- ped. G
WARNING
If children operate the sliding sunroof they
could become trapped, particularly if they are left unsupervised. There is a risk of injury.
When leaving the vehicle, always take the
SmartKey with you and lock the vehicle. Never
leave children unsupervised in the vehicle.
! Only open the sliding sunroof if it is free of
snow and ice. Otherwise, malfunctions may
occur.
Do not allow anything to protrude from the sliding sunroof. Otherwise, the seals could
be damaged. !
The weather can change abruptly. It could
start to rain or snow. Make sure that the
sliding sunroof is closed when you leave the
vehicle. The vehicle electronics can be
damaged if water enters the vehicle inte-
rior.
i Resonance noises can occur in addition to
the usual airflow noises when the sliding
sunroof is open. They are caused by minor
pressure fluctuations in the vehicle interior.
Change the position of the sliding sunroof
or open a side window slightly to reduce or
eliminate these noises. Sliding sunroof reversing feature
The sliding sunroof is equipped with an auto- matic reversing feature. If a solid object
blocks or restricts the sliding sunroof during
the closing process, the sliding sunroof opensagain automatically. However, the automatic
reversing feature is only an aid and does not
relieve you of the responsibility of paying
attention when closing the sliding sunroof. G
WARNING
The reversing feature does not react:
R to soft, light and thin objects, e.g. small fin-
gers
R over the last 1/6 in(4 mm) of the closing
movement
R during resetting
R when closing the sliding sunroof again man-
ually immediately after automatic reversing
This means that the reversing feature cannot
prevent someone being trapped in these sit-
uations. There is a risk of injury.
Make sure that no body parts are in close
proximity during the closing procedure.
If somebody becomes trapped:
R release the switch immediately, or
R during automatic operation, push the
switch briefly in any direction
The closing process is stopped. 94
Sliding sunroofOpening and closing
Page 108 of 386
Problems with the seat heating
Problem
Possible causes/consequences and
0050
0050Solutions The seat heating has
switched off prema-
turely or cannot be
switched on. The on-board voltage is too low because too many electrical con-
sumers are switched on.
X Switch off electrical consumers that you do not need, such as
the rear window defroster or interior lighting. Steering wheel
Important safety notes
G
WARNING
You could lose control of your vehicle if you do the following while driving:
R adjust the driver's seat, head restraint,
steering wheel or mirrors
R fasten the seat belt
There is a risk of an accident.
Adjust the driver's seat, head restraint, steer-
ing wheel and mirror and fasten your seat belt before starting the engine. G
WARNING
If the steering wheel is unlocked while the
vehicle is in motion, it could change position
unexpectedly. This could cause you to lose
control of the vehicle. There is a risk of an
accident.
Before starting off, make sure the steering
wheel is locked. Never unlock the steering
wheel while the vehicle is in motion. G
WARNING
Children could injure themselves if they
adjust the steering wheel. There is a risk of
injury.
When leaving the vehicle, always take the
SmartKey with you and lock the vehicle. Never leave children unsupervised in the vehicle.
The electrically adjustable steering wheel can
still be adjusted when there is no SmartKey in
the ignition lock. Adjusting the steering wheel man-
ually
G
WARNING
If the steering wheel is unlocked while the
vehicle is in motion, it could change position
unexpectedly. This could cause you to lose
control of the vehicle. There is a risk of an
accident.
Before starting off, make sure the steering
wheel is locked. Never unlock the steering
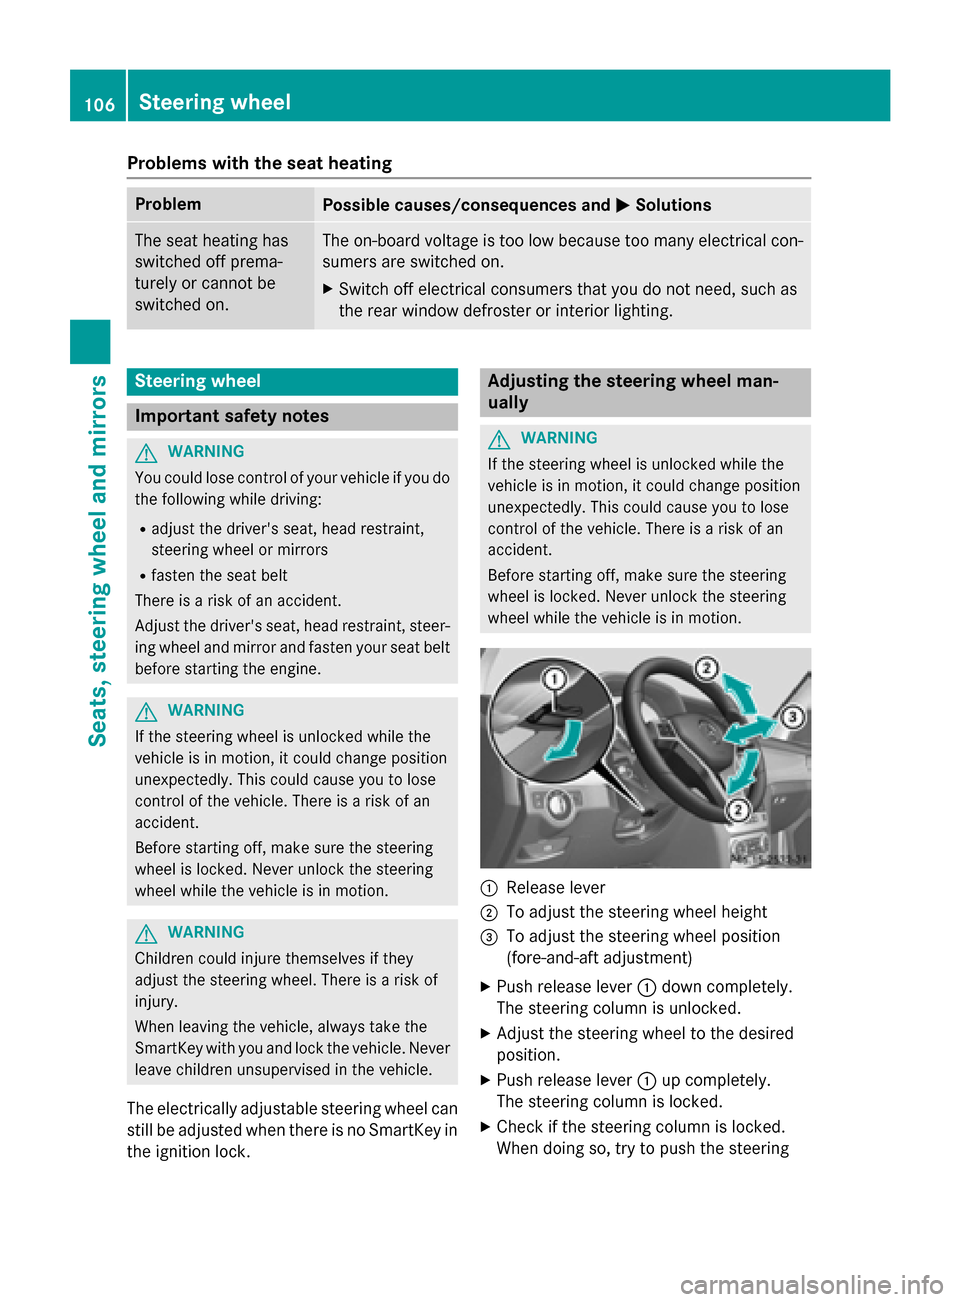
wheel while the vehicle is in motion. 0043
Release lever
0044 To adjust the steering wheel height
0087 To adjust the steering wheel position
(fore-and-aft adjustment)
X Push release lever 0043down completely.
The steering column is unlocked.
X Adjust the steering wheel to the desired
position.
X Push release lever 0043up completely.
The steering column is locked.
X Check if the steering column is locked.
When doing so, try to push the steering 106
Steering wheelSeats, steering wheel and mirrors
Page 110 of 386
Problems with the steering wheel heating
Problem
Possible causes/consequences and
0050
0050Solutions The steering wheel
heating has switched
off prematurely or can-
not be switched on. The on-board voltage is too low because too many electrical con-
sumers are switched on.
X Switch off electrical consumers that you do not need, such as
the rear window defroster or interior lighting.
Once the battery is sufficiently charged, the steering wheel
heating will switch back on automatically. EASY-ENTRY/EXIT feature
Important safety notes G
WARNING
When the EASY-ENTRY/EXIT feature adjusts
the steering wheel, you and other vehicle
occupants – particularly children – could
become trapped. There is a risk of injury.
While the EASY-ENTRY/EXIT feature is mak-
ing adjustments, make sure that no one has
any body parts in the sweep of the steering
wheel.
If somebody becomes trapped:
R press one of the memory function position
buttons, or
R move the switch for steering wheel adjust-
ment in the opposite direction to that in
which the steering wheel is moving.
The adjustment process is stopped. G
WARNING
If you drive off while the EASY-ENTRY/EXIT
feature is making adjustments, you could lose
control of the vehicle. There is a risk of an
accident.
Always wait until the adjustment process is
complete before driving off.
The EASY-ENTRY/EXIT feature makes getting in and out of your vehicle easier.
You can activate and deactivate the EASY-
ENTRY/EXIT feature in the on-board com-
puter (Y page 233). Position of the steering wheel when the
EASY-ENTRY/EXIT feature is active The steering wheel swings upwards when
you:
R remove the SmartKey from the ignition lock
R open the driver's door with KEYLESS-GO in
position 1
R open the driver's door and the SmartKey is
in position 0or 1in the ignition lock
(Y page 149)
i The steering wheel only moves upwards if
it has not already reached the upper stop.
Position of the steering wheel for driv-
ing The steering wheel is moved to the last selec-
ted position when:
R the driver's door is closed
R you insert the SmartKey into the ignition
lock
or
R you press the Start/Stop button once on
vehicles with KEYLESS-GO
When you close the driver's door with the
ignition switched on, the steering wheel is
also automatically moved to the previously
set position.
The last position of the steering wheel is
stored when you switch off the ignition or
when you store the setting with the memory
function (Y page 112).108
Steering wheelSeats, steering wheel and mirrors
Page 111 of 386
Crash-responsive EASY-EXIT feature
If the crash-responsive EASY-EXIT feature is
triggered in an accident, the steering column will move upwards when the driver's door is
opened. This occurs irrespective of the posi-
tion of the SmartKey in the ignition lock. Thismakes it easier to exit the vehicle and rescue
the occupants.
The crash-responsive EASY-EXIT feature is
only operational if the EASY-EXIT/ENTRY fea- ture is activated in the on-board computer. Mirrors
Rear-view mirror
X
Anti-glare mode: flick anti-glare lever 0043
forwards or back. Exterior mirrors
Adjusting the exterior mirrors G
WARNING
You could lose control of your vehicle if you do the following while driving:
R adjust the driver's seat, head restraint,
steering wheel or mirrors
R fasten the seat belt
There is a risk of an accident.
Adjust the driver's seat, head restraint, steer-
ing wheel and mirror and fasten your seat belt before starting the engine. G
WARNING
The exterior mirror on the front-passenger
side reduces the size of the image. Visible
objects are actually closer than they appear.
This means that you could misjudge the dis-
tance from road users traveling behind, e.g.
when changing lane. There is a risk of an acci-
dent.
For this reason, always make sure of the
actual distance from the road users traveling
behind by glancing over your shoulder.
The convex exterior mirrors provide a larger
field of vision.
The exterior mirrors are automatically heated
after starting the vehicle if the rear window
defroster is switched on and the outside tem- perature is low. Heating takes a maximum of
10 minutes.
i You can also heat up the exterior mirrors
manually by switching on the rear window
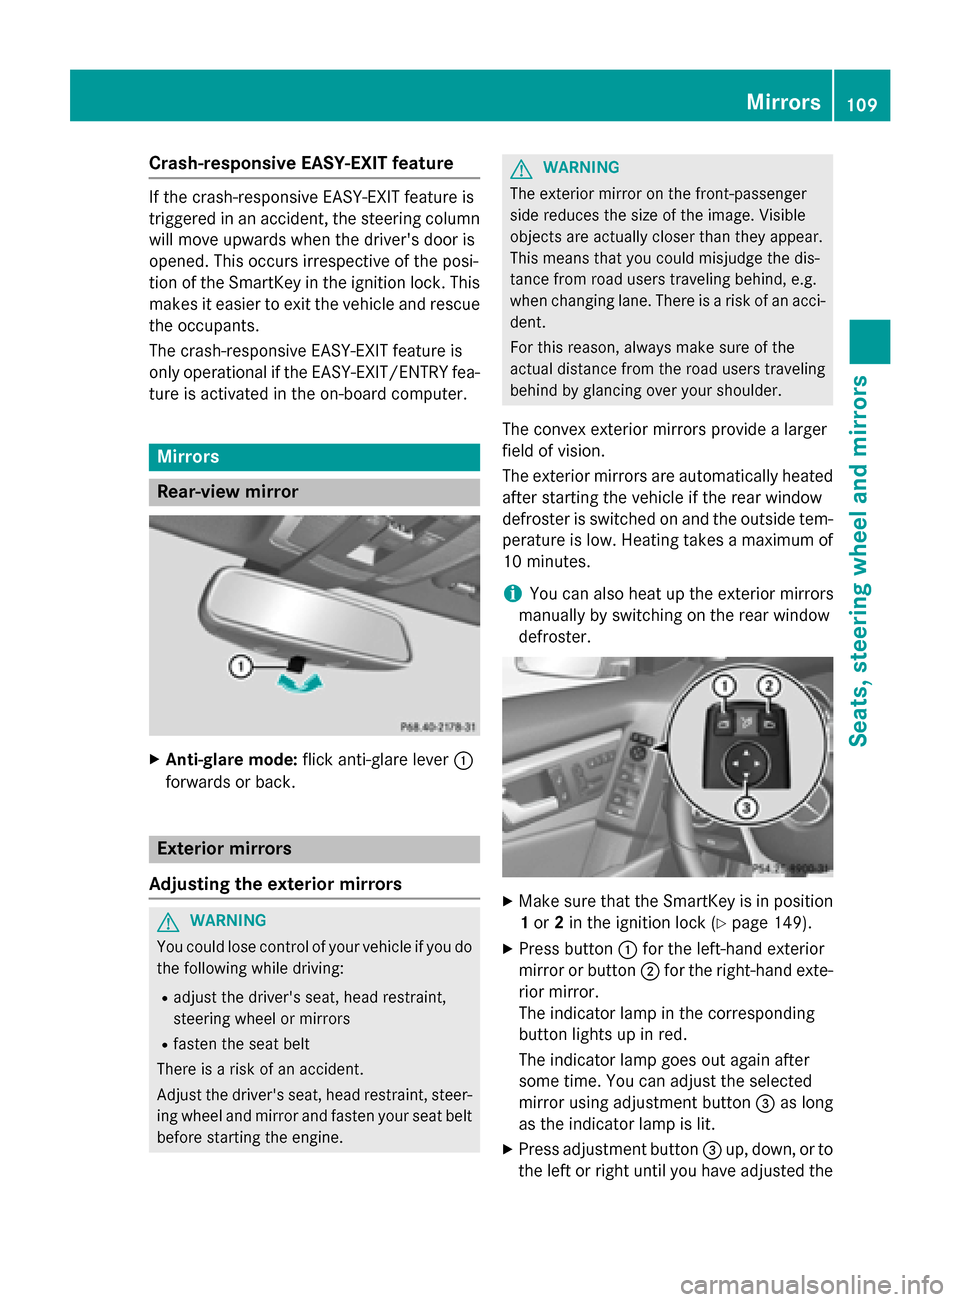
defroster. X
Make sure that the SmartKey is in position
1 or 2in the ignition lock (Y page 149).
X Press button 0043for the left-hand exterior
mirror or button 0044for the right-hand exte-
rior mirror.
The indicator lamp in the corresponding
button lights up in red.
The indicator lamp goes out again after
some time. You can adjust the selected
mirror using adjustment button 0087as long
as the indicator lamp is lit.
X Press adjustment button 0087up, down, or to
the left or right until you have adjusted the Mirrors
109Seats, steering wheel and mirrors Z
Page 129 of 386
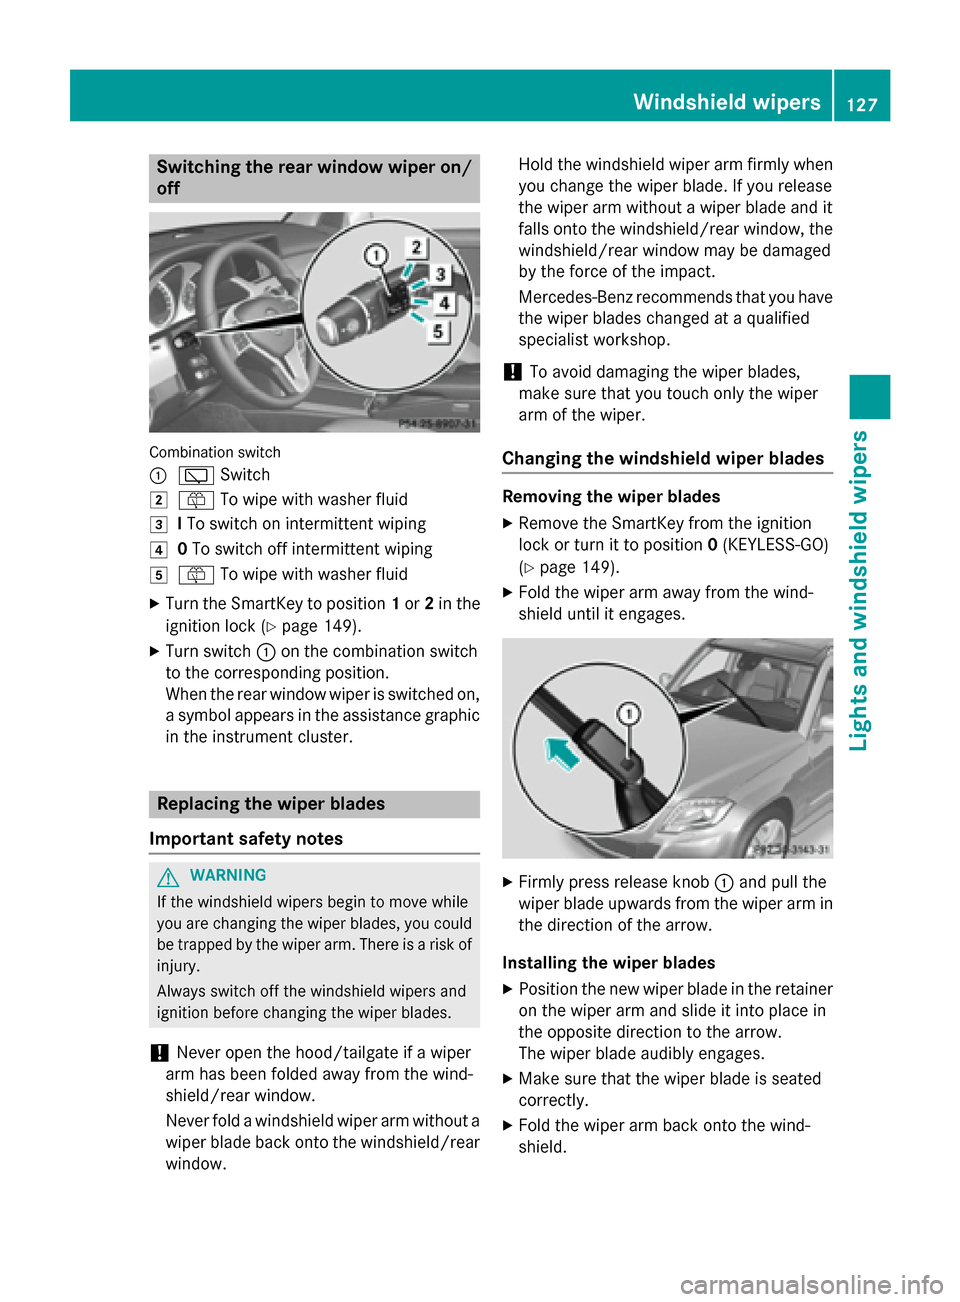
Switching the rear window wiper on/
off Combination switch
0043
00C5 Switch
0048 00E2 To wipe with washer fluid
0049 ITo switch on intermittent wiping
004A 0To switch off intermittent wiping
004B 00E2 To wipe with washer fluid
X Turn the SmartKey to position 1or 2in the
ignition lock (Y page 149).
X Turn switch 0043on the combination switch
to the corresponding position.
When the rear window wiper is switched on,
a symbol appears in the assistance graphic in the instrument cluster. Replacing the wiper blades
Important safety notes G
WARNING
If the windshield wipers begin to move while
you are changing the wiper blades, you could be trapped by the wiper arm. There is a risk of
injury.
Always switch off the windshield wipers and
ignition before changing the wiper blades.
! Never open the hood/tailgate if a wiper
arm has been folded away from the wind-
shield/rear window.
Never fold a windshield wiper arm without a
wiper blade back onto the windshield/rear window. Hold the windshield wiper arm firmly when
you change the wiper blade. If you release
the wiper arm without a wiper blade and it
falls onto the windshield/rear window, the
windshield/rear window may be damaged
by the force of the impact.
Mercedes-Benz recommends that you have the wiper blades changed at a qualified
specialist workshop.
! To avoid damaging the wiper blades,
make sure that you touch only the wiper
arm of the wiper.
Changing the windshield wiper blades Removing the wiper blades
X Remove the SmartKey from the ignition
lock or turn it to position 0(KEYLESS-GO)
(Y page 149).
X Fold the wiper arm away from the wind-
shield until it engages. X
Firmly press release knob 0043and pull the
wiper blade upwards from the wiper arm in the direction of the arrow.
Installing the wiper blades
X Position the new wiper blade in the retainer
on the wiper arm and slide it into place in
the opposite direction to the arrow.
The wiper blade audibly engages.
X Make sure that the wiper blade is seated
correctly.
X Fold the wiper arm back onto the wind-
shield. Windshield wipers
127Lights and windshield wipers Z
Page 130 of 386
Replacing the rear window wiper blade
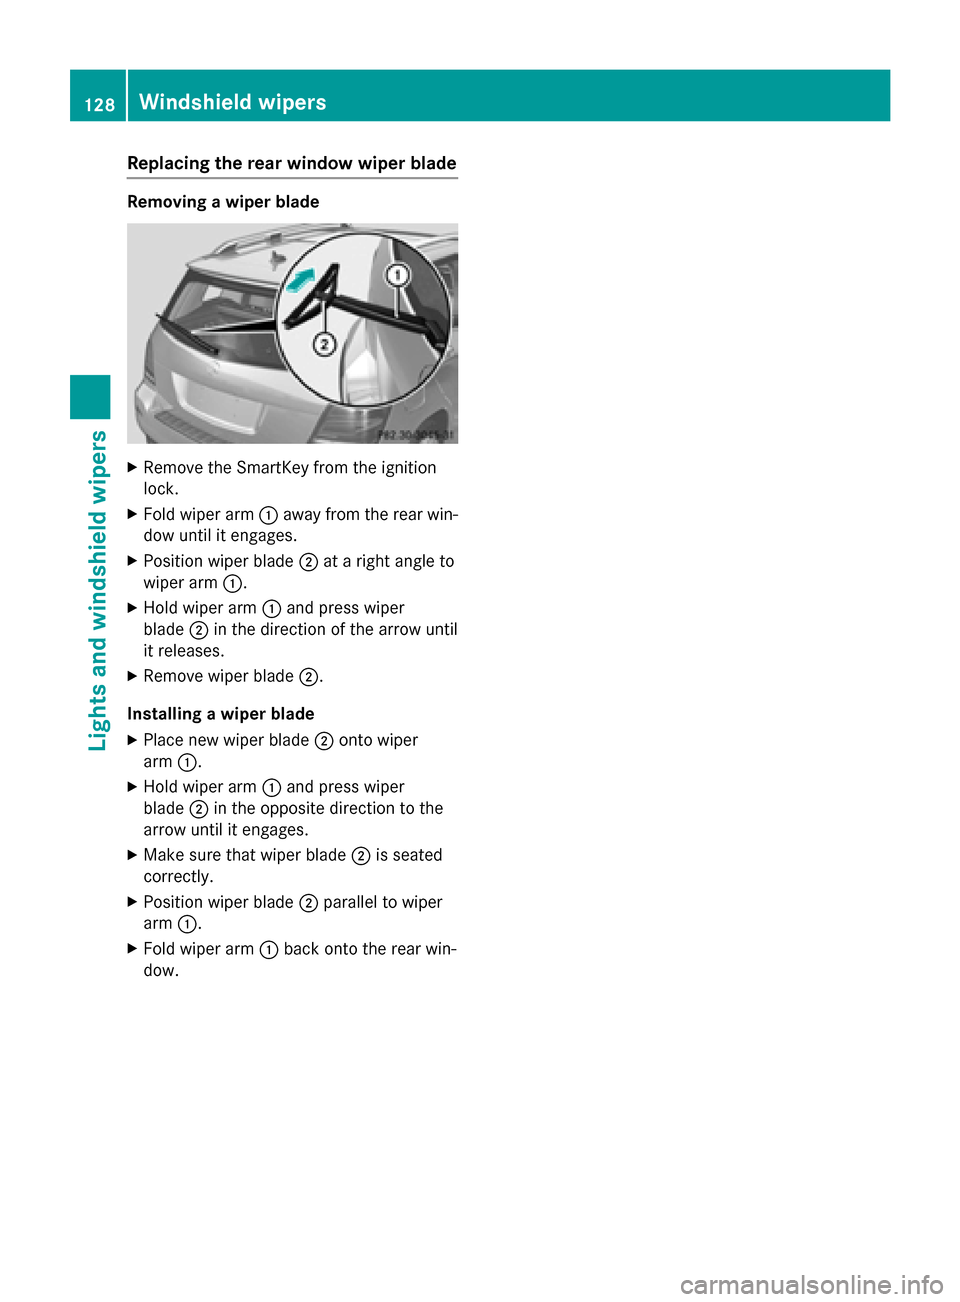
Removing a wiper blade
X
Remove the SmartKey from the ignition
lock.
X Fold wiper arm 0043away from the rear win-
dow until it engages.
X Position wiper blade 0044at a right angle to
wiper arm 0043.
X Hold wiper arm 0043and press wiper
blade 0044in the direction of the arrow until
it releases.
X Remove wiper blade 0044.
Installing a wiper blade
X Place new wiper blade 0044onto wiper
arm 0043.
X Hold wiper arm 0043and press wiper
blade 0044in the opposite direction to the
arrow until it engages.
X Make sure that wiper blade 0044is seated
correctly.
X Position wiper blade 0044parallel to wiper
arm 0043.
X Fold wiper arm 0043back onto the rear win-
dow. 128
Windshield wipersLights and windshield wipers
Page 134 of 386

Useful information
i This Operator's Manual describes all
models and all standard and optional equip- ment of your vehicle available at the time of
publication of the Operator's Manual.
Country-specific differences are possible.
Please note that your vehicle may not be
equipped with all features described. This
also applies to safety-related systems and
functions.
i Read the information on qualified special-
ist workshops (Y page 27). Overview of climate control systems
Important safety notes
Observe the settings recommended on the
following pages. The windows could other-
wise fog up.
To prevent the windows from fogging up:
R switch off climate control only briefly
R switch on air-recirculation mode only
briefly
R switch on the cooling with air dehumidifi-
cation function
R switch on the defrost windshield function
briefly, if required
Climate control regulates the temperature
and the humidity in the vehicle interior and
filters undesirable substances out of the air.
Climate control can only be operated when
the engine is running. Optimum operation is
only achieved with the side windows and roof
closed.
The residual heat function can only be acti-
vated or deactivated with the ignition
switched off (Y page 143).
i Ventilate the vehicle for a brief period
during warm weather, e.g. using the con-
venience opening feature (Y page 92). This
will speed up the cooling process and the
desired interior temperature will be
reached more quickly. i
The integrated filter filters out most par-
ticles of dust and soot and completely fil-
ters out pollen. It also reduces gaseous pol-
lutants and odors. A clogged filter reduces the amount of air supplied to the vehicle
interior. For this reason, you should alwaysobserve the interval for replacing the filter,which is specified in the Maintenance
Booklet. As it depends on environmental
conditions, e.g. heavy air pollution, the
interval may be shorter than stated in the
Maintenance Booklet.
i It is possible that the dehumidification
function of the climate control system may
be activated automatically an hour after the
SmartKey has been removed. The vehicle is then ventilated for 30 minutes. 132
Overview of climate control systemsClimate control
Page 135 of 386
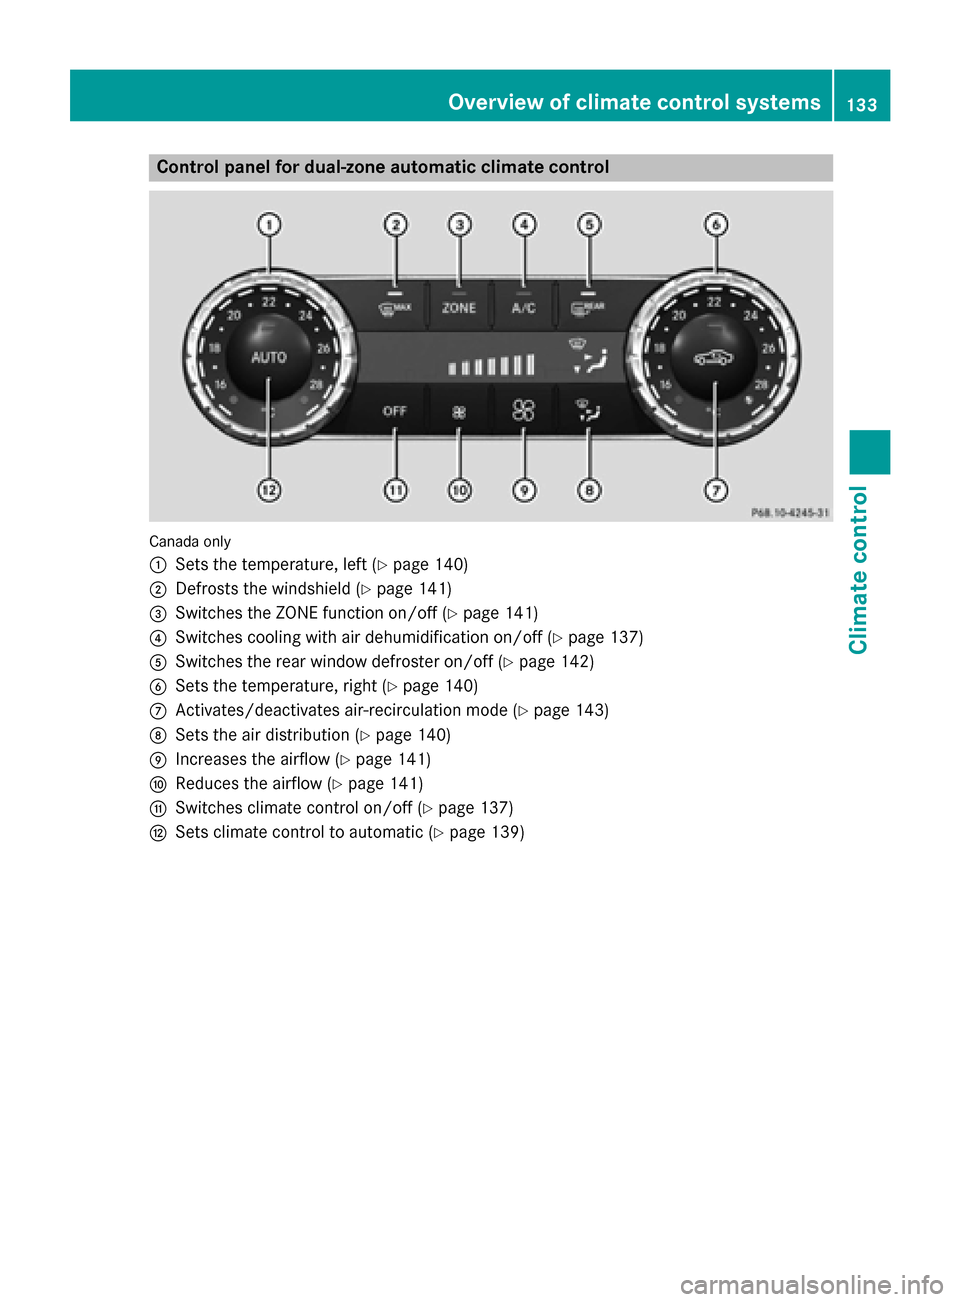
Control panel for dual-zone automatic climate control
Canada only
0043
Sets the temperature, left (Y page 140)
0044 Defrosts the windshield (Y page 141)
0087 Switches the ZONE function on/off (Y page 141)
0085 Switches cooling with air dehumidification on/off (Y page 137)
0083 Switches the rear window defroster on/off (Y page 142)
0084 Sets the temperature, right (Y page 140)
006B Activates/deactivates air-recirculation mode (Y page 143)
006C Sets the air distribution (Y page 140)
006D Increases the airflow (Y page 141)
006E Reduces the airflow (Y page 141)
006F Switches climate control on/off (Y page 137)
0070 Sets climate control to automatic (Y page 139) Overview of climate control systems
133Climate control