brake fluid MERCEDES-BENZ GLK-Class 2015 X204 Owner's Manual
[x] Cancel search | Manufacturer: MERCEDES-BENZ, Model Year: 2015, Model line: GLK-Class, Model: MERCEDES-BENZ GLK-Class 2015 X204Pages: 386, PDF Size: 7.16 MB
Page 8 of 386
Brake fluid
Display message ............................ 238
Notes ............................................. 377
Brake lamps
Display message ............................ 244
Brakes
ABS .................................................. 68
BAS .................................................. 69
BAS PLUS ........................................ 69
Brake fluid (notes) ......................... 377
Display message ............................ 236
Important safety notes .................. 172
Maintenance .................................. 172
Parking brake ........................ 169, 173
Riding tips ...................................... 172
Warning lamp ................................. 262
Breakdown
see Flat tire
see Towing away/tow-starting
Brightness control knob (instru-
ment cluster lighting, multifunc-
tion steering wheel with 12 but-
tons) ..................................................... 33
Bulbs see Replacing bulbs C
California Important notice for retail cus-
tomers and lessees .......................... 24
Calling up a malfunction
see Display messages
Car
see Vehicle
Care
Carpets .......................................... 312
Car wash ........................................ 306
Displa y........................................... 310
Exterior lights ................................ 309
Gear or selector lever .................... 311
Interior ........................................... 310
Matte finish ................................... 307
Notes ............................................. 305
Paint .............................................. 307
Plastic trim .................................... 310
Power washe r................................ 306
Rear view camera .......................... 309 Roof lining ...................................... 312
Seat belt ........................................ 312
Seat cover ..................................... 311
Sensors ......................................... 309
Steering wheel ............................... 311
Tail pipe
s....................................... 309
Trim pieces .................................... 311
Washing by hand ........................... 306
Wheels ........................................... 307
Windows ........................................ 308
Wiper blades .................................. 308
Wooden trim .................................. 311
Cargo compartment cover
Important safety notes .................. 278
Cargo compartment enlarge-
ment ................................................... 276
Cargo compartment floor Opening/closing ............................ 281
Stowage well (under )..................... 281
Cargo net
Attaching ....................................... 280
Important safety information ......... 279
Cargo tie down rings ......................... 277
CD player/CD changer (on-board
computer) .......................................... 226
Center console Lower section .................................. 37
Upper section .................................. 36
Central locking
Automatic locking (on-board com-
puter) ............................................. 232
Locking/unlocking (SmartKey )........ 78
Changing bulbs
Cornering light function ................. 124
High-beam headlamp s................... 124
Low-beam headlamp s.................... 124
Parking lamps ................................ 124
Reversing lamps ............................ 125
Standing lamps (front) ................... 124
Turn signals (front) ......................... 124
Child-proof locks
Important safety notes .................... 66
Rear doors ....................................... 67
Children
In the vehicle ................................... 61
Restraint systems ............................ 61
Special seat belt retractor ............... 64 6
Index
Page 18 of 386
Route guidance (navigation)
............ 225S
Safety Child restraint systems .................... 61
Occupant Classification System
(OCS) ............................................... 49
Overview of occupant safety sys-
tems ................................................ 42
Safety system
see Driving safety systems
Seat belts
Adjusting the driver's and front-
passenger seat bel t......................... 59
Adjusting the height ......................... 59
Belt force limiters ............................ 60
center rear-compartment sea t......... 59
Cleaning ......................................... 312
Correct usage .................................. 57
Emergency Tensioning Devices ........ 60
Fastening ......................................... 58
Important safety guidelines ............. 56
Releasing ......................................... 59
Safety guidelines ............................. 43
Switching belt adjustment on/off
(on-board computer) ...................... 233
Warning lamp ................................. 261
Warning lamp (function) ................... 60
Seats
Adjusting (electrically) ................... 102
Adjusting lumbar support .............. 104
Adjusting the 4-way lumbar sup-
port ................................................ 105
Adjusting the head restraint .......... 102
Cleaning the cover ......................... 311
Correct driver's seat position ........ 100
Folding the backrest (rear com-
partment) forwards/back .............. 276
Folding the rear bench seat for-
wards/back ................................... 276
Important safety notes .................. 101
Seat heating problem .................... 106
Storing settings (memory func-
tion) ............................................... 112
Switching seat heating on/of f....... 105
Sensors (cleaning instructions) ....... 309Service Center
see Qualified specialist workshop
Service menu (on-board com-
puter) .................................................. 230
Service products Brake fluid ..................................... 377
Coolant (engine) ............................ 378
DEF special additives ..................... 376
Engine oil ....................................... 377
Fuel ................................................ 373
Important safety notes .................. 373
Refrigerant (air-conditioning sys-
tem) ............................................... 379
Washer fluid ................................... 379
Settings
Factory (on-board computer) ......... 234
On-board compute r....................... 230
Setting the air distribution ............... 140
Setting the airflow ............................ 141
Side impact air bag ............................. 47
Side marker lamp (display mes-
sage) ................................................... 245
Side windows Cleaning ......................................... 308
Convenience closing feature ............ 92
Convenience opening feature .......... 92
Important safety information ........... 90
Opening/closing .............................. 91
Problem (malfunction) ..................... 93
Resetting ......................................... 93
Sliding sunroof
see Panorama roof with power
tilt/sliding panel
SmartKey
Changing the battery ....................... 81
Changing the programming ............. 79
Checking the battery ....................... 81
Convenience closing feature ............ 92
Convenience opening feature .......... 92
Display message ............................ 259
Door central locking/unlocking ....... 78
Important safety notes .................... 78
Loss ................................................. 82
Mechanical key ................................ 80
Positions (ignition lock) ................. 149
Problem (malfunction) ..................... 82
Starting the engine ........................ 151 16
Index
Page 22 of 386
Trip odometer
Calling up ....................................... 223
Resetting (on-board computer) ...... 224
Turn signals
Changing bulbs (front) ................... 124
Display message ............................ 244
Switching on/off ........................... 118
TWR (Tongue Weight Rating) (defi-
nition) ................................................. 354
Type identification plate see Vehicle identification plate U
Unlocking Emergency unlocking ....................... 85
From inside the vehicle (central
unlocking button) ............................. 84 V
Vanity mirror (in the sun visor) ........ 283
Vehicle Correct use ...................................... 27
Data acquisition ............................... 28
Display message ............................ 258
Emergency locking ........................... 85
Emergency unlocking ....................... 85
Equipment ....................................... 23
Individual settings .......................... 230
Limited Warranty ............................. 28
Loading .......................................... 342
Locking (in an emergency) ............... 85
Locking (SmartKey) .......................... 78
Lowering ........................................ 359
Maintenance .................................... 24
Parking for a long period ................ 169
Pulling away ................................... 151
Raising ........................................... 357
Reporting problems ......................... 27
Securing from rolling away ............ 356
Towing away .................................. 325
Transporting .................................. 327
Unlocking (in an emergency) ........... 85
Unlocking (SmartKey) ...................... 78
Vehicle data ................................... 380
Vehicle data ....................................... 380
Vehicle dimensions ........................... 380 Vehicle emergency locking
................ 85
Vehicle identification number see VIN
Vehicle identification plate .............. 372
Vehicle maintenance see ASSYST PLUS
Vehicle tool kit .................................. 314
Video (DVD) ........................................ 227
VIN ...................................................... 372 W
Warning and indicator lamps ABS ................................................ 262
Brakes ........................................... 262
Check Engine ................................. 267
Coolant .......................................... 268
Distance warning ........................... 270
DISTRONIC PLUS ........................... 270
ESP ®
.............................................. 264
ESP ®
OFF ....................................... 265
Overview .......................................... 34
PASSENGER AIRBAG OFF ................ 49
Reserve fuel ................................... 267
Seat belt ........................................ 261
SRS ................................................ 266
Tire pressure monitor .................... 271
Warranty .............................................. 23
Washer fluid Display message ............................ 259
Wheel and tire combination
see Tires
Wheel bolt tightening torque ........... 359
Wheel chock ...................................... 356
Wheels Changing a whee l.......................... 355
Checking ........................................ 333
Cleaning ......................................... 307
Cleaning (warning) ......................... 356
Emergency spare wheel ................. 366
Important safety notes .................. 332
Interchanging/changing ................ 355
Mounting a new whee l................... 358
Mounting a whee l.......................... 356
Removing a whee l.......................... 358
Storing ........................................... 355 20
Index
Page 121 of 386
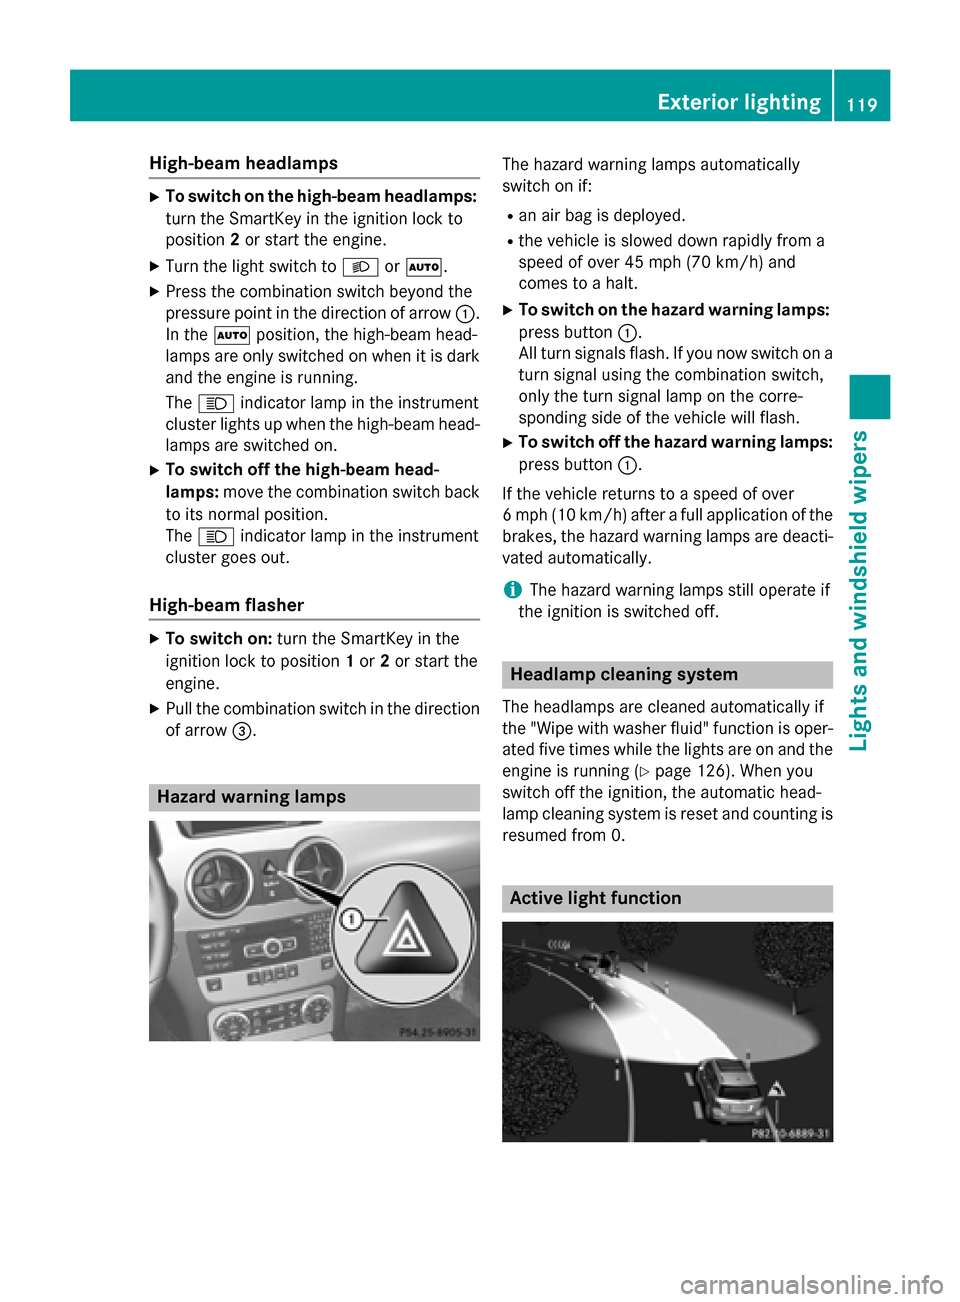
High-beam headlamps
X
To switch on the high-beam headlamps:
turn the SmartKey in the ignition lock to
position 2or start the engine.
X Turn the light switch to 0058or0058.
X Press the combination switch beyond the
pressure point in the direction of arrow 0043.
In the 0058position, the high-beam head-
lamps are only switched on when it is dark
and the engine is running.
The 0057 indicator lamp in the instrument
cluster lights up when the high-beam head-
lamps are switched on.
X To switch off the high-beam head-
lamps: move the combination switch back
to its normal position.
The 0057 indicator lamp in the instrument
cluster goes out.
High-beam flasher X
To switch on: turn the SmartKey in the
ignition lock to position 1or 2or start the
engine.
X Pull the combination switch in the direction
of arrow 0087. Hazard warning lamps The hazard warning lamps automatically
switch on if:
R an air bag is deployed.
R the vehicle is slowed down rapidly from a
speed of over 45 mph (70 km/h) and
comes to a halt.
X To switch on the hazard warning lamps:
press button 0043.
All turn signals flash. If you now switch on a turn signal using the combination switch,
only the turn signal lamp on the corre-
sponding side of the vehicle will flash.
X To switch off the hazard warning lamps:
press button 0043.
If the vehicle returns to a speed of over
6 mph (10 km/h) after a full application of the
brakes, the hazard warning lamps are deacti-
vated automatically.
i The hazard warning lamps still operate if
the ignition is switched off. Headlamp cleaning system
The headlamps are cleaned automatically if
the "Wipe with washer fluid" function is oper-
ated five times while the lights are on and the engine is running (Y page 126). When you
switch off the ignition, the automatic head-
lamp cleaning system is reset and counting is resumed from 0. Active light function Exterior lighting
119Lights and windshield wipers Z
Page 174 of 386
change dynamically at the beginning of the
journey. On longer journeys, there are
fewer changes. For more dynamic changes, carry out a manual reset.
For further information on the ECO display,
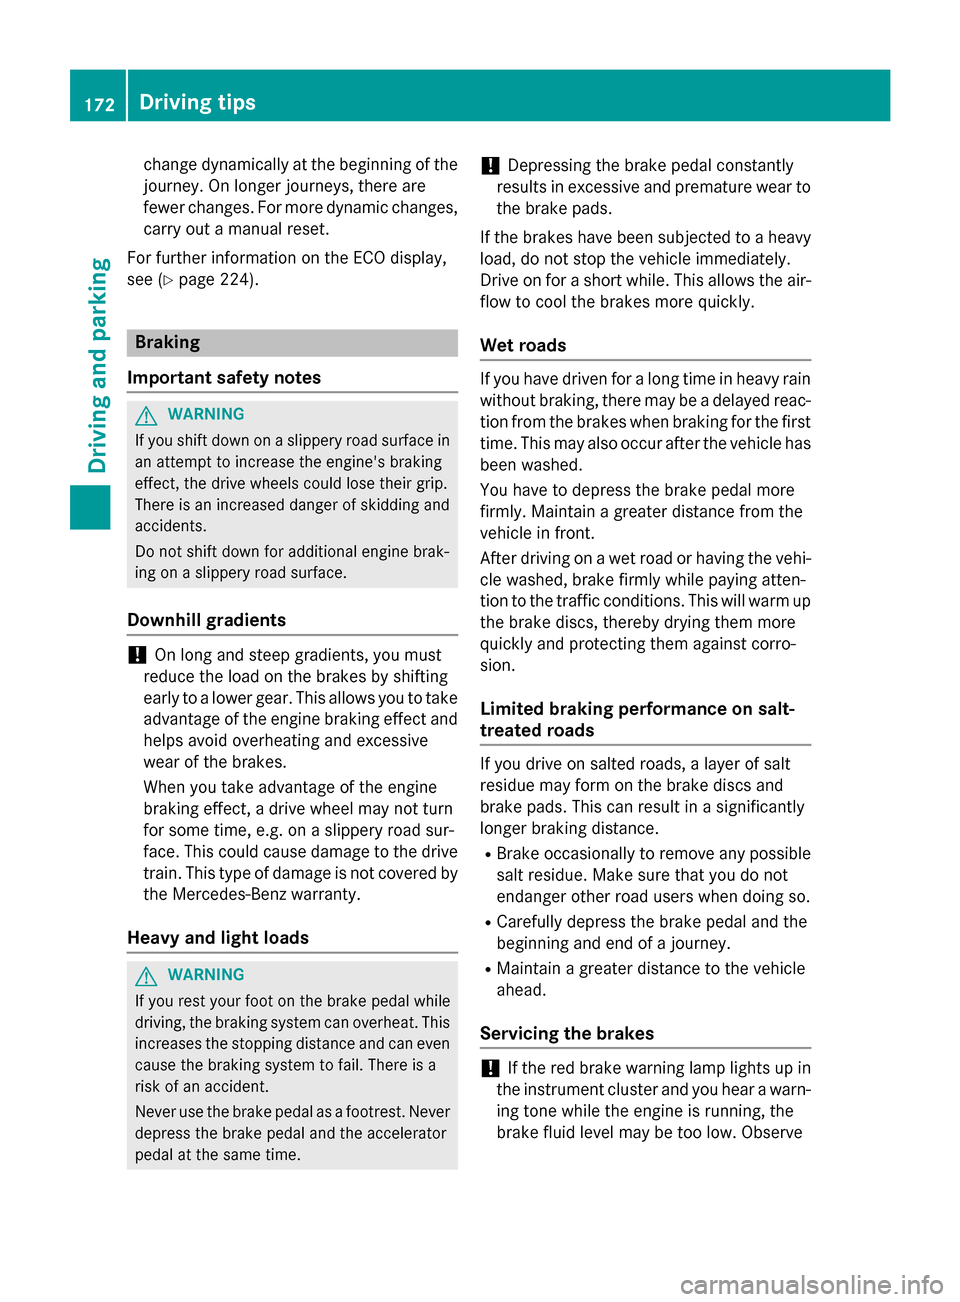
see (Y page 224). Braking
Important safety notes G
WARNING
If you shift down on a slippery road surface in an attempt to increase the engine's braking
effect, the drive wheels could lose their grip.
There is an increased danger of skidding and
accidents.
Do not shift down for additional engine brak-
ing on a slippery road surface.
Downhill gradients !
On long and steep gradients, you must
reduce the load on the brakes by shifting
early to a lower gear. This allows you to take advantage of the engine braking effect and
helps avoid overheating and excessive
wear of the brakes.
When you take advantage of the engine
braking effect, a drive wheel may not turn
for some time, e.g. on a slippery road sur-
face. This could cause damage to the drive train. This type of damage is not covered bythe Mercedes-Benz warranty.
Heavy and light loads G
WARNING
If you rest your foot on the brake pedal while
driving, the braking system can overheat. This increases the stopping distance and can even
cause the braking system to fail. There is a
risk of an accident.
Never use the brake pedal as a footrest. Never
depress the brake pedal and the accelerator
pedal at the same time. !
Depressing the brake pedal constantly
results in excessive and premature wear to
the brake pads.
If the brakes have been subjected to a heavy load, do not stop the vehicle immediately.
Drive on for a short while. This allows the air-
flow to cool the brakes more quickly.
Wet roads If you have driven for a long time in heavy rain
without braking, there may be a delayed reac- tion from the brakes when braking for the firsttime. This may also occur after the vehicle has
been washed.
You have to depress the brake pedal more
firmly. Maintain a greater distance from the
vehicle in front.
After driving on a wet road or having the vehi-
cle washed, brake firmly while paying atten-
tion to the traffic conditions. This will warm up the brake discs, thereby drying them more
quickly and protecting them against corro-
sion.
Limited braking performance on salt-
treated roads If you drive on salted roads, a layer of salt
residue may form on the brake discs and
brake pads. This can result in a significantly
longer braking distance.
R Brake occasionally to remove any possible
salt residue. Make sure that you do not
endanger other road users when doing so.
R Carefully depress the brake pedal and the
beginning and end of a journey.
R Maintain a greater distance to the vehicle
ahead.
Servicing the brakes !
If the red brake warning lamp lights up in
the instrument cluster and you hear a warn- ing tone while the engine is running, the
brake fluid level may be too low. Observe 172
Driving tipsDriving and parking
Page 175 of 386
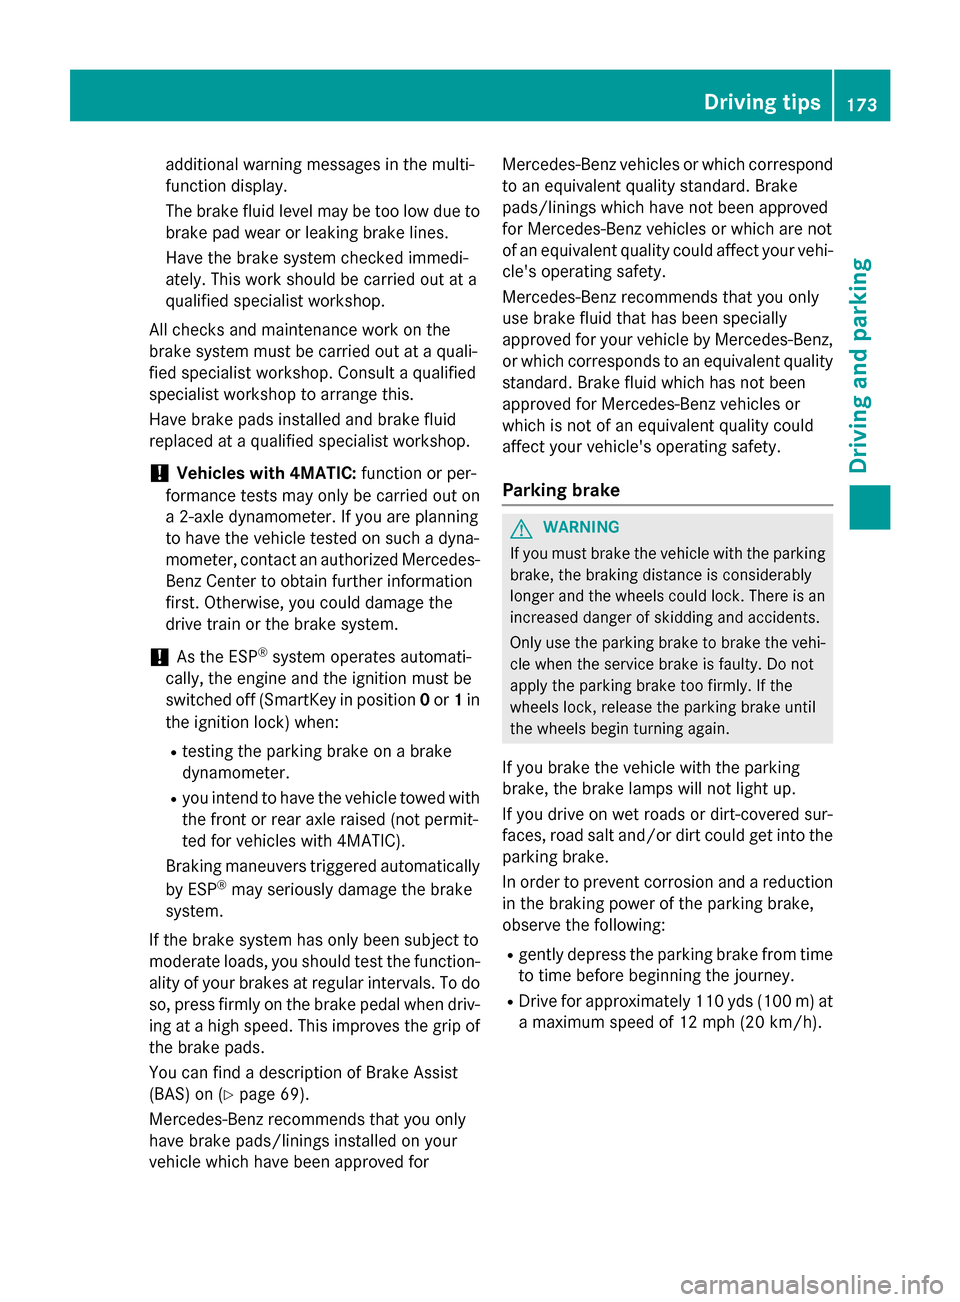
additional warning messages in the multi-
function display.
The brake fluid level may be too low due to brake pad wear or leaking brake lines.
Have the brake system checked immedi-
ately. This work should be carried out at a
qualified specialist workshop.
All checks and maintenance work on the
brake system must be carried out at a quali-
fied specialist workshop. Consult a qualified
specialist workshop to arrange this.
Have brake pads installed and brake fluid
replaced at a qualified specialist workshop.
! Vehicles with 4MATIC:
function or per-
formance tests may only be carried out on
a 2-axle dynamometer. If you are planning
to have the vehicle tested on such a dyna-
mometer, contact an authorized Mercedes- Benz Center to obtain further information
first. Otherwise, you could damage the
drive train or the brake system.
! As the ESP ®
system operates automati-
cally, the engine and the ignition must be
switched off (SmartKey in position 0or 1in
the ignition lock) when:
R testing the parking brake on a brake
dynamometer.
R you intend to have the vehicle towed with
the front or rear axle raised (not permit-
ted for vehicles with 4MATIC).
Braking maneuvers triggered automatically
by ESP ®
may seriously damage the brake
system.
If the brake system has only been subject to
moderate loads, you should test the function-
ality of your brakes at regular intervals. To do so, press firmly on the brake pedal when driv-
ing at a high speed. This improves the grip of
the brake pads.
You can find a description of Brake Assist
(BAS) on (Y page 69).
Mercedes-Benz recommends that you only
have brake pads/linings installed on your
vehicle which have been approved for Mercedes-Benz vehicles or which correspond
to an equivalent quality standard. Brake
pads/linings which have not been approved
for Mercedes-Benz vehicles or which are not
of an equivalent quality could affect your vehi- cle's operating safety.
Mercedes-Benz recommends that you only
use brake fluid that has been specially
approved for your vehicle by Mercedes-Benz,
or which corresponds to an equivalent quality standard. Brake fluid which has not been
approved for Mercedes-Benz vehicles or
which is not of an equivalent quality could
affect your vehicle's operating safety.
Parking brake G
WARNING
If you must brake the vehicle with the parking brake, the braking distance is considerably
longer and the wheels could lock. There is an
increased danger of skidding and accidents.
Only use the parking brake to brake the vehi- cle when the service brake is faulty. Do not
apply the parking brake too firmly. If the
wheels lock, release the parking brake until
the wheels begin turning again.
If you brake the vehicle with the parking
brake, the brake lamps will not light up.
If you drive on wet roads or dirt-covered sur-
faces, road salt and/or dirt could get into the parking brake.
In order to prevent corrosion and a reduction
in the braking power of the parking brake,
observe the following:
R gently depress the parking brake from time
to time before beginning the journey.
R Drive for approximately 110 yds (100 m) at
a maximum speed of 12 mph (20 km/h). Driving tips
173Driving and parking Z
Page 240 of 386
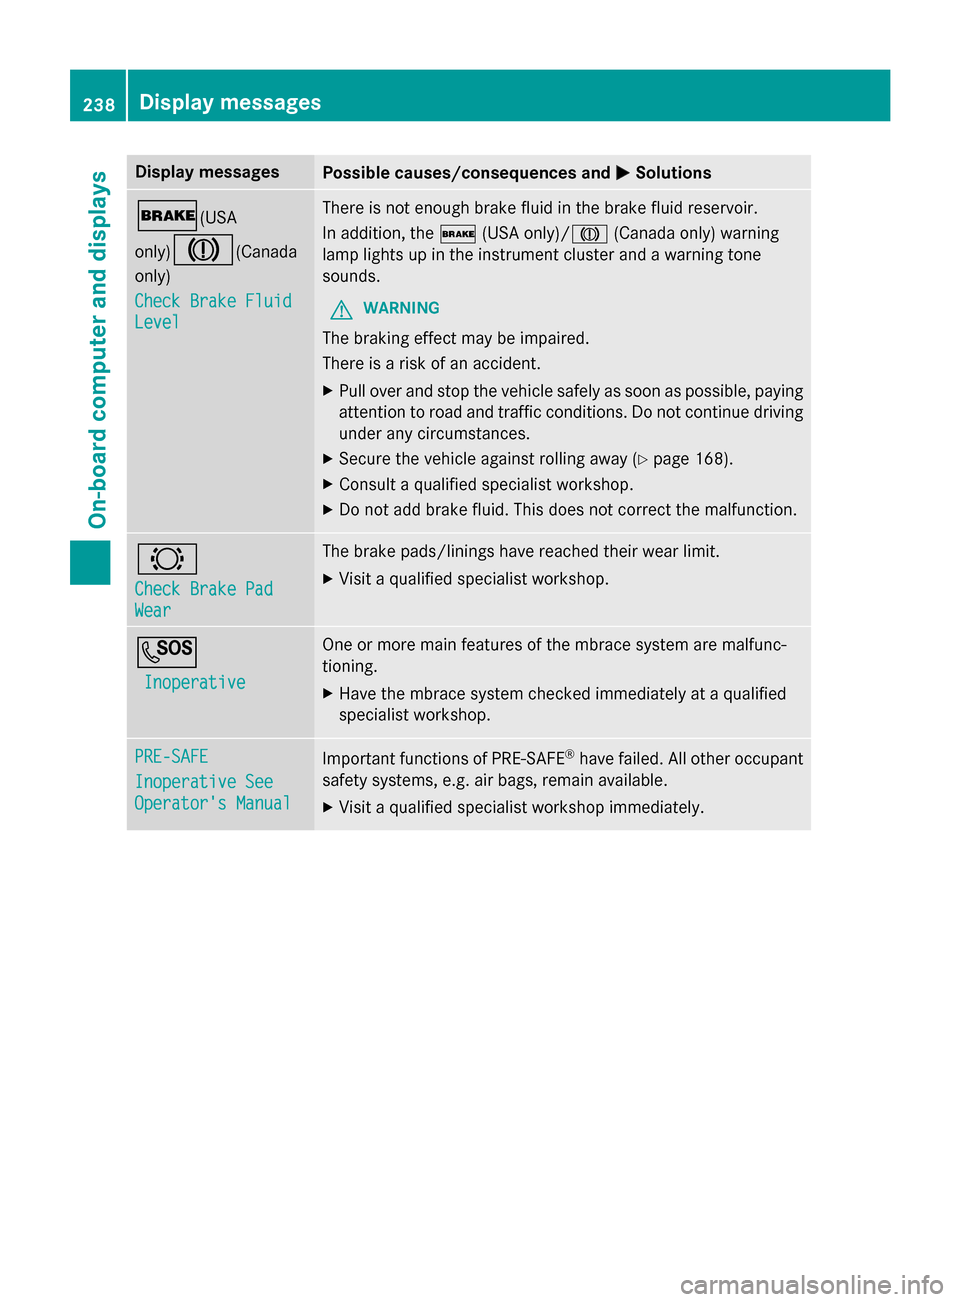
Display messages
Possible causes/consequences and
0050
0050Solutions 0027(USA
only)004D
(Canada
only)
Check Brake Fluid Check Brake Fluid
Level Level There is not enough brake fluid in the brake fluid reservoir.
In addition, the
0027(USA only)/ 004D(Canada only) warning
lamp lights up in the instrument cluster and a warning tone
sounds.
G WARNING
The braking effect may be impaired.
There is a risk of an accident. X Pull over and stop the vehicle safely as soon as possible, paying
attention to road and traffic conditions. Do not continue driving
under any circumstances.
X Secure the vehicle against rolling away (Y page 168).
X Consult a qualified specialist workshop.
X Do not add brake fluid. This does not correct the malfunction. 0026
Check Brake Pad Check Brake Pad
Wear Wear The brake pads/linings have reached their wear limit.
X Visit a qualified specialist workshop. 0053
Inoperative
Inoperative One or more main features of the mbrace system are malfunc-
tioning.
X Have the mbrace system checked immediately at a qualified
specialist workshop. PRE-SAFE PRE-SAFE
Inoperative See Inoperative See
Operator's Manual Operator's Manual
Important functions of PRE-SAFE
®
have failed. All other occupant
safety systems, e.g. air bags, remain available.
X Visit a qualified specialist workshop immediately. 238
Display
messagesOn-board computer and displays
Page 264 of 386
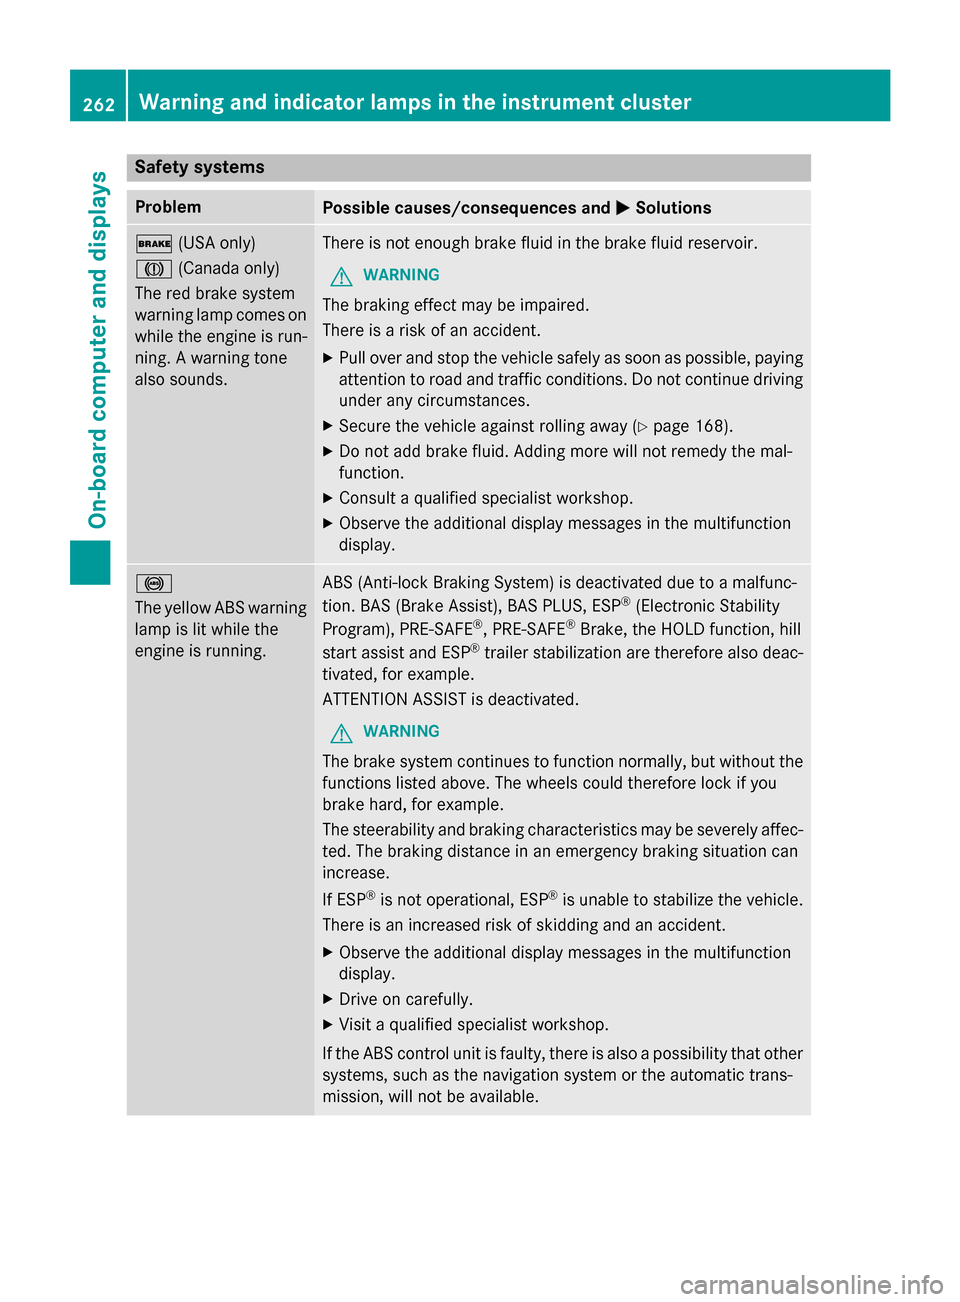
Safety systems
Problem
Possible causes/consequences and
0050
0050Solutions 0027
(USA only)
004D (Canada only)
The red brake system
warning lamp comes on while the engine is run-
ning. A warning tone
also sounds. There is not enough brake fluid in the brake fluid reservoir.
G WARNING
The braking effect may be impaired.
There is a risk of an accident. X Pull over and stop the vehicle safely as soon as possible, paying
attention to road and traffic conditions. Do not continue driving
under any circumstances.
X Secure the vehicle against rolling away (Y page 168).
X Do not add brake fluid. Adding more will not remedy the mal-
function.
X Consult a qualified specialist workshop.
X Observe the additional display messages in the multifunction
display. 0025
The yellow ABS warning
lamp is lit while the
engine is running. ABS (Anti-lock Braking System) is deactivated due to a malfunc-
tion. BAS (Brake Assist), BAS PLUS, ESP ®
(Electronic Stability
Program), PRE‑ SAFE®
, PRE‑SAFE ®
Brake, the HOLD function, hill
start assist and ESP ®
trailer stabilization are therefore also deac-
tivated, for example.
ATTENTION ASSIST is deactivated.
G WARNING
The brake system continues to function normally, but without the functions listed above. The wheels could therefore lock if you
brake hard, for example.
The steerability and braking characteristics may be severely affec-ted. The braking distance in an emergency braking situation can
increase.
If ESP ®
is not operational, ESP ®
is unable to stabilize the vehicle.
There is an increased risk of skidding and an accident.
X Observe the additional display messages in the multifunction
display.
X Drive on carefully.
X Visit a qualified specialist workshop.
If the ABS control unit is faulty, there is also a possibility that other
systems, such as the navigation system or the automatic trans-
mission, will not be available. 262
Warning and indicator lamps in the instrument clusterOn-board computer and displays
Page 309 of 386
Do not use power washers with circular jet
nozzles to clean the vehicle. Have damaged
tires or chassis components replaced imme-
diately.
! Always maintain a distance of at least
11.8 in (30 cm) between the vehicle and the power washer nozzle. Information about
the correct distance is available from the
equipment manufacturer.
Move the power washer nozzle around
when cleaning your vehicle.
Do not aim directly at any of the following:
R tires
R door gaps, roof gaps, joints, etc.
R electrical components
R battery
R connectors
R lights
R seals
R trim
R ventilation slots
Damaged seals or electrical components
can lead to leaks or failures.
Cleaning the wheels !
Do not use acidic wheel cleaning products
to remove brake dust. This could damage
wheel bolts and brake components.
! Do not park the vehicle for an extended
period straight after cleaning it, particularly after having cleaned the wheels with wheel cleaner. Wheel cleaners could cause
increased corrosion of the brake discs and
brake pads/linings. For this reason, you
should drive for a few minutes after clean-
ing. Braking heats the brake discs and the
brake pads/linings, thus drying them. The
vehicle can then be parked.
Cleaning the paintwork Scratches, corrosive deposits, areas affected
by corrosion and damage caused by inade-
quate care cannot always be completely repaired. In such cases, visit a qualified spe-
cialist workshop.
X Remove dirt immediately, where possible,
while avoiding rubbing too hard.
X Soak insect remains with insect remover
and rinse off the treated areas afterwards.
X Soak bird droppings with water and rinse
off the treated areas afterwards.
X Remove coolant, brake fluid, tree resin,
oils, fuels and greases by rubbing gently
with a cloth soaked in petroleum ether or
lighter fluid.
X Use tar remover to remove tar stains.
X Use silicone remover to remove wax.
! Do not affix:
R stickers
R films
R magnetic plates or similar items
to painted surfaces. You could otherwise
damage the paintwork.
If water no longer forms "beads" on the paint
surface, use the paint care products recom-
mended and approved by Mercedes-Benz.
This is the case approximately every three to
five months, depending on the climate con-
ditions and the care product used.
If the dirt has penetrated the paint surface or
if the paintwork has become dull, then the
paintwork should be cleaned. Use the clean-
ing product Paint Cleaner, which has been
approved by Mercedes-Benz.
Do not use these care products in the sun or
on the hood while the hood is hot.
X Use a suitable touch-up stick, e.g. MB
Touch-Up Stick, to repair slight damage to
the paintwork quickly and provisionally.
Matte finish care If your vehicle has a clear matte finish,
observe the following instructions in order to
avoid damage to the paintwork due to incor-
rect care. Care
307Maintenance and care Z
Page 375 of 386
X
Slide the right-hand front seat to its rear-
most position.
X Fold floor covering 0043upwards.
You will see VIN 0044.
The VIN can also be found in the following
locations:
R on the lower edge of the windshield
(Y page 373)
R on the vehicle identification plate
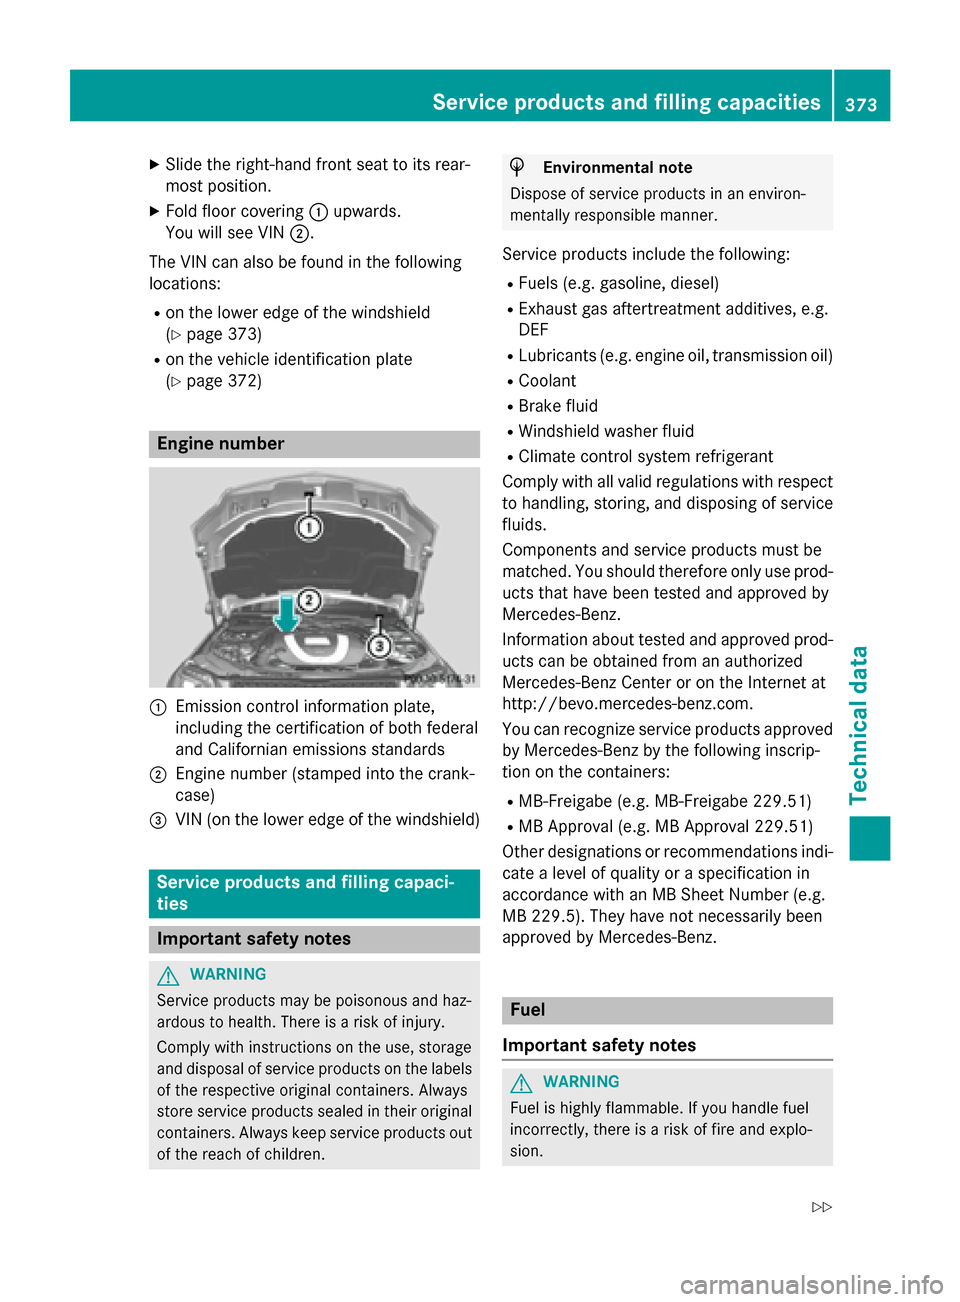
(Y page 372) Engine number
0043
Emission control information plate,
including the certification of both federal
and Californian emissions standards
0044 Engine number (stamped into the crank-
case)
0087 VIN (on the lower edge of the windshield) Service products and filling capaci-
ties Important safety notes
G
WARNING
Service products may be poisonous and haz-
ardous to health. There is a risk of injury.
Comply with instructions on the use, storage
and disposal of service products on the labels of the respective original containers. Always
store service products sealed in their original containers. Always keep service products out
of the reach of children. H
Environmental note
Dispose of service products in an environ-
mentally responsible manner.
Service products include the following: R Fuels (e.g. gasoline, diesel)
R Exhaust gas aftertreatment additives, e.g.
DEF
R Lubricants (e.g. engine oil, transmission oil)
R Coolant
R Brake fluid
R Windshield washer fluid
R Climate control system refrigerant
Comply with all valid regulations with respect to handling, storing, and disposing of service
fluids.
Components and service products must be
matched. You should therefore only use prod- ucts that have been tested and approved by
Mercedes-Benz.
Information about tested and approved prod- ucts can be obtained from an authorized
Mercedes-Benz Center or on the Internet at
http://bevo.mercedes-benz.com.
You can recognize service products approved
by Mercedes-Benz by the following inscrip-
tion on the containers:
R MB-Freigabe (e.g. MB-Freigabe 229.51)
R MB Approval (e.g. MB Approval 229.51)
Other designations or recommendations indi- cate a level of quality or a specification in
accordance with an MB Sheet Number (e.g.
MB 229.5). They have not necessarily been
approved by Mercedes-Benz. Fuel
Important safety notes G
WARNING
Fuel is highly flammable. If you handle fuel
incorrectly, there is a risk of fire and explo-
sion. Service products and filling capacities
373Technical data
Z