fuel fill door release MERCEDES-BENZ GLK-Class 2015 X204 Owner's Manual
[x] Cancel search | Manufacturer: MERCEDES-BENZ, Model Year: 2015, Model line: GLK-Class, Model: MERCEDES-BENZ GLK-Class 2015 X204Pages: 386, PDF Size: 7.16 MB
Page 80 of 386

Useful information
i This Operator's Manual describes all
models and all standard and optional equip- ment of your vehicle available at the time of
publication of the Operator's Manual.
Country-specific differences are possible.
Please note that your vehicle may not be
equipped with all features described. This
also applies to safety-related systems and
functions.
i Read the information on qualified special-
ist workshops (Y page 27). SmartKey
Important safety notes
G
WARNING
If children are left unsupervised in the vehicle, they could:
R open the doors, thus endangering other
people or road users.
R get out and disrupt traffic.
R operate the vehicle's equipment.
Additionally, children could set the vehicle in
motion if, for example, they:
R release the parking brake.
R shifting the automatic transmission out of
park position P
R Start the engine.
There is a risk of an accident and injury.
When leaving the vehicle, always take the
SmartKey with you and lock the vehicle. Never
leave children or animals unattended in the
vehicle. Always keep the SmartKey out of
reach of children. G
WARNING
If persons, particularly children are subjected to prolonged exposure to extreme heat or
cold, there is a risk of injury, possibly even
fatal. Never leave children unattended in the
vehicle. G
WARNING
If you attach heavy or large objects to the
SmartKey, the SmartKey could be uninten-
tionally turned in the ignition lock. This could
cause the engine to be switched off. There is a risk of an accident.
Do not attach any heavy or large objects to the
SmartKey. Remove any bulky key rings before
inserting the SmartKey into the ignition lock.
! Keep the SmartKey away from strong
magnetic fields. Otherwise, the remote
control function could be affected.
Strong magnetic fields can occur in the
vicinity of powerful electrical installations.
R Do not keep the KEYLESS-GO key:
- with electronic devices, e.g. a mobile
phone or another SmartKey
- with metallic objects, e.g. coins or metal
foil
- inside metallic objects e.g. a metal case
This can affect the functionality of the
SmartKey. SmartKey functions
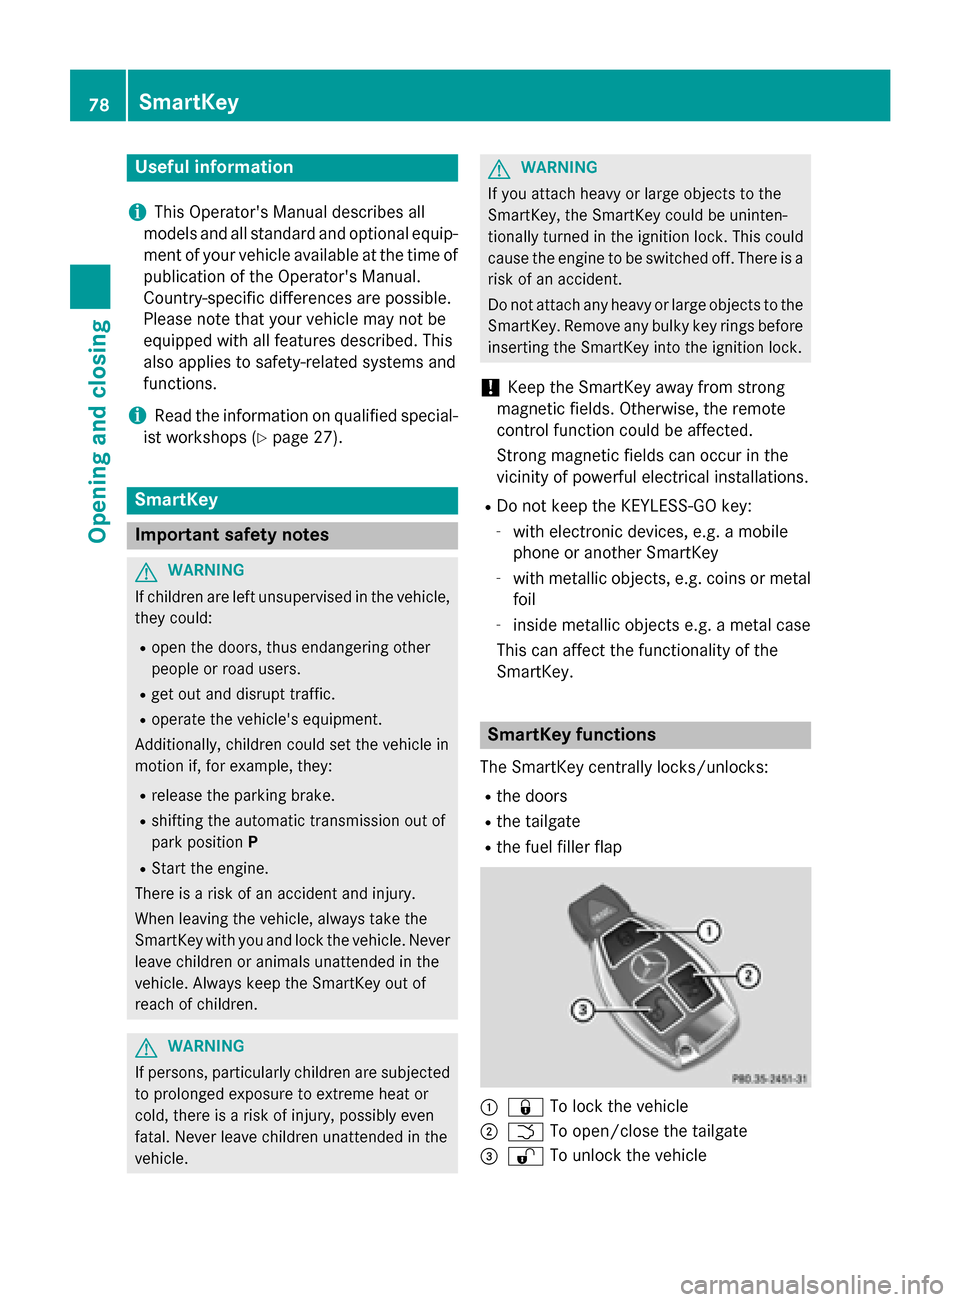
The SmartKey centrally locks/unlocks:
R the doors
R the tailgate
R the fuel filler flap 0043
0037 To lock the vehicle
0044 0054 To open/close the tailgate
0087 0036 To unlock the vehicle 78
SmartKeyOpening and closing
Page 82 of 386

i
If the setting of the locking system is
changed within the signal range of the vehi- cle, pressing the 0037or0036 button:
R locks or
R unlocks the vehicle
The SmartKey now functions as follows:
X To unlock the driver's door: press the
0036 button once.
X To unlock centrally: press the0036but-
ton twice.
X To lock centrally: press the0037button.
The KEYLESS-GO function is changed as fol-
lows:
X To unlock the driver's door: touch the
inner surface of the door handle on the
driver's door.
X To unlock centrally: touch the inner sur-
face of the door handle on the front-
passenger door or the rear door.
X To lock centrally: touch the outer sensor
surface on one of the door handles
(Y page 79).
X To restore the factory settings: press
and hold down the 0036and0037 buttons
simultaneously for approximately six sec-
onds until the battery check lamp flashes
twice. Mechanical key
General notes If the vehicle can no longer be locked or
unlocked with the SmartKey or the KEYLESS- GO key, use the mechanical key.
If you use the mechanical key to unlock and
open the driver's door, the anti-theft alarm
system will be triggered (Y page 75).
X To end the alarm: insert the SmartKey into
the ignition lock.
i With KEYLESS-GO:
remove the Start/
Stop button from the ignition lock before-
hand. If you unlock the vehicle using the mechanical
key, the fuel filler flap will not be unlocked
automatically.
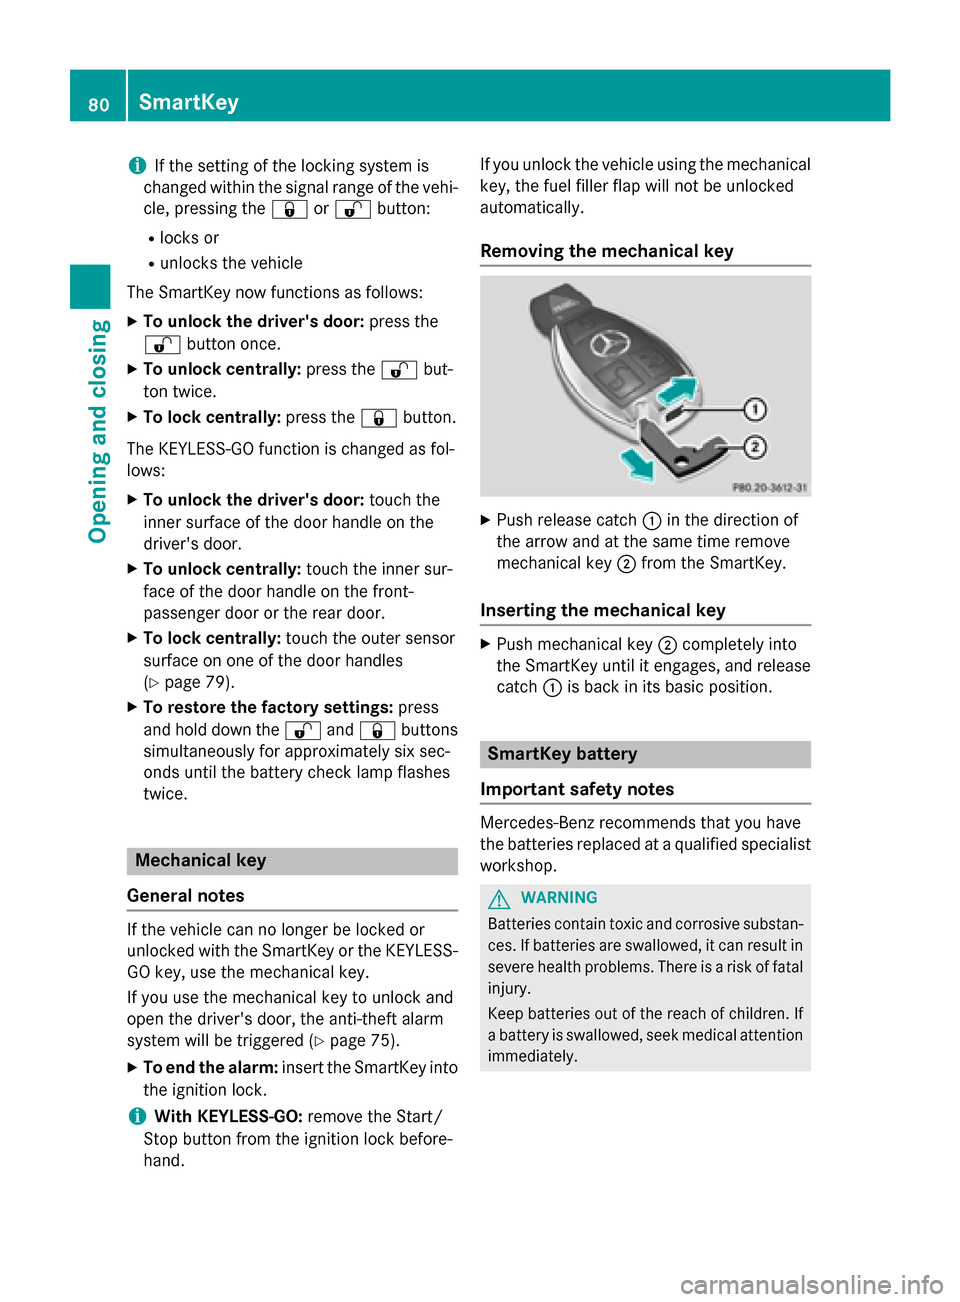
Removing the mechanical key X
Push release catch 0043in the direction of
the arrow and at the same time remove
mechanical key 0044from the SmartKey.
Inserting the mechanical key X
Push mechanical key 0044completely into
the SmartKey until it engages, and release
catch 0043is back in its basic position. SmartKey battery
Important safety notes Mercedes-Benz recommends that you have
the batteries replaced at a qualified specialist
workshop. G
WARNING
Batteries contain toxic and corrosive substan- ces. If batteries are swallowed, it can result in
severe health problems. There is a risk of fatal injury.
Keep batteries out of the reach of children. If
a battery is swallowed, seek medical attention immediately. 80
SmartKeyOpening and closing
Page 86 of 386

are not secured by the child-proof locks
(Y page 67).
You can open a door from inside the vehicle
even if it has been locked.
Only open the door when the traffic situation permits.
If the vehicle has been locked with the Smart-
Key or with KEYLESS-GO, opening a door from the inside will trigger the anti-theft alarm sys-
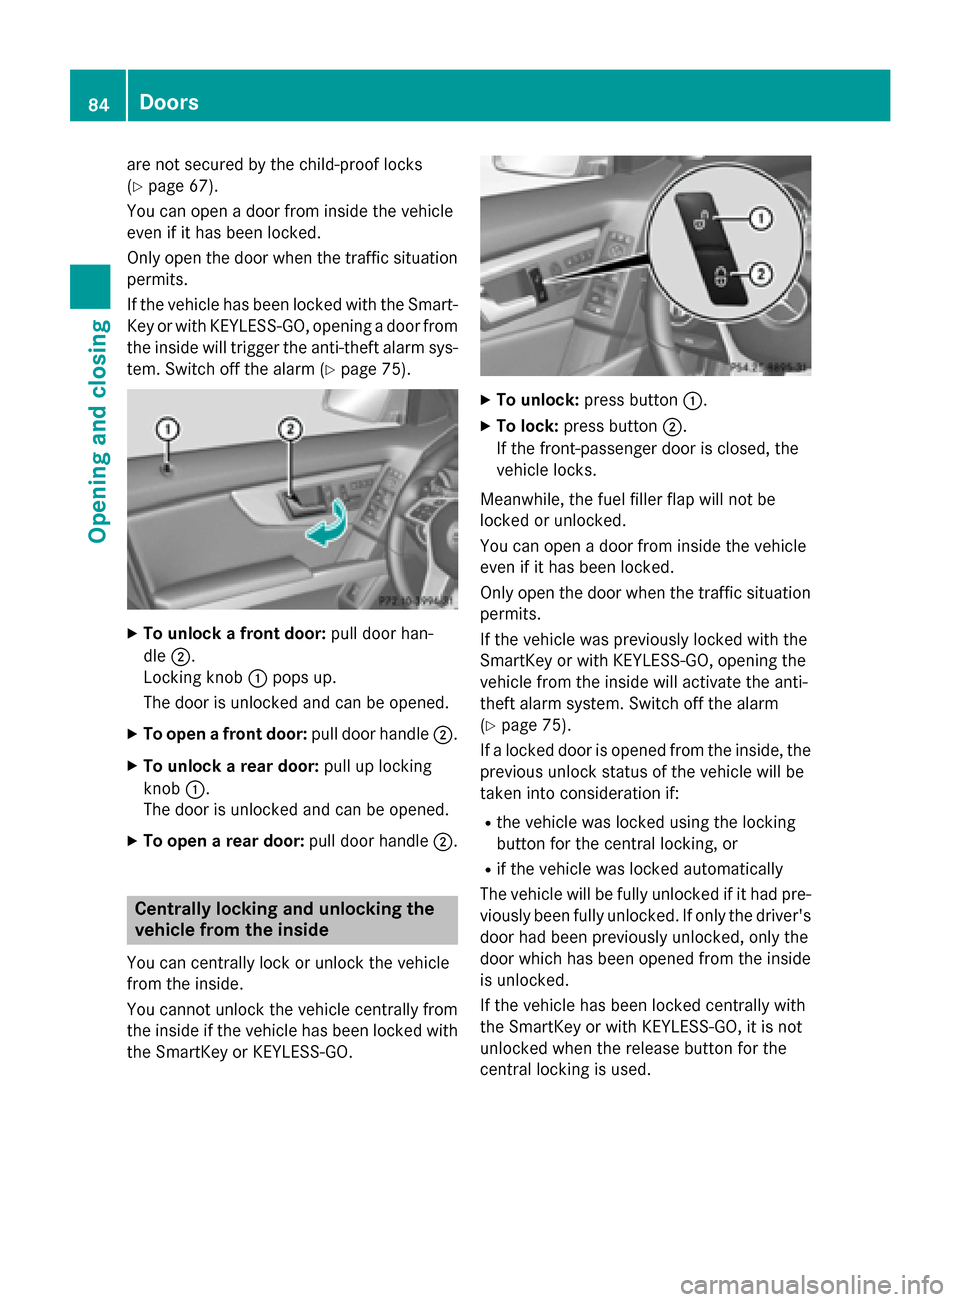
tem. Switch off the alarm (Y page 75).X
To unlock a front door: pull door han-
dle 0044.
Locking knob 0043pops up.
The door is unlocked and can be opened.
X To open a front door: pull door handle0044.
X To unlock a rear door: pull up locking
knob 0043.
The door is unlocked and can be opened.
X To open a rear door: pull door handle0044. Centrally locking and unlocking the
vehicle from the inside
You can centrally lock or unlock the vehicle
from the inside.
You cannot unlock the vehicle centrally from
the inside if the vehicle has been locked with the SmartKey or KEYLESS-GO. X
To unlock: press button 0043.
X To lock: press button 0044.
If the front-passenger door is closed, the
vehicle locks.
Meanwhile, the fuel filler flap will not be
locked or unlocked.
You can open a door from inside the vehicle
even if it has been locked.
Only open the door when the traffic situation permits.
If the vehicle was previously locked with the
SmartKey or with KEYLESS-GO, opening the
vehicle from the inside will activate the anti-
theft alarm system. Switch off the alarm
(Y page 75).
If a locked door is opened from the inside, the
previous unlock status of the vehicle will be
taken into consideration if:
R the vehicle was locked using the locking
button for the central locking, or
R if the vehicle was locked automatically
The vehicle will be fully unlocked if it had pre- viously been fully unlocked. If only the driver's
door had been previously unlocked, only the
door which has been opened from the inside
is unlocked.
If the vehicle has been locked centrally with
the SmartKey or with KEYLESS-GO, it is not
unlocked when the release button for the
central locking is used. 84
DoorsOpening and closing
Page 341 of 386

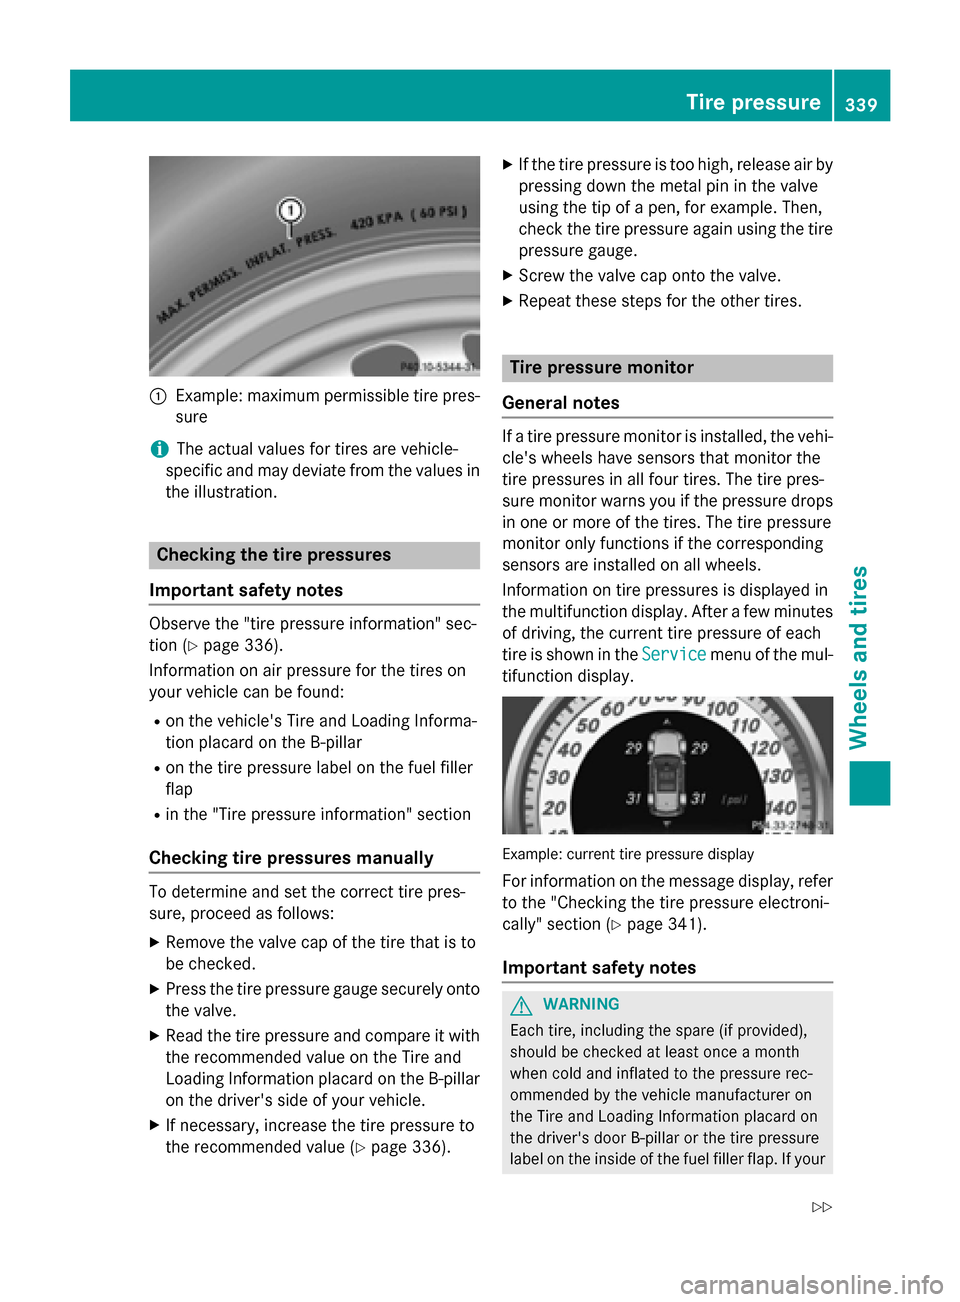
0043
Example: maximum permissible tire pres-
sure
i The actual values for tires are vehicle-
specific and may deviate from the values in
the illustration. Checking the tire pressures
Important safety notes Observe the "tire pressure information" sec-
tion (Y page 336).
Information on air pressure for the tires on
your vehicle can be found:
R on the vehicle's Tire and Loading Informa-
tion placard on the B-pillar
R on the tire pressure label on the fuel filler
flap
R in the "Tire pressure information" section
Checking tire pressures manually To determine and set the correct tire pres-
sure, proceed as follows:
X Remove the valve cap of the tire that is to
be checked.
X Press the tire pressure gauge securely onto
the valve.
X Read the tire pressure and compare it with
the recommended value on the Tire and
Loading Information placard on the B-pillar
on the driver's side of your vehicle.
X If necessary, increase the tire pressure to
the recommended value (Y page 336).X
If the tire pressure is too high, release air by
pressing down the metal pin in the valve
using the tip of a pen, for example. Then,
check the tire pressure again using the tire
pressure gauge.
X Screw the valve cap onto the valve.
X Repeat these steps for the other tires. Tire pressure monitor
General notes If a tire pressure monitor is installed, the vehi-
cle's wheels have sensors that monitor the
tire pressures in all four tires. The tire pres-
sure monitor warns you if the pressure drops
in one or more of the tires. The tire pressure
monitor only functions if the corresponding
sensors are installed on all wheels.
Information on tire pressures is displayed in
the multifunction display. After a few minutes of driving, the current tire pressure of each
tire is shown in the Service
Service menu of the mul-
tifunction display. Example: current tire pressure display
For information on the message display, refer to the "Checking the tire pressure electroni-
cally" section (Y page 341).
Important safety notes G
WARNING
Each tire, including the spare (if provided),
should be checked at least once a month
when cold and inflated to the pressure rec-
ommended by the vehicle manufacturer on
the Tire and Loading Information placard on
the driver's door B-pillar or the tire pressure
label on the inside of the fuel filler flap. If your Tire pressure
339Wheels and tires
Z