height MERCEDES-BENZ GLK-Class 2015 X204 Owner's Manual
[x] Cancel search | Manufacturer: MERCEDES-BENZ, Model Year: 2015, Model line: GLK-Class, Model: MERCEDES-BENZ GLK-Class 2015 X204Pages: 386, PDF Size: 7.16 MB
Page 18 of 386
Route guidance (navigation)
............ 225S
Safety Child restraint systems .................... 61
Occupant Classification System
(OCS) ............................................... 49
Overview of occupant safety sys-
tems ................................................ 42
Safety system
see Driving safety systems
Seat belts
Adjusting the driver's and front-
passenger seat bel t......................... 59
Adjusting the height ......................... 59
Belt force limiters ............................ 60
center rear-compartment sea t......... 59
Cleaning ......................................... 312
Correct usage .................................. 57
Emergency Tensioning Devices ........ 60
Fastening ......................................... 58
Important safety guidelines ............. 56
Releasing ......................................... 59
Safety guidelines ............................. 43
Switching belt adjustment on/off
(on-board computer) ...................... 233
Warning lamp ................................. 261
Warning lamp (function) ................... 60
Seats
Adjusting (electrically) ................... 102
Adjusting lumbar support .............. 104
Adjusting the 4-way lumbar sup-
port ................................................ 105
Adjusting the head restraint .......... 102
Cleaning the cover ......................... 311
Correct driver's seat position ........ 100
Folding the backrest (rear com-
partment) forwards/back .............. 276
Folding the rear bench seat for-
wards/back ................................... 276
Important safety notes .................. 101
Seat heating problem .................... 106
Storing settings (memory func-
tion) ............................................... 112
Switching seat heating on/of f....... 105
Sensors (cleaning instructions) ....... 309Service Center
see Qualified specialist workshop
Service menu (on-board com-
puter) .................................................. 230
Service products Brake fluid ..................................... 377
Coolant (engine) ............................ 378
DEF special additives ..................... 376
Engine oil ....................................... 377
Fuel ................................................ 373
Important safety notes .................. 373
Refrigerant (air-conditioning sys-
tem) ............................................... 379
Washer fluid ................................... 379
Settings
Factory (on-board computer) ......... 234
On-board compute r....................... 230
Setting the air distribution ............... 140
Setting the airflow ............................ 141
Side impact air bag ............................. 47
Side marker lamp (display mes-
sage) ................................................... 245
Side windows Cleaning ......................................... 308
Convenience closing feature ............ 92
Convenience opening feature .......... 92
Important safety information ........... 90
Opening/closing .............................. 91
Problem (malfunction) ..................... 93
Resetting ......................................... 93
Sliding sunroof
see Panorama roof with power
tilt/sliding panel
SmartKey
Changing the battery ....................... 81
Changing the programming ............. 79
Checking the battery ....................... 81
Convenience closing feature ............ 92
Convenience opening feature .......... 92
Display message ............................ 259
Door central locking/unlocking ....... 78
Important safety notes .................... 78
Loss ................................................. 82
Mechanical key ................................ 80
Positions (ignition lock) ................. 149
Problem (malfunction) ..................... 82
Starting the engine ........................ 151 16
Index
Page 59 of 386
modifications could invalidate the vehicle's
general operating permit.
The use of seat belts and child restraint sys-
tems is required by law in:
R all 50 states
R the U.S. territories
R the District of Columbia
R all Canadian provinces
Even where this is not required by law, all
vehicle occupants should correctly fasten
their seat belts before starting the journey.
i See "Children in the vehicle"
(Y page 61) for further information on
infants and children traveling in the vehicle,
as well as on child restraint systems.
Proper use of the seat belts G
WARNING
USE SEAT BELTS PROPERLY
R Seat belts can only work when used prop-
erly. Never wear seat belts in any other way
than as described in this section, as that
could result in serious injuries in the event
of an accident.
R Each occupant should wear their seat belt
at all times, because seat belts help reduce the likelihood of and potential severity of
injuries in accidents, including rollovers.
The integrated restraint system includes
SRS (driver front air bag, driver's side knee
bag, front-passenger front air bag, side
impact air bags, pelvis air bags, window
curtain air bags for the side windows),
Emergency Tensioning Devices, seat belt
force limiters, and front seat knee bolsters.
The system is designed to enhance the pro-
tection offered to properly belted occu-
pants in certain frontal (front air bags, driv-
er's side knee bag and ETDs) and side (side
impact air bags, window curtain air bags,
and ETDs) impacts which exceed preset
deployment thresholds and in certain roll-
overs (window curtain air bags and ETDs). R
Never wear the shoulder belt under your
arm, across your neck or off your shoulder.
In a frontal crash, your body would move
too far forward. That would increase the
chance of head and neck injuries. The seat belt would also apply too much force to the
ribs or abdomen, which could severely
injure internal organs such as your liver or
spleen.
Adjust the seat belt so that the shoulder
section is located as close as possible to
the middle of the shoulder. It should not
touch the neck. Never pass the shoulder
portion of the seat belt under your arm. For
this purpose, you can adjust the height of
the seat belt outlet.
R Position the lap belt as low as possible on
your hips and not across the abdomen. If
the lap belt is positioned across your abdo-
men, it could cause serious injuries in a
crash.
R Never wear seat belts over rigid or breaka-
ble objects in or on your clothing, such as
eyeglasses, pens, keys etc., as these might cause injuries.
R Make sure the seat belt is always fitted
snugly. Take special care of this when wear-
ing loose clothing.
R Never use a seat belt for more than one
person at a time. Do not fasten a seat belt
around a person and another person or
other objects at the same time.
R Seat belts should not be worn twisted. In a
crash, you would not have the full width of
the seat belt to distribute impact forces.
The twisted seat belt against your body
could cause injuries.
R Pregnant women should also always use a
lap-shoulder belt. The lap belt portion
should be positioned as low as possible on
the hips to avoid any possible pressure on
the abdomen.
R Place the seat backrest in a position that is
as upright as possible.
R Check your seat belt during travel to make
sure it is properly positioned. Occupant safety
57Safety
Z
Page 60 of 386
R
Never place your feet on the instrument
panel, dashboard, or on the seat. Always
keep both feet on the floor in front of the
seat.
R When using a seat belt to secure infant
restraints, toddler restraints, or children in
booster seats, always follow the child seat
manufacturer's instructions. G
WARNING
Do not pass seat belts over sharp edges. They
could tear.
Do not allow the seat belt to get caught in the door or in the seat adjustment mechanism.
This could damage the seat belt.
Never attempt to make modifications to seat
belts. This could impair the effectiveness of
the seat belts.
Fastening seat belts G
WARNING
According to accident statistics, children are
safer when properly restrained on the rear
seats than on the front-passenger seat. Thus, we strongly recommend that children be
placed in the rear seat whenever possible.
Regardless of seating position, children 12
years old and under must be seated and prop- erly secured in an appropriately sized child
restraint system or booster seat recommen-
ded for the size and weight of the child. For
additional information, see the "Children in
the vehicle" section.
A child's risk of serious or fatal injuries is sig-
nificantly increased if the child restraints are
not properly secured in the vehicle and/or the child is not properly secured in the child
restraint. X
Adjust the seat and move the backrest to
an almost vertical position (Y page 100).
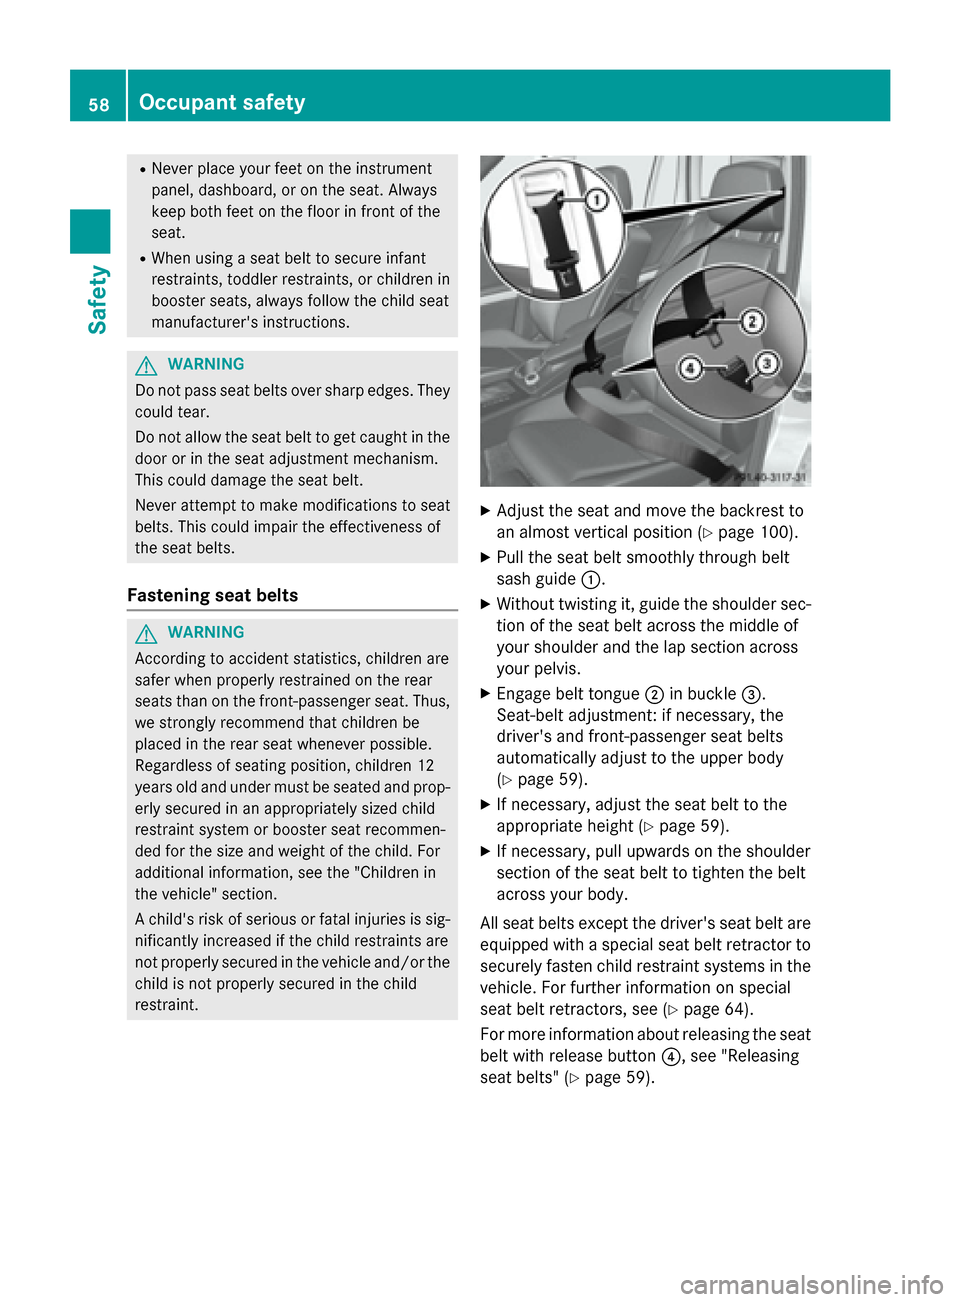
X Pull the seat belt smoothly through belt
sash guide 0043.
X Without twisting it, guide the shoulder sec-
tion of the seat belt across the middle of
your shoulder and the lap section across
your pelvis.
X Engage belt tongue 0044in buckle 0087.
Seat-belt adjustment: if necessary, the
driver's and front-passenger seat belts
automatically adjust to the upper body
(Y page 59).
X If necessary, adjust the seat belt to the
appropriate height (Y page 59).
X If necessary, pull upwards on the shoulder
section of the seat belt to tighten the belt
across your body.
All seat belts except the driver's seat belt are equipped with a special seat belt retractor tosecurely fasten child restraint systems in the
vehicle. For further information on special
seat belt retractors, see (Y page 64).
For more information about releasing the seat
belt with release button 0085, see "Releasing
seat belts" (Y page 59).58
Occupant safetySafety
Page 61 of 386
Seat belt adjustment
The seat-belt adjustment function adjusts the
driver's and front-passenger seat belt to the
upper body of the occupants.
The belt strap is tightened slightly when:
R the belt tongue is engaged in the buckle
and
R the ignition is switched on
The seat-belt adjustment will apply a retrac-
tion force if any slack is detected between the occupant and the seat belt. Do not hold on tothe seat belt tightly while it is adjusting. You
can switch the seat-belt adjustment on and
off in the on-board computer (Y page 233).
The seat-belt adjustment is an integral part of
the PRE-SAFE ®
convenience function. More
information about PRE-SAFE ®
can be found in
the "PRE-SAFE ®
(anticipatory occupant pro-
tection system)" section (Y page 54).
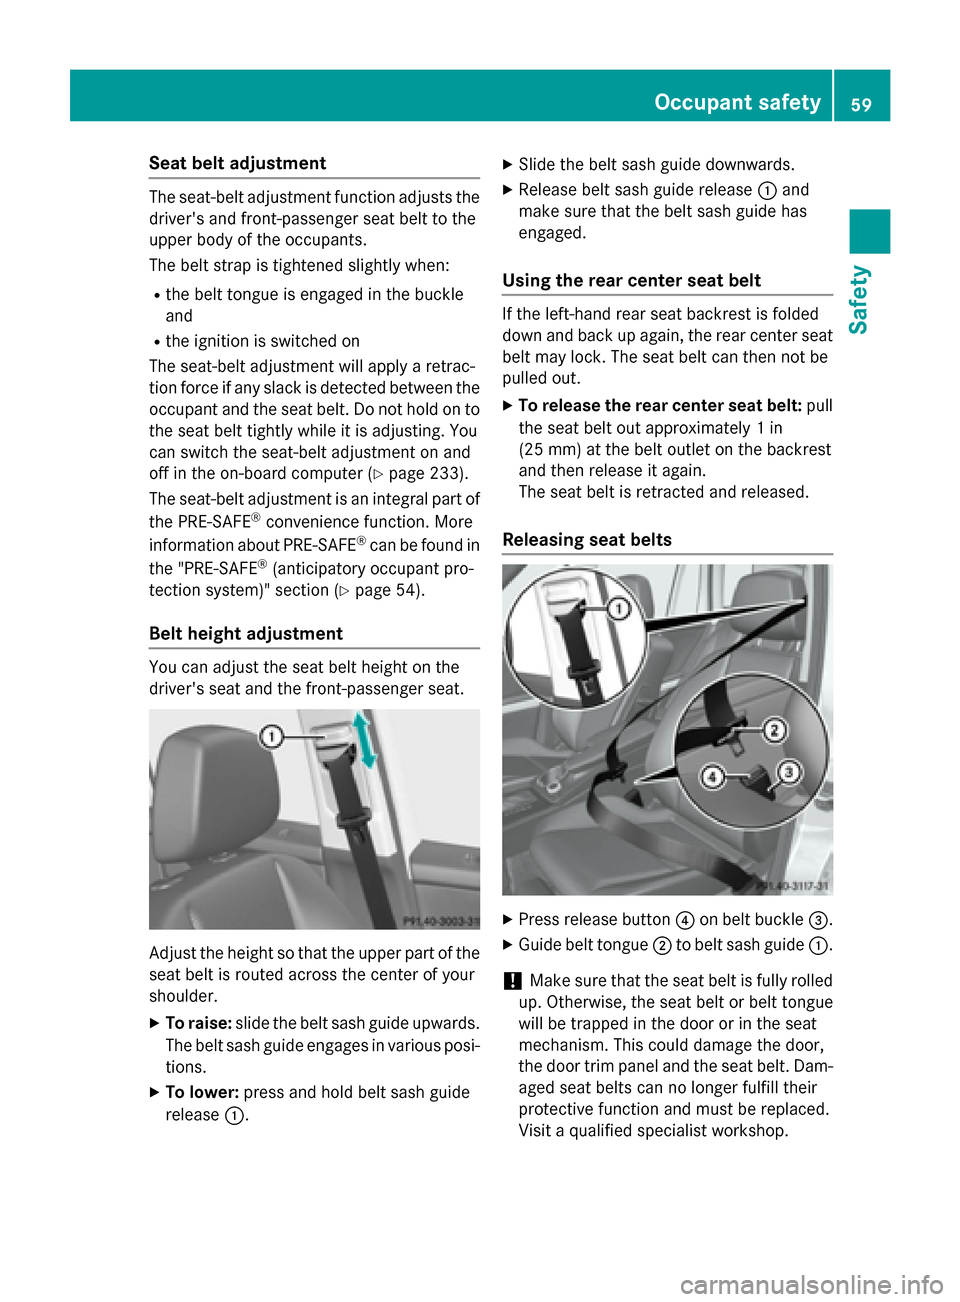
Belt height adjustment You can adjust the seat belt height on the
driver's seat and the front-passenger seat.
Adjust the height so that the upper part of the
seat belt is routed across the center of your
shoulder.
X To raise: slide the belt sash guide upwards.
The belt sash guide engages in various posi- tions.
X To lower: press and hold belt sash guide
release 0043. X
Slide the belt sash guide downwards.
X Release belt sash guide release 0043and
make sure that the belt sash guide has
engaged.
Using the rear center seat belt If the left-hand rear seat backrest is folded
down and back up again, the rear center seat
belt may lock. The seat belt can then not be
pulled out.
X To release the rear center seat belt: pull
the seat belt out approximately 1 in
(25 mm) at the belt outlet on the backrest
and then release it again.
The seat belt is retracted and released.
Releasing seat belts X
Press release button 0085on belt buckle 0087.
X Guide belt tongue 0044to belt sash guide 0043.
! Make sure that the seat belt is fully rolled
up. Otherwise, the seat belt or belt tongue
will be trapped in the door or in the seat
mechanism. This could damage the door,
the door trim panel and the seat belt. Dam- aged seat belts can no longer fulfill their
protective function and must be replaced.
Visit a qualified specialist workshop. Occupant safety
59Safety Z
Page 65 of 386
designed for them. Only replace damaged
covers with genuine covers. G
WARNING
If the child restraint system is installed incor- rectly or is not secured, it can come loose in
the event of an accident, heavy braking or a
sudden change in direction. The child
restraint system could be thrown about, strik- ing vehicle occupants. There is an increased
risk of injury, possibly even fatal.
Always install child restraint systems prop-
erly, even if they are not being used. Make
sure that you observe the child restraint sys-
tem manufacturer's installation instructions. G
WARNING
Child restraint systems or their securing sys-
tems which have been damaged or subjected to a load in an accident can no longer protect
as intended. The child cannot then be
restrained in the event of an accident, heavy
braking or sudden changes of direction. There is an increased risk of injury, possibly even
fatal.
Replace child restraint systems which have
been damaged or subjected to a load in an
accident as soon as possible. Have the secur-
ing systems on the child restraint system
checked at a qualified specialist workshop,
before you install a child restraint system
again.
The securing systems of child restraint sys-
tems are:
R the seat belt system
R the LATCH-type (ISOFIX) securing rings
R the Top Tether anchorages G
WARNING
Infants and small children should never share a seat belt with another occupant. In the event
of an accident, they could be crushed
between the occupant and seat belt.
A child's risk of serious or fatal injuries is sig- nificantly increased if the child restraints are not properly secured in the vehicle and/or the
child is not properly secured in the child
restraint.
Children that are too large for a child restraint
must travel in seats using normal seat belts.
Position the shoulder belt across the chest
and shoulder, not the face or neck. A booster seat may be necessary to achieve proper seat
belt positioning for children over 41 lbs
(18 kg) until they reach a height where a lap/
shoulder belt fits properly without a booster
seat.
When the child restraint is not in use, remove it from the vehicle or secure it with the seat
belt to prevent the child restraint from becom-
ing a projectile in the event of an accident. G
WARNING
If children are left unsupervised in the vehicle, they could:
R open the doors, thus endangering other
people or road users.
R get out and disrupt traffic.
R operate the vehicle's equipment.
Additionally, children could set the vehicle in
motion if, for example, they:
R release the parking brake.
R shifting the automatic transmission out of
park position P
R Start the engine.
There is a risk of an accident and injury.
When leaving the vehicle, always take the
SmartKey with you and lock the vehicle. Never
leave children or animals unattended in the
vehicle. Always keep the SmartKey out of
reach of children. G
WARNING
If persons, particularly children are subjected to prolonged exposure to extreme heat or
cold, there is a risk of injury, possibly even
fatal. Never leave children unattended in the
vehicle. Children in the vehicle
63Safety Z
Page 66 of 386
G
WARNING
If the child restraint system is subjected to
direct sunlight, parts may get very hot. Chil-
dren may burn themselves on these parts,
particularly on the metal parts of the child
restraint system. There is a risk of injury.
If you leave the vehicle, taking the child with
you, always ensure that the child restraint
system is not exposed to direct sunlight. Pro- tect it with a blanket, for example. If the childrestraint system has been exposed to direct
sunlight, let it cool down before securing the
child in it. Never leave children unattended in the vehicle.
If an infant or child is traveling in the vehicle:
X Secure the child with a child or infant seat
restraint system appropriate to the age and
weight of the child.
X Make sure that the infant or child is prop-
erly secured at all times while the vehicle is
in motion.
Special seat belt retractor All seat belts except the driver's seat belt are
equipped with a special seat belt retractor.
When activated, the special seat belt retrac-
tor ensures that the seat belt will not slacken
once the child restraint system has been
secured.
Installing a child restraint system:
X Always comply with the manufacturer's
installation instructions.
X Pull the seat belt smoothly from the seat
belt retractor.
X Engage the seat belt tongue in the belt
buckle. Activating the special seat belt retractor:
X Pull the seat belt out fully and let the seat
belt retractor retract it again.
While the seat belt is retracting, you should
hear a ratcheting sound. The special seat
belt retractor is activated.
X Push down on the child restraint system to
take up any slack.
Removing a child restraint system/deactivat-
ing the special seat belt retractor:
X Always comply with the manufacturer's
installation instructions.
X Press the release button on the belt buckle,
hold the belt tongue firmly and guide it back
towards the belt sash guide.
The special seat belt retractor is deactiva-
ted. G
WARNING
If the seat belt is released while driving, the
child restraint system will no longer be
secured properly. The special seat belt retrac- tor is disabled and the inertia real draws in a
portion of the seat belt. The seat belt cannot
be immediately refastened. There is an
increased risk of injury, possibly even fatal.
Stop the vehicle immediately, paying atten-
tion to road and traffic conditions. Reactivate
the special seat belt retractor and secure the
child restraint system properly.
LATCH-type (ISOFIX) child seat anchors
in the rear G
WARNING
Children that are too large for a child restraint
must travel in seats using normal seat belts.
Position shoulder belt across the chest and
shoulder, not face or neck.
A booster seat may be necessary to achieve
proper seat belt positioning for children over
41 lb (18 kg) until they reach a height where a lap/shoulder belt fits properly without a boos-
ter. 64
Children in the vehicleSafety
Page 103 of 386
settings with the memory function
(Y
page 112). Seats
Important safety notes
G
WARNING
Children could become trapped if they adjust the seats, particularly when unattended.
There is a risk of injury.
When leaving the vehicle, always take the
SmartKey with you and lock the vehicle. Never leave children unsupervised in the vehicle.
The seats can still be adjusted when there is
no SmartKey in the ignition lock. G
WARNING
You could lose control of your vehicle if you do the following while driving:
R adjust the driver's seat, head restraint,
steering wheel or mirrors
R fasten the seat belt
There is a risk of an accident.
Adjust the driver's seat, head restraint, steer-
ing wheel and mirror and fasten your seat belt before starting the engine. G
WARNING
If you adjust the seat height carelessly, you or other vehicle occupants could be trapped andthereby injured. Children in particular could
accidentally press the electrical seat adjust-
ment buttons and become trapped. There is a
risk of injury.
While moving the seats, make sure that your
hands or other body parts do not get under the
lever assembly of the seat adjustment sys-
tem. G
WARNING
When you adjust a seat, you or other vehicle
occupants could become trapped, e.g. on the seat guide rail. There is a risk of injury. Make sure when adjusting a seat that no one
has any body parts in the sweep of the seat.
Observe the safety notes on "Air bags"
(Y page 44) and "Children in the vehicle"
(Y page 61).
! To avoid damage to the seats and the seat
heating, observe the following information:
R keep liquids from spilling on the seats. If
liquid is spilled on the seats, dry them as soon as possible.
R if the seat covers are damp or wet, do not
switch on the seat heating. The seat
heating should also not be used to dry
the seats.
R clean the seat covers as recommended;
see the "Interior care" section.
R do not transport heavy loads on the
seats. Do not place sharp objects on the
seat cushions, e.g. knives, nails or tools.
The seats should only be occupied by
passengers, if possible.
R when the seat heating is in operation, do
not cover the seats with insulating mate- rials, e.g. blankets, coats, bags, seat cov-
ers, child seats or booster seats.
! Make sure that there are no objects in the
footwell under or behind the seats when
moving the seats back. There is a risk that
the seats and/or the objects could be dam-
aged.
i The rear-compartment head restraints
can be removed (Y page 104).
For more information, contact a qualified
specialist workshop.
i Further related subjects:
R Cargo compartment enlargement (fold-
ing down the rear bench seat)
(Y page 276) Seats
101Seats, steering wheel and mirrors Z
Page 104 of 386
Adjusting the seats
i Vehicles without Memory function: the
seats can be adjusted within three minutes of a front door being opened.
The time period starts over again if, within
these three minutes, you:
R open or close a front door
R insert the SmartKey into the ignition lock
or remove it from the ignition lock
R switch the ignition on or off
If the SmartKey is in position 2in the igni-
tion lock (Y page 149), the seats can be
adjusted at any time.
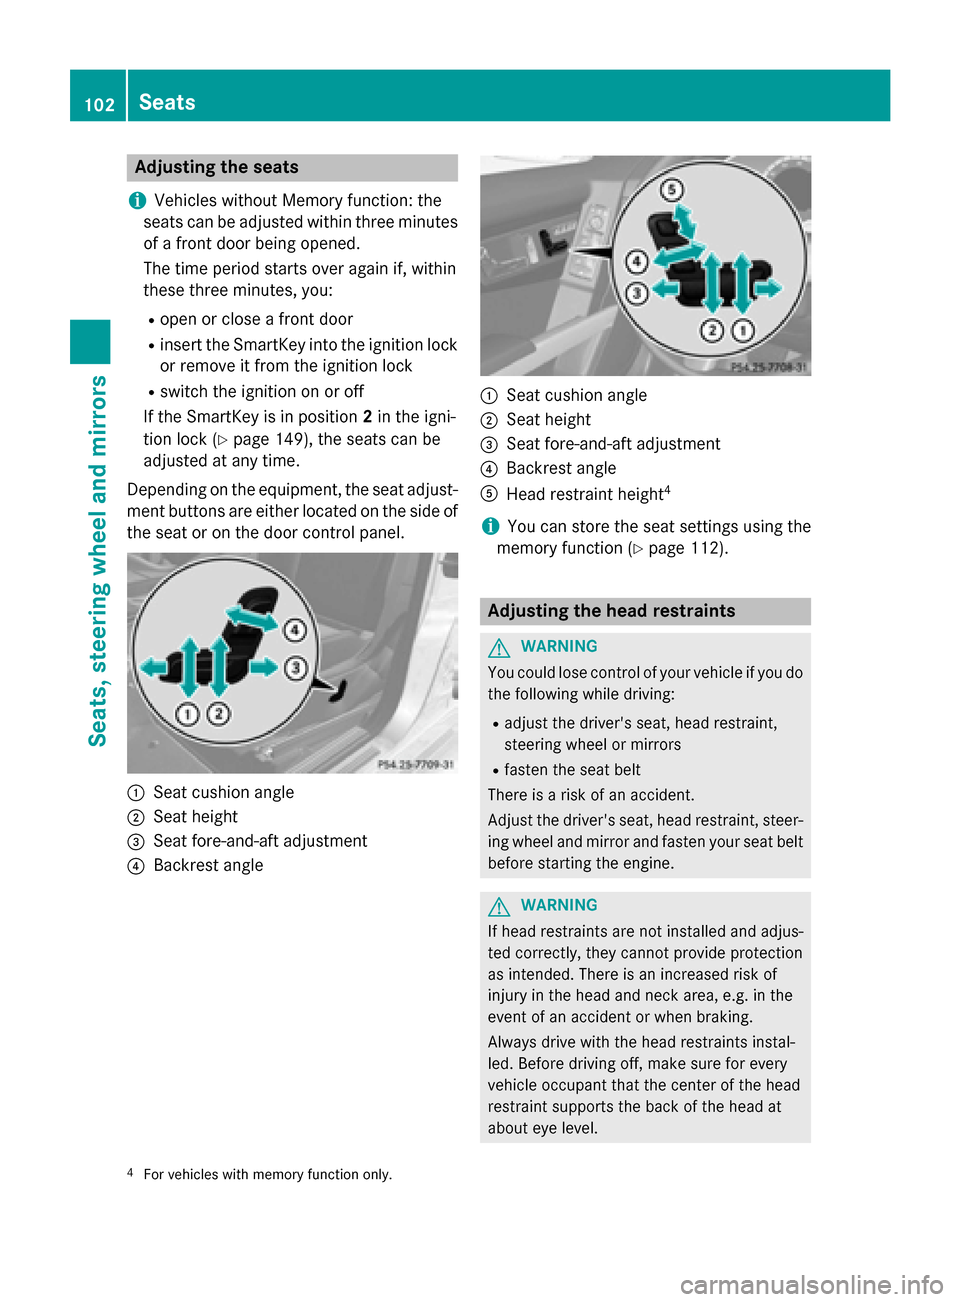
Depending on the equipment, the seat adjust- ment buttons are either located on the side of
the seat or on the door control panel. 0043
Seat cushion angle
0044 Seat height
0087 Seat fore-and-aft adjustment
0085 Backrest angle 0043
Seat cushion angle
0044 Seat height
0087 Seat fore-and-aft adjustment
0085 Backrest angle
0083 Head restraint height 4
i You can store the seat settings using the
memory function (Y page 112). Adjusting the head restraints
G
WARNING
You could lose control of your vehicle if you do the following while driving:
R adjust the driver's seat, head restraint,
steering wheel or mirrors
R fasten the seat belt
There is a risk of an accident.
Adjust the driver's seat, head restraint, steer-
ing wheel and mirror and fasten your seat belt before starting the engine. G
WARNING
If head restraints are not installed and adjus-
ted correctly, they cannot provide protection
as intended. There is an increased risk of
injury in the head and neck area, e.g. in the
event of an accident or when braking.
Always drive with the head restraints instal-
led. Before driving off, make sure for every
vehicle occupant that the center of the head
restraint supports the back of the head at
about eye level.
4 For vehicles with memory function only. 102
SeatsSeats
, steering wheel and mirrors
Page 105 of 386
Do not rotate the head restraints of the front
and rear seats. Otherwise, you cannot adjust
the height and angle of the head restraints to
the correct position.
Using the fore-and-aft adjustment, adjust the head restraint so that it is as close as possibleto your head.
Pay attention to the important safety notes
(Y page 101).
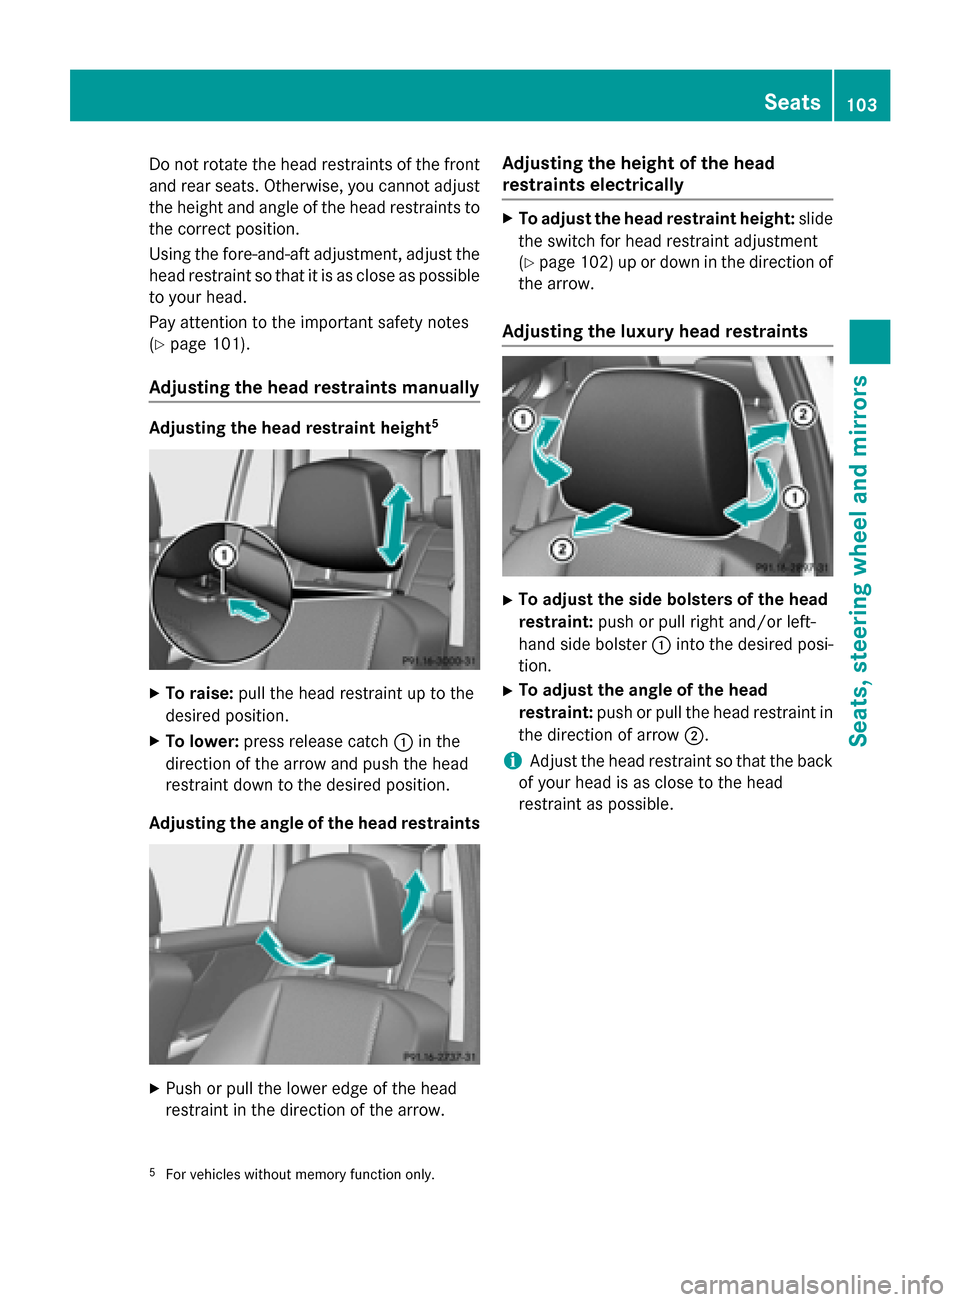
Adjusting the head restraints manually Adjusting the head restraint height
5X
To raise: pull the head restraint up to the
desired position.
X To lower: press release catch 0043in the
direction of the arrow and push the head
restraint down to the desired position.
Adjusting the angle of the head restraints X
Push or pull the lower edge of the head
restraint in the direction of the arrow. Adjusting the height of the head
restraints electrically X
To adjust the head restraint height: slide
the switch for head restraint adjustment
(Y page 102 )up or down in the direction of
the arrow.
Adjusting the luxury head restraints X
To adjust the side bolsters of the head
restraint: push or pull right and/or left-
hand side bolster 0043into the desired posi-
tion.
X To adjust the angle of the head
restraint: push or pull the head restraint in
the direction of arrow 0044.
i Adjust the head restraint so that the back
of your head is as close to the head
restraint as possible.
5 For vehicles without memory function only. Seats
103Seats, steering wheel and mirrors Z
Page 106 of 386
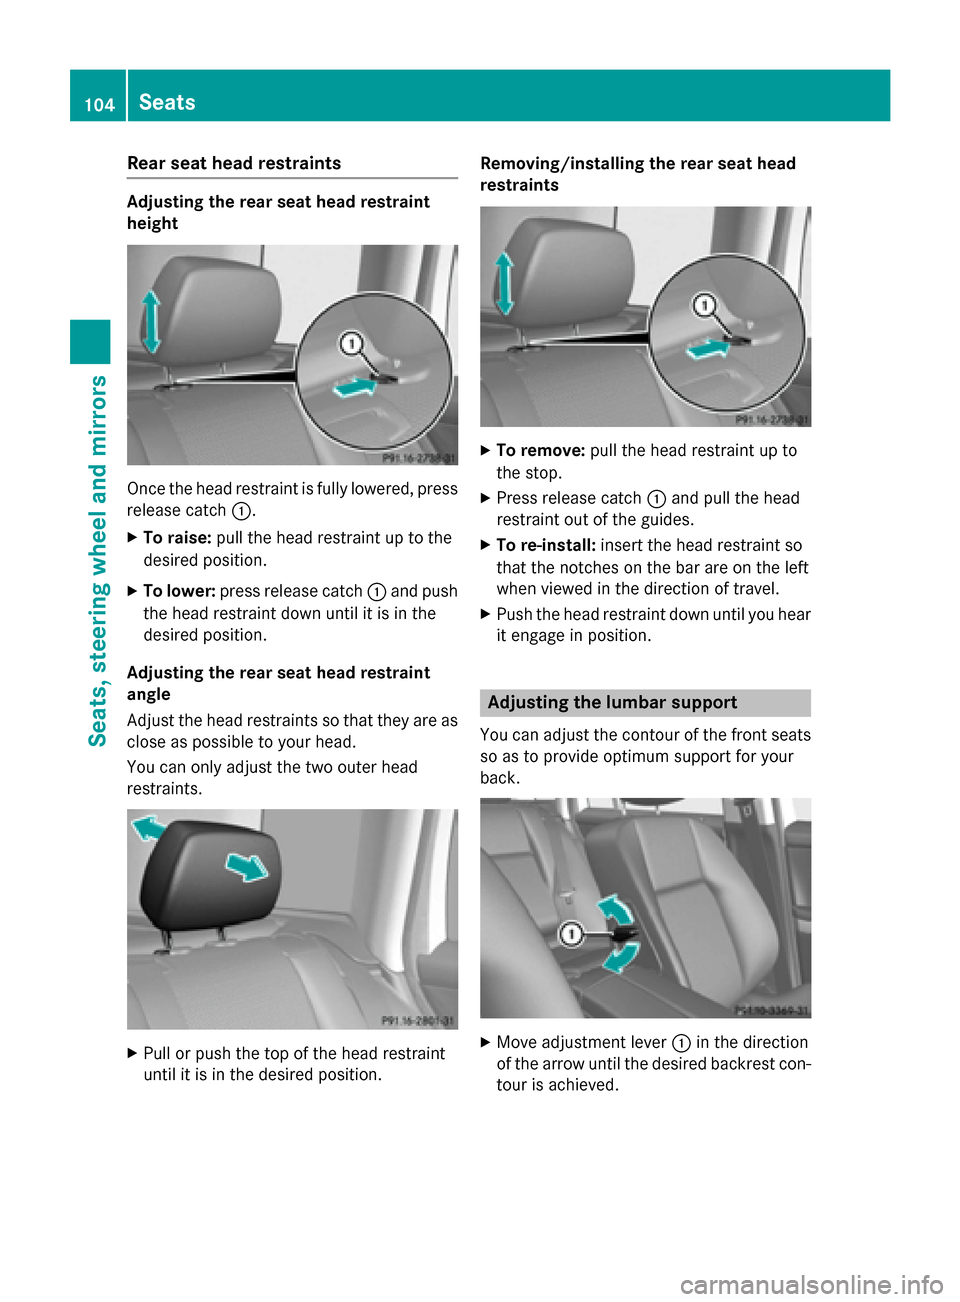
Rear seat head restraints
Adjusting the rear seat head restraint
height
Once the head restraint is fully lowered, press
release catch 0043.
X To raise: pull the head restraint up to the
desired position.
X To lower: press release catch 0043and push
the head restraint down until it is in the
desired position.
Adjusting the rear seat head restraint
angle
Adjust the head restraints so that they are as
close as possible to your head.
You can only adjust the two outer head
restraints. X
Pull or push the top of the head restraint
until it is in the desired position. Removing/installing the rear seat head
restraints X
To remove: pull the head restraint up to
the stop.
X Press release catch 0043and pull the head
restraint out of the guides.
X To re-install: insert the head restraint so
that the notches on the bar are on the left
when viewed in the direction of travel.
X Push the head restraint down until you hear
it engage in position. Adjusting the lumbar support
You can adjust the contour of the front seats so as to provide optimum support for your
back. X
Move adjustment lever 0043in the direction
of the arrow until the desired backrest con- tour is achieved. 104
SeatsSeats, steering wheel and mirrors