sensor MERCEDES-BENZ GLK-CLASS SUV 2015 Owner's Manual
[x] Cancel search | Manufacturer: MERCEDES-BENZ, Model Year: 2015, Model line: GLK-CLASS SUV, Model: MERCEDES-BENZ GLK-CLASS SUV 2015Pages: 386, PDF Size: 26 MB
Page 118 of 386
Useful information
iThis Operator's Manual describes all
models and all standard and optional equip- ment of your vehicle available at the time of
publication of the Operator's Manual.
Country-specific differences are possible.
Please note that your vehicle may not be
equipped with all features described. This
also applies to safety-related systems and
functions.
iRead the information on qualified special-
ist workshops ( Y page 27).
Exterior lighting
General notes
For reasons of safety, Mercedes-Benz recom-
mends that you drive with the lights switchedon even during the daytime. In some coun-
tries, operation of the headlamps varies due
to legal requirements and self-imposed obli-
gations.
Setting the exterior lighting
Setting options
Exterior lighting can be set using: R the light switch
R the combination switch ( Y page 118)
R the on-board computer ( Y page 231)
Light switch
Operation
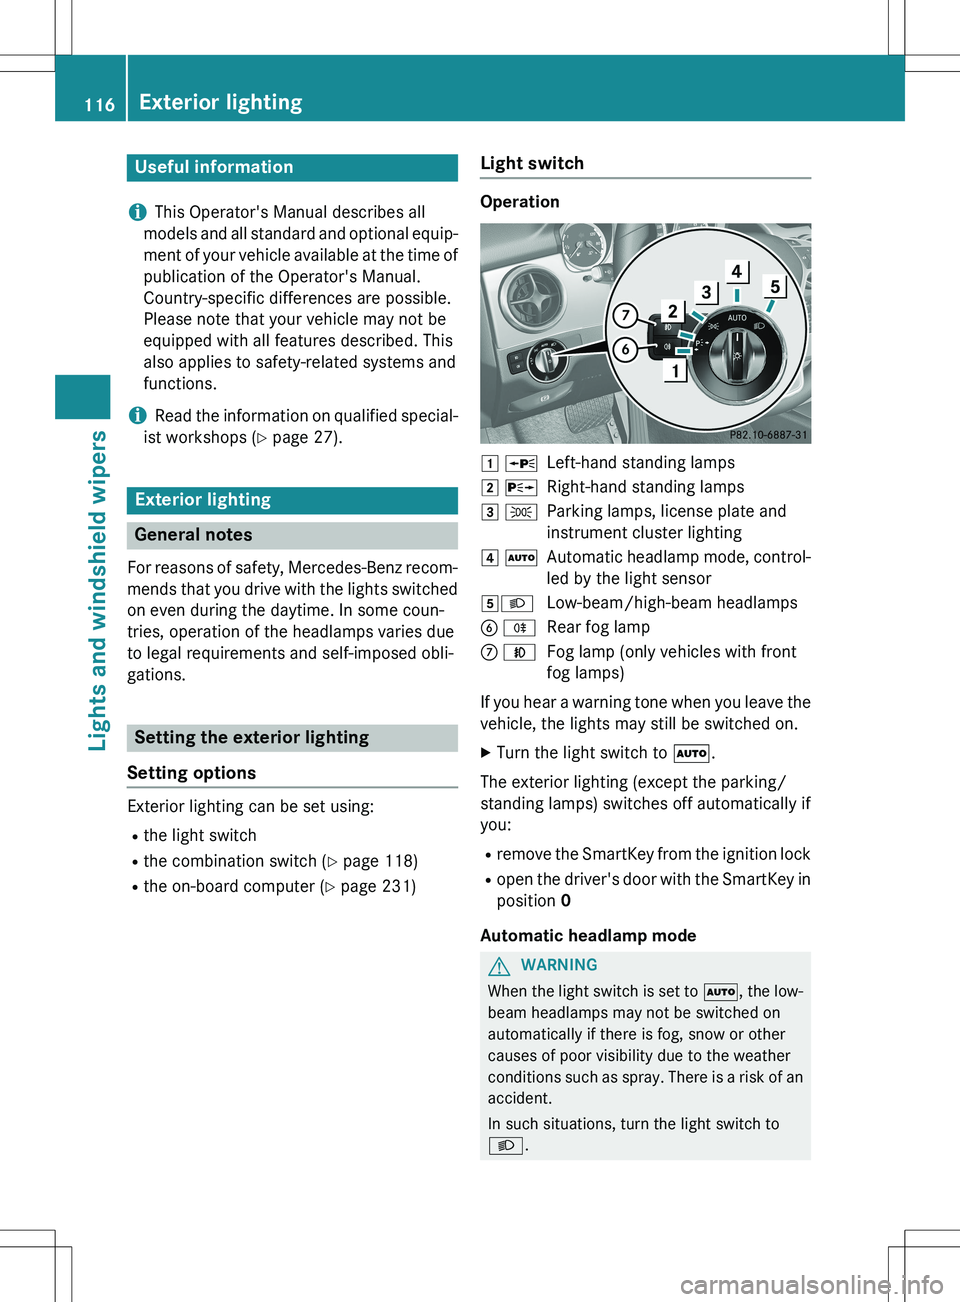
1 WLeft-hand standing lamps
2 XRight-hand standing lamps
3 TParking lamps, license plate and
instrument cluster lighting
4 ÃAutomatic headlamp mode, control-
led by the light sensor
5 LLow-beam/high-beam headlamps
B RRear fog lamp
C NFog lamp (only vehicles with front
fog lamps)
If you hear a warning tone when you leave the
vehicle, the lights may still be switched on. X Turn the light switch to Ã.
The exterior lighting (except the parking/
standing lamps) switches off automatically if
you: R remove the SmartKey from the ignition lock
R open the driver's door with the SmartKey in
position 0
Automatic headlamp mode
GWARNING
When the light switch is set to Ã, the low-
beam headlamps may not be switched on
automatically if there is fog, snow or other
causes of poor visibility due to the weather
conditions such as spray. There is a risk of an
accident.
In such situations, turn the light switch to L .
116Exterior lighting
Lights and windshield wipers
Page 119 of 386
The automatic headlamp feature is only an
aid. The driver is responsible for the vehicle'slighting at all times. Ã is the favored light switch setting. The
light setting is automatically selected accord- ing to the brightness of the ambient light
(exception: poor visibility due to weather con-
ditions such as fog, snow or spray):
R SmartKey in position 1 in the ignition lock:
the parking lamps are switched on or off
automatically depending on the brightness
of the ambient light.
R With the engine running: if you have acti-
vated the "Daytime running lamps" func-
tion via the on-board computer, the day-
time running lamps or the parking lamps
and the low-beam headlamps are switched
on or off automatically depending on the
brightness of the ambient light.
X To switch on automatic headlamp
mode: turn the light switch to Ã.
Canada only:
The daytime running lamps improve the visi-
bility of your vehicle during the day. The day-
time running lamps function is required by law in Canada. It cannot therefore be deactivated.
When the engine is running and the vehicle is
stationary: if you move the selector lever from
a drive position to P, the daytime running
lamps/low-beam headlamps go out after
three minutes.
When the engine is running, the vehicle is
stationary and in bright ambient light: if you
turn the light switch to T, the daytime
running lamps and parking lamps switch on.
If the engine is running and you turn the light switch to L, the manual settings take
precedence over the daytime running lamps.
USA only:
The daytime running lamps improve the visi-
bility of your vehicle during the day. To do this,
the daytime running lamps function must be
switched on using the on-board computer
( Y page 231). If the engine is running and you turn the light
switch to T or L , the manual settings
take precedence over the daytime running
lamps.
Low-beam headlamps
GWARNING
When the light switch is set to Ã, the low-
beam headlamps may not be switched on
automatically if there is fog, snow or other
causes of poor visibility due to the weather
conditions such as spray. There is a risk of an
accident.
In such situations, turn the light switch to L .
Even if the light sensor does not detect that it is dark, the parking lamps and low-beam
headlamps switch on when the ignition is
switched on and the light switch is set to the L position. This is a particularly useful
function in the event of rain and fog. X To switch on the low-beam headlamps:
turn the SmartKey in the ignition lock to
position 2 or start the engine.
X Turn the light switch to L.
The green L indicator lamp in the instru-
ment cluster lights up.
Front fog lamps
In conditions where visibility is poor due to
fog, snow or rain, the fog lamps improve vis-
ibility as well as making it easier for other road
users to see you. They can be operated
together with the parking lamps or together
with the parking lamps and low-beam head-
lamps. X To switch on the front fog lamps: turn
the SmartKey in the ignition lock to position
2 or start the engine.
X Turn the light switch to L or à .
Exterior lighting117
Lights and windshield wipers
Z
Page 122 of 386
Cornering light function
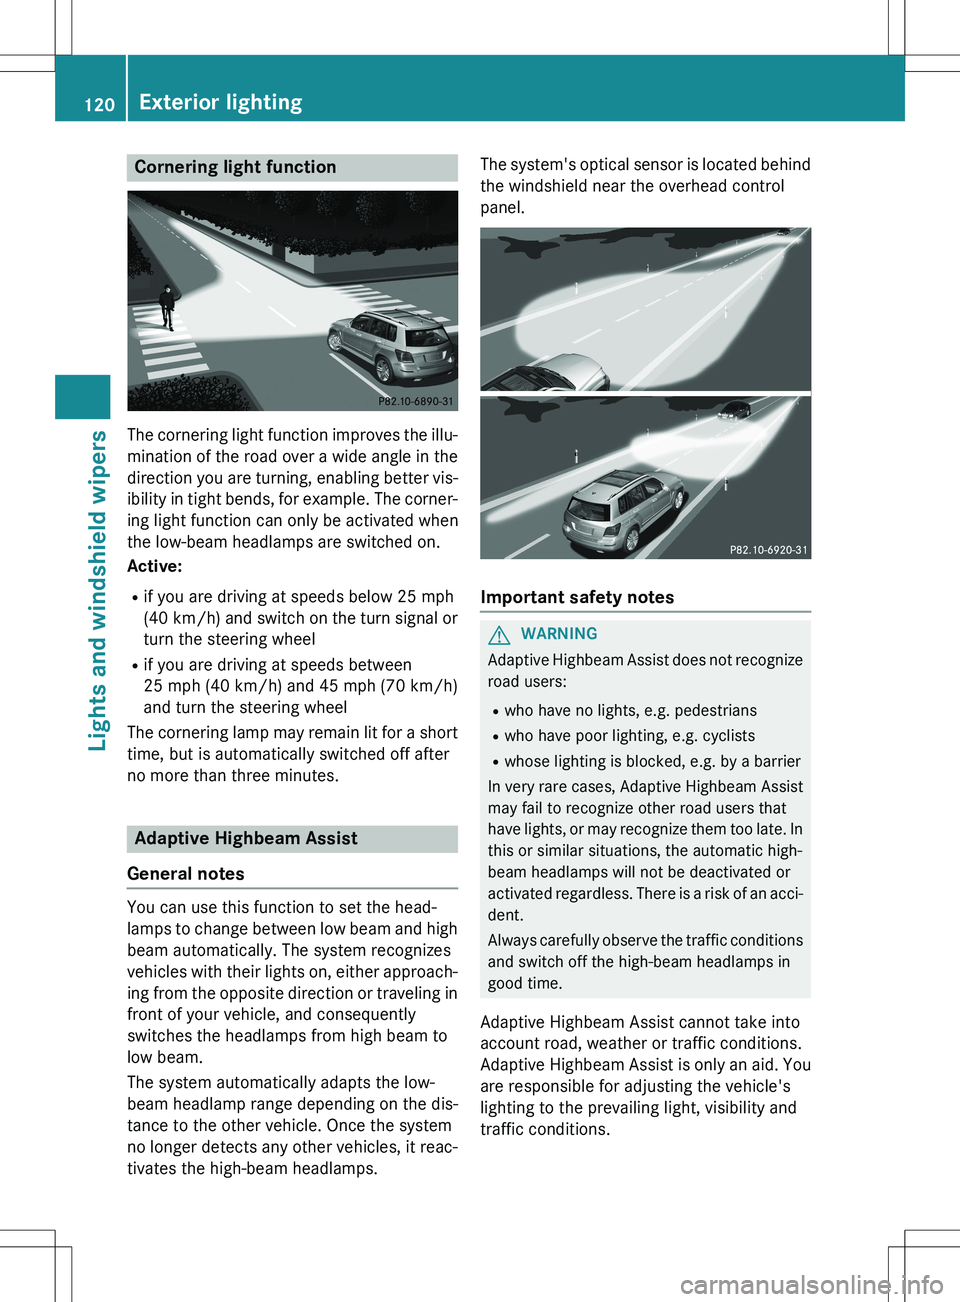
The cornering light function improves the illu-
mination of the road over a wide angle in the direction you are turning, enabling better vis-
ibility in tight bends, for example. The corner- ing light function can only be activated when
the low-beam headlamps are switched on.
Active: R if you are driving at speeds below 25 mph
(40 km/h) and switch on the turn signal or
turn the steering wheel
R if you are driving at speeds between
25 mph (40 km/h) and 45 mph (70 km/h)
and turn the steering wheel
The cornering lamp may remain lit for a short
time, but is automatically switched off after
no more than three minutes.
Adaptive Highbeam Assist
General notes
You can use this function to set the head-
lamps to change between low beam and high beam automatically. The system recognizes
vehicles with their lights on, either approach-
ing from the opposite direction or traveling in front of your vehicle, and consequently
switches the headlamps from high beam to
low beam.
The system automatically adapts the low-
beam headlamp range depending on the dis-
tance to the other vehicle. Once the system
no longer detects any other vehicles, it reac-
tivates the high-beam headlamps. The system's optical sensor is located behind
the windshield near the overhead control
panel.
Important safety notes
GWARNING
Adaptive Highbeam Assist does not recognize road users:
R who have no lights, e.g. pedestrians
R who have poor lighting, e.g. cyclists
R whose lighting is blocked, e.g. by a barrier
In very rare cases, Adaptive Highbeam Assist
may fail to recognize other road users that
have lights, or may recognize them too late. In this or similar situations, the automatic high-
beam headlamps will not be deactivated or
activated regardless. There is a risk of an acci-
dent.
Always carefully observe the traffic conditions and switch off the high-beam headlamps in
good time.
Adaptive Highbeam Assist cannot take into
account road, weather or traffic conditions.
Adaptive Highbeam Assist is only an aid. You are responsible for adjusting the vehicle's
lighting to the prevailing light, visibility and
traffic conditions.
120Exterior lighting
Lights and windshield wipers
Page 123 of 386
In particular, the detection of obstacles can
be restricted if there is: Rpoor visibility, e.g. due to fog, heavy rain or
snow
R dirt on the sensors or the sensors are
obscured
Switching Adaptive Highbeam Assist
on/off
XTo activate: turn the light switch to Ã.
X Press the combination switch beyond the
pressure point in the direction of arrow :
( Y page 118).
The _ indicator lamp in the multifunc-
tion display lights up if it is dark and the
light sensor activates the low-beam head-
lamps.
If you are driving at speeds above approx-
imately 28 mph (45 km/h):
The headlamp range is set automatically
depending on the distance between the
vehicle and other road users.
If you are driving at speeds above approx-
imately 35 mph (55 km/h) and no other
road users have been detected:
The high-beam headlamps are switched on
automatically. The K indicator lamp in
the instrument cluster also lights up.
If you are driving at speeds below approx-
imately 30 mph (45 km/h) or other road
users have been detected or the roads are adequately lit:
The high-beam headlamps are switched off
automatically. The K indicator lamp in
the instrument cluster goes out. The _
indicator lamp in the multifunction display
remains lit.
X To deactivate: move the combination
switch back to its normal position.
The _ indicator lamp in the multifunc-
tion display goes out.
Headlamps fogged up on the inside
Certain climatic and physical conditions may
cause moisture to form in the headlamp. This moisture does not affect the functionality of
the headlamp.
Interior lighting
Overview of interior lighting
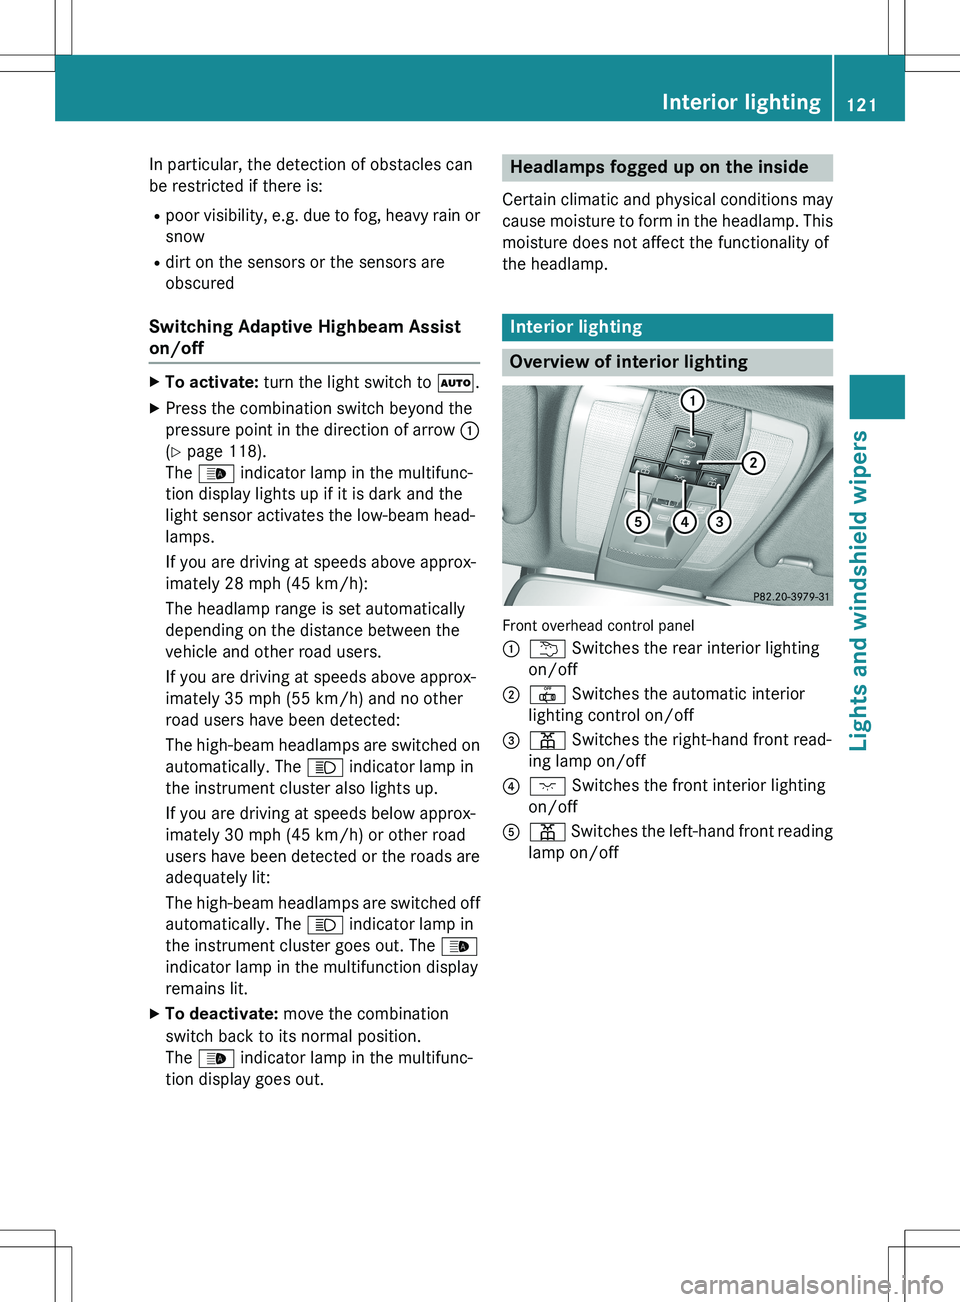
Front overhead control panel :
u Switches the rear interior lighting
on/off
;| Switches the automatic interior
lighting control on/off
=p Switches the right-hand front read-
ing lamp on/off
?c Switches the front interior lighting
on/off
Ap Switches the left-hand front reading
lamp on/off
Interior lighting121
Lights and windshield wipers
Z
Page 128 of 386
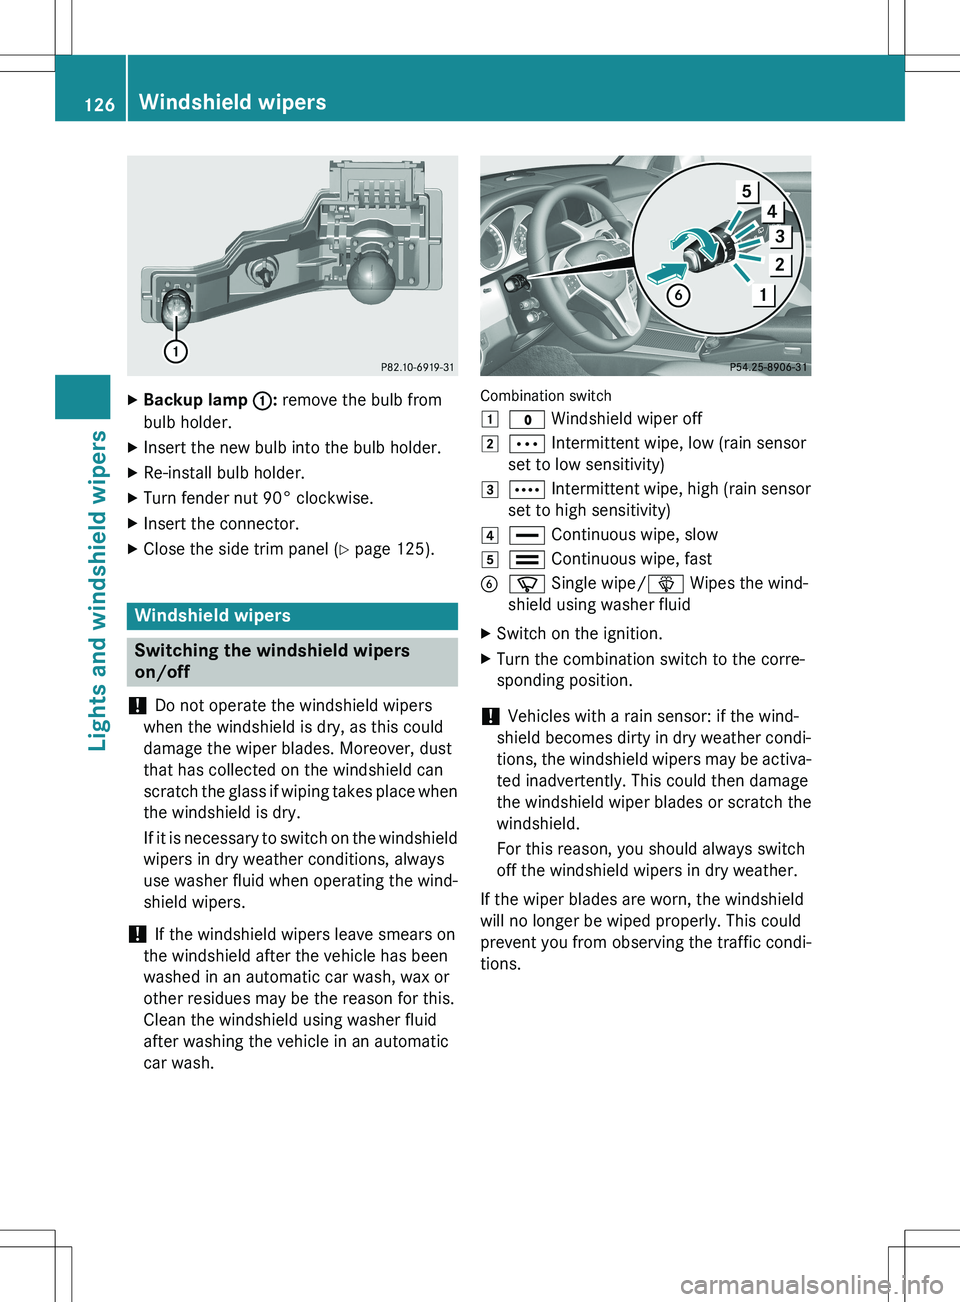
XBackup lamp :: remove the bulb from
bulb holder.
X Insert the new bulb into the bulb holder.
X Re-install bulb holder.
X Turn fender nut 90° clockwise.
X Insert the connector.
X Close the side trim panel ( Y page 125).
Windshield wipers
Switching the windshield wipers
on/off
!
Do not operate the windshield wipers
when the windshield is dry, as this could
damage the wiper blades. Moreover, dust
that has collected on the windshield can
scratch the glass if wiping takes place when the windshield is dry.
If it is necessary to switch on the windshield wipers in dry weather conditions, always
use washer fluid when operating the wind-
shield wipers.
! If the windshield wipers leave smears on
the windshield after the vehicle has been
washed in an automatic car wash, wax or
other residues may be the reason for this.
Clean the windshield using washer fluid
after washing the vehicle in an automatic
car wash.
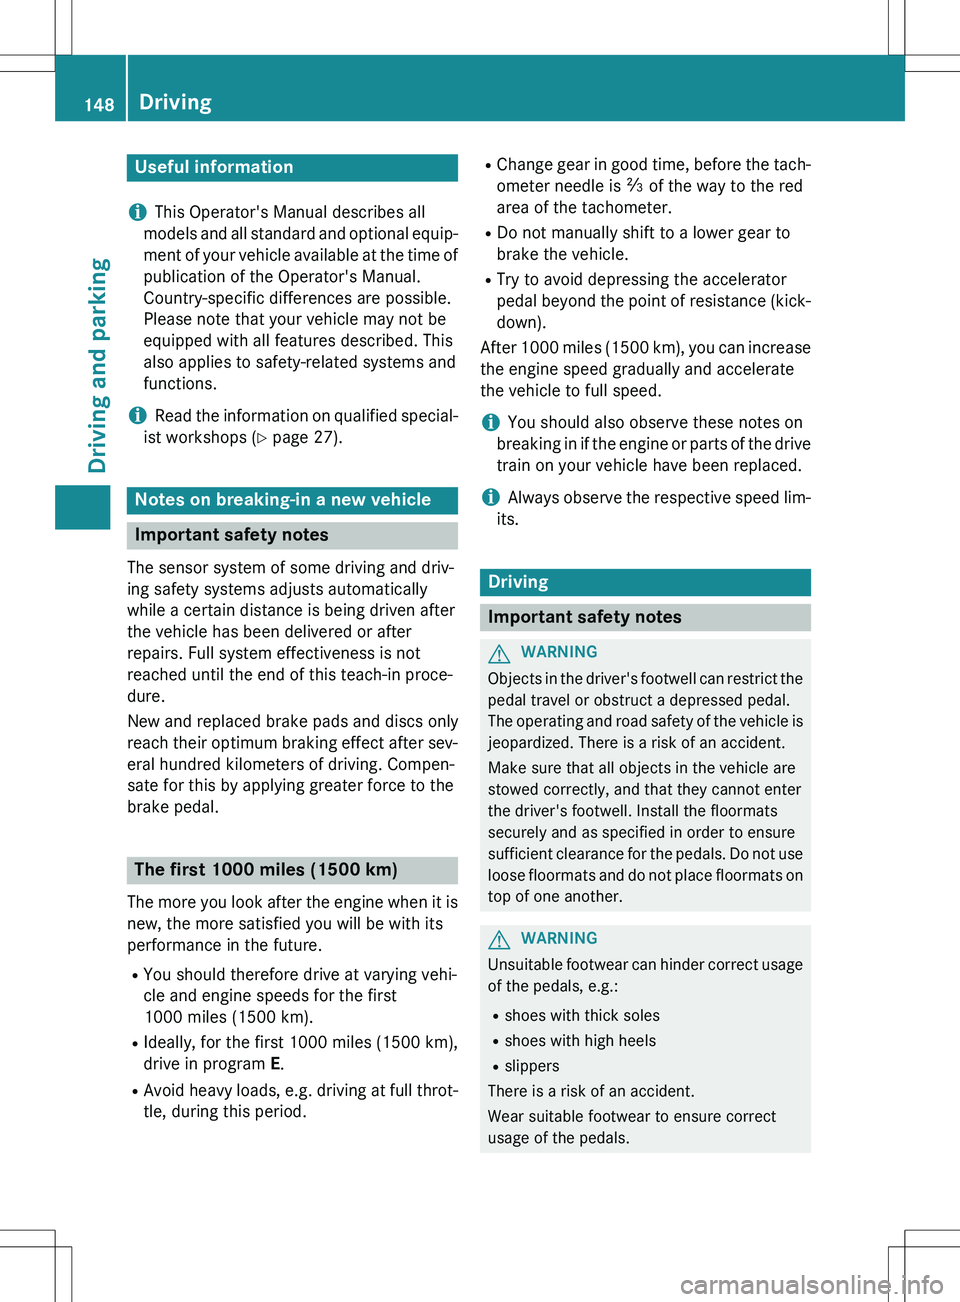
Combination switch 1
$ Windshield wiper off
2Ä Intermittent wipe, low (rain sensor
set to low sensitivity)
3Å Intermittent wipe, high (rain sensor
set to high sensitivity)
4° Continuous wipe, slow
5¯ Continuous wipe, fast
Bí Single wipe/ î Wipes the wind-
shield using washer fluid
X Switch on the ignition.
X Turn the combination switch to the corre-
sponding position.
! Vehicles with a rain sensor: if the wind-
shield becomes dirty in dry weather condi-
tions, the windshield wipers may be activa-
ted inadvertently. This could then damage
the windshield wiper blades or scratch the
windshield.
For this reason, you should always switch
off the windshield wipers in dry weather.
If the wiper blades are worn, the windshield
will no longer be wiped properly. This could
prevent you from observing the traffic condi-
tions.
126Windshield wipers
Lights and windshield wipers
Page 150 of 386
Useful information
iThis Operator's Manual describes all
models and all standard and optional equip- ment of your vehicle available at the time of
publication of the Operator's Manual.
Country-specific differences are possible.
Please note that your vehicle may not be
equipped with all features described. This
also applies to safety-related systems and
functions.
iRead the information on qualified special-
ist workshops ( Y page 27).
Notes on breaking-in a new vehicle
Important safety notes
The sensor system of some driving and driv-
ing safety systems adjusts automatically
while a certain distance is being driven after
the vehicle has been delivered or after
repairs. Full system effectiveness is not
reached until the end of this teach-in proce-
dure.
New and replaced brake pads and discs only
reach their optimum braking effect after sev-
eral hundred kilometers of driving. Compen-
sate for this by applying greater force to the
brake pedal.
The first 1000 miles (1500 km)
The more you look after the engine when it is
new, the more satisfied you will be with its
performance in the future.
R You should therefore drive at varying vehi-
cle and engine speeds for the first
1000 miles (1500 km).
R Ideally, for the first 1000 miles (1500 km),
drive in program E.
R Avoid heavy loads, e.g. driving at full throt-
tle, during this period. R
Change gear in good time, before the tach-
ometer needle is Ô of the way to the red
area of the tachometer.
R Do not manually shift to a lower gear to
brake the vehicle.
R Try to avoid depressing the accelerator
pedal beyond the point of resistance (kick-
down).
After 1000 miles (1500 km), you can increase
the engine speed gradually and accelerate
the vehicle to full speed.
iYou should also observe these notes on
breaking in if the engine or parts of the drive train on your vehicle have been replaced.
iAlways observe the respective speed lim-
its.
Driving
Important safety notes
GWARNING
Objects in the driver's footwell can restrict the pedal travel or obstruct a depressed pedal.
The operating and road safety of the vehicle is
jeopardized. There is a risk of an accident.
Make sure that all objects in the vehicle are
stowed correctly, and that they cannot enter
the driver's footwell. Install the floormats
securely and as specified in order to ensure
sufficient clearance for the pedals. Do not use loose floormats and do not place floormats on
top of one another.
GWARNING
Unsuitable footwear can hinder correct usage of the pedals, e.g.:
R shoes with thick soles
R shoes with high heels
R slippers
There is a risk of an accident.
Wear suitable footwear to ensure correct
usage of the pedals.
148Driving
Driving and parking
Page 179 of 386
If DISTRONIC PLUS detects a slower-moving
vehicle in front, your vehicle is braked in order
to maintain the preset distance to the vehicle in front.
GWARNING
DISTRONIC PLUS does not react to:
R people or animals
R stationary obstacles on the road, e.g. stop-
ped or parked vehicles
R oncoming and crossing traffic
As a result, DISTRONIC PLUS may neither give
warnings nor intervene in such situations.
There is a risk of an accident.
Always pay careful attention to the traffic sit- uation and be ready to brake.
GWARNING
DISTRONIC PLUS cannot always clearly iden-tify other road users and complex traffic sit-
uations.
In such cases, DISTRONIC PLUS may:
R give an unnecessary warning and then
brake the vehicle
R neither give a warning nor intervene
R accelerate or brake unexpectedly
There is a risk of an accident.
Continue to drive carefully and be ready to
brake, in particular when warned to do so by
DISTRONIC PLUS.
GWARNING
DISTRONIC PLUS brakes your vehicle with up to 40% of the maximum braking force. If this
braking force is insufficient, DISTRONIC PLUS
warns you visually and audibly. There is a risk
of an accident.
In such cases, apply the brakes yourself and
try to take evasive action.
! If DISTRONIC PLUS or the HOLD function
is activated, the vehicle brakes automati-
cally in certain situations. To prevent dam-
age to the vehicle, deactivate DISTRONIC
PLUS and the HOLD function in the follow- ing or other similar situations:
R when towing the vehicle
R in the car wash
If you fail to adapt your driving style,
DISTRONIC PLUS can neither reduce the risk
of accident nor override the laws of physics.
DISTRONIC PLUS cannot take into account
the road, traffic and weather conditions.
DISTRONIC PLUS is only an aid. You are
responsible for the distance to the vehicle in
front, for vehicle speed, for braking in good
time and for staying in your lane.
Do not use DISTRONIC PLUS:
R in road and traffic conditions which do not
allow you to maintain a constant speed e.g.
in heavy traffic or on winding roads
R on slippery road surfaces. Braking or accel-
erating could cause the drive wheels to lose
traction and the vehicle could then skid
R when there is poor visibility, e.g. due to fog,
heavy rain or snow
DISTRONIC PLUS may not detect narrow
vehicles driving in front, e.g. motorcycles, or
vehicles driving on a different line.
In particular, the detection of obstacles can
be impaired if:
R there is dirt on the sensors or anything else
covering the sensors
R there is snow or heavy rain
R there is interference by other radar sources
R there are strong radar reflections, for
example, in parking garages
If DISTRONIC PLUS no longer detects a vehi- cle in front, DISTRONIC PLUS may unexpect-
edly accelerate the vehicle to the stored
speed.
Driving systems177
Driving and parking
Z
Page 180 of 386
This speed may:
R be too high if you are driving in a filter lane
or an exit lane
R be so high when driving in the right-hand
lane that you overtake vehicles in the left-
hand lane
R be so high when driving in the left-hand lane
that you overtake vehicles in the right-hand
lane
If there is a change of drivers, advise the new driver of the speed stored.
If there is no vehicle in front, DISTRONIC
PLUS operates in the same way as cruise
control in the speed range between 20 mph
(Canada: 30 km/h) and 120 mph (Canada:
200 km/h). If a vehicle is driving in front of
you, it operates in the speed range between
0 mph (0 km/h) and 120 mph (Canada:
200 km/h).
Do not use DISTRONIC PLUS while driving onroads with steep gradients.
As DISTRONIC PLUS transmits radar waves, it
can resemble the radar detectors of the
responsible authorities. You can refer to the
relevant chapter in the Operator's Manual if
questions are asked about this.
iUSA only:
This device has been approved by the FCC as a "Vehicular Radar System". The radar
sensor is intended for use in an automotive
radar system only. Removing, tampering
with, or altering the device will void any
warranties, and is not permitted by the
FCC. Do not tamper with, alter, or use in
any non-approved way.
Any unauthorized modification to this
device could void the user’s authority to
operate the equipment.
iCanada only: This device complies with
RSS-210 of Industry Canada. Operation is
subject to the following two conditions:
1. This device may not cause harmful inter-
ference, and 2. This device must accept any interference
received, including interference that may
cause undesired operation of the device.
Removal, tampering, or altering of the
device will void any warranties, and is not
permitted. Do not tamper with, alter, or use in any non-approved way.
Any unauthorized modification to this
device could void the user's authority to
operate the equipment.
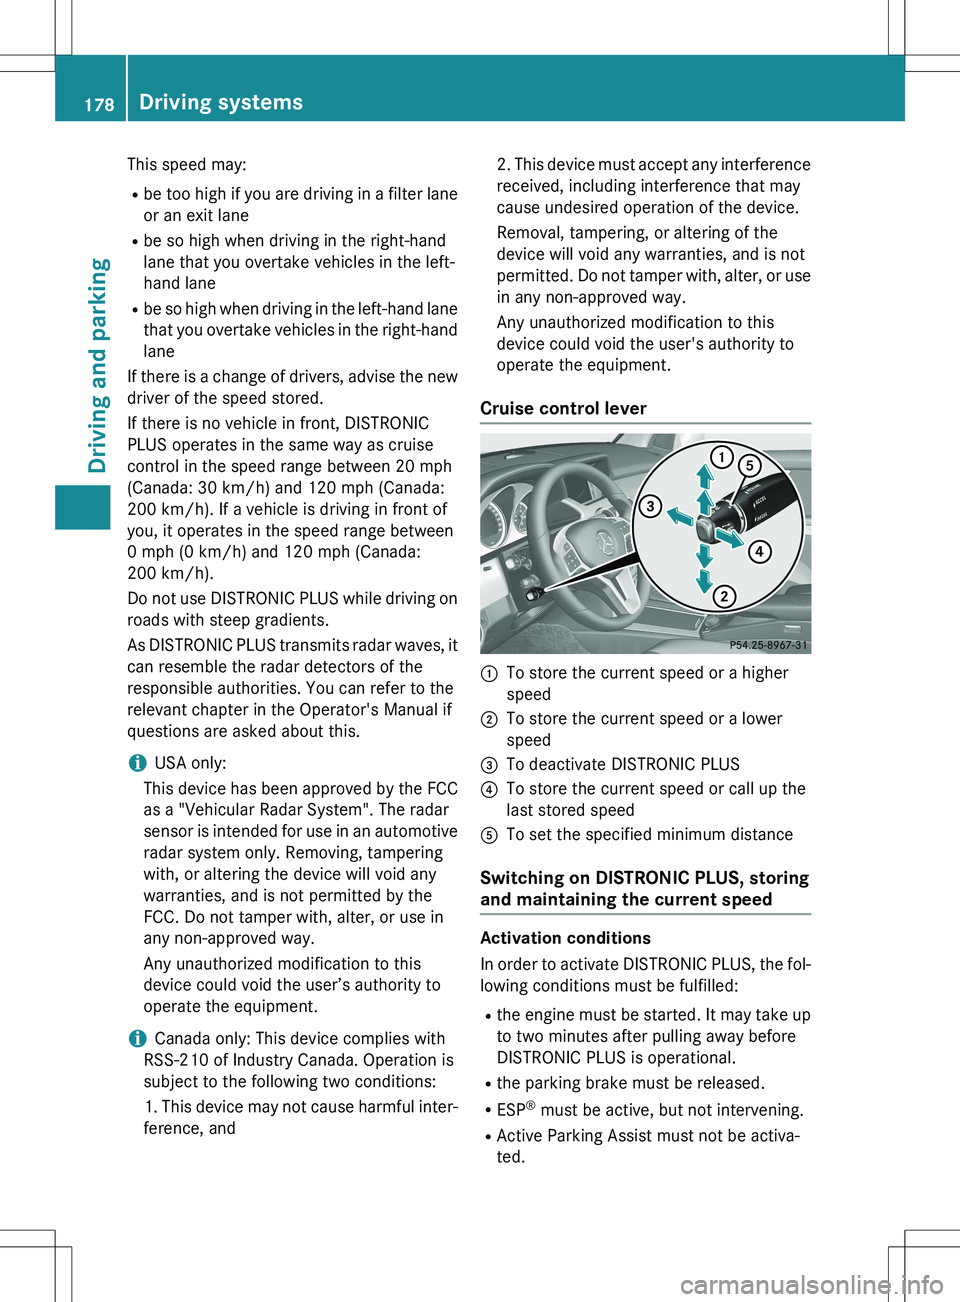
Cruise control lever
:To store the current speed or a higher
speed
;To store the current speed or a lower
speed
=To deactivate DISTRONIC PLUS
?To store the current speed or call up the
last stored speed
ATo set the specified minimum distance
Switching on DISTRONIC PLUS, storing
and maintaining the current speed
Activation conditions
In order to activate DISTRONIC PLUS, the fol-
lowing conditions must be fulfilled:
R the engine must be started. It may take up
to two minutes after pulling away before
DISTRONIC PLUS is operational.
R the parking brake must be released.
R ESP ®
must be active, but not intervening.
R Active Parking Assist must not be activa-
ted.
178Driving systems
Driving and parking
Page 188 of 386
iIn wintry driving conditions, the maximum
effect of 4MATIC can only be achieved if
you use winter tires (M+S tires), with snow
chains if necessary.
! When testing the parking brake, operate
the vehicle only briefly (for a maximum of
ten seconds) on a brake test dynamometer. When doing this, turn the SmartKey to posi-
tion 0 or 1 in the ignition. Failure to do this
can cause damage to the drive train or the brake system.
! A function or performance test should
only be carried out on a two-axle dyna-
mometer. Before you operate the vehicle
on such a dynamometer, please consult a
qualified workshop. You could otherwise
damage the drive train or the brake system.
PARKTRONIC
Important safety notes
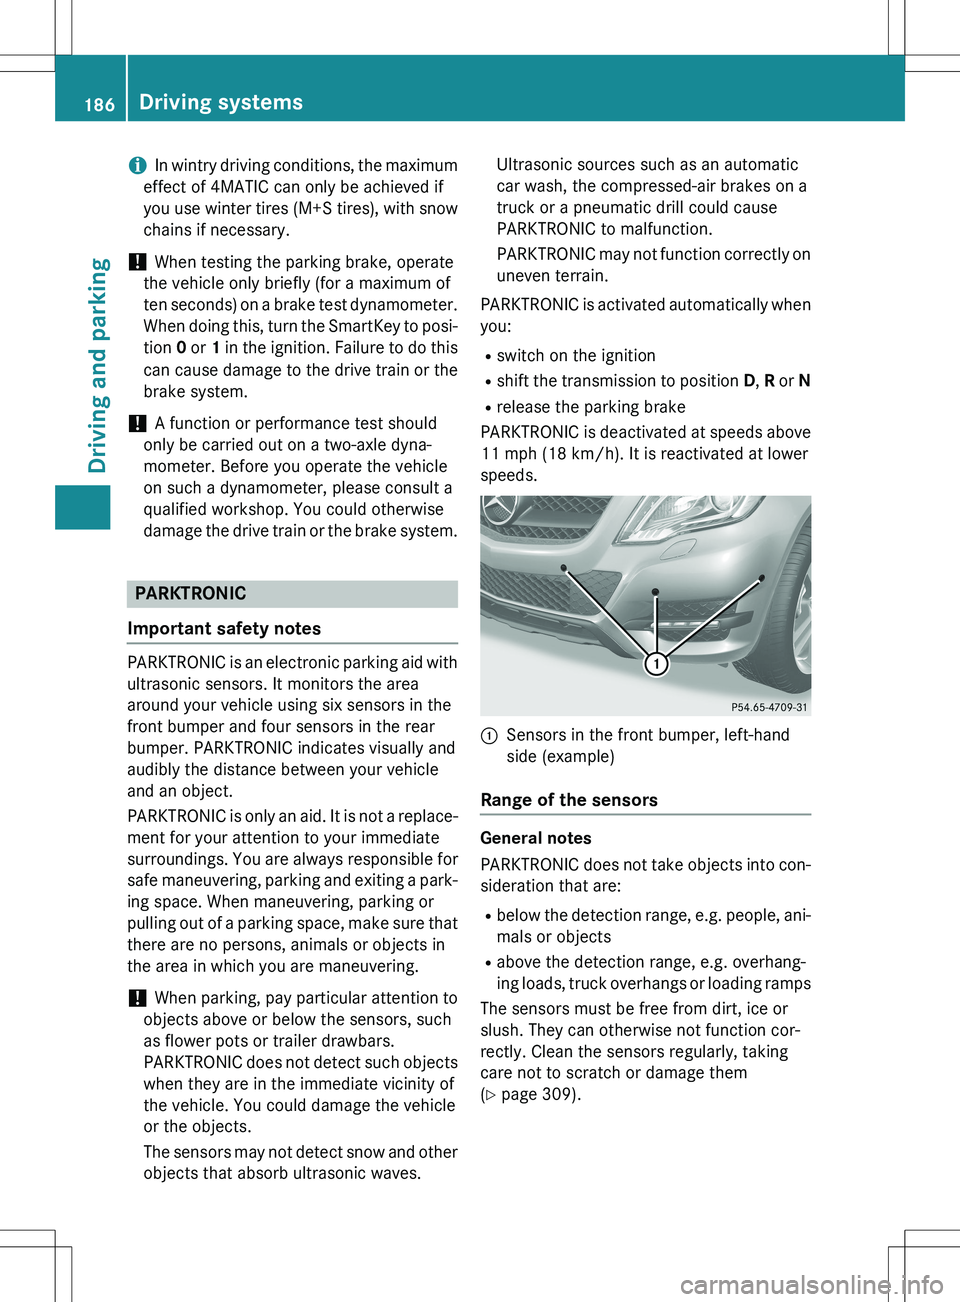
PARKTRONIC is an electronic parking aid with ultrasonic sensors. It monitors the area
around your vehicle using six sensors in the
front bumper and four sensors in the rear
bumper. PARKTRONIC indicates visually and
audibly the distance between your vehicle
and an object.
PARKTRONIC is only an aid. It is not a replace-
ment for your attention to your immediate
surroundings. You are always responsible for
safe maneuvering, parking and exiting a park-
ing space. When maneuvering, parking or
pulling out of a parking space, make sure that there are no persons, animals or objects in
the area in which you are maneuvering.
! When parking, pay particular attention to
objects above or below the sensors, such
as flower pots or trailer drawbars.
PARKTRONIC does not detect such objects
when they are in the immediate vicinity of
the vehicle. You could damage the vehicle
or the objects.
The sensors may not detect snow and other
objects that absorb ultrasonic waves. Ultrasonic sources such as an automatic
car wash, the compressed-air brakes on a
truck or a pneumatic drill could cause
PARKTRONIC to malfunction.
PARKTRONIC may not function correctly on
uneven terrain.
PARKTRONIC is activated automatically when you:
R switch on the ignition
R shift the transmission to position D, R or N
R release the parking brake
PARKTRONIC is deactivated at speeds above
11 mph (18 km/h). It is reactivated at lower
speeds.
:Sensors in the front bumper, left-hand
side (example)
Range of the sensors
General notes
PARKTRONIC does not take objects into con-
sideration that are:
R below the detection range, e.g. people, ani-
mals or objects
R above the detection range, e.g. overhang-
ing loads, truck overhangs or loading ramps
The sensors must be free from dirt, ice or
slush. They can otherwise not function cor-
rectly. Clean the sensors regularly, taking
care not to scratch or damage them
( Y page 309).
186Driving systems
Driving and parking
Page 189 of 386
Side view
Top view
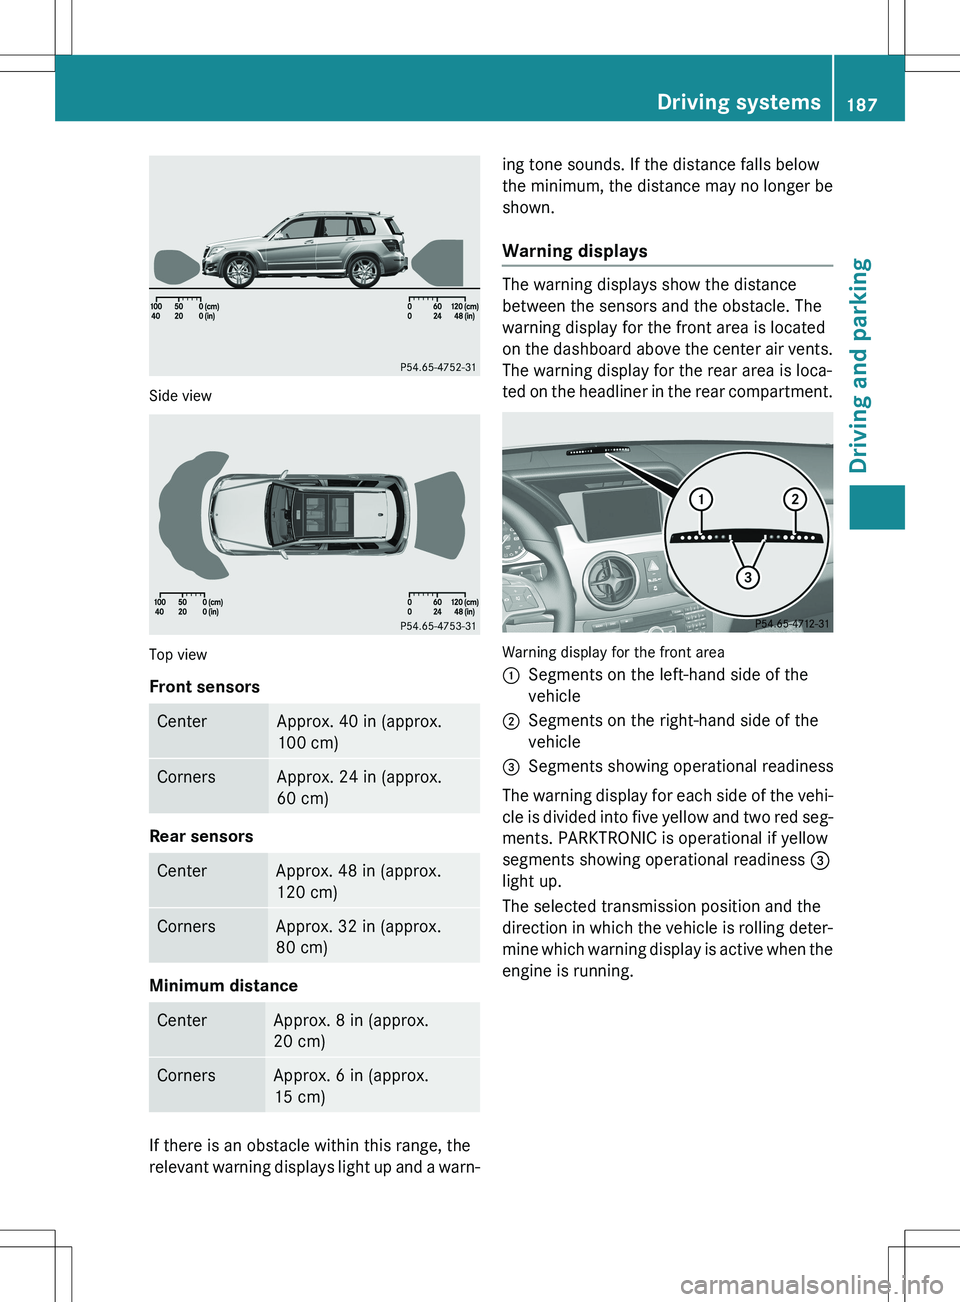
Front sensors
CenterApprox. 40 in (approx.
100 cm)
CornersApprox. 24 in (approx.
60 cm)
Rear sensors
CenterApprox. 48 in (approx.
120 cm)
CornersApprox. 32 in (approx.
80 cm)
Minimum distance
CenterApprox. 8 in (approx.
20 cm)
CornersApprox. 6 in (approx.
15 cm)
If there is an obstacle within this range, the
relevant warning displays light up and a warn-ing tone sounds. If the distance falls below
the minimum, the distance may no longer be
shown.
Warning displays
The warning displays show the distance
between the sensors and the obstacle. The
warning display for the front area is located
on the dashboard above the center air vents.
The warning display for the rear area is loca-
ted on the headliner in the rear compartment.
Warning display for the front area :
Segments on the left-hand side of the
vehicle
;Segments on the right-hand side of the
vehicle
=Segments showing operational readiness
The warning display for each side of the vehi-
cle is divided into five yellow and two red seg- ments. PARKTRONIC is operational if yellow
segments showing operational readiness =
light up.
The selected transmission position and the
direction in which the vehicle is rolling deter-
mine which warning display is active when the engine is running.
Driving systems187
Driving and parking
Z