seat memory MERCEDES-BENZ GLK-CLASS SUV 2015 Owners Manual
[x] Cancel search | Manufacturer: MERCEDES-BENZ, Model Year: 2015, Model line: GLK-CLASS SUV, Model: MERCEDES-BENZ GLK-CLASS SUV 2015Pages: 386, PDF Size: 26 MB
Page 12 of 386
Engine jump startingsee Jump starting (engine)
Engine oil
Adding ........................................... 30 2
Additives ........................................ 377
Checking the oil level ..................... 301
Checking the oil level using the
dipstick .......................................... 30 1
Display message ............................ 248
Filling capacity ............................... 377
Notes about oil grades ................... 377
Notes on oil level/consumption .... 301
Viscosity ........................................ 377
ESP ®
(Electronic Stability Pro-
gram)
Deactivating/activating ................... 71
Display message ............................ 236
ETS/4ETS ........................................ 70
Function/notes ................................ 70
General notes .................................. 70
Important safety information ........... 71
Trailer stabilization ........................... 72
Warning lamp ................................. 264
ETS/4ETS (Electronic Traction Sys-
tem) ................................................... ... 70
Exhaust check ................................... 170
Exhaust tail pipe (cleaning instruc-
tions) .................................................. 3 09
Exterior lighting
Setting options .............................. 116
see Lights
Exterior mirrors
Adjusting ....................................... 109
Dipping (automatic) ....................... 110
Folding in when locking (on-boardcomputer) ...................................... 233
Folding in/out (automatically) ....... 110
Folding in/out (electrically) ........... 110
Out of position (troubleshooting) ... 110
Setting ........................................... 1 10
Storing settings (memory func-
tion) .............................................. . 112
Storing the parking position .......... 111
F
Filler cap
see Fuel filler flap Flat tire
MOExtended tires .......................... 315
Preparing the vehicle ..................... 314
TIREFIT kit ...................................... 316
see Emergency spare wheel
Floormats ........................................... 298
Fog lamps
Switching on/off ........................... 117
Folding the rear bench seat for-
wards/back ....................................... 276
Fording
On flooded roads ........................... 174
Front fog lamps
Switching on/off ........................... 117
Fuel
Additives ........................................ 375
Consumption statistics .................. 223
Displaying the current consump-
tion ............................................... . 224
Displaying the range ...................... 224
Driving tips .................................... 170
Fuel gauge ....................................... 33
Grade (gasoline) ............................ 374
Important safety notes .................. 373
Premium-grade unleaded gaso-
line ............................................... .. 374
Problem (malfunction) ................... 165
Quality (diesel) ............................... 375
Refueling ........................................ 16 2
Tank content/reserve fuel ............. 374
Fuel filler flap
Opening ......................................... 164
Fuel filter (display message) ............ 249
Fuel level
Calling up the range (on-board
computer) ...................................... 224
Fuel tank
Capacity ........................................ 374
Problem (malfunction) ................... 165
Fuse allocation chart (vehicle tool
kit) ................................................... ... 314
Fuses
Allocation chart ............................. 328
Before changing ............................. 328
Dashboard fuse box ....................... 328
Fuse box in the cargo compart-
ment .............................................. 3 29
10Index
Page 18 of 386
Safety systemsee Driving safety systems
Seat belts
Adjusting the driver's and front-
passenger seat belt ......................... 59
Adjusting the height ......................... 59
Belt force limiters ............................ 60
center rear-compartment seat ......... 59
Cleaning ......................................... 31 2
Correct usage .................................. 57
Emergency Tensioning Devices ........ 60
Fastening ......................................... 58
Important safety guidelines ............. 56
Releasing ......................................... 59
Safety guidelines ............................. 43
Switching belt adjustment on/off
(on-board computer) ...................... 233
Warning lamp ................................. 260
Warning lamp (function) ................... 60
Seats
Adjusting (electrically) ................... 101
Adjusting lumbar support .............. 104
Adjusting the 4-way lumbar sup-
port ............................................... . 104
Adjusting the head restraint .......... 102
Cleaning the cover ......................... 311
Correct driver's seat position ........ 100
Folding the backrest (rear com-
partment) forwards/back .............. 276
Folding the rear bench seat for-
wards/back ................................... 276
Important safety notes .................. 101
Seat heating problem .................... 106
Storing settings (memory func-
tion) .............................................. . 112
Switching seat heating on/off ....... 105
Sensors (cleaning instructions) ....... 309
Service menu (on-board com-
puter) .................................................. 2 30
Service products
Brake fluid ..................................... 377
Coolant (engine) ............................ 378
DEF special additives ..................... 376
Engine oil ....................................... 377
Fuel ............................................... . 373
Important safety notes .................. 373
Refrigerant (air-conditioning sys-
tem) ............................................... 379Washer fluid ................................... 379
Setting the air distribution ............... 140
Setting the airflow ............................ 141
Settings
Factory (on-board computer) ......... 234
On-board computer ....................... 230
Side impact air bag ............................. 47
Side marker lamp (display mes-
sage) ................................................... 245
Side windows
Cleaning ......................................... 30 8
Convenience closing feature ............ 93
Convenience opening feature .......... 93
Important safety information ........... 91
Opening/closing .............................. 92
Problem (malfunction) ..................... 94
Resetting ......................................... 94
Sliding sunroof
see Panorama roof with power
tilt/sliding panel
SmartKey
Changing the battery ....................... 81
Changing the programming ............. 80
Checking the battery ....................... 81
Convenience closing feature ............ 93
Convenience opening feature .......... 93
Display message ............................ 258
Door central locking/unlocking ....... 78
Important safety notes .................... 78
Loss ................................................. 83
Mechanical key ................................ 80
Positions (ignition lock) ................. 149
Problem (malfunction) ..................... 83
Starting the engine ........................ 151
Snow chains ...................................... 335
Sockets
Center console .............................. 285
General notes ................................ 284
Rear compartment ......................... 285
Special seat belt retractor .................. 64
Specialist workshop ............................ 27
Speed, controlling
see Cruise control
Speedometer
Digital ............................................ 224
In the Instrument cluster ................. 33
Segments ...................................... 221
16Index
Page 56 of 386
GWARNING
If the 45 indicator lamp does not illuminate or remains out wi th the weight of a typical 12-
month-old child in a standard child restraint or less, or is unoccupied, on the front-passenger seat,
do not transport a child on the front-passenger seat until the system has b een repaired.
PRE-SAFE® (anticipatory occupant
protection system)
Introduction
PRE-SAFE ®
takes preemptive measures to
protect occupants in certain hazardous sit-
uations.
Important safety notes
! Make sure that there are no objects in the
footwell under or behind the seats when
moving the seats back. There is a risk that
the seats and/or the objects could be dam-
aged.
Despite your vehicle being equipped with the PRE-SAFE ®
system, the possibility of per-
sonal injuries occurring as a result of an acci-
dent cannot be eliminated.
Always adapt your driving style to suit the
prevailing road and weather conditions and
maintain a safe distance from the vehicle in
front. Drive carefully.
Function
PRE-SAFE ®
intervenes:
R in emergency braking situations, e.g. when
BAS is activated.
R in critical driving situations, e.g. when phys-
ical limits are exceeded and the vehicle
understeers or oversteers severely.
R vehicles with the Driving Assistance
package: when BAS PLUS intervenes pow-
erfully or the radar sensor system detects
an imminent danger of collision in certain
situations. If you are driving faster than approximately
20 mph (30 km/h) PRE-SAFE
®
may take the
following measures in these situations:
R the front seat belts are pre-tensioned.
R vehicles with the memory function for
the front-passenger seat: the front-
passenger seat is adjusted if it is in an
unfavorable position.
R if the vehicle skids, the side windows are
closed so that only a small gap remains.
The panorama roof with power tilt/sliding
panel is completely closed.
If the hazardous situation passes without
resulting in an accident, PRE-SAFE ®
slackens
the belt pre-tensioning. All settings made by
PRE-SAFE ®
can then be reversed.
If the seat belt pre-tensioning is not reduced: X Move the seat backrest or seat back
slightly when the vehicle is stationary.
The seat belt pre-tensioning is reduced and
the locking mechanism is released.
The seat-belt adjustment is an integral part of
the PRE-SAFE ®
convenience function. More
information about seat-belt adjustment can
be found under "Seat-belt adjustment"
( Y page 59).
NECK-PRO head restraints/NECK-
PRO luxury head restraints
GWARNING
The function of the head restraint may be
impaired if you:
R attach objects such as coat hangers to the
head restraints, for example
R use head restraint covers
54Occupant safety
Safety
Page 101 of 386

Useful information............................100
Correct driver's seat position ..........100
Seats .................................................. 101
Steering wheel .................................. 106
Mirrors ............................................... 109
Memory function ............................... 112
99
Seats, steering wheel and mirrors
Page 102 of 386
Useful information
iThis Operator's Manual describes all
models and all standard and optional equip- ment of your vehicle available at the time of
publication of the Operator's Manual.
Country-specific differences are possible.
Please note that your vehicle may not be
equipped with all features described. This
also applies to safety-related systems and
functions.
iRead the information on qualified special-
ist workshops ( Y page 27).
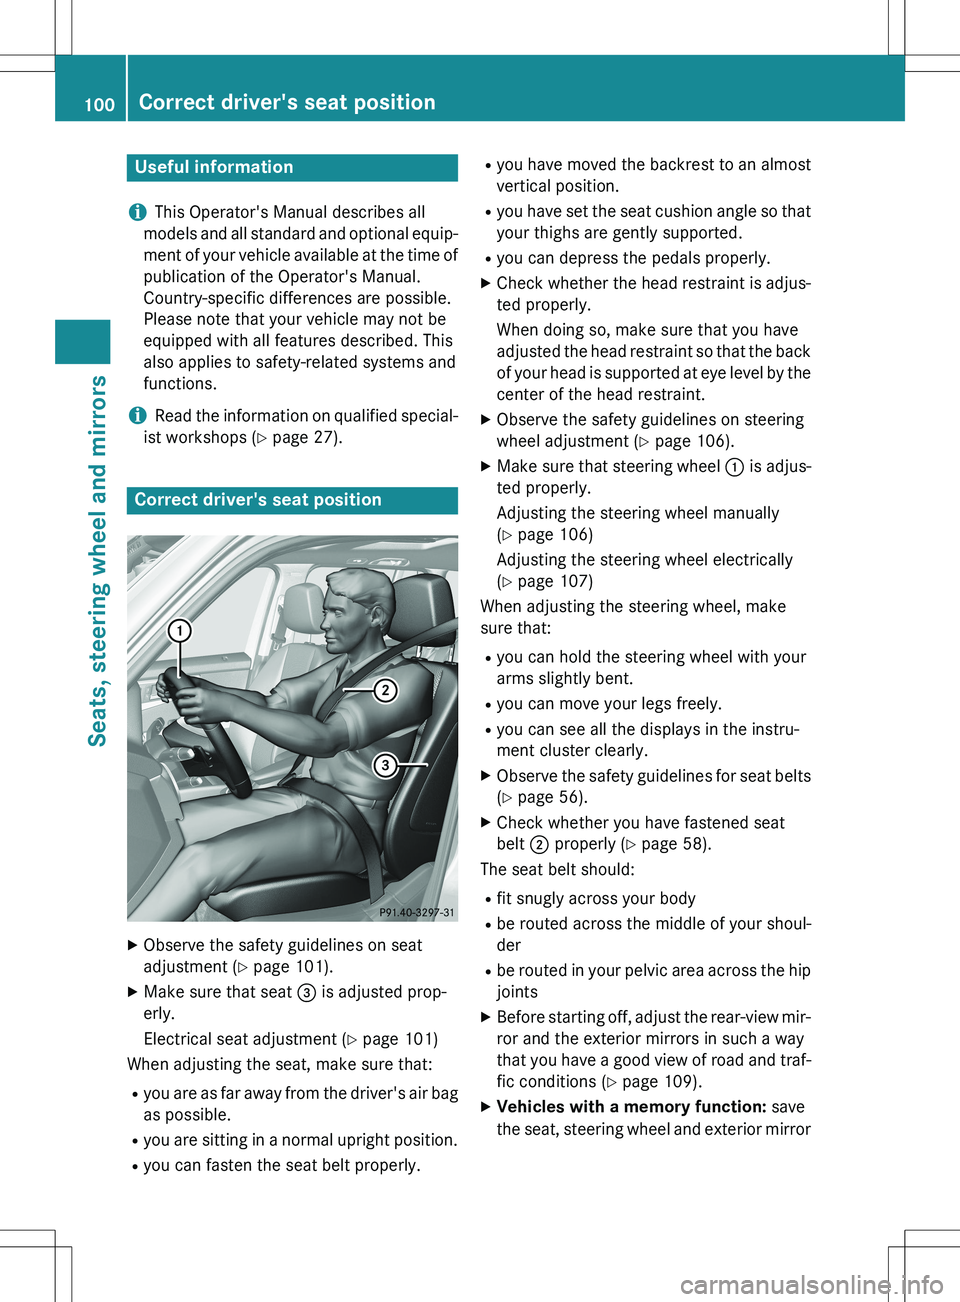
Correct driver's seat position
X
Observe the safety guidelines on seat
adjustment ( Y page 101).
X Make sure that seat = is adjusted prop-
erly.
Electrical seat adjustment ( Y page 101)
When adjusting the seat, make sure that:
R you are as far away from the driver's air bag
as possible.
R you are sitting in a normal upright position.
R you can fasten the seat belt properly. R
you have moved the backrest to an almost
vertical position.
R you have set the seat cushion angle so that
your thighs are gently supported.
R you can depress the pedals properly.
X Check whether the head restraint is adjus-
ted properly.
When doing so, make sure that you have
adjusted the head restraint so that the back of your head is supported at eye level by the
center of the head restraint.
X Observe the safety guidelines on steering
wheel adjustment ( Y page 106).
X Make sure that steering wheel : is adjus-
ted properly.
Adjusting the steering wheel manually
( Y page 106)
Adjusting the steering wheel electrically
( Y page 107)
When adjusting the steering wheel, make
sure that:
R you can hold the steering wheel with your
arms slightly bent.
R you can move your legs freely.
R you can see all the displays in the instru-
ment cluster clearly.
X Observe the safety guidelines for seat belts
( Y page 56).
X Check whether you have fastened seat
belt ; properly ( Y page 58).
The seat belt should:
R fit snugly across your body
R be routed across the middle of your shoul-
der
R be routed in your pelvic area across the hip
joints
X Before starting off, adjust the rear-view mir-
ror and the exterior mirrors in such a way
that you have a good view of road and traf-
fic conditions ( Y page 109).
X Vehicles with a memory function: save
the seat, steering wheel and exterior mirror
100Correct driver's seat position
Seats, steering wheel and mirrors
Page 103 of 386
settings with the memory function
(Y page 112).
Seats
Important safety notes
GWARNING
Children could become trapped if they adjust
the seats, particularly when unattended.
There is a risk of injury.
When leaving the vehicle, always take the
SmartKey with you and lock the vehicle. Neverleave children unsupervised in the vehicle.
The seats can still be adjusted when there is
no SmartKey in the ignition lock.
GWARNING
You could lose control of your vehicle if you do the following while driving:
R adjust the driver's seat, head restraint,
steering wheel or mirrors
R fasten the seat belt
There is a risk of an accident.
Adjust the driver's seat, head restraint, steer-
ing wheel and mirror and fasten your seat belt before starting the engine.
GWARNING
If you adjust the seat height carelessly, you orother vehicle occupants could be trapped and thereby injured. Children in particular could
accidentally press the electrical seat adjust-
ment buttons and become trapped. There is a
risk of injury.
While moving the seats, make sure that your
hands or other body parts do not get under the
lever assembly of the seat adjustment sys-
tem.
GWARNING
When you adjust a seat, you or other vehicle
occupants could become trapped, e.g. on the seat guide rail. There is a risk of injury.
Make sure when adjusting a seat that no onehas any body parts in the sweep of the seat.
Observe the safety notes on "Air bags"
( Y page 44) and "Children in the vehicle" .
! To avoid damage to the seats and the seat
heating, observe the following information:
R keep liquids from spilling on the seats. If
liquid is spilled on the seats, dry them as
soon as possible.
R if the seat covers are damp or wet, do not
switch on the seat heating. The seat
heating should also not be used to dry
the seats.
R clean the seat covers as recommended;
see the "Interior care" section.
R do not transport heavy loads on the
seats. Do not place sharp objects on the
seat cushions, e.g. knives, nails or tools. The seats should only be occupied by
passengers, if possible.
R when the seat heating is in operation, do
not cover the seats with insulating mate-
rials, e.g. blankets, coats, bags, seat cov- ers, child seats or booster seats.
! Make sure that there are no objects in the
footwell under or behind the seats when
moving the seats back. There is a risk that
the seats and/or the objects could be dam- aged.
iThe rear-compartment head restraints
can be removed ( Y page 104).
For more information, contact a qualified
specialist workshop.
iFurther related subjects:
R Cargo compartment enlargement (fold-
ing down the rear bench seat)
(Y page 276)
Adjusting the seats
iVehicles without Memory function: the
seats can be adjusted within three minutes
of a front door being opened.
Seats101
Seats, steering wheel and mirrors
Z
Page 104 of 386

The time period starts over again if, within
these three minutes, you:R open or close a front door
R insert the SmartKey into the ignition lock
or remove it from the ignition lock
R switch the ignition on or off
If the SmartKey is in position 2 in the igni-
tion lock ( Y page 149), the seats can be
adjusted at any time.
Depending on the equipment, the seat adjust-
ment buttons are either located on the side of the seat or on the door control panel.
:Seat cushion angle
;Seat height
=Seat fore-and-aft adjustment
?Backrest angle
:Seat cushion angle
;Seat height
=Seat fore-and-aft adjustment
?Backrest angle
AHead restraint height 4
iYou can store the seat settings using the
memory function ( Y page 112).
Adjusting the head restraints
GWARNING
You could lose control of your vehicle if you do
the following while driving:
R adjust the driver's seat, head restraint,
steering wheel or mirrors
R fasten the seat belt
There is a risk of an accident.
Adjust the driver's seat, head restraint, steer-
ing wheel and mirror and fasten your seat belt before starting the engine.
GWARNING
If head restraints are not installed and adjus-
ted correctly, they cannot provide protection
as intended. There is an increased risk of
injury in the head and neck area, e.g. in the
event of an accident or when braking.
Always drive with the head restraints instal-
led. Before driving off, make sure for every
vehicle occupant that the center of the head
restraint supports the back of the head at
about eye level.
Do not rotate the head restraints of the front and rear seats. Otherwise, you cannot adjust
the height and angle of the head restraints to
the correct position.
Using the fore-and-aft adjustment, adjust the head restraint so that it is as close as possible to your head.
Pay attention to the important safety notes
( Y page 101).
4
For vehicles with memory function only.
102Seats
Seats, steering wheel and mirrors
Page 105 of 386

Adjusting the head restraints manually
Adjusting the head restraint height5
X
To raise: pull the head restraint up to the
desired position.
X To lower: press release catch : in the
direction of the arrow and push the head
restraint down to the desired position.
Adjusting the angle of the head restraints
X Push or pull the lower edge of the head
restraint in the direction of the arrow.
Adjusting the height of the head
restraints electrically
X To adjust the head restraint height: slide
the switch for head restraint adjustment
( Y page 101) up or down in the direction of
the arrow.
Adjusting the luxury head restraints
X To adjust the side bolsters of the head
restraint: push or pull right and/or left-
hand side bolster : into the desired posi-
tion.
X To adjust the angle of the head
restraint: push or pull the head restraint in
the direction of arrow ;.
iAdjust the head restraint so that the back
of your head is as close to the head
restraint as possible.
Rear seat head restraints
Adjusting the rear seat head restraint
height
Once the head restraint is fully lowered, press release catch :.
X To raise: pull the head restraint up to the
desired position.
5 For vehicles without memory function only.
Seats103
Seats, steering wheel and mirrors
Z
Page 110 of 386

Problems with the steering wheel heating
ProblemPossible causes/consequences and M Solutions
The steering wheel
heating has switched
off prematurely or can-
not be switched on.The on-board voltage is too low because too many elect rical con-
sumers are switched on.
X Switch off electrical consumers that you do not need, such as
the rear window defroster or interior lighting.
Once the battery is sufficiently charged, the steering wheel
heating will switch back on automatically.
EASY-ENTRY/EXIT feature
Important safety notes
GWARNING
When the EASY-ENTRY/EXIT feature adjusts
the steering wheel, you and other vehicle
occupants – particularly children – could
become trapped. There is a risk of injury.
While the EASY-ENTRY/EXIT feature is mak-
ing adjustments, make sure that no one has
any body parts in the sweep of the steering
wheel.
If somebody becomes trapped: R press one of the memory function position
buttons, or
R move the switch for steering wheel adjust-
ment in the opposite direction to that in
which the steering wheel is moving.
The adjustment process is stopped.
GWARNING
If you drive off while the EASY-ENTRY/EXIT
feature is making adjustments, you could lose
control of the vehicle. There is a risk of an
accident.
Always wait until the adjustment process is
complete before driving off.
The EASY-ENTRY/EXIT feature makes getting in and out of your vehicle easier.
You can activate and deactivate the EASY-
ENTRY/EXIT feature in the on-board com-
puter ( Y page 233).
Position of the steering wheel when the
EASY-ENTRY/EXIT feature is active
The steering wheel swings upwards when
you:
R remove the SmartKey from the ignition lock
R open the driver's door with KEYLESS-GO in
position 1
R open the driver's door and the SmartKey is
in position 0 or 1 in the ignition lock
( Y page 149)
iThe steering wheel only moves upwards if
it has not already reached the upper stop.
Position of the steering wheel for driv-
ing
The steering wheel is moved to the last selec-
ted position when:
R the driver's door is closed
R you insert the SmartKey into the ignition
lock
or
R you press the Start/Stop button once on
vehicles with KEYLESS-GO
When you close the driver's door with the
ignition switched on, the steering wheel is
also automatically moved to the previously
set position.
The last position of the steering wheel is
stored when you switch off the ignition or
when you store the setting with the memory
function ( Y page 112).
108Steering wheel
Seats, steering wheel and mirrors
Page 113 of 386
If you come into contact with the electrolyte,
observe the following:R Rinse off the electrolyte from your skin
immediately with water.
R Immediately rinse the electrolyte out of
your eyes thoroughly with clean water.
R If the electrolyte is swallowed, immediately
rinse your mouth out thoroughly. Do not
induce vomiting.
R If electrolyte comes into contact with your
skin or hair or is swallowed, seek medical
attention immediately.
R Immediately change out of clothing which
has come into contact with electrolyte.
R If an allergic reaction occurs, seek medical
attention immediately.
The rear-view mirror and the exterior mirror
on the driver's side automatically go into anti-
glare mode if the following conditions are met simultaneously: R the ignition is switched on and
R incident light from headlamps strikes the
sensor in the rear-view mirror.
The mirrors do not go into anti-glare mode if
reverse gear is engaged or if the interior light-
ing is switched on.
Parking position for the exterior mir-
ror on the front-passenger side
Setting and storing the parking position
Using reverse gear
You can position the front-passenger side
exterior mirror in such a way that you can see
the rear wheel on that side as soon as you
engage reverse gear. You can store this posi-
tion.
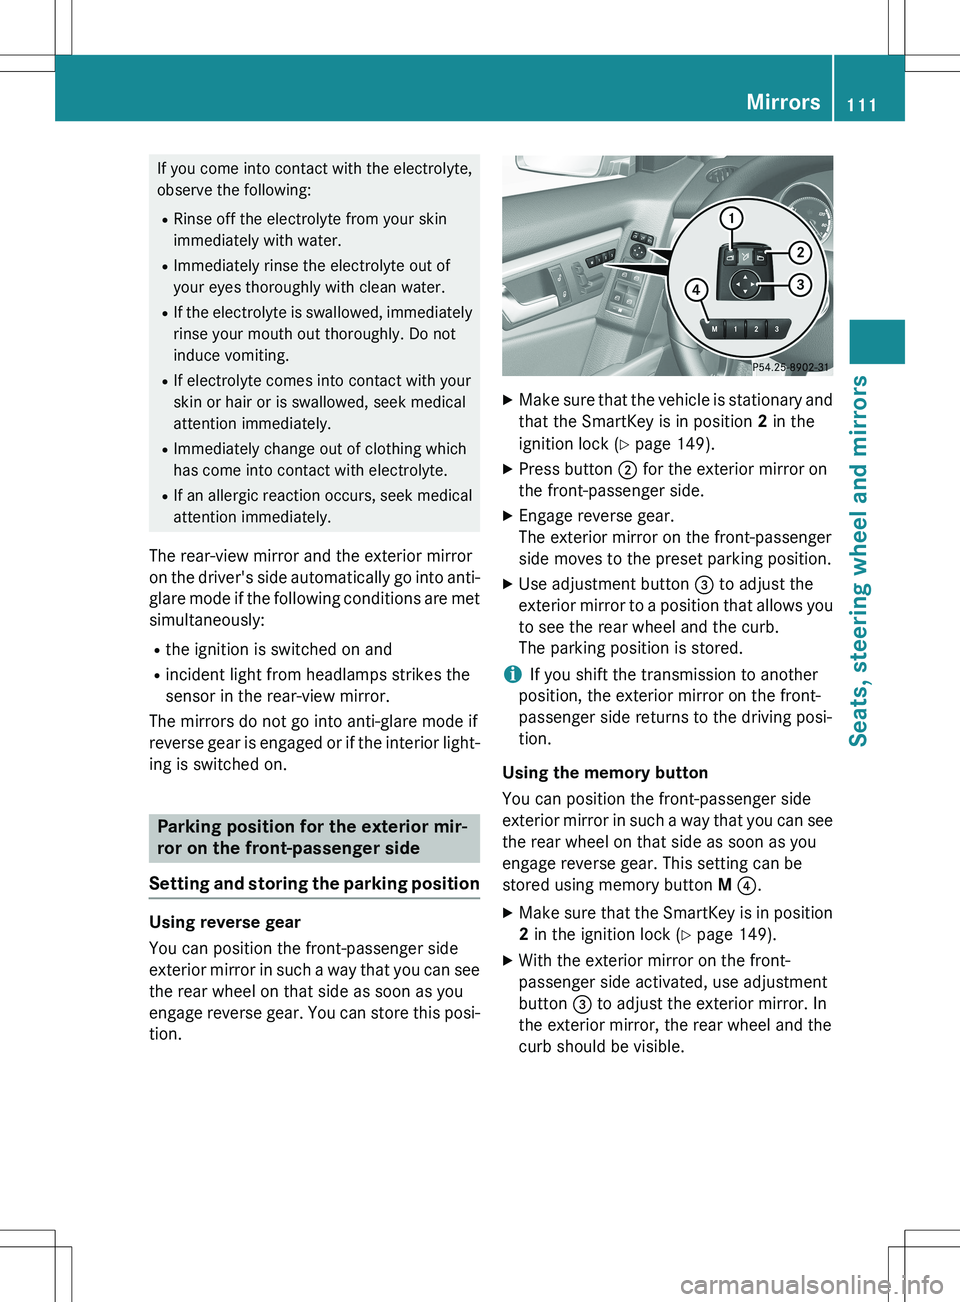
X Make sure that the vehicle is stationary and
that the SmartKey is in position 2 in the
ignition lock ( Y page 149).
X Press button ; for the exterior mirror on
the front-passenger side.
X Engage reverse gear.
The exterior mirror on the front-passenger
side moves to the preset parking position.
X Use adjustment button = to adjust the
exterior mirror to a position that allows you to see the rear wheel and the curb.
The parking position is stored.
iIf you shift the transmission to another
position, the exterior mirror on the front-
passenger side returns to the driving posi-
tion.
Using the memory button
You can position the front-passenger side
exterior mirror in such a way that you can see
the rear wheel on that side as soon as you
engage reverse gear. This setting can be
stored using memory button M ? .
X Make sure that the SmartKey is in position
2 in the ignition lock ( Y page 149).
X With the exterior mirror on the front-
passenger side activated, use adjustment
button = to adjust the exterior mirror. In
the exterior mirror, the rear wheel and the
curb should be visible.
Mirrors111
Seats, steering wheel and mirrors
Z