steering wheel adjustment MERCEDES-BENZ GLK-CLASS SUV 2015 Owners Manual
[x] Cancel search | Manufacturer: MERCEDES-BENZ, Model Year: 2015, Model line: GLK-CLASS SUV, Model: MERCEDES-BENZ GLK-CLASS SUV 2015Pages: 386, PDF Size: 26 MB
Page 102 of 386
Useful information
iThis Operator's Manual describes all
models and all standard and optional equip- ment of your vehicle available at the time of
publication of the Operator's Manual.
Country-specific differences are possible.
Please note that your vehicle may not be
equipped with all features described. This
also applies to safety-related systems and
functions.
iRead the information on qualified special-
ist workshops ( Y page 27).
Correct driver's seat position
X
Observe the safety guidelines on seat
adjustment ( Y page 101).
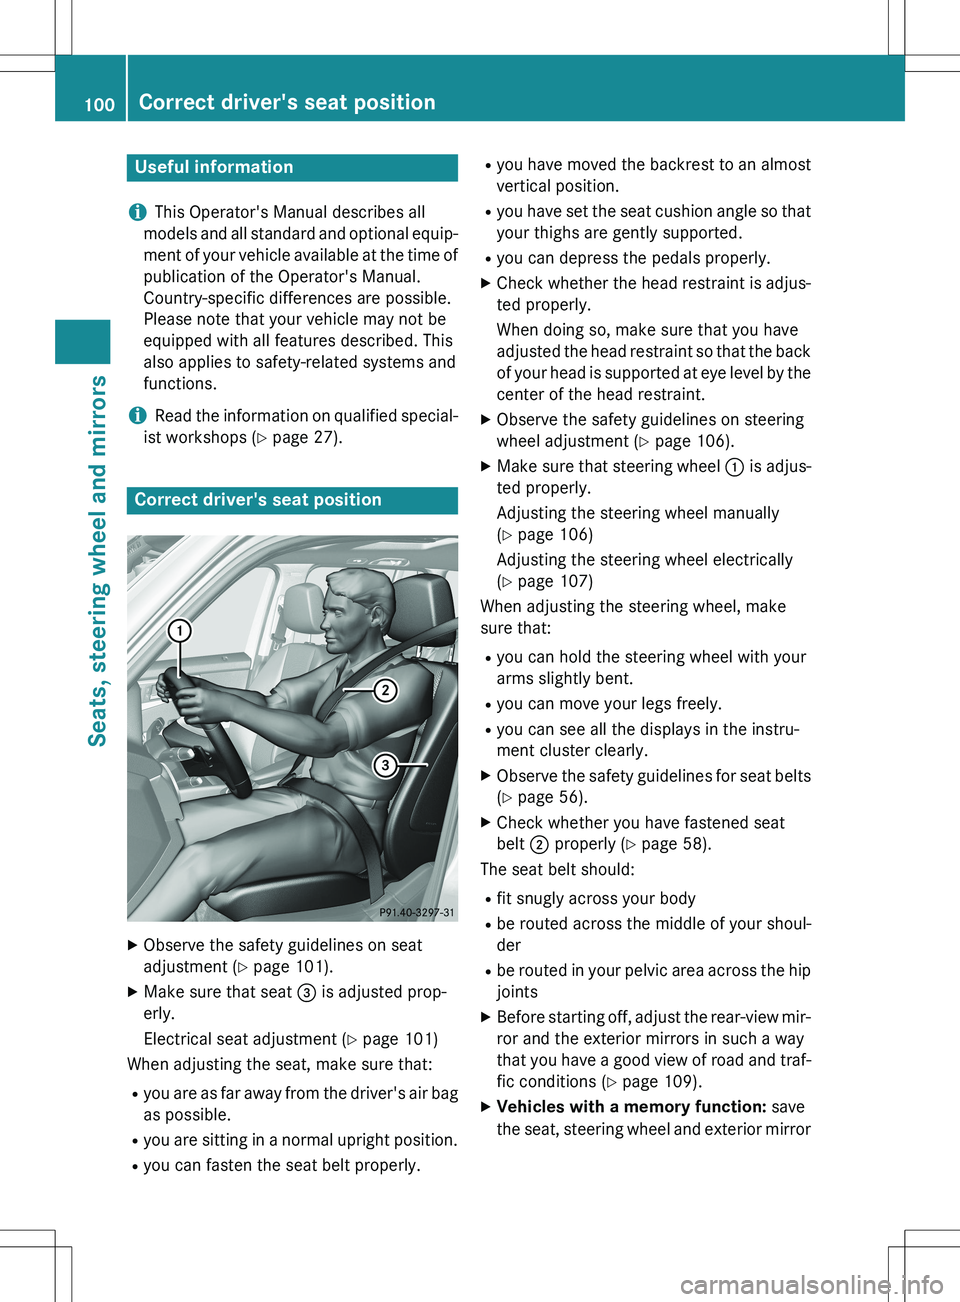
X Make sure that seat = is adjusted prop-
erly.
Electrical seat adjustment ( Y page 101)
When adjusting the seat, make sure that:
R you are as far away from the driver's air bag
as possible.
R you are sitting in a normal upright position.
R you can fasten the seat belt properly. R
you have moved the backrest to an almost
vertical position.
R you have set the seat cushion angle so that
your thighs are gently supported.
R you can depress the pedals properly.
X Check whether the head restraint is adjus-
ted properly.
When doing so, make sure that you have
adjusted the head restraint so that the back of your head is supported at eye level by the
center of the head restraint.
X Observe the safety guidelines on steering
wheel adjustment ( Y page 106).
X Make sure that steering wheel : is adjus-
ted properly.
Adjusting the steering wheel manually
( Y page 106)
Adjusting the steering wheel electrically
( Y page 107)
When adjusting the steering wheel, make
sure that:
R you can hold the steering wheel with your
arms slightly bent.
R you can move your legs freely.
R you can see all the displays in the instru-
ment cluster clearly.
X Observe the safety guidelines for seat belts
( Y page 56).
X Check whether you have fastened seat
belt ; properly ( Y page 58).
The seat belt should:
R fit snugly across your body
R be routed across the middle of your shoul-
der
R be routed in your pelvic area across the hip
joints
X Before starting off, adjust the rear-view mir-
ror and the exterior mirrors in such a way
that you have a good view of road and traf-
fic conditions ( Y page 109).
X Vehicles with a memory function: save
the seat, steering wheel and exterior mirror
100Correct driver's seat position
Seats, steering wheel and mirrors
Page 103 of 386
settings with the memory function
(Y page 112).
Seats
Important safety notes
GWARNING
Children could become trapped if they adjust
the seats, particularly when unattended.
There is a risk of injury.
When leaving the vehicle, always take the
SmartKey with you and lock the vehicle. Neverleave children unsupervised in the vehicle.
The seats can still be adjusted when there is
no SmartKey in the ignition lock.
GWARNING
You could lose control of your vehicle if you do the following while driving:
R adjust the driver's seat, head restraint,
steering wheel or mirrors
R fasten the seat belt
There is a risk of an accident.
Adjust the driver's seat, head restraint, steer-
ing wheel and mirror and fasten your seat belt before starting the engine.
GWARNING
If you adjust the seat height carelessly, you orother vehicle occupants could be trapped and thereby injured. Children in particular could
accidentally press the electrical seat adjust-
ment buttons and become trapped. There is a
risk of injury.
While moving the seats, make sure that your
hands or other body parts do not get under the
lever assembly of the seat adjustment sys-
tem.
GWARNING
When you adjust a seat, you or other vehicle
occupants could become trapped, e.g. on the seat guide rail. There is a risk of injury.
Make sure when adjusting a seat that no onehas any body parts in the sweep of the seat.
Observe the safety notes on "Air bags"
( Y page 44) and "Children in the vehicle" .
! To avoid damage to the seats and the seat
heating, observe the following information:
R keep liquids from spilling on the seats. If
liquid is spilled on the seats, dry them as
soon as possible.
R if the seat covers are damp or wet, do not
switch on the seat heating. The seat
heating should also not be used to dry
the seats.
R clean the seat covers as recommended;
see the "Interior care" section.
R do not transport heavy loads on the
seats. Do not place sharp objects on the
seat cushions, e.g. knives, nails or tools. The seats should only be occupied by
passengers, if possible.
R when the seat heating is in operation, do
not cover the seats with insulating mate-
rials, e.g. blankets, coats, bags, seat cov- ers, child seats or booster seats.
! Make sure that there are no objects in the
footwell under or behind the seats when
moving the seats back. There is a risk that
the seats and/or the objects could be dam- aged.
iThe rear-compartment head restraints
can be removed ( Y page 104).
For more information, contact a qualified
specialist workshop.
iFurther related subjects:
R Cargo compartment enlargement (fold-
ing down the rear bench seat)
(Y page 276)
Adjusting the seats
iVehicles without Memory function: the
seats can be adjusted within three minutes
of a front door being opened.
Seats101
Seats, steering wheel and mirrors
Z
Page 104 of 386

The time period starts over again if, within
these three minutes, you:R open or close a front door
R insert the SmartKey into the ignition lock
or remove it from the ignition lock
R switch the ignition on or off
If the SmartKey is in position 2 in the igni-
tion lock ( Y page 149), the seats can be
adjusted at any time.
Depending on the equipment, the seat adjust-
ment buttons are either located on the side of the seat or on the door control panel.
:Seat cushion angle
;Seat height
=Seat fore-and-aft adjustment
?Backrest angle
:Seat cushion angle
;Seat height
=Seat fore-and-aft adjustment
?Backrest angle
AHead restraint height 4
iYou can store the seat settings using the
memory function ( Y page 112).
Adjusting the head restraints
GWARNING
You could lose control of your vehicle if you do
the following while driving:
R adjust the driver's seat, head restraint,
steering wheel or mirrors
R fasten the seat belt
There is a risk of an accident.
Adjust the driver's seat, head restraint, steer-
ing wheel and mirror and fasten your seat belt before starting the engine.
GWARNING
If head restraints are not installed and adjus-
ted correctly, they cannot provide protection
as intended. There is an increased risk of
injury in the head and neck area, e.g. in the
event of an accident or when braking.
Always drive with the head restraints instal-
led. Before driving off, make sure for every
vehicle occupant that the center of the head
restraint supports the back of the head at
about eye level.
Do not rotate the head restraints of the front and rear seats. Otherwise, you cannot adjust
the height and angle of the head restraints to
the correct position.
Using the fore-and-aft adjustment, adjust the head restraint so that it is as close as possible to your head.
Pay attention to the important safety notes
( Y page 101).
4
For vehicles with memory function only.
102Seats
Seats, steering wheel and mirrors
Page 105 of 386

Adjusting the head restraints manually
Adjusting the head restraint height5
X
To raise: pull the head restraint up to the
desired position.
X To lower: press release catch : in the
direction of the arrow and push the head
restraint down to the desired position.
Adjusting the angle of the head restraints
X Push or pull the lower edge of the head
restraint in the direction of the arrow.
Adjusting the height of the head
restraints electrically
X To adjust the head restraint height: slide
the switch for head restraint adjustment
( Y page 101) up or down in the direction of
the arrow.
Adjusting the luxury head restraints
X To adjust the side bolsters of the head
restraint: push or pull right and/or left-
hand side bolster : into the desired posi-
tion.
X To adjust the angle of the head
restraint: push or pull the head restraint in
the direction of arrow ;.
iAdjust the head restraint so that the back
of your head is as close to the head
restraint as possible.
Rear seat head restraints
Adjusting the rear seat head restraint
height
Once the head restraint is fully lowered, press release catch :.
X To raise: pull the head restraint up to the
desired position.
5 For vehicles without memory function only.
Seats103
Seats, steering wheel and mirrors
Z
Page 106 of 386

XTo lower: press release catch : and push
the head restraint down until it is in the
desired position.
Adjusting the rear seat head restraint
angle
Adjust the head restraints so that they are as
close as possible to your head.
You can only adjust the two outer head
restraints.
X Pull or push the top of the head restraint
until it is in the desired position.
Removing/installing the rear seat head
restraints
X To remove: pull the head restraint up to
the stop.
X Press release catch : and pull the head
restraint out of the guides.
X To re-install: insert the head restraint so
that the notches on the bar are on the left
when viewed in the direction of travel.
X Push the head restraint down until you hear
it engage in position.
Adjusting the lumbar support
You can adjust the contour of the front seats so as to provide optimum support for your
back.
X Move adjustment lever : in the direction
of the arrow until the desired backrest con- tour is achieved.
Adjusting the 4-way lumbar support
You can adjust the contour of the front seat
backrests individually to provide optimum
support for your back.
:To raise the backrest contour
;To soften the backrest contour
=To lower the backrest contour
?To harden the backrest contour
104Seats
Seats, steering wheel and mirrors
Page 108 of 386
Problems with the seat heating
ProblemPossible causes/consequences and M Solutions
The seat heating has
switched off prema-
turely or cannot be
switched on.The on-board voltage is too low because too many elect rical con-
sumers are switched on.
X Switch off electrical consumers that you do not need, such as
the rear window defroster or interior lighting.
Steering wheel
Important safety notes
GWARNING
You could lose control of your vehicle if you do
the following while driving:
R adjust the driver's seat, head restraint,
steering wheel or mirrors
R fasten the seat belt
There is a risk of an accident.
Adjust the driver's seat, head restraint, steer-
ing wheel and mirror and fasten your seat belt before starting the engine.
GWARNING
If the steering wheel is unlocked while the
vehicle is in motion, it could change position
unexpectedly. This could cause you to lose
control of the vehicle. There is a risk of an
accident.
Before starting off, make sure the steering
wheel is locked. Never unlock the steering
wheel while the vehicle is in motion.
GWARNING
Children could injure themselves if they
adjust the steering wheel. There is a risk of
injury.
When leaving the vehicle, always take the
SmartKey with you and lock the vehicle. Neverleave children unsupervised in the vehicle.
The electrically adjustable steering wheel can
still be adjusted when there is no SmartKey in
the ignition lock.
Adjusting the steering wheel man-
ually
GWARNING
If the steering wheel is unlocked while the
vehicle is in motion, it could change position
unexpectedly. This could cause you to lose
control of the vehicle. There is a risk of an
accident.
Before starting off, make sure the steering
wheel is locked. Never unlock the steering
wheel while the vehicle is in motion.
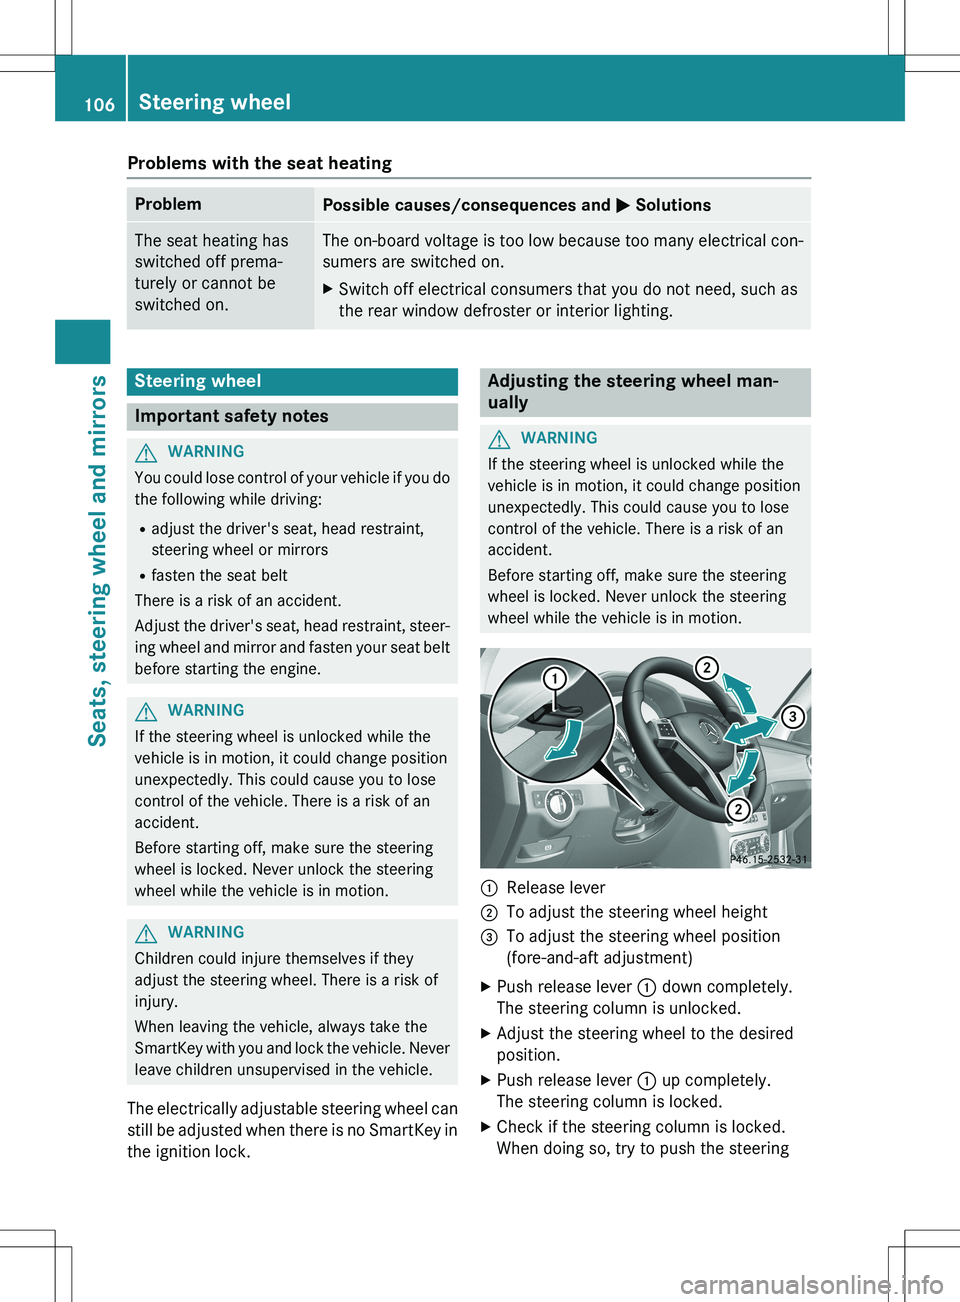
:Release lever
;To adjust the steering wheel height
=To adjust the steering wheel position
(fore-and-aft adjustment)
X Push release lever : down completely.
The steering column is unlocked.
X Adjust the steering wheel to the desired
position.
X Push release lever : up completely.
The steering column is locked.
X Check if the steering column is locked.
When doing so, try to push the steering
106Steering wheel
Seats, steering wheel and mirrors
Page 109 of 386
wheel up or down or try to move it in the
fore-and-aft direction.
Adjusting the steering wheel electri-
cally
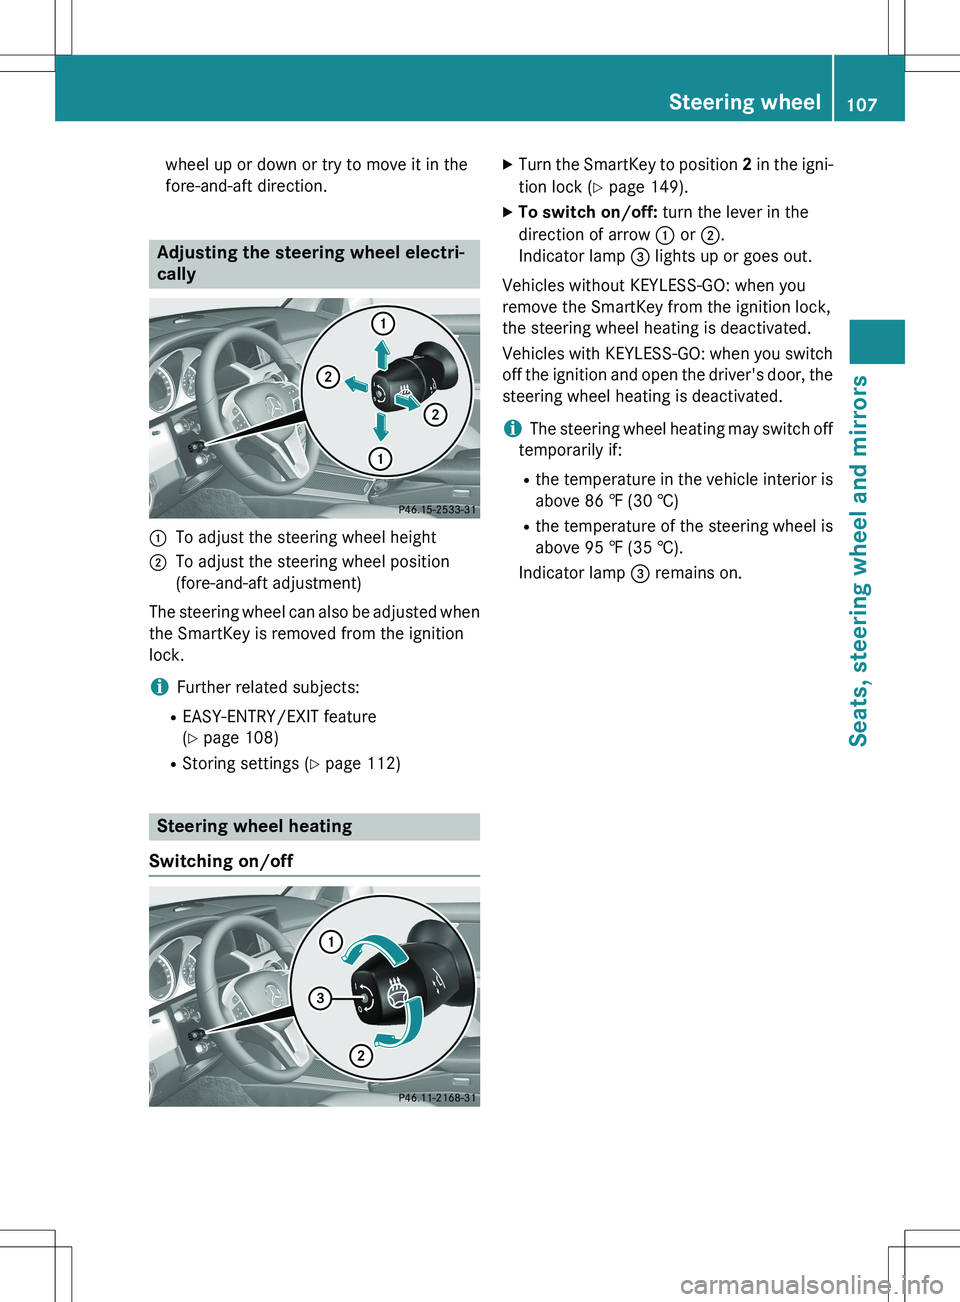
:To adjust the steering wheel height
;To adjust the steering wheel position
(fore-and-aft adjustment)
The steering wheel can also be adjusted when the SmartKey is removed from the ignition
lock.
iFurther related subjects:
R EASY-ENTRY/EXIT feature
(Y page 108)
R Storing settings ( Y page 112)
Steering wheel heating
Switching on/off
X Turn the SmartKey to position 2 in the igni-
tion lock ( Y page 149).
X To switch on/off: turn the lever in the
direction of arrow : or ;.
Indicator lamp = lights up or goes out.
Vehicles without KEYLESS-GO: when you
remove the SmartKey from the ignition lock,
the steering wheel heating is deactivated.
Vehicles with KEYLESS-GO: when you switch
off the ignition and open the driver's door, the steering wheel heating is deactivated.
iThe steering wheel heating may switch off
temporarily if:
R the temperature in the vehicle interior is
above 86 ‡ (30 †)
R the temperature of the steering wheel is
above 95 ‡ (35 †).
Indicator lamp = remains on.
Steering wheel107
Seats, steering wheel and mirrors
Z
Page 110 of 386

Problems with the steering wheel heating
ProblemPossible causes/consequences and M Solutions
The steering wheel
heating has switched
off prematurely or can-
not be switched on.The on-board voltage is too low because too many elect rical con-
sumers are switched on.
X Switch off electrical consumers that you do not need, such as
the rear window defroster or interior lighting.
Once the battery is sufficiently charged, the steering wheel
heating will switch back on automatically.
EASY-ENTRY/EXIT feature
Important safety notes
GWARNING
When the EASY-ENTRY/EXIT feature adjusts
the steering wheel, you and other vehicle
occupants – particularly children – could
become trapped. There is a risk of injury.
While the EASY-ENTRY/EXIT feature is mak-
ing adjustments, make sure that no one has
any body parts in the sweep of the steering
wheel.
If somebody becomes trapped: R press one of the memory function position
buttons, or
R move the switch for steering wheel adjust-
ment in the opposite direction to that in
which the steering wheel is moving.
The adjustment process is stopped.
GWARNING
If you drive off while the EASY-ENTRY/EXIT
feature is making adjustments, you could lose
control of the vehicle. There is a risk of an
accident.
Always wait until the adjustment process is
complete before driving off.
The EASY-ENTRY/EXIT feature makes getting in and out of your vehicle easier.
You can activate and deactivate the EASY-
ENTRY/EXIT feature in the on-board com-
puter ( Y page 233).
Position of the steering wheel when the
EASY-ENTRY/EXIT feature is active
The steering wheel swings upwards when
you:
R remove the SmartKey from the ignition lock
R open the driver's door with KEYLESS-GO in
position 1
R open the driver's door and the SmartKey is
in position 0 or 1 in the ignition lock
( Y page 149)
iThe steering wheel only moves upwards if
it has not already reached the upper stop.
Position of the steering wheel for driv-
ing
The steering wheel is moved to the last selec-
ted position when:
R the driver's door is closed
R you insert the SmartKey into the ignition
lock
or
R you press the Start/Stop button once on
vehicles with KEYLESS-GO
When you close the driver's door with the
ignition switched on, the steering wheel is
also automatically moved to the previously
set position.
The last position of the steering wheel is
stored when you switch off the ignition or
when you store the setting with the memory
function ( Y page 112).
108Steering wheel
Seats, steering wheel and mirrors
Page 111 of 386
Crash-responsive EASY-EXIT feature
If the crash-responsive EASY-EXIT feature is
triggered in an accident, the steering columnwill move upwards when the driver's door is
opened. This occurs irrespective of the posi-
tion of the SmartKey in the ignition lock. This
makes it easier to exit the vehicle and rescue
the occupants.
The crash-responsive EASY-EXIT feature is
only operational if the EASY-EXIT/ENTRY fea- ture is activated in the on-board computer.
Mirrors
Rear-view mirror
X Anti-glare mode: flick anti-glare lever :
forwards or back.
Exterior mirrors
Adjusting the exterior mirrors
GWARNING
You could lose control of your vehicle if you do the following while driving:
R adjust the driver's seat, head restraint,
steering wheel or mirrors
R fasten the seat belt
There is a risk of an accident.
Adjust the driver's seat, head restraint, steer-
ing wheel and mirror and fasten your seat belt before starting the engine.
GWARNING
The exterior mirror on the front-passenger
side reduces the size of the image. Visible
objects are actually closer than they appear.
This means that you could misjudge the dis-
tance from road users traveling behind, e.g.
when changing lane. There is a risk of an acci-
dent.
For this reason, always make sure of the
actual distance from the road users traveling
behind by glancing over your shoulder.
The convex exterior mirrors provide a larger
field of vision.
The exterior mirrors are automatically heated
after starting the vehicle if the rear window
defroster is switched on and the outside tem- perature is low. Heating takes a maximum of
10 minutes.
iYou can also heat up the exterior mirrors
manually by switching on the rear window
defroster.
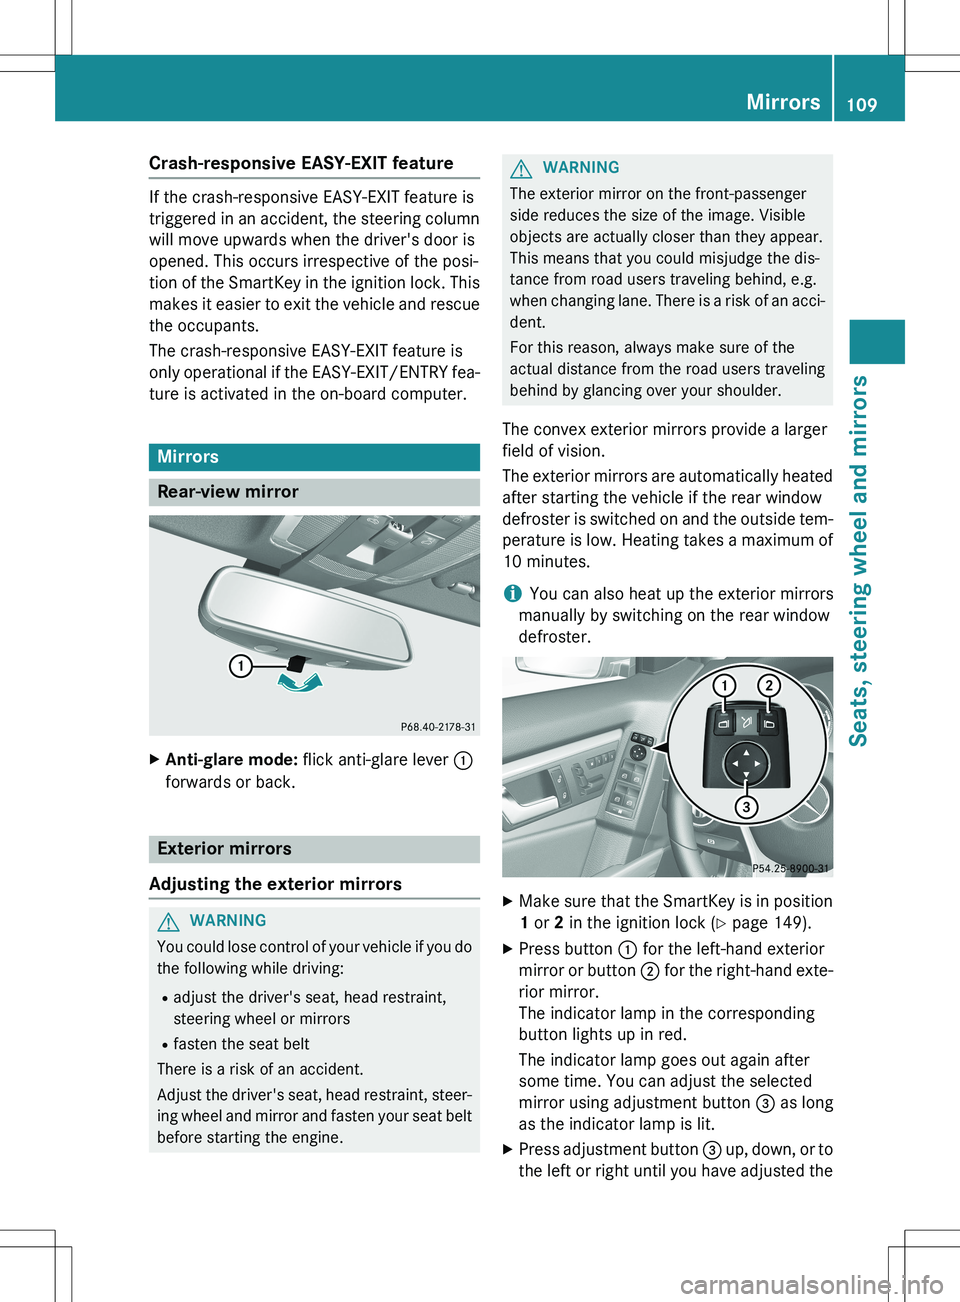
X Make sure that the SmartKey is in position
1 or 2 in the ignition lock ( Y page 149).
X Press button : for the left-hand exterior
mirror or button ; for the right-hand exte-
rior mirror.
The indicator lamp in the corresponding
button lights up in red.
The indicator lamp goes out again after
some time. You can adjust the selected
mirror using adjustment button = as long
as the indicator lamp is lit.
X Press adjustment button = up, down, or to
the left or right until you have adjusted the
Mirrors109
Seats, steering wheel and mirrors
Z
Page 113 of 386
If you come into contact with the electrolyte,
observe the following:R Rinse off the electrolyte from your skin
immediately with water.
R Immediately rinse the electrolyte out of
your eyes thoroughly with clean water.
R If the electrolyte is swallowed, immediately
rinse your mouth out thoroughly. Do not
induce vomiting.
R If electrolyte comes into contact with your
skin or hair or is swallowed, seek medical
attention immediately.
R Immediately change out of clothing which
has come into contact with electrolyte.
R If an allergic reaction occurs, seek medical
attention immediately.
The rear-view mirror and the exterior mirror
on the driver's side automatically go into anti-
glare mode if the following conditions are met simultaneously: R the ignition is switched on and
R incident light from headlamps strikes the
sensor in the rear-view mirror.
The mirrors do not go into anti-glare mode if
reverse gear is engaged or if the interior light-
ing is switched on.
Parking position for the exterior mir-
ror on the front-passenger side
Setting and storing the parking position
Using reverse gear
You can position the front-passenger side
exterior mirror in such a way that you can see
the rear wheel on that side as soon as you
engage reverse gear. You can store this posi-
tion.
X Make sure that the vehicle is stationary and
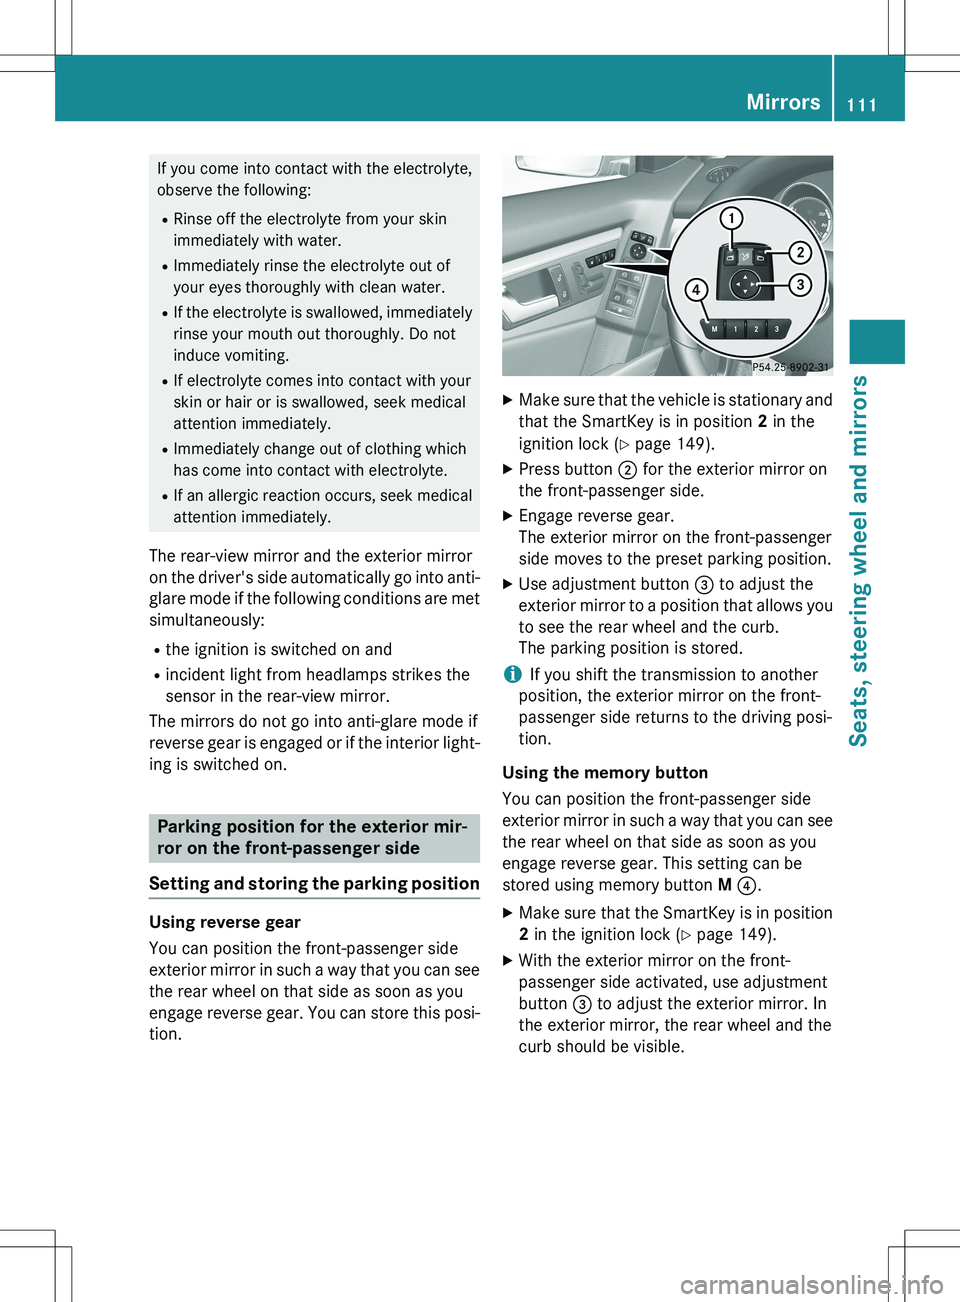
that the SmartKey is in position 2 in the
ignition lock ( Y page 149).
X Press button ; for the exterior mirror on
the front-passenger side.
X Engage reverse gear.
The exterior mirror on the front-passenger
side moves to the preset parking position.
X Use adjustment button = to adjust the
exterior mirror to a position that allows you to see the rear wheel and the curb.
The parking position is stored.
iIf you shift the transmission to another
position, the exterior mirror on the front-
passenger side returns to the driving posi-
tion.
Using the memory button
You can position the front-passenger side
exterior mirror in such a way that you can see
the rear wheel on that side as soon as you
engage reverse gear. This setting can be
stored using memory button M ? .
X Make sure that the SmartKey is in position
2 in the ignition lock ( Y page 149).
X With the exterior mirror on the front-
passenger side activated, use adjustment
button = to adjust the exterior mirror. In
the exterior mirror, the rear wheel and the
curb should be visible.
Mirrors111
Seats, steering wheel and mirrors
Z