bulb MERCEDES-BENZ GLK SUV 2008 Owners Manual
[x] Cancel search | Manufacturer: MERCEDES-BENZ, Model Year: 2008, Model line: GLK SUV, Model: MERCEDES-BENZ GLK SUV 2008Pages: 261, PDF Size: 8.67 MB
Page 8 of 261
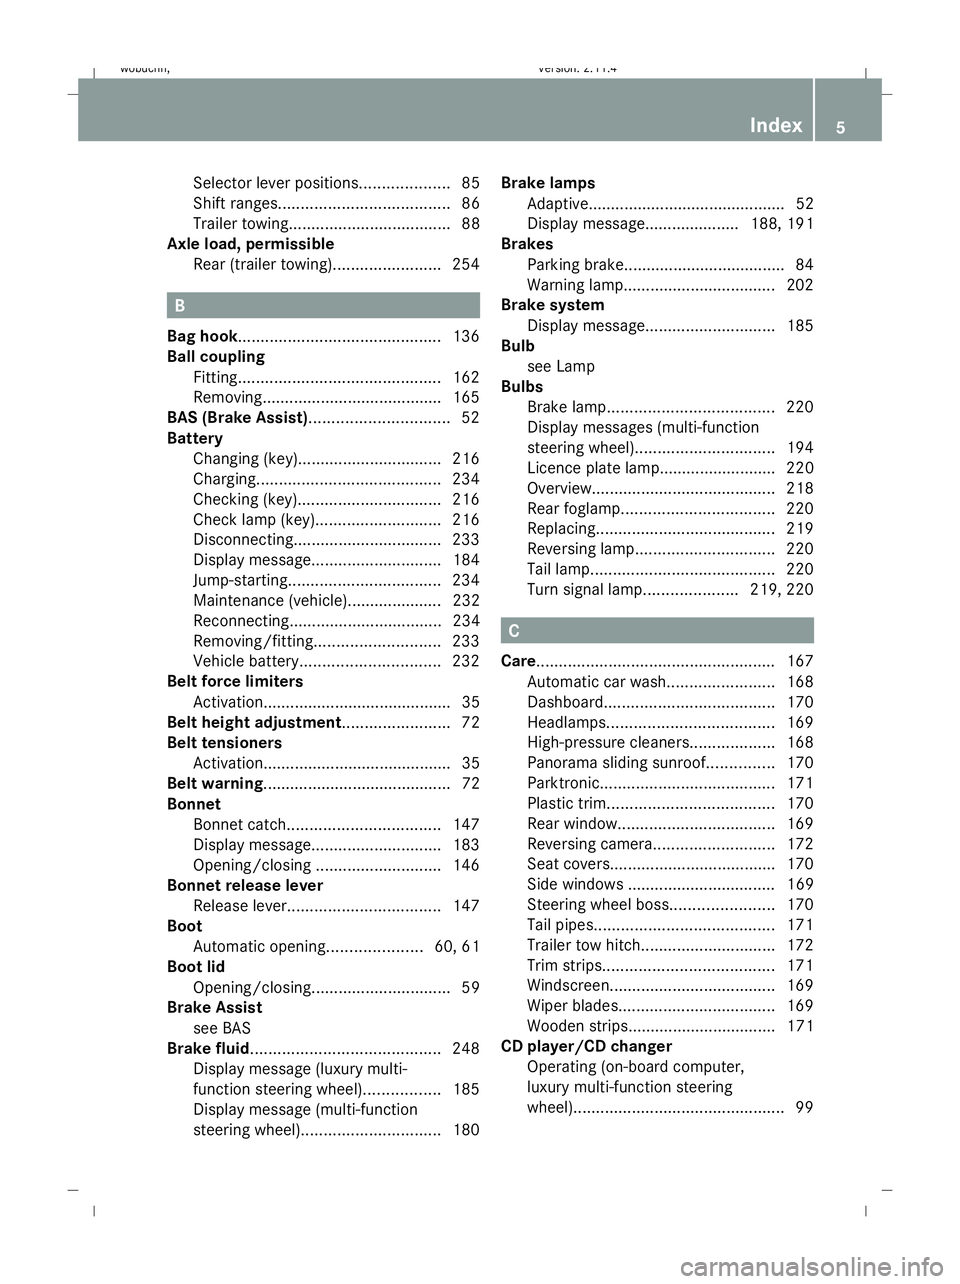
Selector lever positions.
...................85
Shift ranges. ..................................... 86
Trailer towing. ................................... 88
Axle load, permissible
Rear (trailer towing) ........................254 B
Bag hook............................................. 136
Ball coupling Fitting ............................................. 162
Removing....................................... .165
BAS (Brake Assist)............................... 52
Battery Changing (key).. .............................. 216
Charging. ........................................ 234
Checking (key). ............................... 216
Check lamp (key). ........................... 216
Disconnecting ................................. 233
Display message ............................. 184
Jump-starting. ................................. 234
Maintenance (vehicle)..................... 232
Reconnecting.................................. 234
Removing/fitting. ........................... 233
Vehicle battery. .............................. 232
Belt force limiters
Activation.......................................... 35
Belt height adjustment ........................72
Belt tensioners Activation.......................................... 35
Belt warning.......................................... 72
Bonnet
Bonnet catch .................................. 147
Display message ............................. 183
Opening/closing ............................ 146
Bonnet release lever
Release leve r.................................. 147
Boot
Automatic opening. ....................60, 61
Boot lid
Opening/closing. .............................. 59
Brake Assist
see BAS
Brake fluid .......................................... 248
Display message (luxury multi-
function steering wheel) .................185
Display message (multi-function
steering wheel). .............................. 180Brake lamps
Adaptive............................................ 52
Display message..................... 188, 191
Brakes
Parking brake................................... .84
Warning lamp..................................2 02
Brake system
Display message ............................. 185
Bulb
see Lamp
Bulbs
Brake lamp. .................................... 220
Display messages (multi-function
steering wheel). .............................. 194
Licence plate lamp.......................... 220
Overview. ........................................ 218
Rear foglamp. ................................. 220
Replacing. ....................................... 219
Reversing lamp. .............................. 220
Tail lamp ......................................... 220
Turn signal lamp. ....................219, 220 C
Care..................................................... 167
Automatic car wash. .......................168
Dashboard. ..................................... 170
Headlamps. .................................... 169
High-pressure cleaners. ..................168
Panorama sliding sunroo f............... 170
Parktronic. ...................................... 171
Plastic trim. .................................... 170
Rear window. .................................. 169
Reversing camera. ..........................172
Seat covers.................................... .170
Side windows ................................. 169
Steering wheel boss. ......................170
Tail pipes ........................................ 171
Trailer tow hitch. ............................. 172
Trim strips ...................................... 171
Windscreen. .................................... 169
Wiper blades.. ................................. 169
Wooden strips................................. 171
CD player/CD changer
Operating (on-board computer,
luxury multi-function steering
wheel). .............................................. 99 Index
5 X204_AKB; 1; 5, en-GB
wobuchh,
Version: 2.11.4
2008-10-15T13:20:56+02:00 - Seite 5 Dateiname: 6515_0671_02_buchblock.pdf; preflight
Page 169 of 261

X
Remove the protective cap from the ball
coupling recess.
X Press the protective cap into the ball cou-
pling recess until it engages.
X Store the ball coupling with the key inser-
ted in the ball coupling recess.
X Fold the trailer power socket upwards. G
Risk of accident
Do not carry the ball coupling in the vehicle
interior if it is not secured.
Otherwise, you and others could be injured by
the ball coupling being thrown around if you:
R brake sharply
R change direction suddenly
R are involved in an accident Trailer power supply
When it leaves the factory, your vehicle's
trailer socket outlet is equipped with a per-
manent power supply and a power supply that
is switched on via the ignition lock.
The permanent power supply is supplied via
trailer socket pin 9.
The power supply that is switched on via the
ignition lock is supplied via trailer socket pin
10.
! You can connect consumers with a power
rating of up to 240 W to the permanent
power supply and up to 180 W to the power
supply that is switched on via the ignition
lock.
You must not charge a trailer battery using
the power supply.
The trailer's permanent power supply is
switched off in the event of low vehicle supply
voltage and after six hours at the latest.
The trailer's turn signal lamps are only guar-
anteed to function when bulbs are used.
You can obtain further information about
installing the trailer electrics from a qualified
specialist workshop, e.g. a Mercedes-Benz
Service Centre. X
To switch the connected power supply
on or off: turn the key in the ignition lock
to position 2or 0, respectively. Trailer with 7-pin connector
If your trailer has a 7-pin connector, you can
connect it to the 13-pin socket on the ball
coupling using an adapter or, if necessary, an
adapter cable. Both of these can be obtained
at a qualified specialist workshop, e.g. at a
Mercedes-Benz Service Centre.
Fitting the adapter X
Open the socket cover.
X Insert connector with lug :into
groove ;on the socket and turn the con-
nector clockwise to the stop.
X Make the cover engage.
X If you are using an adapter cable, secure
the cable to the trailer with cable ties.
! Make sure that there is sufficient cable
play so that the cable cannot become
detached when cornering. 166
Traile
r towing*Operation
* optional
X204_AKB; 1; 5, en-GB
wobuchh
,V ersion: 2.11.4
2008-10-15T13:20:56+02:00 - Seite 166 Dateiname: 6515_0671_02_buchblock.pdf; preflight
Page 176 of 261
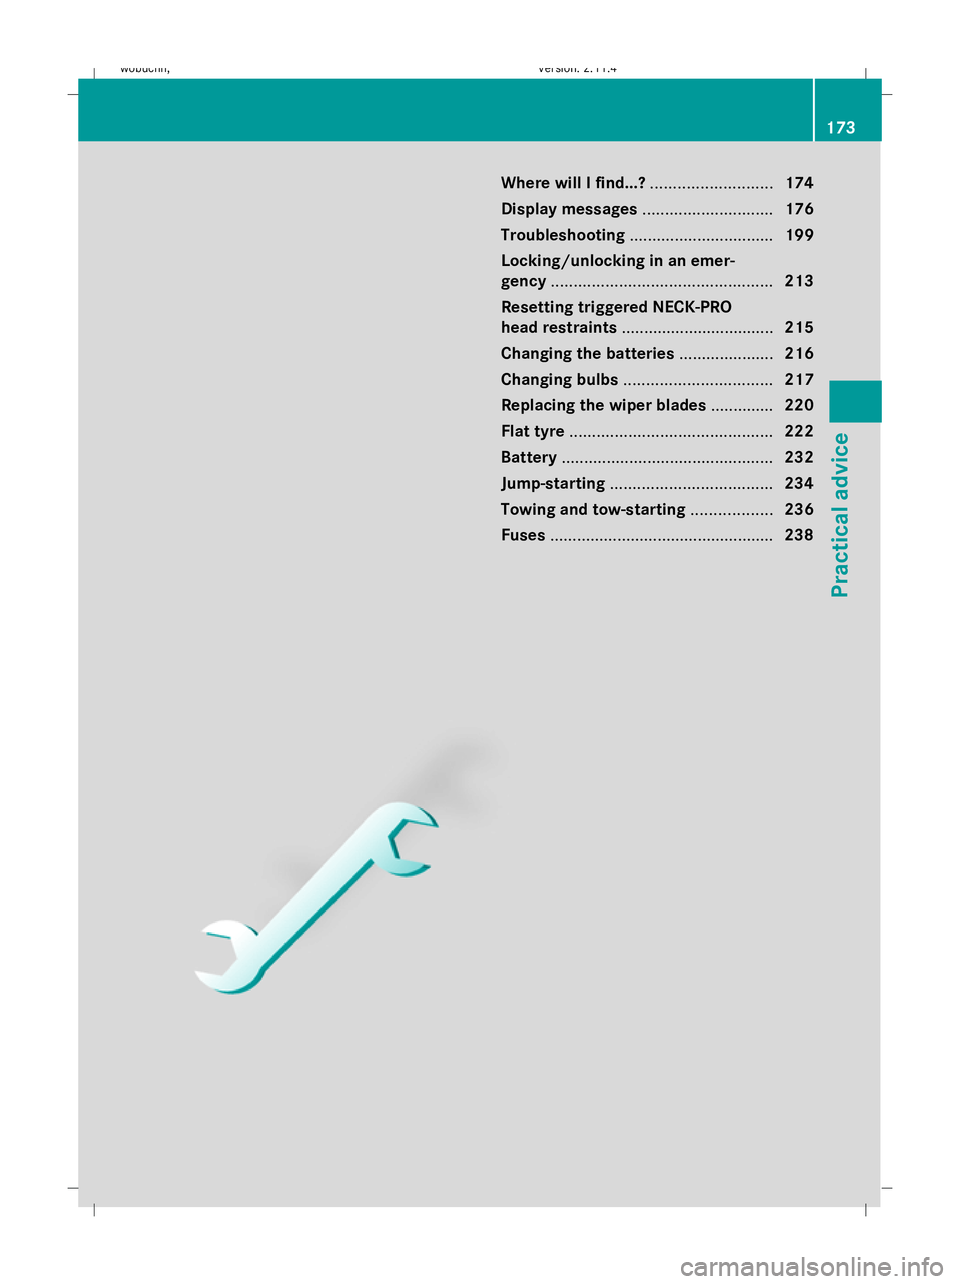
Where will I find...?...........................174
Display messages ............................. 176
Troubleshooting ................................ 199
Locking/unlocking in an emer-
gency ................................................. 213
Resetting triggered NECK-PRO
head restraints .................................. 215
Changing the batteries .....................216
Changing bulbs ................................. 217
Replacing the wiper blades ..............220
Flat tyre ............................................. 222
Battery ............................................... 232
Jump-starting .................................... 234
Towing and tow-starting ..................236
Fuses .................................................. 238
173
Practical advice
X204_AKB; 1; 5, en-GB
wobuchh, Version: 2.11.4
2008-10-15T13:20:56+02:00 - Seite 173 Dateiname: 6515_0671_02_buchblock.pdf; preflight
Page 191 of 261
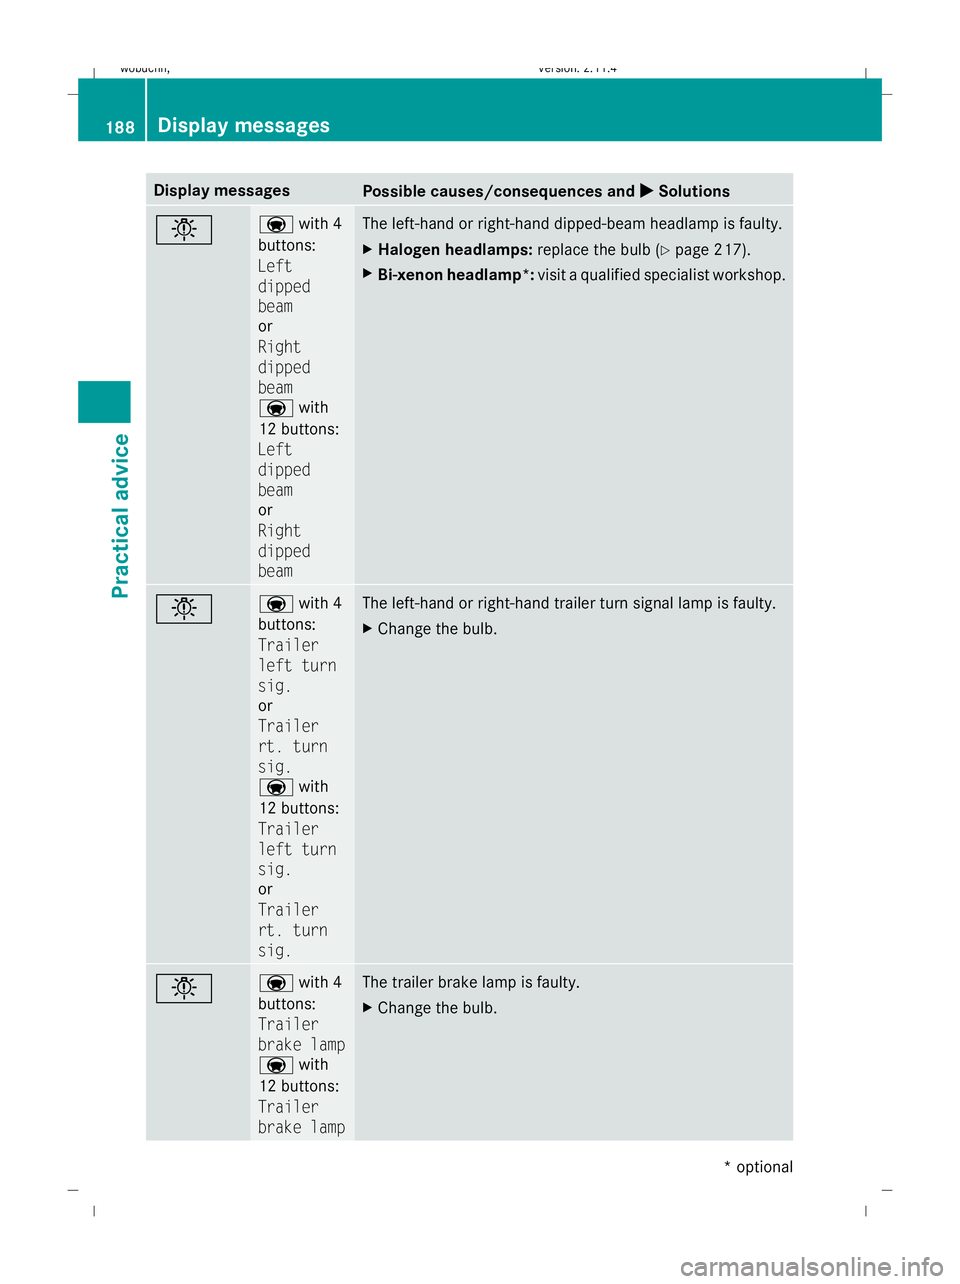
Display messages
Possible causes/consequences and
X
X Solutions b a
with 4
buttons:
Left
dipped
beam
or
Right
dipped
beam
a with
12 buttons:
Left
dipped
beam
or
Right
dipped
beam The left-hand or right-hand dipped-beam headlamp is faulty.
X
Halogen headlamps: replace the bulb (Ypage 217).
X Bi-xenon headlamp*: visit a qualified specialist workshop.b a
with 4
buttons:
Trailer
left turn
sig.
or
Trailer
rt. turn
sig.
a with
12 buttons:
Trailer
left turn
sig.
or
Trailer
rt. turn
sig. The left-hand or right-hand trailer turn signal lamp is faulty.
X
Change the bulb. b a
with 4
buttons:
Trailer
brake lamp
a with
12 buttons:
Trailer
brake lamp The trailer brake lamp is faulty.
X
Change the bulb. 188 Display
messagesPractical advice
* optional
X204_AKB; 1; 5, en-GB
wobuchh
,V ersion: 2.11.4
2008-10-15T13:20:56+02:00 - Seite 188 Dateiname: 6515_0671_02_buchblock.pdf; preflight
Page 192 of 261
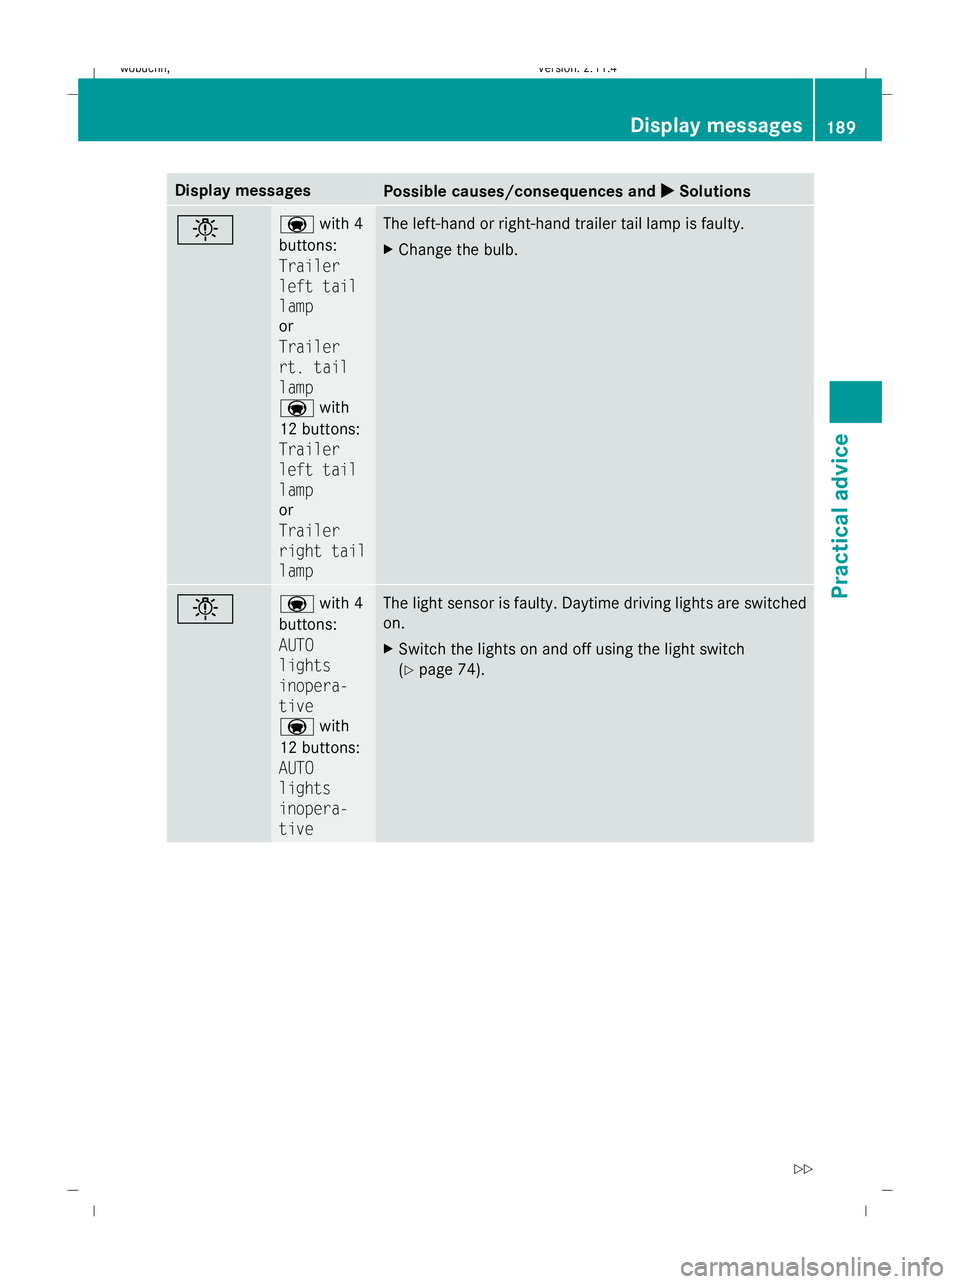
Display messages
Possible causes/consequences and
X
X Solutions b a
with 4
buttons:
Trailer
left tail
lamp
or
Trailer
rt. tail
lamp
a with
12 buttons:
Trailer
left tail
lamp
or
Trailer
right tail
lamp The left-hand or right-hand trailer tail lamp is faulty.
X
Change the bulb. b a
with 4
buttons:
AUTO
lights
inopera-
tive
a with
12 buttons:
AUTO
lights
inopera-
tive The light sensor is faulty. Daytime driving lights are switched
on.
X
Switch the lights on and off using the light switch
(Y page 74). Display
messages
189Practical advice
X204_AKB; 1; 5, en-GB
wobuchh,V ersion: 2.11.4
2008-10-15T13:20:56+02:00 - Seite 189 ZDateiname: 6515_0671_02_buchblock.pdf; preflight
Page 193 of 261
Display messages
Possible causes/consequences and
X
X Solutions b a
with 4
buttons:
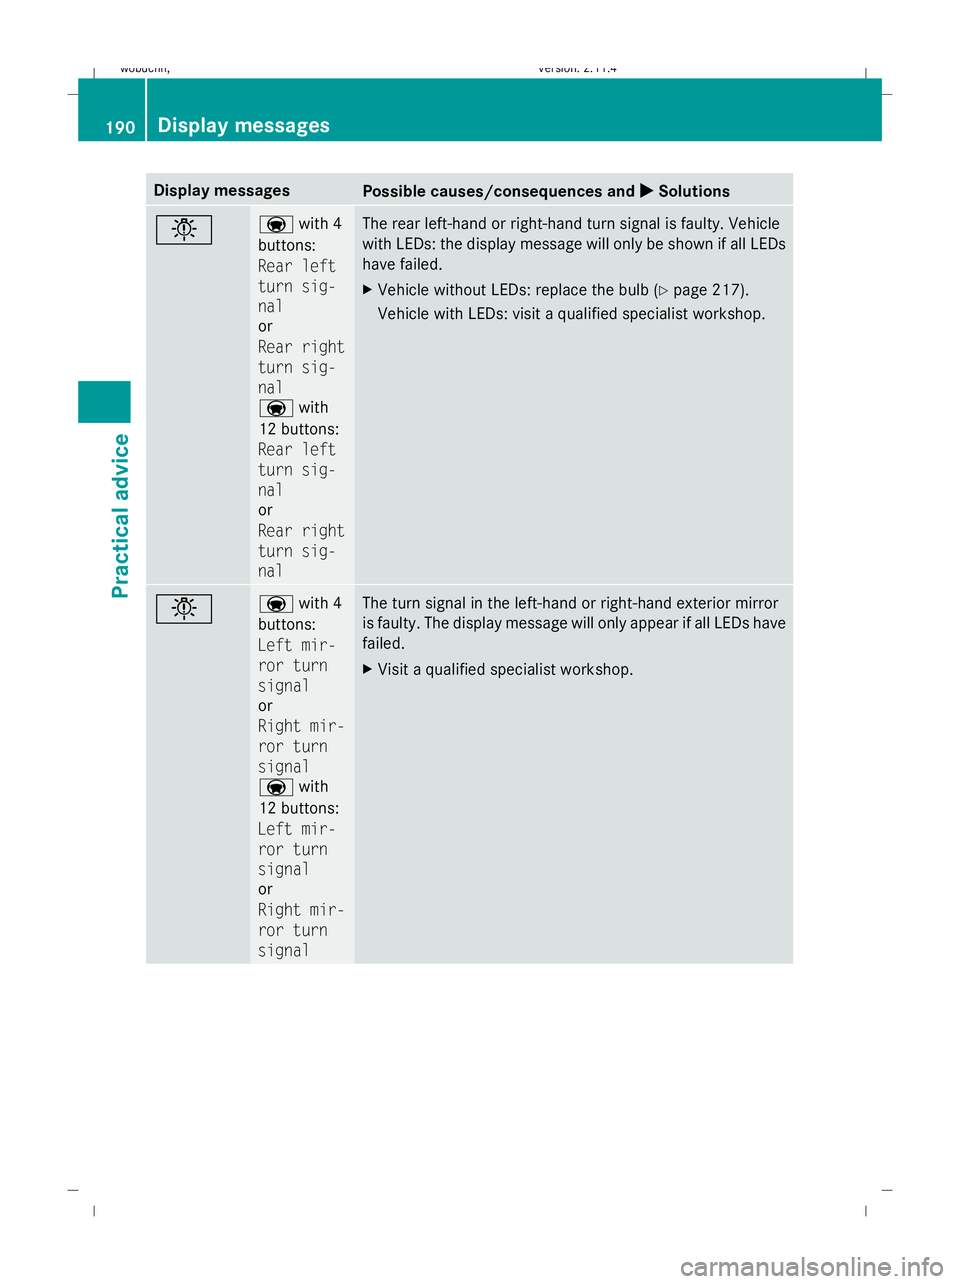
Rear left
turn sig-
nal
or
Rear right
turn sig-
nal
a with
12 buttons:
Rear left
turn sig-
nal
or
Rear right
turn sig-
nal The rear left-hand or right-hand turn signal is faulty. Vehicle
with LEDs: the display message will only be shown if all LEDs
have failed.
X
Vehicle without LEDs: replace the bulb (Y page 217).
Vehicle with LEDs: visit a qualified specialist workshop. b a
with 4
buttons:
Left mir-
ror turn
signal
or
Right mir-
ror turn
signal
a with
12 buttons:
Left mir-
ror turn
signal
or
Right mir-
ror turn
signal The turn signal in the left-hand or right-hand exterior mirror
is faulty. The display message will only appear if all LEDs have
failed.
X
Visit a qualified specialist workshop. 190 Display
messagesPractical advice
X204_AKB; 1; 5, en-GB
wobuchh,V ersion: 2.11.4
2008-10-15T13:20:56+02:00 - Seite 190 Dateiname: 6515_0671_02_buchblock.pdf; preflight
Page 194 of 261
Display messages
Possible causes/consequences and
X
X Solutions b a
with 4
buttons:
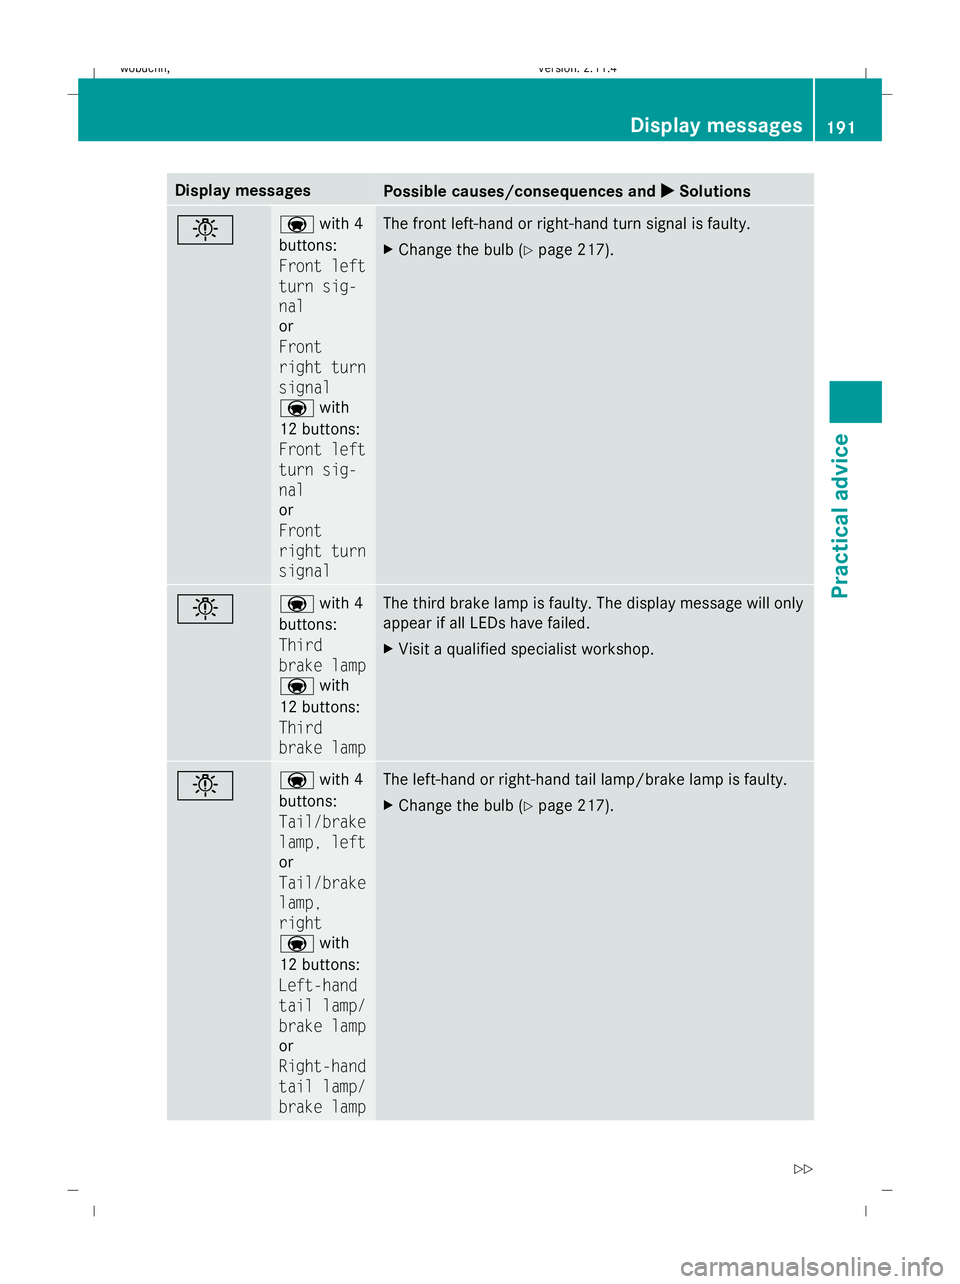
Front left
turn sig-
nal
or
Front
right turn
signal
a with
12 buttons:
Front left
turn sig-
nal
or
Front
right turn
signal The front left-hand or right-hand turn signal is faulty.
X
Change the bulb ( Ypage 217). b a
with 4
buttons:
Third
brake lamp
a with
12 buttons:
Third
brake lamp The third brake lamp is faulty. The display message will only
appear if all LEDs have failed.
X
Visit a qualified specialist workshop. b a
with 4
buttons:
Tail/brake
lamp, left
or
Tail/brake
lamp,
right
a with
12 buttons:
Left-hand
tail lamp/
brake lamp
or
Right-hand
tail lamp/
brake lamp The left-hand or right-hand tail lamp/brake lamp is faulty.
X
Change the bulb ( Ypage 217). Display
messages
191Practical advice
X204_AKB; 1; 5, en-GB
wobuchh,V ersion: 2.11.4
2008-10-15T13:20:56+02:00 - Seite 191 ZDateiname: 6515_0671_02_buchblock.pdf; preflight
Page 195 of 261
Display messages
Possible causes/consequences and
X
X Solutions b a
with 4
buttons:
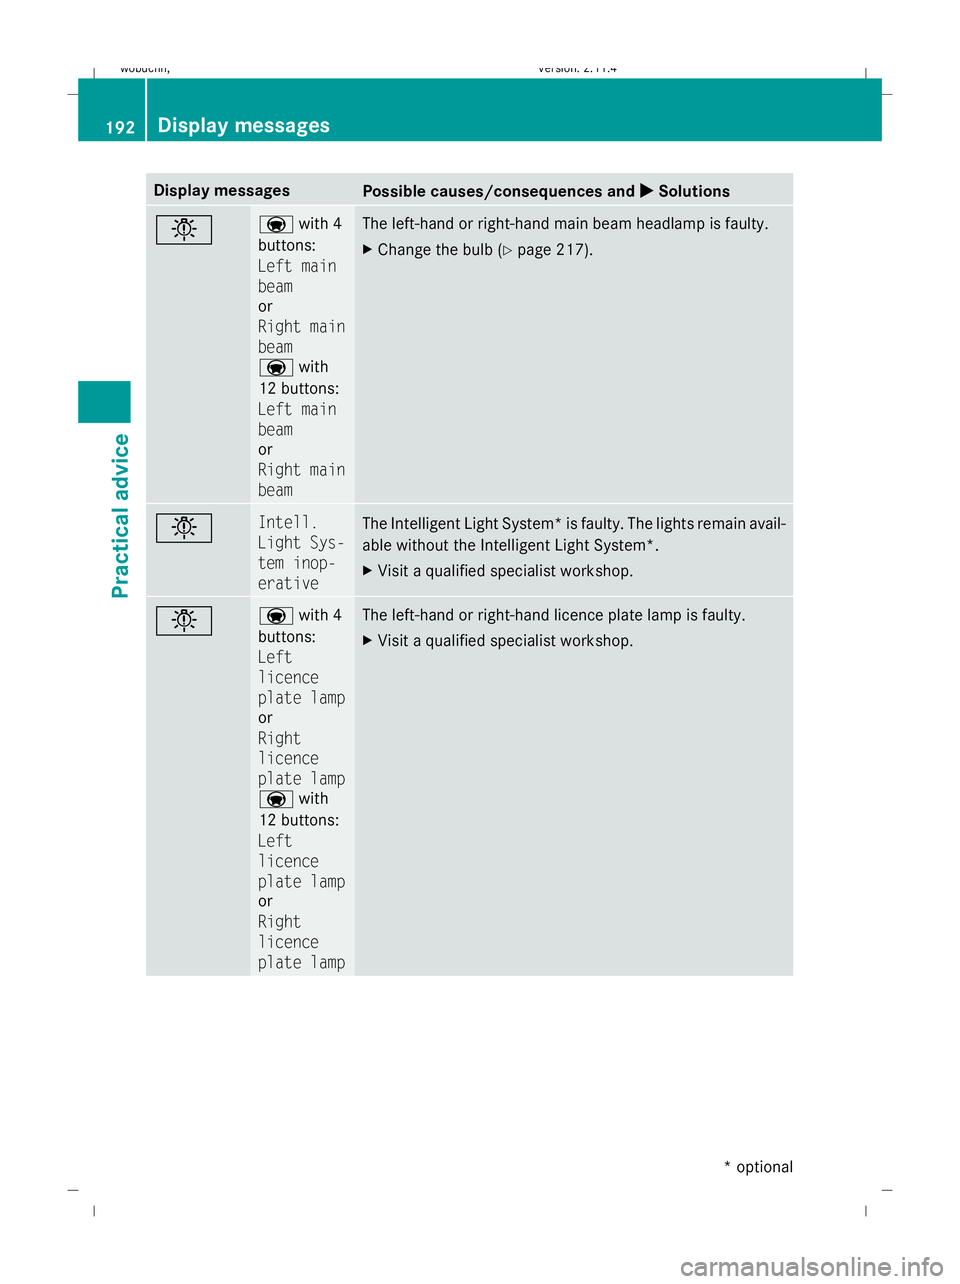
Left main
beam
or
Right main
beam
a with
12 buttons:
Left main
beam
or
Right main
beam The left-hand or right-hand main beam headlamp is faulty.
X
Change the bulb ( Ypage 217). b Intell.
Light Sys-
tem inop-
erative
The Intelligent Light System* is faulty. The lights remain avail-
able without the Intelligent Light System*.
X
Visit a qualified specialist workshop. b a
with 4
buttons:
Left
licence
plate lamp
or
Right
licence
plate lamp
a with
12 buttons:
Left
licence
plate lamp
or
Right
licence
plate lamp The left-hand or right-hand licence plate lamp is faulty.
X
Visit a qualified specialist workshop. 192 Display
messagesPractical advice
* optional
X204_AKB; 1; 5, en-GB
wobuchh
,V ersion: 2.11.4
2008-10-15T13:20:56+02:00 - Seite 192 Dateiname: 6515_0671_02_buchblock.pdf; preflight
Page 196 of 261
Display messages
Possible causes/consequences and
X
X Solutions b a
with 4
buttons:
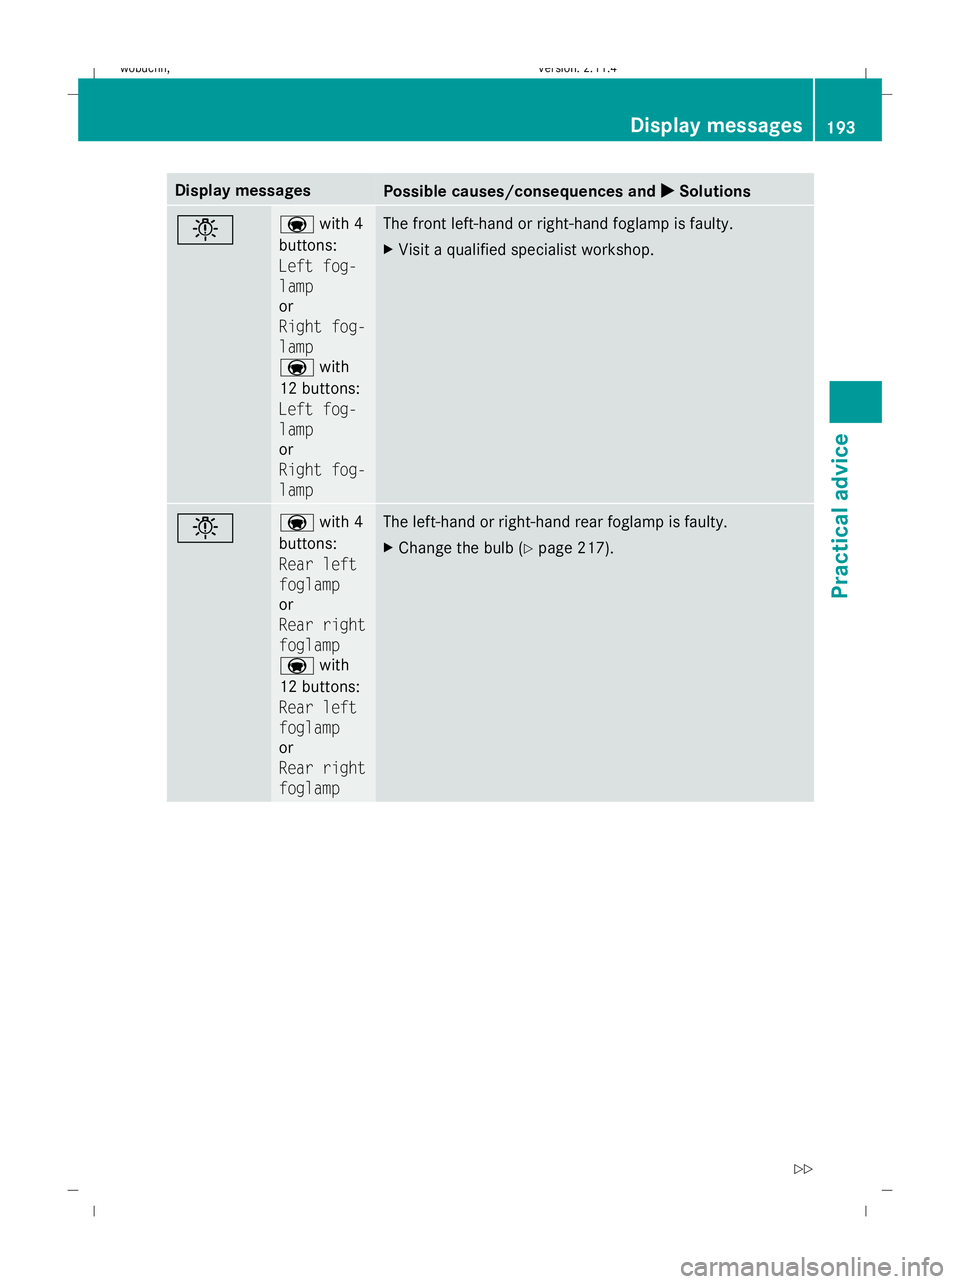
Left fog-
lamp
or
Right fog-
lamp
a with
12 buttons:
Left fog-
lamp
or
Right fog-
lamp The front left-hand or right-hand foglamp is faulty.
X
Visit a qualified specialist workshop. b a
with 4
buttons:
Rear left
foglamp
or
Rear right
foglamp
a with
12 buttons:
Rear left
foglamp
or
Rear right
foglamp The left-hand or right-hand rear foglamp is faulty.
X
Change the bulb ( Ypage 217). Display
messages
193Practical advice
X204_AKB; 1; 5, en-GB
wobuchh,V ersion: 2.11.4
2008-10-15T13:20:56+02:00 - Seite 193 ZDateiname: 6515_0671_02_buchblock.pdf; preflight
Page 197 of 261
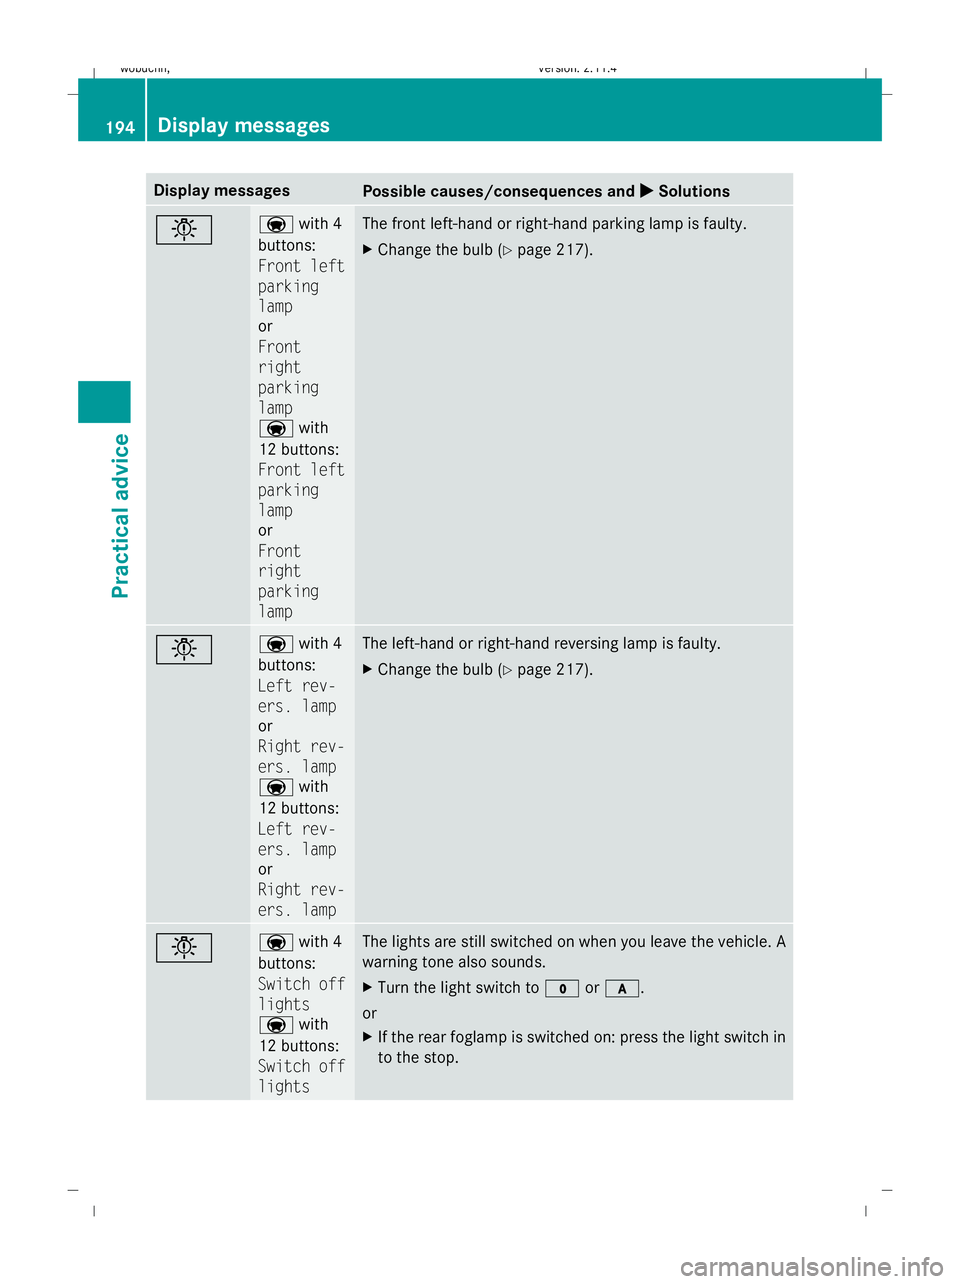
Display messages
Possible causes/consequences and
X
X Solutions b a
with 4
buttons:
Front left
parking
lamp
or
Front
right
parking
lamp
a with
12 buttons:
Front left
parking
lamp
or
Front
right
parking
lamp The front left-hand or right-hand parking lamp is faulty.
X
Change the bulb ( Ypage 217). b a
with 4
buttons:
Left rev-
ers. lamp
or
Right rev-
ers. lamp
a with
12 buttons:
Left rev-
ers. lamp
or
Right rev-
ers. lamp The left-hand or right-hand reversing lamp is faulty.
X
Change the bulb ( Ypage 217). b a
with 4
buttons:
Switch off
lights
a with
12 buttons:
Switch off
lights The lights are still switched on when you leave the vehicle. A
warning tone also sounds.
X
Turn the light switch to $orc.
or
X If the rear foglamp is switched on: press the light switch in
to the stop. 194 Display
messagesPractical advice
X204_AKB; 1; 5, en-GB
wobuchh,V ersion: 2.11.4
2008-10-15T13:20:56+02:00 - Seite 194 Dateiname: 6515_0671_02_buchblock.pdf; preflight