torque MERCEDES-BENZ GLK SUV 2008 Owners Manual
[x] Cancel search | Manufacturer: MERCEDES-BENZ, Model Year: 2008, Model line: GLK SUV, Model: MERCEDES-BENZ GLK SUV 2008Pages: 261, PDF Size: 8.67 MB
Page 17 of 261
Standard display
On-board computer (luxury multi-
function steering wheel). ..................95
On-board computer (multi-func-
tion steering wheel). .........................92
Station
see Radio
Steering wheel
Adjusting .......................................... 66
Buttons (on-board computer,
luxury multi-function steering
wheel). .............................................. 93
Buttons (on-board computer,
multi-function steering wheel) ..........91
Storing settings ................................ 69
Steering wheel boss
Cleaning. ........................................ 170
Steering wheel gearshift paddles....... 88
Stowage compartment ......................129
Armrest (under) .............................. 130
Glove compartment. .......................130
Rear seat armrest. ..........................131
Stowage compartments
Under driver's seat/front-
passenger seat. .............................. 130
Submenu (luxury multi-function
steering wheel)
Convenience ................................... 104
Factory settings .............................. 104
Instrument cluster .......................... 101
Lights ............................................ .102
Standard display. .............................. 95
Time/date. ..................................... 102
Vehicle............................................ 104
Summer opening
see Convenience opening
Sun visor............................................. 137
Supplemental Restraint System see SRS
Surround lighting
On-board computer (luxury multi-
function steering wheel) .................103
Switching off the alarm
ATA. .................................................. 55 T
Tailgate Display message ............................. 183
Emergency unlocking...................... 214
Limiting the opening angle................ 61
Tail lamp
Display message ............................. 191
Tail lamps
changing. ........................................ 220
Display message ............................. 191
Tail pipes
Cleaning. ........................................ 171
Tank
see Fuel tank
Tank capacity ..................................... 245
Technical data GLK 280 4MATIC ............................ 249
GLK 320 CDI 4MATIC .....................250
GLK 350 4MATIC ............................ 249
Trailer loads .................................... 254
Tyres. .............................................. 252
Wheels. ........................................... 252
Telephone
see Mobile phone
Telephone compartment ...................130
Temperature Coolant. ............................................ 90
Outside temperature......................... 90
Thermatic
Malfunction indicator lamp. ............199
Thermotronic
Malfunction indicator lamp. ............199
Tightening torque............................... 231
Time Setting (on-board computer,
luxury multi-function steering
wheel). ............................................ 102
Setting (on-board computer,
multi-function steering wheel)
......................................................... 93
TIREFIT kit
Using. ............................................. 222
TopTether .............................................. 49
Total distance recorder................. 92, 95
Tow-away protection........................... 55
Towing................................................. 23814 Index
X204_AKB; 1; 5, en-GB
wobuchh,
Version: 2.11.4 2008-10-15T13:20:56+02:00 - Seite 14Dateiname: 6515_0671_02_buchblock.pdf; preflight
Page 19 of 261
Washer fluid reservoir...............
149, 249
Filling capacity. ............................... 249
Wearing seat belts............................... 70
Wheel bolts Tightening torque............................ 231
Wheel chock
Use. ................................................ 176
Wheels
General notes. ................................ 150
Interchanging.................................. 154
Technical data. ............................... 252
Windowbag........................................... 39
Windowbags Display message (luxury multi-
function steering wheel) .................198
Display message (multi-function
steering wheel). .............................. 182
Windows
Cleaning. ........................................ 169
Cleaning the windscreen ...............169
see Side windows
Windscreen washer fluid................... 249
Topping up. ..................................... 149
Windscreen washer system...... 149, 249
Windscreen wipers.............................. 79
Cleaning. ........................................ 169
Malfunction..................................... 210
Replacing the wiper blades .............220
Winter diesel...................................... 146
Winter driving............................. 155, 156
Winter tyres ........................................ 155
Limit speed (on-board computer,
luxury multi-function steering
wheel). ............................................ 113
Wooden trim
Cleaning. ........................................ 17116 Index
X204_AKB; 1; 5, en-GB
wobuchh,
Version: 2.11.4 2008-10-15T13:20:56+02:00 - Seite 16Dateiname: 6515_0671_02_buchblock.pdf; preflight
Page 56 of 261
i
Only use wheels with the recommended
tyre sizes. Only then will ESP ®
function
properly.
ESP ®
trailer stabilisation If your trailer begins to lurch, you can only
stabilise the vehicle/trailer combination by
depressing the brake firmly.
In this situation, ESP
®
assists you and detects
if the trailer begins to lurch. ESP ®
slows the
vehicle down by braking and limiting the
engine output until the vehicle/trailer com-
bination has stabilised.
Trailer stabilisation is active above speeds of
about 65 km/h. G
Risk of accident
If road and weather conditions are bad, trailer
stabilisation will not be able to prevent the
trailer from swerving and thereby reduce the
risk of accident. Trailers with a high centre of
gravity can tip over before ESP ®
can detect
this.
Trailer stabilisation does not work if ESP ®
is
deactivated or disabled because of a mal-
function.
ETS (Electronic Traction Support) Traction control is part of ESP
®
.
Traction control brakes the drive wheels indi-
vidually if they spin. This enables you to pull
away and accelerate on slippery surfaces, for
example, if the road surface is slippery on one
side.
Traction control remains active when you
deactivate ESP ®
. G
Risk of accident
Traction control cannot reduce the risk of an
accident if you drive too fast. Traction control
cannot override the laws of physics.
i If heavy demands are made on the brakes,
traction control switches off automatically
for a brief period so that the brakes do not heat up even further. If traction control
does not intervene for this reason, the
d
warning lamp in the instrument clus-
ter lights up. In addition the multi-function
display shows one of the following mes-
sages: ESP inoperative (vehicles with 4-
button multi-function steering wheel) or
ESP currently unavail. See Owner's
Manual (vehicles with 12-button luxury
multi-function steering wheel)*.
Activating/deactivating ESP ® ESP
®
is activated automatically when the
engine is running.
It may be best to deactivate ESP ®
in the fol-
lowing situations:
R when using snow chains
R in deep snow
R on sand or gravel G
Risk of accident
Activate ESP ®
as soon as the situations
described above no longer apply. ESP ®
will
otherwise not be able to stabilise the vehicle
if the vehicle starts to skid or a wheel starts
to spin.
If you deactivate ESP ®
:
R ESP ®
no longer improves driving stability.
R the engine's torque is no longer limited and
the drive wheels can spin. Spinning of the
wheels results in a cutting action, which
provides better grip.
R traction control is still activated.
R ESP ®
still provides support when you
brake.
i If ESP ®
is deactivated and one or more
wheels start to spin, the dwarning lamp
in the instrument cluster flashes. In such
situations, ESP ®
will not stabilise the vehi-
cle. Driving safety systems
53Safety
* optional
X204_AKB; 1; 5, en-GB
wobuchh,
Version: 2.11.4 2008-10-15T13:20:56+02:00 - Seite 53 ZDateiname: 6515_0671_02_buchblock.pdf; preflight
Page 157 of 261
Yes+ Cancel-
To confirm the restart of the tyre pressure
loss warning system:
X Press the +button.
The following appears in the multi-function
display: Run Flat Indicator restar-
ted.
After a teach-in period, the tyre pressure
loss warning system will monitor the set
tyre pressures of all four tyres.
or
To cancel the restart of the tyre pressure
loss warning system:
X Press the -button.
The previous settings will not be changed.
Configuring with the luxury multi-func-
tion steering wheel*
X Make sure that the key is in position 2in
the ignition lock.
X Press the (or& button to select the
Service menu.
X Press the $or% button to select
Tyre pressure.
X Press #.
The following appears in the multi-function
display: Run Flat Indicator active
Restart with OK
X Press #.
The following appears in the multi-function
display: Tyre press. now OK?
To confirm the restart of the tyre pressure
loss warning system:
X Press $or% to select Yes.
X Press #.
The following appears in the multi-function
display: Run Flat Indicator restarted
After a teach-in period, the tyre pressure
loss warning system will monitor the set
tyre pressures of all four tyres.
or
To cancel the restart of the tyre pressure
loss warning system: X
Press $or% to select Cancel.
X Press #.
The previous settings will not be changed. Interchanging the wheels
G
Risk of accident
Interchange the front and rear wheels only if
they have the same dimensions: for example
size, offset, etc.
After every wheel interchange/change, have
the tightening torque checked at a qualified
specialist workshop that has the necessary
specialist knowledge and tools to carry out
the work required. Mercedes-Benz recom-
mends that you use a Mercedes-Benz Service
Centre for this purpose. In particular, work
relevant to safety or on safety-related sys-
tems must be carried out at a qualified spe-
cialist workshop.
The wheels could work loose if they are not
tightened to a torque of 150 Nm.
For safety reasons, Mercedes-Benz recom-
mends that you only use wheel bolts of the
correct size which have been approved for
Mercedes-Benz vehicles.
The wear patterns on the front and rear tyres
differ, depending on the operating conditions.
Interchange the wheels before a clear wear
pattern has formed on the tyres. Front tyres
typically wear more on the shoulders and the
rear tyres in the centre.
Interchange the wheels every 5,000 km to
10,000 km depending on the degree of tyre
wear, provided that the vehicle has the same
size front and rear tyres. Do not reverse the
direction of tyre rotation.
Clean the contact surfaces of the wheel and
the brake disc thoroughly every time a wheel
is interchanged. Check the tyre pressure and,
if necessary, restart the tyre pressure loss
warning system. 154 Tyres and wheelsOperation
* optional
X204_AKB; 1; 5, en-GB
wobuchh,
Version: 2.11.4 2008-10-15T13:20:56+02:00 - Seite 154Dateiname: 6515_0671_02_buchblock.pdf; preflight
Page 163 of 261
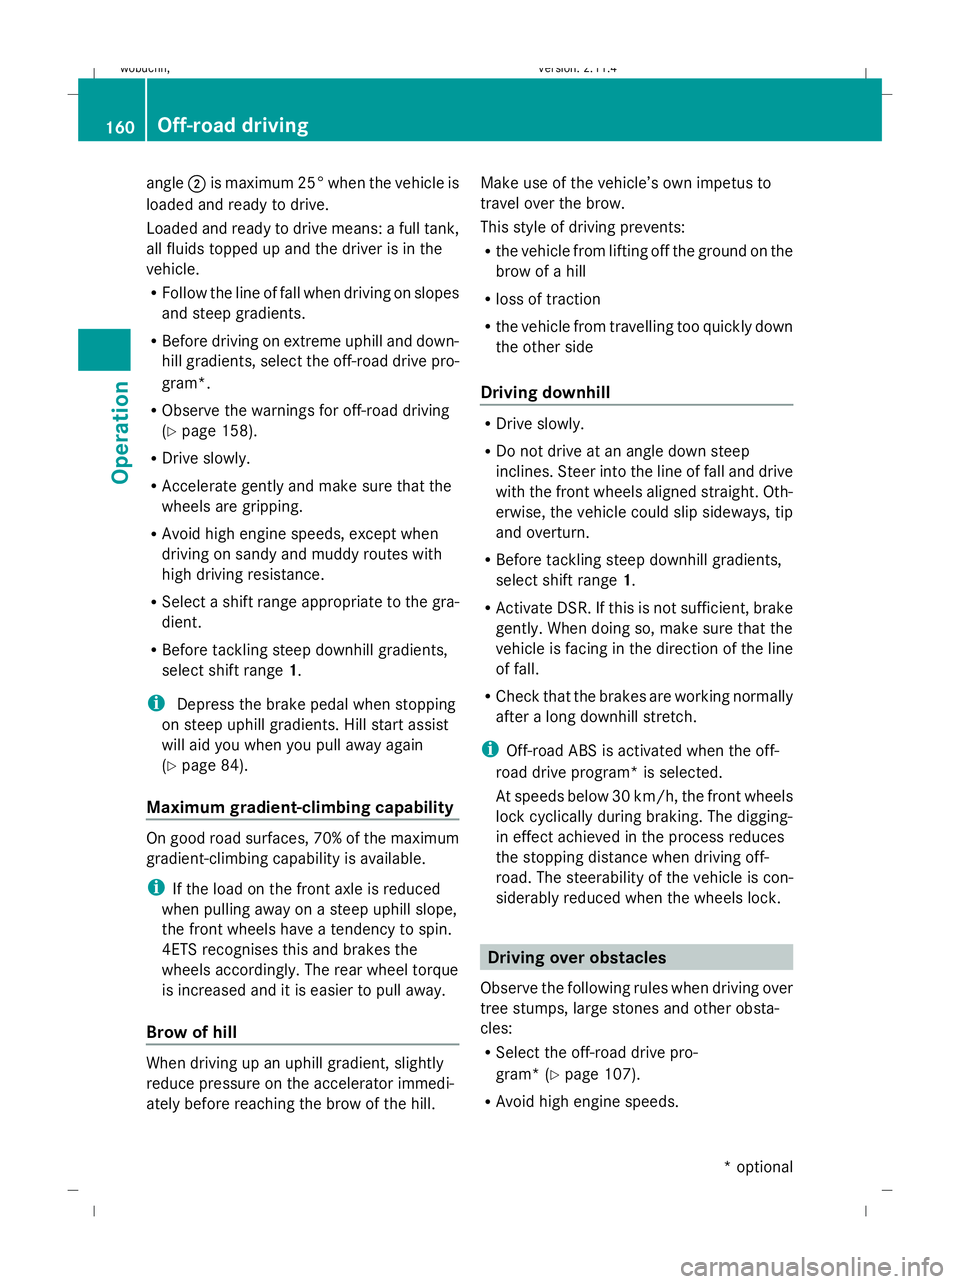
angle
;is maximum 25° when the vehicle is
loaded and ready to drive.
Loaded and ready to drive means: a full tank,
all fluids topped up and the driver is in the
vehicle.
R Follow the line of fall when driving on slopes
and steep gradients.
R Before driving on extreme uphill and down-
hill gradients, select the off-road drive pro-
gram*.
R Observe the warnings for off-road driving
(Y page 158).
R Drive slowly.
R Accelerate gently and make sure that the
wheels are gripping.
R Avoid high engine speeds, except when
driving on sandy and muddy routes with
high driving resistance.
R Select a shift range appropriate to the gra-
dient.
R Before tackling steep downhill gradients,
select shift range 1.
i Depress the brake pedal when stopping
on steep uphill gradients. Hill start assist
will aid you when you pull away again
(Y page 84).
Maximum gradient-climbing capability On good road surfaces, 70% of the maximum
gradient-climbing capability is available.
i If the load on the front axle is reduced
when pulling away on a steep uphill slope,
the front wheels have a tendency to spin.
4ETS recognises this and brakes the
wheels accordingly. The rear wheel torque
is increased and it is easier to pull away.
Brow of hill When driving up an uphill gradient, slightly
reduce pressure on the accelerator immedi-
ately before reaching the brow of the hill. Make use of the vehicle’s own impetus to
travel over the brow.
This style of driving prevents:
R
the vehicle from lifting off the ground on the
brow of a hill
R loss of traction
R the vehicle from travelling too quickly down
the other side
Driving downhill R
Drive slowly.
R Do not drive at an angle down steep
inclines. Steer into the line of fall and drive
with the front wheels aligned straight. Oth-
erwise, the vehicle could slip sideways, tip
and overturn.
R Before tackling steep downhill gradients,
select shift range 1.
R Activate DSR. If this is not sufficient, brake
gently. When doing so, make sure that the
vehicle is facing in the direction of the line
of fall.
R Check that the brakes are working normally
after a long downhill stretch.
i Off-road ABS is activated when the off-
road drive program *is selected.
At speeds below 30 km/h, the front wheels
lock cyclically during braking. The digging-
in effect achieved in the process reduces
the stopping distance when driving off-
road. The steerability of the vehicle is con-
siderably reduced when the wheels lock. Driving over obstacles
Observe the following rules when driving over
tree stumps, large stones and other obsta-
cles:
R Select the off-road drive pro-
gram* (Y page 107).
R Avoid high engine speeds. 160 Off-road drivingOperation
* optional
X204_AKB; 1; 5, en-GB
wobuchh,
Version: 2.11.4 2008-10-15T13:20:56+02:00 - Seite 160Dateiname: 6515_0671_02_buchblock.pdf; preflight
Page 234 of 261
X
Version 1: open flap1.
X Version 1: pull connector 3and air hose
4 out of the housing.
X Version 2: pull connector 3and the air
hose out of the housing.
X Version 1: make sure that pressure
release screw 4on the pressure gauge is
fully closed.
X Remove the cap from the valve on the tyre.
X Screw union nut 5on the air hose onto the
valve.
X Make sure on/off switch 2of the electric
air pump is set to 0.
X Insert plug 3into the cigarette lighter
socket* (Y page 138) or into a 12 V socket
in your vehicle (Y page 139).
X Make sure that the key is in posi-
tion 2(Y page 61) in the ignition lock.
X Press on/off switch 2on the electric air
pump to I.
The electric air pump is switched on. The
tyre is inflated.
X When a tyre pressure of 2.8 bar is reached,
press on/off switch 2on the electric air
pump to 0.
The electric air pump is switched off.
! Do not operate the electric air pump for
longer than eight minutes at a time without
a break. Otherwise, it may overheat.
The air pump can be operated again once
it has cooled down.
If the tyre pressure is higher than 2.8 bar:
X Version 1: open pressure release
screw 4on the pressure gauge until the
tyre pressure is correct.
X Version 2: press pressure release button
6 until the tyre pressure is correct.
X Switch off the electric air pump at on/off
switch 2, disconnect from the tyre valve
and stow away. Lowering the vehicle X
Place the ratchet ring spanner onto the
hexagon nut of the jack so that the letters
AB are visible.
X Lower the vehicle by turning the ratchet
ring spanner until the vehicle is once again
standing firmly on the ground.
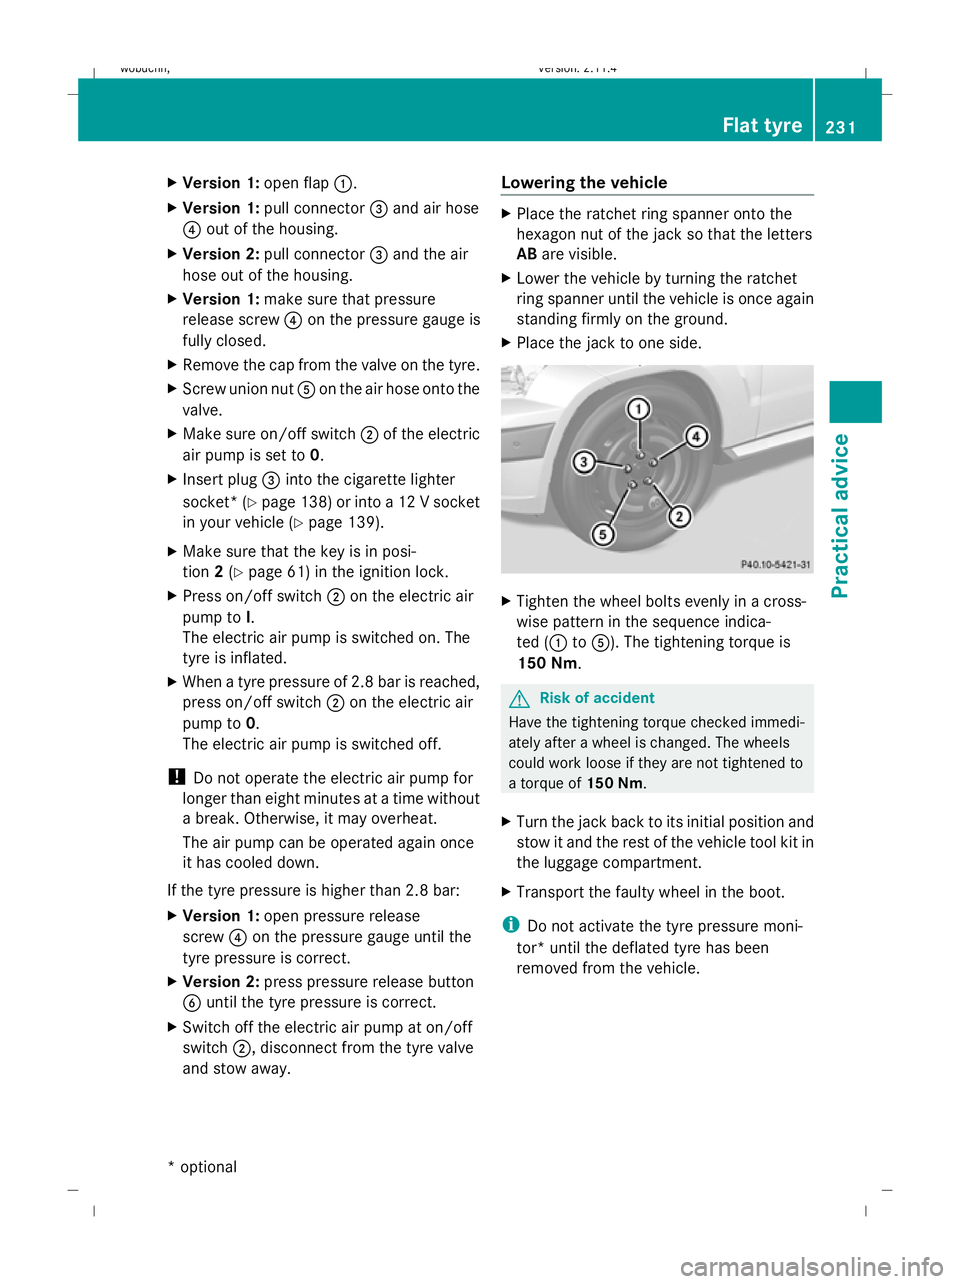
X Place the jack to one side. X
Tighten the wheel bolts evenly in a cross-
wise pattern in the sequence indica-
ted (1 to5). The tightening torque is
150 Nm. G
Risk of accident
Have the tightening torque checked immedi-
ately after a wheel is changed. The wheels
could work loose if they are not tightened to
a torque of 150 Nm.
X Turn the jack back to its initial position and
stow it and the rest of the vehicle tool kit in
the luggage compartment.
X Transport the faulty wheel in the boot.
i Do not activate the tyre pressure moni-
tor* until the deflated tyre has been
removed from the vehicle. Flat tyre
231Practical advice
* optional
X204_AKB; 1; 5, en-GB
wobuchh,
Version: 2.11.4 2008-10-15T13:20:56+02:00 - Seite 231 ZDateiname: 6515_0671_02_buchblock.pdf; preflight
Page 252 of 261
Windscreen washer system
The washer fluid reservoir holds approxi-
mately 6.0 litres.
The headlamp cleaning system* and wind-
screen washer system are both supplied from
the washer fluid reservoir.
Further information on windscreen washer
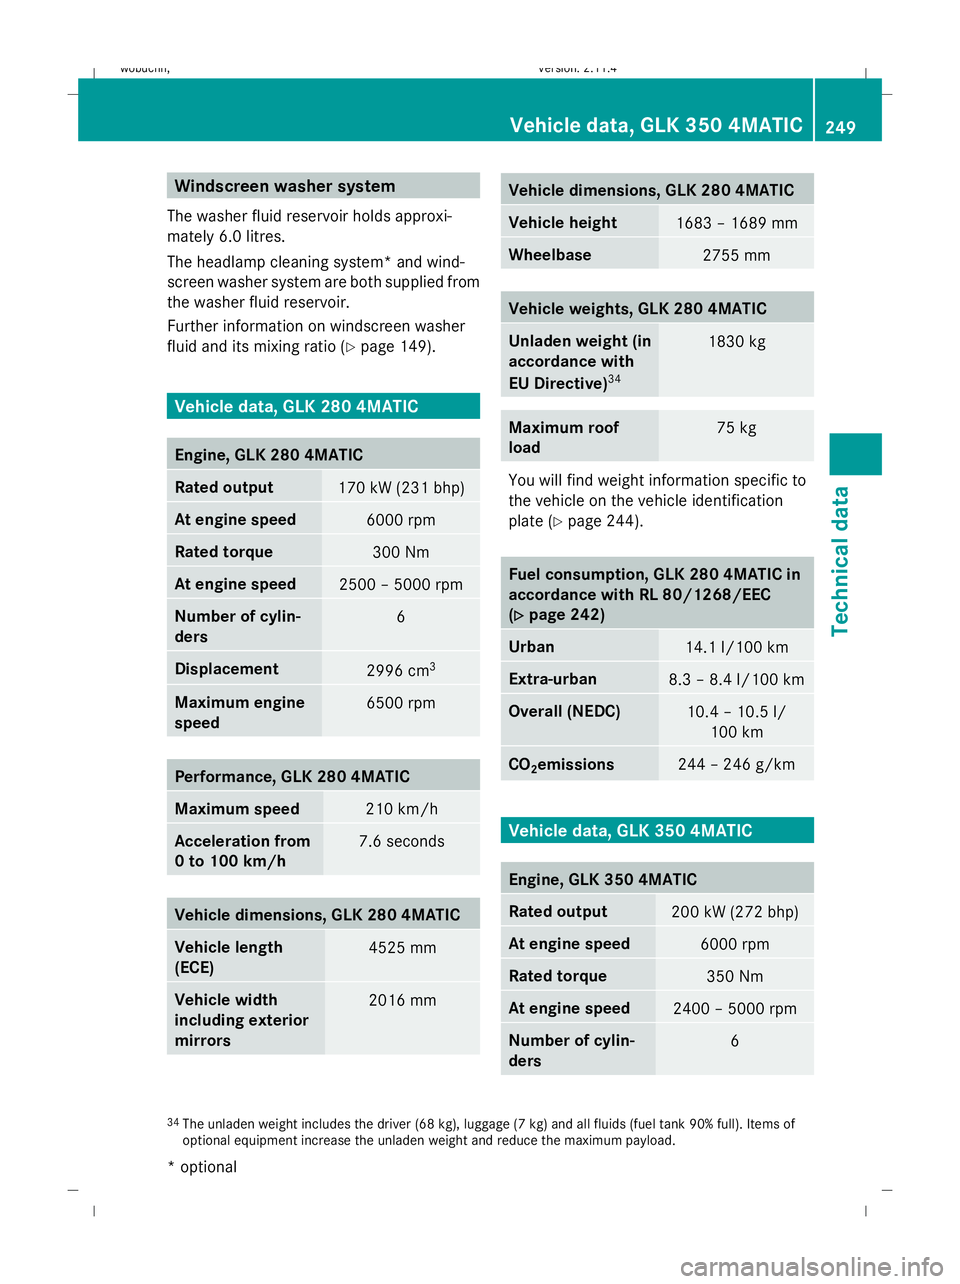
fluid and its mixing ratio (Y page 149).Vehicle data, GLK 280 4MATIC
Engine, GLK 280 4MATIC
Rated output
170 kW (231 bhp)
At engine speed
6000 rpm
Rated torque
300 Nm
At engine speed
2500 – 5000 rpm
Number of cylin-
ders
6
Displacement
2996 cm
3 Maximum engine
speed
6500 rpm
Performance, GLK 280 4MATIC
Maximum speed
210 km/h
Acceleration from
0 to 100 km/h
7.6 seconds
Vehicle dimensions, GLK 280 4MATIC
Vehicle length
(ECE)
4525 mm
Vehicle width
including exterior
mirrors
2016 mm Vehicle dimensions, GLK 280 4MATIC
Vehicle height
1683 – 1689 mm
Wheelbase
2755 mm
Vehicle weights, GLK 280 4MATIC
Unladen weight (in
accordance with
EU Directive)
34 1830 kg
Maximum roof
load
75 kg
You will find weight information specific to
the vehicle on the vehicle identification
plate (Y
page 244). Fuel consumption, GLK 280 4MATIC in
accordance with RL 80/1268/EEC
(Y
Y page 242) Urban
14.1 l/100 km
Extra-urban
8.3 – 8.4 l/100 km
Overall (NEDC)
10.4 – 10.5 l/
100 km CO
2emissions 244 – 246 g/km
Vehicle data, GLK 350 4MATIC
Engine, GLK 350 4MATIC
Rated output
200 kW (272 bhp)
At engine speed
6000 rpm
Rated torque
350 Nm
At engine speed
2400 – 5000 rpm
Number of cylin-
ders
6
34
The unladen weight includes the driver (68 kg), luggage (7 kg) and all fluids (fuel tank 90% full). Items of
optional equipment increase the unladen weight and reduce the maximum payload. Vehicle data, GLK 350 4MATIC
249Technical data
* optional
X204_AKB; 1; 5, en-GB
wobuchh,
Version: 2.11.4 2008-10-15T13:20:56+02:00 - Seite 249 ZDateiname: 6515_0671_02_buchblock.pdf; preflight
Page 253 of 261
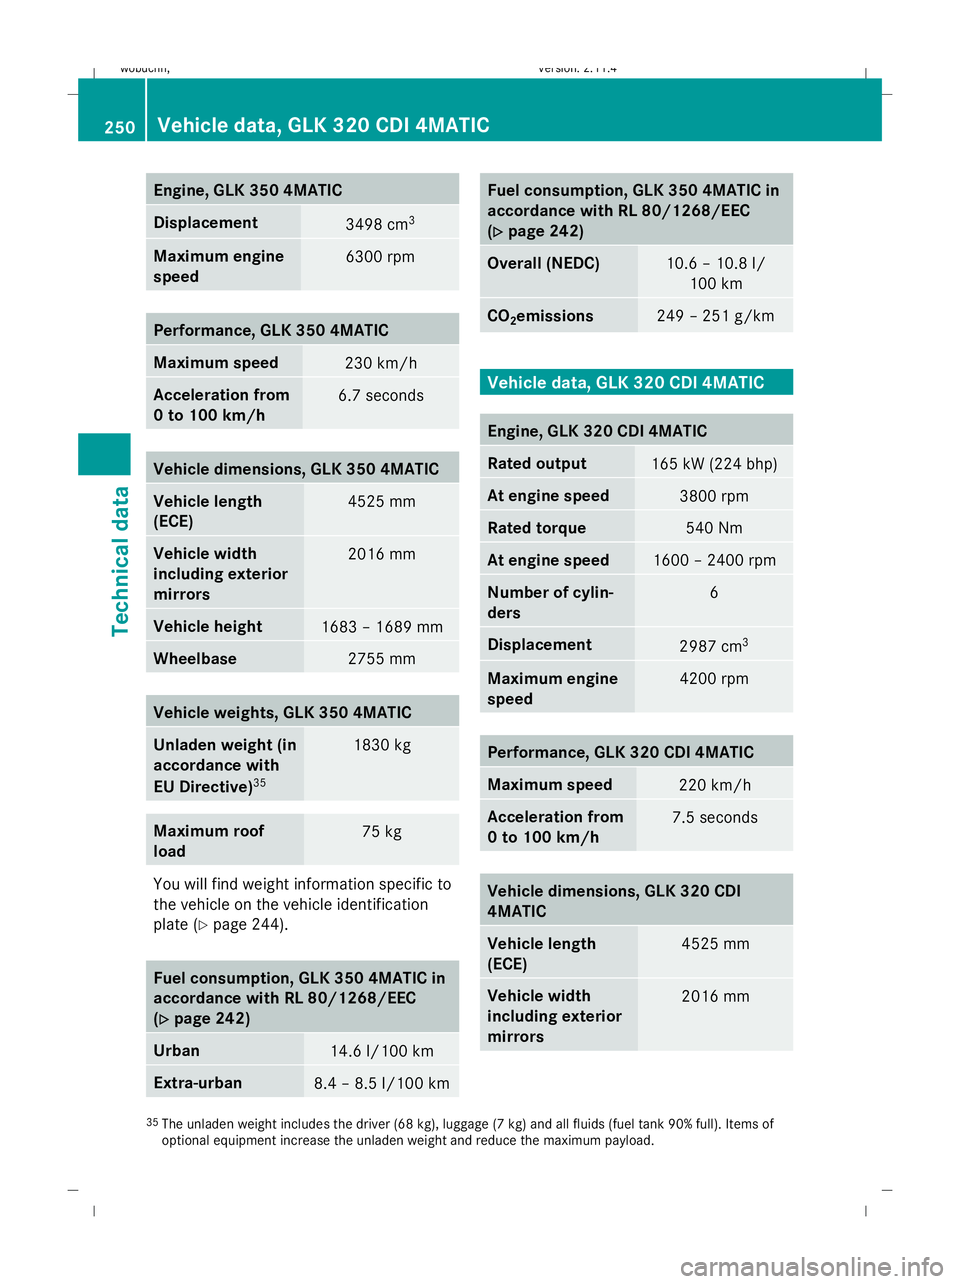
Engine, GLK 350 4MATIC
Displacement
3498 cm
3 Maximum engine
speed
6300 rpm
Performance, GLK 350 4MATIC
Maximum speed
230 km/h
Acceleration from
0 to 100 km/h
6.7 seconds
Vehicle dimensions, GLK 350 4MATIC
Vehicle length
(ECE)
4525 mm
Vehicle width
including exterior
mirrors
2016 mm
Vehicle height
1683 – 1689 mm
Wheelbase
2755 mm
Vehicle weights, GLK 350 4MATIC
Unladen weight (in
accordance with
EU Directive)
35 1830 kg
Maximum roof
load
75 kg
You will find weight information specific to
the vehicle on the vehicle identification
plate (Y page 244). Fuel consumption, GLK 350 4MATIC in
accordance with RL 80/1268/EEC
(Y Y page 242) Urban
14.6 l/100 km
Extra-urban
8.4 – 8.5 l/100 km Fuel consumption, GLK 350 4MATIC in
accordance with RL 80/1268/EEC
(Y
Y page 242) Overall (NEDC)
10.6 – 10.8 l/
100 km CO
2emissions 249 – 251 g/km
Vehicle data, GLK 320 CDI 4MATIC
Engine, GLK 320 CDI 4MATIC
Rated output
165 kW (224 bhp)
At engine speed
3800 rpm
Rated torque
540 Nm
At engine speed
1600 – 2400 rpm
Number of cylin-
ders 6
Displacement
2987 cm
3 Maximum engine
speed
4200 rpm
Performance, GLK 320 CDI 4MATIC
Maximum speed
220 km/h
Acceleration from
0 to 100 km/h
7.5 seconds
Vehicle dimensions, GLK 320 CDI
4MATIC Vehicle length
(ECE) 4525 mm
Vehicle width
including exterior
mirrors 2016 mm
35
The unladen weight includes the driver (68 kg), luggage (7 kg) and all fluids (fuel tank 90% full). Items of
optional equipment increase the unladen weight and reduce the maximum payload. 250 Vehicle data, GLK 320 CDI 4MATICTechnical data
X204_AKB; 1; 5, en-GB
wobuchh,
Version: 2.11.4 2008-10-15T13:20:56+02:00 - Seite 250Dateiname: 6515_0671_02_buchblock.pdf; preflight