child restraint MERCEDES-BENZ GLK SUV 2012 User Guide
[x] Cancel search | Manufacturer: MERCEDES-BENZ, Model Year: 2012, Model line: GLK SUV, Model: MERCEDES-BENZ GLK SUV 2012Pages: 381, PDF Size: 12.68 MB
Page 59 of 381
The front-passenger airbag is not disabled:
R
on vehicles without automatic child seat
recognition on the front-passenger seat
R in vehicles with automatic child seat rec-
ognition in the front-passenger seat, if no
special child restraint system with trans-
ponders for automatic child seat recogni-
tion in the front-passenger seat has been
fitted
R on vehicles with automatic child seat rec-
ognition on the front-passenger seat, if the
PASSENGER AIRBAG OFF indicator lamp
4 is not lit.
To make you aware of this danger, a corre-
sponding warning sticker has been affixed on
the dashboard and on both sides of the sun
visor on the front-passenger side.
Information about recommended child
restraint systems is available at any
Mercedes-Benz Service Centre.
Do not use a rearward-facing child restraint
system for a child on a seat which is already
protected by an airbag.
Automatic child seat recognition on the
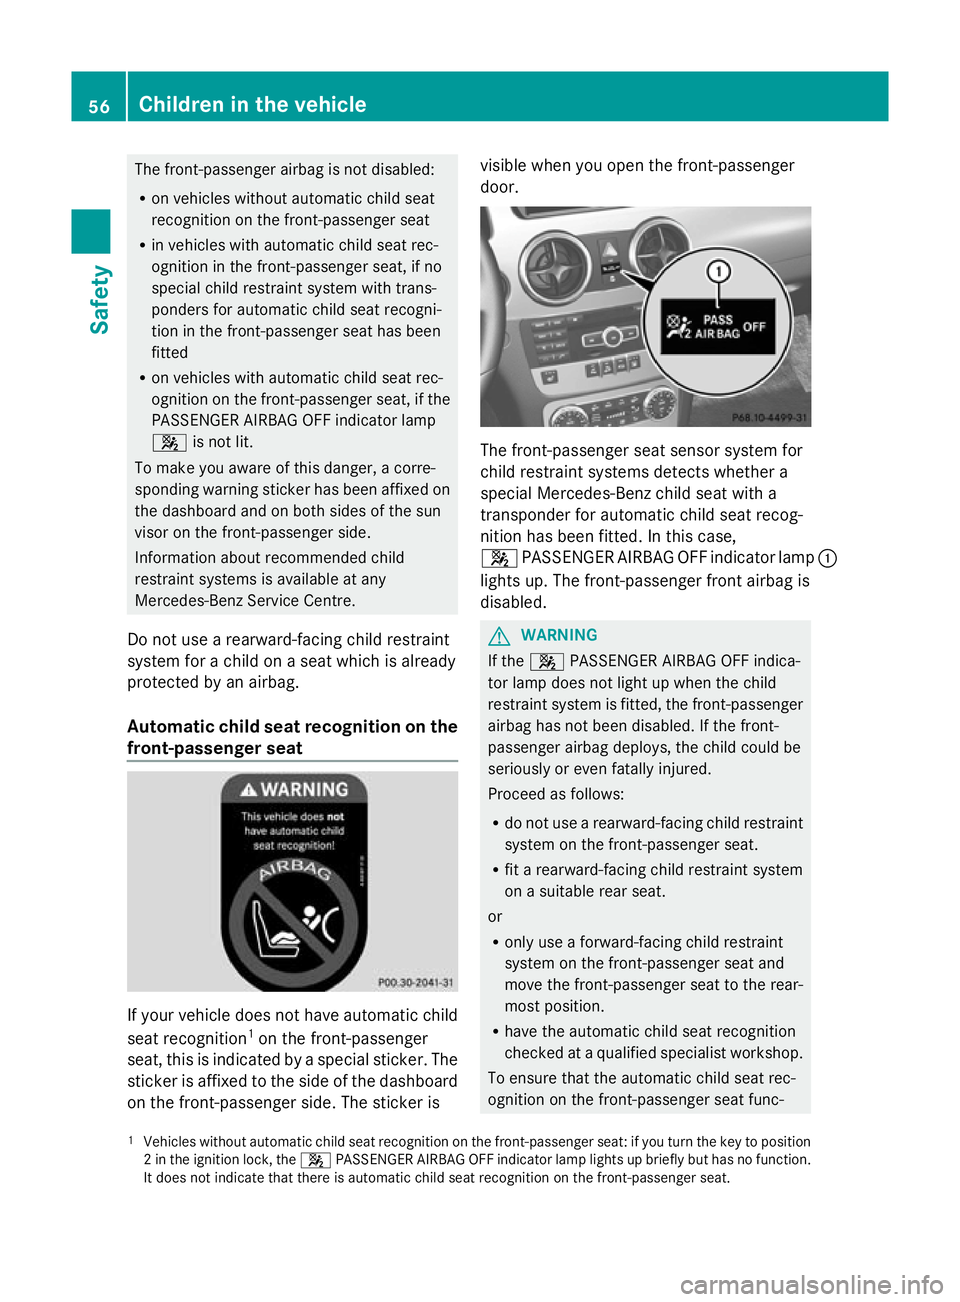
front-passenger seat If your vehicle does not have automatic child
seat recognition 1
on the front-passenger
seat, this is indicated by a special sticker. The
sticker is affixed to the side of the dashboard
on the front-passenger side. The sticker is visible when you open the front-passenger
door.
The front-passenger seat sensor system for
child restraint systems detects whether a
special Mercedes-Benz child seat with a
transponder for automatic child seat recog-
nition has been fitted. In this case,
4
PASSENGER AIRBAG OFF indicator lamp :
lights up. The front-passenger front airbag is
disabled. G
WARNING
If the 4 PASSENGER AIRBAG OFF indica-
tor lamp does not light up when the child
restraint system is fitted, the front-passenger
airbag has not been disabled. If the front-
passenger airbag deploys, the child could be
seriously or even fatally injured.
Proceed as follows:
R do not use a rearward-facing child restraint
system on the front-passenger seat.
R fit a rearward-facing child restraint system
on a suitable rear seat.
or
R only use a forward-facing child restraint
system on the front-passenger seat and
move the front-passenger seat to the rear-
most position.
R have the automatic child seat recognition
checked at a qualified specialist workshop.
To ensure that the automatic child seat rec-
ognition on the front-passenger seat func-
1 Vehicles without automatic child seat recognition on the front-passenger seat: if you turn the key to position
2 in the ignition lock, the 4PASSENGER AIRBAG OFF indicator lamp lights up briefly but has no function.
It does not indicate that there is automatic child seat recognition on the front-passenger seat. 56
Children in the vehicleSafety
Page 60 of 381
tions/communicates correctly, never place
objects, e.g. a cushion, under the child
restraint system. The entire base of the child
restraint system must always rest on the seat
cushion. An incorrectly fitted child restraint
system cannot perform its intended protec-
tive function in the event of an accident, and
could lead to injuries.
i If the front-passenger front airbag is dis-
abled by the automatic child seat recogni-
tion, the following remain enabled on the
front-passenger side:
R the sidebag
R the pelvisbag
R the windowbag
R the belt tensioner G
WARNING
Do not place electronic devices on the front-
passenger seat, e.g.:
R laptops, when switched on
R mobile phones
R cards with transponders, e.g. ski passes or
access cards
Signals from electronic equipment can cause
interference in the automatic child seat rec-
ognition sensor system. This can lead to a
system malfunction. This may cause the
4 PASSENGER AIRBAG OFF indicator
lamp to light up without there being a child
seat with transponders for automatic child
seat recognition fitted. The front-passenger
airbag will not then deploy during an accident.
It is also possible that the 6SRS warning
lamp lights up and/or the 4PASSENGER
AIRBAG OFF indicator lamp does not light up
briefly when you turn the key in the ignition
lock to position 2.
ISOFIX child seat securing system for
the rear seats ISOFIX is a standardised securing system for
specially designed child restraint systems on
the rear seats. Securing rings for two ISOFIX child restraint systems are fitted on the left
and right of the rear seats. G
WARNING
A child restraint system secured by the ISOFIX
child seat securing system does not provide
sufficient protection for children weighing
more than 22 kg. For this reason, do not
secure children weighing more than 22 kg in
a child restraint system secured by the ISOFIX
child seat securing system. If the child weighs
more than 22 kg, secure the child restraint
system with the vehicle seat belt as well. In
addition, when fitting a child restraint system,
be sure to observe the manufacturer's instal-
lation instructions and the instructions for
correct use of the child restraint system. G
WARNING
The child restraint system cannot perform its
protective function if it is not correctly fitted
to a suitable vehicle seat. The child cannot be
restrained in the event of an accident, heavy
braking or sudden changes of direction. The
child could be seriously or even fatally injured.
For this reason, when fitting a child restraint
system, be sure to observe the manufactur-
er's installation instructions and the instruc-
tions for correct use of the child restraint sys-
tem.
For safety reasons, when installing child
restraint systems on the rear seats, only use
child restraint systems with the ISOFIX child
seat securing system, which are specially tes-
ted and approved for Mercedes-Benz vehi-
cles.
An incorrectly fitted child restraint system
could come loose and seriously or even fatally
injure the child or other vehicle occupants.
When fitting the child restraint system, always
make sure that it is engaged correctly in the
securing rings on both sides. G
WARNING
Please note that if child restraint systems, or
their retaining systems, are damaged or sub-
jected to a load in an accident, they may not Children in the vehicle
57Safety
Z
Page 61 of 381
be able to provide their protective function.
This could result in serious or even fatal inju-
ries to the secured child in the event of an
accident, heavy braking or a sudden change
in direction.
For this reason, have child restraint systems
and their anchorages which have been dam-
aged or subjected to a load in an accident
checked immediately at a qualified specialist
workshop.
! When fitting the child restraint system,
make sure that the seat belt for the centre
seat does not get trapped. Otherwise, the
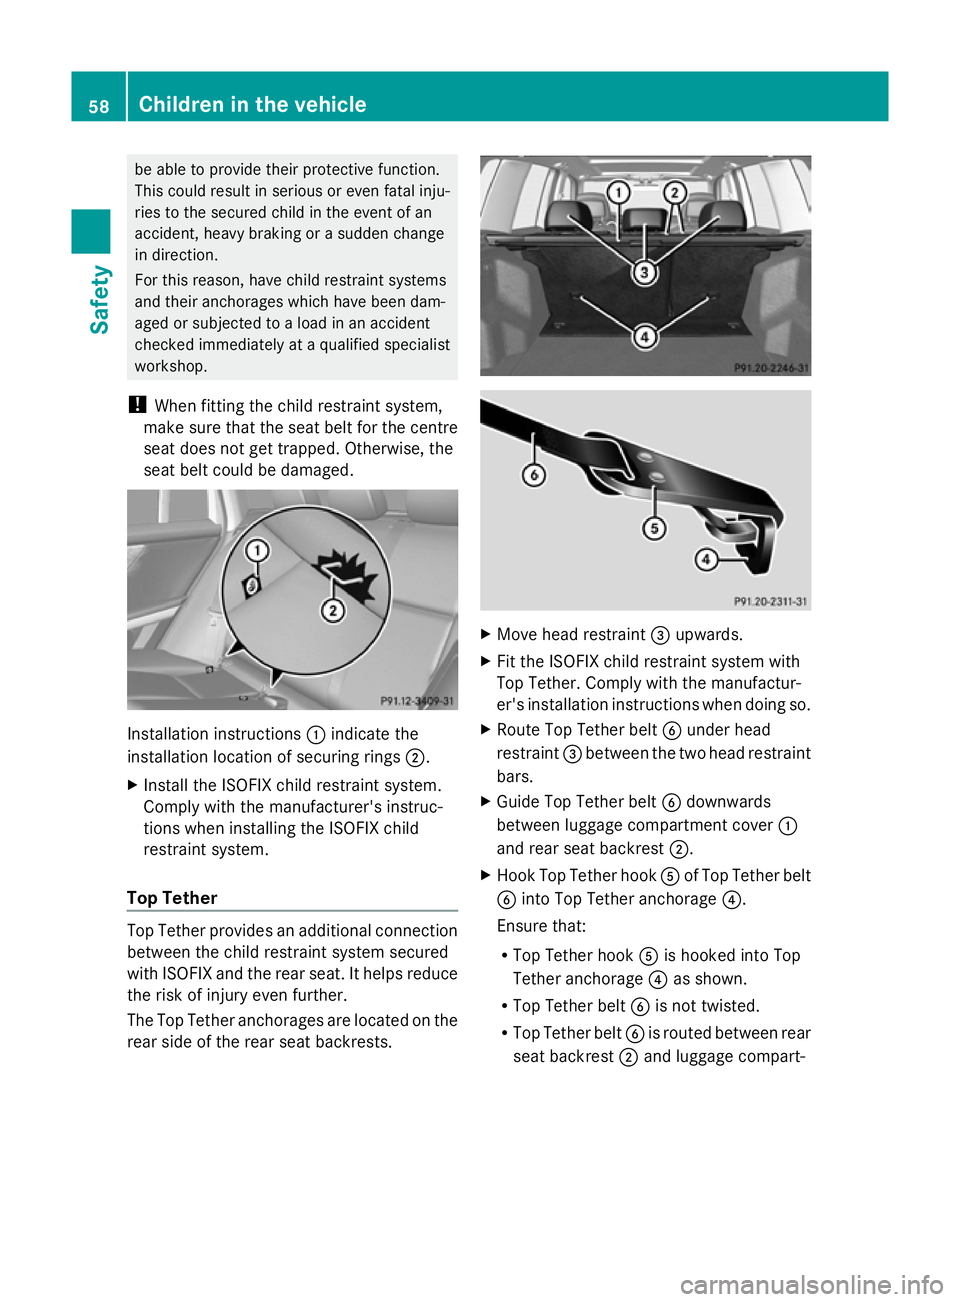
seat belt could be damaged. Installation instructions
:indicate the
installation location of securing rings 2.
X Install the ISOFIX child restraint system.
Comply with the manufacturer's instruc-
tions when installing the ISOFIX child
restraint system.
Top Tether Top Tether provides an additional connection
between the child restraint system secured
with ISOFIX and the rear seat. It helps reduce
the risk of injury even further.
The Top Tether anchorages are located on the
rear side of the rear seat backrests. X
Move head restraint =upwards.
X Fit the ISOFIX child restraint system with
Top Tether. Comply with the manufactur-
er's installation instructions when doing so.
X Route Top Tether belt Bunder head
restraint =between the two head restraint
bars.
X Guide Top Tether belt Bdownwards
between luggage compartment cover :
and rear seat backrest ;.
X Hook Top Tether hook Aof Top Tether belt
B into Top Tether anchorage ?.
Ensure that:
R Top Tether hook Ais hooked into Top
Tether anchorage ?as shown.
R Top Tether belt Bis not twisted.
R Top Tether belt Bis routed between rear
seat backrest ;and luggage compart- 58
Children in the vehicleSafety
Page 62 of 381
ment cover
:if luggage compartment
cover :is fitted.
R Top Tether belt Bis routed between rear
seat backrest ;and the safety net if the
safety net is fitted.
X Move head restraint =back down again
slightly if necessary (Y page 99). Make
sure that you do not interfere with the cor-
rect routing of Top Tether belt B. Children in the vehicle
59Safety Z
Page 63 of 381
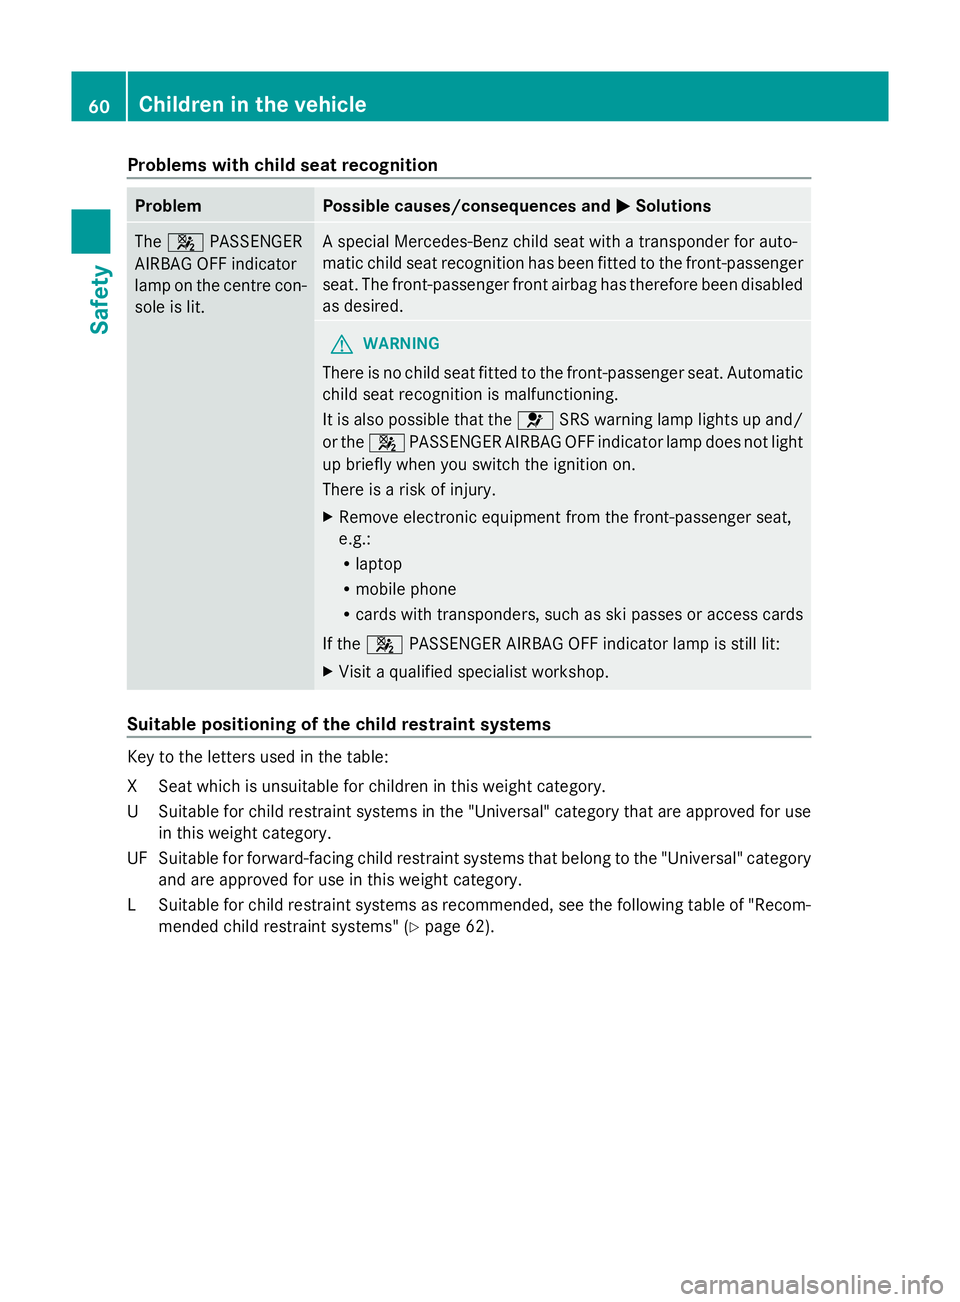
Problems with child seat recognition
Problem Possible causes/consequences and
M
MSolutions The
4 PASSENGER
AIRBAG OFF indicator
lamp on the centre con-
sole is lit. A special Mercedes-Benz child seat with a transponder for auto-
matic child seat recognition has been fitted to the front-passenger
seat. The front-passenger front airbag has therefore been disabled
as desired.
G
WARNING
There is no child seat fitted to the front-passenger seat. Automatic
child seat recognition is malfunctioning.
It is also possible that the 6SRS warning lamp lights up and/
or the 4PASSENGER AIRBAG OFF indicator lamp does not light
up briefly when you switch the ignition on.
There is a risk of injury.
X Remove electronic equipment from the front-passenger seat,
e.g.:
R
laptop
R mobile phone
R cards with transponders, such as ski passes or access cards
If the 4 PASSENGER AIRBAG OFF indicator lamp is still lit:
X Visit a qualified specialist workshop. Suitable positioning of the child restraint systems
Key to the letters used in the table:
XS
eat which is unsuitable for children in this weight category.
US uitable for child restraint systems in the "Universal" category that are approved for use
in this weight category.
UF Suitable for forward-facing child restraint systems that belong to the "Universal" category and are approved for use in this weight category.
LS uitable for child restraint systems as recommended, see the following table of "Recom-
mended child restraint systems" (Y page 62).60
Children in the vehicleSafety
Page 64 of 381
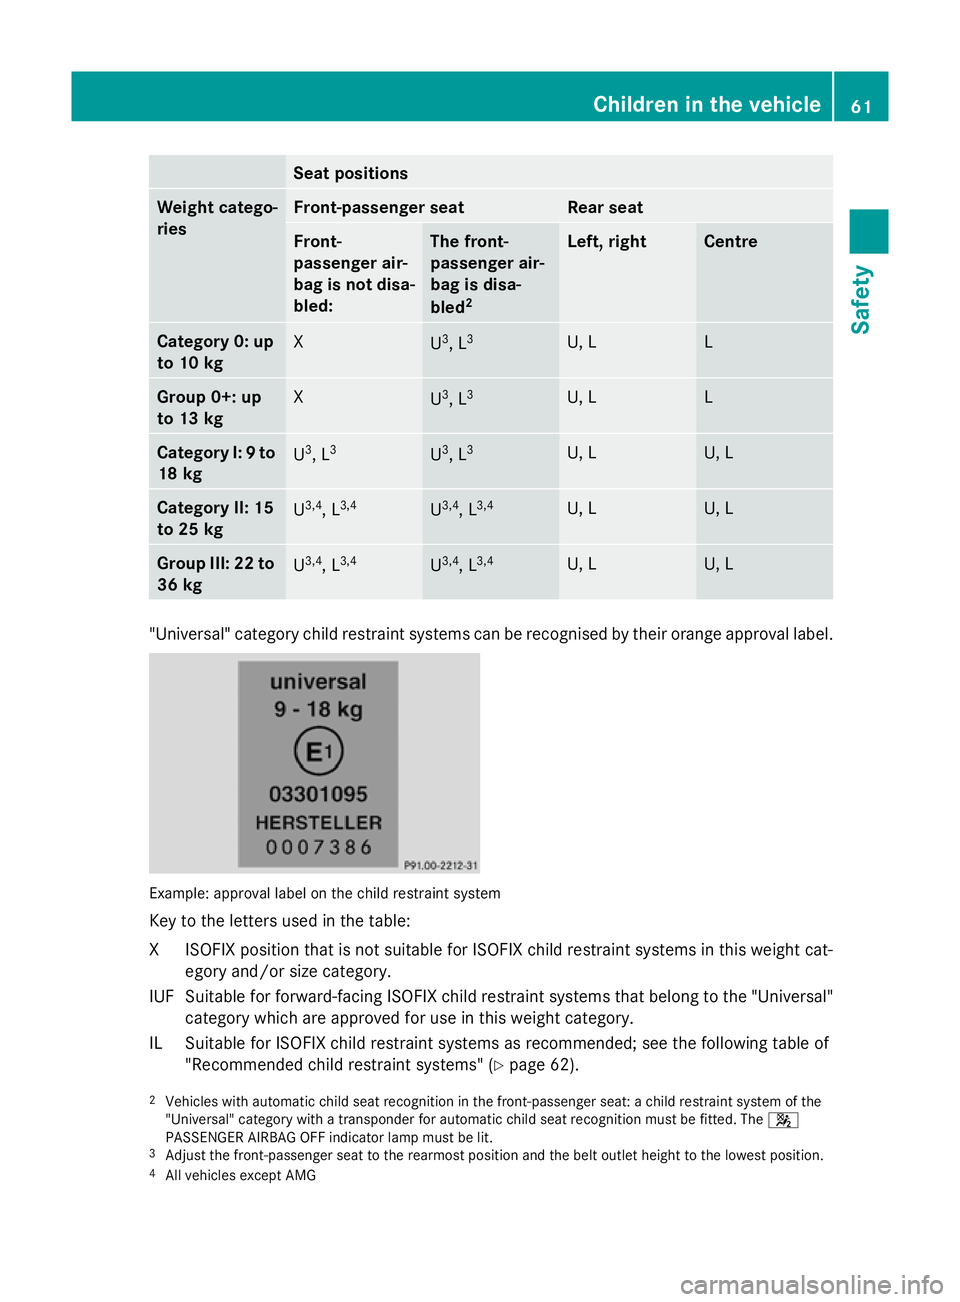
Seat positions
Weight catego-
ries Front-passenger seat Rear seat
Front-
passenger air-
bag is not disa-
bled: The front-
passenger air-
bag is disa-
bled
2 Left, right Centre
Category 0: up
to 10 kg
X
U
3
, L 3 U, L L
Group 0+: up
to 13 kg
X
U
3
, L 3 U, L L
Category I:
9to
18 kg U
3
, L 3 U
3
, L 3 U, L U, L
Category II: 15
to 25 kg
U
3,4
, L 3,4 U
3,4
, L 3,4 U, L U, L
Group III: 22 to
36 kg
U
3,4
, L 3,4 U
3,4
, L 3,4 U, L U, L
"Universal" category child restraint systems can be recognised by their orange approval label.
Example: approval label on the child restraint system
Key to the letters used in the table:
XI
SOFIX position that is not suitable for ISOFIX child restraint systems in this weight cat-
egory and/or size category.
IUF Suitable for forward-facing ISOFIX child restraint systems that belong to the "Universal" category which are approved for use in this weight category.
IL Suitable for ISOFIX child restraint systems as recommended; see the following table of "Recommended child restraint systems" (Y page 62).
2 Vehicles with automatic child seat recognition in the front-passenger seat: a child restraint system of the
"Universal" category with a transponder for automatic child seat recognition must be fitted. The 4
PASSENGER AIRBAG OFF indicator lamp must be lit.
3 Adjust the front-passenger seat to the rearmost position and the belt outlet height to the lowest position.
4 All vehicles except AMG Children in the vehicle
61Safety Z
Page 65 of 381
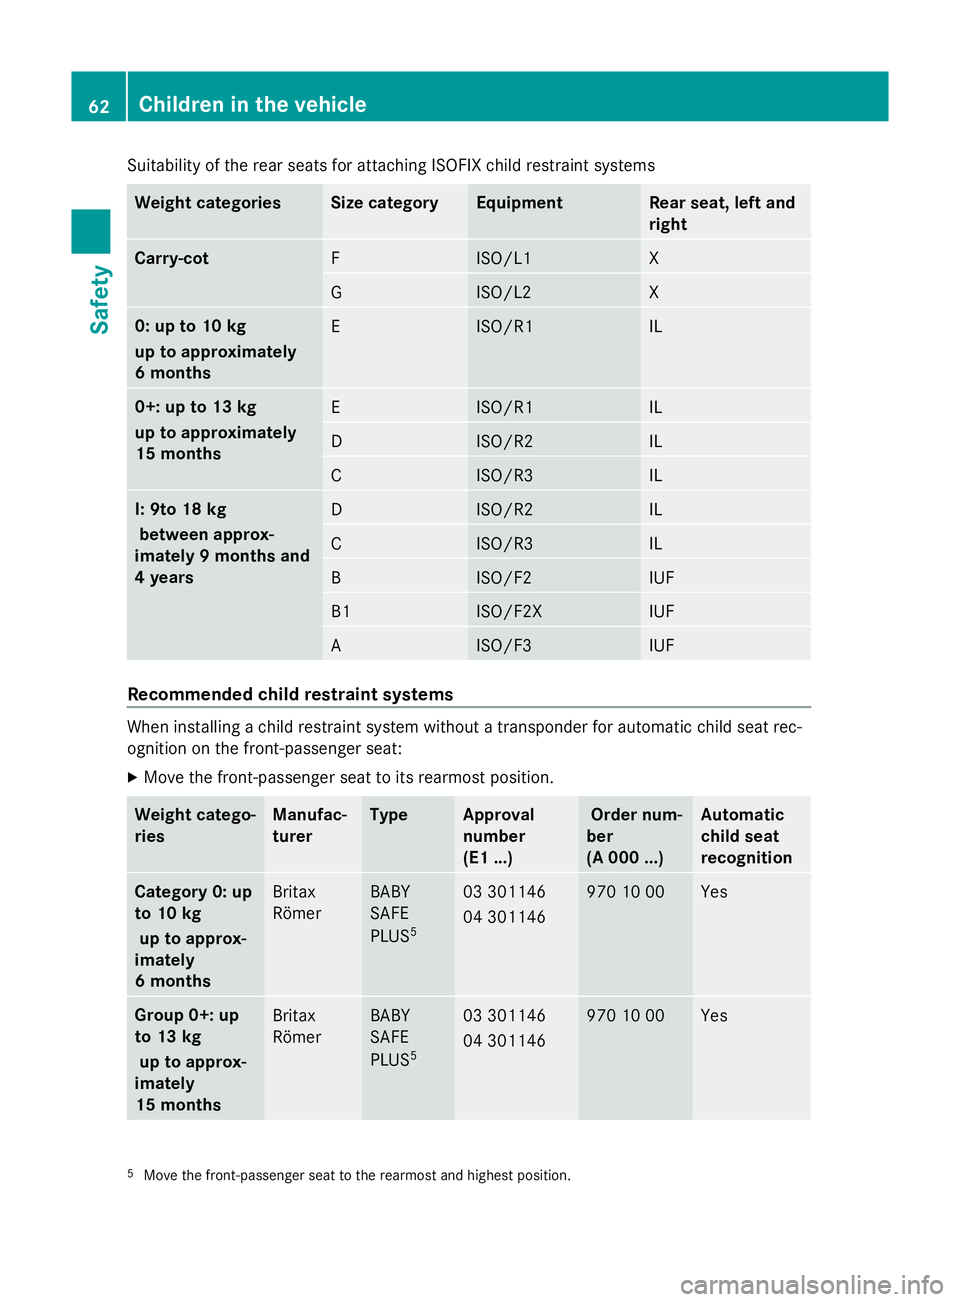
Suitability of the rear seats for attaching ISOFIX child restraint systems
Weight categories Size category Equipment Rear seat, left and
right
Carry-cot
F ISO/L1 X
G ISO/L2 X
0: up to 10 kg
up to approximately
6 months
E ISO/R1 IL
0+: up to 13 kg
up to approximately
15 months
E ISO/R1 IL
D ISO/R2 IL
C ISO/R3 IL
I: 9to 18 kg
between approx-
imately 9 months and
4 years D ISO/R2 IL
C ISO/R3 IL
B ISO/F2 IUF
B1 ISO/F2X IUF
A ISO/F3 IUF
Recommended child restraint systems
When installing a child restraint system without a transponder for automatic child seat rec-
ognition on the front-passenger seat:
X
Move the front-passenger seat to its rearmost position. Weight catego-
ries Manufac-
turer Type Approval
number
(E1 ...) Order num-
ber
(A 000 ...) Automatic
child seat
recognition
Category 0: up
to 10 kg
up to approx-
imately
6 months Britax
Römer BABY
SAFE
PLUS
5 03 301146
04 301146 970 10 00 Yes
Group 0+: up
to 13 kg
up to approx-
imately
15 months Britax
Römer BABY
SAFE
PLUS
5 03 301146
04 301146 970 10 00 Yes
5
Move the front-passenger seat to the rearmost and highest position. 62
Children in the vehicleSafety
Page 66 of 381
Weight catego-
ries Manufac-
turer Type Approval
number
(E1 ...) Order num-
ber
(A 000 ...) Automatic
child seat
recognition
Category I:
9to
18 kg
between
approximately
9 months and
4 years Britax
Römer DUO
PLUS
5 03 301133
04 301133 970 11 00 Yes
970 16 00 No
Group II/III: 15
to 36 kg
between
approximately
4and 12 years
Britax
Römer 970 12 00 Yes
970 17 00 No
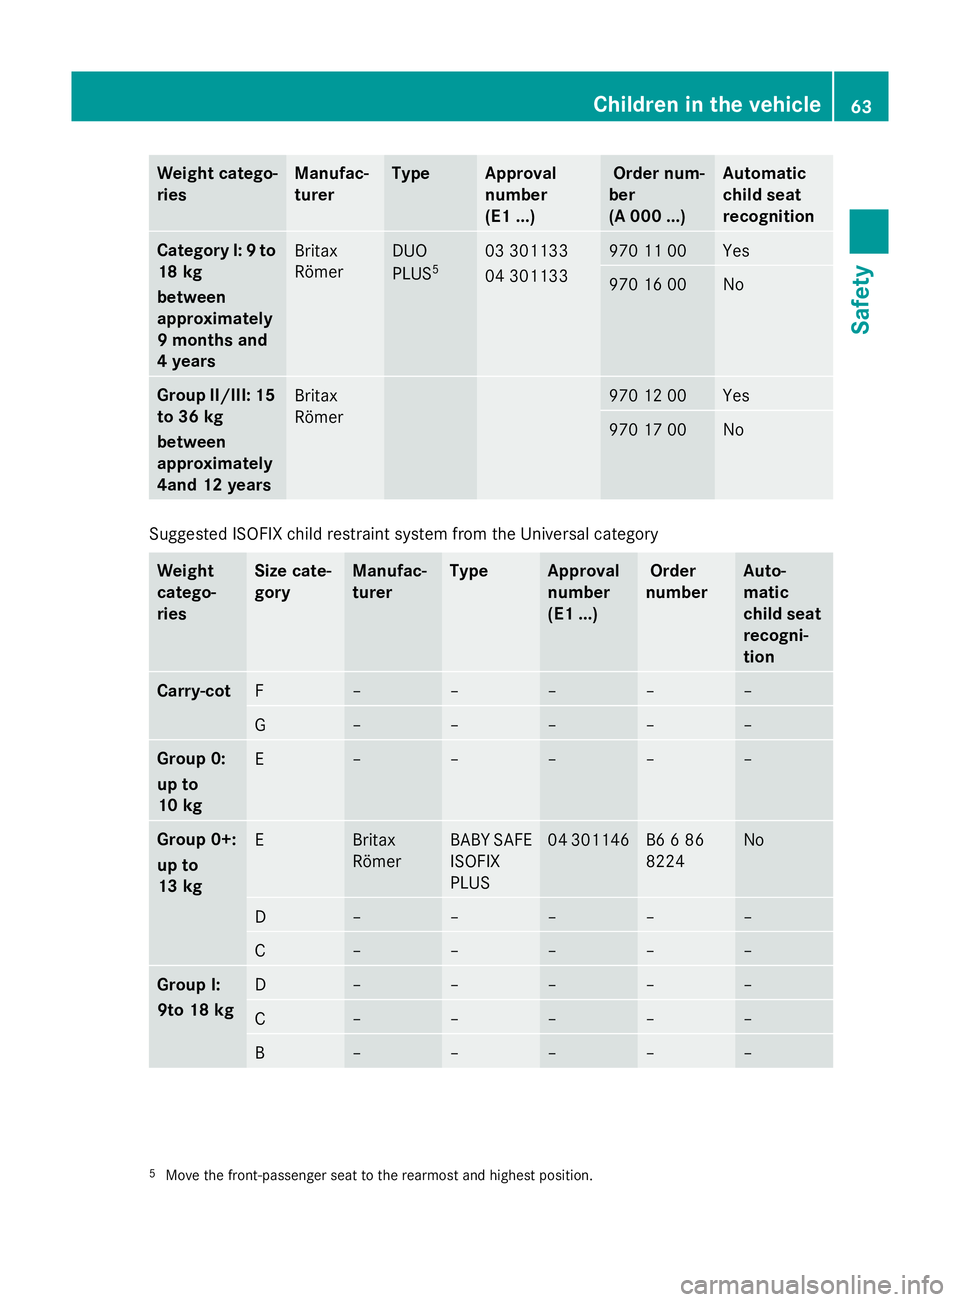
Suggested ISOFIX child restraint system from the Universal category
Weight
catego-
ries Size cate-
gory Manufac-
turer Type Approval
number
(E1 ...) Order
number Auto-
matic
child seat
recogni-
tion
Carry-cot
F – – – – –
G – – – – –
Group 0:
up to
10 kg
E – – – – –
Group 0+:
up to
13 kg
E Britax
Römer BABY SAFE
ISOFIX
PLUS 04 301146 B6 6 86
8224 No
D – – – – –
C – – – – –
Group I:
9to 18 kg
D – – – – –
C – – – – –
B – – – – –
5
Move the front-passenger seat to the rearmost and highest position. Children in the vehicle
63Safety Z
Page 67 of 381
Weight
catego-
ries Size cate-
gory Manufac-
turer Type Approval
number
(E1 ...) Order
number Auto-
matic
child seat
recogni-
tion
B1 Britax
Römer DUO PLUS 03 301133
04 301133 A000 970
11 00 Yes
A – – – – –
Child-proof locks
Important safety notes G
WARNING
Activate the child-proof locks for the rear
doors and the override switch for the rear
windows when children are travelling in the
vehicle. Otherwise, the children could open
doors or side windows while the vehicle is in
motion and injure themselves or others. G
WARNING
Do not leave children unsupervised in the
vehicle, even if they are secured in a child
restraint system. They could injure them-
selves on parts of the vehicle. They could also
be seriously or even fatally injured by pro-
longed exposure to extreme heat or cold.
Do not expose the child restraint system to
direct sunlight. Parts of the child restraint sys-
tem could heat up and the child could burn
herself/himself on them.
If a child opens a door, the child or other per-
sons could be injured as a result. They could
get out and injure themselves or be injured by
a passing vehicle.
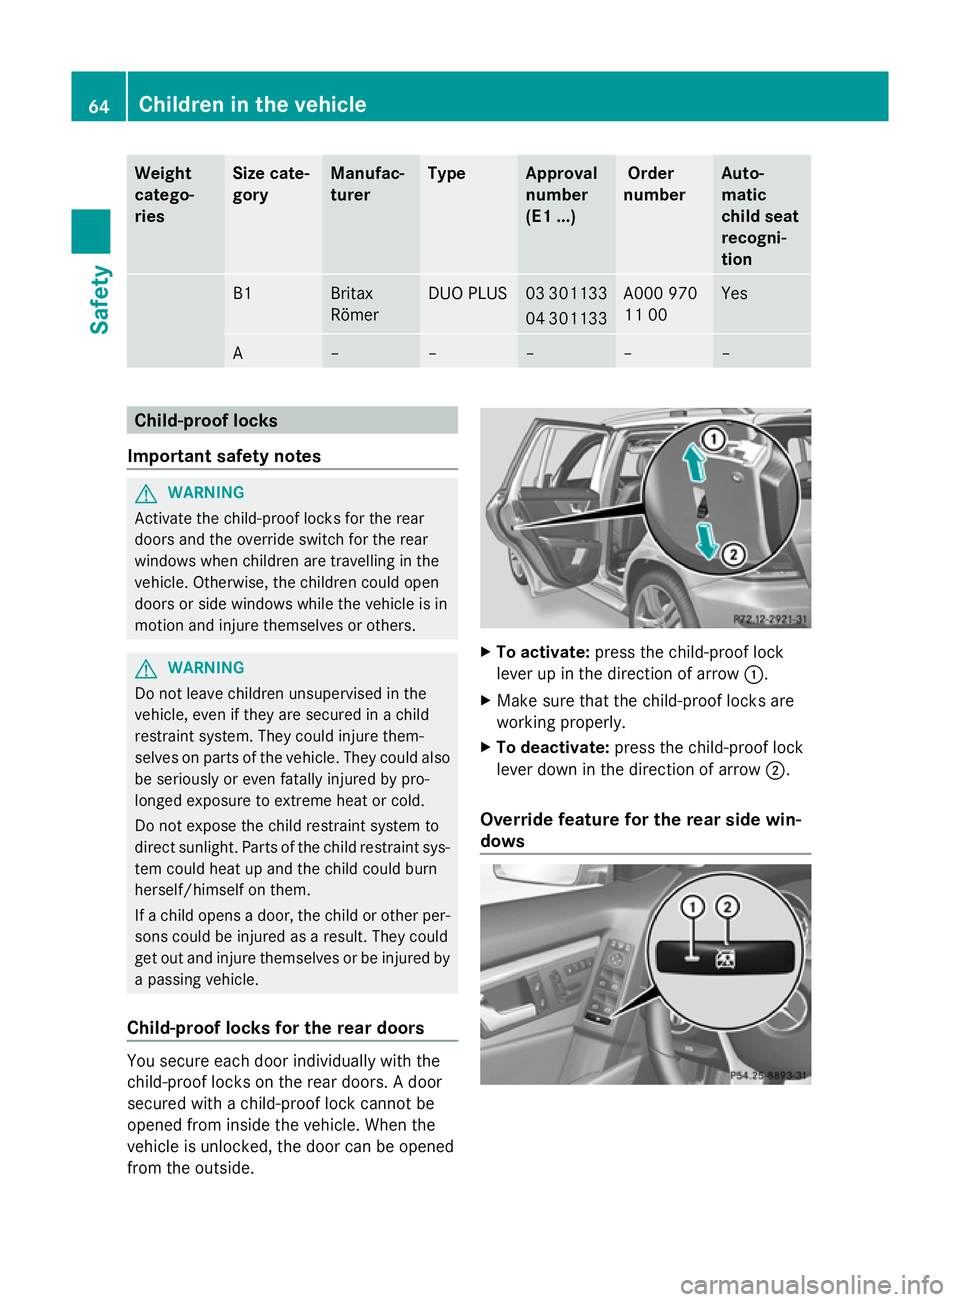
Child-proof locks for the rear doors You secure each door individually with the
child-proof locks on the rear doors. A door
secured with a child-proof lock cannot be
opened from inside the vehicle. When the
vehicle is unlocked, the door can be opened
from the outside. X
To activate: press the child-proof lock
lever up in the direction of arrow :.
X Make sure that the child-proof locks are
working properly.
X To deactivate: press the child-proof lock
lever down in the direction of arrow ;.
Override feature for the rear side win-
dows 64
Children in the vehicleSafety
Page 92 of 381
opening procedure. You could become trap-
ped between the side window and the door
frame as the side window moves down. If
there is a risk of becoming trapped, release
the switch or pull the switch upwards to close
the side window again. G
WARNING
Make sure that nobody can become trapped
as you close a side window. If there is a risk
of becoming trapped, release the switch or
press it again to open the side window again. G
WARNING
Children may injure themselves if they open
or close the side windows.
Never leave children unsupervised in the vehi-
cle. Always take the key with you when leaving
the vehicle, even if you are only leaving it for
a short time. G
WARNING
Do not leave children unsupervised in the
vehicle, even if they are secured in a child
restraint system. The children could:
R be seriously or even fatally injured on parts
of the vehicle
R be seriously or even fatally injured by pro-
longed exposure to extremely high or
extremely low temperatures
If children open a door, they could:
R seriously or even fatally injure other people
R get out of the vehicle and injure them-
selves, or be seriously or even fatally
injured by a passing vehicle
Activate the child-proof locks/override fea-
ture if children are travelling in the vehicle.
They could otherwise open doors or side win-
dows while the vehicle is in motion and
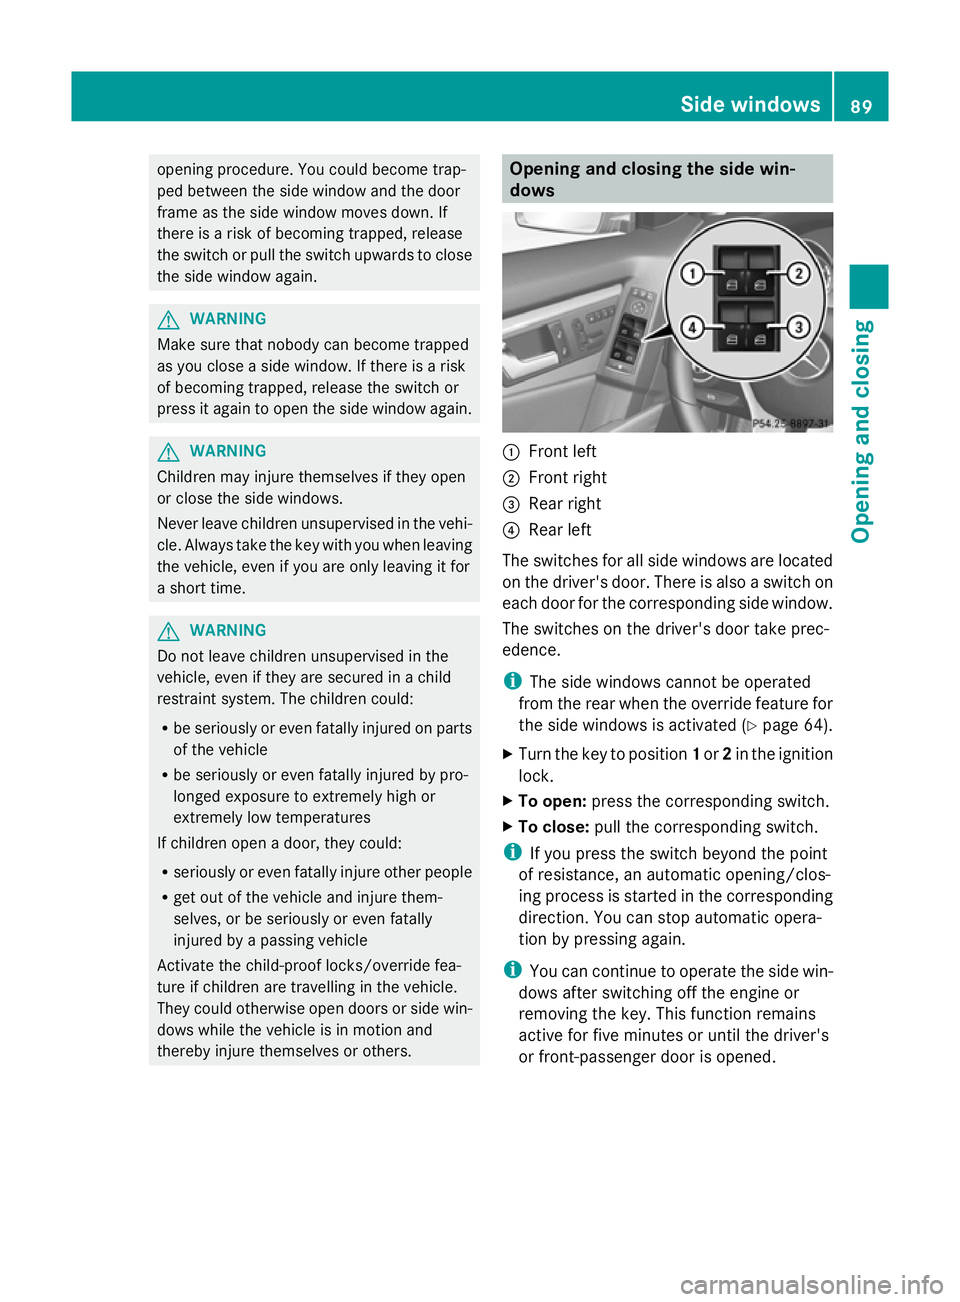
thereby injure themselves or others. Opening and closing the side win-
dows
:
Front left
; Front right
= Rear right
? Rear left
The switches for all side windows are located
on the driver's door. There is also a switch on
each door for the corresponding side window.
The switches on the driver's door take prec-
edence.
i The side windows cannot be operated
from the rear when the override feature for
the side windows is activated (Y page 64).
X Turn the key to position 1or 2in the ignition
lock.
X To open: press the corresponding switch.
X To close: pull the corresponding switch.
i If you press the switch beyond the point
of resistance, an automatic opening/clos-
ing process is started in the corresponding
direction. You can stop automatic opera-
tion by pressing again.
i You can continue to operate the side win-
dows after switching off the engine or
removing the key. This function remains
active for five minutes or until the driver's
or front-passenger door is opened. Side windows
89Opening and closing Z