dashboard MERCEDES-BENZ GLK SUV 2012 Owners Manual
[x] Cancel search | Manufacturer: MERCEDES-BENZ, Model Year: 2012, Model line: GLK SUV, Model: MERCEDES-BENZ GLK SUV 2012Pages: 381, PDF Size: 12.68 MB
Page 11 of 381
Setting the air vents
......................141
Setting the climate mode .............. .132
Setting the temperature ................132
Switching air-recirculation mode
on/off ............................................ 135
Switching on/off ........................... 131
Switching residual heat on/off ......136
Switching the rear window heat-
ing on/off ...................................... 135
Switching the ZONE function on/
off .................................................. 134
THERMATIC automatic climate
control (2-zone) ............................. 129
THERMOTRONIC (3-zone) auto-
matic climate control .....................130
Clock
Setting (4-button multifunction
steering wheel) .............................. 227
Coat hooks ......................................... 303
Cockpit Overview .......................................... 30
see Instrument cluster
Collapsible emergency spare
wheel
see Emergency spare wheel
COMAND Online
see separate operating instructions
Combination switch ..........................113
Constant headlamp mode see Daytime driving lights
Consumption statistics
On-board computer (12-button
multifunction steering wheel) ........230
On-board computer (4-button
multifunction steering wheel) ........226
Convenience closing feature ..............90
Convenience opening/closing (air-
recirculation mode) ........................... 136
Convenience opening feature ............90
Coolant (engine) Checking the level .........................316
Display message (12-button mul-
tifunction steering wheel) ..............267
Display message (4-button multi-
function steering wheel) ................264
Important safety notes ..................371
Temperature gauge (12-button
multifunction steering wheel) ........227 Temperature gauge (4-button
multifunction steering wheel)
........224
Warning lamp ................................. 292
Cooling
see Climate control
Cornering lamps
Changing bulbs .............................. 121
Cornering light function
Display message (12-button mul-
tifunction steering wheel) ..............260
Display message (4-button multi-
function steering wheel) ................257
Function/notes ............................. 115
Crash-responsive emergency light-
ing ....................................................... 118
Cruise control Cruise control lever .......................174
Deactivating ................................... 175
Display message (12-button mul-
tifunction steering wheel) ..............275
Display message (4-button multi-
function steering wheel) ................270
Driving system ............................... 173
Important safety notes ..................173
LIM indicator lamp .........................174
Selecting ........................................ 174
Setting a speed .............................. 175
Storing and maintaining current
speed ............................................ .174
Cup holder
Centre console .............................. 305
Important safety notes ..................305
Rear compartment .........................305 D
Dashboard lighting see Instrument cluster lighting
Data
see Technical data
Date
Setting (4-button multifunction
steering wheel) .............................. 227
Daytime driving lamps
Switching on/off (on-board com-
puter, 12-button multifunction
steering wheel) .............................. 2398
Index
Page 15 of 381
Exhaust tail pipe (cleaning instruc-
tions) .................................................. 321
Exterior lighting Settings options ............................ .110
see Lights
Exterior mirrors
Adjusting ....................................... 103
Anti-dazzle mode (automatic) ........105
Folding in/out (automatically). ......104
Folding in/out (electrically). ..........104
Folding in (12-button multifunc-
tion steering wheel) .......................244
Out of position (troubleshooting) ...104
Parking position ............................. 105
Resetting ....................................... 104
Storing settings (memory func-
tion) ............................................... 106F
Fault message see Display messages
Filler cap
see Fuel filler flap
Fire extinguisher ............................... 326
First-aid kit ......................................... 326
Flat tyre Changing a wheel/fitting the
spare wheel ................................... 332
Preparing the vehicle .....................329
Raising the vehicle .........................333
TIREFIT kit ...................................... 329
see Emergency spare wheel
Floormat ............................................ .310
Foglamps Extended range .............................. 115
Switching on/off ........................... 112
Folding the rear bench seat for-
wards/back ....................................... 298
Fording Off-road ......................................... 169
On flooded roads ........................... 168
Frequencies
Mobile phone ................................. 363
Two-way radio ................................ 363
Front foglamp
Display message (12-button mul-
tifunction steering wheel) ..............262Front foglamps
Display message (4-button multi-
function steering wheel) ................259
Fuel
Additives ........................................ 366
Consumption information ..............368
Displaying the range (12-button
multifunction steering wheel) ........231
Displaying the range (4-button
multifunction steering wheel) ........226
Grade (petrol) ................................ 366
Important safety notes ..................365
Problem (malfunction) ...................163
Quality (diesel )............................... 367
Refuelling ...................................... .161
Tank content/reserve fuel .............366
Tank content display (12-button
multifunction steering wheel) ..........33
Tank content display (4-button
multifunction steering wheel) ..........31
Fuel consumption
Current (12-button multifunction
steering wheel) .............................. 231
Fuel filler flap
Opening/closing ............................ 162
Fuel filter
Display message (12-button mul-
tifunction steering wheel) ..............269
Display message (4-button multi-
function steering wheel) ................266
Fuel reserve
Display message (12-button mul-
tifunction steering wheel) ..............268
Display message (4-button multi-
function steering wheel) ................265
see Fuel
Fuel tank
Capacity ........................................ 366
Problem (malfunction) ...................163
Fuse allocation chart (vehicle tool
kit) ...................................................... 327
Fuses Allocation chart ............................. 346
Before changing ............................. 346
Dashboard fuse box .......................347
Fuse box in the engine compart-
ment .............................................. 34712
Index
Page 48 of 381
the backrest, which should be positioned
as close to the vertical as possible. The
head restraint must support the back of the
head at about eye level.
R always secure children less than
1.50 m tall or under 12 years of age in suit-
able child restraint systems.
R all vehicle occupants must select a seat
position that is as far away from the airbag
as possible. The driver's seat position must
allow the vehicle to be driven safely. The
driver's chest should be as far away from
the centre of the driver's airbag cover as
possible.
R move the front-passenger seat as far back
as possible. This is especially important if
you have secured a child in a child restraint
system on the front-passenger seat.
R vehicle occupants – in particular, children
– must not lean their heads into the area of
the window in which the sidebag/window-
bag is deployed.
R rearward-facing child restraint systems
must not be fitted to the front-passenger
seat unless the front-passenger airbag has
been disabled. On the front-passenger
seat, the front-passenger airbag is disabled
if a child restraint system with a trans-
ponder for automatic child seat recognition
is fitted to the front-passenger seat in a
vehicle equipped with automatic child seat
recognition. The 4PASSENGER AIRBAG
OFF indicator lamp must be continuously
lit.
If the front-passenger seat of your vehicle
does not have automatic child seat recog-
nition, or your rearward-facing child
restraint system does not have automatic
child seat recognition, children must be
secured in a child restraint system on a
suitable seat in the rear. If you secure a
forward-facing child restraint system to the
front-passenger seat, you must move the
front-passenger seat as far back as possi-
ble. R
make sure there are no heavy or sharp-
edged objects in the pockets of clothing.
R do not lean forwards, e.g. over the cover of
the driver's/front-passenger front airbag,
particularly when the vehicle is in motion.
R do not put your feet on the dashboard.
R only hold the steering wheel on the outside.
This allows the airbag to be fully deployed.
You could be injured if the airbag is
deployed and you are holding the inside of
the steering wheel.
R do not lean on the doors from inside the
vehicle.
R make sure that there are no people, ani-
mals or objects between the vehicle occu-
pants and the area where the airbags are
deployed.
R do not place any objects between the seat
backrest and the door.
R do not hang any hard objects, for example,
coat hangers, on the grab handles or coat
hooks.
R do not attach accessories, e.g. cup holders,
to the doors.
It is not possible to rule out a risk of injury
being caused by an airbag, due to the high
speed at which the airbag must be deployed. G
WARNING
Airbag functionality can only be assured if the
following parts are not covered and no badges
or stickers are attached to them:
R padded steering wheel boss
R kneebag cover below the steering column
R front-passenger airbag cover
R outer side of front seat bolsters
R side trim next to the rear seat backrest
R roof frame cover between the front A-pillar
and the C-pillar in the rear compartment G
WARNING
When an airbag deploys, a small amount of
powder is released. The powder may cause
short-term breathing difficulties to persons Occupant safety
45Safety
Z
Page 59 of 381
The front-passenger airbag is not disabled:
R
on vehicles without automatic child seat
recognition on the front-passenger seat
R in vehicles with automatic child seat rec-
ognition in the front-passenger seat, if no
special child restraint system with trans-
ponders for automatic child seat recogni-
tion in the front-passenger seat has been
fitted
R on vehicles with automatic child seat rec-
ognition on the front-passenger seat, if the
PASSENGER AIRBAG OFF indicator lamp
4 is not lit.
To make you aware of this danger, a corre-
sponding warning sticker has been affixed on
the dashboard and on both sides of the sun
visor on the front-passenger side.
Information about recommended child
restraint systems is available at any
Mercedes-Benz Service Centre.
Do not use a rearward-facing child restraint
system for a child on a seat which is already
protected by an airbag.
Automatic child seat recognition on the
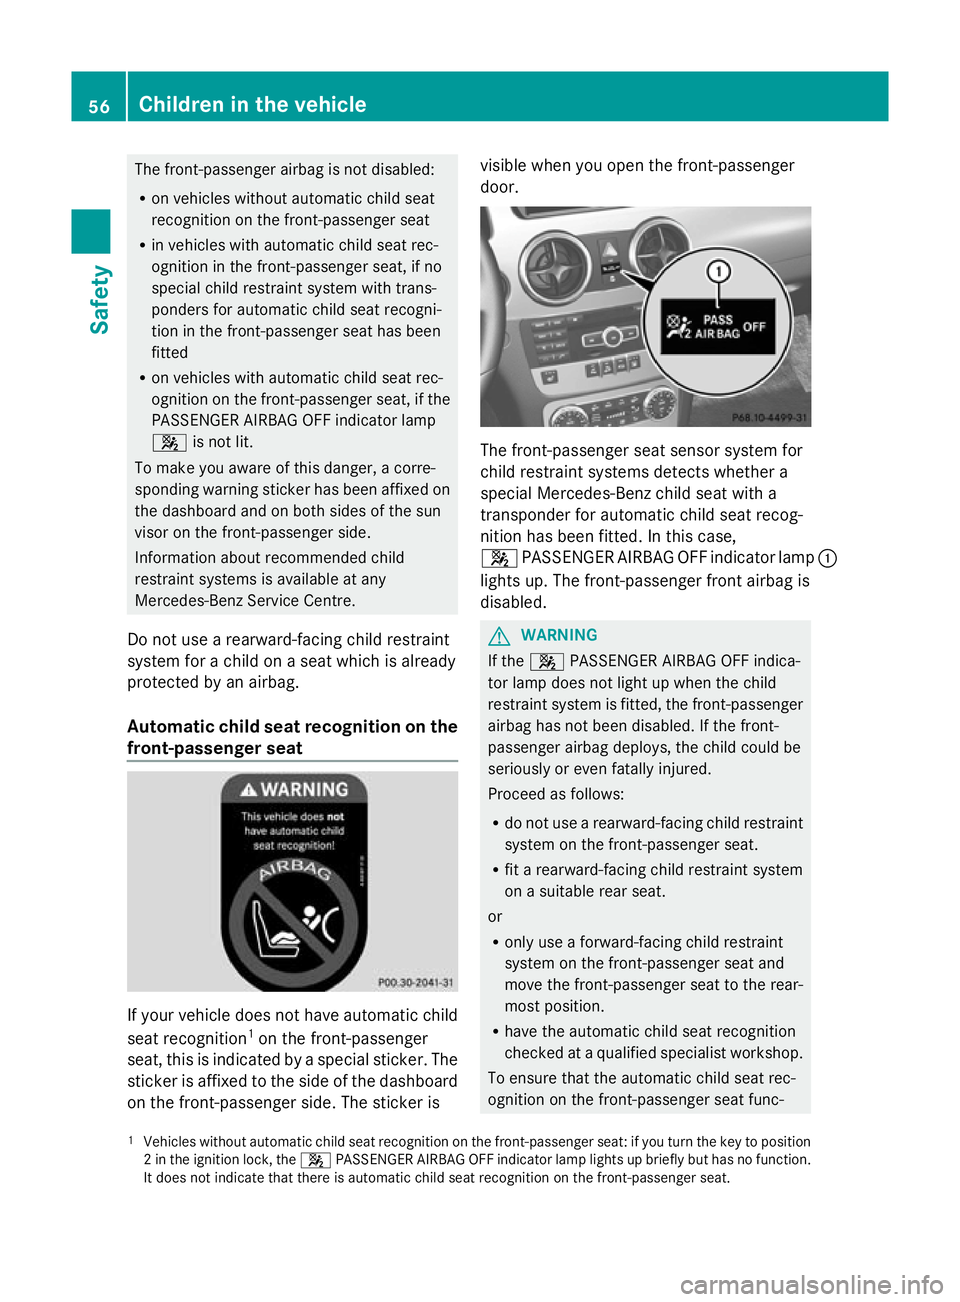
front-passenger seat If your vehicle does not have automatic child
seat recognition 1
on the front-passenger
seat, this is indicated by a special sticker. The
sticker is affixed to the side of the dashboard
on the front-passenger side. The sticker is visible when you open the front-passenger
door.
The front-passenger seat sensor system for
child restraint systems detects whether a
special Mercedes-Benz child seat with a
transponder for automatic child seat recog-
nition has been fitted. In this case,
4
PASSENGER AIRBAG OFF indicator lamp :
lights up. The front-passenger front airbag is
disabled. G
WARNING
If the 4 PASSENGER AIRBAG OFF indica-
tor lamp does not light up when the child
restraint system is fitted, the front-passenger
airbag has not been disabled. If the front-
passenger airbag deploys, the child could be
seriously or even fatally injured.
Proceed as follows:
R do not use a rearward-facing child restraint
system on the front-passenger seat.
R fit a rearward-facing child restraint system
on a suitable rear seat.
or
R only use a forward-facing child restraint
system on the front-passenger seat and
move the front-passenger seat to the rear-
most position.
R have the automatic child seat recognition
checked at a qualified specialist workshop.
To ensure that the automatic child seat rec-
ognition on the front-passenger seat func-
1 Vehicles without automatic child seat recognition on the front-passenger seat: if you turn the key to position
2 in the ignition lock, the 4PASSENGER AIRBAG OFF indicator lamp lights up briefly but has no function.
It does not indicate that there is automatic child seat recognition on the front-passenger seat. 56
Children in the vehicleSafety
Page 192 of 381
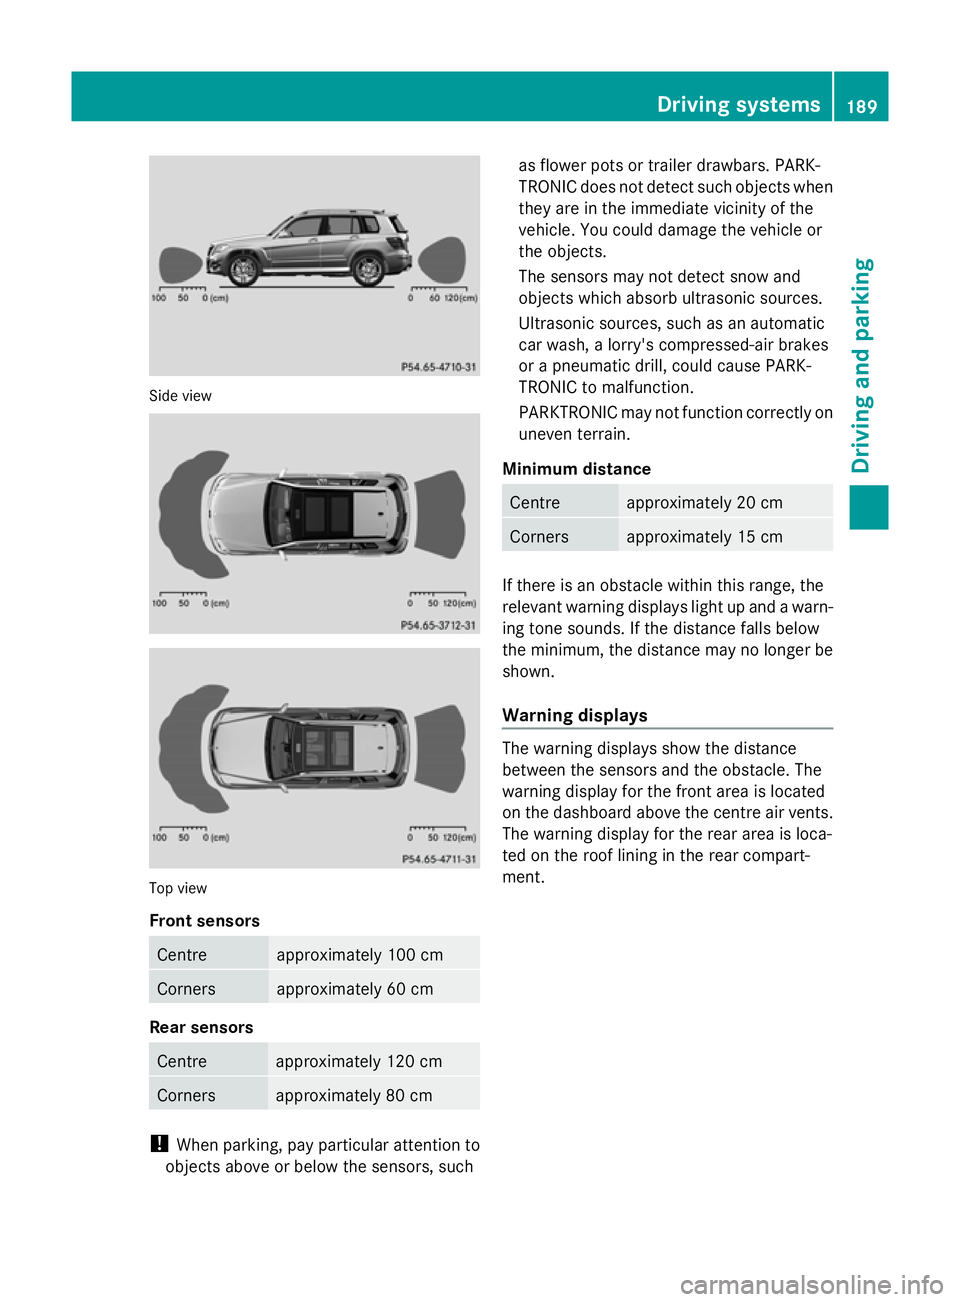
Side view
Top view
Front sensors
Centre approximately 100 cm
Corners approximately 60 cm
Rear sensors
Centre approximately 120 cm
Corners approximately 80 cm
!
When parking, pay particular attention to
objects above or below the sensors, such as flower pots or trailer drawbars. PARK-
TRONIC does not detect such objects when
they are in the immediate vicinity of the
vehicle. You could damage the vehicle or
the objects.
The sensors may not detect snow and
objects which absorb ultrasonic sources.
Ultrasonic sources, such as an automatic
car wash, a lorry's compressed-air brakes
or a pneumatic drill, could cause PARK-
TRONIC to malfunction.
PARKTRONIC may not function correctly on
uneven terrain.
Minimum distance Centre approximately 20 cm
Corners approximately 15 cm
If there is an obstacle within this range, the
relevant warning displays light up and a warn-
ing tone sounds. If the distance falls below
the minimum, the distance may no longer be
shown.
Warning displays
The warning displays show the distance
between the sensors and the obstacle. The
warning display for the front area is located
on the dashboard above the centre air vents.
The warning display for the rear area is loca-
ted on the roof lining in the rear compart-
ment. Driving systems
189Driving and parking Z
Page 325 of 381
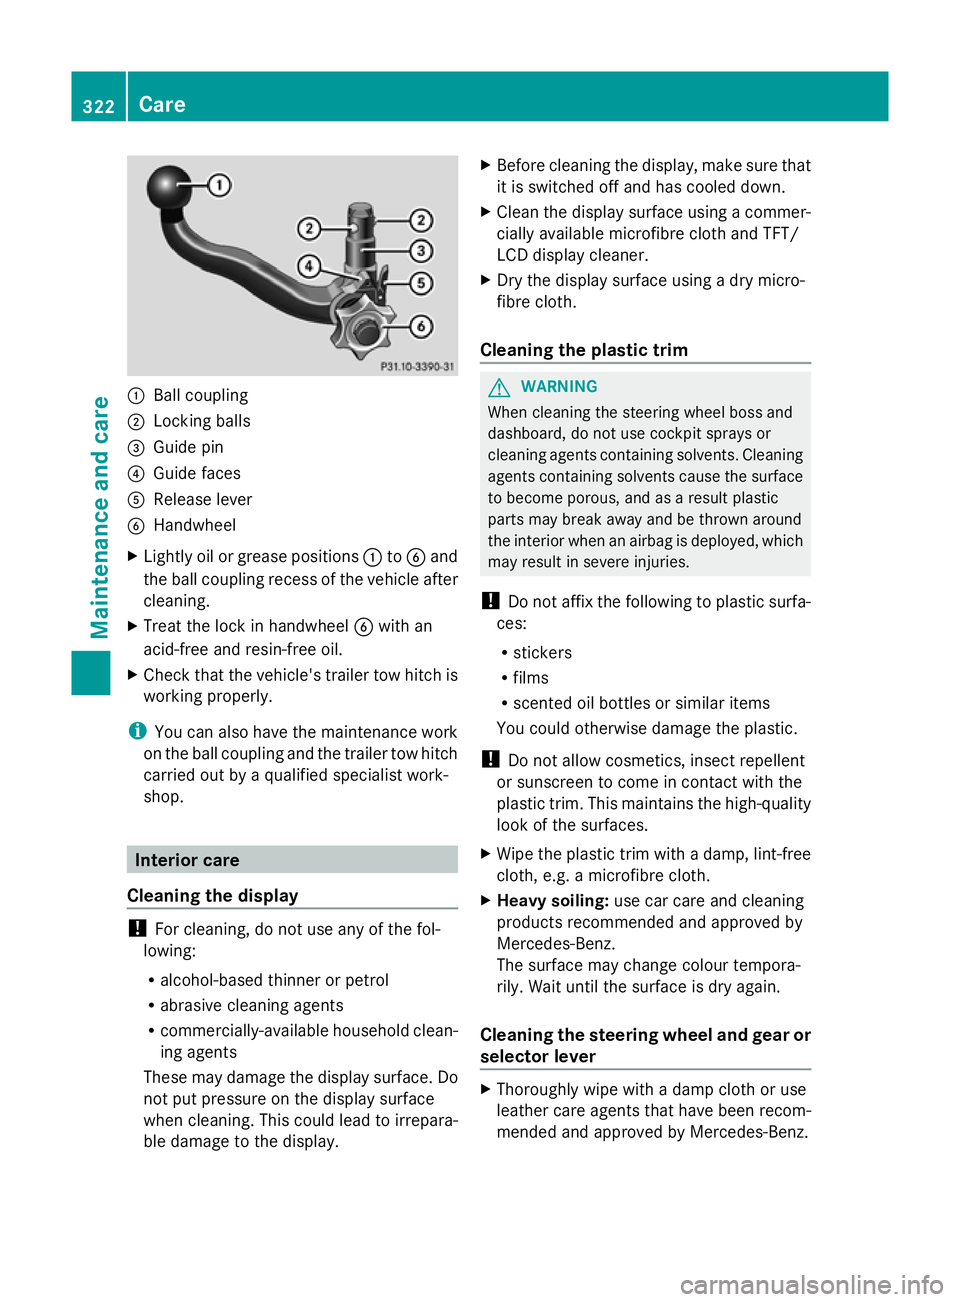
:
Ball coupling
; Locking balls
= Guide pin
? Guide faces
A Release lever
B Handwheel
X Lightly oil or grease positions :toB and
the ball coupling recess of the vehicle after
cleaning.
X Treat the lock in handwheel Bwith an
acid-free and resin-free oil.
X Check that the vehicle's trailer tow hitch is
working properly.
i You can also have the maintenance work
on the ball coupling and the trailer tow hitch
carried out by a qualified specialist work-
shop. Interior care
Cleaning the display !
For cleaning, do not use any of the fol-
lowing:
R alcohol-based thinner or petrol
R abrasive cleaning agents
R commercially-available household clean-
ing agents
These may damage the display surface. Do
not put pressure on the display surface
when cleaning. This could lead to irrepara-
ble damage to the display. X
Before cleaning the display, make sure that
it is switched off and has cooled down.
X Clean the display surface using a commer-
cially available microfibre cloth and TFT/
LCD display cleaner.
X Dry the display surface using a dry micro-
fibre cloth.
Cleaning the plastic trim G
WARNING
When cleaning the steering wheel boss and
dashboard, do not use cockpit sprays or
cleaning agents containing solvents. Cleaning
agents containing solvents cause the surface
to become porous, and as a result plastic
parts may break away and be thrown around
the interior when an airbag is deployed, which
may result in severe injuries.
! Do not affix the following to plastic surfa-
ces:
R stickers
R films
R scented oil bottles or similar items
You could otherwise damage the plastic.
! Do not allow cosmetics, insect repellent
or sunscreen to come in contact with the
plastic trim. This maintains the high-quality
look of the surfaces.
X Wipe the plastic trim with a damp, lint-free
cloth, e.g. a microfibre cloth.
X Heavy soiling: use car care and cleaning
products recommended and approved by
Mercedes-Benz.
The surface may change colour tempora-
rily. Wait until the surface is dry again.
Cleaning the steering wheel and gear or
selector lever X
Thoroughly wipe with a damp cloth or use
leather care agents that have been recom-
mended and approved by Mercedes-Benz. 322
CareMaintenance and care
Page 350 of 381
Dashboard fuse box
! Do not use a pointed object such as a
screwdriver to open the cover in the dash-
board. You could damage the dashboard or
the cover.
! Make sure that no moisture can enter the
fuse box when the cover is open.
! When closing the cover, make sure that it
is lying correctly on the fuse box. Moisture
seeping in or dirt could otherwise impair
the operation of the fuses. X
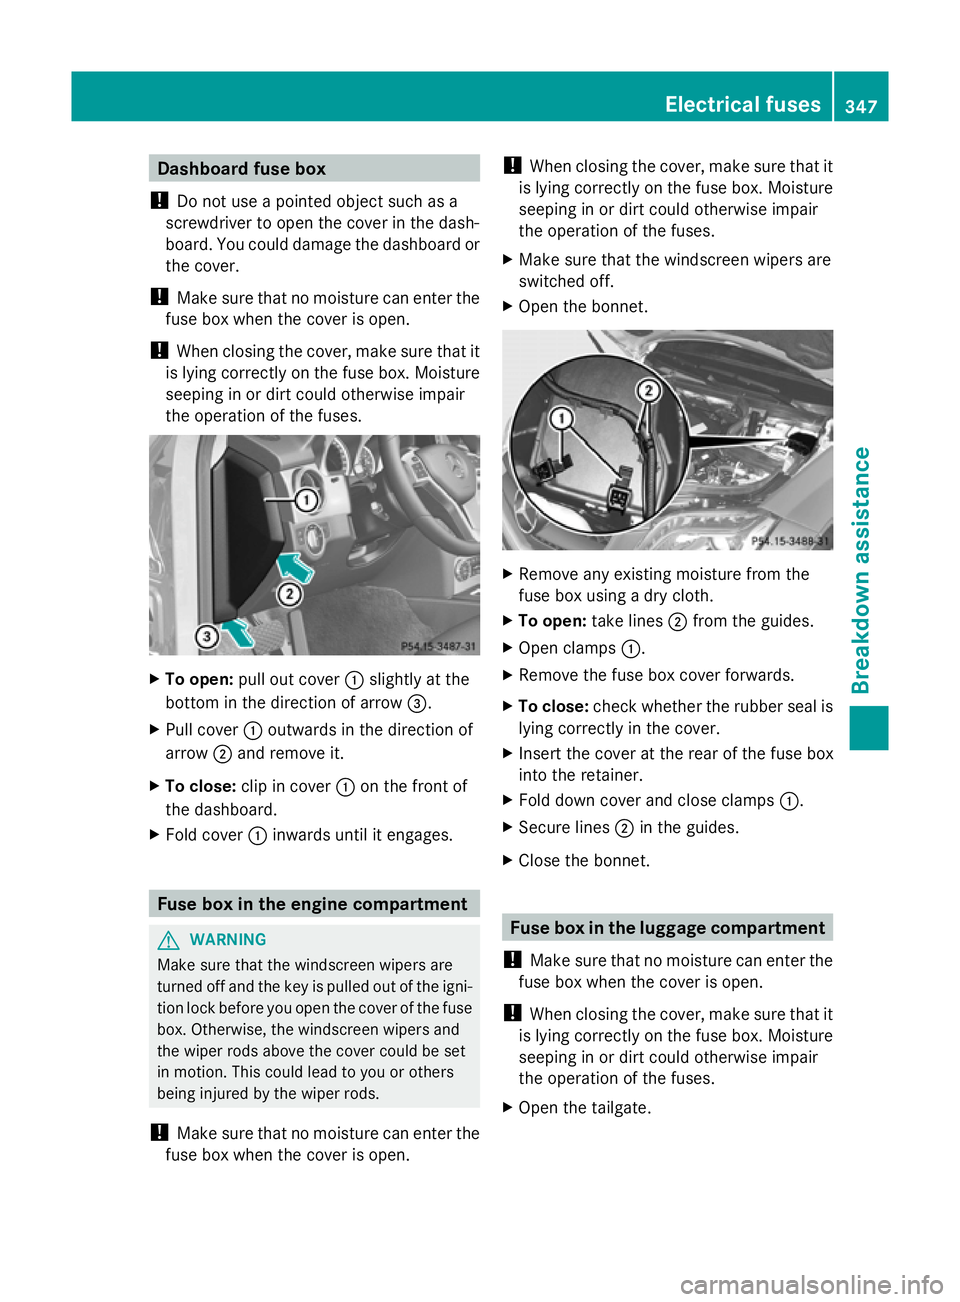
To open: pull out cover :slightly at the
bottom in the direction of arrow =.
X Pull cover :outwards in the direction of
arrow ;and remove it.
X To close: clip in cover :on the front of
the dashboard.
X Fold cover :inwards until it engages. Fuse box in the engine compartment
G
WARNING
Make sure that the windscreen wipers are
turned off and the key is pulled out of the igni-
tion lock before you open the cover of the fuse
box. Otherwise, the windscreen wipers and
the wiper rods above the cover could be set
in motion. This could lead to you or others
being injured by the wiper rods.
! Make sure that no moisture can enter the
fuse box when the cover is open. !
When closing the cover, make sure that it
is lying correctly on the fuse box. Moisture
seeping in or dirt could otherwise impair
the operation of the fuses.
X Make sure that the windscreen wipers are
switched off.
X Open the bonnet. X
Remove any existing moisture from the
fuse box using a dry cloth.
X To open: take lines ;from the guides.
X Open clamps :.
X Remove the fuse box cover forwards.
X To close: check whether the rubber seal is
lying correctly in the cover.
X Insert the cover at the rear of the fuse box
into the retainer.
X Fold down cover and close clamps :.
X Secure lines ;in the guides.
X Close the bonnet. Fuse box in the luggage compartment
! Make sure that no moisture can enter the
fuse box when the cover is open.
! When closing the cover, make sure that it
is lying correctly on the fuse box. Moisture
seeping in or dirt could otherwise impair
the operation of the fuses.
X Open the tailgate. Elect
rical fuses
347Breakdown assis tance Z
Page 365 of 381
Useful information
i This Owner's Manual describes all mod-
els, series and optional equipment for your
vehicle that were available at the time of
going to press. National variations are pos-
sible. Note that your vehicle may not be
equipped with all of the functions descri-
bed. This is also the case for systems and
functions relevant to safety.
i Read the information on qualified special-
ist workshops: (Y page 27). Information on technical data
You can find current technical data on the
Internet at:
http://www.mercedes-benz.com
i The technical data was determined in
accordance with EC Directives. All data
applies to the vehicle's standard equip-
ment. The data may therefore differ for
vehicles with optional equipment. You can
obtain further information from a
Mercedes-Benz Service Centre. Genuine Mercedes-Benz parts
G
WARNING
Driving safety may be impaired if non-
approved parts, tyres and wheels or safety-
relevant accessories are used.
This could lead to malfunctions in safety-rel-
evant systems, e.g. the brake system. This
could cause you to lose control of your vehicle
and cause an accident.
For this reason, Mercedes-Benz recommends
that you use genuine Mercedes-Benz parts or
parts of equal quality. Only use tyres, wheels
and accessories that have been specifically
approved for your vehicle. H
Environmental note
Daimler AG also supplies reconditioned
assemblies and parts which are of the same
quality as new parts. For these, the same war-
ranty applies as for new parts.
! Airbags and seat belt tensioners, as well
as control units and sensors for these
restraint systems, may be installed in the
following areas of your vehicle:
R doors
R door pillars
R door sills
R seats
R dashboard
R instrument cluster
R centre console
Do not install accessories such as audio
systems in these areas. Do not carry out
repairs or welding. You could impair the
operating efficiency of the restraint sys-
tems.
Have accessories retrofitted at a qualified
specialist workshop.
Mercedes-Benz tests genuine parts and con-
version parts and accessories that have been
specifically approved for your vehicle for their
reliability, safety and suitability. Despite
ongoing market research, Mercedes-Benz is
unable to assess other parts. Mercedes-Benz
accepts no responsibility for the use of parts
that have been independently or officially
approved.
In Germany, certain parts are only officially
approved for installation or modification if
they comply with legal requirements. This
also applies to some other countries. All gen-
uine Mercedes-Benz parts meet the approval
requirements. The use of non-approved parts
may invalidate the vehicle's general operating
permit. 362
Genuine Mercedes-Benz partsTechnical data