dimensions MERCEDES-BENZ GLK SUV 2012 Owners Manual
[x] Cancel search | Manufacturer: MERCEDES-BENZ, Model Year: 2012, Model line: GLK SUV, Model: MERCEDES-BENZ GLK SUV 2012Pages: 381, PDF Size: 12.68 MB
Page 24 of 381
Rear
............................................... 298
Under driver's seat/front-
passenger seat .............................. 298
Stowage net ....................................... 298
Stowage space Stowage net ................................... 298
Summer opening
see Convenience opening feature
Summer tyres .................................... 352
Sun visor ............................................ 305
Supplement Restraint System see SRS (Supplemental Restraint
System)
Surround lighting (12-button mul-
tifunction steering wheel) ................240
Switching off the alarm (ATA) ............72 T
Tailgate Display message (12-button mul-
tifunction steering wheel) ..............279
Display message (4-button multi-
function steering wheel) ................278
Emergency unlocking .......................88
Important safety notes ....................85
Limiting the opening angle ...............88
Opening/closing (automatically
from inside) ...................................... 87
Opening/closing (automatically
from outside) ................................... 86
Opening/closing (from outside) .......85
Opening dimensions ......................372
Tail lamp
Display message (12-button mul-
tifunction steering wheel) ..............261
Display message (4-button multi-
function steering wheel) ................258
Tank
see Fuel tank
Tank content
Displaying the range (12-button
multifunction steering wheel) ........231
Displaying the range (4-button
multifunction steering wheel) ........226 Fuel gauge (12-button multifunc-
tion steering wheel)
.........................33
Fuel gauge (4-button multifunc-
tion steering wheel) .........................31
Technical data
Capacities ...................................... 365
Information .................................... 362
Trailer loads ................................... 374
Tyres/wheels ................................. 357
Vehicle data ................................... 372
Telephone
Accepting a call ............................. 235
Display message (12-button mul-
tifunction steering wheel) ..............281
Menu (on-board computer) ............234
Number from the phone book ....... .235
Redialling ....................................... 236
Rejecting/ending a call .................235
Telephone compartment ................297
Temperature
Coolant (12-button multifunction
steering wheel) .............................. 227
Coolant (4-button multifunction
steering wheel) .............................. 224
Outside temperature (12-button
multifunction steering wheel) ........227
Outside temperature (4-button
multifunction steering wheel) ........225
Setting (climate control) ................132
TEMPOMAT
Function/notes ............................. 173
Theft-deterrent system
ATA (Anti-Theft Alarm system) .........72
Immobiliser ...................................... 71
Time
Setting the clock (4-button multi-
function steering wheel) ................227
see Separate Owner's manual
TIREFIT kit .......................................... 329
Top Tether ............................................ 58
Total distance recorder Displaying (12-button multifunc-
tion steering wheel) .......................230
Displaying (4-button multifunc-
tion steering wheel) .......................226
Tow-away protection ..........................72 Index
21
Page 25 of 381
Towing
Important safety notes ..................342
With the rear axle raised ................344
Towing a trailer
Active Blind Spot Assist .................210
Active Lane Keeping Assist .... 207, 213
Active Parking Assist .....................196
Lights display message (12-but-
ton multifunction steering wheel) ..260
Lights display message (4-button
multifunction steering wheel) ........257
Towing away
Fitting the towing eye ....................343
Removing the towing eye ...............344
With both axles on the ground .......344
Tow-starting
Emergency engine starting ............345
Fitting the towing eye ....................343
Important safety notes ..................342
Removing the towing eye ...............344
Trailer coupling
see Towing a trailer
Trailer towing
7-pin connector ............................. 221
Blind Spot Assist ............................ 205
Cleaning the trailer tow hitch ......... 321
Coupling up a trailer ......................220
Decoupling a trailer .......................220
Driving tips .................................... 215
ESP ®
................................................ 69
Fitting the ball coupling .................217
Important safety notes ..................215
Mounting dimensions ....................373
Parktroni c...................................... 191
Power supply ................................. 221
Removing the ball coupling ............220
Shift range ..................................... 158
Storing the ball coupling ................220
Trailer loads ................................... 374
Transmission
see Automatic transmission
see Manual transmission
Transmission position display .........156
Transmission position display
(DIRECT SELECT lever) ......................156
Transporting the vehicle ..................345Travelling uphill
Brow of hill ..................................... 173
Driving downhill ............................. 173
Maximum gradient-climbing capa-
bility .............................................. .173
Trim pieces (cleaning instructions) .323
Trip computer On-board computer (12-button
multifunction steering wheel) ........230
On-board computer (4-button
multifunction steering wheel) ........226
Trip meter
Displaying/resetting (4-button
multifunction steering wheel) ........226
Displaying (12-button multifunc-
tion steering wheel) .......................230
Resetting (12-button multifunc-
tion steering wheel) .......................232
Turn signal
Display message (12-button mul-
tifunction steering wheel) ..............261
Display message (4-button multi-
function steering wheel) ................258
see Turn signals
Turn signals
Changing bulbs (front) ...................120
Changing bulbs (rear) ....................121
Switching on/off ........................... 113
TV
Operating (on-board computer) .....234
see Separate operating instructions
Two-way radio
Frequencies ................................... 363
Installation ..................................... 363
Transmission output (maximum) .... 363
Type identification plate
see Vehicle identification plate
Tyre pressure
Display message (12-button mul-
tifunction steering wheel) ..............277
Display message (4-button multi-
function steering wheel) ................276
Not reached (TIREFIT) ....................331
Pressure loss warning ....................355
Reached (TIREFIT) ..........................331
Recommended ............................... 353
Tyres
Checking ........................................ 351 22
Index
Page 26 of 381
Direction of rotatio
n...................... 357
Display message (12-button mul-
tifunction steering wheel) ..............277
Display message (4-button multi-
function steering wheel) ................276
Important safety notes ..................350
Replacing ....................................... 356
Service life ..................................... 351
Storing ........................................... 357
Tyre size (data) .............................. 357
Tyre tread ...................................... 351
see Flat tyre U
Unladen weight ................................. 372
Unlocking Emergency unlocking .......................84
From inside the vehicle (central
unlocking button) ............................. 83 V
Vanity mirror (in sun visor) ..............306
Variable SPEEDTRONIC see SPEEDTRONIC
Vehicle
Correct use ...................................... 27
Data acquisition ............................... 28
Electronics ..................................... 363
Emergency unlocking .......................84
Equipment ....................................... 25
Implied warranty .............................. 28
Individual settings ..........................238
Leaving parked up .........................165
Locking (in an emergency) ...............84
Locking (key) ................................... 76
Lowering ........................................ 337
Pulling away ................................... 149
Raising ........................................... 333
Registration ..................................... 27
Towing away .................................. 342
Tow-starting ................................... 342
Transporting .................................. 345
Unlocking (in an emergency) ...........84
Unlocking (key) ................................ 76
Vehicle data ................................... 372
Vehicle data ....................................... 372
Vehicle dimensions ...........................372Vehicle emergency locking
................84
Vehicle identification number see VIN
Vehicle identification plate ..............364
Vehicle tool kit .................................. 327
Vehicle weights ................................. 372
Video (DVD) ........................................ 234
Video DVD (12-button multifunc-
tion steering wheel) ..........................234
VIN ...................................................... 364 W
Warning and indicator lamps ABS ................................................ 286
Brakes ........................................... 286
Distance warning signal .................294
ESP ®
.............................................. 288
ESP ®
OFF ....................................... 289
LIM (cruise control) ........................ 174
LIM (DISTRONIC PLUS) ..................179
LIM (variable SPEEDTRONIC )......... 176
PASSENGER AIRBAG OFF ................56
Reserve fuel ................................... 292
Seat belt ........................................ 284
SRS ................................................ 291
Warning triangle ................................ 326
Washer fluid Display message (12-button mul-
tifunction steering wheel) ..............281
Display message (4-button multi-
function steering wheel) ................279
Wheel bolt tightening torque ...........337
Wheel chock ...................................... 333
Wheels Changing/replacing .......................356
Changing a wheel .......................... 332
Checking ........................................ 351
Cleaning ......................................... 319
Fitting a new wheel ........................335
Important safety notes ..................350
Removing a wheel ..........................335
Storing ........................................... 357
Tightening torque ........................... 337
Wheel size/tyre size ......................357 Index
23
Page 88 of 381
X
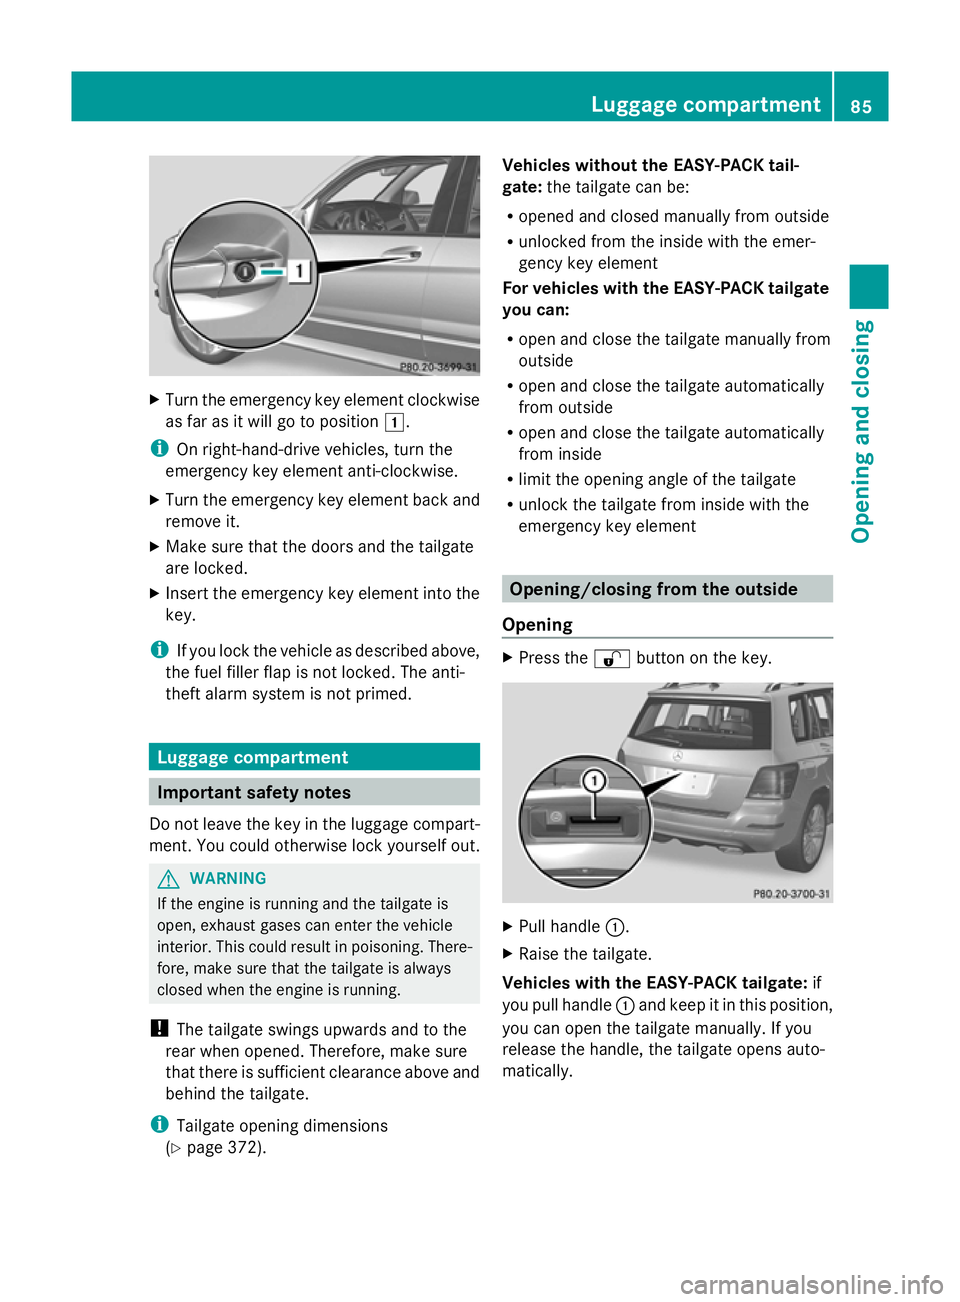
Turn the emergency key element clockwise
as far as it will go to position 1.
i On right-hand-drive vehicles, turn the
emergency key element anti-clockwise.
X Turn the emergency key element back and
remove it.
X Make sure that the doors and the tailgate
are locked.
X Insert the emergency key element into the
key.
i If you lock the vehicle as described above,
the fuel filler flap is not locked. The anti-
theft alarm system is not primed. Luggage compartment
Important safety notes
Do not leave the key in the luggage compart-
ment. You could otherwise lock yourself out. G
WARNING
If the engine is running and the tailgate is
open, exhaust gases can enter the vehicle
interior. This could result in poisoning. There-
fore, make sure that the tailgate is always
closed when the engine is running.
! The tailgate swings upwards and to the
rear when opened. Therefore, make sure
that there is sufficient clearance above and
behind the tailgate.
i Tailgate opening dimensions
(Y page 372). Vehicles without the EASY-PACK tail-
gate:
the tailgate can be:
R opened and closed manually from outside
R unlocked from the inside with the emer-
gency key element
For vehicles with the EASY-PACK tailgate
you can:
R open and close the tailgate manually from
outside
R open and close the tailgate automatically
from outside
R open and close the tailgate automatically
from inside
R limit the opening angle of the tailgate
R unlock the tailgate from inside with the
emergency key element Opening/closing from the outside
Opening X
Press the %button on the key. X
Pull handle :.
X Raise the tailgate.
Vehicles with the EASY-PACK tailgate: if
you pull handle :and keep it in this position,
you can open the tailgate manually. If you
release the handle, the tailgate opens auto-
matically. Luggage compartment
85Opening and closing Z
Page 89 of 381
Closing
G
WARNING
Make sure that nobody can become trapped
as you close the tailgate. X
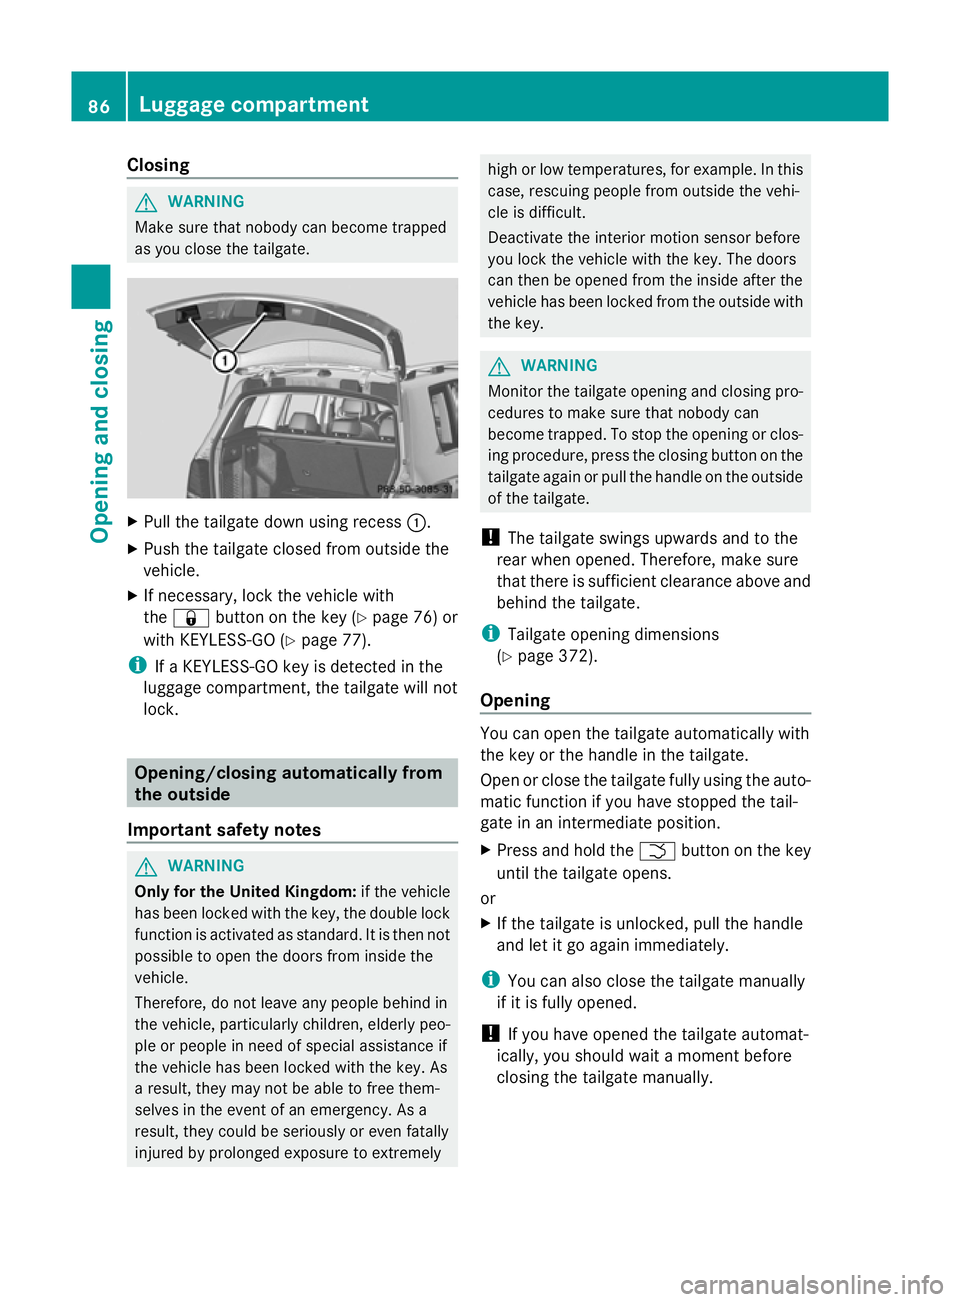
Pull the tailgate down using recess :.
X Push the tailgate closed from outside the
vehicle.
X If necessary, lock the vehicle with
the & button on the key ( Ypage 76) or
with KEYLESS-GO (Y page 77).
i If a KEYLESS-GO key is detected in the
luggage compartment, the tailgate will not
lock. Opening/closing automatically from
the outside
Important safety notes G
WARNING
Only for the United Kingdom: if the vehicle
has been locked with the key, the double lock
function is activated as standard. It is then not
possible to open the doors from inside the
vehicle.
Therefore, do not leave any people behind in
the vehicle, particularly children, elderly peo-
ple or people in need of special assistance if
the vehicle has been locked with the key. As
a result, they may not be able to free them-
selves in the event of an emergency. As a
result, they could be seriously or even fatally
injured by prolonged exposure to extremely high or low temperatures, for example. In this
case, rescuing people from outside the vehi-
cle is difficult.
Deactivate the interior motion sensor before
you lock the vehicle with the key. The doors
can then be opened from the inside after the
vehicle has been locked from the outside with
the key. G
WARNING
Monitor the tailgate opening and closing pro-
cedures to make sure that nobody can
become trapped. To stop the opening or clos-
ing procedure, press the closing button on the
tailgate again or pull the handle on the outside
of the tailgate.
! The tailgate swings upwards and to the
rear when opened. Therefore, make sure
that there is sufficient clearance above and
behind the tailgate.
i Tailgate opening dimensions
(Y page 372).
Opening You can open the tailgate automatically with
the key or the handle in the tailgate.
Open or close the tailgate fully using the auto-
matic function if you have stopped the tail-
gate in an intermediate position.
X Press and hold the Fbutton on the key
until the tailgate opens.
or
X If the tailgate is unlocked, pull the handle
and let it go again immediately.
i You can also close the tailgate manually
if it is fully opened.
! If you have opened the tailgate automat-
ically, you should wait a moment before
closing the tailgate manually. 86
Luggage compartmentOpening and closing
Page 90 of 381
Closing
You can close the tailgate automatically using
the key, the closing button 6
or the locking
button 7
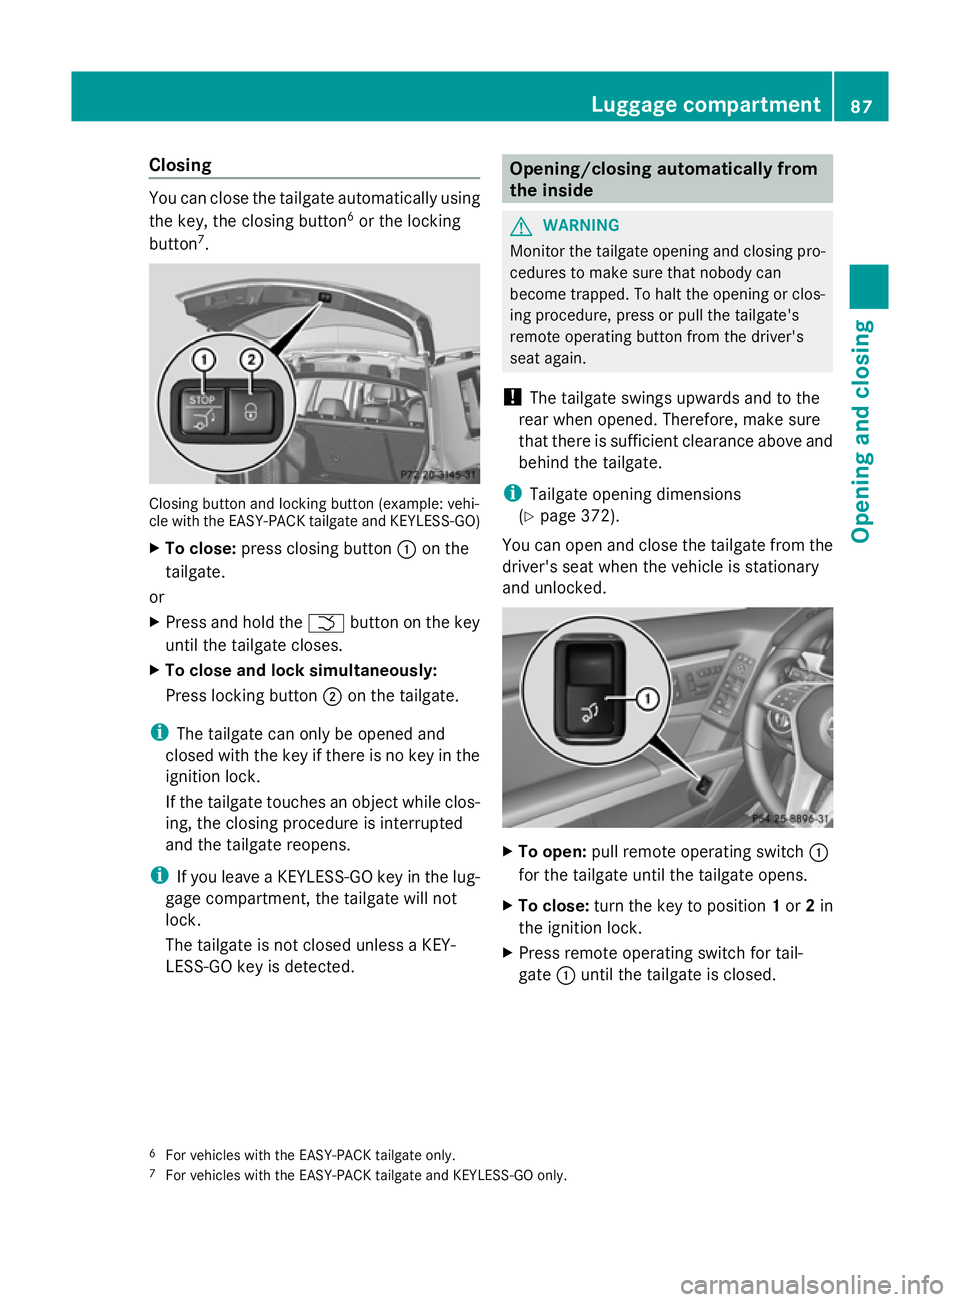
. Closing button and locking button (example: vehi-
cle with the EASY-PACK tailgate and KEYLESS-GO)
X To close: press closing button :on the
tailgate.
or
X Press and hold the Fbutton on the key
until the tailgate closes.
X To close and lock simultaneously:
Press locking button ;on the tailgate.
i The tailgate can only be opened and
closed with the key if there is no key in the
ignition lock.
If the tailgate touches an object while clos-
ing, the closing procedure is interrupted
and the tailgate reopens.
i If you leave a KEYLESS-GO key in the lug-
gage compartment, the tailgate will not
lock.
The tailgate is not closed unless a KEY-
LESS-GO key is detected. Opening/closing automatically from
the inside
G
WARNING
Monitor the tailgate opening and closing pro-
cedures to make sure that nobody can
become trapped. To halt the opening or clos-
ing procedure, press or pull the tailgate's
remote operating button from the driver's
seat again.
! The tailgate swings upwards and to the
rear when opened. Therefore, make sure
that there is sufficient clearance above and
behind the tailgate.
i Tailgate opening dimensions
(Y page 372).
You can open and close the tailgate from the
driver's seat when the vehicle is stationary
and unlocked. X
To open: pull remote operating switch :
for the tailgate until the tailgate opens.
X To close: turn the key to position 1or 2in
the ignition lock.
X Press remote operating switch for tail-
gate :until the tailgate is closed.
6 For vehicles with the EASY-PACK tailgate only.
7 For vehicles with the EASY-PACK tailgate and KEYLESS-GO only. Luggage compartment
87Opening and closing Z
Page 91 of 381
Limiting the opening angle of the tail-
gate
Important safety notes You can limit the opening angle of the tail-
gate. This is possible in the top half of its
opening range, up to approximately 20 cm
before the stop.
This could be useful, for example, if there is
insufficient space above the tailgate.
! Make sure there is sufficient clearance to
open the tailgate fully when setting the
opening angle. The tailgate could otherwise
be damaged. Ideally, set the opening angle
outside.
Activating X
To open the tailgate: pull the handle on
the tailgate.
X To stop the opening procedure at the
desired position: press the closing button
(Y page 86 )in the tailgate or pull the handle
on the outside of the tailgate again.
X To store the position: press and hold the
closing button in the tailgate until you hear
a short tone.
The opening angle limiter is activated. The
tailgate then stops in the stored position
when opened.
i To open the tailgate fully, pull the handle
on the outside of the tailgate again after it
has stopped automatically. This does not
delete the stored position.
Deactivating X
Press and hold the closing button
(Y page 86) in the tailgate until you hear
two short tones. Tailgate emergency release
Important safety notes !
The tailgate swings upwards and to the
rear when opened. Therefore, make sure
that there is sufficient clearance above and
behind the tailgate.
If the tailgate can no longer be opened from
outside the vehicle, use the emergency
release on the inside of the tailgate.
i Tailgate opening dimensions
(Y page 372).
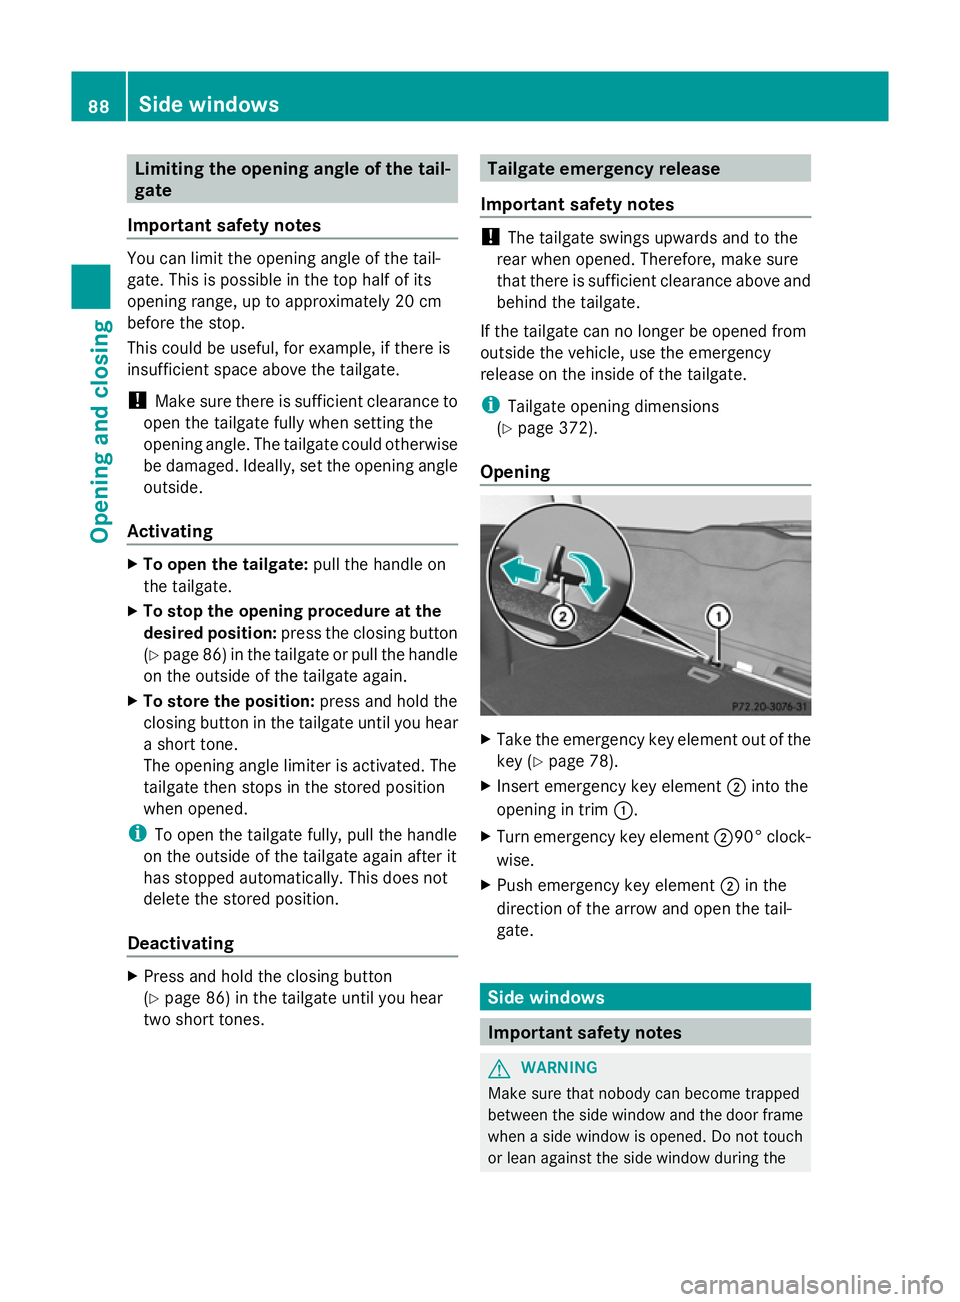
Opening X
Take the emergency key element out of the
key (Y page 78).
X Insert emergency key element ;into the
opening in trim :.
X Turn emergency key element ;90° clock-
wise.
X Push emergency key element ;in the
direction of the arrow and open the tail-
gate. Side windows
Important safety notes
G
WARNING
Make sure that nobody can become trapped
between the side window and the door frame
when a side window is opened. Do not touch
or lean against the side window during the 88
Side windowsOpening and closing
Page 219 of 381
G
WARNING
You could lose control of the vehicle/trailer
combination if it begins to swerve. The vehi-
cle/trailer combination could even overturn.
There is a risk of an accident.
On no account should you attempt to
straighten out the vehicle/trailer combina-
tion by increasing speed. Decrease your
speed and do not countersteer. Brake if nec-
essary. G
WARNING
If you exceed the permissible noseweight
while carrying a load, the carrier system could
detach from the vehicle and fall on the road.
There is a risk of an accident and injury.
Always maintain the permissible noseweight
when carrying loads.
! Depressing the brake pedal constantly
results in excessive and premature wear to
the brake pads.
You can use carrier systems, e.g. bicycle
racks or load-bearing implements, on the ball
coupling. The maximum noseweight of
75 kg applies when using carrier systems on
the ball coupling.
When using a detachable trailer coupling,
make sure you observe the trailer coupling
manufacturer's operating instructions.
When reversing the vehicle towards the
trailer, make sure there is nobody between
the trailer and the vehicle.
Couple and uncouple the trailer carefully. If
you do not couple the trailer to the towing
vehicle correctly, the trailer could become
detached.
Make sure that the following values are not
exceeded:
R the permissible trailer drawbar noseweight
R the permissible trailer load R
the permissible rear axle load of the towing
vehicle
R the maximum permissible gross vehicle
weight of both the towing vehicle and the
trailer
The applicable permissible values, which
must not be exceeded, can be found:
R in the vehicle documents
R on the identification plates of the trailer tow
hitch, the trailer and the vehicle
If the values differ, the lowest value applies.
You will find the values approved by the man-
ufacturer on the vehicle identification plates
and those for the towing vehicle under "Tech-
nical data".
When towing a trailer, your vehicle's handling
characteristics will be different in comparison
to when driving without a trailer.
The vehicle/trailer combination:
R is heavier
R is restricted in its acceleration and gradi-
ent-climbing capability
R has an increased braking distance
R is affected more by strong crosswinds
R demands more sensitive steering
R has a larger turning circle
This can impair the vehicle's handling char-
acteristics. Adapt your style of driving accord-
ingly. Maintain a safe distance. Drive care-
fully.
When towing a trailer, always adjust your
speed to the current road and weather con-
ditions. Do not exceed the maximum permis-
sible speed for your vehicle/trailer combina-
tion.
General notes i
When towing a trailer, set the tyre pres-
sure on the rear axle of the towing vehicle
for a maximum load; see the tyre pressure
table in the fuel filler flap (Y page 353).
You will find fitting dimensions and loads in
the "Technical data" section (Y page 373).216
Towing a trailerDriving and parking
Page 335 of 381
number, e.g. on the B-pillar on the driver's
side.
X Correct the tyre pressure if it is still at least
130 kPa (1.3 ba r/19 psi) (see the fuel filler
flap for values).
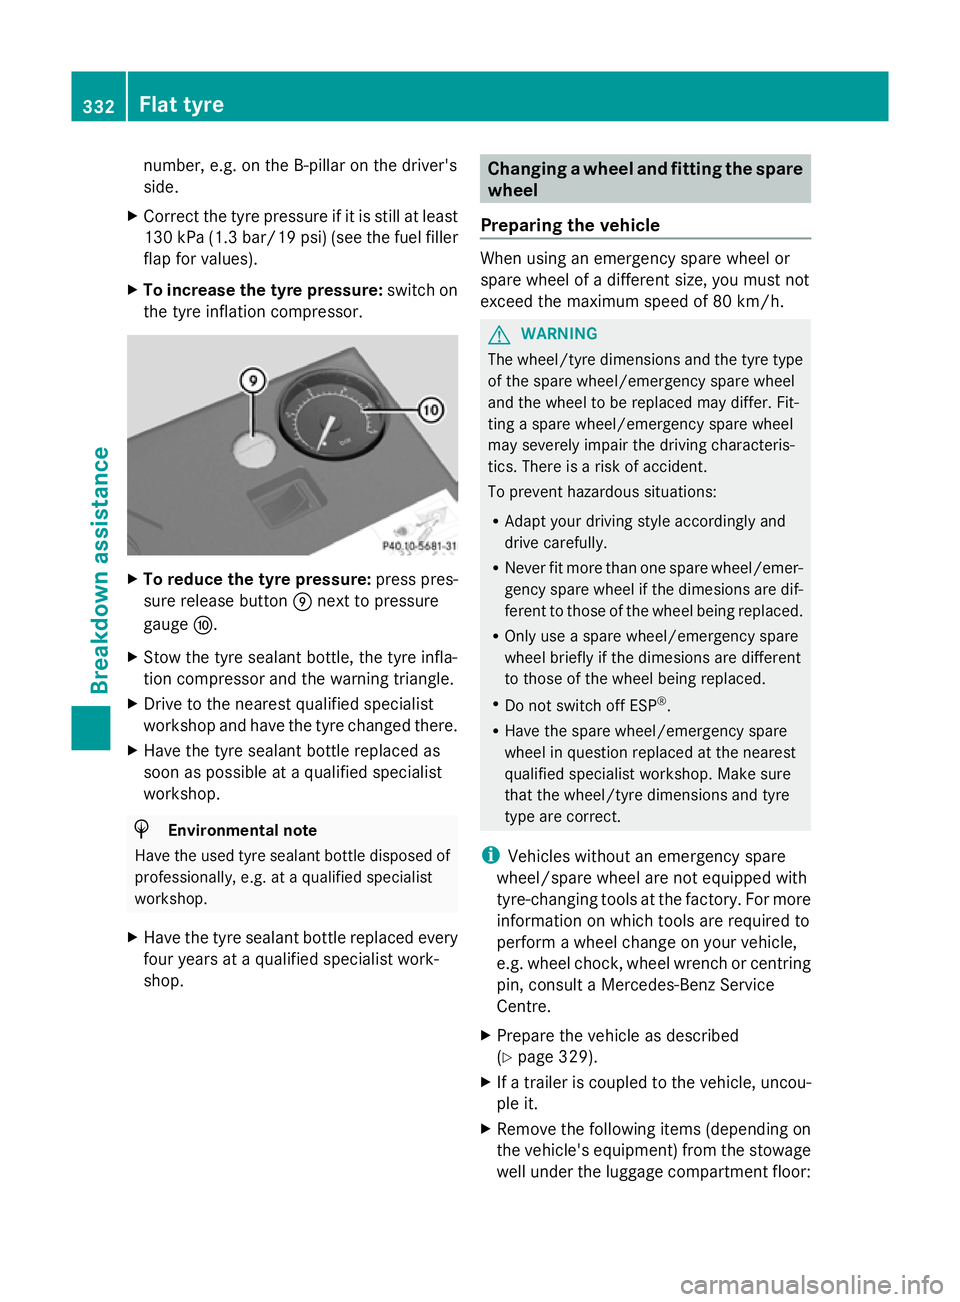
X To increase the tyre pressure: switch on
the tyre inflation compressor. X
To reduce the tyre pressure: press pres-
sure release button Enext to pressure
gauge F.
X Stow the tyre sealant bottle, the tyre infla-
tion compressor and the warning triangle.
X Drive to the nearest qualified specialist
workshop and have the tyre changed there.
X Have the tyre sealant bottle replaced as
soon as possible at a qualified specialist
workshop. H
Environmental note
Have the used tyre sealant bottle disposed of
professionally, e.g. at a qualified specialist
workshop.
X Have the tyre sealant bottle replaced every
four years at a qualified specialist work-
shop. Changing a wheel and fitting the spare
wheel
Preparing the vehicle When using an emergency spare wheel or
spare wheel of a different size, you must not
exceed the maximum speed of 80 km/h.
G
WARNING
The wheel/tyre dimensions and the tyre type
of the spare wheel/emergency spare wheel
and the wheel to be replaced may differ. Fit-
ting a spare wheel/emergency spare wheel
may severely impair the driving characteris-
tics. There is a risk of accident.
To prevent hazardous situations:
R Adapt your driving style accordingly and
drive carefully.
R Never fit more than one spare wheel/emer-
gency spare wheel if the dimesions are dif-
ferent to those of the wheel being replaced.
R Only use a spare wheel/emergency spare
wheel briefly if the dimesions are different
to those of the wheel being replaced.
R Do not switch off ESP ®
.
R Have the spare wheel/emergency spare
wheel in question replaced at the nearest
qualified specialist workshop. Make sure
that the wheel/tyre dimensions and tyre
type are correct.
i Vehicles without an emergency spare
wheel/spare wheel are not equipped with
tyre-changing tools at the factory. For more
information on which tools are required to
perform a wheel change on your vehicle,
e.g. wheel chock, wheel wrench or centring
pin, consult a Mercedes-Benz Service
Centre.
X Prepare the vehicle as described
(Y page 329).
X If a trailer is coupled to the vehicle, uncou-
ple it.
X Remove the following items (depending on
the vehicle's equipment) from the stowage
well under the luggage compartment floor: 332
Flat tyreBreakdown assistance
Page 353 of 381
Useful information
i This Owner's Manual describes all mod-
els, series and optional equipment for your
vehicle that were available at the time of
going to press. National variations are pos-
sible. Note that your vehicle may not be
equipped with all of the functions descri-
bed. This is also the case for systems and
functions relevant to safety.
i Read the information on qualified special-
ist workshops: (Y page 27). Important safety notes
G
WARNING
If wheels and tyres of the wrong size are used,
the wheel brakes or suspension components
may be damaged. There is a risk of accident.
Always replace wheels and tyres with those
that fulfil the specifications of the original part
(designation, manufacturer, model). G
WARNING
A flat tyre severely impairs the driving, steer-
ing and braking characteristics of the vehicle.
There is a risk of accident.
Tyres without run-flat characteristics:
R do not drive with a flat tyre.
R immediately replace the flat tyre with your
emergency spare wheel or spare wheel, or
consult a qualified specialist workshop.
Tyres with run-flat characteristics:
R pay attention to the information and warn-
ing notices on MOExtended tyres (tyres
with run-flat characteristics).
Accessories that are not approved for your
vehicle by Mercedes-Benz or are not being
used correctly can impair the operating
safety. Before purchasing and using non-approved
accessories, visit a qualified specialist work-
shop and enquire about:
R
suitability
R legal stipulations
R factory recommendations
Information on the dimensions and types of
wheels and tyres for your vehicle can be
found in the "Wheel/tyre combinations" sec-
tion (Y page 357).
Information on air pressure for the tyres on
your vehicle can be found:
R on the tyre pressure label on the fuel filler
flap
R in the "Tyre pressure" section
Modification work on the brake system and
wheels is not permitted, nor is the use of
spacer plates or brake dust shields. This inva-
lidates the general operating permit for the
vehicle.
Pay special attention to the country-specific
requirements for tyre approval. These
requirements can stipulate a specific tyre
type for your vehicle. Furthermore, the use of
certain tyre types in certain regions and areas
of operation can be highly beneficial. You can
find further information regarding tyres at
specialist tyre retailers, at qualified specialist
workshops or at any Mercedes-Benz Service
Centre.
i Further information on wheels and tyres
can be obtained at any qualified specialist
workshop. Operation
Notes on driving
R While driving, pay attention to vibrations,
noises and unusual handling characteris-
tics, e.g. pulling to one side. This may indi-
cate that the wheels or tyres are damaged.
If you suspect that a tyre is defective,
reduce your speed immediately. Stop the
vehicle as soon as possible to check the 350
OperationWheels and tyres