driver seat adjustment MERCEDES-BENZ GLK SUV 2012 Owners Manual
[x] Cancel search | Manufacturer: MERCEDES-BENZ, Model Year: 2012, Model line: GLK SUV, Model: MERCEDES-BENZ GLK SUV 2012Pages: 381, PDF Size: 12.68 MB
Page 22 of 381
Roller sunblind
Opening/closing .............................. 93
Panorama sliding sunroo f................ 93
Roof carrier ........................................ 304
Roof lining and carpets (cleaning
instructions) ...................................... 323
Roof load (maximum) ........................372
Route (navigation) see Route guidance (navigation)
Route guidance (navigation) ............232 S
Safety Children in the vehicle .....................54
Child restraint systems ....................54
Safety net
Attaching ....................................... 302
Important safety information .........301
Safety system
see Driving safety system
Seat
Folding the backrest (rear com-
partment) forwards/back ..............299
Seat belt
Activating/deactivating seat-belt
adjustment (12-button multifunc-
tion steering wheel) .......................243
Adjusting the driver's and front-
passenger seat belt .........................51
Adjusting the height ......................... 52
Belt force limiter .............................. 53
Belt tensioner .................................. 53
Centre rear-compartment sea t........ 52
Cleaning ......................................... 323
Display message (12-button mul-
tifunction steering wheel) ..............255
Display message (4-button multi-
function steering wheel) ................249
Fastening ......................................... 51
Important safety guidelines .............50
Rear seat belt status indicator .........53
Releasing ......................................... 52
Warning lamp ................................. 284
Warning lamp (function) ................... 52 Seats
Adjusting (electrically) .....................98
Adjusting (manually and electri-
cally) ................................................ 98
Adjusting lumbar support ..............100
Adjusting the 4-way lumbar sup-
port ................................................ 100
Adjusting the head restraint ............98
Cleaning the cover .........................323
Correct driver's seat position ........... 96
Folding the rear bench seat for-
wards/back ................................... 298
Important safety notes ....................97
Seat heating problem ....................101
Seat ventilation problem ................101
Storing settings (memory func-
tion) ............................................... 106
Switching seat heating on/off .......100
Switching the seat ventilation on/
off .................................................. 101
Sensors (cleaning instructions) .......321
Service see ASSYST PLUS
Service Centre
see Qualified specialist workshop
Service menu (12-button multi-
function steering wheel) ..................238
Service products
AdBlue ®
special additive s.............. 368
Brake fluid ..................................... 371
Coolant (engine) ............................ 371
Engine oil ....................................... 369
Fuel ................................................ 365
Important safety notes ..................365
Washer fluid .................................. .372
Settings
Factory (12-button multifunction
steering wheel) .............................. 244
On-board computer (12-button
multifunction steering wheel) ........238
Setting the air distribution ...............133
Setting the airflow ............................134
Shifting to neutral (manual trans-
mission) ............................................. 154
Short journeys (diesel particle fil-
ter) ...................................................... 167
Sidebag ................................................ 47 Index
19
Page 52 of 381
!
Make sure that there are no objects in the
footwell or behind the seats when moving
the seat back. There is a risk that the seats
and/or the objects could be damaged.
More information about seat belt adjustment,
a convenience function integrated into PRE-
SAFE ®
, can be found in the "Seat belt adjust-
ment" section (Y page 51). NECK-PRO head restraints/NECK-
PRO luxury head restraints
NECK-PRO head restraints/NECK-PRO luxury
head restraints increase protection of the
driver's and front-passenger's head and
neck. In the event of a rear collision of a cer-
tain severity, the NECK-PRO head restraints/
NECK-PRO luxury head restraints on the driv-
er's and front-passenger seats are moved for-
wards and upwards. This provides better
head support. G
WARNING
Only use head restraint covers which have
been tested and approved by Mercedes-Benz
for your vehicle model.
The use of non-approved head restraint cov-
ers may prevent NECK-PRO head restraints/
NECK-PRO luxury head restraints from trig-
gering properly. The NECK-PRO head
restraints/NECK-PRO luxury head restraints
can therefore not provide the intended pro-
tection.
Consult a Mercedes-Benz Service Centre
regarding availability.
If the NECK-PRO head restraints/NECK-PRO
luxury head restraints have been triggered in
an accident, reset the NECK-PRO head
restraints/NECK-PRO luxury head restraints
on the driver's and front-passenger seats
(Y page 49). Otherwise, the additional pro-
tection will not be available in the event of
another rear-end collision. NECK-PRO head
restraints/NECK-PRO luxury head restraints
that have been triggered are moved forwards
and can no longer be adjusted. Resetting a triggered NECK-PRO head
restraint/NECK-PRO luxury head
restraint
Important safety notes Mercedes-Benz recommends that you have
NECK-PRO head restraints/NECK-PRO luxury
head restraints checked at a qualified spe-
cialist workshop, e.g. a Mercedes-Benz
Service Centre, if your vehicle is involved in a
rear-end collision.
NECK-PRO head restraints
i
Resetting the NECK-PRO head restraints
requires a lot of strength. If you have diffi-
culty resetting the NECK-PRO head
restraints, have this work carried out at a
qualified specialist workshop, e.g. a
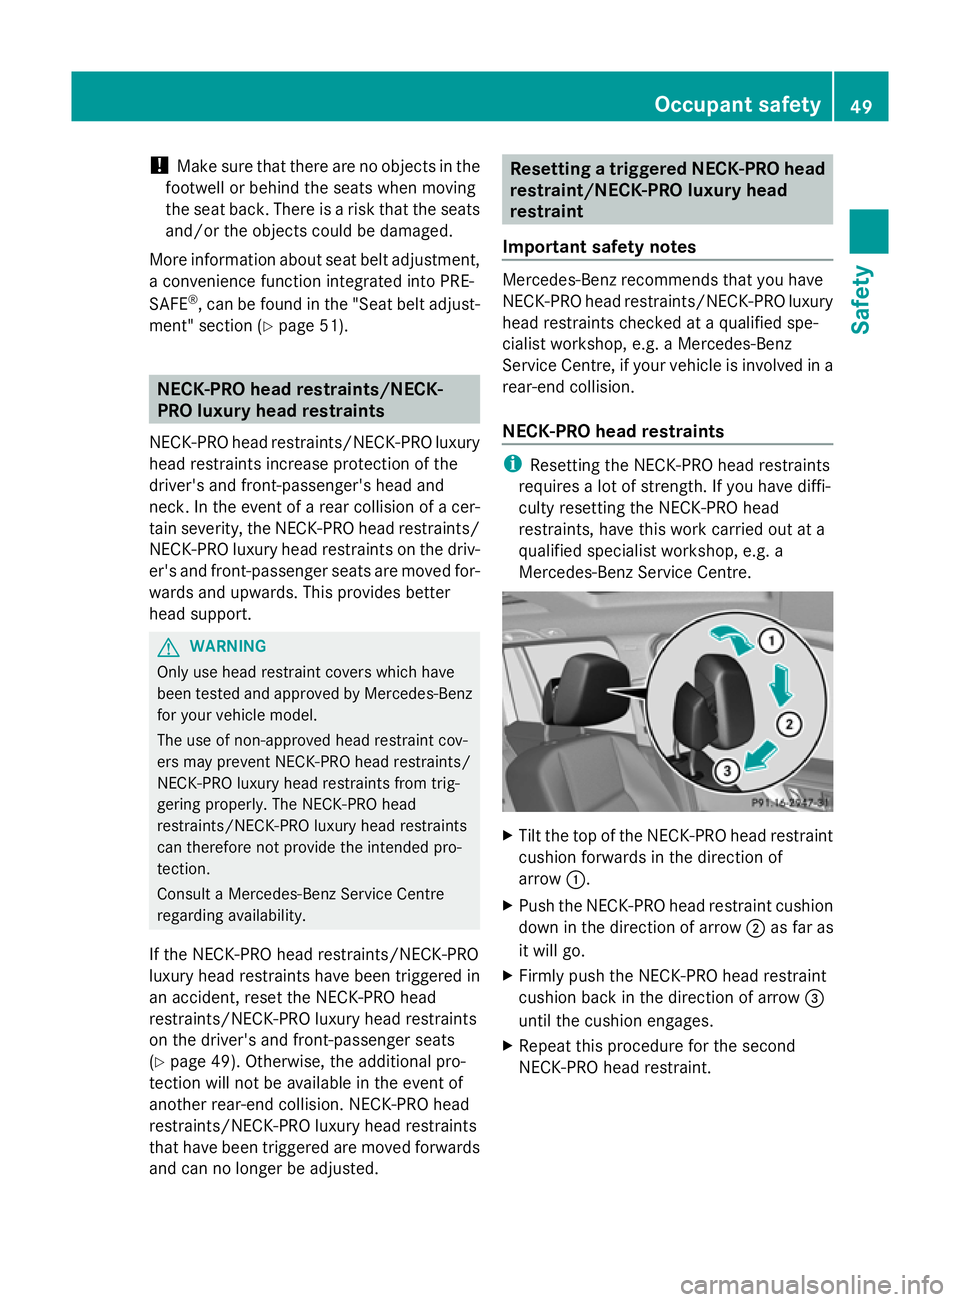
Mercedes-Benz Service Centre. X
Tilt the top of the NECK-PRO head restraint
cushion forwards in the direction of
arrow :.
X Push the NECK-PRO head restraint cushion
down in the direction of arrow ;as far as
it will go.
X Firmly push the NECK-PRO head restraint
cushion back in the direction of arrow =
until the cushion engages.
X Repeat this procedure for the second
NECK-PRO head restraint. Occupant safety
49Safety Z
Page 54 of 381
tems installed on a suitable seat. Additional
information can be found in the Operating
Instructions in the chapter "Safety", "Chil-
dren in the Vehicle". Observe the installa-
tion instructions of the child restraint sys-
tem manufacturer.
R Do not secure an object with a seat belt if
the seat belt is also being used by one of
the vehicle's occupants. G
WARNING
The seat belt does not offer the intended level
of protection unless the backrest is almost
vertical. Under certain circumstances, this
could cause severe or even fatal injuries in the
event of an accident.
Before starting a journey, make sure that the
seat is properly adjusted and that the back-
rest is almost vertical. G
WARNING
A dirty or damaged seat belt or one that has
been modified or subjected to a load in an
accident no longer offers the intended level of
protection. Under certain circumstances, this
could cause severe or even fatal injuries in the
event of an accident.
For this reason, check regularly that the seat
belts are not damaged or dirty.
Always have damaged seat belts or seat belts
that have been subjected to a load in an acci-
dent replaced at a qualified specialist work-
shop.
For safety reasons, Mercedes-Benz recom-
mends that you only use seat belts which have
been approved by Mercedes-Benz for your
vehicle. Fastening seat belts
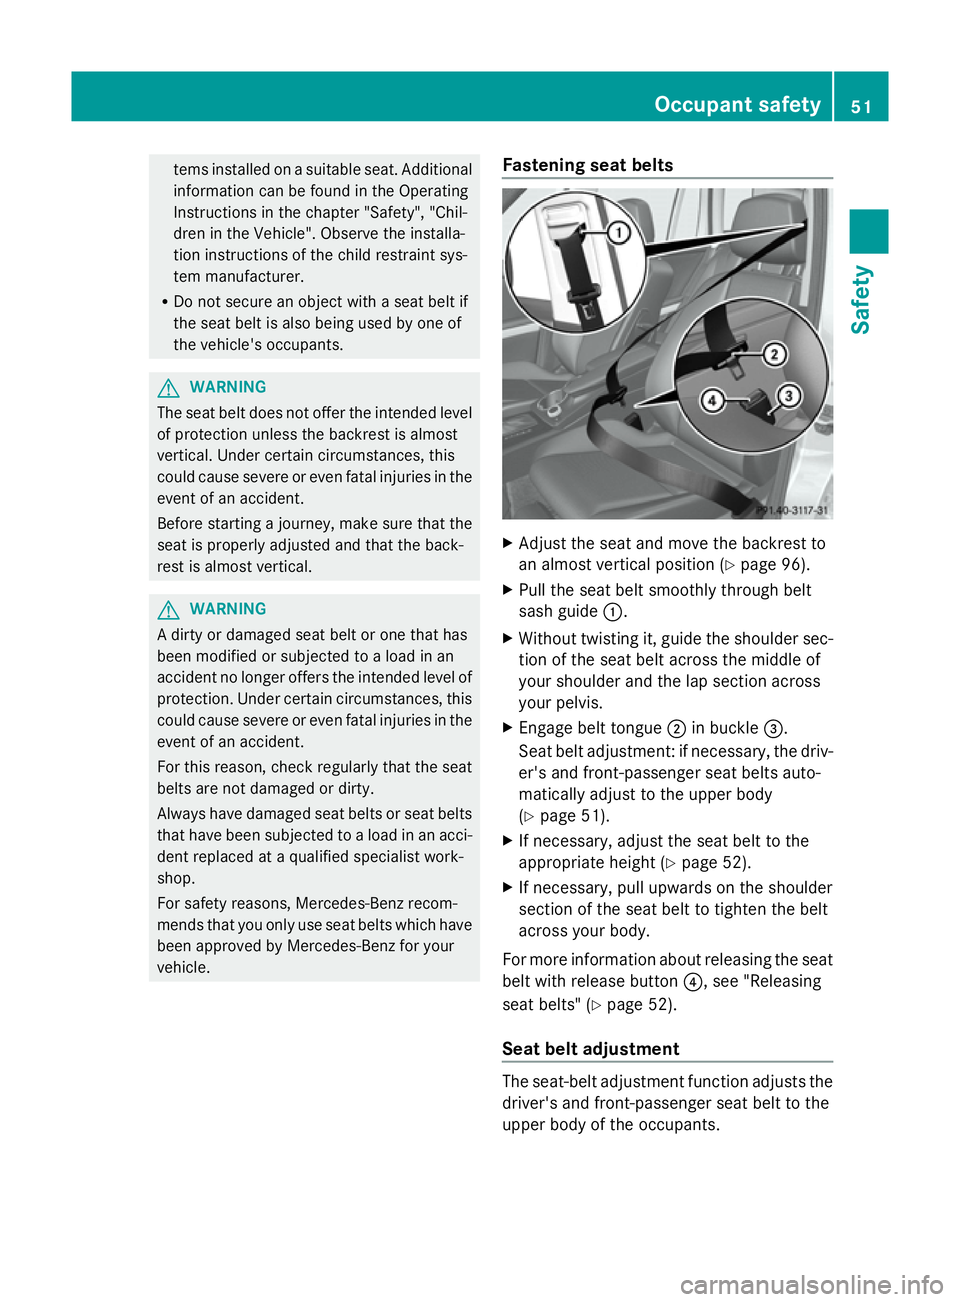
X
Adjust the seat and move the backrest to
an almost vertical position (Y page 96).
X Pull the seat belt smoothly through belt
sash guide :.
X Without twisting it, guide the shoulder sec-
tion of the seat belt across the middle of
your shoulder and the lap section across
your pelvis.
X Engage belt tongue ;in buckle =.
Seat belt adjustment: if necessary, the driv-
er's and front-passenger seat belts auto-
matically adjust to the upper body
(Y page 51).
X If necessary, adjust the seat belt to the
appropriate height (Y page 52).
X If necessary, pull upwards on the shoulder
section of the seat belt to tighten the belt
across your body.
For more information about releasing the seat
belt with release button ?, see "Releasing
seat belts" (Y page 52).
Seat belt adjustment The seat-belt adjustment function adjusts the
driver's and front-passenger seat belt to the
upper body of the occupants. Occupant safety
51Safety Z
Page 55 of 381
The belt strap is tightened slightly when:
R you engage the belt tongue in the belt
buckle and you then turn the key to position
2 in the ignition lock.
R the key is in position 2in the ignition lock
and you then engage the belt tongue in the
buckle.
The seat-belt adjustment will apply a certain
tightening force if any slack is detected
between the occupant and the seat belt. Do
not hold on to the seat belt tightly while it is
adjusting. On vehicles with a luxury multi-
function steering wheel (12 buttons) you can
switch the seat-belt adjustment on and off
using the on-board computer (Y page 243).
The seat-belt adjustment is an integral part of
the PRE-SAFE ®
convenience function. More
information about PRE-SAFE ®
can be found
in the "PRE-SAFE ®
(preventative occupant
protection)" section (Y page 48).
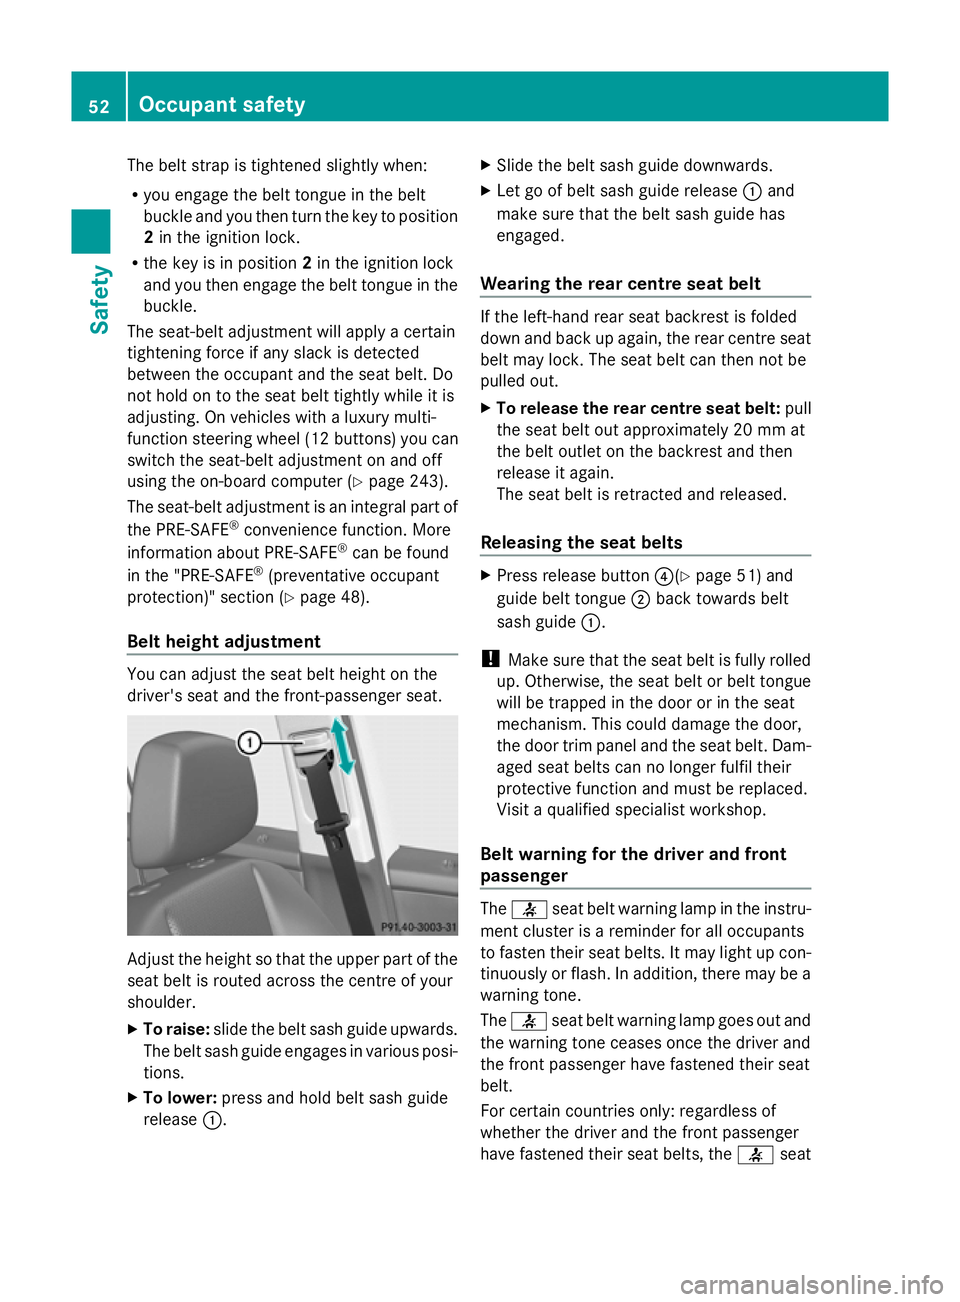
Belt height adjustment You can adjust the seat belt height on the
driver's seat and the front-passenger seat. Adjust the height so that the upper part of the
seat belt is routed across the centre of your
shoulder.
X To raise: slide the belt sash guide upwards.
The belt sash guide engages in various posi-
tions.
X To lower: press and hold belt sash guide
release :. X
Slide the belt sash guide downwards.
X Let go of belt sash guide release :and
make sure that the belt sash guide has
engaged.
Wearing the rear centre seat belt If the left-hand rear seat backrest is folded
down and back up again, the rear centre seat
belt may lock. The seat belt can then not be
pulled out.
X
To release the rear centre seat belt: pull
the seat belt out approximately 20 mm at
the belt outlet on the backrest and then
release it again.
The seat belt is retracted and released.
Releasing the seat belts X
Press release button ?(Ypage 51) and
guide belt tongue ;back towards belt
sash guide :.
! Make sure that the seat belt is fully rolled
up. Otherwise, the seat belt or belt tongue
will be trapped in the door or in the seat
mechanism. This could damage the door,
the door trim panel and the seat belt. Dam-
aged seat belts can no longer fulfil their
protective function and must be replaced.
Visit a qualified specialist workshop.
Belt warning for the driver and front
passenger The
7 seat belt warning lamp in the instru-
ment cluster is a reminder for all occupants
to fasten their seat belts. It may light up con-
tinuously or flash. In addition, there may be a
warning tone.
The 7 seat belt warning lamp goes out and
the warning tone ceases once the driver and
the front passenger have fastened their seat
belt.
For certain countries only: regardless of
whether the driver and the front passenger
have fastened their seat belts, the 7seat 52
Occupant safetySafety
Page 99 of 381
Useful information
i This Owner's Manual describes all mod-
els, series and optional equipment for your
vehicle that were available at the time of
going to press. National variations are pos-
sible. Note that your vehicle may not be
equipped with all of the functions descri-
bed. This is also the case for systems and
functions relevant to safety.
i Read the information on qualified special-
ist workshops: (Y page 27). Correct driver's seat position
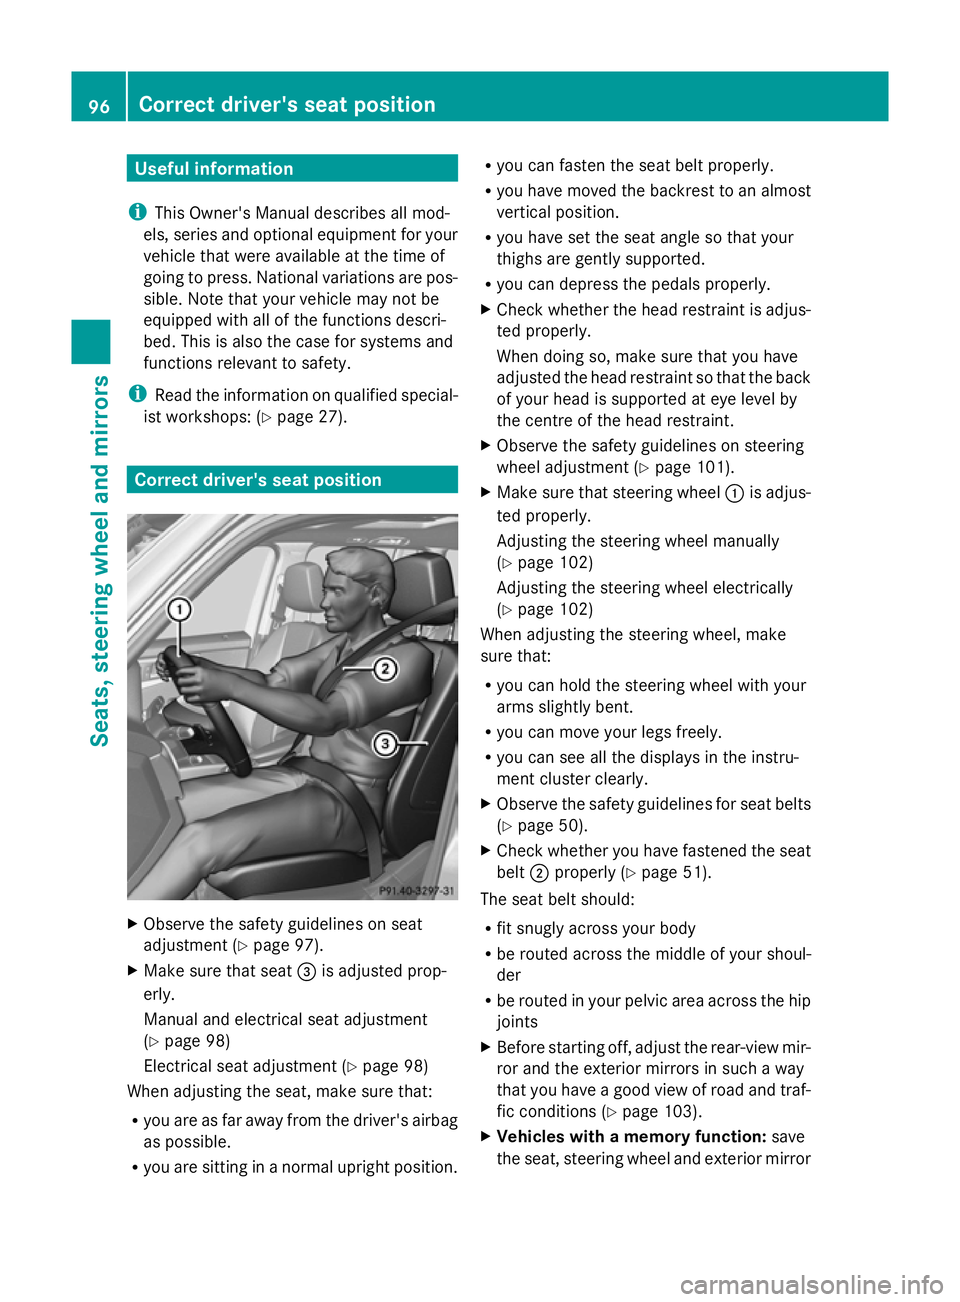
X
Observe the safety guidelines on seat
adjustment (Y page 97).
X Make sure that seat =is adjusted prop-
erly.
Manual and electrical seat adjustment
(Y page 98)
Electrical seat adjustment (Y page 98)
When adjusting the seat, make sure that:
R you are as far away from the driver's airbag
as possible.
R you are sitting in a normal upright position. R
you can fasten the seat belt properly.
R you have moved the backrest to an almost
vertical position.
R you have set the seat angle so that your
thighs are gently supported.
R you can depress the pedals properly.
X Check whether the head restraint is adjus-
ted properly.
When doing so, make sure that you have
adjusted the head restraint so that the back
of your head is supported at eye level by
the centre of the head restraint.
X Observe the safety guidelines on steering
wheel adjustment (Y page 101).
X Make sure that steering wheel :is adjus-
ted properly.
Adjusting the steering wheel manually
(Y page 102)
Adjusting the steering wheel electrically
(Y page 102)
When adjusting the steering wheel, make
sure that:
R you can hold the steering wheel with your
arms slightly bent.
R you can move your legs freely.
R you can see all the displays in the instru-
ment cluster clearly.
X Observe the safety guidelines for seat belts
(Y page 50).
X Check whether you have fastened the seat
belt ;properly (Y page 51).
The seat belt should:
R fit snugly across your body
R be routed across the middle of your shoul-
der
R be routed in your pelvic area across the hip
joints
X Before starting off, adjust the rear-view mir-
ror and the exterior mirrors in such a way
that you have a good view of road and traf-
fic conditions (Y page 103).
X Vehicles with a memory function: save
the seat, steering wheel and exterior mirror 96
Correct driver's seat positionSeats, steering wheel and mirrors
Page 100 of 381
settings with the memory function
(Y
page 106). Seats
Important safety notes
G
WARNING
The seats can still be adjusted when there is
no key in the ignition lock. For this reason,
children should never be left unsupervised in
the vehicle. They could adjust the seats and
become trapped. G
WARNING
Only adjust the driver's seat when the vehicle
is stationary. You will otherwise be distracted
from the road and traffic conditions and you
could lose control of the vehicle as a result of
the seat moving. This could cause an acci-
dent. G
WARNING
If you adjust the seat height carelessly, you or
others could be trapped and thereby injured.
Children in particular could unintentionally
press the buttons to electrically adjust the
seats and become trapped.
Take care that:
R while moving the seats, your hands do not
get under the lever assembly of the seat
adjustment system.
R children in the vehicle do not slide their
hands under the levers. G
WARNING
Make sure that nobody can become trapped
when adjusting the seats.
Observe the notes on airbags.
Secure children as recommended; see the
"Children in the vehicle" section. G
WARNING
Make sure that the back of your head is sup-
ported at eye level by the central area of the head restraint. If your head is not supported
correctly by the head restraint, you could suf-
fer a severe neck injury in the event of an
accident. Never drive if the head restraints are
not engaged and set correctly.
G
WARNING
A seat belt can only offer its intended degree
of protection when the backrest is almost ver-
tical and the occupant is sitting upright. Avoid
seat positions that do not allow the seat belt
to be routed correctly. Adjust the backrest so
that it is as upright as possible. Never travel
with the backrest reclined too far backwards.
You could otherwise be seriously or even
fatally injured in the event of an accident or
sudden braking.
! To avoid damage to the seats and the seat
heating, observe the following information:
R do not spill any liquids on the seats. If
liquid is spilled on the seats, dry them as
soon as possible.
R if the seat covers are damp or wet, do not
switch on the seat heating. The seat
heating should also not be used to dry
the seats.
R clean the seat covers as recommended;
see the "Interior care" section.
R do not transport heavy loads on the
seats. Do not place sharp objects on the
seat cushions, e.g. knives, nails or tools.
The seats should only be occupied by
passengers, if possible.
R when the seat heating is in operation, do
not cover the seats with insulating mate-
rials, e.g. blankets, coats, bags, seat cov-
ers, child seats or booster seats.
! Make sure that there are no objects in the
footwell or behind the seats when moving
the seat back. There is a risk that the seats
and/or the objects could be damaged.
i The rear-compartment head restraints
can be removed (Y page 99). Seats
97Seats, steering wheel and mirrors Z
Page 103 of 381
X
To remove: pull the head restraint up to
the stop.
X Press release catch :and pull the head
restraint out of the guides.
X To refit: insert the head restraint so that
the notches on the bar are on the left when
viewed in the direction of travel.
X Push the head restraint down until you hear
it engage in position. Adjusting the lumbar support
You can adjust the contour of the driver's seat
so as to provide optimum support for your
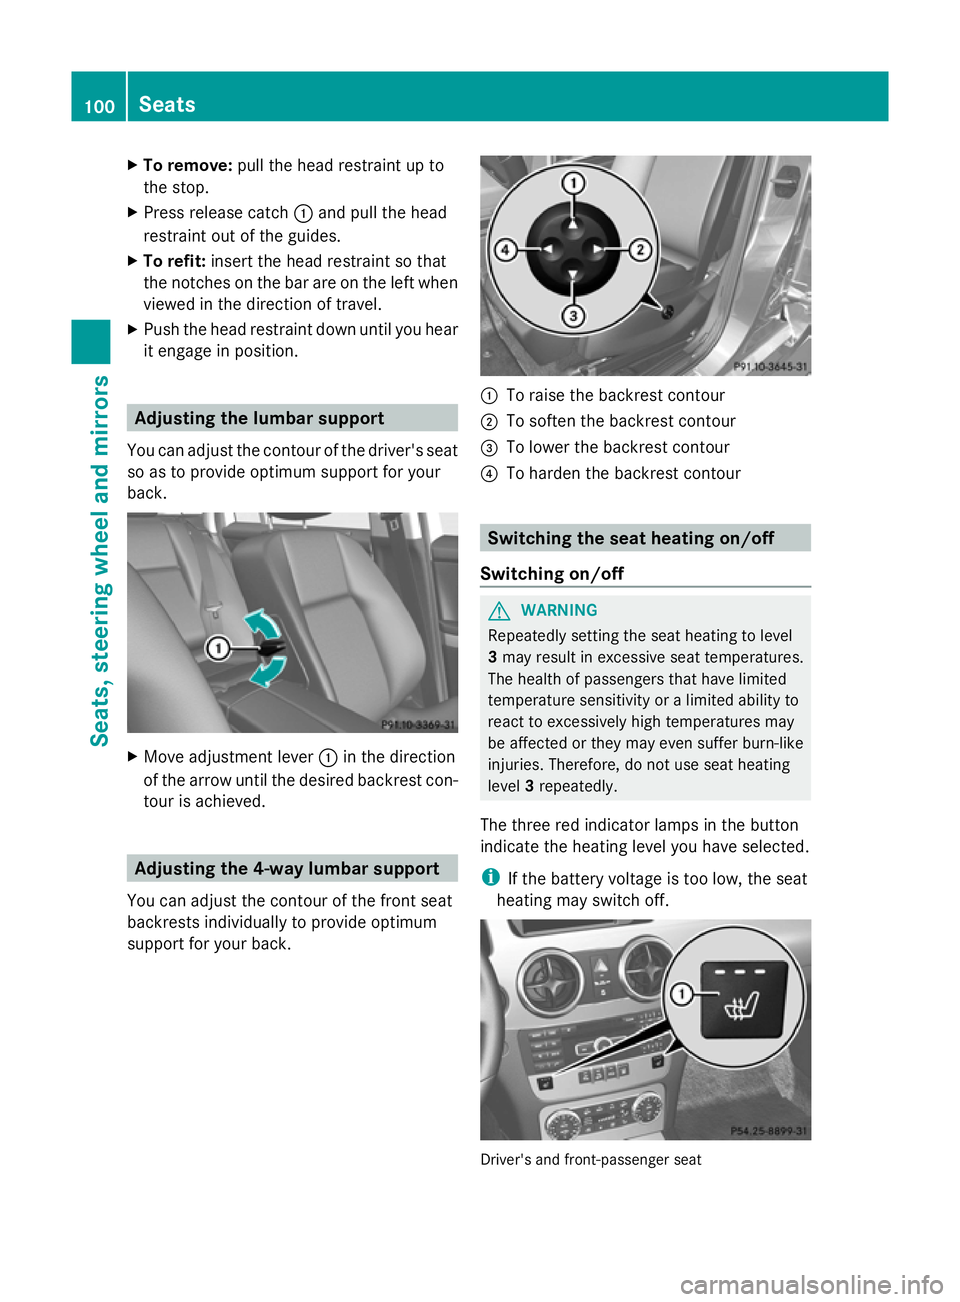
back. X
Move adjustment lever :in the direction
of the arrow until the desired backrest con-
tour is achieved. Adjusting the 4-way lumbar support
You can adjust the contour of the front seat
backrests individually to provide optimum
support for your back. :
To raise the backrest contour
; To soften the backrest contour
= To lower the backrest contour
? To harden the backrest contour Switching the seat heating on/off
Switching on/off G
WARNING
Repeatedly setting the seat heating to level
3 may result in excessive seat temperatures.
The health of passengers that have limited
temperature sensitivity or a limited ability to
react to excessively high temperatures may
be affected or they may even suffer burn-like
injuries. Therefore, do not use seat heating
level 3repeatedly.
The three red indicator lamps in the button
indicate the heating level you have selected.
i If the battery voltage is too low, the seat
heating may switch off. Driver's and front-passenger seat100
SeatsSeats, steering
wheel and mirrors
Page 104 of 381
The system automatically switches down
from level 3to level 2after approximately
eight minutes.
The system automatically switches down
from level 2to level 1after approximately ten
minutes.
The system automatically switches off
approximately 20 minutes after it is set to
level 1.
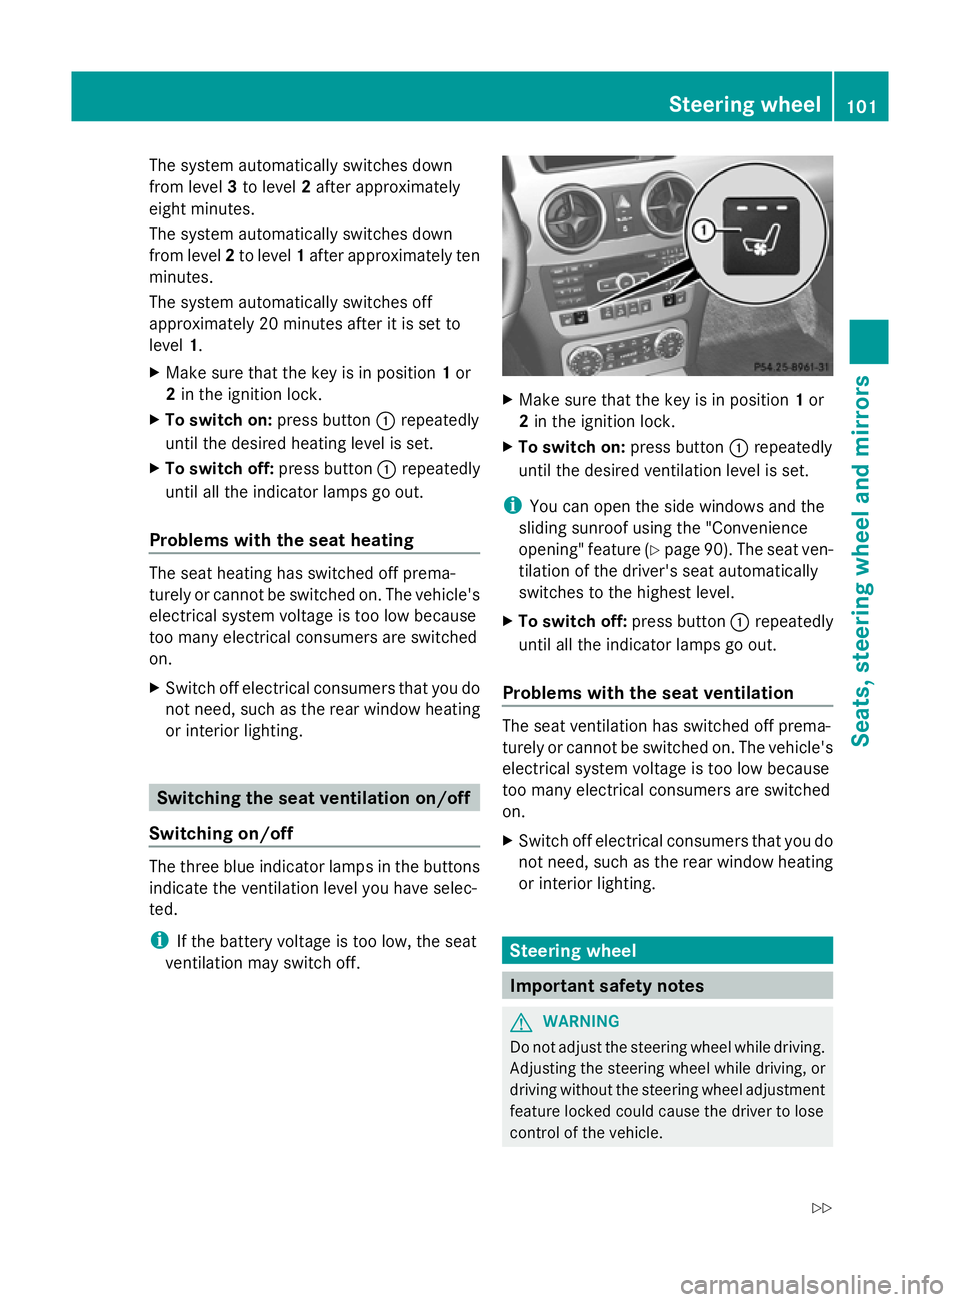
X Make sure that the key is in position 1or
2 in the ignition lock.
X To switch on: press button:repeatedly
until the desired heating level is set.
X To switch off: press button:repeatedly
until all the indicator lamps go out.
Problems with the seat heating The seat heating has switched off prema-
turely or cannot be switched on. The vehicle's
electrical system voltage is too low because
too many electrical consumers are switched
on.
X Switch off electrical consumers that you do
not need, such as the rear window heating
or interior lighting. Switching the seat ventilation on/off
Switching on/off The three blue indicator lamps in the buttons
indicate the ventilation level you have selec-
ted.
i If the battery voltage is too low, the seat
ventilation may switch off. X
Make sure that the key is in position 1or
2 in the ignition lock.
X To switch on: press button:repeatedly
until the desired ventilation level is set.
i You can open the side windows and the
sliding sunroof using the "Convenience
opening" feature (Y page 90). The seat ven-
tilation of the driver's seat automatically
switches to the highest level.
X To switch off: press button:repeatedly
until all the indicator lamps go out.
Problems with the seat ventilation The seat ventilation has switched off prema-
turely or cannot be switched on. The vehicle's
electrical system voltage is too low because
too many electrical consumers are switched
on.
X
Switch off electrical consumers that you do
not need, such as the rear window heating
or interior lighting. Steering wheel
Important safety notes
G
WARNING
Do not adjust the steering wheel while driving.
Adjusting the steering wheel while driving, or
driving without the steering wheel adjustment
feature locked could cause the driver to lose
control of the vehicle. Steering wheel
101Seats, steering wheel and mirrors
Z
Page 105 of 381
The electrical steering wheel adjustment fea-
ture can be operated at any time. Therefore,
do not leave children unattended in the vehi-
cle, or with access to an unlocked vehicle. A
child's unsupervised access to a vehicle could
result in an accident and/or serious personal
injury. Adjusting the steering wheel man-
ually
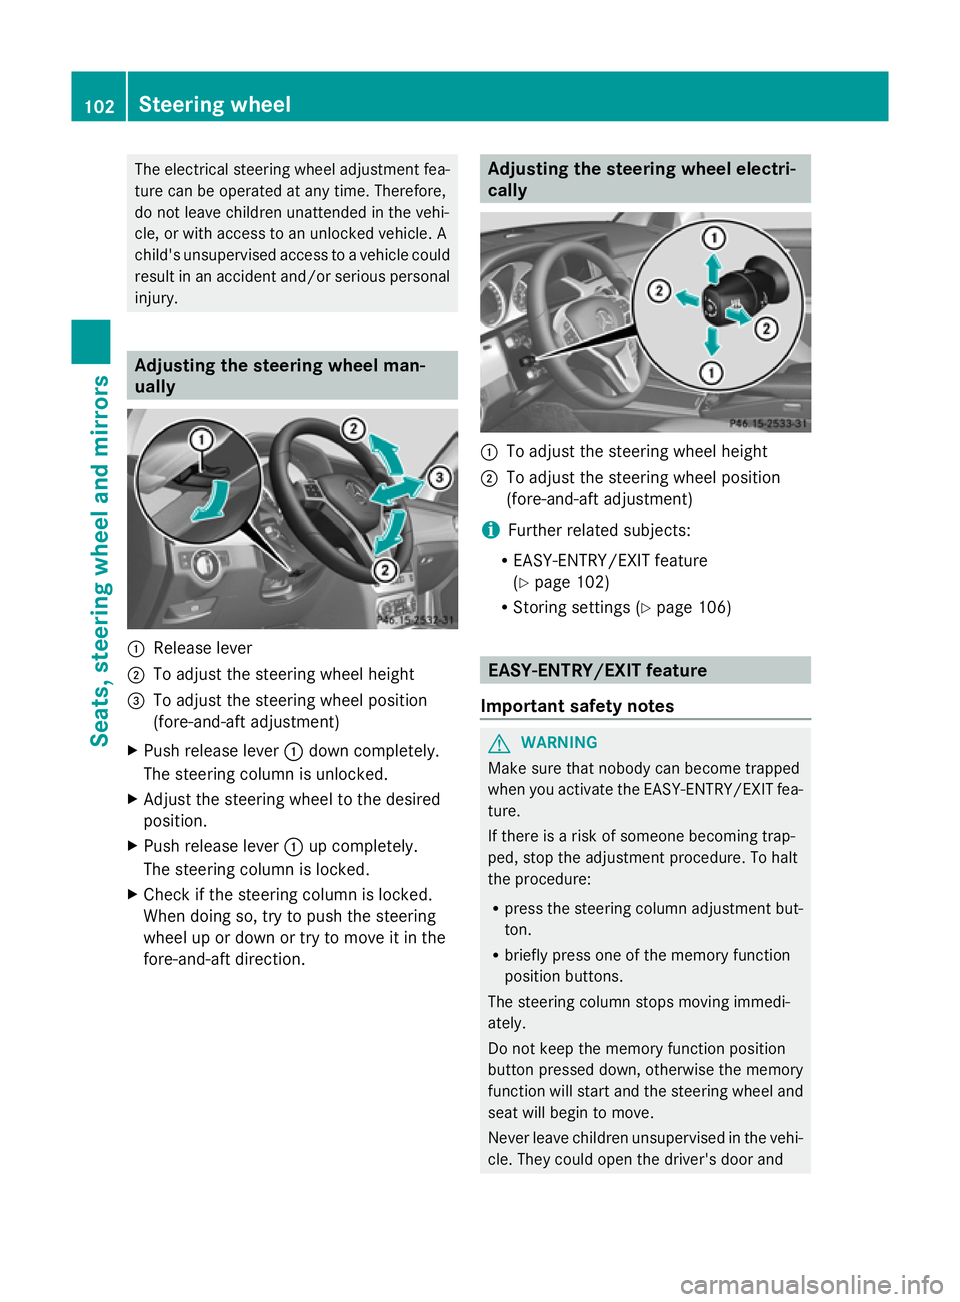
:
Release lever
; To adjust the steering wheel height
= To adjust the steering wheel position
(fore-and-aft adjustment)
X Push release lever :down completely.
The steering column is unlocked.
X Adjust the steering wheel to the desired
position.
X Push release lever :up completely.
The steering column is locked.
X Check if the steering column is locked.
When doing so, try to push the steering
wheel up or down or try to move it in the
fore-and-aft direction. Adjusting the steering wheel electri-
cally
:
To adjust the steering wheel height
; To adjust the steering wheel position
(fore-and-aft adjustment)
i Further related subjects:
R EASY-ENTRY/EXIT feature
(Y page 102)
R Storing settings (Y page 106) EASY-ENTRY/EXIT feature
Important safety notes G
WARNING
Make sure that nobody can become trapped
when you activate the EASY-ENTRY/EXIT fea-
ture.
If there is a risk of someone becoming trap-
ped, stop the adjustment procedure. To halt
the procedure:
R press the steering column adjustment but-
ton.
R briefly press one of the memory function
position buttons.
The steering column stops moving immedi-
ately.
Do not keep the memory function position
button pressed down, otherwise the memory
function will start and the steering wheel and
seat will begin to move.
Never leave children unsupervised in the vehi-
cle. They could open the driver's door and 102
Steering wheelSeats, steering wheel and mirrors
Page 107 of 381
i
You can also heat up the exterior mirrors
manually by switching on the rear window
heating. X
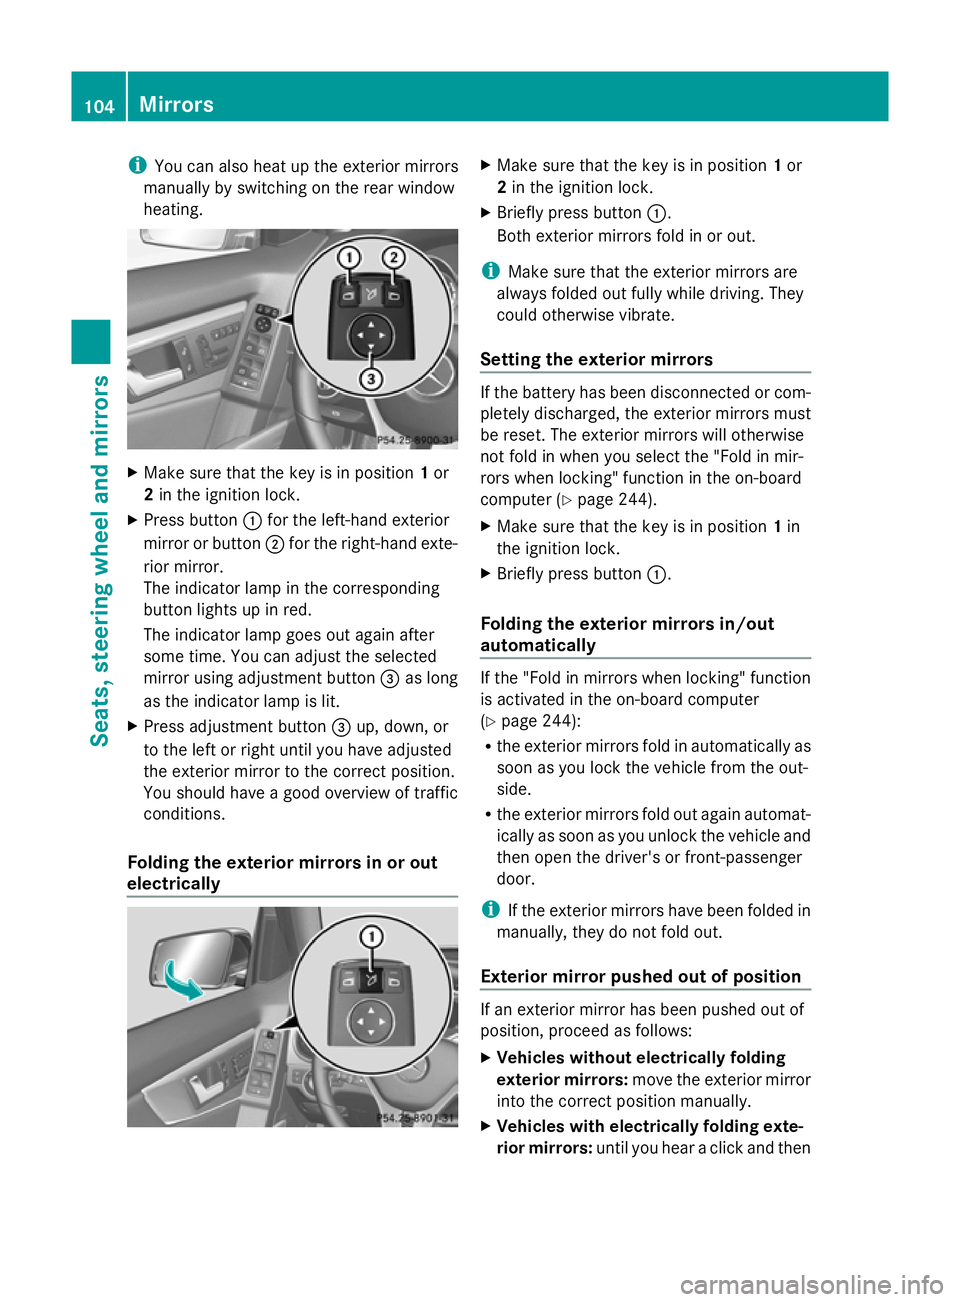
Make sure that the key is in position 1or
2 in the ignition lock.
X Press button :for the left-hand exterior
mirror or button ;for the right-hand exte-
rior mirror.
The indicator lamp in the corresponding
button lights up in red.
The indicator lamp goes out again after
some time. You can adjust the selected
mirror using adjustment button =as long
as the indicator lamp is lit.
X Press adjustment button =up, down, or
to the left or right until you have adjusted
the exterior mirror to the correct position.
You should have a good overview of traffic
conditions.
Folding the exterior mirrors in or out
electrically X
Make sure that the key is in position 1or
2 in the ignition lock.
X Briefly press button :.
Both exterior mirrors fold in or out.
i Make sure that the exterior mirrors are
always folded out fully while driving. They
could otherwise vibrate.
Setting the exterior mirrors If the battery has been disconnected or com-
pletely discharged, the exterior mirrors must
be reset. The exterior mirrors will otherwise
not fold in when you select the "Fold in mir-
rors when locking" function in the on-board
computer (Y
page 244).
X Make sure that the key is in position 1in
the ignition lock.
X Briefly press button :.
Folding the exterior mirrors in/out
automatically If the "Fold in mirrors when locking" function
is activated in the on-board computer
(Y
page 244):
R the exterior mirrors fold in automatically as
soon as you lock the vehicle from the out-
side.
R the exterior mirrors fold out again automat-
ically as soon as you unlock the vehicle and
then open the driver's or front-passenger
door.
i If the exterior mirrors have been folded in
manually, they do not fold out.
Exterior mirror pushed out of position If an exterior mirror has been pushed out of
position, proceed as follows:
X
Vehicles without electrically folding
exterior mirrors: move the exterior mirror
into the correct position manually.
X Vehicles with electrically folding exte-
rior mirrors: until you hear a click and then104
MirrorsSeats, steering wheel and mirrors