dashboard MERCEDES-BENZ GLS 2017 Owners Manual
[x] Cancel search | Manufacturer: MERCEDES-BENZ, Model Year: 2017, Model line: GLS, Model: MERCEDES-BENZ GLS 2017Pages: 390, PDF Size: 11.93 MB
Page 14 of 390

Fuel filler flap
Opening ........................................ .1 55
Fuel filter (display message) ............ 260
Fuel level
Calling up the range (on-board
computer) ...................................... 233
Fuel tank
Capacity ........................................ 379
Problem (malfunction) ................... 156
Fuses
Allocation chart ............................ .3 43
Before changing ............................ .3 44
Dashboard fuse box ....................... 344
Fuse box in the engine compart-
ment .............................................. 344
Fuse box under rear bench seat .... 345
Important safety notes .................. 343
GGarage door opener
Clearing the memory ..................... 318
General notes ................................ 315
Important safety notes .................. 315
Opening/closing the garage doo r. .3 17
Problems when programming ....... .3 17
Programming (button in the rear-
view mirror) ................................... 316
Synchronizing the rolling code ....... 316
Gear indicator (on-board com-
puter, Mercedes-AMG vehicles) ....... 241
Genuine parts ...................................... 25
Glove box .......................................... .2 95
Google™ Local Search
see also Digital Operator's Man-
ual ................................................. .2 87
GTW (Gross Trailer Weight) (defini-
tion) .................................................... 365
H
Handbrake
see Parking brake
Hazard warning lamps ..................... .1 14
Head restraints
Adjusting ......................................... 96
Adjusting (electrically) ..................... 97
Adjusting (manually) ........................ 96 Adjusting (rear) ................................ 97
Installing/removing (rear) ................ 98
Luxury .............................................. 97
Headlamps
Fogging up ..................................... 116
see Automatic headlamp mode
Heating
see Climate control
High beam flasher ............................ .1 13
High-beam headlamps
Adaptive Highbeam Assist ............. 115
Display message ............................ 256
Replacing bulbs ............................ .1 19
Switching on/off ........................... 113
Highway mode ................................... 114
Hill start assist .................................. 141
HOLD function
Deactivating ................................... 185
Display message ............................ 264
Function/notes ............................ .1 85
Home address
see also Digital Operator's Man-
ual ................................................. .2 87
Hood
Closing .......................................... .3 20
Display message ............................ 272
Important safety notes .................. 319
Opening ......................................... 319
Horn ...................................................... 33
Hydroplaning ..................................... 166
I
Ignition lock
see Key positions
Immobilizer .......................................... 72
Indicator lamps
see Warning and indicator lamps
Indicators
see Turn signals
Insect protection on the radiator .... 320
Instrument cluster
Overview .......................................... 34
Warning and indicator lamps ........... 34
Instrument cluster lighting .............. 229
Intelligent Light System
Activating/deactivating ................. 239
Overview ........................................ 11412
Index
Page 52 of 390

G WARNING
If the PASSENGER AIR BAG OFF indicator
lamp is lit, the front-passenger front air bag is
disabled. It will not be deployed in the event of
an accident and cannot perform its intended
protective function. A person in the front-
passenger seat could then, for example, come
into contact with the vehicle's interior, espe-
cially if the person is sitting too close to the
dashboard. This poses an increased risk of
injury or even fatal injury.
When the front-passenger seat is occupied,
always ensure that: R
the classification of the person in the front-
passenger seat is correct and the front-
passenger front air bag is enabled or disa-
bled in accordance with the person in the
front-passenger seat R
the front-passenger seat has been moved
back as far back as possible. R
the person is seated correctly.
Make sure, both before and during the jour-
ney, that the status of the front-passenger
front air bag is correct.
G WARNING
If you secure a child in a rearward-facing child
restraint system on the front-passenger seat
and the PASSENGER AIR BAG OFF indicator
lamp is off, the front-passenger front air bag
may deploy in the event of an accident. The
child could be struck by the air bag. This poses
an increased risk of injury or even fatal injury.
Make sure that the front-passenger front air
bag has been disabled. The PASSENGER AIR
BAG OFF indicator lamp must be lit.
If the PASSENGER AIR BAG OFF indicator lamp
stays off, do not install a rearward-facing child
restraint system on the front-passenger seat.
You can find more information on OCS under
"Problems with the Occupant Classification Sys-
tem" ( Y
page 52). G WARNING
If you secure a child in a forward-facing child
restraint system on the front-passenger seat
and you position the front-passenger seat too
close to the dashboard, the child could, in the
event of an accident: R
come into contact with the vehicle's inte-
rior if the PASSENGER AIR BAG OFF indi-
cator lamp is lit, for example R
be struck by the air bag if the PASSENGER
AIR BAG OFF indicator lamp is off
This poses an increased risk of injury or even
fatal injury.
Move the front-passenger seat as far back as
possible. Always make sure that the shoulder
belt strap is correctly routed from the vehicle
belt sash guide to the shoulder belt guide on
the child restraint system. The shoulder belt
strap must be routed forwards and down-
wards from the vehicle belt sash guide. If nec-
essary, adjust the vehicle belt sash guide and
the front-passenger seat accordingly. Always
observe the child restraint system manufac-
turer's installation instructions.
If OCS determines that: R
the front-passenger seat is unoccupied, the
PASSENGER AIR BAG OFF indicator lamp
lights up after the system self-test and
remains lit. This indicates that the front-
passenger front air bag is deactivated. R
the front-passenger seat is occupied by a
child of up to twelve months old, in a standard
child restraint system, the PASSENGER AIR
BAG OFF indicator lamp lights up after the
system self-test and remains lit. This indi-
cates that the front-passenger front air bag is
deactivated.
But even in the case of a twelve-month-old
child, in a standard child restraint system, the
PASSENGER AIR BAG OFF indicator lamp can
go out after the system self-test. This indi-
cates that the front-passenger front air bag is
activated. The result of the classification is
dependent on, among other factors, the child
restraint system and the child's stature. It is
recommended that you install the child
restraint sy stem on a suitable rear seat.50
Occupant safety
Safety
Page 346 of 390

! When closing the cover, make sure that it is
lying correctly on the fuse box. Moisture seep-
ing in or dirt could otherwise impair the oper-
ation of the fuses.
The fuses in your vehicle serve to close down
faulty circuits. If a fuse blows, all the compo-
nents on the circuit and their functions stop
operating.
Blown fuses must be replaced with fuses of the
same rating, which you can recognize by the
color and value. The fuse ratings are listed in the
fuse allocation chart.
The fuse allocation chart is located in the fuse
box under the rear bench seat ( Y
page 345).
If a newly inserted fuse also blows, have the
cause traced and rectified at a qualified special-
ist workshop, e.g. an authorized Mercedes-Benz
Center.
Before changing a fuse Observe the important safety notes
( Y
page 343) X
Switch off the engine. X
Switch off all electrical consumers. X
Remove the SmartKey from the ignition lock.
or, in vehicles with KEYLESS-GO start-function
or KEYLESS ‑ GOX
Open the driver's door.
The vehicle electronics now have status 0 .
This is the same as the SmartKey having been
removed.
The driver’s door can be closed again. X
Secure the vehicle against rolling away
( Y
page 159).
All indicator lamps in the instrument cluster
must be off.
The fuses are located in various fuse boxes: R
Fuse box on the front-passenger side of the
dashboard R
Fuse box in the engine compartment on the
right-hand side of the vehicle, when viewed in
the direction of travel R
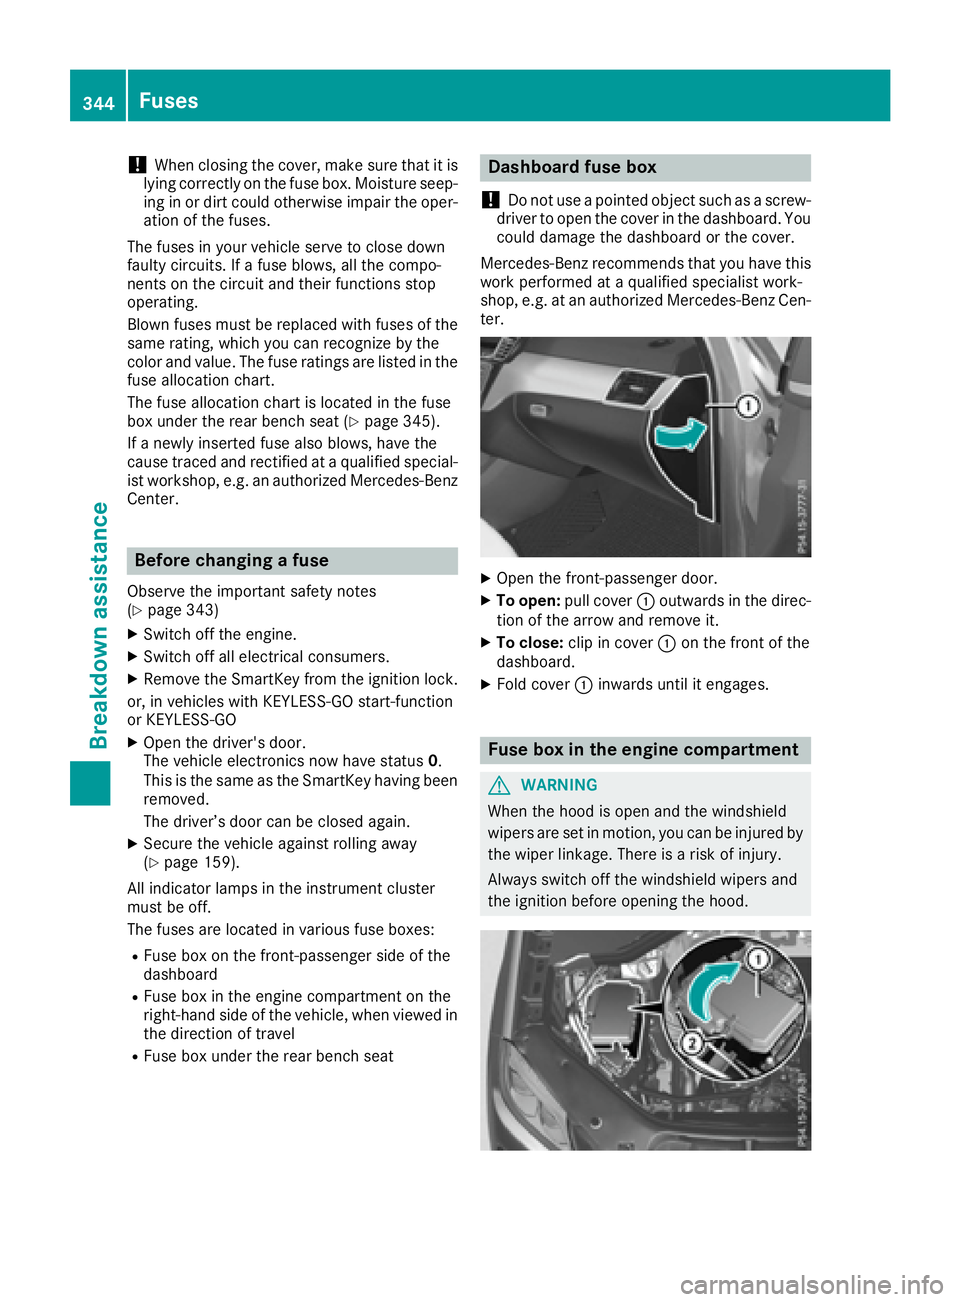
Fuse box under the rear bench seat Dashboard fuse box
! Do not use a pointed object such as a screw-
driver to open the cover in the dashboard. You
could damage the dashboard or the cover.
Mercedes-Benz recommends that you have this
work performed at a qualified specialist work-
shop, e.g. at an authorized Mercedes-Benz Cen-
ter.
X
Open the front-passenger door. X
To open: pull cover �C outwards in the direc-
tion of the arrow and remove it. X
To close: clip in cover �C on the front of the
dashboard. X
Fold cover �C inwards until it engages.
Fuse box in the engine compartment
G WARNING
When the hood is open and the windshield
wipers are set in motion, you can be injured by
the wiper linkage. There is a risk of injury.
Always switch off the windshield wipers and
the ignition before opening the hood.344
Fuses
Breakdown assistance