open hood MERCEDES-BENZ GLS 2018 Owners Manual
[x] Cancel search | Manufacturer: MERCEDES-BENZ, Model Year: 2018, Model line: GLS, Model: MERCEDES-BENZ GLS 2018Pages: 398, PDF Size: 5.73 MB
Page 14 of 398
 ................... 158
Quality (diesel) ............................... 388
Refueling .")
Important safety notes .................. 387
Low outside temperatures ............ .3 88
Problem (malfunction) ................... 158
Quality (diesel) ............................... 388
Refueling ........................................ 155
Tank content/reserve fuel ............. 387
Fuel filler flap
Opening ......................................... 157
Fuel filter (display message) ............ 264
Fuel level
Calling up the range (on-board
computer) ...................................... 237
Fuel tank
Capacity ........................................ 387
Problem (malfunction) ................... 158
Fuses
Allocation chart ............................. 352
Before changing ............................. 352
Dashboard fuse box ....................... 352
Fuse box in the engine compart-
ment .............................................. 353
Fuse box under rear bench seat .... 353
Important safety notes .................. 352
G
Garage door opener
Clearing the memory ..................... 324
General notes ................................ 321
Important safety notes .................. 321
Opening/closing the garage doo r. .3 23
Problems when programming ....... .3 23
Programming (button in the rear-
view mirror) ................................... 322
Synchronizing the rolling code ....... 322
Gear indicator (on-board com-
puter, Mercedes-AMG vehicles) ....... 245
Genuine parts ...................................... 27
Glove box .......................................... .3 01
Google™ Local Search
see also Digital Operator's Man-
ual ................................................. .2 92
GTW (Gross Trailer Weight) (defini-
tion) .................................................... 373 H Handbrake
see Parking brake
Hazard warning lamps ..................... .1 17
Head restraints
Adjusting ......................................... 99
Adjusting (electrically) ................... 100
Adjusting (manually) ........................ 99
Adjusting (rear) .............................. 100
Installing/removing (rear) .............. 100
Luxury ............................................ 100
Headlamps
Fogging up ..................................... 119
see Automatic headlamp mode
Heating
see Climate control
High beam flasher ............................ .1 16
High-beam headlamps
Adaptive Highbeam Assist ............. 118
Display message ............................ 260
Replacing bulbs ............................ .1 21
Switching on/off ........................... 116
Highway mode ................................... 118
Hill start assist .................................. 143
HOLD function
Deactivating ................................... 187
Display message ............................ 268
Function/notes ............................ .1 87
Home address
see also Digital Operator's Man-
ual ................................................. .2 92
Hood
Closing .......................................... .3 26
Display message ............................ 277
Important safety notes .................. 325
Opening ......................................... 325
Horn ...................................................... 36
Hydroplaning ..................................... 168
I
Ignition lock
see Key positions
Immobilizer .......................................... 75
Indicator lamps
see Warning and indicator lamps12
Index
Page 77 of 398

The braking application of Active Brake Assist
with cross-traffic function is ended automati-
cally if: R
you maneuver to avoid the obstacle R
there is no longer a risk of collision R
there is no longer an obstacle detected in
front of your vehicle
STEER CONTROL
General information STEER CONTROL helps you by transmitting a
noticeable steering force to the steering wheel
in the direction required for vehicle stabilization.
This steering assistance is provided in particular
if: R
both right wheels or both left wheels are on a
wet or slippery road surface when you brake R
the vehicle starts to skid
Important safety notes
i Observe the "Important safety notes" sec-
tion ( Y
page 66).
No steering assistance is provided from STEER
CONTROL, if: R
ESP ®
is deactivatedR
ESP ®
is malfunctioningR
the steering is malfunctioning
If ESP ®
is malfunctioning, you will be assisted
further by the electrical power steering.
Protection against theft
Immobilizer X
To activate with the SmartKey: remove the
SmartKey from the ignition lock. X
To activate with KEYLESS-GO: switch the
ignition off and open the driver's door. X
To deactivate: switch on the ignition.
The immobilizer prevents your vehicle from
being started without the correct SmartKey.
When leaving the vehicle, always take the
SmartKey with you and lock the vehicle. Anyone
can start the engine if a valid SmartKey has been
left inside the vehicle. i The immobilizer is always deactivated when
you start the engine.
In the event that the engine cannot be started
(yet the vehicle's battery is charged), the sys-
tem is not operational. Contact an authorized
Mercedes-Benz Center or call
1-800 FOR-MERCEDES (in the USA) or
1-800-387-0100 (in Canada).
ATA (anti-theft alarm system) X
To arm: lock the vehicle with the SmartKey or
KEYLESS-GO.
Indicator lamp �C flashes. The alarm system
is armed after approximately 15 seconds. X
To switch off using the SmartKey: unlock
the vehicle with the SmartKey.
or X
Insert the SmartKey into the ignition lock. X
To switch off using KEYLESS-GO: unlock
the vehicle with KEYLESS-GO.
or X
Press the Start/Stop button on the dash-
board. The SmartKey must be inside the vehi-
cle.
A visual and audible alarm is triggered if the
alarm system is armed and you open: R
a door R
the vehicle with the mechanical key R
the tailgate R
the hoodProtection against theft 75
Safety Z
Page 138 of 398
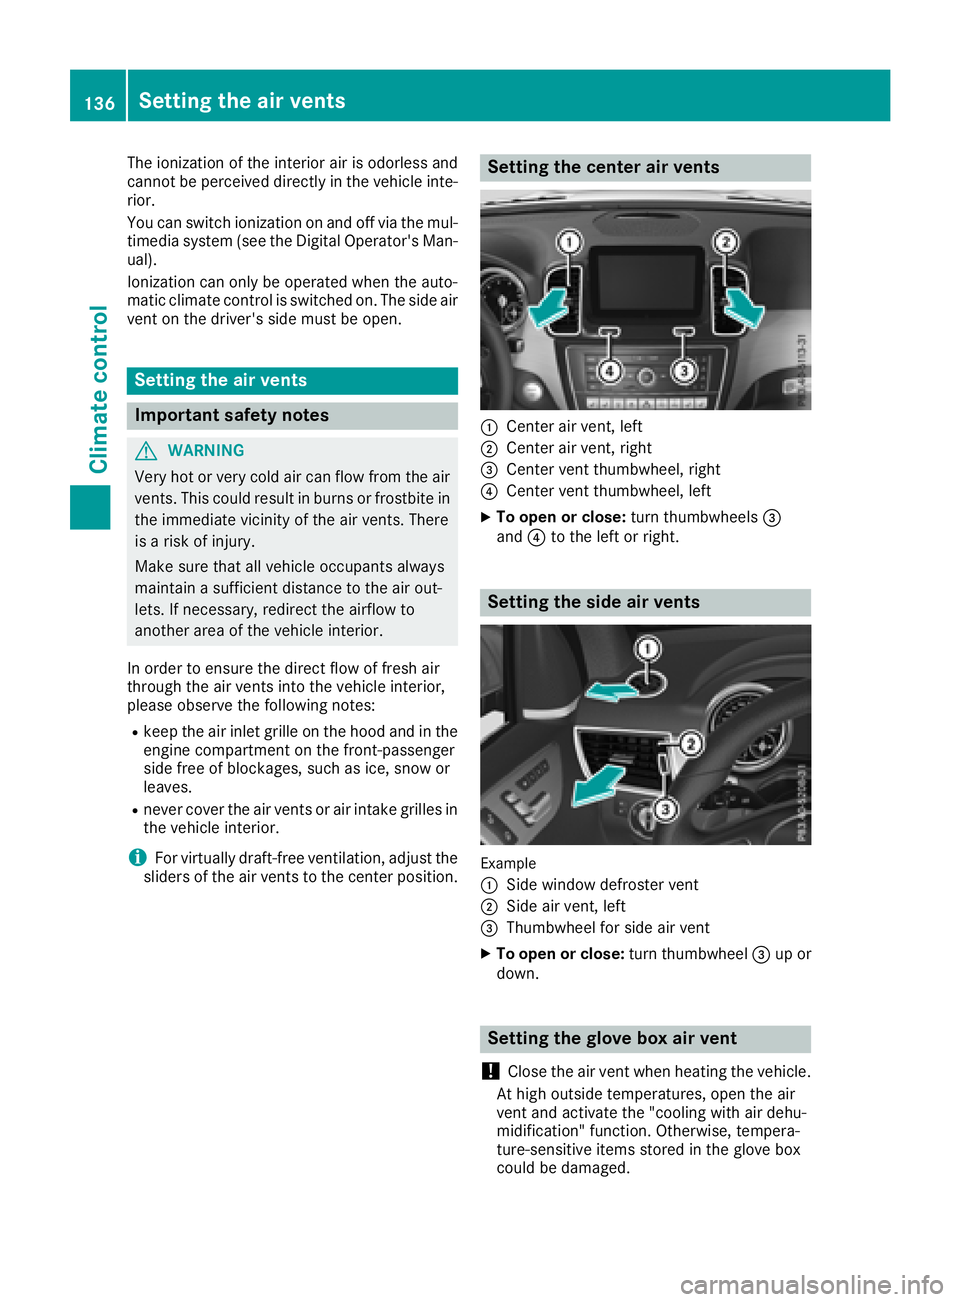
The ionization of the interior air is odorless and
cannot be perceived directly in the vehicle inte-
rior.
You can switch ionization on and off via the mul-
timedia system (see the Digital Operator's Man-
ual).
Ionization can only be operated when the auto-
matic climate control is switched on. The side air
vent on the driver's side must be open.
Setting the air vents
Important safety notes
G WARNING
Very hot or very cold air can flow from the air
vents. This could result in burns or frostbite in
the immediate vicinity of the air vents. There
is a risk of injury.
Make sure that all vehicle occupants always
maintain a sufficient distance to the air out-
lets. If necessary, redirect the airflow to
another area of the vehicle interior.
In order to ensure the direct flow of fresh air
through the air vents into the vehicle interior,
please observe the following notes: R
keep the air inlet grille on the hood and in the
engine compartment on the front-passenger
side free of blockages, such as ice, snow or
leaves. R
never cover the air vents or air intake grilles in
the vehicle interior.
i For virtually draft-free ventilation, adjust the
sliders of the air vents to the center position. Setting the center air vents
�C
Center air vent, left �D
Center air vent, right �
Page 145 of 398

G WARNING
Limbs could be crushed or trapped if the
engine is started unintentionally during ser-
vice or maintenance work. There is a risk of
injury.
Always secure the engine against uninten-
tional starting before carrying out mainte-
nance or repair work.
Make sure that the engine cannot be started via
your smartphone before carrying out mainte-
nance or repairs. You can prevent an engine
start via your smartphone, for example, if you: R
switch on the hazard warning lamps R
do not lock the doors R
open the hood
Pulling away
General notes
G WARNING
If the engine speed is above the idling speed
and you engage transmission position D or R ,
the vehicle could pull away suddenly. There is
a risk of an accident.
When engaging transmission position D or R ,
always firmly depress the brake pedal and do
not simultaneously accelerate.
Depress the accelerator carefully when pulling
away.
The vehicle locks centrally once you have pulled
away. The locking knobs in the doors drop down.
You can open the doors from the inside at any
time.
You can also deactivate the automatic locking
feature ( Y
page 244).
It is only possible to shift the transmission from
position P to the desired position if you depress
the brake pedal. Only then is the parking lock
released. If you do not depress the brake pedal,
the DIRECT SELECT lever can still be moved but
the parking lock remains engaged.
i Upshifts take place at higher engine speeds
after a cold start. This helps the catalytic con-
verter to reach its operating temperature
more quickly. Information on the automatic release of the
electric parking brake ( Y
page 163).
Pulling away with a trailer
To ensure that you do not roll backwards when
pulling away on an uphill slope, engage the elec-
tric parking brake. X
Press and hold handle �C .
The electric parking brake continues to brake
and prevent the vehicle from rolling back-
wards.
The red �I (USA only) or �$ (Canada
only) indicator lamp in the instrument cluster
remains on. X
Depress the accelerator pedal. X
As soon as the vehicle/trailer combination is
held by the driving force of the engine, release
lever �C .
the electric parking brake is released.
The red �I (USA only) or �$ (Canada
only) indicator lamp in the instrument cluster
goes out.
Hill start assist Hill start assist helps you when pulling away for-
wards or in reverse on an uphill gradient. It holds
the vehicle for a short time after you have
removed your foot from the brake pedal. This
gives you enough time to move your foot from
the brake pedal to the accelerator pedal and to
depress it before the vehicle begins to roll.
G WARNING
After a short time, hill start assist will no lon-
ger brake your vehicle and it could roll away.
There is a risk of an accident and injury.
Therefore, quickly move your foot from the
brake pedal to the accelerator pedal. Never Driving 143
Driving and parking Z
Page 236 of 398

There is a short delay before a change in outside
temperature appears in the multifunction dis-
play.
Coolant temperature gauge
G WARNING
Opening the hood when the engine is over-
heated or when there is a fire in the engine
compartment could expose you to hot gases
or other service products. There is a risk of
injury.
Let an overheated engine cool down before
opening the hood. If there is a fire in the
engine compartment, keep the hood closed
and contact the fire department.
! If the coolant temperature is too high, a dis-
play message is shown.
If the coolant temperature display is in the
area marked in red, do not continue driving.
Otherwise, the engine will be damaged.
The coolant temperature gauge is in the instru-
ment cluster on the right-hand side ( Y
page 37).
Under normal operating conditions and with the
specified coolant level, the coolant temperature
gauge may rise to the red marking. Operating the on-board computer
Overview
�C
Multifunction display �D
Right control panel �
Page 279 of 398

Display messages
Possible causes/consequences and �P Solutions
�f The hoo d is open .
G WARNIN G
The open hoo d may bloc k your vie w when th e vehicl e is in motion .
There is a ris k of an accident.X
Pull ove r and stop th e vehicl e safely as soo n as possible, payin g
attention to roa d and traffic conditions.X
Secur e th e vehicl e against rollin g away ( Y
page 161).X
Clos e th e hood.
�Q At least on e door is open .
A warning tone also sounds. X
Clos e all th e doors.
�o 2nd Sea t Row , Lef t
Not Locked or 2nd
Sea t Row , Right Not
Locked The secon d row of seat s is no t engage d on th e left-han d or right-hand
side . X
Fold bac k th e secon d row of seat s until it engages.
�o 3rd Sea t Row , Lef t
Not Locked or 3rd
Sea t Row , Lef t Not
Locked The third row of seat s is no t engage d on th e left-han d or right-hand
side . X
Fold bac k th e third row of seat s until it engages.
�
Page 327 of 398

Engine compartment
Hood
Important safety notes
G WARNING
If the hood is unlatched, it may open up when
the vehicle is in motion and block your view.
There is a risk of an accident.
Never unlatch the hood while driving. Before
every trip, ensure that the hood is locked.
G WARNING
When opening and closing the hood, it may
suddenly fall into the closed position. There is
a risk of injury to persons within range of
movement of the hood.
Open and close the hood only when no one is
within its range of movement.
G WARNING
Opening the hood when the engine is over-
heated or when there is a fire in the engine
compartment could expose you to hot gases
or other service products. There is a risk of
injury.
Let an overheated engine cool down before
opening the hood. If there is a fire in the
engine compartment, keep the hood closed
and contact the fire department.
G WARNING
The engine compartment contains moving
components. Certain components, such as
the radiator fan, may continue to run or start
again suddenly when the ignition is off. There
is a risk of injury.
If you need to do any work inside the engine
compartment: R
switch off the ignition R
never reach into the area where there is a
risk of danger from moving components,
such as the fan rotation area R
remove jewelry and watches R
keep items of clothing and hair, for exam-
ple, away from moving parts
G WARNING
The ignition system and the fuel injection sys-
tem work under high voltage. If you touch
components which are under voltage, you
could get an electric shock. There is a risk of
injury.
Never touch components of the ignition sys-
tem or fuel injection system when the ignition
is switched on.
Electrically live components include ignition
coils, spark plug connectors and the test socket.
Opening the hood
G WARNING
Certain components in the engine compart-
ment, such as the engine, radiator and parts
of the exhaust system, can become very hot.
Working in the engine compartment poses a
risk of injury.
Where possible, let the engine cool down and
touch only the components described in the
following.
G WARNING
When the hood is open and the windshield
wipers are set in motion, you can be injured by
the wiper linkage. There is a risk of injury.
Always switch off the windshield wipers and
the ignition before opening the hood.
! Make sure that the windshield wipers are
not folded away from the windshield. You
could otherwise damage the windshield wip-
ers or the hood.Engine compartment 325
Maintenance and care Z
Page 328 of 398

X
Make sure that the windshield wipers are
turned off. X
Pull release lever �C on the hood.
The hood is released.
X
Reach into the gap, pull hood catch handle �D
up and lift the hood.
If you lift the hood by approximately 15 in
(40 cm), the hood is opened and held open
automatically by the gas-filled strut.
Closing the hood X
Lower the hood and let it fall from a height of
approximately 8 in (20 cm). X
Check that the hood has engaged properly.
If the hood can be raised slightly, it is not
properly engaged. Open it again and close it
with a little more force.
Radiator
Vehicles with a diesel engine: do not cover
the radiator. such as with a thermal mat or
insect protection cover. Otherwise, the values of
the European on-board diagnostics may be
affected. Some of these readings are required
by law and must be accurate at all times. Engine oil
Important safety notes
G WARNING
Certain components in the engine compart-
ment, such as the engine, radiator and parts
of the exhaust system, can become very hot.
Working in the engine compartment poses a
risk of injury.
Where possible, let the engine cool down and
touch only the components described in the
following.
G WARNING
Opening the hood when the engine is over-
heated or when there is a fire in the engine
compartment could expose you to hot gases
or other service products. There is a risk of
injury.
Let an overheated engine cool down before
opening the hood. If there is a fire in the
engine compartment, keep the hood closed
and contact the fire department.
G WARNING
If engine oil comes into contact with hot com-
ponents in the engine compartment, it may
ignite. There is a risk of fire and injury.
Make sure that engine oil is not spilled next to
the filler neck. Let the engine cool down and
thoroughly clean the engine oil off the com-
ponents before starting the engine.
General notes Depending on your driving style, the vehicle
consumes up to 0.9 US qt (0.8 liters) of oil per
600 miles (1,000 km). The oil consumption may
be higher than this when the vehicle is new or if
you frequently drive at high engine speeds.
Depending on the engine, the oil dipstick may be
in a different location.326
Engine compartment
Maintenance and care
Page 348 of 398

Charging the 12 V battery
G WARNING
During charging and jump-starting, explosive
gases can escape from the battery. There is a
risk of an explosion.
Particularly avoid fire, open flames, creating
sparks and smoking. Ensure there is sufficient
ventilation while charging and jump-starting.
Do not lean over a battery.
G WARNING
Battery acid is caustic. There is a risk of injury.
Avoid contact with skin, eyes or clothing. Do
not inhale any battery gases. Do not lean over
the battery. Keep children away from batter-
ies. Wash away battery acid immediately with
plenty of clean water and seek medical atten-
tion.
G WARNING
A discharged battery can freeze at tempera-
tures below freezing point. When jump-start-
ing the vehicle or charging the battery, gases
can escape from the battery. There is a risk of
an explosion.
Allow the frozen battery to thaw out before
charging it or jump-starting.
! Only use battery chargers with a maximum
charging voltage of 14.8 V. ! Only charge the battery using the jump-
starting connection point.
The jump-starting connection point is in the
engine compartment ( Y
page 346).X
Open the hood. X
Connect the battery charger to the positive
terminal and ground point in the same order
as when connecting the donor battery in the
jump-starting procedure ( Y
page 346).
Keep away from fire and open flames. Do not
lean over a battery. Never charge the battery if it
is still installed in the vehicle, unless you use a
battery charger which has been tested and
approved by Mercedes-Benz. A battery charger
unit specially adapted for Mercedes-Benz vehi-
cles and tested and approved by Mercedes-
Benz is available as an accessory. It permits the
charging of the battery in its installed position.
Contact an authorized Mercedes-Benz Center
for further information and availabilit y. Read t he
batt ery charger's operating instructions before
charging the battery.
If, at low temperatures, the indicator lamps/
warning lamps in the instrument cluster do not
light up, it is highly likely that the discharged
battery has frozen. In this case you may neither
jump-start the vehicle nor charge the battery.
The service life of a thawed-out battery may be
shorter. The starting characteristics can be
impaired, particularly at low temperatures. Have
the thawed-out battery checked at a qualified
specialist workshop.
Jump-starting
For the jump-starting procedure, use only the jump-starting connection point in the engine com-
partment, consisting of a positive terminal and a ground point.
G WARNING
Battery acid is caustic. There is a risk of injury.
Avoid contact with skin, eyes or clothing. Do not inhale any battery gases. Do not lean over the
battery. Keep children away from batteries. Wash away battery acid immediately with plenty of
clean water and seek medical attention.
G WARNING
During charging and jump-starting, explosive gases can escape from the battery. There is a risk
of an explosion.346
Jump-starting
Breakdown assistance
Page 355 of 398

shop, e.g. at an authorized Mercedes-Benz Cen-
ter.
X
Open the front-passenger door. X
To open: pull cover �C outwards in the direc-
tion of the arrow and remove it. X
To close: clip in cover �C on the front of the
dashboard. X
Fold cover �C inwards until it engages.
Fuse box in the engine compartment
G WARNING
When the hood is open and the windshield
wipers are set in motion, you can be injured by
the wiper linkage. There is a risk of injury.
Always switch off the windshield wipers and
the ignition before opening the hood.
X
Open the hood ( Y
page 325).X
Use a dry cloth to remove any moisture from
the fuse box. X
To open: open clamps �D .X
Fold up cover �C in the direction of the arrow
and remove it. X
To close: check whether the seal is seated
correctly in cover �C .X
Insert cover �C at the side of the fuse box into
the retainers. X
Fold down cover �C and close clamps �D .X
Close the hood.
Fuse box under the rear bench seat X
Fold the left-hand rear bench seat forward
( Y
page 303). X
To open: reach into recesses �D on each side
of fuse box cover �C .X
Fold cover �C up in the direction of the arrow
and remove it from the fuse box.
i The fuse allocation chart is located in a
recess at the side of the fuse box. X
To close: place cover �C on the fuse box.X
Press cover �C down until you feel the clamps
engage. X
Fold back the left-hand rear bench seat
( Y
page 303). Fuses 353
Breakdown assistance Z