fold seats MERCEDES-BENZ GLS 2019 Owners Manual
[x] Cancel search | Manufacturer: MERCEDES-BENZ, Model Year: 2019, Model line: GLS, Model: MERCEDES-BENZ GLS 2019Pages: 398, PDF Size: 7.3 MB
Page 19 of 398
Function/notes ............................. 189
Important safety notes .................. 189
Problems (malfunctions) ................ 192
Sensor range ................................
.190
Towing a trailer .............................. 189
Warning displa y............................. 191
Parking assistance
see Driving system
Parking brake
Applying automaticall y................... 159
Applying or releasing manually ...... 159
Display message ............................ 248
Electric parking brake .................... 159
Emergency braking ........................ 160
General notes ................................ 159
Releasing automaticall y................. 160
Warning lamp ................................. 282
Parking lamps
Switching on/of f........................... 116
PASSENGER AIR BAG
Display message ............................ 255
Indicator lamps ................................ 45
Problem (malfunction) ................... 255
Pets in the vehicle ............................... 65
Phone book
see also Digital Operator's Man-
ual .................................................. 287
Plastic trim (cleaning instruc-
tions) .................................................. 332
Power locks ......................................... 84
Power washers .................................. 327
Power windows
see Side windows
PRE-SAFE ®
(anticipatory occupant
protection)
Display message ............................ 252
Operation ......................................... 58
PRE-SAFE ®
PLUS (anticipatory
occupant protection PLUS)
Display message ............................ 252
Operation ......................................... 59
Protection against theft
ATA (Anti-Theft Alarm system) ......... 75
Immobilizer ...................................... 75
Protection of the environment
General notes .................................. 27 Pulling away
Automatic transmission ................. 143
General notes ................................ 143
Hill start assist ............................... 143
Trailer ............................................ 143 Q
QR code Mercedes-Benz Guide App ................. 1
Rescue card ..................................... 32
Qualified specialist workshop ........... 31 R
RACE TIMER (on-board computer,
Mercedes-AMG vehicles) .................. 243
Radiator cover ................................... 322
Radio
Selecting a station ......................... 236
Radio mode
see also Digital Operator's Man-
ual.................................................. 287
Radio-controlled devices (instal-
ling) ..................................................... 320
Radio-wave reception/transmis-
sion in the vehicle
Declaration of conformity ................ 30
REACH Regulation ............................... 31
Reading lamp ..................................... 119
Rear bench seat
Folding forwards/back .................. 299
Rear compartment
Exit/entry position (3rd row of
seats) ............................................. 103
Setting the air vents ...................... 137
Setting the temperature ................ 132
Rear fog lamp
Display message ............................ 257
Switching on/of f........................... 116
Rear Seat Entertainment System
AUX jacks ...................................... 294
AUX jacks CD/DVD drive .............. 294
Rear seats
Adjusting ....................................... 101
Display message ............................ 272
Rear view camera
Cleaning instructions ..................... 330 Index
17
Page 21 of 398
Correct usage .................................. 47
Fastening ........................................
.48
Important safety guidelines .............46
Introduction .....................................45
Releasin g......................................... 48
Switching belt adjustment on/off
(on-board computer) ...................... 241
Warning lamp ................................. 275
Warning lamp (function) ................... 48
Seats
Adjusting (electrically) ..................... 98
Adjusting the 4-way lumbar sup-
port ................................................ 106
Adjusting the head restraint ............ 99
Calling up a stored setting (mem-
ory function) .................................. 114
Cleaning the cover ......................... 332
Entry position (3rd row of seats) .... 103
Exit position (3rd row of seats) ...... 104
Folding down/up (third row of
seats) ............................................. 101
Folding the 2nd row of seats
forward electrically ........................ 105
Folding the 2nd row of seats
forward manually ........................... 103
Folding the rear bench seat for-
wards/back ................................... 298
Important safety notes .................... 97
Overview .......................................... 97
Seat heating problem .................... 107
Seat ventilation problem ................ 107
Storing settings (memory func-
tion) ............................................... 113
Switching seat heating on/of f....... 106
Switching seat ventilation on/of f.. 107
Section
Sliding sunroof ................................. 92
Selector lever
Cleaning ......................................... 332
Sensors (cleaning instructions) ....... 330
Service menu (on-board com-
puter) .................................................. 239
Service message
see ASSYST PLUS
Service products
Brake fluid ..................................... 387
Coolant (engine) ............................ 387
Engine oil ....................................... 386 Fuel ................................................ 385
Important safety notes .................. 384
Refrigerant (air-conditioning sys-
tem) ............................................... 388
Washer fluid ................................... 388
Setting the air distribution ............... 133
Setting the airflow ............................ 133
Setting the date/time format
see also Digital Operator's Man-
ual .................................................. 287
Setting the language
see also Digital Operator's Man-
ual .................................................. 287
Setting the time
see also Digital Operator's Man-
ual .................................................. 287
Settings
Factory (on-board computer) ......... 242
On-board computer ....................... 240
SETUP (on-board computer,
Mercedes-AMG vehicles) .................. 243
Side impact air bag ............................. 51
Side marker lamp (display mes-
sage) ................................................... 257
Side windows
Cleaning ......................................... 329
Convenience closing feature ............ 90
Convenience opening feature .......... 90
Hinged side window s....................... 89
Important safety information ........... 88
Opening/closing .............................. 89
Overview .......................................... 88
Problem (malfunction) ..................... 92
Resetting ......................................... 91
Reversing feature ............................. 89
SIRIUS services
see also Digital Operator's Man-
ual .................................................. 287
Sliding sunroof
Important safety notes .................... 92
Opening/closing .............................. 93
Problem (malfunction) ..................... 96
Resetting ......................................... 94
see Panorama roof with power
tilt/sliding panel
SmartKey
Changing the battery ....................... 80 Index
19
Page 45 of 398
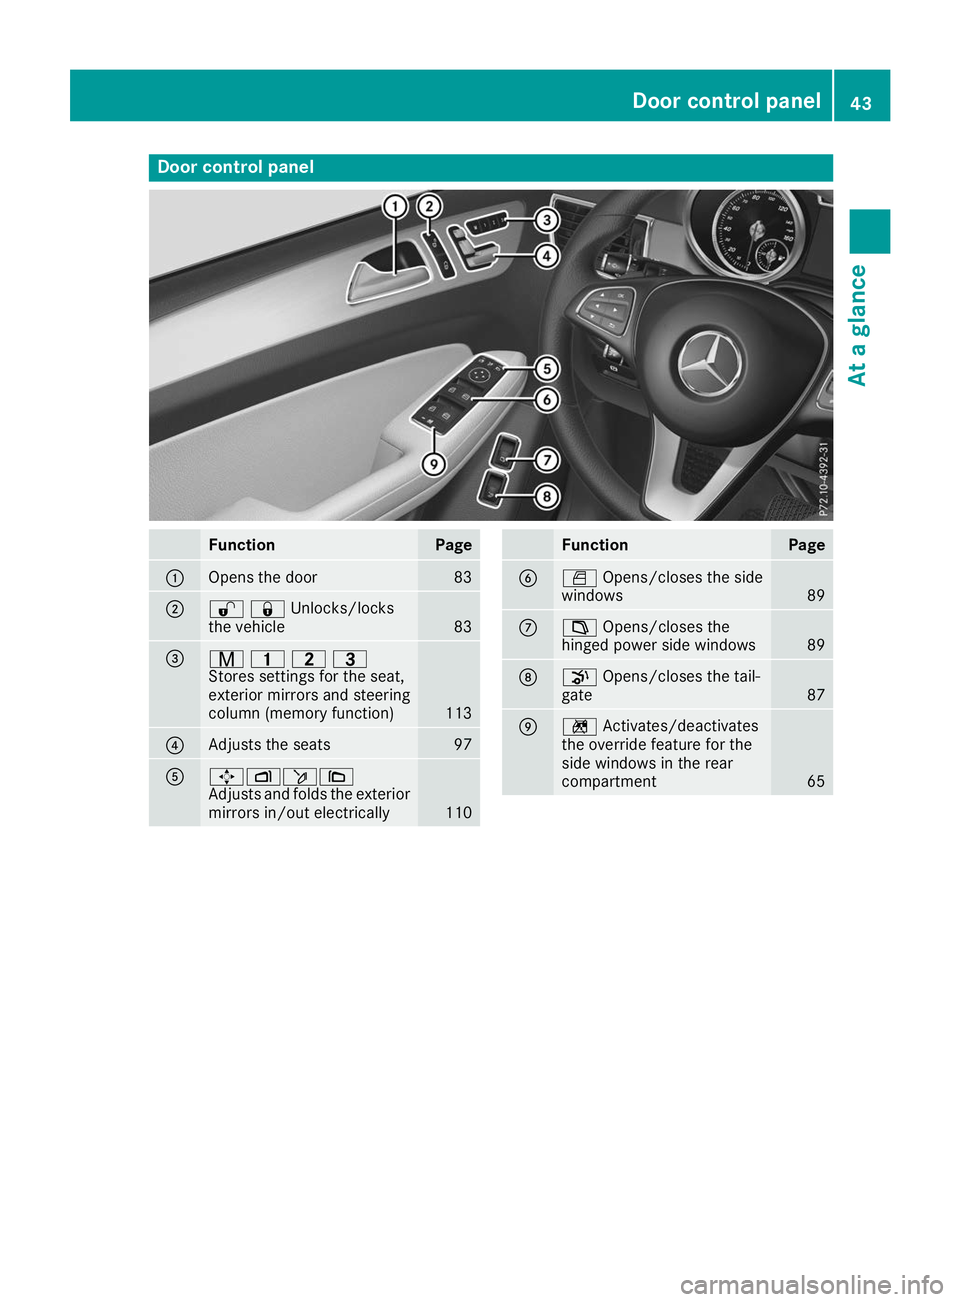
Door control panel
Function Page
0043
Opens the door 83
0044
00360037Unlocks/locks
the vehicle
83
0087
008D
003700380040
Stores settings for the seat,
exterior mirrors and steering
column (memory function) 113
0085
Adjusts the seats 97
0083
0062007000F50071
Adjusts and folds the exterior
mirrors in/out electrically 110 Function Page
0084
0062
Opens/closes the side
windows 89
006B
00FD
Opens/closes the
hinged power side windows 89
006C
008B
Opens/closes the tail-
gate 87
006D
0089
Activates/deactivates
the override feature for the
side windows in the rear
compartment 65Door control panel
43At a glance
Page 65 of 398
Non-LATCH-type (ISOFIX) child seats may also
be used and can be installed using the vehicle's seat belt system. Install the child seat according
to the manufacturer's instructions. Top Tether
Introduction Top Tether provides an additional connection
between the child restraint system secured with
a LATCH-type (ISOFIX) system and the vehicle.
This helps reduce the risk of injury even further.
If the child restraint system is equipped with a
Top Tether belt, this should always be used.
Important safety notes G
WARNING
If the rear seat backrests are not locked, they
could fold forwards in the event of an acci-
dent, heavy braking or sudden changes of
direction. As a result, child restraint systems
cannot perform their intended protective
function. Rear seat backrests that are not
locked can also cause additional injuries, e.g. in the event of an accident. This poses an
increased risk of injury or even fatal injury.
Always lock rear seat backrests after instal-
ling a Top Tether belt. Adjust the rear seat
backrests so that they are in an upright posi-
tion.
Make sure that the backrest in the rear com-
partment engages fully. To do so, pull firmly on
the seat backrest.
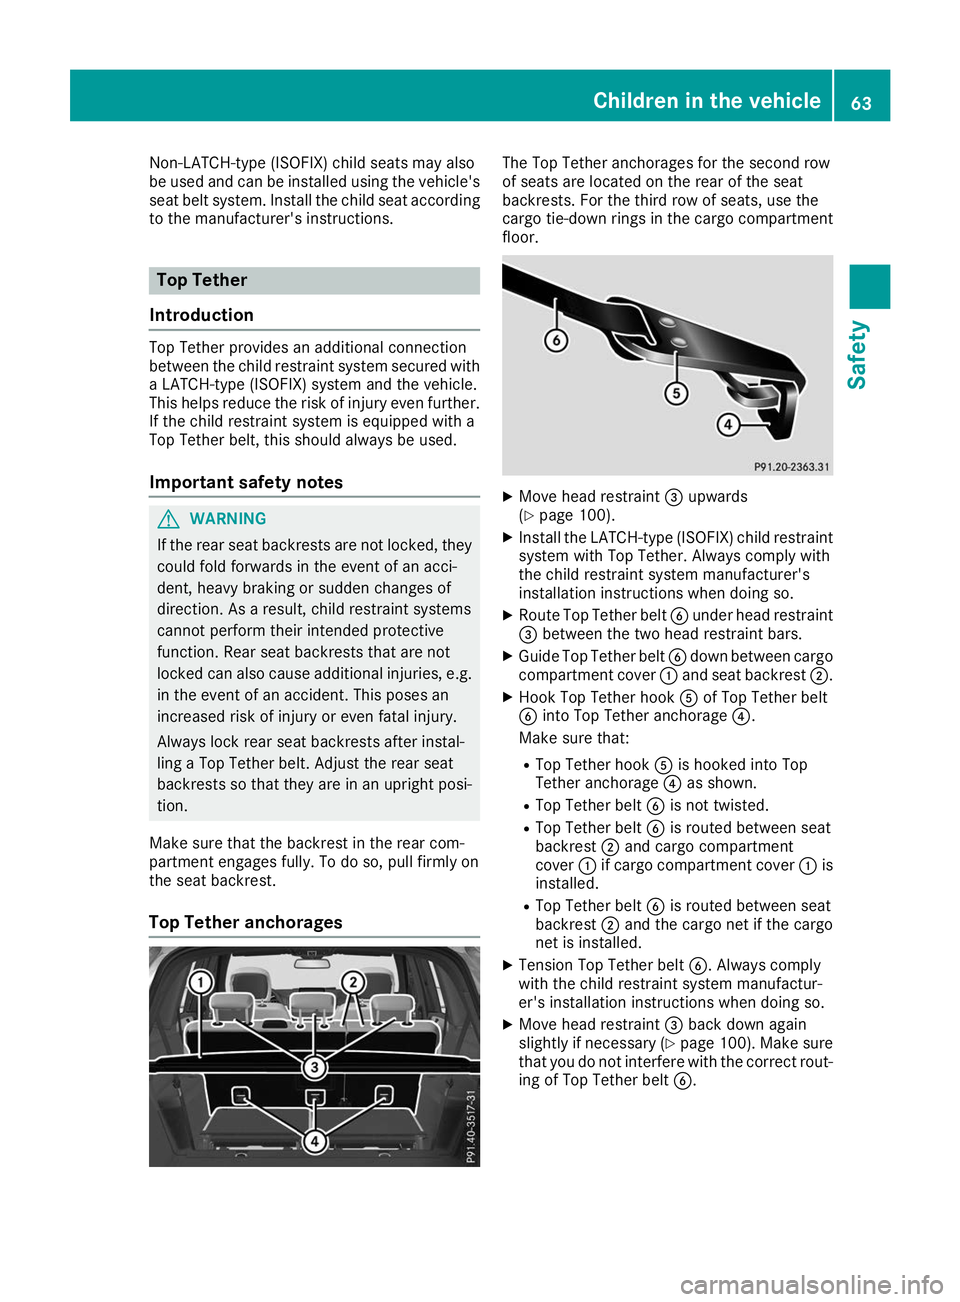
Top Tether anchorages The Top Tether anchorages for the second row
of seats are located on the rear of the seat
backrests. For the third row of seats, use the
cargo tie-down rings in the cargo compartment
floor.
X
Move head restraint 0087upwards
(Y page 100).
X Install the LATCH-type (ISOFIX) child restraint
system with Top Tether. Always comply with
the child restraint system manufacturer's
installation instructions when doing so.
X Route Top Tether belt 0084under head restraint
0087 between the two head restraint bars.
X Guide Top Tether belt 0084down between cargo
compartment cover 0043and seat backrest 0044.
X Hook Top Tether hook 0083of Top Tether belt
0084 into Top Tether anchorage 0085.
Make sure that:
R Top Tether hook 0083is hooked into Top
Tether anchorage 0085as shown.
R Top Tether belt 0084is not twisted.
R Top Tether belt 0084is routed between seat
backrest 0044and cargo compartment
cover 0043if cargo compartment cover 0043is
installed.
R Top Tether belt 0084is routed between seat
backrest 0044and the cargo net if the cargo
net is installed.
X Tension Top Tether belt 0084. Always comply
with the child restraint system manufactur-
er's installation instructions when doing so.
X Move head restraint 0087back down again
slightly if necessary (Y page 100). Make sure
that you do not interfere with the correct rout-
ing of Top Tether belt 0084. Children in the vehicle
63Safety Z
Page 100 of 398
G
WARNING
You could lose control of your vehicle if you do the following while driving:
R adjust the driver's seat, head restraint,
steering wheel or mirrors
R fasten the seat belt
There is a risk of an accident.
Adjust the driver's seat, head restraint, steer-
ing wheel and mirror and fasten your seat belt before starting the engine. G
WARNING
If you adjust the seat height carelessly, you or other vehicle occupants could be trapped andthereby injured. Children in particular could
accidentally press the electrical seat adjust-
ment buttons and become trapped. There is a
risk of injury.
While moving the seats, make sure that your
hands or other body parts do not get under the
lever assembly of the seat adjustment sys-
tem. G
WARNING
If the head restraints are not installed or not
adjusted correctly, they cannot provide pro-
tection as intended. There is an increased risk
of injury in the head and neck area, e.g. in the event of an accident or when braking.
Always drive with the head restraints instal-
led. Before driving off, make sure for every
vehicle occupant that the center of the head
restraint supports the back of the head at
about eye level. G
WARNING
The seat belt does not offer the intended level of protection if you have not moved the back-
rest to an almost vertical position. When brak-
ing or in the event of an accident, you could
slide underneath the seat belt and sustain
abdomen or neck injuries, for example. This
poses an increased risk of injury or even fatal injury. Adjust the seat properly before beginning
your journey. Always ensure that the backrest
is in an almost vertical position and that the
shoulder section of your seat belt is routed
across the center of your shoulder.
! To prevent damage to the seats and the seat
heating, observe the following notes:
R Do not spill liquids onto the seats. Dry the
seats as soon as possible if liquid does get
spilled on the seats.
R If the seat covers are damp or wet, do not
switch on the seat heating. Also, do not use
the seat heating to dry the seats.
R Clean the seat covers as recommended;
see keyword "Care".
R Do not transport heavy loads on the seats.
Do not place pointed objects on the seat
cushions such as knives, nails or tools.
Where possible, use the seats only for car-
rying passengers.
R When operating the seat heating, do not
cover the seats with insulating materials,
e.g. blankets, coats, bags, protective cov-
ers, child seats or booster seats.
! Make sure that there are no objects in the
footwell under or behind the seats when mov-
ing the seats back. There is a risk that the
seats and/or the objects could be damaged.
i Further related subjects:
R Cargo compartment enlargement (folding
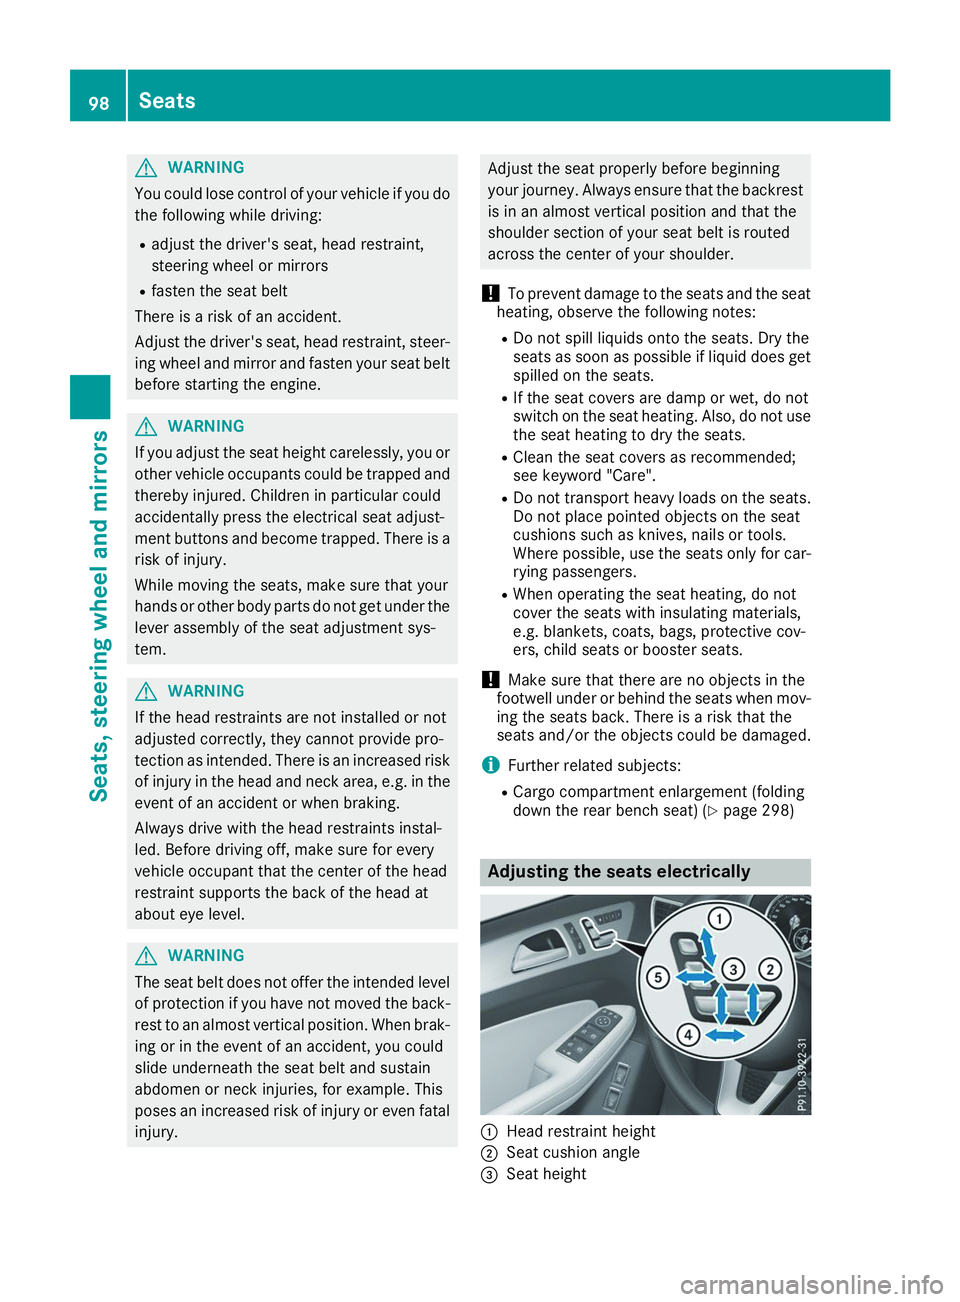
down the rear bench seat) (Y page 298) Adjusting the seats electrically
0043
Head restraint height
0044 Seat cushion angle
0087 Seat height 98
SeatsSeats, steering wheel and mirrors
Page 102 of 398
Adjusting the head restraints electri-
cally X
To adjust the head restraint height: slide
the switch for the head restraint adjustment
(Y page 98) up or down in the direction of the
arrow.
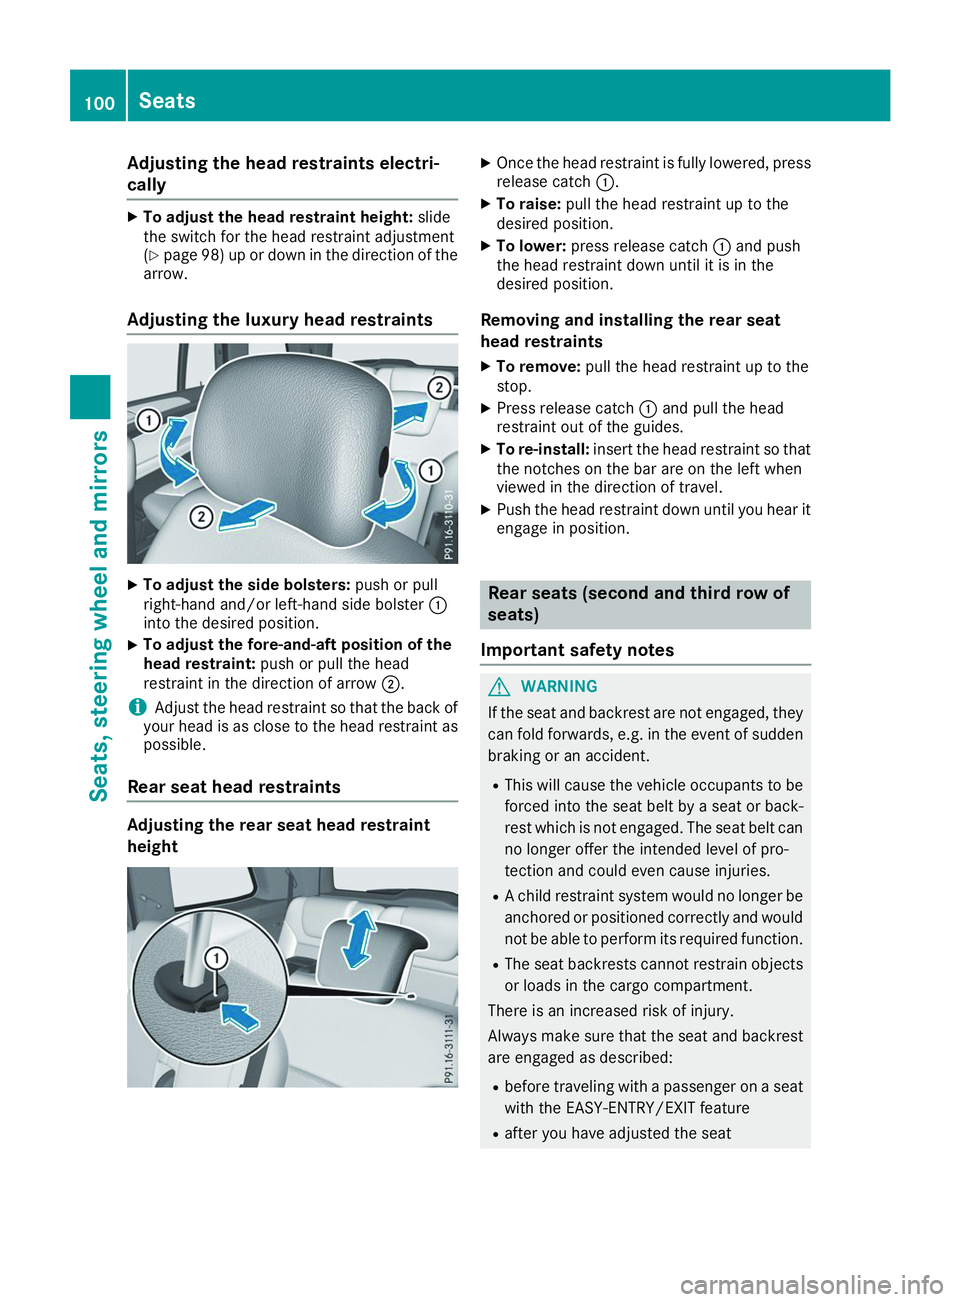
Adjusting the luxury head restraints X
To adjust the side bolsters: push or pull
right-hand and/or left-hand side bolster 0043
into the desired position.
X To adjust the fore-and-aft position of the
head restraint: push or pull the head
restraint in the direction of arrow 0044.
i Adjust the head restraint so that the back of
your head is as close to the head restraint as possible.
Rear seat head restraints Adjusting the rear seat head restraint
height X
Once the head restraint is fully lowered, press
release catch 0043.
X To raise: pull the head restraint up to the
desired position.
X To lower: press release catch 0043and push
the head restraint down until it is in the
desired position.
Removing and installing the rear seat
head restraints X To remove: pull the head restraint up to the
stop.
X Press release catch 0043and pull the head
restraint out of the guides.
X To re-install: insert the head restraint so that
the notches on the bar are on the left when
viewed in the direction of travel.
X Push the head restraint down until you hear it
engage in position. Rear seats (second and third row of
seats)
Important safety notes G
WARNING
If the seat and backrest are not engaged, they can fold forwards, e.g. in the event of sudden
braking or an accident.
R This will cause the vehicle occupants to be
forced into the seat belt by a seat or back-
rest which is not engaged. The seat belt can no longer offer the intended level of pro-
tection and could even cause injuries.
R A child restraint system would no longer be
anchored or positioned correctly and would not be able to perform its required function.
R The seat backrests cannot restrain objects
or loads in the cargo compartment.
There is an increased risk of injury.
Always make sure that the seat and backrest are engaged as described:
R before traveling with a passenger on a seat
with the EASY-ENTRY/EXIT feature
R after you have adjusted the seat 100
SeatsSeats
, steering wheel and mirrors
Page 103 of 398
R
after the EASY-ENTRY/EXIT feature has
been used
R after the cargo compartment enlargement
has been folded forwards G
WARNING
The seat does not engage in the entry/exit
position. The seat could fold back suddenly,
e.g. when accelerating, braking, changing
direction suddenly or in the event of an acci-
dent. Persons in the sweep of the seat could
become trapped. There is a risk of injury.
Always fold back a seat which has been folded forwards before you pull away. Make sure thatthe seat and backrest engage fully. G
WARNING
Children could become trapped if they adjust the seats, particularly when unattended.
There is a risk of injury.
When leaving the vehicle, always take the
SmartKey with you and lock the vehicle. Never leave children unsupervised in the vehicle.
The seats can still be adjusted when there is no
SmartKey in the ignition lock. G
WARNING
When you adjust a seat, you or other vehicle
occupants could become trapped, e.g. on the seat guide rail. There is a risk of injury.
When adjusting a seat, make sure that no one
has any body parts in the sweep of the seat.
Observe the safety notes on "Air bags"
(Y page 49) and "Children in the vehicle"
(Y page 59). Adjusting the backrest angle (second
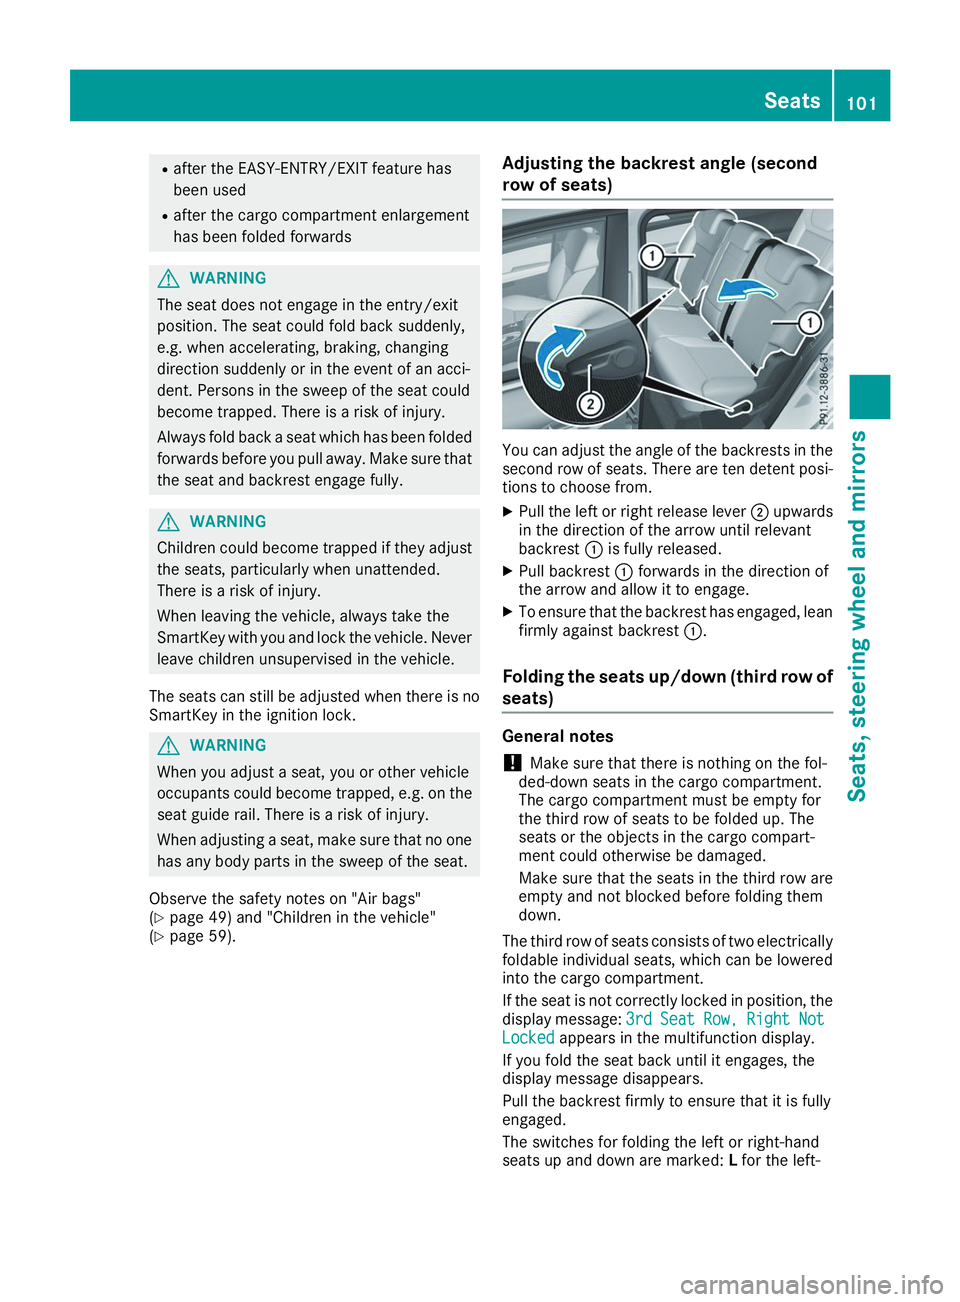
row of seats) You can adjust the angle of the backrests in the
second row of seats. There are ten detent posi-
tions to choose from.
X Pull the left or right release lever 0044upwards
in the direction of the arrow until relevant
backrest 0043is fully released.
X Pull backrest 0043forwards in the direction of
the arrow and allow it to engage.
X To ensure that the backrest has engaged, lean
firmly against backrest 0043.
Folding the seats up/down (third row of seats) General notes
! Make sure that there is nothing on the fol-
ded-down seats in the cargo compartment.
The cargo compartment must be empty for
the third row of seats to be folded up. The
seats or the objects in the cargo compart-
ment could otherwise be damaged.
Make sure that the seats in the third row are
empty and not blocked before folding them
down.
The third row of seats consists of two electrically foldable individual seats, which can be lowered
into the cargo compartment.
If the seat is not correctly locked in position, the
display message: 3rd
3rd Seat Seat Row,
Row,Right
Right Not
Not
Locked
Locked appears in the multifunction display.
If you fold the seat back until it engages, the
display message disappears.
Pull the backrest firmly to ensure that it is fully
engaged.
The switches for folding the left or right-hand
seats up and down are marked: Lfor the left- Seats
101Seats, steering wheel and mirrors Z
Page 104 of 398
hand seat when viewed in the direction of travel,
R for the right-hand seat when viewed in the
direction of travel.
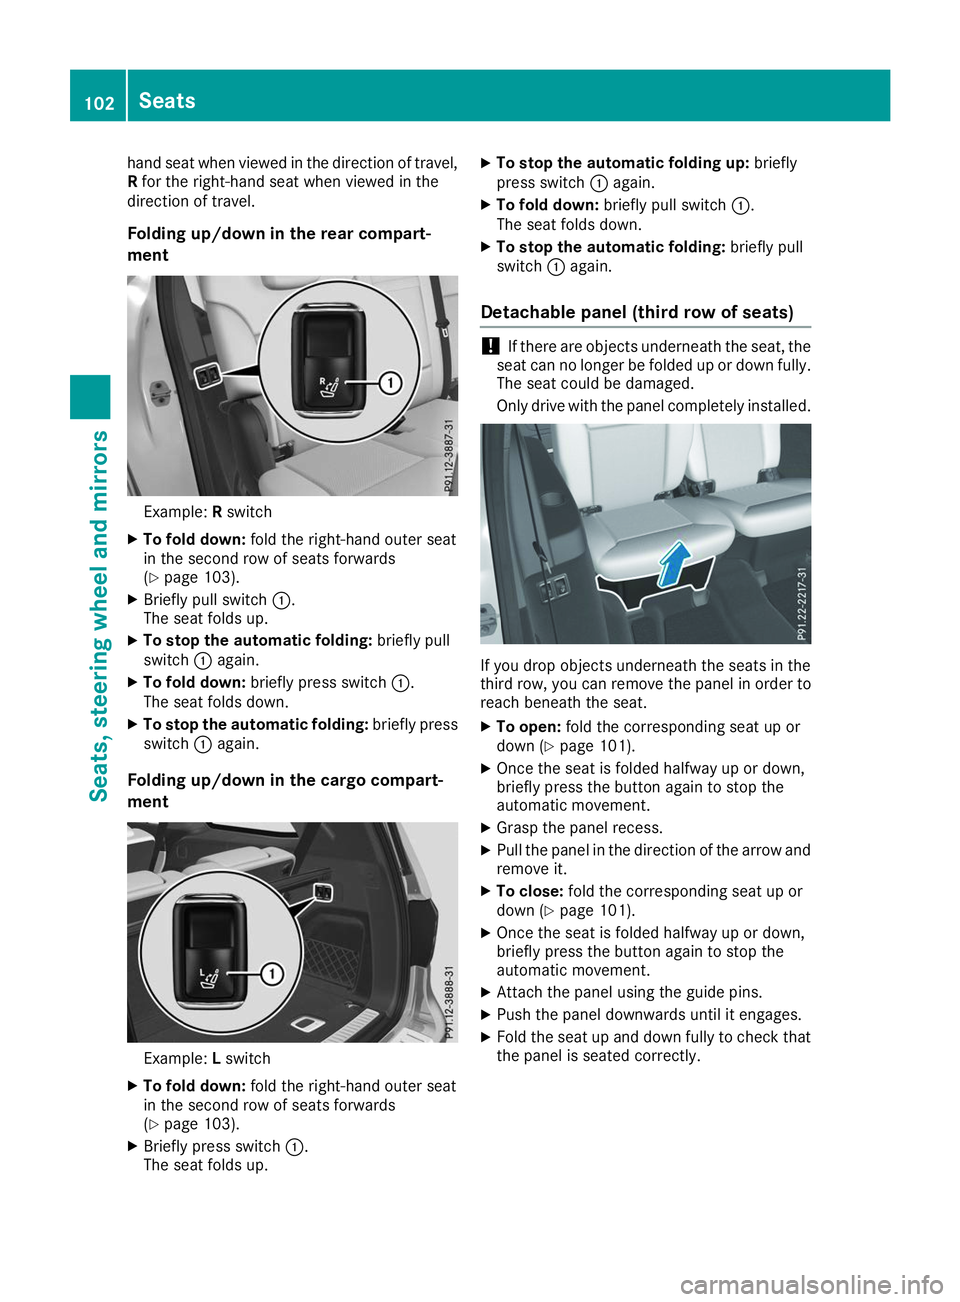
Folding up/down in the rear compart-
ment Example:
Rswitch
X To fold down: fold the right-hand outer seat
in the second row of seats forwards
(Y page 103).
X Briefly pull switch 0043.
The seat folds up.
X To stop the automatic folding: briefly pull
switch 0043again.
X To fold down: briefly press switch 0043.
The seat folds down.
X To stop the automatic folding: briefly press
switch 0043again.
Folding up/down in the cargo compart-
ment Example:
Lswitch
X To fold down: fold the right-hand outer seat
in the second row of seats forwards
(Y page 103).
X Briefly press switch 0043.
The seat folds up. X
To stop the automatic folding up: briefly
press switch 0043again.
X To fold down: briefly pull switch 0043.
The seat folds down.
X To stop the automatic folding: briefly pull
switch 0043again.
Detachable panel (third row of seats) !
If there are objects underneath the seat, the
seat can no longer be folded up or down fully. The seat could be damaged.
Only drive with the panel completely installed. If you drop objects underneath the seats in the
third row, you can remove the panel in order to
reach beneath the seat.
X To open: fold the corresponding seat up or
down (Y page 101).
X Once the seat is folded halfway up or down,
briefly press the button again to stop the
automatic movement.
X Grasp the panel recess.
X Pull the panel in the direction of the arrow and
remove it.
X To close: fold the corresponding seat up or
down (Y page 101).
X Once the seat is folded halfway up or down,
briefly press the button again to stop the
automatic movement.
X Attach the panel using the guide pins.
X Push the panel downwards until it engages.
X Fold the seat up and down fully to check that
the panel is seated correctly. 102
SeatsSeats, steering wheel and mirrors
Page 105 of 398
Folding down the seats in the second
row manually Important safety notes
G
WARNING
If the seat and backrest are not engaged, they can fold forwards, e.g. in the event of sudden
braking or an accident.
R This will cause the vehicle occupants to be
forced into the seat belt by a seat or back-
rest which is not engaged. The seat belt can no longer offer the intended level of pro-
tection and could even cause injuries.
R A child restraint system would no longer be
anchored or positioned correctly and would not be able to perform its required function.
R The seat backrests cannot restrain objects
or loads in the cargo compartment.
There is an increased risk of injury.
Always make sure that the seat and backrest are engaged as described:
R before traveling with a passenger on a seat
with the EASY-ENTRY/EXIT feature
R after you have adjusted the seat
R after the EASY-ENTRY/EXIT feature has
been used
R after the cargo compartment enlargement
has been folded forwards G
WARNING
The seat does not engage in the entry/exit
position. The seat could fold back suddenly,
e.g. when accelerating, braking, changing
direction suddenly or in the event of an acci-
dent. Persons in the sweep of the seat could
become trapped. There is a risk of injury.
Always fold back a seat which has been folded forwards before you pull away. Make sure thatthe seat and backrest engage fully.
General notes
Getting into or out of the third row of seats: you can fold forward the right outer seat in the sec-
ond row of seats. If the right outer rear seat in the second row of
seats is in the entry/exit position: the display
message: 2nd
2nd Seat Seat Row,
Row,Right
Right Not
NotLocked
Locked
appears in the multifunction display, for exam-
ple.
If you fold the seat back until it engages, the
display message disappears.
Pull the backrest firmly to ensure that it is fully
engaged.
i Further related subjects:
R Cargo compartment enlargement (folding
the second row of seats forwards)
(Y page 298)
R Folding the seats in the third row forwards/
back (Y page 101)
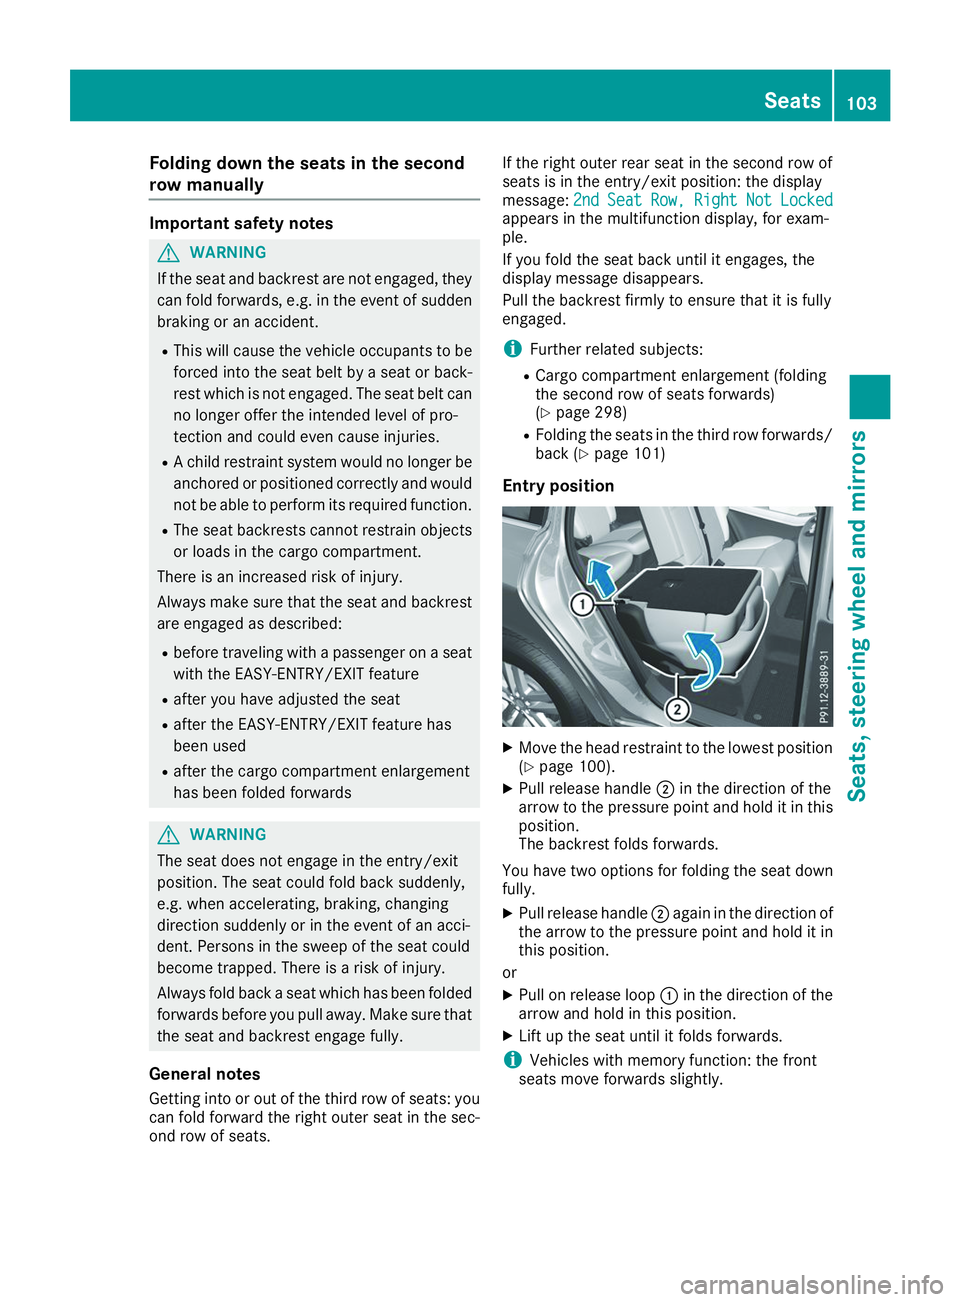
Entry position X
Move the head restraint to the lowest position
(Y page 100).
X Pull release handle 0044in the direction of the
arrow to the pressure point and hold it in this position.
The backrest folds forwards.
You have two options for folding the seat down
fully.
X Pull release handle 0044again in the direction of
the arrow to the pressure point and hold it in
this position.
or X Pull on release loop 0043in the direction of the
arrow and hold in this position.
X Lift up the seat until it folds forwards.
i Vehicles with memory function: the front
seats move forwards slightly. Seats
103Seats, steering wheel and mirrors Z
Page 106 of 398
Entry position
Exit position G
WARNING
When you adjust a seat, you or other vehicle
occupants could become trapped, e.g. on the seat guide rail. There is a risk of injury.
When adjusting a seat, make sure that no one
has any body parts in the sweep of the seat.
i Further related subjects:
R Important safety notes on air bags
(Y page 49)
R Securing children in the vehicle
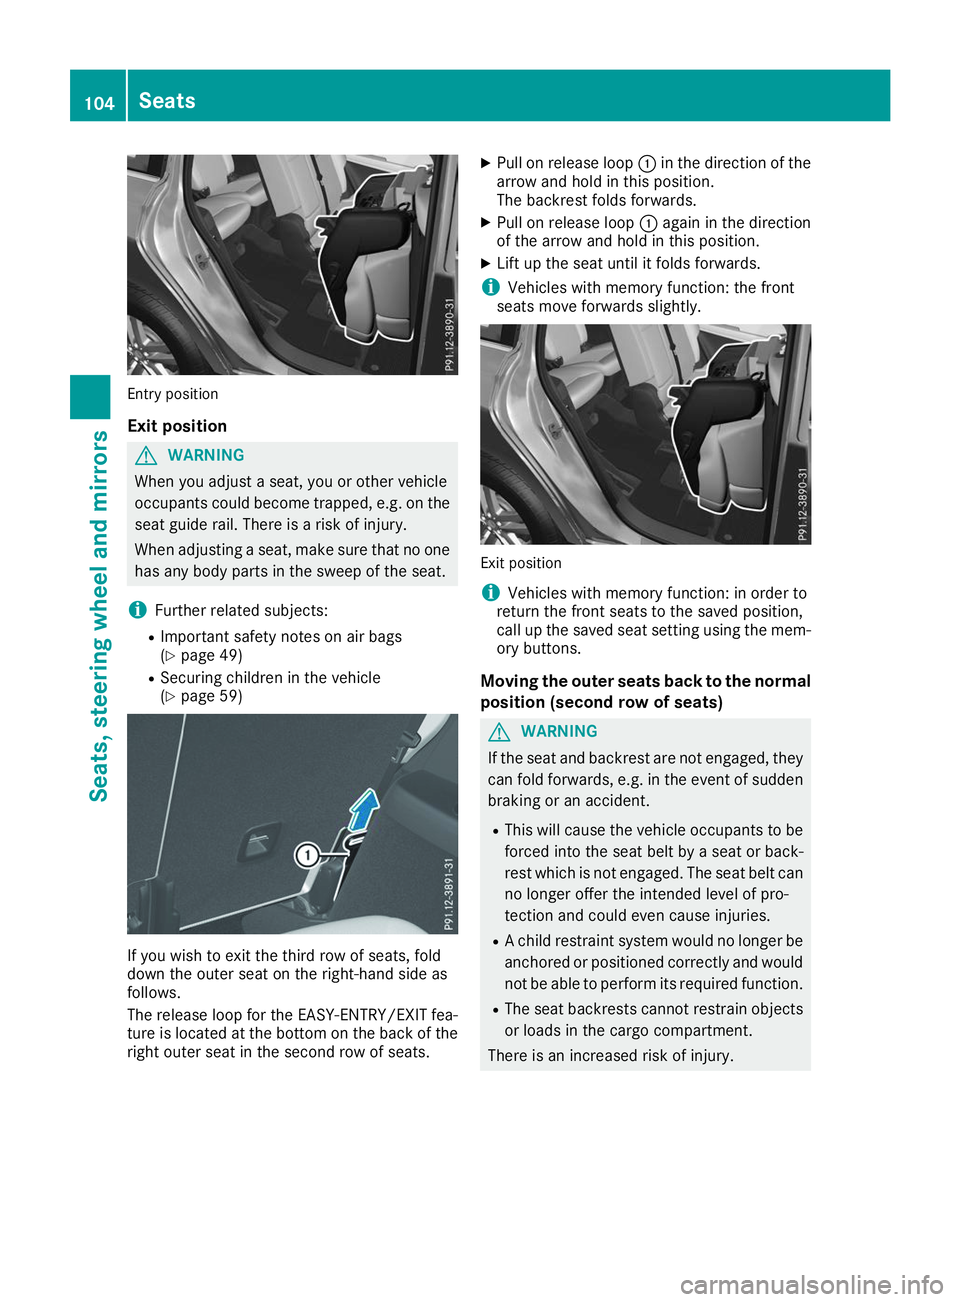
(Y page 59) If you wish to exit the third row of seats, fold
down the outer seat on the right-hand side as
follows.
The release loop for the EASY-ENTRY/EXIT fea-
ture is located at the bottom on the back of theright outer seat in the second row of seats. X
Pull on release loop 0043in the direction of the
arrow and hold in this position.
The backrest folds forwards.
X Pull on release loop 0043again in the direction
of the arrow and hold in this position.
X Lift up the seat until it folds forwards.
i Vehicles with memory function: the front
seats move forwards slightly. Exit position
i
Vehicles with memory function: in order to
return the front seats to the saved position,
call up the saved seat setting using the mem-
ory buttons.
Moving the outer seats back to the normal position (second row of seats) G
WARNING
If the seat and backrest are not engaged, they can fold forwards, e.g. in the event of sudden
braking or an accident.
R This will cause the vehicle occupants to be
forced into the seat belt by a seat or back-
rest which is not engaged. The seat belt can no longer offer the intended level of pro-
tection and could even cause injuries.
R A child restraint system would no longer be
anchored or positioned correctly and would not be able to perform its required function.
R The seat backrests cannot restrain objects
or loads in the cargo compartment.
There is an increased risk of injury. 104
SeatsSeats, steering
wheel and mirrors