cooling MERCEDES-BENZ GLS-Class SUV 2017 X166 User Guide
[x] Cancel search | Manufacturer: MERCEDES-BENZ, Model Year: 2017, Model line: GLS-Class SUV, Model: MERCEDES-BENZ GLS-Class SUV 2017 X166Pages: 390, PDF Size: 9.71 MB
Page 134 of 390

iYou can use 3-zone automatic climate con-
trol to set the airflow in the rear compartment
separately.
Switching the ZONE function on/off
XTo activate: press theábutton.
The indicator lamp above the ábutton
lights up.
Dual-zone automatic climate control: the tem-
perature setting for the driver's side is not
adopted for the front-passenger side.
3-zone automatic climate control: the tem-
perature setting for the driver's side is not
adopted for the front-passenger side and the rear compartment.
XTo deactivate: press theábutton.
The indicator lamp above the ábutton
goes out.
Dual-zone automatic climate control: the tem-
perature setting for the driver's side is adop-
ted for the front-passenger side.
3-zone automatic climate control: the tem-
perature setting for the driver's side is adop-
ted for the front-passenger side and the rear
compartment.
Defrosting the windshield
General notes
You can use this function to defrost the wind-
shield or to clear a fogged up windshield or front
side windows on the inside.
Switch off the "Windshield defrosting" function
as soon as the windshield is clear again.
Activating/deactivating
XTurn the SmartKey to position 2in the ignition
lock (Ypage 138).
XTo activate: press the¬button.
The indicator lamp in the ¬button lights
up.
The climate control system switches to the
following settings:
Rhigh airflow
Rhigh temperature
Rair distribution to the windshield and front
side windows
Rair-recirculation mode off
XTo deactivate: press the¬button.
The indicator lamp in the ¬button goes
out. The previously selected settings are
restored. Air-recirculation mode remains
deactivated.
MAX COOL maximum cooling
The MAX COOL function is only available in vehi-
cles for the USA.
MAX COOL is only operational when the engine
is running.
XTo activate: press theÙbutton.
The indicator lamp in the Ùbutton lights
up.
XTo deactivate: press theÙbutton.
The indicator lamp in the Ùbutton goes
out. The previously selected settings are
restored.
When you activate MAX COOL, climate control
switches to the following functions:
Rmaximum cooling
Rmaximum airflow
Rair-recirculation mode on
Defrosting the windows
Windows fogged up on the inside
XActivate the ¿orÁ cooling with air
dehumidification function.
XActivate automatic mode Ã.
XIf the windows continue to fog up, activate the
"windshield defrosting" function
(
Ypage 132).
iYou should only select this setting until the
windshield is clear again.
Windows fogged up on the outside
XActivate the windshield wipers.
XPress the _button repeatedly until the
P orO symbol appears in the display.
iYou should only select this setting until the
windshield is clear again.
132Operating the climate control systems
Climate control
Page 135 of 390

iIf you clean the windows regularly, they do
not fog up so quickly.
Rear window defroster
General notes
The rear window defroster has a high current
draw. You should therefore switch it off as soon
as the rear window is clear. Otherwise, the rear
window defroster switches off automatically
after several minutes. If the battery voltage is too low, the rear window
defroster may switch off.
Switching on/off
XTurn the SmartKey to position 2in the ignition
lock (Ypage 138).
XPress the ¤button.
The indicator lamp in the ¤button lights
up or goes out.
Problems with the rear window defroster
ProblemPossible causes/consequences and MSolutions
The rear window
defroster has deactiva-
ted prematurely or can-
not be activated.The battery has not been sufficiently charged.
XSwitch off any consumers that are not required, e.g. reading lamps,
interior lighting or the seat heating.
When the battery is sufficiently charged, the rear window defroster
can be activated again.
Switching air-recirculation mode
on/off
General notes
You can deactivate the flow of fresh air if
unpleasant odors are entering the vehicle from
outside. The air already inside the vehicle will
then be recirculated.
If you switch on air-recirculation mode, the win-
dows can fog up more quickly, in particular at
low temperatures. Only use air-recirculation
mode briefly to prevent the windows from fog-
ging up.
Switching on/off
XTurn the SmartKey to position 2in the ignition
lock (Ypage 138).
XTo activate: press thedbutton.
The indicator lamp in the dbutton lights
up.
iIn the event of high pollution levels (3-zone
automatic climate control only) or at high out-
side temperatures, air-recirculation mode is
automatically activated. When air-recircula-
tion mode is activated automatically, the indi-
cator lamp in the dbutton is not lit. Outside air is added after about 30 minutes.
XTo deactivate:
press thedbutton.
The indicator lamp in the dbutton goes
out.
iAir-recirculation mode deactivates auto-
matically:
Rafter approximately five minutes at outside
temperatures below approximately 41 ‡
(5 †)
Rafter approximately five minutes if cooling
with air dehumidification is deactivated
Rafter approximately 30 minutes at outside
temperatures above approximately 41 ‡
(5 †) if the "Cooling with air dehumidifica-
tion" function is activated
Switching the residual heat on or off
General notes
The residual heat function is only available on
vehicles for Canada.
It is possible to make use of the residual heat of
the engine to continue heating the stationary
vehicle for up to 30 minutesafter the engine has
Operating the climate control systems133
Climate control
Page 137 of 390

Setting the side air vents
Example
:
Side window defroster vent
;Side air vent, left
=Thumbwheel for side air vent
XTo open or close:turn thumbwheel=up or
down.
Setting the glove box air vent
!
Close the air vent when heating the vehicle.
At high outside temperatures, open the air
vent and activate the "cooling with air dehu-
midification" function. Otherwise, tempera-
ture-sensitive items stored in the glove box
could be damaged.
:Air vent control
;Air vent
When the climate control system is activated,
the glove box can be ventilated, for instance to
cool its contents. The level of airflow depends on the airflow and air distribution settings.
XTo open or close: turn thumbwheel:to the
right or left.
Setting the rear-compartment air
vents
Setting the center vents in the rear com-
partment
Example: center vents with rear control panel
:
Rear-compartment air vent thumbwheel
;Rear-compartment air vent, right
=Rear control panel
?Rear-compartment air vent, left
XTo open or close: turn thumbwheel:up or
down.
Setting the B-pillar air vent
Second row of seats
:B-pillar air vent
;Thumbwheel for B-pillar air vent
XTo open or close: turn thumbwheel;to the
left or right.
Setting the air vents135
Climate control
Z
Page 224 of 390
driving characteristics and the trailer can
come loose. There is a risk of an accident.
You should only ever install a ball coupling
that has the permissible dimensions and thatis designed to meet your trailer-towing
requirements. Do not modify the ball coupling
or the trailer tow hitch.
You will find the values approved by the manu-
facturer on the vehicle identification plates and
those for the towing vehicle under "Technical
data" (
Ypage 387).
GWARNING
If the ball coupling is not installed correctly or not secured with the bolt provided and the
corresponding spring cotter, the trailer may
come loose. There is a risk of an accident.
Always install and secure the ball coupling as
described. Before every journey, ensure that
the ball coupling is secured with the bolt and
the corresponding spring cotter.
GWARNING
When the vehicle/trailer combination begins
to lurch, you could lose control of it. The vehi- cle/trailer combination could even rollover.
There is a risk of an accident.
On no account should you attempt to
straighten up the vehicle/trailer combination
by increasing the speed. Reduce vehicle
speed and do not countersteer. Apply the
brake as necessary.
Please observe the manufacturer's operating
instructions for the trailer coupling if a detach-
able trailer coupling is used.
Couple and uncouple the trailer carefully. If you
do not couple the trailer to the towing vehicle
correctly, the trailer could become detached.
Make sure that the following values are not
exceeded:
Rthe permissible trailer drawbar noseweight
Rthe permissible trailer load
Rthe permissible rear axle load of the towing
vehicle
Rthe maximum permissible gross vehicle
weight of both the towing vehicle and the
trailer The applicable permissible values, which must
not be exceeded, can be found:
Rin the vehicle documents
Ron the identification plates for the trailer tow
hitch and the trailer
Ron the vehicle identification plate
If the values differ, the lowest value applies.
When towing a trailer, your vehicle's handling
characteristics will be different in comparison
with when driving without a trailer.
The vehicle/trailer combination:
Ris heavier
Ris restricted in its acceleration and gradient-
climbing capability
Rhas an increased braking distance
Ris affected more by strong crosswinds
Rdemands more sensitive steering
Rhas a larger turning circle
This could impair the handling characteristics.
When towing a trailer, always adjust your speed
to the current road and weather conditions. Do
not exceed the maximum permissible speed for
your vehicle/trailer combination.
Notes on towing a trailer
General notes
!If you have a trailer tow hitch retrofitted,
changes to the cooling system and drive train
may be necessary, depending on the vehicle
type.
If you have a trailer tow hitch retrofitted,
observe the anchorage points on the chassis
frame.
RDo not exceed the legally prescribed maxi-
mum speed for vehicle/trailer combinations
in the relevant country.
This lowers the risk of an accident.
ROnly install an approved trailer coupling on
your vehicle.
Further information on availability and on
installation is available from any authorized
Mercedes-Benz Center.
RThe bumpers of your vehicle are not suitable
for installing detachable trailer couplings.
222Towing a trailer
Driving and parking
Page 286 of 390

Warning/
indicator
lampNSignal type
Possible causes/consequences and M
Solutions
?NThe red coolant warning lamp comes on while the engine is running.
The coolant level is too low.
If the coolant level is correct, the airflow to the engine radiator may be blocked or
the electric engine radiator fan may be defective.
The coolant is too hot and the engine is no longer being cooled sufficiently.
XObserve the additional display messages in the multifunction display.
XPull over and stop the vehicle safely and switch off the engine, paying attention
to road and traffic conditions.
XSecure the vehicle against rolling away (Ypage 159).
XLeave the vehicle and keep a safe distance from the vehicle until the engine has cooled down.
XCheck the coolant level and add coolant, observing the warning notes
(Ypage 322).
XIf you have to add coolant frequently, have the engine cooling system checked.
XMake sure that the air supply to the engine radiator is not blocked, e.g. by snow,
slush or ice.
XDo not start the engine again until the coolant temperature is below 248 ‡
(120 †). Otherwise, the engine could be damaged.
XDrive to the nearest qualified specialist workshop.
XAvoid heavy loads on the engine as you do so, e.g. driving in mountainous terrain
and stop-and-go traffic.
?N The red coolant warning lamp comes on while the engine is running.
The coolant temperature has exceeded 248 ‡ (120 †). The airflow to the engine
radiator may be blocked or the coolant level may be too low.
GWARNING
The engine is not being cooled sufficiently and may be damaged.
Do not drive when your engine is overheated. This can cause some fluids which
may have leaked into the engine compartment to catch fire.
Steam from the overheated engine can also cause serious burns which can occur
just by opening the hood.
There is a risk of injury.
XObserve the additional display messages in the multifunction display.
XPull over and stop the vehicle safely and switch off the engine, paying attention
to road and traffic conditions.
XSecure the vehicle against rolling away (Ypage 159).
XLeave the vehicle and keep a safe distance from the vehicle until the engine has
cooled down.
XCheck the coolant level and add coolant, observing the warning notes
(Ypage 322).
XIf you have to add coolant frequently, have the engine cooling system checked.
XMake sure that the air supply to the engine radiator is not blocked, e.g. by snow,
slush or ice.
284Warning and indicator lamps in the instrument cluster
On-board computer and displays
Page 305 of 390
The stowage compartments in the doors provide
space for bottles with a capacity of up to
34 fl. oz. (1.0l).
The bottles are not secured or prevented from
tipping over. Therefore, do not place any open
drink containers in the stowage compartments.
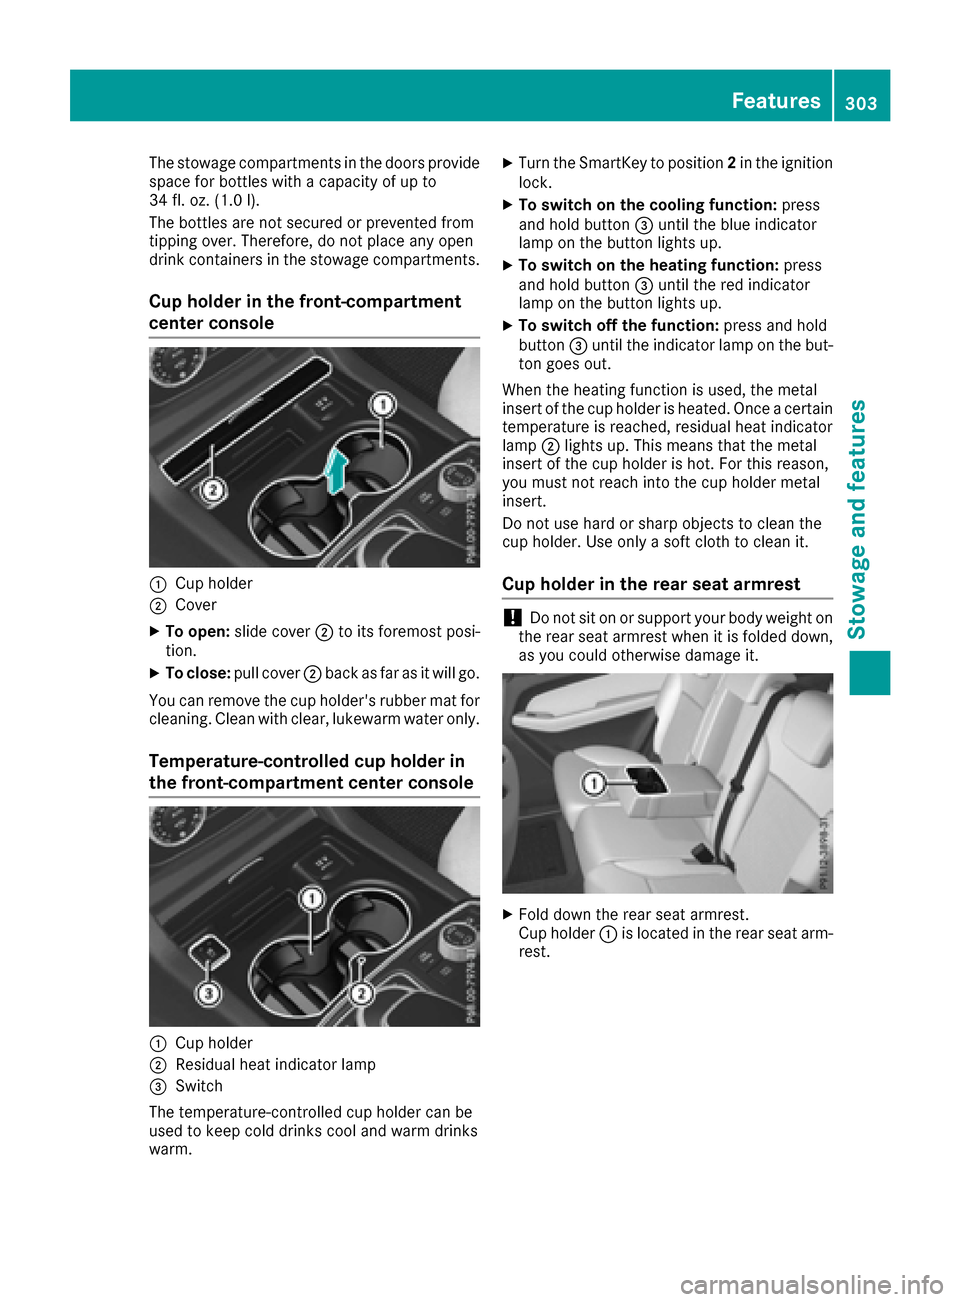
Cup holder in the front-compartment
center console
:Cup holder
;Cover
XTo open: slide cover ;to its foremost posi-
tion.
XTo close: pull cover ;back as far as it will go.
You can remove the cup holder's rubber mat for
cleaning. Clean with clear, lukewarm water only.
Temperature-controlled cup holder in
the front-compartment center console
:Cup holder
;Residual heat indicator lamp
=Switch
The temperature-controlled cup holder can be
used to keep cold drinks cool and warm drinks
warm.
XTurn the SmartKey to position 2in the ignition
lock.
XTo switch on the cooling function: press
and hold button =until the blue indicator
lamp on the button lights up.
XTo switch on the heating function: press
and hold button =until the red indicator
lamp on the button lights up.
XTo switch off the function: press and hold
button =until the indicator lamp on the but-
ton goes out.
When the heating function is used, the metal
insert of the cup holder is heated. Once a certain
temperature is reached, residual heat indicator
lamp ;lights up. This means that the metal
insert of the cup holder is hot. For this reason,
you must not reach into the cup holder metal
insert.
Do not use hard or sharp objects to clean the
cup holder. Use only a soft cloth to clean it.
Cup holder in the rear seat armrest
!Do not sit on or support your body weight on
the rear seat armrest when it is folded down,
as you could otherwise damage it.
XFold down the rear seat armrest.
Cup holder :is located in the rear seat arm-
rest.
Features303
Stowage and features
Z
Page 310 of 390
Problems with the 115 V power socket
ProblemPossible causes/consequences andMSolutions
The warning lamp on the
115 V power socket is
not lit.The on-board voltage is too low because the battery is too weak.
XStart the engine.
or
XCharge the battery (Ypage 338).
If the indicator lamp still does not light up:
XVisit a qualified specialist workshop.
The temperature of the DC/AC converter is temporarily too high.
XRemove the electronic device connector from the 115 V socket.
XLet the DC/AC converter cool down.
If the indicator lamp still does not light up after cooling down the
converter:
XVisit a qualified specialist workshop.
You have connected an electronic device that has a constant nominal
power of less than 150 watts, but has a very high switch-on current.
This device will not work. If you connect such a device, the 115 V
power socket will not supply it with power.
XConnect a suitable electronic device.
mbrace
General notes
The mbrace system is only available in the USA.
You must have a license agreement to activate
the mbrace service. Make sure that your system
is activated and operational. To log in, press the
ï MB Info call button. If any of the steps
mentioned are not carried out, the system may
not be activated.
If you have questions about the activation, con-
tact one of the following telephone hotlines:
Mercedes-Benz Customer Assistance Center at
1-800-FOR-MERCedes (1-800-367-6372) or
1-866-990-9007
Shortly after successfully registering with the
mbrace service, a user ID and password will be
sent to you by mail. You can use this password
to log onto the mbrace area under "Owners
Online" at http://www.mbusa.com. The system is available if:
Rit has been activated and is operational
Rthe corresponding mobile phone network is
available for transmitting data to the Cus-
tomer Center
Ra service subscription is available
Determining the location of the vehicle on a map
is only possible if:
RGPS reception is available.
Rthe vehicle position can be forwarded to the
Customer Assistance Center.
The mbrace system
To adjust the volume during a call, proceed as
follows:
XPress the WorX button on the multi-
function steering wheel.
or
XUse the volume control on the multimedia
system.
308Features
Stowage and features
Page 324 of 390

Where possible, let the engine cool down andtouch only the components described in the
following.
GWARNING
The cooling system is pressurized, particularly
when the motor is warm. If you open the cap,
you could be scalded if hot coolant sprays out.
There is a risk of injury.
Let the engine cool down before you open the
cap. Wear gloves and eye protection. Slowly
open the cap to relieve pressure.
GWARNING
Windshield washer concentrate could ignite if it comes into contact with hot engine compo-
nents or the exhaust system. There is a risk of
fire and injury.
Make sure that no windshield washer con-
centrate is spilled next to the filler neck.
Checking coolant level
XPark the vehicle on a level surface.
Only check the coolant level when the vehicle
is on a level surface and the engine has cooled
down.
XTurn the SmartKey to position 2in the ignition
lock (Ypage 138).
On vehicles with KEYLESS-GO, press the
Start/Stop button twice (
Ypage 140).
XCheck the coolant temperature gauge in the
multifunction display.
The coolant temperature must be below
158 ‡ (70 †).
XTurn the SmartKey to position 0in the ignition
lock (Ypage 138).
XOn vehicles with KEYLESS-GO, press the
Start/Stop button (Ypage 140).
XPress the Start/Stop button (Ypage 140).
XSlowly turn cap :half a turn counter-clock-
wise and allow excess pressure to escape.
XTurn cap :further counter-clockwise and
remove it.
If the coolant is at the level of marker bar =
in the filler neck when cold, there is enough
coolant in coolant expansion tank ;.
If the coolant level is approximately 0.6 in
(1.5 cm) above marker bar =in the filler neck
when warm, there is enough coolant in expan-
sion tank ;.
XIf necessary, add coolant that has been tested
and approved by Mercedes-Benz.
XReplace cap :and turn it clockwise as far as
it will go.
For further information on coolant, see
(
Ypage 382).
Adding washer fluid to the windshield
washer system
Example: washer fluid reservoir
XTo open: pull cap:upwards by the tab.
XAdd the premixed washer fluid.
XTo close: press cap :onto the filler neck
until it engages.
If the washer fluid level drops below the recom-
mended minimum of 1 liter, a message appears
in the multifunction display prompting you to
add washer fluid (
Ypage 273).
Further information on windshield washer fluid
(
Ypage 383).
322Engine compartment
Maintenance and care
Page 384 of 390
Gasoline enginesMB-Freigabe orMB-Approval
All models229.5
Diesel enginesMB-Freigabe orMB-Approval
GLS 350 d 4MATIC228.51, 229.31,229.51, 229.52
Mercedes-AMG vehicles: only use SAE 0W-40
or SAE 5W-40 engine oils.
iMB approval is indicated on the oil contain-
ers.
Filling capacities
The following values refer to an oil change
including the oil filter.
ModelCapacity
GLS 350 d 4MATIC8.5 US qt (8.0 l)
GLS 550 4MATIC
Mercedes‑AMG
vehicles9.0 US qt (8.5l)
Allot her models7.4 US qt (7.0 l)
Additives
!Do not use any additives in the engine oil.
This could damage the engine.
Brake fluid
GWARNING
The brake fluid constantly absorbs moisture
from the air. This lowers the boiling point of
the brake fluid. If the boiling point of the brake
fluid is too low, vapor pockets may form in the
brake system when the brakes are applied
hard. This would impair braking efficiency.
There is a risk of an accident.
You should have the brake fluid renewed at
the specified intervals. Comply with the important safety notes for ser-
vice products when handling brake fluid
(
Ypage 378).
The brake fluid change intervals can be found in
the Maintenance Booklet.
Only use brake fluid approved by Mercedes-
Benz in accordance with MB-Freigabe or MB-
Approval 331.0.
Information about approved brake fluid can be
obtained at any qualified specialist workshop or on the Internet at
http://bevo.mercedes-benz.co m.
iHave the brake fluid regularly replaced at a
qualified specialist workshop in accordance
with the replacement intervals and the
replacement confirmed in the Maintenance
Booklet.
Coolant
Important safety notes
GWARNING
If antifreeze comes into contact with hot com- ponents in the engine compartment, it may
ignite. There is a risk of fire and injury.
Let the engine cool down before you add anti-
freeze. Make sure that antifreeze is not spilled
next to the filler neck. Thoroughly clean the
antifreeze from components before starting
the engine.
!Only add coolant that has been premixed
with the desired antifreeze protection. You
could otherwise damage the engine.
Further information on coolants can be found
in the Mercedes-Benz Specifications for Ser-
vice Products, MB BeVo 310.1, e.g. on the
Internet at http://bevo.mercedes-benz.com.
Or contact a qualified specialist workshop.
!Always use a suitable coolant mixture, even
in countries where high temperatures prevail.
Otherwise, the engine cooling system is not
sufficiently protected from corrosion and
overheating.
iHave the coolant regularly replaced at a
qualified specialist workshop and the replace-
ment confirmed in the Maintenance Booklet.
382Service products and filling capacities
Technical data
Page 389 of 390
Accelerate carefully and make sure that the
wheels do not spin when driving on steep ter-
rain.
iIf the load on the front axle is reduced when
pulling away on a steep uphill slope, the front
wheels have a tendency to spin. 4ETS recog-
nizes this and brakes the wheels accordingly.
The rear wheel torque is increased, making it
easier to drive off.
For further information about the maximum gra-
dient climbing ability, see (
Ypage 171).
Trailer tow hitch
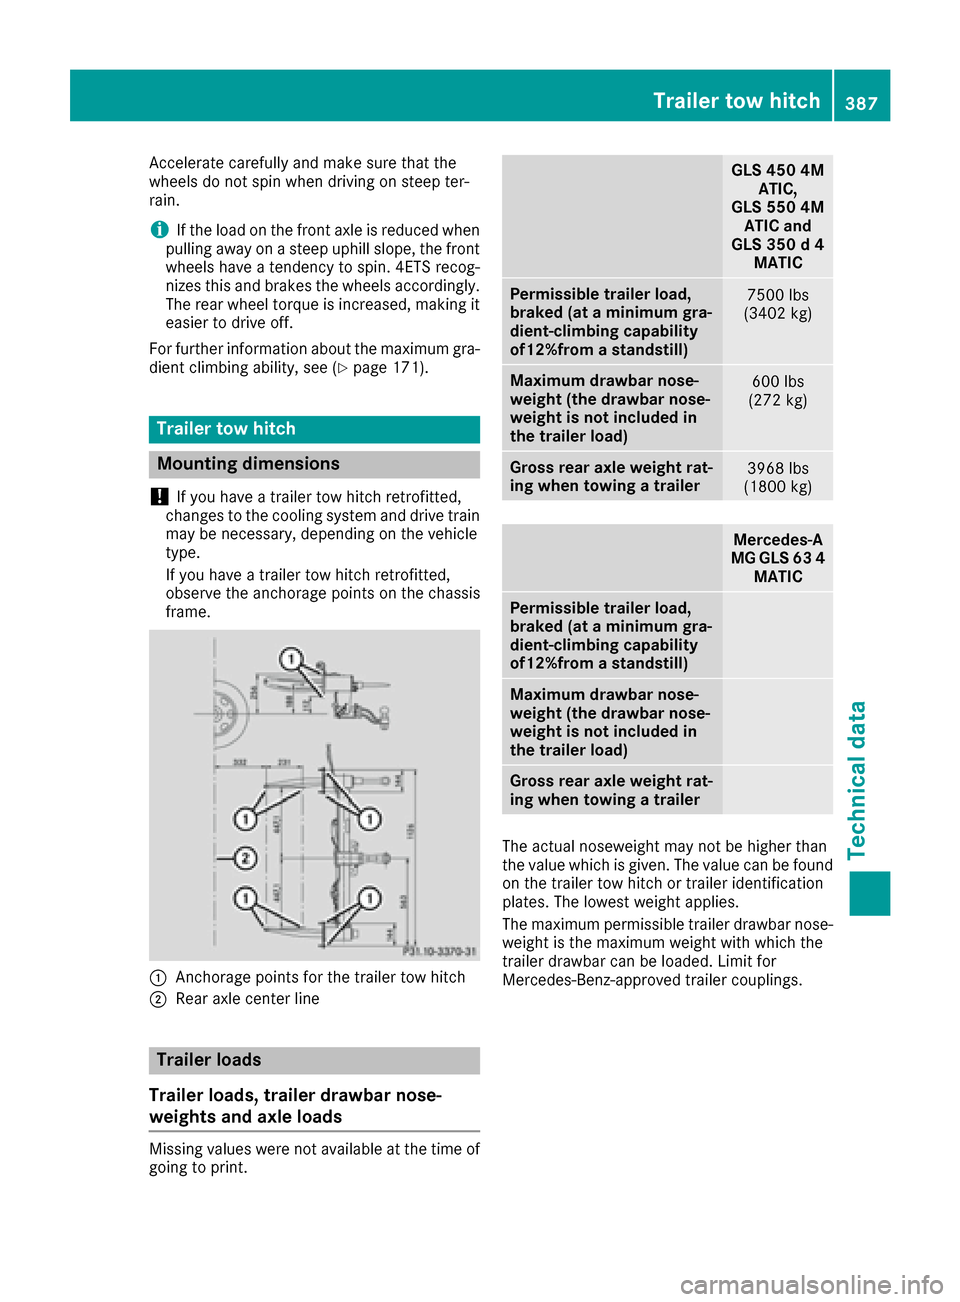
Mounting dimensions
!
If you have a trailer tow hitch retrofitted,
changes to the cooling system and drive train
may be necessary, depending on the vehicle
type.
If you have a trailer tow hitch retrofitted,
observe the anchorage points on the chassis
frame.
:Anchorage points for the trailer tow hitch
;Rear axle center line
Trailer loads
Trailer loads, trailer drawbar nose-
weights and axle loads
Missing values were not available at the time of going to print.
GLS 450 4M ATIC,
GLS 550 4M ATIC and
GLS 350 d 4 MATIC
Permissible trailer load,
braked (at a minimum gra-
dient-climbing capability
of12%from a standstill)7500 lbs
(3402 kg)
Maximum drawbar nose-
weight (the drawbar nose-
weight is not included in
the trailer load)600 lbs
(272 kg)
Gross rear axle weight rat-
ing when towing a trailer3968 lbs
(1800 kg)
Mercedes ‑A
MG GLS 63 4 MATIC
Permissible trailer load,
braked (at a minimum gra-
dient-climbing capability
of12%from a standstill)
Maximum drawbar nose-
weight (the drawbar nose-
weight is not included in
the trailer load)
Gross rear axle weight rat-
ing when towing a trailer
The actual noseweight may not be higher than
the value which is given. The value can be found
on the trailer tow hitch or trailer identification
plates. The lowest weight applies.
The maximum permissible trailer drawbar nose-
weight is the maximum weight with which the
trailer drawbar can be loaded. Limit for
Mercedes-Benz-approved trailer couplings.
Trailer tow hitch387
Technical data
Z