child lock MERCEDES-BENZ GLS-Class SUV 2017 X166 Owner's Manual
[x] Cancel search | Manufacturer: MERCEDES-BENZ, Model Year: 2017, Model line: GLS-Class SUV, Model: MERCEDES-BENZ GLS-Class SUV 2017 X166Pages: 390, PDF Size: 9.71 MB
Page 9 of 390
Roof lining...................................... 33 0
Se at belt ........................................ 330
Seat cover .................................... .330
Sensors ......................................... 328
Side running board ........................ 327
Steering wheel ............................... 329
Trim pieces ....................................3 30
Washing by hand ........................... 325
Wheels ...........................................3 26
Windows ........................................ 327
Wiper blades .................................. 327
Wooden trim .................................. 330
Cargo compartment cover
Notes/how to use ......................... 300
Cargo compartment enlargement
Important safety notes .................. 297
Cargo compartment floor
Important safety notes .................. 301
Opening/closing ............................ 301
Stowage well (under) ..................... 301
Cargo tie down rings ......................... 299
CD
see also Digital Operator's Man-
ual ..................................................2 87
CD player (on-board computer) ........235
Center console
Lower section .................................. 37
Upper section .................................. 36
Central locking
Automatic locking (on-board com-
puter) ............................................. 239
Locking/unlocking (SmartKey) ........7 4
Child
Restraint system .............................. 58
Child seat
Forward-facing restraint system ...... 61
LATCH-type (ISOFIX) child seat
anchors ............................................ 59
On the front-passenger seat ............ 61
Rearwar d-fac
ing restraint system .... 61
Top Tether ...................................... .60
Child-proof locks
Important safety notes .................... 61
Rear doors ...................................... .62
Children
Special seat belt retractor .............. .57
Cigarette lighter ................................ 306 Cleaning
Mirror turn signal .......................... .327
Trailer tow hitch .............................3 29
Climate control
3-zone automatic climate control
with additional rear-compartment
climate control ............................... 127
Automatic climate control (3-
zone) .............................................. 125
Controlling automatically ...............1 30
Cooling with air dehumidification .. 130
Defrosting the windows ................. 132
Defrosting the windshield .............. 132
Dual-zone automatic climate con-
trol ................................................. 123
General notes ................................ 123
Indicator lamp ................................ 130
Ionization ....................................... 134
Maximum cooling .......................... 132
Notes on using the automatic cli-
mate control .................................. 129
Overview of systems ......................1 23
Problem with the rear window
defroster ........................................ 133
Problems with cooling with air
dehumidification ............................ 130
Rear control panel ......................... 125
Rear control panel (3-zone auto-
matic climate control with addi-
tional rear-compartment climate
control) .......................................... 127
Refrigerant ..................................... 383
R
efrigerant filling capacity ............. 384
Setting the air distribution ............. 131
Setting the air vents ......................1 34
Setting the airflow ......................... 131
Setting the climate mode (AIR
FLOW) ............................................ 130
Setting the temperature ................ 131
Switching air-recirculation mode
on/off ............................................ 133
Switching on/off ........................... 129
Switching residual heat on/off ...... 133
Switching the rear window
defroster on/off ............................ 133
Switching the ZONE function
on/off ............................................ 132
Coat hooks ......................................... 300
Index7
Page 15 of 390
Interior lightingAutomatic control .......................... 117
Emergency lighting ........................ 117
General notes ................................ 117
Manual control .............................. .116
Overview ........................................ 116
Reading lamp ................................. 116
iPod
®
see also Digital Operator's Man-
ual ..................................................2 87
J
Jack
Storage location ............................ 331
Using ............................................. 368
Jump starting (engine) ......................338
K
Key positions
KEYLESS-GO .................................. 138
SmartKey ....................................... 138
KEYLESS-GO
Activating ......................................... 75
Convenience closing feature ............ 88
Deactivation ..................................... 75
Display message ............................ 273
Locking ............................................ 75
Removing the Start/Stop button ... 139
Start function ................................... 76
Start/Stop button .......................... 138
Starting the engine ........................ 140
Unlocking ......................................... 75
Kickdown
Driving tips ....................................1 49
Manual gearshifting ....................... 152
Knee bag .............................................. 47
L
Lamps
see Warning and indicator lamps
Lane Keeping Assist
Activating/deactivating ................. 238
Display message ............................ 264
Function/information .................... 209
see Active Lane Keeping Assist
Lap time (RACETIMER) ...................... 241LATCH-type (ISOFIX) child seat
anchors
................................................ 59
Level control
AIRMATIC ...................................... 188
Level control (display message) ...... 261
Level control (vehicle with the Off-
Road Engineering package)
Basic settings ................................ 182
Function/notes ............................. 182
Important safety notes .................. 182
License plate lamp (display mes-
sage) ................................................... 256
Light function, active
Display message ............................ 256
Light sensor (display message) ....... 256
Lights
Activating/deactivating the Intel-
ligent Light System ........................ 239
Active light function ....................... 114
Adaptive Highbeam Assist ............. 115
Automatic headlamp mode ............ 112
Fog lamps (extended) .................... 115
Hazard warning lamps ................... 114
High beam flasher .......................... 113
High-beam headlamps ................... 113
Highway mode ............................... 114
Light switch ................................... 112
Low-beam headlamps .................... 113
Off-road lights ................................ 115
Parking lamps ................................ 113
Rear fog lamp ................................ 113
Standing lamps .............................. 113
Switching the daytime running
lamps on/off (on-board com-
puter) ............................................. 239
Turn signals ................................... 113
see Interior lighting
see Replacing bulbs
Loading guidelines ............................ 294
Locking
see Central locking
Locking (doors)
Automatic ........................................ 81
Emergency locking ........................... 81
From inside (central locking but-
ton) .................................................. 80
Index13
Page 43 of 390
Panic alarm
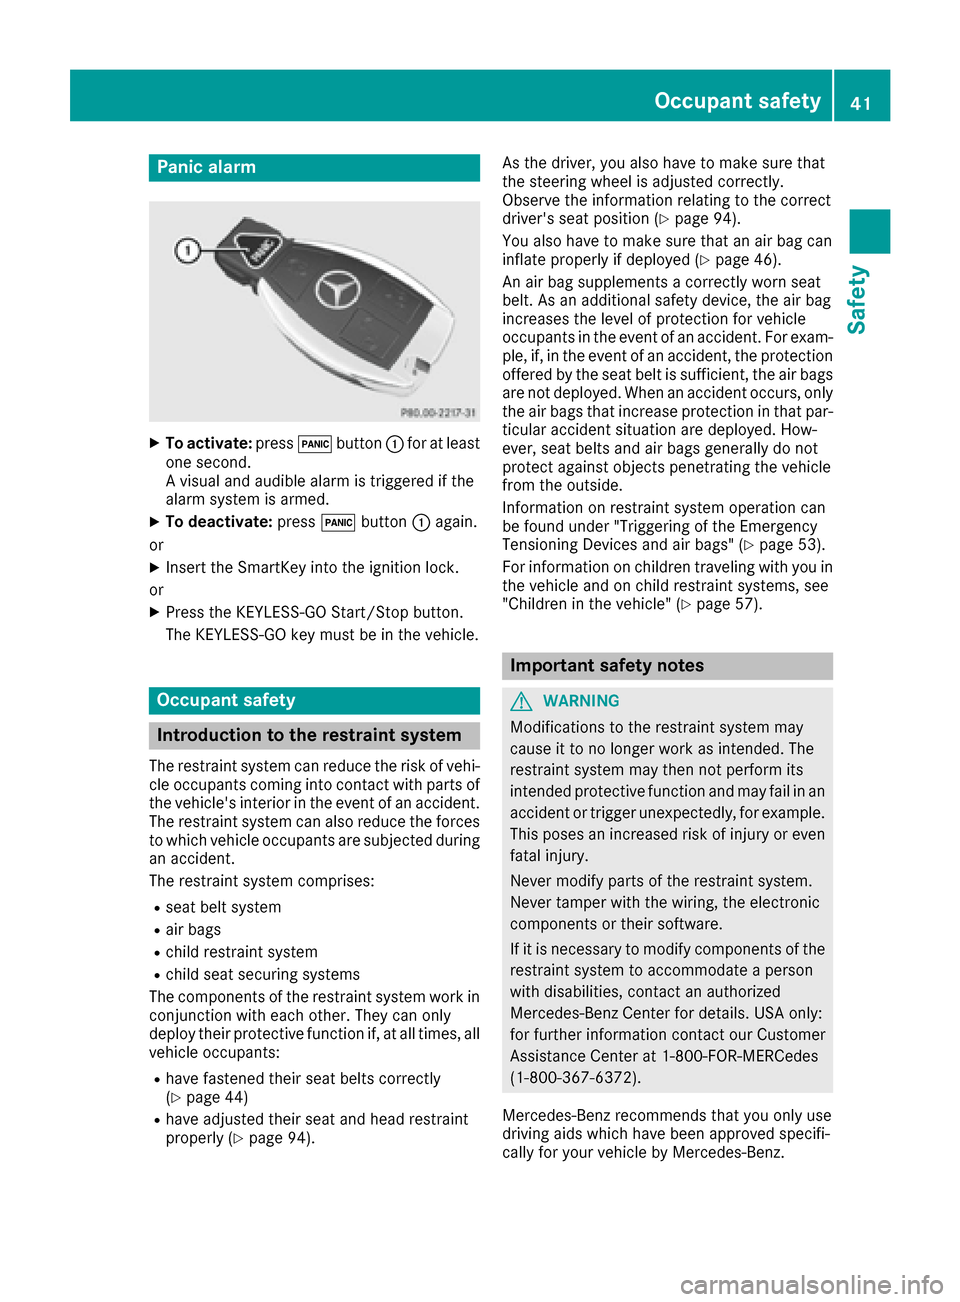
XTo activate:press!button :for at least
one second.
A visual and audible alarm is triggered if the
alarm system is armed.
XTo deactivate: press!button :again.
or
XInsert the SmartKey into the ignition lock.
or
XPress the KEYLESS-GO Start/Stop button.
The KEYLESS-GO key must be in the vehicle.
Occupant safety
Introduction to the restraint system
The restraint system can reduce the risk of vehi- cle occupants coming into contact with parts of
the vehicle's interior in the event of an accident.
The restraint system can also reduce the forces to which vehicle occupants are subjected during
an accident.
The restraint system comprises:
Rseat belt system
Rair bags
Rchild restraint system
Rchild seat securing systems
The components of the restraint system work in
conjunction with each other. They can only
deploy their protective function if, at all times, all vehicle occupants:
Rhave fastened their seat belts correctly
(Ypage 44)
Rhave adjusted their seat and head restraint
properly (Ypage 94). As the driver, you also have to make sure that
the steering wheel is adjusted correctly.
Observe the information relating to the correct
driver's seat position (
Ypage 94).
You also have to make sure that an air bag can
inflate properly if deployed (
Ypage 46).
An air bag supplements a correctly worn seat
belt. As an additional safety device, the air bag
increases the level of protection for vehicle
occupants in the event of an accident. For exam-
ple, if, in the event of an accident, the protection
offered by the seat belt is sufficient, the air bags are not deployed. When an accident occurs, only
the air bags that increase protection in that par-ticular accident situation are deployed. How-
ever, seat belts and air bags generally do not
protect against objects penetrating the vehicle
from the outside.
Information on restraint system operation can
be found under "Triggering of the Emergency
Tensioning Devices and air bags" (
Ypage 53).
For information on children traveling with you in
the vehicle and on child restraint systems, see
"Children in the vehicle" (
Ypage 57).
Important safety notes
GWARNING
Modifications to the restraint system may
cause it to no longer work as intended. The
restraint system may then not perform its
intended protective function and may fail in an
accident or trigger unexpectedly, for example.
This poses an increased risk of injury or even fatal injury.
Never modify parts of the restraint system.
Never tamper with the wiring, the electronic
components or their software.
If it is necessary to modify components of the
restraint system to accommodate a person
with disabilities, contact an authorized
Mercedes-Benz Center for details. USA only:
for further information contact our Customer
Assistance Center at 1-800-FOR-MERCedes
(1‑800‑367‑6372).
Mercedes-Benz recommends that you only use
driving aids which have been approved specifi-
cally for your vehicle by Mercedes-Benz.
Occupant safety41
Safety
Z
Page 45 of 390
occupant in the best position in relation to the
air bag.
The seat belt system comprises:
RSeat belts
REmergency Tensioning Devices for the front
seat belts and the outer seat belts in the sec-
ond row of seats as well as the seat belts in
the third row
RSeat belt force limiters for the front seat belts
and the outer seat belts in the second row of
seats as well as the seat belts in the third row
If the seat belt is pulled out of the belt outlet
quickly or with a jerky movement, the belt
retractor locks. The belt strap cannot be extrac-
ted any further.
The Emergency Tensioning Device tightens the
seat belt in an accident, pulling the belt close
against the body. However it does not pull the
vehicle occupant back in the direction of the
backrest.
The Emergency Tensioning Device does not cor- rect an incorrect seat position or the routing of
an incorrectly fastened seat belt.
When triggered, a seat belt force limiter helps to
reduce the force exerted by the seat belt on the
vehicle occupant.
The seat belt force limiters for the front seats are
synchronized with the front air bags, which
absorb part of the deceleration force. This can
reduce the force exerted on the vehicle occu-
pants during an accident.
!If the front-passenger seat is unoccupied,
do not insert the belt tongue into the buckle of the front-passenger seat. This may otherwise
lead to the triggering of the Emergency Ten-
sioning Device in the event of an accident,
which will then need to be replaced.
Important safety notes
The use of seat belts and child restraint systemsis required by law in:
Rall 50 states
Rthe U.S. territories
Rthe District of Columbia
Rall Canadian provinces
Even where this is not required by law, all vehicle
occupants should correctly fasten their seat
belts before starting the journey.
GWARNING
If the seat belt is not worn correctly, it cannot
perform its intended protective function. An
incorrectly fastened seat belt can also cause
injuries, for example, in the event of an acci-
dent or when braking or changing direction
abruptly. This poses an increased risk of injury
or even fatal injury.
Always ensure that all vehicle occupants have
their seat belts fastened correctly and are sit-
ting properly.
GWARNING
The seat belt does not offer the intended level of protection if you have not moved the back-
rest to an almost vertical position. When brak-
ing or in the event of an accident, you could
slide underneath the seat belt and sustain
abdomen or neck injuries, for example. This
poses an increased risk of injury or even fatal injury.
Adjust the seat properly before beginning
your journey. Always ensure that the backrest
is in an almost vertical position and that the
shoulder section of your seat belt is routed
across the center of your shoulder.
GWARNING
Persons less than 5 ft (1.50 m) tall cannot
wear the seat belt correctly without an addi-
tional and suitable restraint system. If the
seat belt is not worn correctly, it cannot per-
form its intended protective function. An
incorrectly fastened seat belt can also cause
injuries, for example, in the event of an acci-
dent or when braking or changing direction
abruptly. This poses an increased risk of injury or even fatal injury.
For this reason, always secure persons under
5 ft (1.50 m) tall in suitable additional restraint
systems.
If a child younger than twelve years old and
under 5 ft (1.50 m) in height is traveling in the
vehicle:
Ralways secure the child in a child restraint
system suitable for this Mercedes-Benz vehi-
Occupant safety43
Safety
Z
Page 51 of 390
In the following situation, the side impact air bag
and the Emergency Tensioning Device are deac-
tivated:
ROCS has not categorized the person on the
front-passenger seat as an adult or a person
of corresponding stature and
Rthe seat belt tongue of the seat belt is not
inserted into the front-passenger seat belt
buckle
Requirements
To be classified correctly, the front passenger
must sit:
Rwith the seat belt fastened correctly
Rin an almost upright position with their back
against the seat backrest
Rwith their feet resting on the floor, if possible
If the front passenger does not observe these
conditions, OCS may produce a false classifica-
tion, e.g. because the front passenger:
Rtransfers their weight by supporting them-
selves on a vehicle armrest
Rsits in such a way that their weight is raised
from the seat cushion
If it is absolutely necessary to install a child
restraint system on the front-passenger seat, be
sure to observe the correct positioning of the
child restraint system. Never place objects
under or behind the child restraint system, e.g. a
cushion. The entire base of the child restraint
system must always rest on the seat cushion of the front-passenger seat. The backrest of the
forward-facing child restraint system must lie as
flat as possible against the backrest of the front-
passenger seat.
The child restraint system must not touch the
roof or be subjected to a load by the head
restraint. Adjust the angle of the seat backrest
and the head restraint position accordingly.
Only then can OCS be guaranteed to function
correctly. Always observe the child restraint sys-
tem manufacturer's installation and operating
instructions.
Occupant Classification System opera-
tion (OCS)
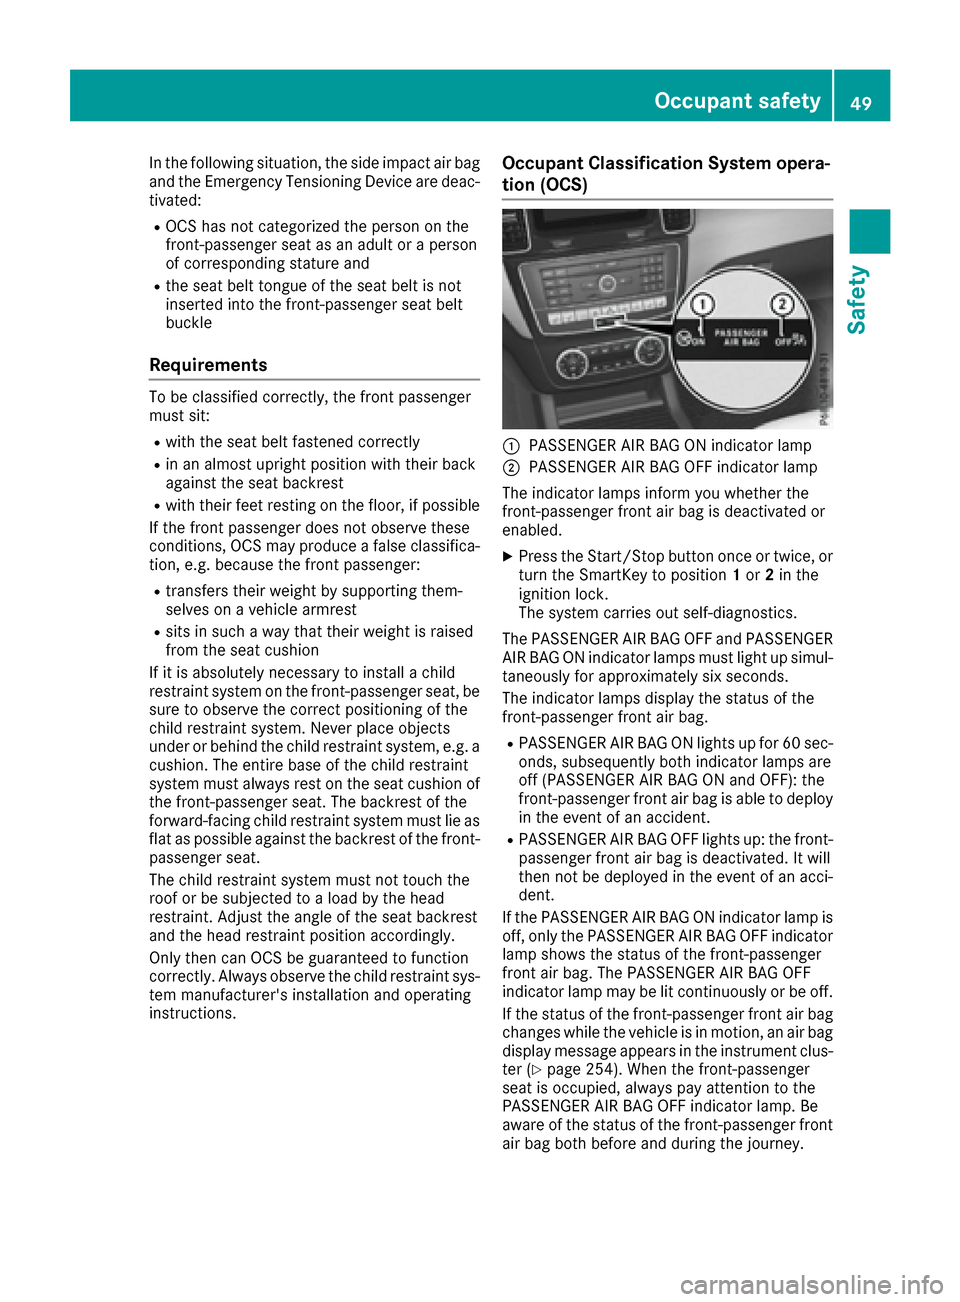
:PASSENGER AIR BAG ON indicator lamp
;PASSENGER AIR BAG OFF indicator lamp
The indicator lamps inform you whether the
front-passenger front air bag is deactivated or
enabled.
XPress the Start/Stop button once or twice, or
turn the SmartKey to position 1or 2in the
ignition lock.
The system carries out self-diagnostics.
The PASSENGER AIR BAG OFF and PASSENGER AIR BAG ON indicator lamps must light up simul-
taneously for approximately six seconds.
The indicator lamps display the status of the
front-passenger front air bag.
RPASSENGER AIR BAG ON lights up for 60 sec-
onds, subsequently both indicator lamps are
off (PASSENGER AIR BAG ON and OFF): the
front-passenger front air bag is able to deploy
in the event of an accident.
RPASSENGER AIR BAG OFF lights up: the front-
passenger front air bag is deactivated. It will
then not be deployed in the event of an acci-
dent.
If the PASSENGER AIR BAG ON indicator lamp is
off, only the PASSENGER AIR BAG OFF indicator lamp shows the status of the front-passenger
front air bag. The PASSENGER AIR BAG OFF
indicator lamp may be lit continuously or be off.
If the status of the front-passenger front air bag
changes while the vehicle is in motion, an air bag
display message appears in the instrument clus-
ter (
Ypage 254). When the front-passenger
seat is occupied, always pay attention to the
PASSENGER AIR BAG OFF indicator lamp. Be
aware of the status of the front-passenger front air bag both before and during the journey.
Occupant safety49
Safety
Z
Page 59 of 390
Children in the vehicle
Important safety notes
Accident statistics show that children secured
in the rear seats are safer than children secured
in the front-passenger seat. For this reason,
Mercedes-Benz strongly advises that you install
a child restraint system on a rear seat. Children are generally better protected there.
If a child younger than twelve years old and
under 5 ft (1.50 m) in height is traveling in the
vehicle:
Ralways secure the child in a child restraint
system suitable for Mercedes-Benz vehicles.
The child restraint system must be appropri-
ate to the age, weight and size of the child
Rbe sure to observe the instructions and safety
notes in this section in addition to the child
restraint system manufacturer's installation
instructions
Rbe sure to observe the instructions and safetynotes on the "Occupant classification system
(OCS)" (
Ypage 48)
GWARNING
If you leave children unsupervised in the vehi-
cle, they could set it in motion by, for example:
Rrelease the parking brake.
Rshift the automatic transmission out of the
parking position P.
Rstart the engine.
In addition, they may operate vehicle equip-
ment and become trapped. There is a risk of
an accident and injury.
When leaving the vehicle, always take the
SmartKey with you and lock the vehicle. Never
leave children unsupervised in the vehicle.
GWARNING
If persons, particularly children are subjected to prolonged exposure to extreme heat or
cold, there is a risk of injury, possibly even
fatal. Never leave children unattended in the
vehicle.
GWARNING
If the child restraint system is subjected to
direct sunlight, parts may get very hot. Chil-
dren may burn themselves on these parts,
particularly on the metal parts of the child
restraint system. There is a risk of injury.
If you leave the vehicle, taking the child with
you, always ensure that the child restraint
system is not exposed to direct sunlight. Pro- tect it with a blanket, for example. If the child
restraint system has been exposed to direct
sunlight, let it cool down before securing the
child in it. Never leave children unattended in
the vehicle.
Always ensure that all vehicle occupants have
their seat belts fastened correctly and are sitting
properly. Particular attention must be paid to
children.
Observe the safety notes on the seat belt
(
Ypage 43 )and the notes on correct use of seat
belts (Ypage 44).
A booster seat may be necessary to achieve
proper seat belt positioning for children over
41 lb s(18 kg) until they reach a height where a
three-point seat belt can be properly fastened
without a booster seat.
Special seat belt retractor
GWARNING
If the seat belt is released while driving, the
child restraint system will no longer be
secured properly. The special seat belt retrac- tor is disabled and the inertia real draws in a
portion of the seat belt. The seat belt cannot
be immediately refastened. There is an
increased risk of injury, possibly even fatal.
Stop the vehicle immediately, paying atten-
tion to road and traffic conditions. Reactivate
the special seat belt retractor and secure the
child restraint system properly.
All seat belts except the driver's seat belt are
equipped with a special seat belt retractor.
When activated, the special seat belt retractor
ensures that the seat belt will not slacken once
the child restraint system has been secured.
Children in the vehicle57
Safety
Z
Page 62 of 390
Top Tether
Introduction
Top Tether provides an additional connection
between the child restraint system secured with
a LATCH-type (ISOFIX) system and the vehicle.
This helps reduce the risk of injury even further.
If the child restraint system is equipped with a
Top Tether belt, this should always be used.
Important safety notes
GWARNING
If the rear seats or the rear seat backrests are
not locked, they could fold forwards in the
event of an accident, heavy braking or sudden
changes of direction. As a result, child
restraint systems cannot perform their inten-
ded protective function. Rear seats and rear
seat backrests that are not locked can also
cause additional injuries, e.g. in the event of
an accident. This poses an increased risk of
injury or even fatal injury.
Always lock the rear seats and rear seat
backrests after installing a Top Tether belt.
Observe the lock verification indicator. Adjust the rear seat backrests so that they are in an
upright position.
Make sure that the backrest in the rear com-
partment engages fully. To do so, pull firmly on
the seat backrest.
Top Tether anchorages
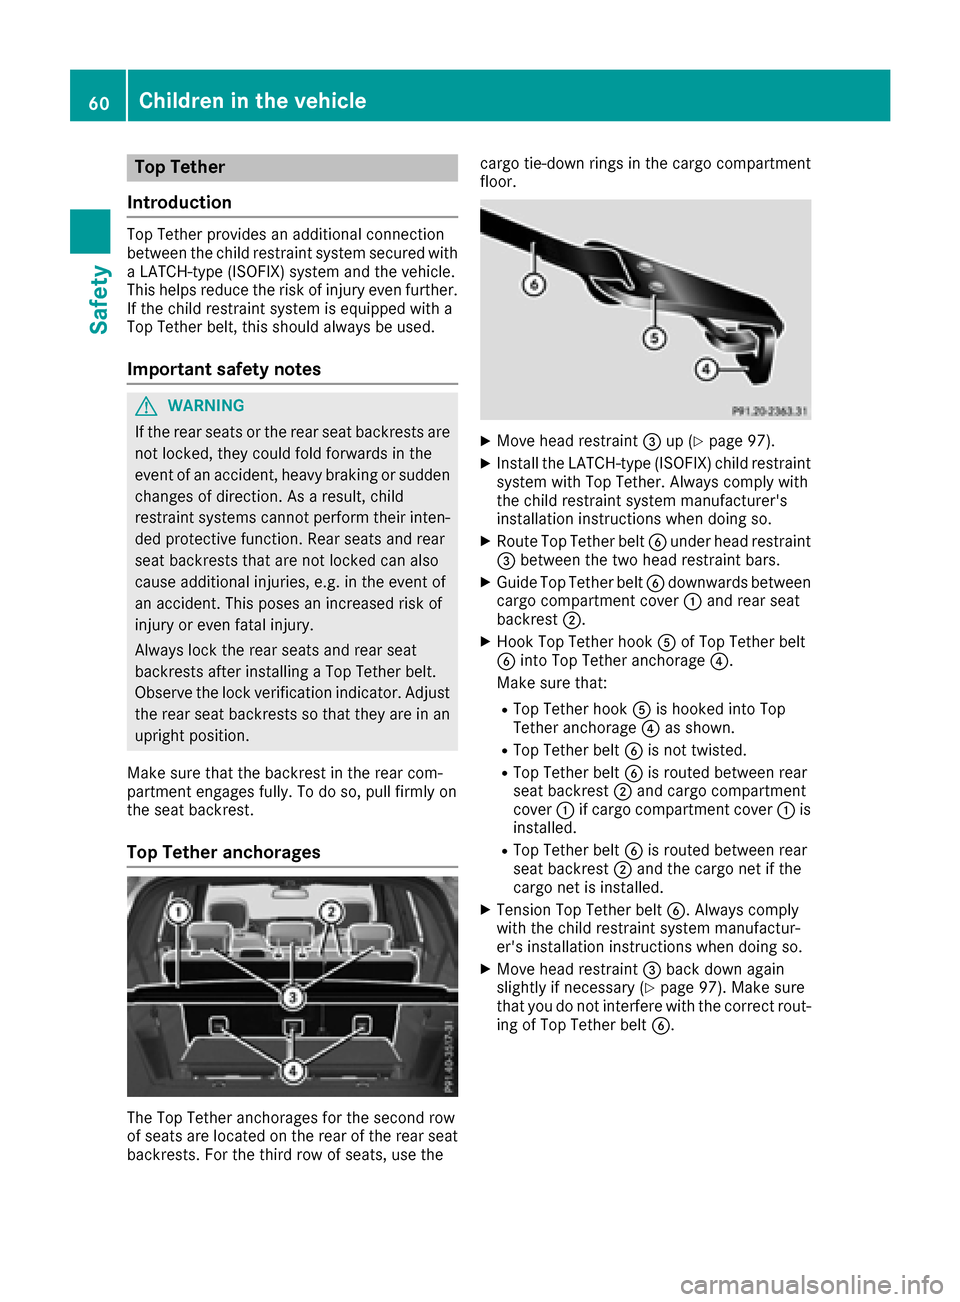
The Top Tether anchorages for the second row
of seats are located on the rear of the rear seat
backrests. For the third row of seats, use the cargo tie-down rings in the cargo compartment
floor.
XMove head restraint
=up (Ypage 97).
XInstall the LATCH-type (ISOFIX) child restraint
system with Top Tether. Always comply with
the child restraint system manufacturer's
installation instructions when doing so.
XRoute Top Tether belt Bunder head restraint
= between the two head restraint bars.
XGuide Top Tether belt Bdownwards between
cargo compartment cover :and rear seat
backrest ;.
XHook Top Tether hook Aof Top Tether belt
B into Top Tether anchorage ?.
Make sure that:
RTop Tether hook Ais hooked into Top
Tether anchorage ?as shown.
RTop Tether belt Bis not twisted.
RTop Tether belt Bis routed between rear
seat backrest ;and cargo compartment
cover :if cargo compartment cover :is
installed.
RTop Tether belt Bis routed between rear
seat backrest ;and the cargo net if the
cargo net is installed.
XTension Top Tether belt B. Always comply
with the child restraint system manufactur-
er's installation instructions when doing so.
XMove head restraint =back down again
slightly if necessary (Ypage 97). Make sure
that you do not interfere with the correct rout-
ing o
f Top Tether belt B.
60Children in the vehicle
Safety
Page 63 of 390
Child restraint system on the front-
passenger seat
General notes
Accident statistics show that children secured
in the rear seats are safer than children secured
in the front-passenger seat. For this reason,
Mercedes-Benz strongly advises that you install
the child restraint system on a rear seat.
If it is absolutely necessary to install a child
restraint system on the front-passenger seat,
always observe the instructions and safety
notes on the "Occupant Classification System
(OCS)" (
Ypage 48).
You can thus avoid the risks that could arise as a result of:
Ran incorrectly categorized person in the front-
passenger seat
Rthe unintentional deactivation of the front-
passenger front air bag
Rthe unsuitable positioning of the child
restraint system, e.g. too close to the dash-
board
Rearward-facing child restraint system
If it is absolutely necessary to install a rearward-
facing child restraint system on the front-
passenger seat, always make sure that the
front-passenger front air bag is deactivated.
Only if the PASSENGER AIR BAG OFF indicator
lamp is permanently lit (
Ypage 42) is the front-
passenger front air bag deactivated.
Always observe the child restraint system man-
ufacturer's installation and operating instruc-
tions.
Forward-facing child restraint system
If it is absolutely necessary to install a forward-
facing child restraint system on the front-
passenger seat, always move the front-
passenger seat as far back as possible. The
entire base of the child restraint system must
always rest on the seat cushion of the front-
passenger seat. The backrest of the child
restraint system must lie as flat as possible
against the backrest of the front-passenger
seat. The child restraint system must not touch
the roof or be subjected to a load by the head
restraint. Adjust the angle of the seat backrest
and the head restraint position accordingly.
Always make sure that the shoulder belt strap is correctly routed from the vehicle belt outlet to
the shoulder belt guide on the child restraint
system. The shoulder belt strap must be routed
forwards and downwards from the vehicle belt
outlet. If necessary, adjust the vehicle belt out-
let and the front-passenger seat accordingly.
Always observe the child restraint system man-
ufacturer's installation and operating instruc-
tions.
Child-proof locks
Important safety notes
GWARNING
If children are traveling in the vehicle, they
could:
Ropen doors, thus endangering other people
or road users
Rexit the vehicle and be caught by oncoming
traffic
Roperate vehicle equipment and become
trapped
There is a risk of an accident and injury.
Always activate the child-proof locks and
override feature if children are traveling in the vehicle. When leaving the vehicle, always take
the key with you and lock the vehicle. Never
leave children unattended in the vehicle.
Override feature for:
Rthe rear doors (Ypage 62)
Rthe rear side windows (Ypage 62)
GWARNING
If you leave children unsupervised in the vehi-
cle, they could set it in motion by, for example:
Rrelease the parking brake.
Rshift the automatic transmission out of the
parking position P.
Rstart the engine.
In addition, they may operate vehicle equip-
ment and become trapped. There is a risk of
an accident and injury.
Children in the vehicle61
Safety
Z
Page 64 of 390
When leaving the vehicle, always take the
SmartKey with you and lock the vehicle. Never
leave children unsupervised in the vehicle.
GWARNING
If persons, particularly children are subjected to prolonged exposure to extreme heat or
cold, there is a risk of injury, possibly even
fatal. Never leave children unattended in the
vehicle.
GWARNING
If the child restraint system is subjected to
direct sunlight, parts may get very hot. Chil-
dren may burn themselves on these parts,
particularly on the metal parts of the child
restraint system. There is a risk of injury.
If you leave the vehicle, taking the child with
you, always ensure that the child restraint
system is not exposed to direct sunlight. Pro- tect it with a blanket, for example. If the child
restraint system has been exposed to direct
sunlight, let it cool down before securing the
child in it. Never leave children unattended in
the vehicle.
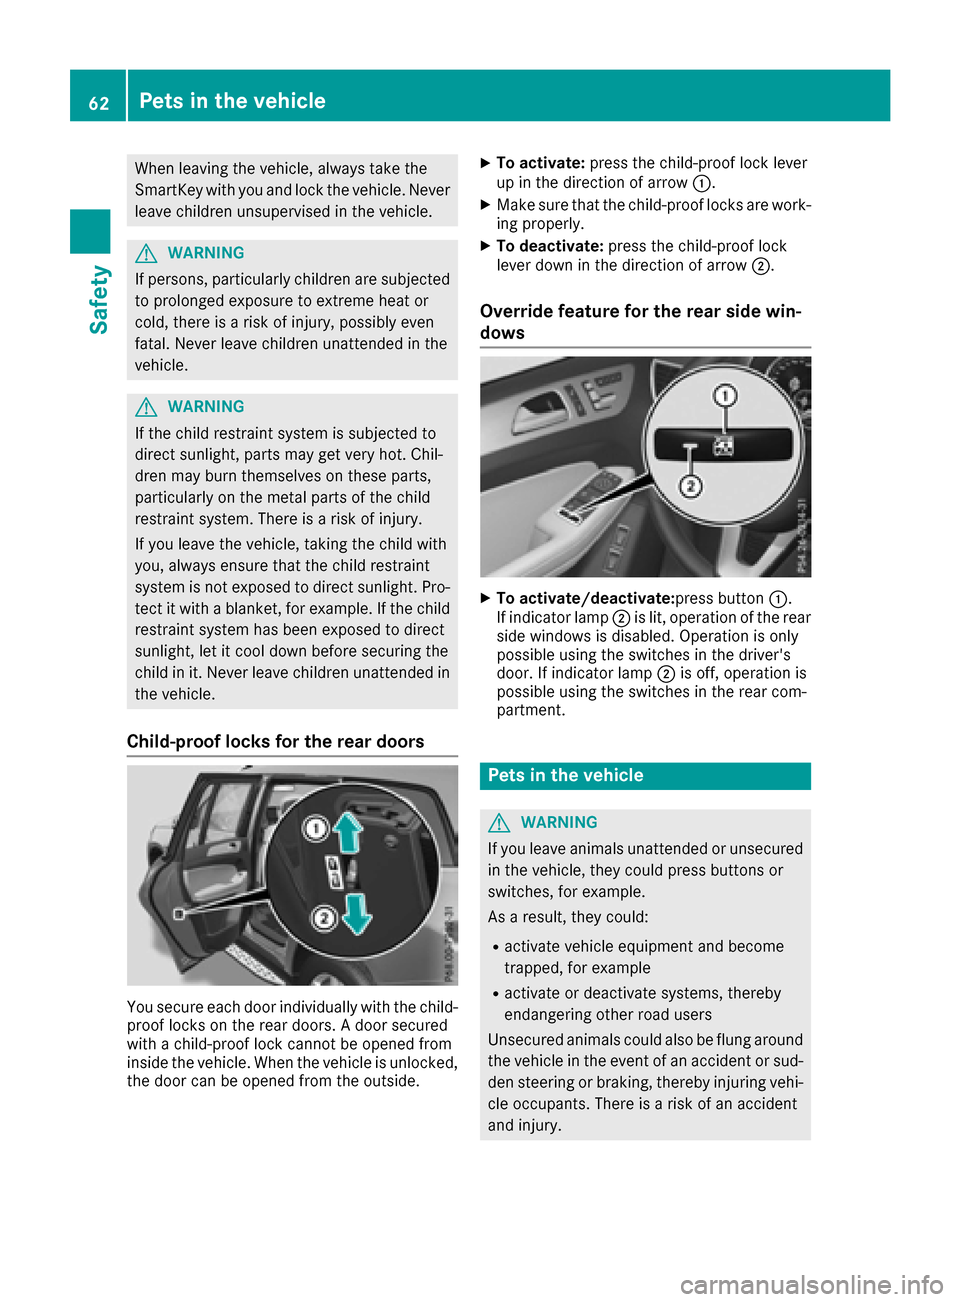
Child-proof locks for the rear doors
You secure each door individually with the child-
proof locks on the rear doors. A door secured
with a child-proof lock cannot be opened from
inside the vehicle. When the vehicle is unlocked,the door can be opened from the outside.
XTo activate: press the child-proof lock lever
up in the direction of arrow :.
XMake sure that the child-proof locks are work-
ing properly.
XTo deactivate: press the child-proof lock
lever down in the direction of arrow ;.
Override feature for the rear side win-
dows
XTo activate/deactivate:press button :.
If indicator lamp ;is lit, operation of the rear
side windows is disabled. Operation is only
possible using the switches in the driver's
door. If indicator lamp ;is off, operation is
possible using the switches in the rear com-
partment.
Pets in the vehicle
GWARNING
If you leave animals unattended or unsecured
in the vehicle, they could press buttons or
switches, for example.
As a result, they could:
Ractivate vehicle equipment and become
trapped, for example
Ractivate or deactivate systems, thereby
endangering other road users
Unsecured animals could also be flung around
the vehicle in the event of an accident or sud-
den steering or braking, thereby injuring vehi-
cle occupants. There is a risk of an accident
and injury.
62Pets in the vehicle
Safety
Page 76 of 390
SmartKey
Important safety notes
GWARNING
If children are left unsupervised in the vehicle,
they could:
Ropen the doors, thus endangering other
people or road users.
Rget out and disrupt traffic.
Roperate the vehicle's equipment.
Additionally, children could set the vehicle in
motion if, for example, they:
Rrelease the parking brake.
Rshifting the automatic transmission out of
park position P
RStart the engine.
There is a risk of an accident and injury.
When leaving the vehicle, always take the
SmartKey with you and lock the vehicle. Never
leave children or animals unattended in the
vehicle. Always keep the SmartKey out of
reach of children.
GWARNING
If you attach heavy or large objects to the
SmartKey, the SmartKey could be uninten-
tionally turned in the ignition lock. This could
cause the engine to be switched off. There is a risk of an accident.
Do not attach any heavy or large objects to the
SmartKey. Remove any bulky key rings before
inserting the SmartKey into the ignition lock.
!Keep the SmartKey away from strong mag-
netic fields. Otherwise, the remote control
function could be affected.
Strong magnetic fields can occur in the vicin-
ity of powerful electrical installations.
Do not keep the SmartKey:
Rwith electronic devices, e.g. a mobile phone
or another SmartKey.
Rwith metallic objects, e.g. coins or metal foil.
Rinside metallic objects, e.g. a metal case.
This can affect the functionality of the Smart- Key. Do not keep the KEYLESS-GO or KEYLESS-GO
Start function key in the temperature-controlled
cup holder. Otherwise, the KEYLESS-GO or KEY-
LESS-GO Start function key will not be detected.
Vehicles with KEYLESS-GO start function:
do
not keep the SmartKey in the cargo compart-
ment. Otherwise, the SmartKey may not be
detected, e.g. when starting the engine using
the Start/Stop button.
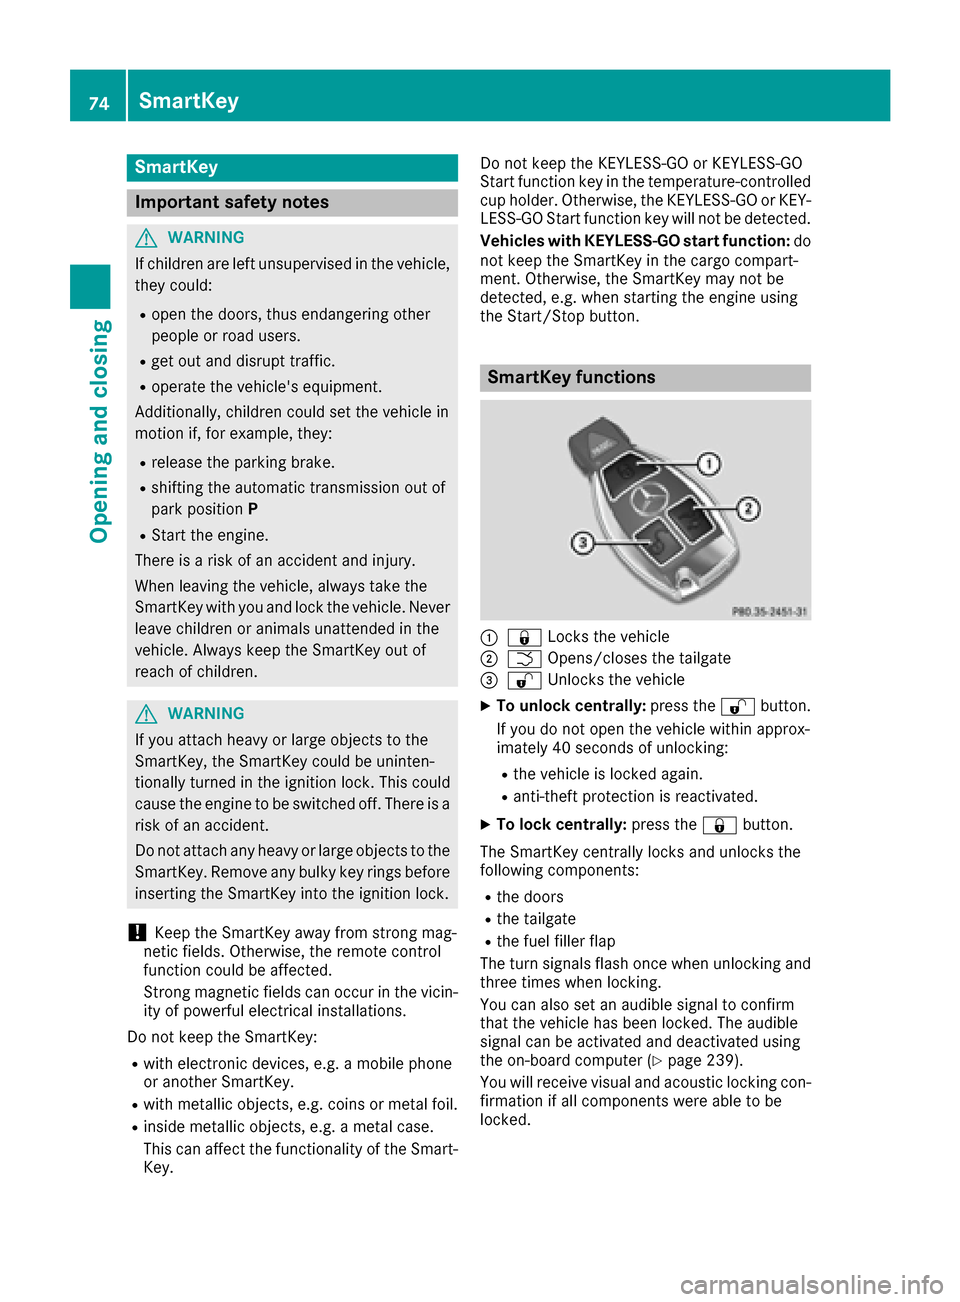
SmartKey functions
:& Locks the vehicle
;FOpens/closes the tailgate
=%Unlocks the vehicle
XTo unlock centrally: press the%button.
If you do not open the vehicle within approx-
imately 40 seconds of unlocking:
Rthe vehicle is locked again.
Ranti-theft protection is reactivated.
XTo lock centrally: press the&button.
The SmartKey centrally locks and unlocks the
following components:
Rthe doors
Rthe tailgate
Rthe fuel filler flap
The turn signals flash once when unlocking and
three times when locking.
You can also set an audible signal to confirm
that the vehicle has been locked. The audible
signal can be activated and deactivated using
the on-board computer (
Ypage 239).
You will receive visual and acoustic locking con-
firmation if all components were able to be
locked.
74SmartKey
Opening and closing