winter tyres MERCEDES-BENZ GLS SUV 2016 Owners Manual
[x] Cancel search | Manufacturer: MERCEDES-BENZ, Model Year: 2016, Model line: GLS SUV, Model: MERCEDES-BENZ GLS SUV 2016Pages: 397, PDF Size: 14.21 MB
Page 6 of 397
Breakdown assistance
.....................345
Where will I find...? .............................. 345
Flat tyre ............................................... 346
Battery (vehicle) .................................. 351
Jump-starting ....................................... 354
Towing away and tow-starting ............. 356
Electrical fuses .................................... 359 Wheels and tyres
.............................. 361
Important safety notes ........................ 361
Operation ............................................ 361
Winter operation .................................. 363
Tyre pressure ....................................... 364
Changing a wheel ................................ 369
Wheel and tyre combinations .............. 374
Emergency spare wheel ....................... 375 Technical data
................................... 379
Information on technical data .............. 379
Vehicle electronics .............................. 379
Identification plates ............................. 380
Service products and capacities .......... 381
Vehicle data ......................................... 387
Vehicle data for off-road driving .......... 388
Trailer tow hitch ................................... 390 Contents
3
Page 24 of 397
Speedometer
Digital ............................................ 245
In the Instrument cluster ................. 35
Segments ...................................... 241
Selecting a display unit .................. 251
Start/Stop button
Starting the engine ........................ 150
Start/stop function
see ECO start/stop function
Starting (engine) ................................ 149
STEER CONTROL ..................................78
Steering
Display message ............................2 89
Steering Pilot
Activating/deactivating ................. 250
Display message ............................ 281
Steering wheel
Adjusting (electrically) ................... 114
Adjusting (manually) ...................... 113
Button overview ............................... 36
Buttons (on-board computer) ......... 242
Cleaning ......................................... 343
Important safety notes .................. 113
Steering wheel heating .................. 114
Storing settings (memory func-
tion) ............................................... 118
Steering wheel gearshift paddles .... 160
Steering wheel heating
Problem (malfunction) ................... 115
Switching on/of f........................... 114
Stopwatch (RACETIMER) ................... 256
Stowage areas ................................... 312
Stowage compartments
Armrest (under) ............................. 313
Centre console .............................. 314
Centre console (rear) ..................... 314
Cup holde r..................................... 320
Glove compartment ....................... 313
Important safety information ......... 312
Spectacles compartment ............... 314
Stowage net ....................................... 314
Stowage space
Stowage net ................................... 314
Summer tyres
In winter ........................................ 363
Sun blind
Rear side window s......................... 322 Sun visor
............................................ 322
Suspension settings
AMG RIDE CONTROL sports sus-
pension .......................................... 200
SETUP (on-board computer) .......... 256
Switching on media mode
Via the device list .......................... 310
Switching the auxiliary heating/
ventilation
On/off ........................................... 141 T
Tailgate Display message ............................ 286
Emergency unlocking ....................... 93
Important safety notes .................... 89
Limiting the opening angle ............... 92
Opening dimensions ...................... 387
Opening/closing (automatically
from inside) ...................................... 92
Opening/closing (automatically
from outside) ................................... 90
Opening/closing (from outside) ....... 90
Power closing .................................. 88
Tank
see Fuel tank
Technical data
Capacities ...................................... 381
Information .................................... 379
Trailer load s................................... 390
Tyres/wheels ................................. 374
Vehicle data ................................... 387
Telephone
Accepting a call (multifunction
steering wheel) .............................. 248
Authorising a mobile phone (con-
necting) ......................................... 307
Connecting a Mobile phone (gen-
eral information) ............................ 306
Display message ............................ 289
Menu (on-board computer) ............ 248
Number from the phone book ........ 248
Redialling ....................................... 249
Rejecting/ending a call ................. 248
See also Digital Owner's Manua l... 303
Switching between mobile
phones ........................................... 307 Index
21
Page 26 of 397
Lights display messag
e.................. 270
Power supply ................................. 238
Problem (fault) ............................... 239
Trailer load s................................... 390
Transmission
see Automatic transmission
Transmission position display ......... 158
Transporting the vehicle .................. 358
Travelling uphill
Brow of hill ..................................... 180
Driving downhill ............................. 180
Maximum gradient-climbing capa-
bility ............................................... 180
Trim pieces (cleaning instruc-
tions) .................................................. 343
Trip computer (on-board com-
puter) .................................................. 244
Trip meter
Calling up ....................................... 244
Resetting (on-board computer) ...... 245
Turn signals
Replacing bulbs (front) ................... 128
Switching on/of f........................... 122
TV
Operating (on-board computer) ..... 248
see Separate operating instructions
Two-way radio
Frequencies ................................... 379
Installation ..................................... 379
Transmission output (maximum) .... 379
Type identification plate
see Vehicle identification plate
Tyre inflation compressor
see TIREFIT kit
Tyre pressure
Calling up (on-board computer) ..... 367
Display message ............................ 283
Not reached (TIREFIT) .................... 350
Reached (TIREFIT) .......................... 350
Recommended ............................... 364
Tyre pressure loss warning
General notes ................................ 366
Important safety notes .................. 366
Restarting ...................................... 366
Tyre pressure monitor
Checking the tyre pressure elec-
tronically ........................................ 367
Function/note s............................. 367 General notes ................................ 367
Important safety notes .................. 367
Radio type approval for the tyre
pressure monitor ........................... 369
Restarting ...................................... 368
Warning lamp ................................. 302
Warning message .......................... 368
Tyres
Changing a whee l.......................... 369
Checking ........................................ 361
Direction of rotation ...................... 370
Display message ............................ 283
Important safety notes .................. 361
Information on driving .................... 361
M+S tyres ...................................... 363
MOExtended tyre s......................... 363
Replacing ....................................... 369
Service life ..................................... 362
Snow chains .................................. 364
Storing ........................................... 370
Summer tyres in winter ................. 363
Tyre size (data ).............................. 374
Tyre tread ...................................... 362
Wheel and tyre combinations ........ 374
see Flat tyre U
Unlocking Emergency unlocking ....................... 89
From inside the vehicle (central
unlocking button) ............................. 88
Upshift indicator (on-board com-
puter, Mercedes-AMG vehicles) ....... 255
USB devices
Connecting to the Media Inter-
face ............................................... 311 V
Vanity mirror (in sun visor) .............. 322
Vehicle
Correct use ...................................... 31
Data acquisition ............................... 31
Display message ............................ 285
Electronics ..................................... 379
Equipment ....................................... 27
Implied warranty .............................. 31
Individual settings .......................... 251 Index
23
Page 28 of 397
Windscreen wipers
Problem (malfunction) .................. .130
Rear window wiper ........................ 129
Replacing the wiper blades ............ 129
Switching on/off ........................... 128
Winter operation
Overview ........................................ 363
Radiator cover ............................... 333
Slippery road surfaces ................... 175
Winter tyres
Limiting the speed (on-board com-
puter) ............................................. 252
M+S tyres ...................................... 363
Wiper blades
Cleaning ......................................... 340
Replacing ....................................... 129
Replacing (on the rear window) ..... 130
Replacing (windscreen) .................. 129
Wooden trim (cleaning instruc-
tions) ................................................. .343
Workshop
see Qualified specialist workshop Z
ZONE function Switching on/off ........................... 137 Index
25
Page 71 of 397
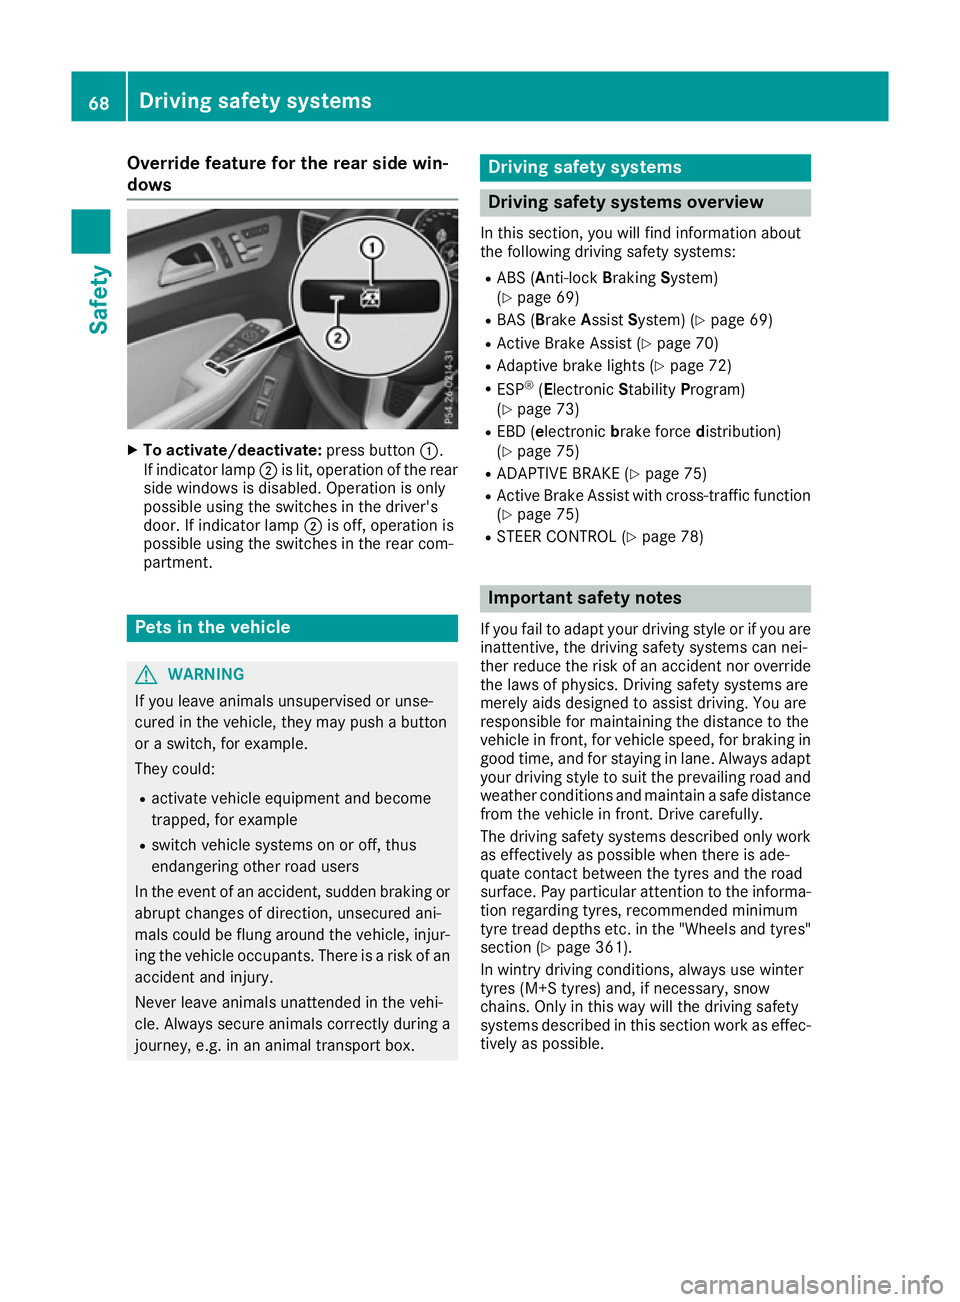
Override feature for the rear side win-
dows X
To activate/deactivate: press button:.
If indicator lamp ;is lit, operation of the rear
side windows is disabled. Operation is only
possible using the switches in the driver's
door. If indicator lamp ;is off, operation is
possible using the switches in the rear com-
partment. Pets in the vehicle
G
WARNING
If you leave animals unsupervised or unse-
cured in the vehicle, they may push a button
or a switch, for example.
They could:
R activate vehicle equipment and become
trapped, for example
R switch vehicle systems on or off, thus
endangering other road users
In the event of an accident, sudden braking or
abrupt changes of direction, unsecured ani-
mals could be flung around the vehicle, injur-
ing the vehicle occupants. There is a risk of an accident and injury.
Never leave animals unattended in the vehi-
cle. Always secure animals correctly during a
journey, e.g. in an animal transport box. Driving safety systems
Driving safety systems overview
In this section, you will find information about
the following driving safety systems:
R ABS (A nti-lock Braking System)
(Y page 69)
R BAS (Brake AssistSystem) (Y page 69)
R Active Brake Assist (Y page 70)
R Adaptive brake lights (Y page 72)
R ESP ®
(Electronic StabilityProgram)
(Y page 73)
R EBD (e lectronic brake force distribution)
(Y page 75)
R ADAPTIVE BRAKE (Y page 75)
R Active Brake Assist with cross-traffic function
(Y page 75)
R STEER CONTROL (Y page 78) Important safety notes
If you fail to adapt your driving style or if you are
inattentive, the driving safety systems can nei-
ther reduce the risk of an accident nor override the laws of physics. Driving safety systems are
merely aids designed to assist driving. You are
responsible for maintaining the distance to the
vehicle in front, for vehicle speed, for braking in
good time, and for staying in lane. Always adapt your driving style to suit the prevailing road and
weather conditions and maintain a safe distance from the vehicle in front. Drive carefully.
The driving safety systems described only work
as effectively as possible when there is ade-
quate contact between the tyres and the road
surface. Pay particular attention to the informa- tion regarding tyres, recommended minimum
tyre tread depths etc. in the "Wheels and tyres" section (Y page 361).
In wintry driving conditions, always use winter
tyres (M+S tyres) and, if necessary, snow
chains. Only in this way will the driving safety
systems described in this section work as effec-
tively as possible. 68
Driving safety systemsSafety
Page 178 of 397
Brake pads/linings and discs that are either new
or have been replaced only achieve optimum
braking effect after several hundred kilometres
of driving. Compensate for the reduced braking
effect by applying greater force to the brake
pedal. Always be aware of this and adapt your
driving and braking accordingly during the run-
ning-in period.
Excessive heavy braking results in correspond-
ingly high brake wear. Observe the #brake
wear warning lamp in the instrument cluster and
note any brake status messages in the multi-
function display. If you regularly drive at high
speeds, it is particularly important to have the
brake system checked and maintained regu-
larly. Driving on wet roads
Aquaplaning If water has accumulated to a certain depth on
the road surface, there is a danger of aquaplan-
ing occurring, even if:
R you are driving at low speeds
R the tyres have adequate tread depth
For this reason, drive in the following manner in
the event of heavy rain or in conditions in which aquaplaning can occur:
R lower your speed
R avoid tyre ruts
R avoid sudden steering movements
R brake carefully
Driving on flooded roads !
Bear in mind that vehicles travelling in front
or in the opposite direction create waves. This may cause the maximum permissible water
depth to be exceeded.
These notes must be observed under all cir-
cumstances. You could otherwise damage
the engine, the electronics or the transmis-
sion.
If you must drive on stretches of road on which
water has collected, please bear in mind that:
R in the case of standing water, the water level
must be no higher than the lower edge of the vehicle body
R you should drive no faster than walking pace Off-road fording !
Under no circumstances should you accel-
erate before entering the water. The bow
wave could cause water to enter and damage
the engine and neighbouring assemblies.
! Do not open any of the vehicle's doors while
fording. Otherwise, water could get into the
vehicle interior and damage the vehicle's
electronics and interior equipment.
R Establish how deep the water is and the char-
acteristics of the body of water before ford-
ing.
R Select the highest possible vehicle level.
R Shift to a lower gear using the left-hand steer-
ing wheel gearshift paddle.
R Avoid high engine speeds.
R Enter and exit the water at a flat place and at
a steady walking pace.
R Drive slowly and at a constant speed through
the water.
R Ensure that a bow wave does not form as you
drive.
R Do not stop and do not switch off the engine.
Water offers a high degree of resistance, the
ground is slippery and, in some cases, unsta- ble. Therefore, it is difficult and dangerous to
pull away in the water.
R Clean any mud from the tyre tread after ford-
ing.
R Apply the brakes to dry them after fording.
Always observe the fording depth values
(Y page 388). Winter driving
G
WARNING
If you shift down on a slippery road surface in an attempt to increase the engine's braking
effect, the drive wheels could lose their grip.
This increases the risk of skidding and having
an accident.
Do not shift down for additional engine brak-
ing on a slippery road surface. G
DANGER
If the exhaust pipe is blocked or adequate
ventilation is not possible, poisonous gases Driving tips
175Driving and parking
Z
Page 179 of 397
such as carbon monoxide (CO) may enter the
vehicle. This is the case, e.g. if the vehicle
becomes trapped in snow. There is a risk of
fatal injury.
If you leave the engine or the auxiliary heating
running, make sure the exhaust pipe and area
around the vehicle are clear of snow. To
ensure an adequate supply of fresh air, open a window on the side of the vehicle that is not
facing into the wind.
! Take care not to damage the sealing strip
and the moulding on the side of the rear win- dow when scraping ice off the rear window.
Have your vehicle winterproofed at a qualified
specialist workshop at the onset of winter.
You should drive particularly carefully on slip-
pery road surfaces. Avoid sudden acceleration,
steering and braking manoeuvres. Do not use
cruise control or Distance Pilot DISTRONIC.
If the vehicle threatens to skid or cannot be
stopped when moving at low speed:
X Shift the transmission to position N.
X Try to bring the vehicle under control by using
corrective steering.
When driving in snow with or without snow
chains, select driving program Slippery
(Y page 155).
The outside temperature indicator is not
designed to serve as an ice-warning device and
is therefore unsuitable for that purpose.
Changes in the outside temperature are dis-
played after a short delay.
Indicated temperatures just above the freezing
point do not guarantee that the road surface is
free of ice. The road may still be icy, especially in wooded areas or on bridges. You should pay
special attention to road conditions when tem-
peratures are around freezing point.
Further information on driving with snow chains
(Y page 364).
Further information on driving with summer
tyres (Y page 363).
Observe the notes in the "Changing a wheel"
section (Y page 369). Off-road driving
Important safety notes G
WARNING
If you drive on a steep incline at an angle or
turn on a steep incline, the vehicle could slip
sideways, tip and overturn. There is a risk of
an accident.
When driving on an incline, drive into the line of fall (upwards or downwards in a straight
line) and do not turn. G
WARNING
Flammable material such as leaves, grass or
twigs may ignite if they come into contact with hot parts of the exhaust system. There is a risk of fire.
When driving off road or on unpaved roads,
check the vehicle's underside regularly. In
particular, remove parts of plants or other
flammable materials which have become
trapped. In the case of damage, contact a
qualified specialist workshop. G
WARNING
If the vehicle level is high, the vehicle centre of gravity is raised. This could cause the vehicleto tip over more easily on uphill or downhill
gradients. There is a risk of an accident.
Select the lowest possible vehicle level.
! There is a risk of damage to the vehicle if:
R the vehicle becomes stuck, e.g. on a high
kerb or an unpaved road
R you drive too fast over an obstacle, e.g. a
kerb, a speed bump or a pothole in the road
R a heavy object strikes the underbody or
parts of the chassis
In situations like this, the body, the under-
body, chassis parts, wheels or tyres could be damaged without the damage being visible.
Components damaged in this way can unex-
pectedly fail or, in the case of an accident, no
longer withstand the strain they are designed
to.
If the underbody panelling is damaged, com-
bustible materials such as leaves, grass or 176
Driving tipsDriving and parking
Page 185 of 397
accelerate or brake unexpectedly. There is a
risk of an accident.
Take the traffic conditions into account
before calling up the stored speed. If you do
not know what the stored speed is, store the
desired speed again.
X Briefly pull the cruise control lever towards
you =.
X Remove your foot from the accelerator pedal.
Cruise control is on and, when activated for
the first time, accepts the current speed or it
adjusts the vehicle's speed to the speed
stored.
Setting a speed Bear in mind that it may take a brief moment
until the vehicle has accelerated or braked to
the set speed.
X Press the cruise control lever up :for a
higher speed or down ?for a lower speed.
X Keep the cruise control lever pressed until the
desired speed is reached.
X Release the cruise control lever.
The new speed is stored.
X To adjust the set speed in1 km/hincre-
ments: briefly press the cruise control lever
up : or down ?to the pressure point.
The last stored speed increases or decreases
in 1 km/h increments.
X To adjust the set speed in10 km/hincre-
ments: briefly press the cruise control lever
up : or down ?beyond the pressure point.
The last stored speed increases or decreases
in 10 km/h increments.
i Cruise control is not deactivated if you
depress the accelerator pedal. For example, if
you accelerate briefly to overtake, cruise con-
trol adjusts the vehicle's speed to the speed
stored after you have finished overtaking.
Deactivating cruise control There are several ways to deactivate cruise con-
trol:
X Briefly press the cruise control lever forwards
=.
or
X Brake. or
X Briefly press the cruise control lever in the
direction of arrow ;.
The variable speed limiter is selected. LIM
indicator lamp :in the cruise control lever is
on.
Cruise control is automatically deactivated if: R you apply the electric parking brake
R you are driving at less than 30 km/h
R ESP ®
engages or you deactivate ESP ®
R you activate DSR
R you activate the Offroad Plus program (vehi-
cles with the Off-Road Engineering package)
R you shift the transmission to position Nwhile
driving
If cruise control is deactivated, you will hear a
warning tone. You will see the Cruise con‐
Cruise con‐
trol off trol off message in the multifunction display
for approximately five seconds.
i The last speed stored is cleared when you
switch off the engine. Speed limiter
General notes The speed limiter brakes automatically so that
you do not exceed the set speed. You must
select a lower gear in good time on long and
steep downhill gradients, especially if the vehi-
cle is laden or towing a trailer. By doing so, you
will make use of the braking effect of the engine. This relieves the load on the brake system and
prevents the brakes from overheating and wear-ing too quickly.
You can set a variable or permanent limit speed:
R variable for speed limits, e.g. in built-up areas
R permanent for long-term speed restrictions,
e.g. when driving with winter tyres fitted
(Y page 184)
i The speed indicated in the speedometer
may differ slightly from the limit speed stored.
Important safety notes If you fail to adapt your driving style, the speed
limiter can neither reduce the risk of an accident
nor override the laws of physics. The speed lim-
iter cannot take into account road, weather or
traffic conditions. The speed limiter is only an 182
Driving systemsDriving and parking
Page 187 of 397

up
: to the pressure point for a higher speed
or down ?for a lower speed.
or
X Keep the cruise control lever pressed to the
pressure point until the desired speed is set.
Press the cruise control lever up :for a
higher speed or down ?for a lower speed.
Switching the speed limiter to passive
If you depress the accelerator pedal beyond the pressure point (kickdown), the speed limiter is
switched to passive mode. The Limiter pas‐
Limiter pas‐
sive sive message appears in the multifunction dis-
play.
You can then exceed the stored speed. The
speed limiter is activated again if you:
R drive slower than the stored speed without
kickdown
R set a new speed or
R call up the last speed stored again
The Limiter passive
Limiter passive message in the multi-
function display disappears.
Switching off the variable speed limiter There are several ways to deactivate the varia-
ble speed limiter:
X Briefly press the cruise control lever forwards
B.
or X Briefly move the cruise control lever in the
direction of arrow A.
LIM indicator lamp ;in the cruise control
lever goes out. The variable speed limiter is
switched off.
Cruise control or Distance Pilot DISTRONIC is selected.
You cannot switch the variable speed limiter off
by braking.
i The last speed stored is cleared when you
switch off the engine.
Permanent limiter
You can use the on-board computer to perma-
nently limit the speed to a value between
160 km/h(e.g. for driving on winter tyres) and
the maximum design speed (Y page 252).
Shortly before the stored speed is reached, it
appears in the multifunction display.
The permanent speed limiter remains active
even if the variable speed limiter is deactivated. You cannot exceed the stored limit speed, even
if you depress the accelerator pedal beyond the
pressure point (kickdown). Distance Pilot DISTRONIC
General notes Distance Pilot DISTRONIC regulates the speed
and automatically helps you maintain the dis-
tance to the vehicle detected in front. Vehicles
are detected with the aid of the radar sensor
system. Distance Pilot DISTRONIC brakes auto-
matically so that the set speed is not exceeded.
You must select a lower gear in good time on
long and steep downhill gradients, especially if
the vehicle is laden or towing a trailer. By doing
so, you will make use of the braking effect of the engine. This relieves the load on the brake sys-
tem and prevents the brakes from overheating
and wearing too quickly.
If Distance Pilot DISTRONIC detects that there is
a risk of a collision, you will be warned visually
and acoustically. Without your intervention, Dis- tance Pilot DISTRONIC cannot prevent a colli-
sion. An intermittent warning tone will then
sound and the distance warning lamp will light
up in the instrument cluster. Brake immediately to increase the distance to the vehicle in front,
or take evasive action, provided it is safe to do
so.
For Distance Pilot DISTRONIC to assist you
when driving, the radar sensor system must be
operational.
Distance Pilot DISTRONIC operates in the range
between 0 km/h and 200 km/h.
Do not use Distance Pilot DISTRONIC while driv- ing on roads with steep gradients.
Important safety notes G
WARNING
Distance Pilot DISTRONIC does not recognise
R people or animals
R stationary objects on the road, e.g. stopped
or parked vehicles
R oncoming vehicles or crossing traffic
As a result, Distance Pilot DISTRONIC may
neither give warnings nor intervene in such
situations. There is a risk of an accident. 184
Driving systemsDriving and pa
rking
Page 230 of 397
R
you brake hard.
R you steer actively, e.g. swerve to avoid an
obstacle or change lane quickly.
R you cut the corner on a sharp bend.
Towing a trailer
If you couple up a trailer, make sure that you
have correctly established the electrical con-
nection. This can be accomplished by checking
the trailer lighting. Lane-correcting brake appli-
cation does not take place when towing a trailer.
Active Lane Keeping Assist is not activated and the lines in the assistance graphic are grey. Off-road driving systems
4MATIC (permanent all-wheel drive) 4MATIC ensures that all four wheels are perma-
nently driven. Together with ESP ®
and 4ETS, it
improves the traction of your vehicle whenever
a drive wheel spins due to insufficient grip.
If you fail to adapt your driving style, 4MATIC can
neither reduce the risk of an accident nor over-
ride the laws of physics. 4MATIC cannot take
account of road, weather and traffic conditions.
4MATIC is only an aid. You are responsible for
the distance to the vehicle in front, for vehicle
speed, for braking in good time and for staying in
lane.
! Never tow the vehicle with one axle raised.
This may damage the transfer case. Damage
of this sort is not covered by the Mercedes-
Benz implied warranty. All wheels must
remain either on the ground or be fully raised. Observe the instructions for towing the vehi-
cle with all wheels in full contact with the
ground.
! A function or performance test should only
be carried out on a twin-axle dynamometer.
Before you operate the vehicle on such a
dynamometer, please consult a qualified
workshop. You could otherwise damage the
drive train or the brake system.
i In wintry driving conditions, the maximum
effect of 4MATIC can only be achieved if you
use winter tyres (M+S tyres), with snow
chains if necessary.
Further information about "Driving off-road"
(Y page 176). DSR (Downhill Speed Regulation) General notes
DSR is an aid to assist you when driving down-
hill. It keeps the speed of travel at the speed
selected on the on-board computer. The steeper
the downhill gradient, the greater the DSR brak- ing effect on the vehicle. When driving on flat
stretches of road or on an uphill gradient, the
DSR braking effect is minimal or non-existent.
DSR controls the vehicle’s speed when it is acti-
vated and the transmission is in position D,Ror
N. By accelerating or braking, you can always
drive at a higher or a lower speed than that set
on the on-board computer.
Important safety notes G
WARNING
If the speed driven and the set speed deviate and you activate DSR on a slippery road sur-
face, the wheels may lose traction. This
increases the risk of skidding and having an
accident.
Before switching DSR on, please take into
consideration the road surface and the differ-
ence between driving speed and the set
speed.
If you fail to adapt your driving style, DSR can
neither reduce the risk of accident nor override the laws of physics. DSR cannot take account ofroad, weather and traffic conditions. DSR is only
an aid. You are responsible for the distance to
the vehicle in front, for vehicle speed, for brak-
ing in good time and for staying in lane.
You are always responsible for keeping control
of the vehicle and for assessing whether the
downhill gradient can be managed. DSR may not
always be able to keep to the set speed, depend-
ing on road surface and tyre conditions. Select a set speed suitable for the prevailing conditions
and when necessary, apply the brakes manually. Driving systems
227Driving and parking Z