flat tire MERCEDES-BENZ GLS SUV 2018 Owner's Manual
[x] Cancel search | Manufacturer: MERCEDES-BENZ, Model Year: 2018, Model line: GLS SUV, Model: MERCEDES-BENZ GLS SUV 2018Pages: 398, PDF Size: 6.75 MB
Page 5 of 398
Features .............................................. 308
Maintenance and care......................325
Engine compartment ........................... 325
ASSYST PLUS ...................................... 329
Care ..................................................... 330
Breakdown assistance .....................338
Where will I find...? .............................. 338
Flat tire ................................................ 339
Battery (vehicle) .................................. 344
Jump-starting ....................................... 346
Towing and tow-starting ...................... 349
Fuses ................................................... 352
Wheels and tires ............................... 354
Important safety notes ........................ 354
Operation ............................................ 354
Winter operation .................................. 356
Tire pressure ....................................... 357
Loading the vehicle .............................. 364
All about wheels and tires ................... 367
Changing a wheel ................................ 374
Wheel and tire combinations ............... 379
Emergency spare wheel ....................... 380
Technical data ................................... 384
Information regarding technical data ... 384
Vehicle electronics .............................. 384
Identification plates ............................. 385
Service products and filling capaci-
ties ...................................................... 386
Vehicle data ......................................... 392
Vehicle data for off-road driving .......... 393
Trailer tow hitch ................................... 395
Contents3
Page 8 of 398
Bag hook............................................ 305
Ball coupling
Installing ........................................ 226
Removing ....................................... 229
BAS (Brake Assist System) ................. 67
Battery (SmartKey)
Checking .......................................... 80
Important safety notes .................... 80
Replacing ......................................... 80
Battery (vehicle)
Charging ........................................ 346
Display message ............................ 262
Important safety notes .................. 344
Jump starting ................................. 346
Overview ........................................ 344
Belt
see Seat belts
Belt warning ......................................... 48
Bicycle rack ....................................... 230
Blind Spot Assist
Activating/deactivating ................. 242
Display message ............................ 269
Notes/function .............................. 209
Trailer towing ................................. 211
see Active Blind Spot Assist
BlueTEC
Adding DEF .................................... 158
BlueTEC (DEF) .................................... 389
Bluetooth
®
Searching for a mobile phone ........ 296
Searching for a mobile phone
(device manager) ........................... 297
see also Digital Operator's Man-
ual .................................................. 292
Telephony ...................................... 296
Brake Assist
see BAS (Brake Assist System)
Brake fluid
Display message ............................ 254
Notes ............................................. 390
Brake force distribution
see EBD (electronic brake force
distribution)
Brake lamps
Display message ............................ 260
Brake linings
Display message ............................ 254 Brakes
ABS .................................................. 66
BAS .................................................. 67
Brake fluid (notes) ......................... 390
Braking assistance appropriate to
the situation ..................................... 69
Display message ............................ 249
High-performance brake system .... 168
Hill start assist ............................... 143
Important safety notes .................. 166
Maintenance .................................. 167
Parking brake ................................ 162
Riding tips ...................................... 166
Warning lamp ................................. 281
Braking assistance appropriate to
the situation
Function/notes ................................ 69
Breakdo
wn
Where will I find...? ........................ 338
see Flat tire
see Towing away
Brightness control (instrument
cluster lighting) ................................... 37
Bulbs
see Replacing bulbs
C
CaliforniaImportant notice for retail cus-
tomers and lessees .......................... 28
Calling up a malfunction
see Display messages
Car
see Vehicle
Care
360° camera ................................. 334
Car wash ........................................ 330
Carpets .......................................... 337
Display ........................................... 335
Exhaust pipe .................................. 334
Exterior lights ................................ 333
Gear or selector lever .................... 336
Interior ........................................... 335
Matte finish ................................... 332
Notes ............................................. 330
Paint .............................................. 332
Plastic trim .................................... 335
6Index
Page 13 of 398
Display message ............................ 261
ECO start/stop function ................ 144
Engine number ............................... 386
Irregular running ............................ 146
Jump-starting ................................. 346
Starting (important safety notes) ... 141
Starting problems .......................... 146
Starting the engine with the
SmartKey ....................................... 142
Starting via smartphone ................ 142
Starting with KEYLESS-GO ............. 142
Switching off .................................. 162
Tow-starting (vehicle) ..................... 352
Engine electronics
Problem (malfunction) ................... 146
Engine jump starting
see Jump starting (engine)
Engine oil
Adding ........................................... 327
Additives ........................................ 390
Checking the oil level ..................... 326
Checking the oil level using the
dipstick .......................................... 327
Display message ............................ 263
Filling capacity ............................... 390
Notes about oil grades ................... 389
Notes on oil level/consumption .... 326
Temperature (on-board computer,
Mercedes-AMG vehicles) ............... 245
Engine switch-off
see ECO start/stop function
Entering an address
see also Digital Operator's Man-
ual .................................................. 292
ESP
®(Electronic Stability Pro-
gram)
AMG menu (on-board computer) ... 246
Characteristics ................................. 70
Deactivating/activating ................... 71
Display message ............................ 249
Function/notes ................................ 69
General notes .................................. 69
Important safety information ........... 70
Warning lamp ................................. 284
ETS/4ETS (Electronic Traction Sys-
tem) ...................................................... 70
Exhaust check ................................... 165 Exhaust pipe (cleaning instruc-
tions)
.................................................. 334
Exterior lighting
see Lights
Exterior mirrors
Adjusting ....................................... 110
Dipping (automatic) ....................... 112
Folding in whe
n locking (on-board
computer) ...................................... 245
Folding in/out (automatically) ....... 111
Folding in/out (electrically) ........... 111
Out of position (troubleshooting) ... 112
Setting ........................................... 111
Storing settings (memory func-
tion) ............................................... 113
Storing the parking position .......... 112
Eyeglasses compartment ................. 302
F
Favorites
Overview ........................................ 294
Filler cap
see Refueling
Flat tire
MOExtended tires .......................... 340
Preparing the vehicle ..................... 339
TIREFIT kit ...................................... 341
see Emergency spare wheel
Floormats ........................................... 324
Fog lamps (extended range) ............. 118
Folding the rear bench seat for-
wards/back ....................................... 303
Fording
Off-road ......................................... 169
On flooded roads ........................... 168
Frequencies
Mobile phone ................................. 384
Two-way radio ................................ 384
Fuel
Additives ........................................ 388
Consumption statistics .................. 236
Displaying the current consump-
tion ................................................ 237
Displaying the range ...................... 237
Driving tips .................................... 164
Fuel gauge ....................................... 37
Grade (gasoline) ............................ 387
Index11
Page 24 of 398
Average weight of the vehicle
occupants (definition) .................... 372
Bar (definition) ............................... 372
Changing a wheel .......................... 374
Characteristics .............................. 372
Checking ........................................ 354
Curb weight (definition) ................. 373
Definition of terms ......................... 372
Direction of rotation ...................... 375
Display message ............................ 273
Distribution of the vehicle occu-
pants (definition) ............................ 374
DOT (Department of Transporta-
tion) (definition) ............................. 372
DOT, Tire Identification Number
(TIN) ............................................... 371
GAWR (Gross Axle Weight Rating)
(definition) ..................................... 372
GTW (Gross Trailer Weight) (defi-
nition) ............................................ 373
GVW (Gross Vehicle Weight) (def-
inition) ........................................... 373
GVWR (Gross Vehicle Weight Rat-
ing) (definition) .............................. 373
Important safety notes .................. 354
Increased vehicle weight due to
optional equipment (definition) ...... 372
Information on driving .................... 354
Kilopascal (kPa) (definition) ........... 373
Labeling (overview) ........................ 369
Load bearing index (definition) ...... 374
Load index ..................................... 371
Load index (definition) ................... 373
M+S tires ....................................... 356
Maximum load on a tire (defini-
tion) ............................................... 373
Maximum loaded vehicle weight
(definition) ..................................... 373
Maximum permissible tire pres-
sure (definition) ............................. 373
Maximum tire load ......................... 371
Maximum tire load (definition) ....... 373
MOExtended tires .......................... 356
Optional equipment weight (defi-
nition) ............................................ 374
PSI (pounds per square inch)(de
f-
inition) ........................................... 373
Replacing ....................................... 374 Service life ..................................... 355
Sidewall (definition) ....................... 374
Snow chains .................................. 356
Speed rating (definition) ................ 373
Storing ........................................... 375
Structure and characteristics
(definition) ..................................... 372
Summer tires in winter .................. 356
Temperature .................................. 368
TIN (Tire Identification Number)
(definition) ..................................... 374
Tire bead (definition) ...................... 373
Tire pressure (definition) ................ 373
Tire pressures (recommended) ...... 372
Tire size (data) ............................... 379
Tire size designation, load-bearing
capacity, speed rating .................... 369
Tire tread ....................................... 355
Tire tread (definition) ..................... 373
Total load limit (definition) ............. 374
Traction ......................................... 368
Traction (definition) ....................... 374
Tread wear ..................................... 368
TWR (permissible trailer drawbar
noseweight) (definition) ................. 374
Uniform Tire Quality Grading
Standards ...................................... 367
Uniform Tire Quality Grading
Standards (definition) .................... 372
Wear indicator (definition) ............. 374
Wheel and tire combination ........... 379
Wheel rim (definition) .................... 372
see Flat tire
Tool
see Vehicle tool kit
Top Tether ............................................ 63
Tow-starting
Emergency engine starting ............ 352
Important safety notes .................. 349
Towing a trailer
Axle load, permissible .................... 395
Cleaning the trailer tow hitch ......... 335
Coupling up a trailer ...................... 227
Decoupling a trailer ....................... 229
Driving tips .................................... 225
Important safety notes .................. 224
Installing the ball coupling ............. 226
Lights displ ay me
ssage .................. 260
22Index
Page 54 of 398
In the following situation, the side impact air bag
and the Emergency Tensioning Device are deac-
tivated:
ROCS has not categorized the person on the
front-passenger seat as an adult or a person
of corresponding stature and
Rthe seat belt buckle tongue of the seat belt is
not inserted into the front-passenger seat belt
buckle
Requirements
To be classified correctly, the front passenger
must sit:
Rwith the seat belt fastened correctly
Rin an almost upright position with their back
against the seat backrest
Rwith their feet resting on the floor, if possible
If the front passenger does not observe these
conditions, OCS may produce a false classifica-
tion, e.g. because the front passenger:
Rtransfers their weight by supporting them-
selves on a vehicle armrest
Rsits in such a way that their weight is raised
from the seat cushion
If it is absolutely necessary to install a child
restraint system on the front-passenger seat, be
sure to observe the correct positioning of the
child restraint system. Never place objects
under or behind the child restraint system, e.g. a
cushion. The entire base of the child restraint
system must always rest on the seat cushion of the front-passenger seat. The backrest of the
forward-facing child restraint system must lie as
flat as possible against the backrest of the front-
passenger seat.
The child restraint system must not touch the
roof or be subjected to a load by the head
restraint. Adjust the angle of the seat backrest
and the head restraint position accordingly.
Only then can OCS be guaranteed to function
correctly. Always observe the child restraint sys-
tem manufacturer's installation and operating
instructions.
Occupant Classification System opera-
tion (OCS)
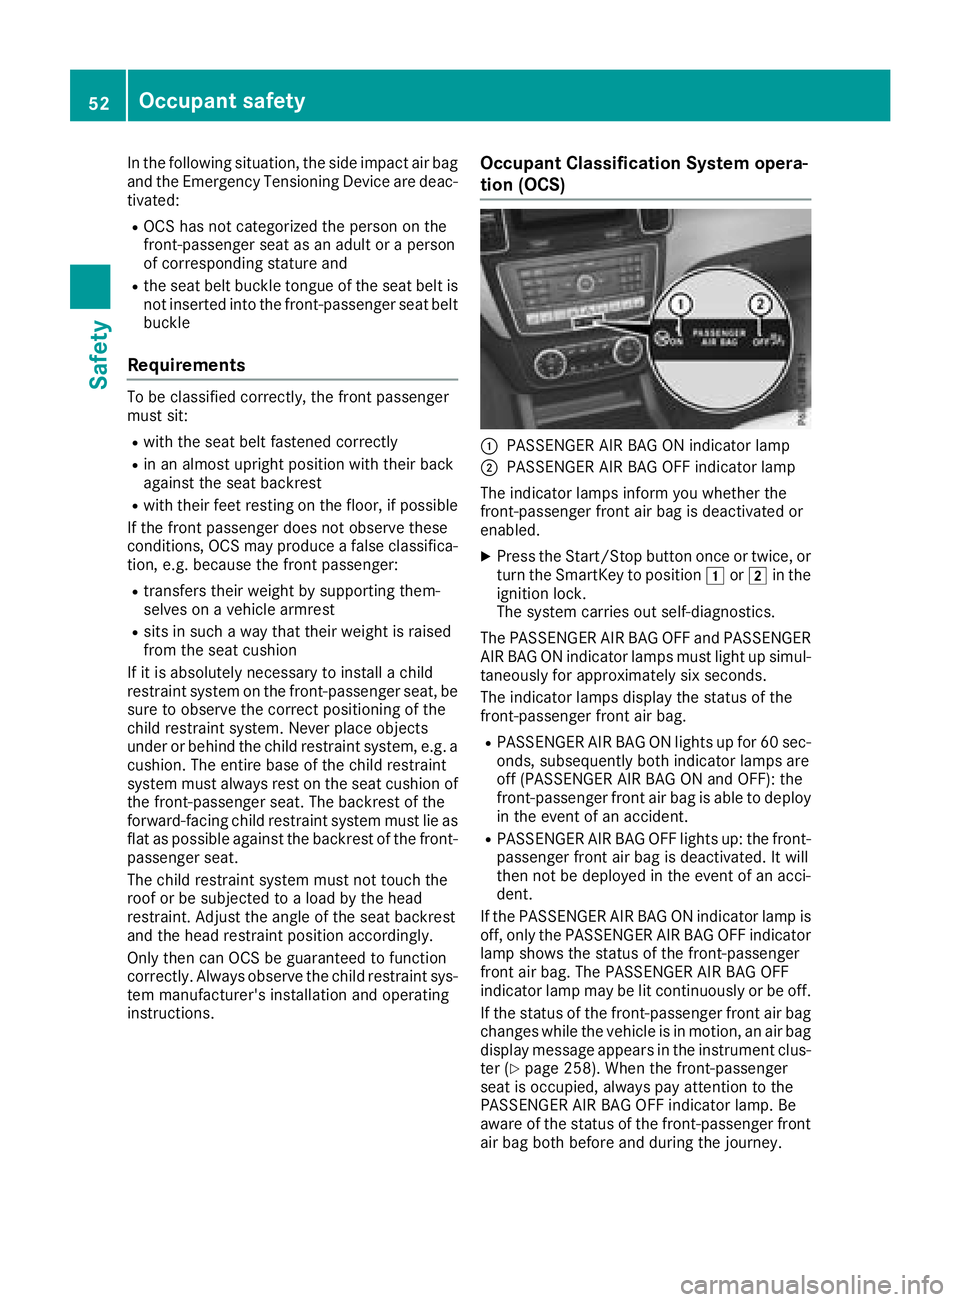
:PASSENGER AIR BAG ON indicator lamp
;PASSENGER AIR BAG OFF indicator lamp
The indicator lamps inform you whether the
front-passenger front air bag is deactivated or
enabled.
XPress the Start/Stop button once or twice, or turn the SmartKey to position 1or2 in the
ignition lock.
The system carries out self-diagnostics.
The PASSENGER AIR BAG OFF and PASSENGER
AIR BAG ON indicator lamps must light up simul-
taneously for approximately six seconds.
The indicator lamps display the status of the
front-passenger front air bag.
RPASSENGER AIR BAG ON lights up for 60 sec-
onds, subsequently both indicator lamps are
off (PASSENGER AIR BAG ON and OFF): the
front-passenger front air bag is able to deploy
in the event of an accident.
RPASSENGER AIR BAG OFF lights up: the front-
passenger front air bag is deactivated. It will
then not be deployed in the event of an acci-
dent.
If the PASSENGER AIR BAG ON indicator lamp is
off, only the PASSENGER AIR BAG OFF indicator lamp shows the status of the front-passenger
front air bag. The PASSENGER AIR BAG OFF
indicator lamp may be lit continuously or be off.
If the status of the front-passenger front air bag
changes while the vehicle is in motion, an air bag
display message appears in the instrument clus-
ter (
Ypage 258). When the front-passenger
seat is occupied, always pay attention to the
PASSENGER AIR BAG OFF indicator lamp. Be
aware of the status of the front-passenger front
air bag both before and during the journey.
52Occupant safety
Safety
Page 58 of 398
ProblemPossible causes/consequences andMSolutions
The PASSENGER AIR
BAG OFF indicator lamp
lights up and remains lit,
even though the front-
passenger seat is occu-
pied by an adult or a per-
son of a stature corre-
sponding to that of an
adult.The classification of the person on the front-passenger seat is incor-
rect.
XMake sure the conditions for a correct classification of the person
on the front-passenger seat are met (Ypage 52).
XIf the PASSENGER AIR BAG OFF indicator lamp remains lit, the front-
passenger seat may not be used.
XHave OCS checked as soon as possible at an authorized Mercedes- Benz Center.
The PASSENGER AIR
BAG OFF indicator lamp
does not light up and/or
does not stay on.
The front-passenger seat
is:
Runoccupied
Roccupied by the
weight of a child up to
twelve months old in a
child restraint system
OCS is malfunctioning.
XMake sure there is nothing between the seat cushion and the child
seat.
XMake sure that the entire base of the child restraint system rests on
the seat cushion of the front-passenger seat. The backrest of the
forward-facing child restraint system must lie as flat as possible
against the backrest of the front-passenger seat. If necessary,
adjust the position of the front-passenger seat.
XWhen installing the child restraint system, make sure that the seat belt is tight. Do not pull the seat belt tight using the front-passenger
seat adjustment. This could result in the seat belt and the child
restraint system being pulled too tightly.
XCheck for correct installation of the child restraint system.
Make sure that the head restraint does not apply a load to the child
restraint system. If necessary, adjust the head restraint accord-
ingly.
XMake sure that no objects are applying additional weight onto the
seat.
XIf the PASSENGER AIR BAG OFF indicator lamp remains off and/or
the PASSENGER AIR BAG ON indicator lamp lights up, do not install a child restraint system on the front-passenger seat. It is recom-
mended that you install the child restraint system on a suitable rear
seat.
XHave OCS checked as soon as possible at an authorized Mercedes-Benz Center.
Deployment of Emergency Tensioning
Devices and air bags
Important safety notes
GWARNING
The air bag parts are hot after an air bag has
been deployed. There is a risk of injury.
Do not touch the air bag parts. Have a
deployed air bag replaced at a qualified spe-
cialist workshop as soon as possible.
GWARNING
A deployed air bag no longer offers any pro-
tection and cannot provide the intended pro-
tection in an accident. There is an increased
risk of injury.
Have the vehicle towed to a qualified special-
ist workshop in order to have a deployed air
bag replaced.
It is important for your safety and that of your
passenger to have deployed air bags replaced
and to have any malfunctioning air bags
56Occupant safety
Safety
Page 66 of 398
Child restraint system on the front-
passenger seat
General notes
Accident statistics show that children secured
in the rear seats are safer than children secured
in the front-passenger seat. For this reason,
Mercedes-Benz strongly advises that you install
the child restraint system on a rear seat.
If it is absolutely necessary to install a child
restraint system on the front-passenger seat,
always observe the instructions and safety
notes on the "Occupant Classification System
(OCS)" (
Ypage 51).
You can thus avoid the risks that could arise as a result of:
Ran incorrectly categorized person in the front-
passenger seat
Rthe unintentional deactivation of the front-
passenger front air bag
Rthe unsuitable positioning of the child
restraint system, e.g. too close to the dash-
board
Rearward-facing child restraint system
If it is absolutely necessary to install a rearward-
facing child restraint system on the front-
passenger seat, always make sure that the
front-passenger front air bag is deactivated.
Only if the PASSENGER AIR BAG OFF indicator
lamp is permanently lit (
Ypage 45) is the front-
passenger front air bag deactivated.
Always observe the child restraint system man-
ufacturer's installation and operating instruc-
tions.
Forward-facing child restraint system
If it is absolutely necessary to install a forward-
facing child restraint system on the front-
passenger seat, always move the front-
passenger seat as far back as possible. The
entire base of the child restraint system must
always rest on the seat cushion of the front-
passenger seat. The backrest of the child
restraint system must lie as flat as possible
against the backrest of the front-passenger
seat. The child restraint system must not touch
the roof or be subjected to a load by the head
restraint. Adjust the angle of the seat backrest
and the head restraint position accordingly.
Always make sure that the shoulder belt strap is correctly routed from the vehicle belt outlet to
the shoulder belt guide on the child restraint
system. The shoulder belt strap must be routed
forward and down from the vehicle belt outlet. If
necessary, adjust the vehicle belt outlet and the
front-passenger seat accordingly.
Always observe the child restraint system man-
ufacturer's installation and operating instruc-
tions.
Child-proof locks
Important safety notes
GWARNING
If children are traveling in the vehicle, they
could:
Ropen doors, thus endangering other people
or road users
Rexit the vehicle and be caught by oncoming
traffic
Roperate vehicle equipment and become
trapped
There is a risk of an accident and injury.
Always activate the child-proof locks and
override feature if children are traveling in the vehicle. When leaving the vehicle, always take
the key with you and lock the vehicle. Never
leave children unattended in the vehicle.
Override feature for:
Rthe rear doors (Ypage 65)
Rthe rear side windows (Ypage 65)
GWARNING
If you leave children unsupervised in the vehi-
cle, they could set it in motion by, for example:
Rrelease the parking brake.
Rshift the automatic transmission out of the
parking position P.
Rstart the engine.
In addition, they may operate vehicle equip-
ment and become trapped. There is a risk of
an accident and injury.
64Children in the vehicle
Safety
Page 166 of 398
Emergency braking
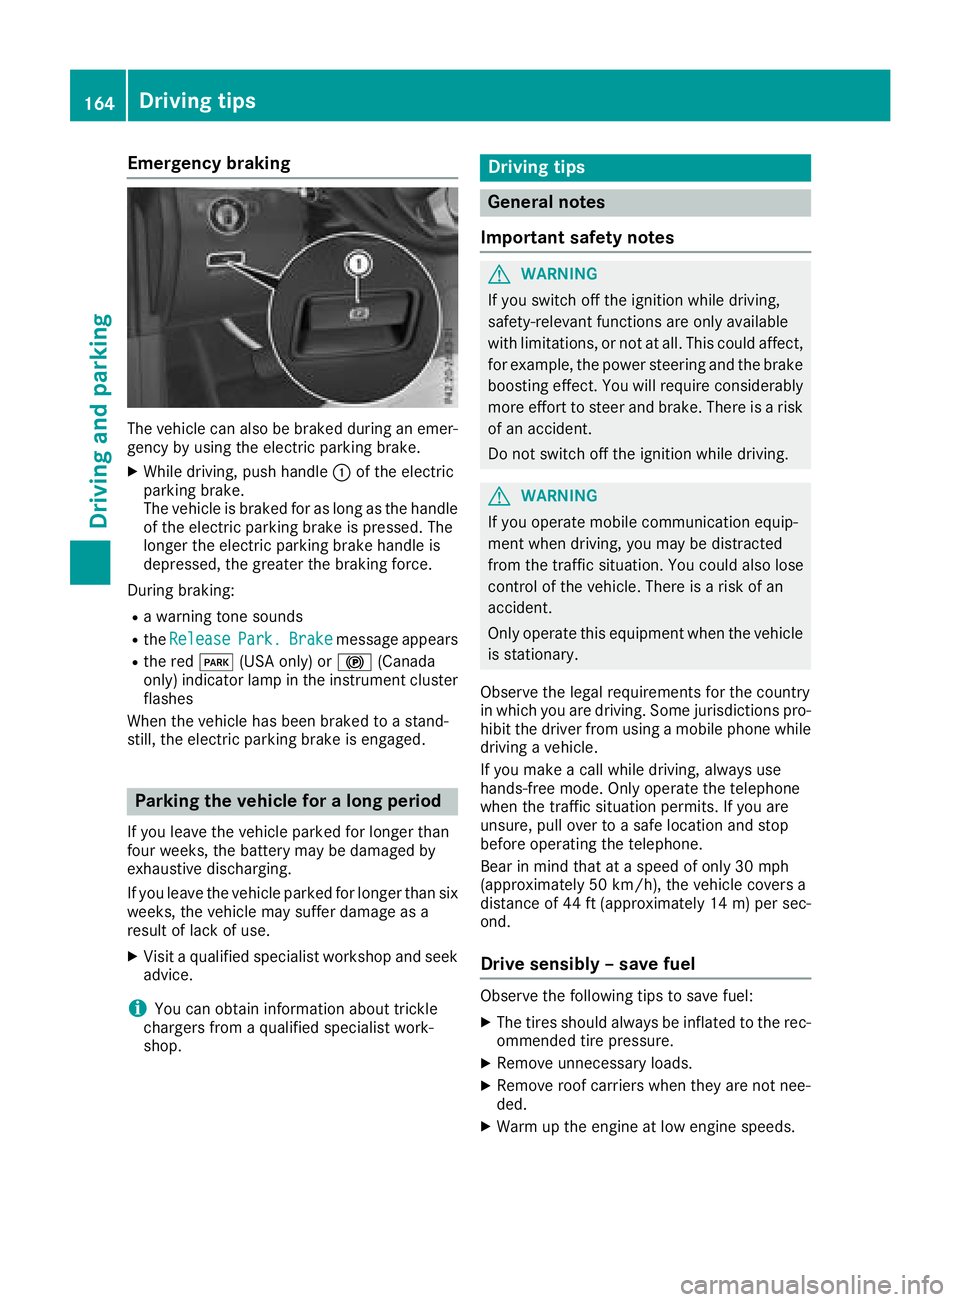
The vehicle can also be braked during an emer-gency by using the electric parking brake.
XWhile driving, push handle :of the electric
parking brake.
The vehicle is braked for as long as the handle
of the electric parking brake is pressed. The
longer the electric parking brake handle is
depressed, the greater the braking force.
During braking:
Ra warning tone sounds
Rthe ReleasePark.Brakemessage appears
Rthe red F(USA only) or !(Canada
only) indicator lamp in the instrument cluster flashes
When the vehicle has been braked to a stand-
still, the electric parking brake is engaged.
Parking the vehicle for a long period
If you leave the vehicle parked for longer than
four weeks, the battery may be damaged by
exhaustive discharging.
If you leave the vehicle parked for longer than six
weeks, the vehicle may suffer damage as a
result of lack of use.
XVisit a qualified specialist workshop and seek
advice.
iYou can obtain information about trickle
chargers from a qualified specialist work-
shop.
Driving tips
General notes
Important safety notes
GWARNING
If you switch off the ignition while driving,
safety-relevant functions are only available
with limitations, or not at all. This could affect, for example, the power steering and the brake
boosting effect. You will require considerably
more effort to steer and brake. There is a risk
of an accident.
Do not switch off the ignition while driving.
GWARNING
If you operate mobile communication equip-
ment when driving, you may be distracted
from the traffic situation. You could also lose
control of the vehicle. There is a risk of an
accident.
Only operate this equipment when the vehicle
is stationary.
Observe the legal requirements for the country
in which you are driving. Some jurisdictions pro-
hibit the driver from using a mobile phone while driving a vehicle.
If you make a call while driving, always use
hands-free mode. Only operate the telephone
when the traffic situation permits. If you are
unsure, pull over to a safe location and stop
before operating the telephone.
Bear in mind that at a speed of only 30 mph
(approximately 50 km/h), the vehicle covers a
distance of 44 ft (approximately 14 m)per sec-
ond.
Drive sensibly – save fuel
Observe the following tips to save fuel:
XThe tires should always be inflated to the rec-
ommended tire pressure.
XRemove unnecessary loads.
XRemove roof carriers when they are not nee-
ded.
XWarm up the engine at low engine speeds.
164Driving tips
Driving and parking
Page 171 of 398
Off-road fording
!Under no circumstances should you accel-
erate before entering the water. The bow
wave could cause water to enter and damage
the engine and other assemblies.
!Do not open any of the vehicle's doors while
fording. Otherwise, water could get into the
vehicle interior and damage the vehicle's
electronics and interior equipment.
REstablish how deep the water is and the char-
acteristics of the body of water before ford-
ing.
RSelect the highest possible vehicle level.
RShift to a lower gear using the left-hand steer-
ing wheel paddle shifter.
RAvoid high engine speeds.
REnter and exit the water at a flat place and at
a steady walking pace.
RDrive slowly and at an even speed through the
water.
REnsure that a bow wave does not form as you
drive.
RDo not stop and do not switch off the engine.
Water offers a high degree of resistance, and
the ground is slippery and in some cases
unstable. Therefore, it is difficult and danger-
ous to pull away in the water.
RClean any mud from the tire tread after ford-
ing.
RApply the brakes to dry them after fording.
Always observe the fording depth values
(
Ypage 393).
Winter driving
GWARNING
If you shift down on a slippery road surface in an attempt to increase the engine's braking
effect, the drive wheels could lose their grip.
There is an increased danger of skidding and
accidents.
Do not shift down for additional engine brak-
ing on a slippery road surface.
GDANGER
If the exhaust pipe is blocked or adequate
ventilation is not possible, poisonous gases
such as carbon monoxide (CO) may enter the vehicle. This is the case, e.g. if the vehicle
becomes trapped in snow. There is a risk of
fatal injury.
If you leave the engine or the auxiliary heating
running, make sure the exhaust pipe and area
around the vehicle are clear of snow. To
ensure an adequate supply of fresh air, open a
window on the side of the vehicle that is not
facing into the wind.
!When scraping ice off the rear window, take
care not to damage the rear-window seal or
trim.
Have your vehicle winter-proofed at a qualified
specialist workshop at the onset of winter.
Drive particularly carefully on slippery road sur-
faces. Avoid sudden acceleration, steering and
braking maneuvers. Do not use cruise control or
Distance Pilot DISTRONIC.
If the vehicle threatens to skid or cannot be
stopped when moving at low speed:
XShift the transmission to position i.
XTry to bring the vehicle under control using
corrective steering.
When driving in snow with or without snow
chains, select driving program Slippery
(
Ypage 147).
iVehicles with a diesel engine: do not
cover the radiator, e.g. with a protective
cover. The measuring function of the on-
board diagnosis system may otherwise pro-
vide inaccurate values. Some of these values
are required by law and must therefore always be accurate.
The outside temperature indicator is not
designed to serve as an ice-warning device and
is therefore unsuitable for that purpose.
Changes in the outside temperature are dis-
played after a short delay.
Indicated temperatures just above the freezing
point do not guarantee that the road surface is
free of ice. The road may still be icy, especially in
wooded areas or on bridges. You should pay
special attention to road conditions when tem-
peratures are around the freezing point.
For more information on driving with snow
chains, see (
Ypage 356).
Driving tips169
Driving and parking
Z
Page 220 of 398
WhenAdaptiveis selected, no warning vibra-
tion occurs if:
Ryou switch on the turn signals. In this event,
the warnings are suppressed for a certain
period of time
Ra driving safety system intervenes, e.g.
ABS, BAS or ESP®
Ryou accelerate hard, e.g. kickdown
Ryou brake hard
Ryou steer actively, e.g. swerve to avoid an
obstacle or change lanes quickly
Ryou cut the corner on a sharp bend
Towing a trailer
When you attach a trailer, make sure you have
correctly established the electrical connection.
This can be accomplished by checking the trailer
lighting. Lane-correcting brake application does
not take place when towing a trailer. Active Lane
Keeping Assist is not activated and the lines in
the assistance graphic are gray.
Off-road driving systems
4MATIC (permanent four-wheel drive)
4MATIC ensures that all four wheels are perma-
nently driven. Together with ESP®and 4ETS, it
improves the traction of your vehicle whenever
a drive wheel spins due to insufficient grip.
If you fail to adapt your driving style, 4MATIC can
neither reduce the risk of accident nor override the laws of physics. 4MATIC cannot take
account of road, weather and traffic conditions.
4MATIC is only an aid. You are responsible for
the distance to the vehicle in front, for vehicle
speed, for braking in good time and for staying in
your lane.
!Never tow the vehicle with one axle raised.
This may damage the transfer case. Damage
of this sort is not covered by the Mercedes-
Benz Limited Warranty. All wheels must
remain either on the ground or be fully raised.
Observe the instructions for towing the vehi-
cle with all wheels in full contact with the
ground.
!A function or performance test should only
be carried out on a two-axle dynamometer.
Before you operate the vehicle on such a
dynamometer, please consult a qualified workshop. You could otherwise damage the
drive train or the brake system.
iIn wintry driving conditions, the maximum
effect of 4MATIC can only be achieved if you
use winter tires (M+S tires), with snow chains
if necessary.
Further information about "Driving off-road"
(
Ypage 170).
DSR (Downhill Speed Regulation)
General notes
DSR is an aid to assist you when driving down-
hill. It keeps the speed of travel at the speed
selected on the on-board computer. The steeper
the downhill gradient, the greater the DSR brak-
ing effect on the vehicle. When driving on flat
stretches of road or on an uphill gradient, the
DSR braking effect is minimal or nonexistent.
DSR controls the vehicle’s speed when it is acti- vated and the transmission is in position D,Ror
N . You can drive at a higher or a lower speed
than that set on the on-board computer at any
time by accelerating or braking.
Important safety notes
GWARNING
If the speed driven and the set speed deviate and you activate DSR on a slippery road sur-
face, the wheels may lose traction. There is an
increased danger of skidding and accidents.
Before switching DSR on, please take into
consideration the road surface and the differ- ence between driving speed and the set
speed.
If you fail to adapt your driving style, DSR can
neither reduce the risk of accident nor override the laws of physics. DSR cannot take account of
road, weather and traffic conditions. DSR is only
an aid. You are responsible for the distance to
the vehicle in front, for vehicle speed, for brak-
ing in good time and for staying in your lane.
You are always responsible for keeping control
of the vehicle and for assessing whether the
downhill gradient can be managed. DSR may not always be able to keep to the set speed, depend-
ing on road surface and tire conditions. Select a
set speed suitable for the prevailing conditions
and when necessary, apply the brakes manually.
218Driving systems
Driving and parking