torque MERCEDES-BENZ GLS SUV 2018 Owner's Manual
[x] Cancel search | Manufacturer: MERCEDES-BENZ, Model Year: 2018, Model line: GLS SUV, Model: MERCEDES-BENZ GLS SUV 2018Pages: 398, PDF Size: 6.75 MB
Page 26 of 398
Parking .......................................... 161
Parking for a long period ................164
Pulling away ................................... 143
Raising ...........................................3 76
Reporting problems ......................... 31
Securing from rolling away ............ 375
Towing away .................................. 349
Transporting .................................. 351
Unlocking (in an emergency) ........... 84
Unlocking (SmartKey) ......................7 7
Vehicle data ................................... 392
Vehicle battery
see Battery (vehicle)
Vehicle data ....................................... 392
Vehicle data (off-road driving)
Approach/departure angle ............ 394
Fording depth ................................ 393
Maximum gradient climbing abil-
ity .................................................. 394
Vehicle dimensions ........................... 392
Vehicle emergency locking ................ 84
Vehicle identification number
see VIN
Vehicle identification plate .............. 385
Vehicle level
AIRMATIC ...................................... 190
Vehicle level (display message) ....... 265
Vehicle tool kit .................................. 339
Video
Operating the DVD .........................2 39
see also Digital Operator's Man-
ual ..................................................2 92
VIN ...................................................... 385
Seat ............................................... 386
Type plate ...................................... 385
W
Warning and indicator lamps ABS ................................................ 282
Brakes ...........................................2 81
Coolant .......................................... 288
Distance Pilot DISTRONIC ............. 290
Distance warning ........................... 290
Engine diagnostics ......................... 288
ESP
®.............................................. 284
ESP®OFF ....................................... 285
Fuel tank ........................................ 288 Overview .......................................... 37
Parking brake ................................ 287
PASSENGER AIR BAG ...................... 45
Reserve fuel ................................... 288
Restraint system ............................ 287
Seat belt ........................................ 280
Tire pressure monitor .................... 291
Warranty .............................................. 28
Washer fluid
Display message ............................ 278
Weather display (COMAND)
see also Digital Operator's Man-
ual .................................................. 292
Wheel and tire combinations
Tires ............................................... 379
Wheel bolt tightening torque ........... 378
Wheel chock ...................................... 375
Wheels
Changing a wheel .......................... 374
Checking ........................................ 354
Cleaning ......................................... 333
Emergency spare wheel ................. 380
Important safety notes .................. 354
Information on driving .................... 354
Interchanging/changing ................ 374
Mounting a new wheel ................... 377
Mounting a wheel .......................... 375
Overview ........................................ 354
Removing a wheel .......................... 377
Snow chains .................................. 356
Storing ........................................... 375
Tightening torque ........................... 378
Wheel size/tire size ....................... 379
Window curtain air bag
Display message ............................ 257
Operation ......................................... 51
Windows
see Side windows
Windshield
Defrosting ...................................... 133
Infrared reflective .......................... 324
Windshield washer fluid
see Windshield washer system
Windshield washer system
Adding washer fluid ....................... 329
Important safety notes .................. 391
Windshield wipers
Problem (malfunction) ................... 124
24Index
Page 72 of 398
If ESP®detects that the vehicle is deviating from
the direction desired by the driver, one or more
wheels are braked to stabilize the vehicle. The
engine output is also modified to keep the vehi-
cle on the desired course within physical limits.
ESP
®assists the driver when pulling away on
wet or slippery roads. ESP®can also stabilize
the vehicle during braking.
ETS/4ETS (Electronic Traction System)
4ETS traction control is part of ESP®.
Traction control brakes the drive wheels indi-
vidually if they spin. This enables you to pull
away and accelerate on slippery surfaces, for
example if the road surface is slippery on one
side. In addition, more drive torque is transfer-
red to the wheel or wheels with traction.
Traction control remains active, even if you
deactivate ESP
®.
In appropriate driving situations, activate the
offroad program:
XVehicles without the Offroad Engineering
package (Ypage 219)
XVehicles with the Off-Road Engineering pack-
age (Ypage 220)
Off-road 4ETS (Electronic Traction Sys-
tem)
An ETS system specifically suited to off-road
terrain is activated automatically once an off-
road program is activated:
RVehicles without the Offroad Engineering
package (Ypage 219)
RVehicles with the Off-Road Engineering pack-
age (Ypage 220)
Important safety notes
GWARNING
If ESP
®is malfunctioning, ESP®is unable to
stabilize the vehicle. Additionally, further driv-
ing safety systems are deactivated. This
increases the risk of skidding and an accident.
Drive on carefully. Have ESP
®checked at a
qualified specialist workshop.
!Only operate the vehicle for a maximum of
ten seconds on a brake test dynamometer.
Switch off the ignition.
Application of the brakes by ESP
®may oth-
erwise destroy the brake system.
!A function or performance test should only
be carried out on a two-axle dynamometer.
Before you operate the vehicle on such a
dynamometer, please consult a qualified
workshop. You could otherwise damage the
drive train or the brake system.
ESP
®is only deactivated if the åwarning
lamp is lit continuously.
If the ÷ warning lamp and the åwarning
lamp are lit continuously, ESP
®is not available
due to a malfunction.
Observe the information on warning lamps
(
Ypage 284) and display messages which may
be shown in the instrument cluster
(
Ypage 249).
iOnly use wheels with the recommended tire
sizes. Only then will ESP®function properly.
Characteristics of ESP®
General information
If the ÷ ESP warning lamp goes out before
beginning the journey, ESP®is automatically
active.
If ESP
®intervenes, the ÷ESP®warning lamp
flashes in the instrument cluster.
If ESP
®intervenes:
XDo not deactivate ESP®under any circum-
stances.
XOnly depress the accelerator pedal as far as
necessary when pulling away.
XAdapt your driving style to suit the prevailing
road and weather conditions.
ECO start/stop function
The ECO start/stop function switches the
engine off automatically when the vehicle stops
moving. The engine starts automatically when
the driver wants to pull away again. ESP
®
remains in its previously selected status, e.g. if
ESP®was deactivated before the engine was
automatically switched off.
70Driving safety systems
Safety
Page 221 of 398
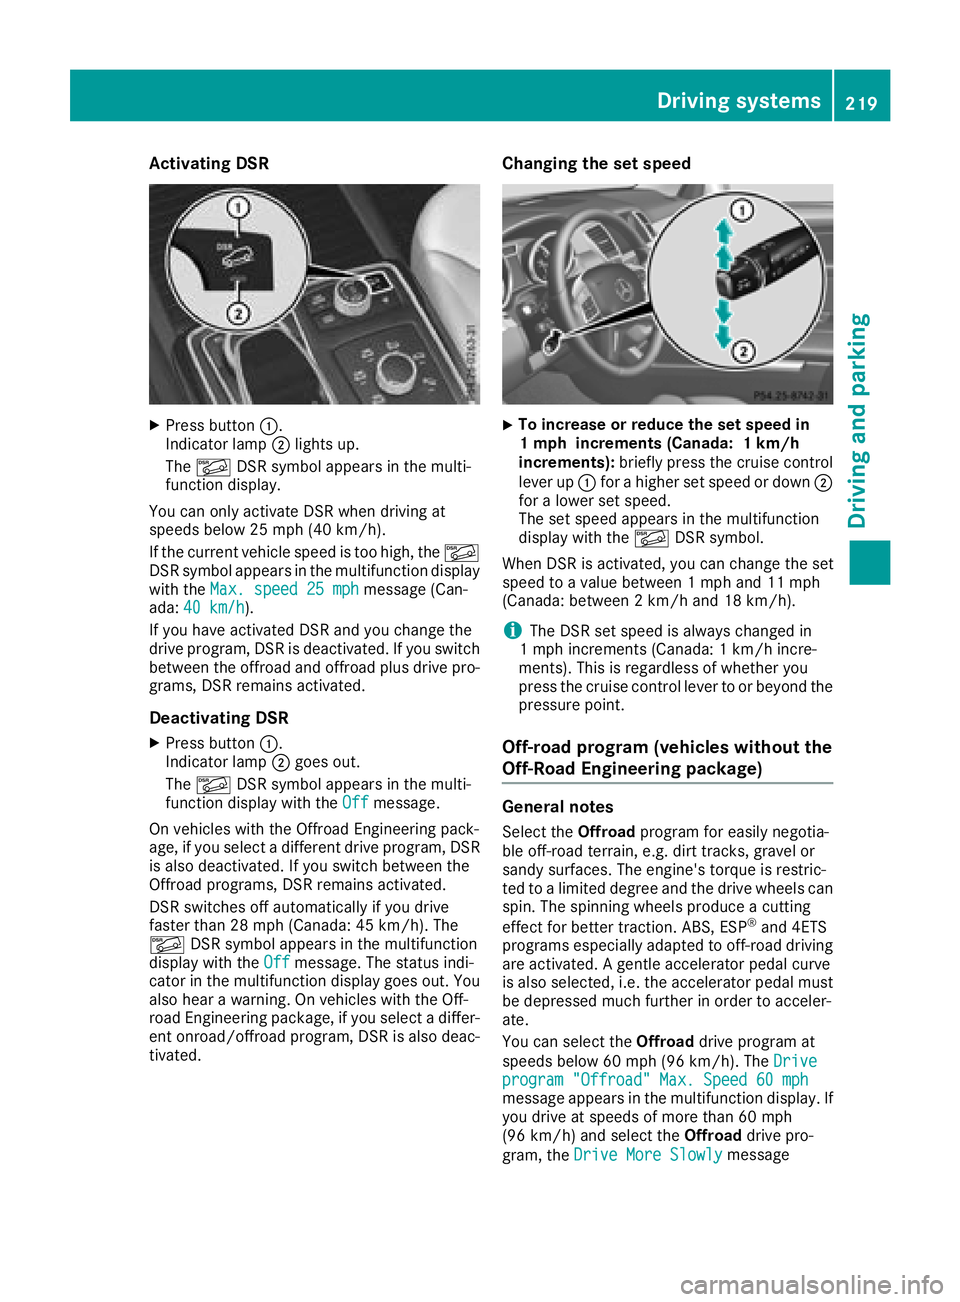
Activating DSR
XPress button:.
Indicato rlamp ;lights up.
The à DSRsymbol appear sin th emulti-
function display.
You can only activat eDS Rwhen driving at
speeds below 25 mph (40 km/h).
If th ecurren tvehicl espee dis to ohigh ,th eÃ
DS Rsymbol appear sin th emultifunction display
wit hth eMax .speed 25 mph
message (Can -
ada: 40 km/ h).
If you have activated DS Rand you chang eth e
driv eprogram ,DS Ris deactivated. If you switch
between th eoffroad and offroad plus driv epro -
grams, DS Rremains activated.
Deactivating DSR
XPress butto n:.
Indicato rlamp ;goes out .
The à DSRsymbol appear sin th emulti-
function display wit hth eOff
message .
On vehicles wit hth e Off road Engineering pack-
age, if you select adifferent driv eprogram ,DS R
is also deactivated. If you switch between th e
Off road programs, DS Rremains activated.
DS Rswitches off automatically if you driv e
faste rthan 28 mph (Canada: 45 km/h). The
à DSRsymbol appear sin th emultifunction
display wit hth eOff
message .The status indi-
cator in th emultifunction display goes out .You
also hear awarning . Onvehicles wit hth e Off-
road Engineering package, if you select adiffer-
en tonroad/offroad program ,DS Ris also deac -
tivated.
Changing the set speed
XTo increase or reduce th eset speed in
1 mp hincrement s(Canada: 1km/h
increments): briefly press th ecruise control
leve rup : for ahigher set spee dor down ;
for alower set speed.
The set spee dappear sin th emultifunction
display wit hth eà DSRsymbol.
When DS Ris activated, you can chang eth eset
spee dto avalue between 1mph and 11 mph
(Canada: between 2km/h and 18 km/h).
iThe DS Rset spee dis always changed in
1 mph increments (Canada: 1km/h incre-
ments). This is regardless of whether you
press th ecruise control leve rto or beyon dth e
pressur epoint.
Off-road program (vehicles without the
Off-Road Engineering package)
General notes
Selec tth eOff roa dprogram for easil ynegotia-
ble off-road terrain, e.g. dirt tracks, gravel or
sandy surfaces. The engine's torque is restric-
te dto alimited degree and th edriv ewheels can
spin .The spinnin gwheels produce acuttin g
effect for bette rtraction .ABS, ES P
®and 4ETS
program sespecially adapted to off-road driving
are activated. Agentle accelerato rpedal curve
is also selected, i.e .th eaccelerato rpedal must
be depressed muc hfurther in order to acceler -
ate .
You can select th eOff roa ddriv eprogram at
speeds below 60 mph (96 km/h). The Drive
program"Offroad" Max .Speed 60 mphmessage appear sin th emultifunction display. If
you driv eat speeds of mor ethan 60 mph
(96 km/ h)and select the Offroaddrive pro-
gram, the Drive More Slowly
message
Driving systems219
Driving and parking
Z
Page 222 of 398
appears in the multifunction display. The last
active drive program is selected again.
Do not use theOffroadprogram on roads that
are snow-covered or icy or if you have installed
your vehicle with snow chains.
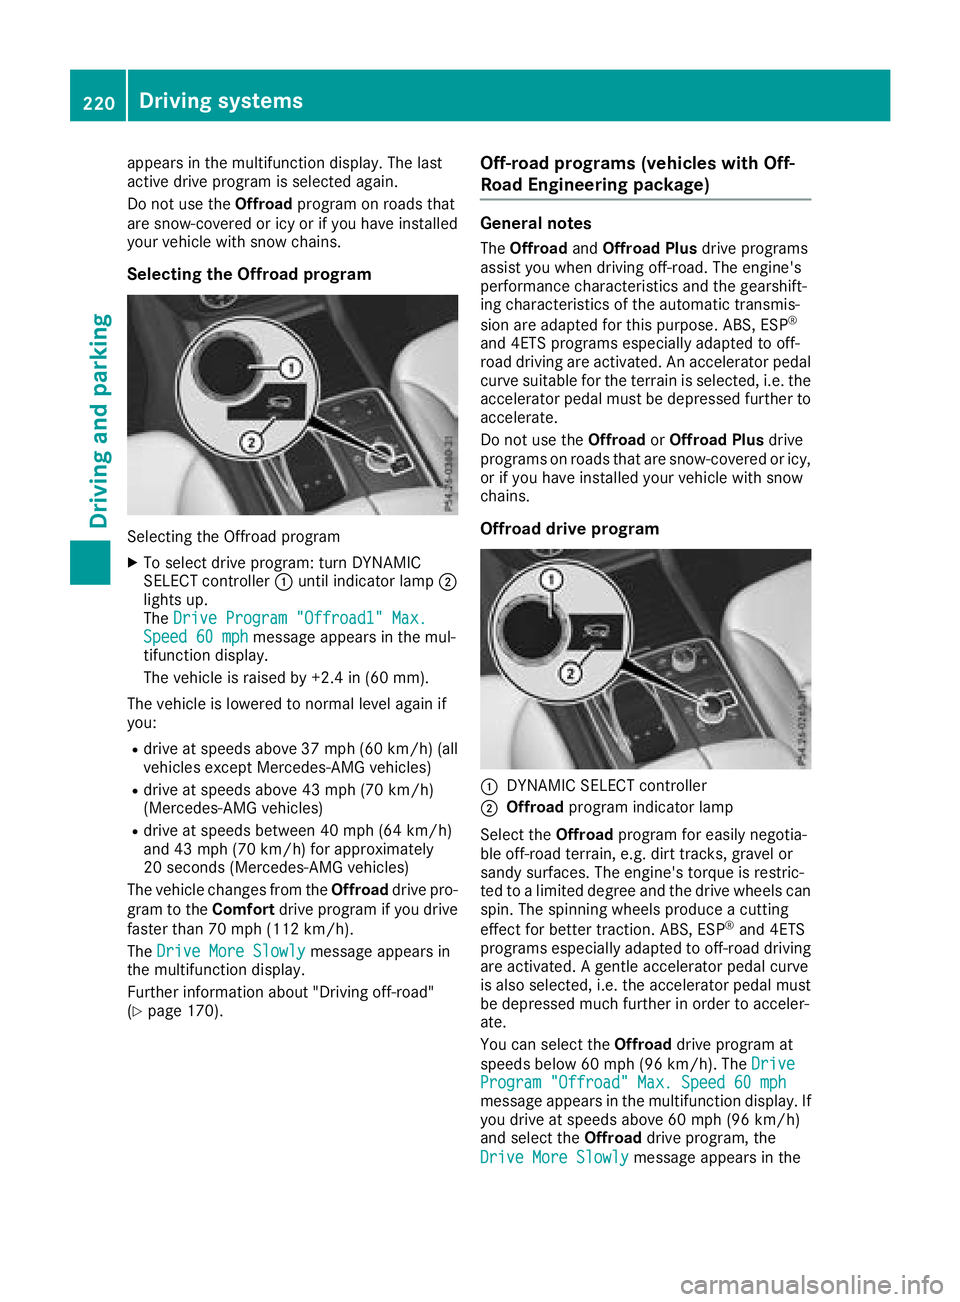
Selecting the Offroad program
Selecting the Offroad program
XTo select drive program: turn DYNAMIC
SELECT controller :until indicator lamp ;
lights up.
The Drive Program "Offroad1" Max.
Speed 60 mphmessage appears in the mul-
tifunction display.
The vehicle is raised by +2.4 in (60 mm).
The vehicle is lowered to normal level again if
you:
Rdrive at speeds above 37 mph (60 km/h) (all
vehicles except Mercedes-AMG vehicles)
Rdrive at speeds above 43 mph (70 km/h)
(Mercedes-AMG vehicles)
Rdrive at speeds between 40 mph (64 km/h)
and 43 mph (70 km/h) for approximately
20 seconds (Mercedes-AMG vehicles)
The vehicle changes from the Offroaddrive pro-
gram to the Comfortdrive program if you drive
faster than 70 mph (112 km/h).
The Drive More Slowly
message appears in
the multifunction display.
Further information about "Driving off-road"
(
Ypage 170).
Off-road programs (vehicles with Off-
Road Engineering package)
General notes
The Offroad andOffroad Plus drive programs
assist you when driving off-road. The engine's
performance characteristics and the gearshift-
ing characteristics of the automatic transmis-
sion are adapted for this purpose. ABS, ESP
®
and 4ETS programs especially adapted to off-
road driving are activated. An accelerator pedal
curve suitable for the terrain is selected, i.e. the
accelerator pedal must be depressed further to
accelerate.
Do not use the OffroadorOffroad Plus drive
programs on roads that are snow-covered or icy,
or if you have installed your vehicle with snow
chains.
Offroad drive program
:DYNAMIC SELECT controller
;Offroad program indicator lamp
Select the Offroadprogram for easily negotia-
ble off-road terrain, e.g. dirt tracks, gravel or
sandy surfaces. The engine's torque is restric-
ted to a limited degree and the drive wheels can
spin. The spinning wheels produce a cutting
effect for better traction. ABS, ESP
®and 4ETS
programs especially adapted to off-road driving are activated. A gentle accelerator pedal curve
is also selected, i.e. the accelerator pedal must
be depressed much further in order to acceler-
ate.
You can select the Offroaddrive program at
speeds below 60 mph (96 km/h). The Drive
Program "Offroad" Max. Speed 60 mphmessage appears in the multifunction display. If
you drive at speeds above 60 mph(96 km/h)
and select the Offroaddrive program, the
Drive More Slowly
message appears in the
220Driving systems
Driving and parking
Page 224 of 398
General notes
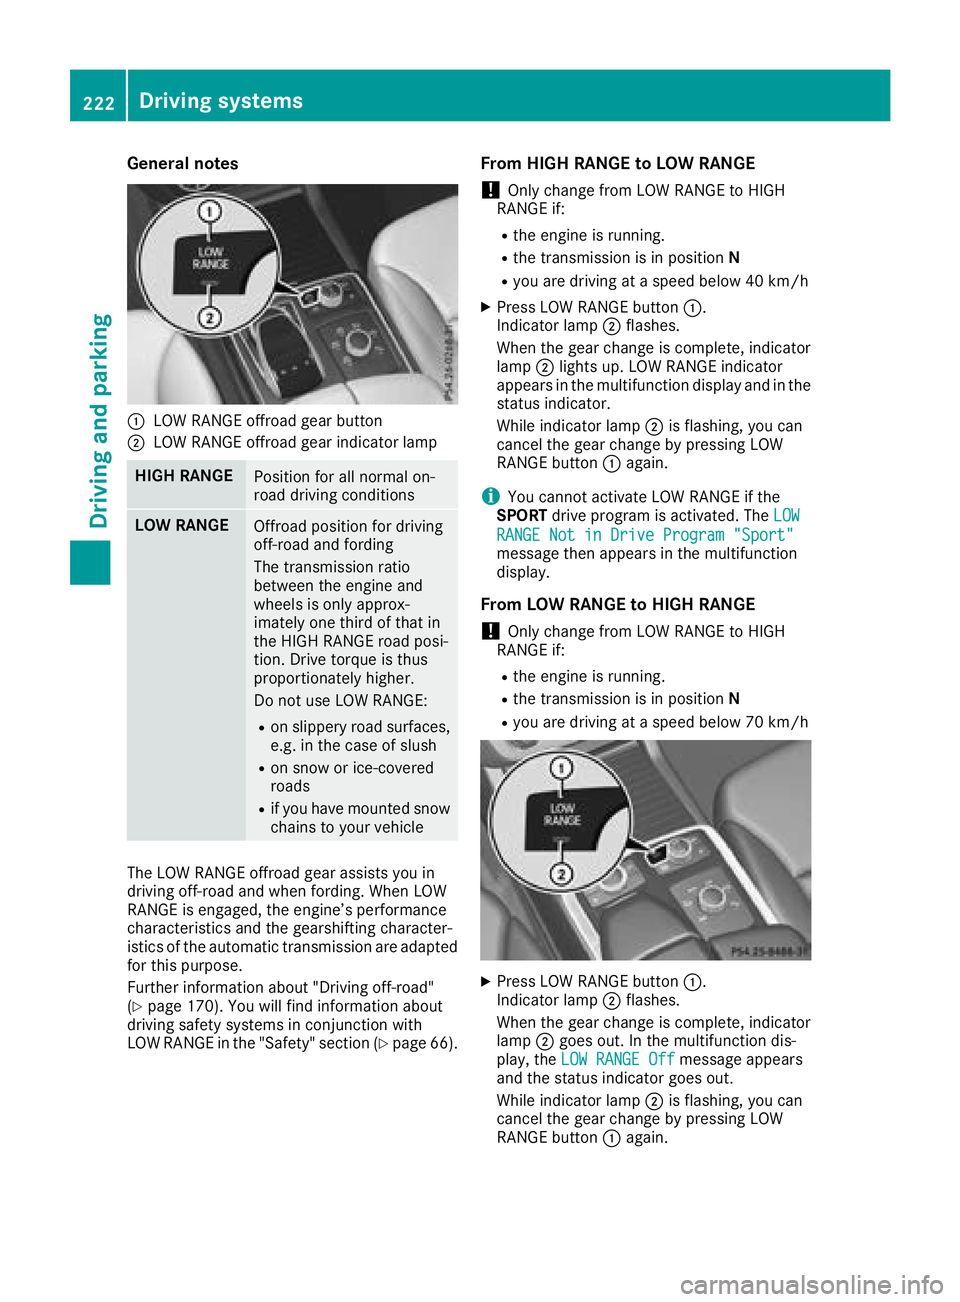
:LOW RANGE offroad gear button
;LOW RANGE offroad gear indicator lamp
HIGH RANGEPosition for all normal on-
road driving conditions
LOW RANGEOffroad position for driving
off-road and fording
The transmission ratio
between the engine and
wheels is only approx-
imately one third of that in
the HIGH RANGE road posi-
tion. Drive torque is thus
proportionately higher.
Do not use LOW RANGE:
Ron slippery road surfaces,
e.g. in the case of slush
Ron snow or ice-covered
roads
Rif you have mounted snow
chains to your vehicle
The LOW RANGE offroad gear assists you in
driving off-road and when fording. When LOW
RANGE is engaged, the engine’s performance
characteristics and the gearshifting character-
istics of the automatic transmission are adapted
for this purpose.
Further information about "Driving off-road"
(
Ypage 170). You will find information about
driving safety systems in conjunction with
LOW RANGE in the "Safety" section (
Ypage 66).
From HIGH RANGE to LOW RANGE
!Only change from LOW RANGE to HIGH
RANGE if:
Rthe engine is running.
Rthe transmission is in position N
Ryou are driving at a speed below 40 km/h
XPress LOW RANGE button:.
Indicator lamp ;flashes.
When the gear change is complete, indicator
lamp ;lights up. LOW RANGE indicator
appears in the multifunction display and in the
status indicator.
While indicator lamp ;is flashing, you can
cancel the gear change by pressing LOW
RANGE button :again.
iYou cannot activate LOW RANGE if the
SPORT drive program is activated. The LOW
RANGE Not in Drive Program "Sport"message then appears in the multifunction
display.
From LOW RANGE to HIGH RANGE
!Only change from LOW RANGE to HIGH
RANGE if:
Rthe engine is running.
Rthe transmission is in position N
Ryou are driving at a speed below 70 km/h
XPress LOW RANGE button:.
Indicator lamp ;flashes.
When the gear change is complete, indicator
lamp ;goes out. In the multifunction dis-
play, the LOW RANGE Off
message appears
and the status indicator goes out.
While indicator lamp ;is flashing, you can
cancel the gear change by pressing LOW
RANGE button :again.
222Driving systems
Driving and parking
Page 380 of 398
GWARNING
If you tighten the wheel bolts or wheel nuts
when the vehicle is raised, the jack could tip
over. There is a risk of injury.
Only tighten the wheel bolts or wheel nuts
when the vehicle is on the ground.
!To prevent damage to the paintwork, hold
the wheel securely against the wheel hub
while screwing in the first wheel bolt.
Always pay attention to the instructions and
safety notes in the "Changing a wheel" section
(
Ypage 374).
Only use wheel bolts that have been designed
for the wheel and the vehicle. For safety rea-
sons, Mercedes-Benz recommends that you
only use wheel bolts which have been approved
for Mercedes-Benz vehicles and the respective
wheel.
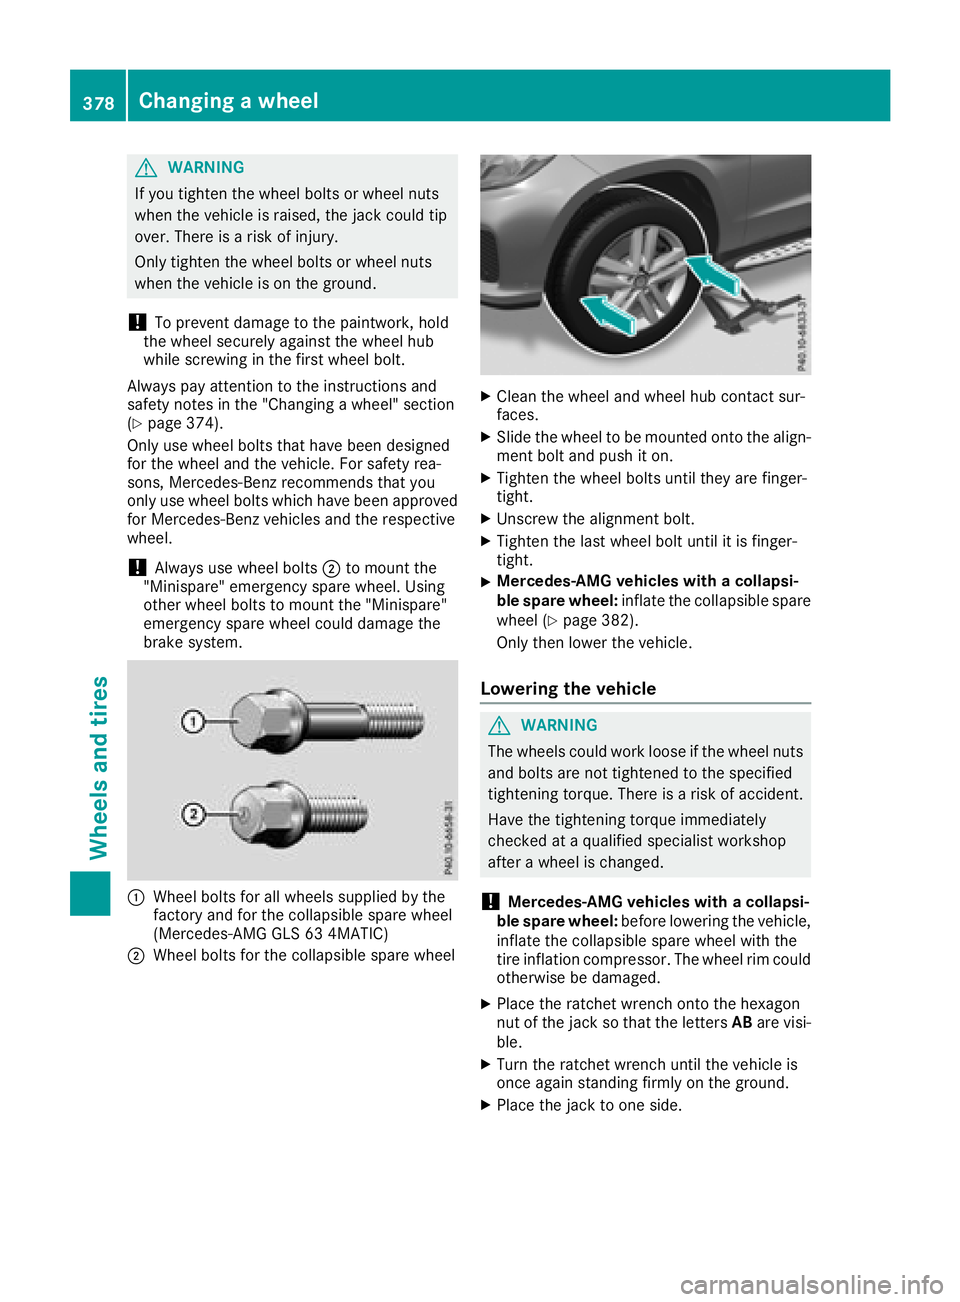
!Always use wheel bolts ;to mount the
"Minispare" emergency spare wheel. Using
other wheel bolts to mount the "Minispare"
emergency spare wheel could damage the
brake system.
:Wheel bolts for all wheels supplied by the
factory and for the collapsible spare wheel
(Mercedes-AMG GLS 63 4MATIC)
;Wheel bolts for the collapsible spare wheel
XClean the wheel and wheel hub contact sur-
faces.
XSlide the wheel to be mounted onto the align-
ment bolt and push it on.
XTighten the wheel bolts until they are finger-
tight.
XUnscrew the alignment bolt.
XTighten the last wheel bolt until it is finger-
tight.
XMercedes-AMG vehicles with a collapsi-
ble spare wheel: inflate the collapsible spare
wheel (
Ypage 382).
Only then lower the vehicle.
Lowering the vehicle
GWARNING
The wheels could work loose if the wheel nuts and bolts are not tightened to the specified
tightening torque. There is a risk of accident.
Have the tightening torque immediately
checked at a qualified specialist workshop
after a wheel is changed.
!Mercedes-AMG vehicles with a collapsi-
ble spare wheel: before lowering the vehicle,
inflate the collapsible spare wheel with the
tire inflation compressor. The wheel rim could
otherwise be damaged.
XPlace the ratchet wrench onto the hexagon
nut of the jack so that the letters ABare visi-
ble.
XTurn the ratchet wrench until the vehicle is
once again standing firmly on the ground.
XPlace the jack to one side.
378Changing a wheel
Wheels and tires
Page 381 of 398
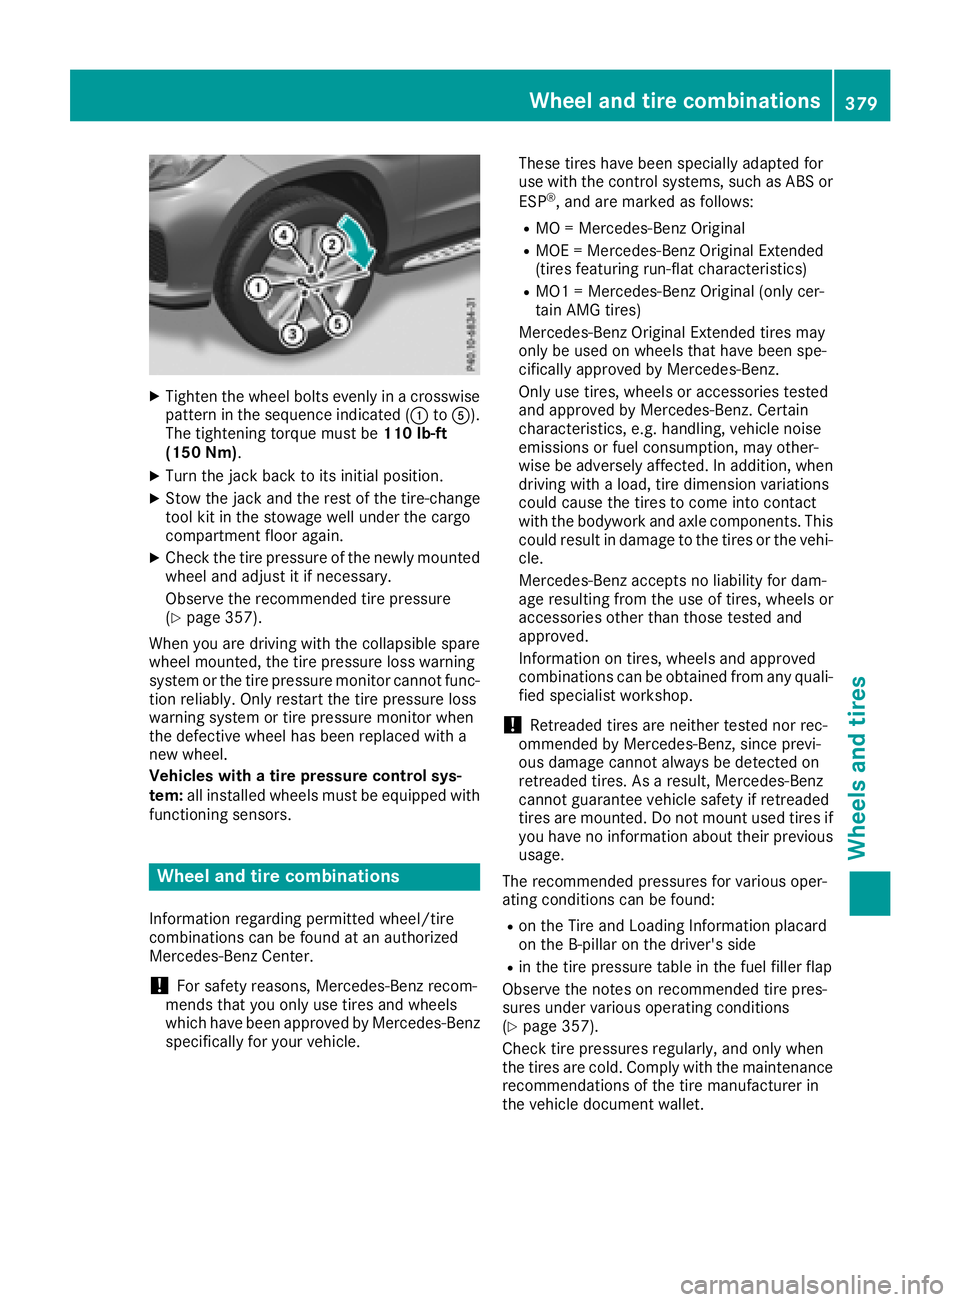
XTighten the wheel bolts evenly in a crosswisepattern in the sequence indicated (: toA).
The tightening torque must be 110 lb-ft
(150 Nm).
XTurn the jack back to its initial position.
XStow the jack and the rest of the tire-change
tool kit in the stowage well under the cargo
compartment floor again.
XCheck the tire pressure of the newly mounted
wheel and adjust it if necessary.
Observe the recommended tire pressure
(
Ypage 357).
When you are driving with the collapsible spare
wheel mounted, the tire pressure loss warning
system or the tire pressure monitor cannot func-
tion reliably. Only restart the tire pressure loss
warning system or tire pressure monitor when
the defective wheel has been replaced with a
new wheel.
Vehicles with a tire pressure control sys-
tem: all installed wheels must be equipped with
functioning sensors.
Wheel and tire combinations
Information regarding permitted wheel/tire
combinations can be found at an authorized
Mercedes-Benz Center.
!For safety reasons, Mercedes-Benz recom-
mends that you only use tires and wheels
which have been approved by Mercedes-Benz
specifically for your vehicle. These tires have been specially adapted for
use with the control systems, such as ABS or
ESP
®, and are marked as follows:
RMO = Mercedes-Benz Original
RMOE = Mercedes-Benz Original Extended
(tires featuring run-flat characteristics)
RMO1 = Mercedes-Benz Original (only cer-
tain AMG tires)
Mercedes-Benz Original Extended tires may
only be used on wheels that have been spe-
cifically approved by Mercedes-Benz.
Only use tires, wheels or accessories tested
and approved by Mercedes-Benz. Certain
characteristics, e.g. handling, vehicle noise
emissions or fuel consumption, may other-
wise be adversely affected. In addition, when
driving with a load, tire dimension variations
could cause the tires to come into contact
with the bodywork and axle components. This
could result in damage to the tires or the vehi- cle.
Mercedes-Benz accepts no liability for dam-
age resulting from the use of tires, wheels or
accessories other than those tested and
approved.
Information on tires, wheels and approved
combinations can be obtained from any quali-
fied specialist workshop.
!Retreaded tires are neither tested nor rec-
ommended by Mercedes-Benz, since previ-
ous damage cannot always be detected on
retreaded tires. As a result, Mercedes-Benz
cannot guarantee vehicle safety if retreaded
tires are mounted. Do not mount used tires if
you have no information about their previous
usage.
The recommended pressures for various oper-
ating conditions can be found:
Ron the Tire and Loading Information placard
on the B-pillar on the driver's side
Rin the tire pressure table in the fuel filler flap
Observe the notes on recommended tire pres-
sures under various operating conditions
(
Ypage 357).
Check tire pressures regularly, and only when
the tires are cold. Comply with the maintenance
recommendations of the tire manufacturer in
the vehicle document wallet.
Wheel and tire combinations379
Wheels and tires
Z
Page 397 of 398
Accelerate carefully and make sure that the
wheels do not spin when driving on steep ter-
rain.
iIf the load on the front axle is reduced when
pulling away on a steep uphill slope, the front
wheels have a tendency to spin. 4ETS recog-
nizes this and brakes the wheels accordingly.
The rear wheel torque is increased, making it
easier to drive off.
For further information about the maximum gra-
dient climbing ability, see (
Ypage 173).
Trailer tow hitch
Mounting dimensions
!
If you have a trailer tow hitch retrofitted,
changes to the cooling system and drive train
may be necessary, depending on the vehicle
type.
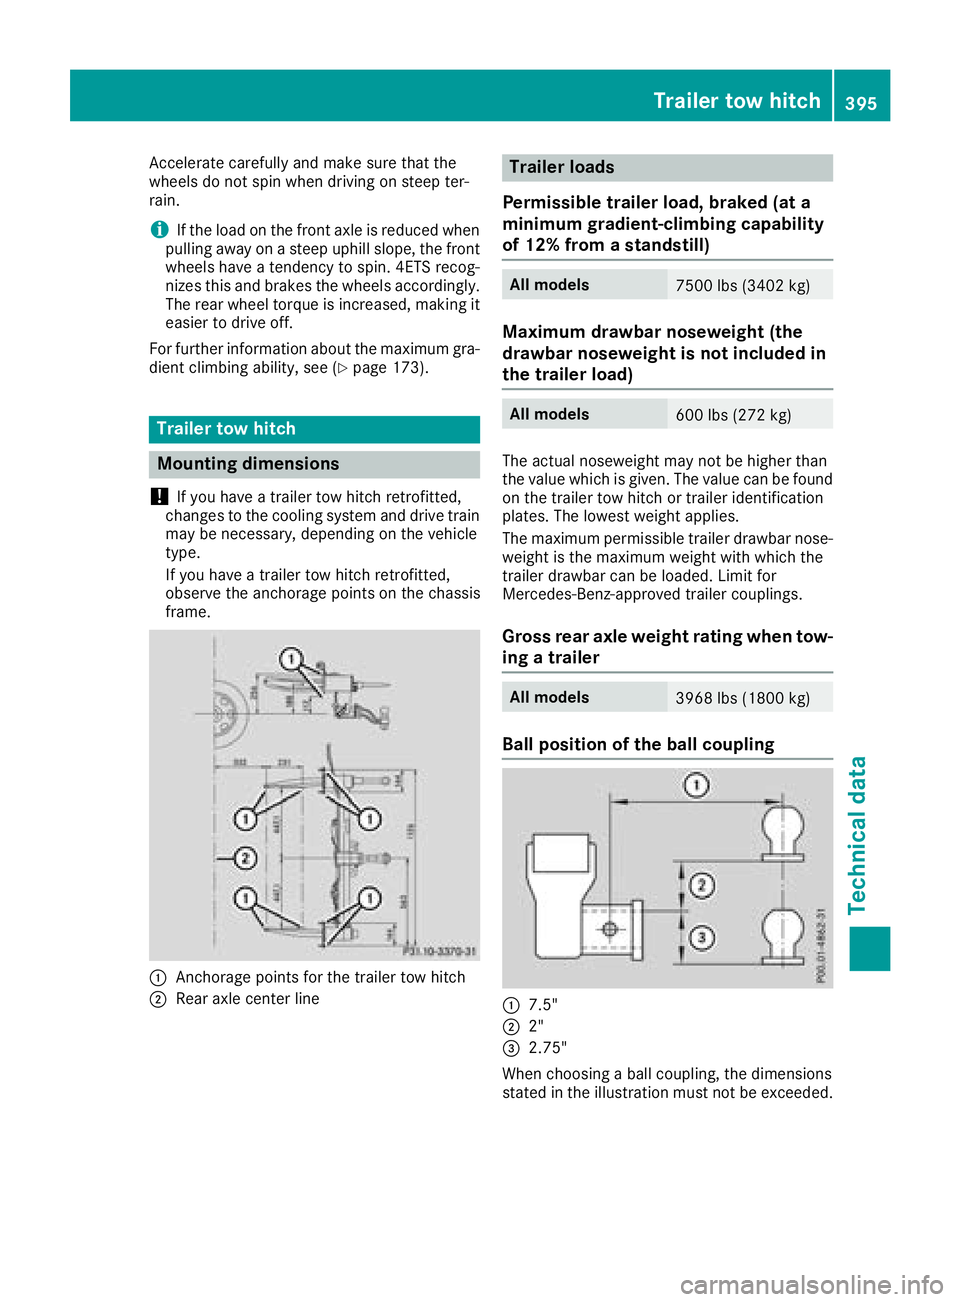
If you have a trailer tow hitch retrofitted,
observe the anchorage points on the chassis
frame.
:Anchorage points for the trailer tow hitch
;Rear axle center line
Trailer loads
Permissible trailer load, braked (at a
minimum gradient-climbing capability
of 12% from a standstill)
All models7500 lbs (3402 kg)
Maximum drawbar noseweight (the
drawbar noseweight is not included in
the trailer load)
All models600 lbs (272 kg)
The actual noseweight may not be higher than
the value which is given. The value can be found
on the trailer tow hitch or trailer identification
plates. The lowest weight applies.
The maximum permissible trailer drawbar nose-
weight is the maximum weight with which the
trailer drawbar can be loaded. Limit for
Mercedes-Benz-approved trailer couplings.
Gross rear axle weight rating when tow-
ing a trailer
All models3968 lbs (1800 kg)
Ball position of the ball coupling
:7.5"
;2"
=2.75"
When choosing a ball coupling, the dimensions
stated in the illustration must not be exceeded.
Trailer tow hitch395
Technical data
Z