wiper blades MERCEDES-BENZ GLS SUV 2018 Owner's Manual
[x] Cancel search | Manufacturer: MERCEDES-BENZ, Model Year: 2018, Model line: GLS SUV, Model: MERCEDES-BENZ GLS SUV 2018Pages: 398, PDF Size: 6.75 MB
Page 9 of 398
Power washer ................................ 331
Rear view camera .......................... 334
Roof lining ...................................... 337
Seat belt ........................................336
Seat cover ..................................... 336
Sensors ......................................... 334
Side running board ........................ 334
Steering wheel ............................... 336
Trim pieces ....................................3 36
Washing by hand ........................... 331
Wheels ...........................................3 33
Windows ........................................ 333
Wiper blades .................................. 333
Wooden trim .................................. 336
Cargo compartment cover
Notes/how to use ......................... 306
Cargo compartment enlargement
Important safety notes .................. 303
Cargo compartment floor
Important safety notes .................. 307
Opening/closing ............................ 307
Stowage well (under) ..................... 307
Cargo tie down rings ......................... 305
CD
see also Digital Operator's Man-
ual ..................................................2 92
CD player (on-board computer) ........239
Center console
Lower section .................................. 40
Upper section .................................. 39
Central locking
Automatic locking (on-board com-
puter) ............................................. 244
Locking/unlocking (SmartKey) ........7 7
Child
Restraint system .............................. 61
Child seat
Forward-facing restraint system ...... 64
LATCH-type (ISOFIX) child seat
anchors ............................................ 62
On the front-passenger seat ............ 64
Rearward-facing res train
t system .... 64
Top Tether ...................................... .63
Child-proof locks
Important safety notes .................... 64
Rear doors ...................................... .65
Children
Special seat belt retractor .............. .60 Children in the vehicle
Important safety notes .................... 59
Cigarette lighter ................................ 312
Cleaning
Mirror turn signal .......................... .334
Trailer tow hitch .............................3 35
Climate control
3-zone automatic climate control
with additional rear-compartment
climate control ............................... 129
Automatic climate control (3-
zone) .............................................. 127
Controlling automatically ...............1 32
Cooling with air dehumidification .. 131
Defrosting the windows ................. 134
Defrosting the windshield .............. 133
Dual-zone automatic climate con-
trol ................................................. 125
General notes ................................ 125
Indicator lamp ................................ 132
Ionization ....................................... 135
Maximum cooling .......................... 134
Notes on using the automatic cli-
mate control .................................. 131
Overview of systems ......................1 25
Problem with the rear window
defroster ........................................ 135
Problems with cooling with air
dehumidification ............................ 132
Rear control panel ......................... 127
Rear control panel (3-zone auto-
matic climate control with addi-
tional rear-compa
rtment climate
control) .......................................... 129
Refrigerant ..................................... 391
Refrigerant filling capacity ............. 392
Setting the air distribution ............. 133
Setting the air vents ......................1 36
Setting the airflow ......................... 133
Setting the climate mode (AIR
FLOW) ............................................ 132
Setting the temperature ................ 132
Switching air-recirculation mode
on/off ............................................ 135
Switching on/off ........................... 131
Switching residual heat on/off ...... 135
Switching the rear window
defroster on/off ............................ 134
Index7
Page 27 of 398
Rear window wiper ........................ 123
Replacin gth ewiper blade s ............ 123
Switching on/off ........................... 122
Winter driving
Slippery road surfaces ................... 169
Winter operation
Overview ........................................ 356
Radiator cover ............................... 326
Winter tires
M+S tires ....................................... 356
Wiper blades
Cleaning ......................................... 333
Replacing ....................................... 123
Replacing (rear window) ................ 124
Replacing (windshield) ................... 123
Wooden trim (cleaning instruc-
tions) .................................................. 336
Workshop
see Qualified specialist workshop
Z
ZONE functionSwitching on/off ........................... 133
Index25
Page 124 of 398
XSimultaneously press on bulb holder;and
pull lever =downwards.
XPress on housing cover :and turn it clock-
wise.
Turn signals
XSwitch off the lights.
XOpen the hood.
XTurn housing cover :counter-clockwise and
remove it.
XTurn bulb holder ;counter-clockwise and
pull out.
XPull the bulb out of bulb holder ;.
XInsert new bulb into bulb holder ;.
XInsert bulb holder;and turn it clockwise.
XPress on housing cover :and turn it to the
right.
Windshield wipers
Switching the windshield wipers
on/off
!
Do not operate the windshield wipers when
the windshield is dry, as this could damage
the wiper blades. Moreover, dust that has col-
lected on the windshield can scratch the glass
if wiping takes place when the windshield is
dry.
If it is necessary to switch on the windshield
wipers in dry weather conditions, always use
washer fluid when operating the windshield
wipers.
!If the windshield wipers leave smears on the
windshield after the vehicle has been washed
in an automatic car wash, wax or other resi-
dues may be the reason for this. Clean the windshield using washer fluid after washing
the vehicle in an automatic car wash.
!Intermittent wiping with rain sensor: due to
optical influences and the windshield becom-
ing dirty in dry weather conditions, the wind-
shield wipers may be activated inadvertently.
This could then damage the windshield wiper
blades or scratch the windshield.
For this reason, you should always switch off
the windshield wipers in dry weather.
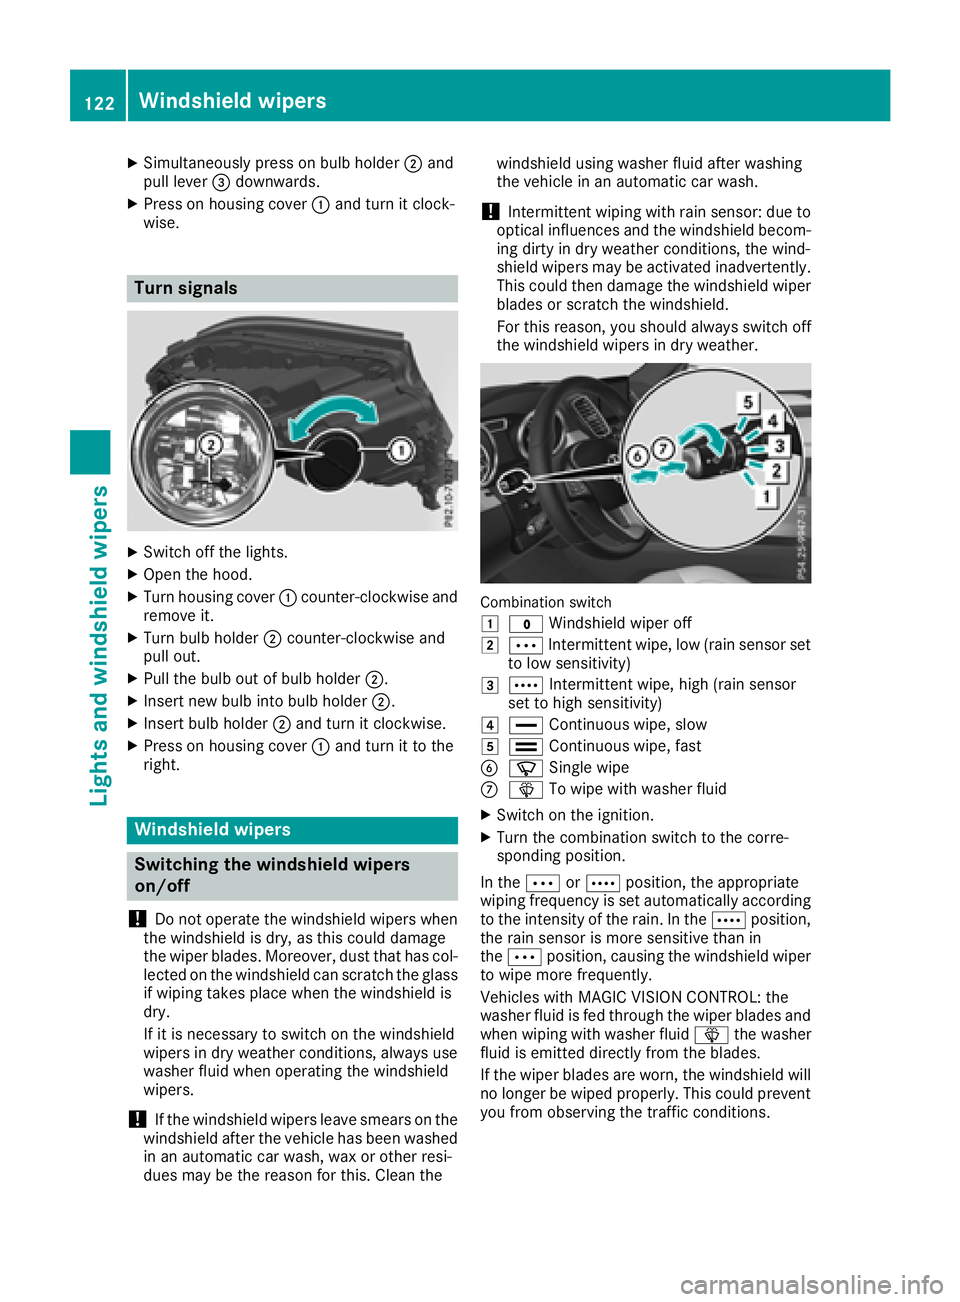
Combination switch
1
$ Windshield wiper off
2ÄIntermittent wipe, low (rain sensor set
to low sensitivity)
3Å Intermittent wipe, high (rain sensor
set to high sensitivity)
4° Continuous wipe, slow
5¯Continuous wipe, fast
BíSingle wipe
CîTo wipe with washer fluid
XSwitch on the ignition.
XTurn the combination switch to the corre-
sponding position.
In the ÄorÅ position, the appropriate
wiping frequency is set automatically according
to the intensity of the rain. In the Åposition,
the rain sensor is more sensitive than in
the Ä position, causing the windshield wiper
to wipe more frequently.
Vehicles with MAGIC VISION CONTROL: the
washer fluid is fed through the wiper blades and
when wiping with washer fluid îthe washer
fluid is emitted directly from the blades.
If the wiper blades are worn, the windshield will
no longer be wiped properly. This could prevent
you from observing the traffic conditions.
122Windshield wipers
Lights and windshield wipers
Page 125 of 398
Switching the rear window wiper on/
off
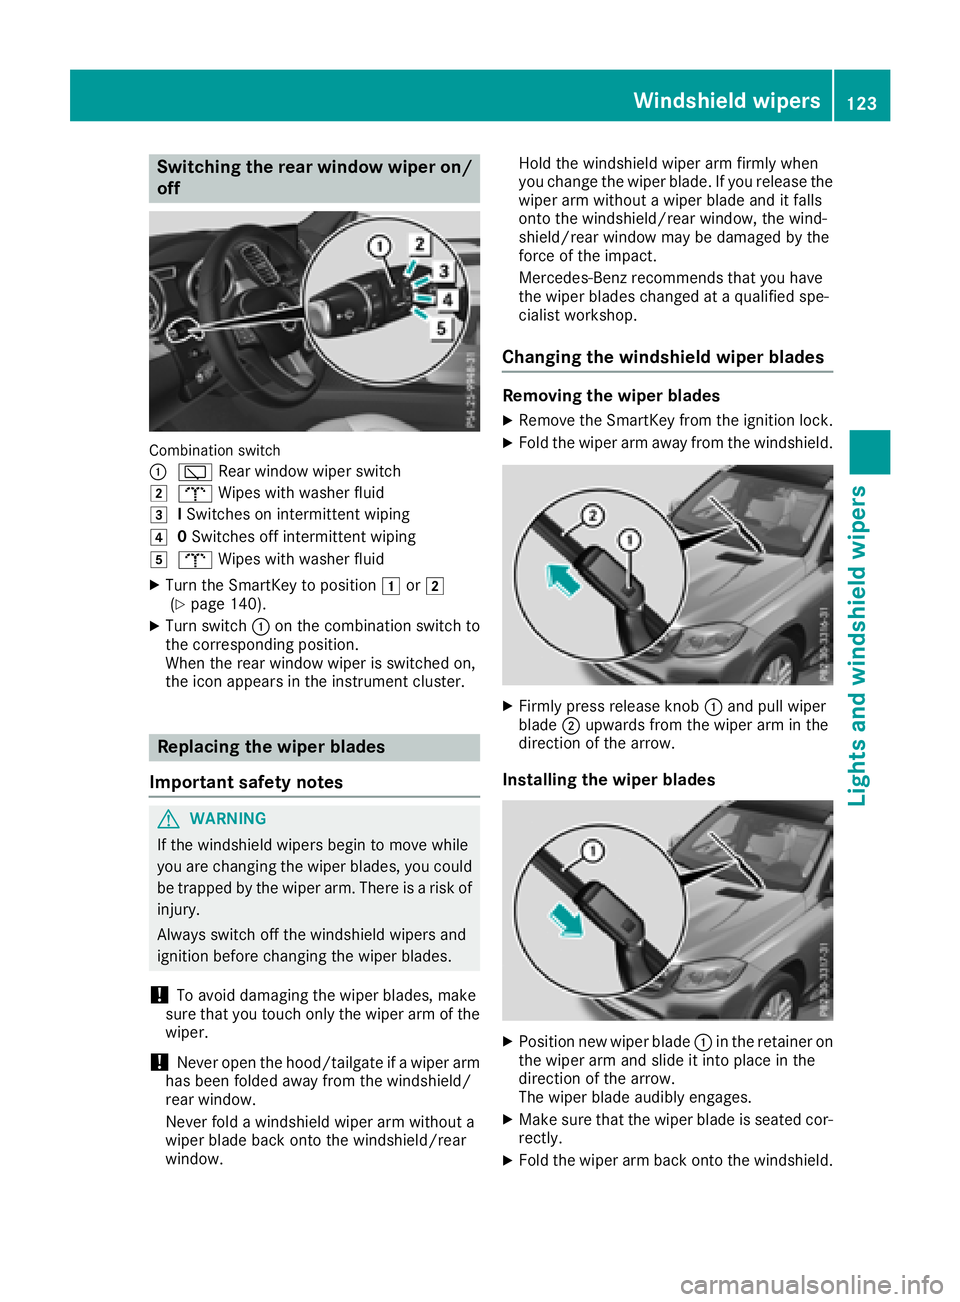
Combination switch
:
èRear window wiper switch
2bWipes with washer fluid
3ISwitches on intermittent wiping
40 Switches off intermittent wiping
5b Wipes with washer fluid
XTurn the SmartKey to position 1or2
(Ypage 140).
XTurn switch :on the combination switch to
the corresponding position.
When the rear window wiper is switched on,
the icon appears in the instrument cluster.
Replacing the wiper blades
Important safety notes
GWARNING
If the windshield wipers begin to move while
you are changing the wiper blades, you could be trapped by the wiper arm. There is a risk of
injury.
Always switch off the windshield wipers and
ignition before changing the wiper blades.
!To avoid damaging the wiper blades, make
sure that you touch only the wiper arm of the
wiper.
!Never open the hood/tailgate if a wiper arm
has been folded away from the windshield/
rear window.
Never fold a windshield wiper arm without a
wiper blade back onto the windshield/rear
window. Hold the windshield wiper arm firmly when
you change the wiper blade. If you release the
wiper arm without a wiper blade and it falls
onto the windshield/rear window, the wind-
shield/rear window may be damaged by the
force of the impact.
Mercedes-Benz recommends that you have
the wiper blades changed at a qualified spe-
cialist workshop.
Changing the windshield wiper blades
Removing the wiper blades
XRemove the SmartKey from the ignition lock.
XFold the wiper arm away from the windshield.
XFirmly press release knob
:and pull wiper
blade ;upwards from the wiper arm in the
direction of the arrow.
Installing the wiper blades
XPosition new wiper blade :in the retainer on
the wiper arm and slide it into place in the
direction of the arrow.
The wiper blade audibly engages.
XMake sure that the wiper blade is seated cor- rectly.
XFold the wiper arm back onto the windshield.
Windshield wipers123
Lights and windshield wipers
Z
Page 333 of 398
To avoid damage to the vehicle, deactivate
Distance Pilot DISTRONIC and the HOLD
function in the following or similar situations:
Rwhen towing the vehicle
Rin the car wash
!Never clean your vehicle in a Touchless
Automatic Car Wash as these use special
cleaning agents. These cleaning agents can
damage the paintwork or plastic parts.
!Make sure that:
Rthe side windows and the sliding sunroof
are fully closed.
Rthat the blower of the ventilation/heating
system is switched off (OFF button has
been pressed).
Rthe windshield wiper switch is at position
g.
The vehicle may otherwise be damaged.
!In car washes with a towing mechanism,
make sure that the automatic transmission is
in transmission position i; otherwise, the
vehicle could be damaged.
RVehicles with a SmartKey:
Do not remove the SmartKey from the igni-
tion lock. Do not open the driver's door or
front-passenger door when the engine is
switched off. Otherwise, the automatic
transmission selects park position jauto-
matically and locks the wheels. You can
prevent this by shifting the automatic trans-
mission to ibeforehand.
RVehicles with KEYLESS-GO:
Do not open the driver's door or front-
passenger door when the engine is
switched off. Otherwise, the automatic
transmission selects park position jauto-
matically and locks the wheels.
Observe the following to make sure that the
automatic transmission stays in position i:
XMake sure the vehicle is stationary and the
ignition is switched off.
XTurn the SmartKey to position in the ignition
lock2(Ypage 140).
Use the SmartKey instead of the Start/Stop
button on vehicles with KEYLESS-GO.
XDepress and hold the brake pedal.
XShift the automatic transmission to position
i.
XRelease the brake pedal.
XRelease the electric parking brake.
XSwitch off the ignition and leave the SmartKey
in the ignition lock.
You can wash the vehicle in an automatic car
wash from the very start.
If the vehicle is very dirty, pre-wash it before
cleaning it in an automatic car wash.
After using an automatic car wash, wipe off wax
from the windshield and the wiper blades. This
will prevent smears and reduce wiping noises caused by residue on t
he windshield.
Washing by hand
In some countries, washing by hand is only
allowed at specially equipped washing bays.
Observe the legal requirements in all countries
concerned.
XDo not use hot water and do not wash the
vehicle in direct sunlight.
XUse a soft sponge to clean.
XUse a mild cleaning agent, such as a car
shampoo approved by Mercedes-Benz.
XThoroughly hose down the vehicle with a gen-
tle jet of water.
XDo not point the water jet directly towards the
air inlets.
XUse plenty of water and rinse out the sponge
frequently.
XRinse the vehicle with clean water and dry
thoroughly with a chamois.
XDo not let the cleaning agent dry on the paint-
work.
When using the vehicle in winter, remove all
traces of road salt deposits carefully and as
soon as possible.
Power washers
GWARNING
The water jet from a circular jet nozzle (dirt
blasters) can cause invisible exterior damage
to the tires or chassis components. Compo-
nents damaged in this way may fail unexpect-
edly. There is a risk of an accident.
Do not use power washers with circular jet
nozzles to clean the vehicle. Have damaged
tires or chassis components replaced imme-
diately.
Care331
Maintenance and care
Z
Page 335 of 398
iUse only insect remover and car shampoo
from the range of recommended and
approved Mercedes-Benz care products.
Cleaning the vehicle parts
Cleaning the wheels
GWARNING
The water jet from a circular jet nozzle (dirt
blasters) can cause invisible exterior damage
to the tires or chassis components. Compo-
nents damaged in this way may fail unexpect-
edly. There is a risk of an accident.
Do not use power washers with circular jet
nozzles to clean the vehicle. Have damaged
tires or chassis components replaced imme-
diately.
!Do not use acidic wheel cleaning products
to remove brake dust. This could damage
wheel bolts and brake components.
!Do not park your vehicle for a long period of
time directly after cleaning, particularly after
cleaning the wheel rim with wheel cleaner.
Wheel cleaner can lead to the increased cor-
rosion of the brake discs and pads. Therefore,
drive for a few minutes after cleaning. By
heating up the brakes, the brake discs and
pads dry. The vehicle can then be parked for a
long period of time.
Cleaning the windows
GWARNING
You could become trapped by the windshield wipers if they start moving while cleaning the
windshield or wiper blades. There is a risk of
injury.
Always switch off the windshield wipers and
the ignition before cleaning the windshield or
wiper blades.
!Do not use dry cloths, abrasive products,
solvents or cleaning agents containing sol-
vents to clean the inside of the windows. Do
not touch the insides of the windows with
hard objects, e.g. an ice scraper or ring. There
is otherwise a risk of damaging the windows.
!Clean the water drainage channels of the
windshield and the rear window at regular
intervals. Deposits such as leaves, petals and pollen may under certain circumstances pre-
vent water from draining away. This can lead
to corrosion damage and damage to elec-
tronic components.
XClean the inside and outside of the windows
with a damp cloth and a cleaning product that
is recommended and approved by Mercedes-
Benz.
Cleaning wiper blades
GWARNING
You could become trapped by the windshield wipers if they start moving while cleaning the
windshield or wiper blades. There is a risk of
injury.
Always switch off the windshield wipers and
the ignition before cleaning the windshield or
wiper blades.
!Do not pull the wiper blade. Otherwise, the
wiper blade could be damaged.
!Do not clean wiper blades too often and do
not rub them too hard. Otherwise, the graph-
ite coating could be damaged. This could
cause wiper noise.
!Hold the wiper arm securely when folding
back. The windshield could be damaged if the
wiper arm smacks against it suddenly.
XFold the windshield wiper arms away from the
windshield (Ypage 123).
XCarefully clean the wiper blades with a damp
cloth.
XFold the windshield wiper arms back again
before switching on the ignition.
Cleaning the exterior lighting
!Only use cleaning agents or cleaning cloths
which are suitable for plastic light lenses.
Unsuitable cleaning agents or cleaning cloths
could scratch or damage the plastic light len- ses.
XClean the plastic lenses of the exterior light-
ing using a wet sponge and a mild cleaning
agent, e. g. Mercedes-Benz car shampoo or
cleaning cloths.
Care333
Maintenance and care
Z