seat adjustment MERCEDES-BENZ GLS SUV 2019 User Guide
[x] Cancel search | Manufacturer: MERCEDES-BENZ, Model Year: 2019, Model line: GLS SUV, Model: MERCEDES-BENZ GLS SUV 2019Pages: 729, PDF Size: 12.03 MB
Page 122 of 729
seat
1without letting go or press and hold
down there lease button in the armrest of the
th ird row of seats 2.
The head restra int mo ves down wards. The
seat backrest mo vesto the front position.
The seat fore -and-aft adjustment mo vesfo r‐
wa rds until the seat is unloc ked. The seat
th en tips forw ards.
Fo lding the seat back into the driving posi‐
tion #
Press there lease button in the backrest
shoulder of there ar seat 1or in the arm‐
re st of theth ird row of seats 2and hold it
down until the seat engages audibl y.
The seat tips down wards and the seat fore-
and-aft adjustment mo vesto there ar. The
seat backrest and head restra int automati‐
cally mo veinto the driving position. #
Tointer rupt thefo lding procedure before
engagement, let go of there lease button . To
continue thefo lding procedure, press and
hold there lease button again. Fo
lding there ar seats forw ards mechanically
(eme rgency release)
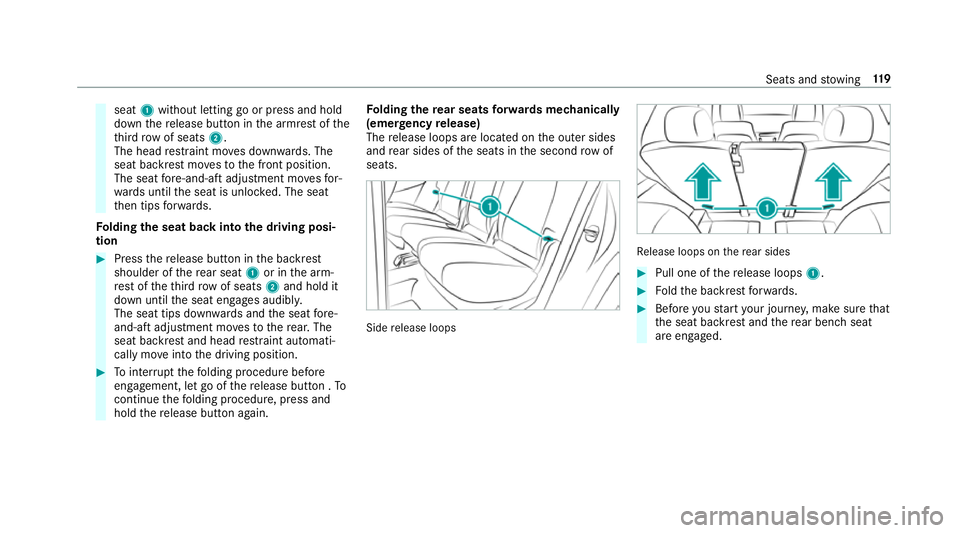
The release loops are located on the outer sides
and rear sides of the seats in the second row of
seats. Side
release loops Re
lease loops on there ar sides #
Pull one of there lease loops 1. #
Foldthe backrest forw ards. #
Before youstart your journe y,make sure that
th e seat backrest and there ar ben chseat
are engaged. Seats and
stowing 11 9
Page 126 of 729
Setting automatic seat adjustment
&
WARNING Risk of becoming trapped
du ring adjustment of the driver's seat
af te r calling up a driver profile
Selecting a profile may trigger an adju stment
of the driver's seat tothe position sa ved
under the profile. You or other vehicle occu‐
pants could be injured in the process. #
Make sure that when the position of
driver's seat is being adjus ted using the
multimedia sy stem, no people or body
parts are in the seat's range of mo ve‐
ment.
If th ere is a risk of someone becoming trap‐
ped, stop the adjustment process immedi‐
ately: #
a)Tapth ewa rning message on the
media displa y.
or #
b) Press a memory position button or a
seat adjustment switch on the driver's
door.
The adjustment process is stopped. Re
quirements for adjusting the driver's seat
and steering wheel position tobody size:
R Automatic seat adju stment is activated.
Multimedia sy stem:
4 © 5
Settings 5
Fahrzeug (Vehicle)
5 Auto. seat adjustment
Switching automatic seat adjustment on/off
When the active user profile is changed while
th eve hicle is stationar y,the driver's seat, steer‐
ing wheel, outside mir rors and seat con tour will
automatically be adap tedto the driver. #
Select OnorOff.
% This setting is available on lyfor individual
user profiles. Forth e guest profile, auto‐
matic seat adjustment cann otbe switched
on or off. Further information about user
profiles (/ page 365). Ad
justing driver's seat and steering wheel
position tobody size
The vehicle calculates a suitable driver's seat
and steering wheel position on the basis of the
driver's body size and sets this immediatel y. #
Select Seat positioning . #
Toset the unit of measurement: select cm
or ft/in. #
Set the size using the scale. #
Select Start positioning.
The driver's seat and steering wheel position
is adjus tedto the body size that has been
set.
% Ifth e driver's seat and steering wheel posi‐
tion calculated bytheve hicle is not practical
or comfor table, it can be manually changed
at any time via the control buttons.
The outside mir rors are not set via this func‐
tion. Ins tead, they have tobe set manually
via the control switches. Seats and
stowing 12 3
Page 128 of 729
Prog
rammes Function
Mobilizing Massage Mobilizing massage with upward-moving massage
waves. Can promo te
deeper respiration and hence impr ovecirculation and blood pressure.
Act. Workout backrest
and
Act. Workout cushion These programmes
requ ire your cooperation. Alternating between tensing
and releasing helps toimpr ove blood flow to yo ur muscles. Press against
a pressure point as soon as youfe el it. Selecting
the massage prog ramme for the
front seats Multimedia sy
stem:
4 © 5
Comfort 5
Massage #
Select a seat. #
Select a massage programme (/ page124). #
Toset the massage intensit y:switch High
intensity on or off. Re
setting seat adjustments Multimedia sy
stem:
4 © 5
Comfort 5
Seat comfort #
Select Reset. #
Select ßforth ere qu ired seat.
The settings forth e selected seat are reset. Switching
the seat heater on/off &
WARNING Risk of bu rns due torepeat‐
edly switching on the seat heater
Re peatedly switching on the seat heater can
cause the seat cushion and seat backrest
padding tobecome very hot.
The health of persons with limited temp era‐
ture sensitivity or a limited ability toreact to
high temp eratures may be af fected or they
may even su ffer burn-like injuries. #
Do not repeatedly switch on the seat
heater. Seats and
stowing 12 5
Page 133 of 729
#
Toswitch off: pushthe switch toposition
2.
Indicator lamp 3goes out.
When you swit ch the ignition off, thesteering
wheel heater switches off. Easy entry and
exitfeature Using
the easy entry and exitfeature &
WARNING Risk of accident when pulling
aw ay during the adjustment process of
th e easy exitfeature
‑ If you pull away while the easy entry and
ex itfeature is making adjustments, you could
lose cont rol of theve hicle. #
Alw ayswa it until the adjustment proc‐
ess is comple tebefore pulling away. &
WARNING Risk of becoming trapped
while adjusting the easy entry andexit
fe ature
When the easy entry andexitfeature adjusts
th esteering wheel and the driver's seat, you
and other vehicle occupants – particular ly
ch ildren – could become trapped. #
During the adjustment process forthe
easy entry andexitfeature, make sure
th at no one has any body parts in the
sweep of thesteering wheel or the driv‐
er's seat.
If th ere is a risk of becoming trapped bythe
st eering wheel: #
Movethe adjustment le ver of thesteer‐
ing wheel.
The adjustment process is stopped.
If th ere is a risk of becoming trapped bythe
driver's seat: #
Press the seat adjustment switch.
The adjustment process is stopped. #
Never lea vechildren unat tended in the
ve hicle. #
When leaving theve hicle, alw aysta ke
th eke y with you and lock theve hicle.
This also applies tothe digital vehicle
ke y if the "Digital Vehicle Key" function
is activated via Mercedes me connect. Yo
u can stop the adjustment process bypress‐
ing one of the memory function position buttons. &
WARNING Risk of becoming trapped
du ring acti vation of the easy entry and
ex itfeature bychildren
If ch ildren activate the easy entry andexit
fe ature, they can become trapped, pa rticu‐
lar lywhen unat tended. #
Never lea vechildren unat tended in the
ve hicle. #
When leaving theve hicle, alw aysta ke
th eke y with you and lock theve hicle. 13 0
Seats and stowing
Page 134 of 729
This also applies
tothe Digital Vehicle Key if the
"Digital Vehicle Key" function is activated via
Mercedes me connect.
If th e easy entry andexitfeature is active, the
st eering wheel will mo veupwards and the driv‐
er's seat will mo veback in thefo llowing situa‐
tions:
R you swit chthe ignition off when the driver's
door is open
R you open the driver's door when the ignition
is switched off
% The steering wheel will mo veupwards on lyif
it is not already as high as it will go. The driv‐
er's seat will mo vebackwards only if it is not
already in there armost position.
The driver's seat backrest will mo vefor‐
wa rds only if it is not already in the front‐
most position.
The steering wheel and the driver's seat will
mo veback tothe last drive position in thefo l‐
lowing cases:
R you swit chthe po wer supp lyor the ignition
on when the driver's door is closed R
you close the driver's door when the ignition
is switched on
The last drive position will be stored when:
R you swit chthe ignition off
R you sa vethe seat setting using the memory
function
If yo u press one of the memory function position
buttons, the adjustment process is stopped. Setting
the easy entry and exitfeature Requ
irements:
R Automatic seat adju stment has been activa‐
te d (/ page123).
Mul timedia sy stem:
4 © 5
Settings 5
Fahrzeug (Vehicle)
5 Easy Entry/Exit #
Select Steer. wheel and seat, Steering wheel
only orOff.
% Ifyo u use an individual user profile and ha ve
set your body size, this information is car ried
ove rfo rth e easy entry andexitfeature. This causes
the driver's seat and steering wheel
to automatically mo veinto the cor rect posi‐
tion. Further information about automatic
seat positioning (/ page123). Operating
the memory function &
WARNING Risk of an accident if the
memory function is used while driving
If yo u use the memory function on the driv‐
er's side while driving, you could lose cont rol
of theve hicle as a result of the adjustments
being made. #
Only use the memory function on the
driver's side when theve hicle is station‐
ar y. &
WARNING Risk of entrapment when set‐
ting the seat with the memory function
When the memory function adjusts the seat,
yo u and other vehicle occupants – particu‐
lar lych ildren – could become trapped. Seats and
stowing 131
Page 135 of 729

#
During the adjustment process of the
memory function, make sure that no
one has any body parts in the sweep of
th e seat. #
If someone becomes trapped, press a
memory position switch or seat adjust‐
ment switch immediately. &
WARNING Risk of entrapment if the
memory function is activated bychildren
Children could become trapped if they acti‐
va te the memory function, particularly when
unattended. #
Never lea vechildren unat tended in the
ve hicle. #
When leaving theve hicle, alw aysta ke
th eke y with you and lock theve hicle. This also applies
tothe Digital Vehicle Key if the
"Digital Vehicle Key" function is activated via
Mercedes me connect.
The memory function can be used when the igni‐
tion is switched off. St
oring
Seat adjustments for up tothre e people can be
st ored and called up using the memory function.
The following sy stems can be selected:
R Seat
R Outside mir rors
R Head-up display
R Steering column
R Seat conto ur #
Set the seat, the seat conto ur,the head-up
display and the outside mir rors to the
desired position. #
Press memory button M and then press pre‐
set position button 1,2 or 3 within thre e sec‐
onds.
An acoustic signal sounds. The settings are
st ored. 13 2
Seats and stowing
Page 354 of 729
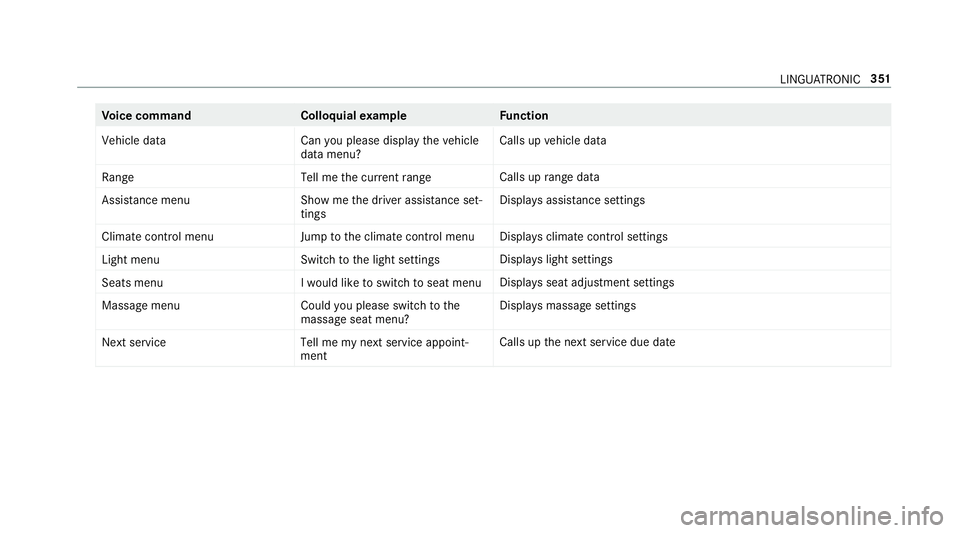
Vo
ice command Colloquialexample Function
Vehicle data Can you please display the vehicle
data menu?Calls up
vehicle data
Range Tell me the current rangeCalls up
range da ta
Assistance menu Show me the driver assistance set-
tingsDispl
ays assis tance settings
Climate control menu Jump to the climate control menuDispla
ysclimate control settings
Light menu Switch to the light settingsDispla
yslight settings
Seats men uI would like to switch to seat menu Displa
ysseat adjustment settings
Massage menu Could you please switch to the
massage seat menu?Displa
ysmassa gesettings
Next service Tell me my next service appoint-
mentCalls up
the next service due date LINGU
ATRO NIC 351
Page 368 of 729
#
Touch and hold an application on the
to uchsc reen until symbols appear. #
Tap on = or; and mo vethe applica‐
tion in the menu. #
Tap on ø. Profile
Note
s on profiles &
WARNING Risk of becoming trapped
du ring adjustment of the driver's seat
af te r calling up a driver profile
Selecting a profile may trigger an adju stment
of the driver's seat tothe position sa ved
under the profile. You or other vehicle occu‐
pants could be injured in the process. #
Make sure that when the position of
driver's seat is being adjus ted using the
multimedia sy stem, no people or body
parts are in the seat's range of mo ve‐
ment. If
th ere is a risk of someone becoming trap‐
ped, stop the adjustment process immedi‐
ately: #
a)Tapth ewa rning message on the
media displa y.
or #
b) Press a memory position button or a
seat adjustment switch on the driver's
door.
The adjustment process is stopped. The driver's seat is equipped with an anti-entrap‐
ment feature.
If th e driver's door is open, the driver's seat will
not be set af ter calling up the driver's profile.
Overview of profiles
Using the multimedia sy stem up toseven pro‐
fi les can be created in theve hicle.
Profiles store your personal vehicle settings and
settings forth e multimedia sy stem.
If th eve hicle is used byseveral drivers, the
driver can select their profile before the journe y,
without changing the settings of other drivers. Yo
u can select the profile:
R when entering (/ page 368)
R using the home screen (/ page 354)
The profile settings are activated as soon as a
profile is selected.
% When you call up your profile, the driver's
seat, steering wheel and outside mir rors can
be set.
If yo u call up your profile when driving then
th e driver's seat position will not be adjus‐
te d.
Yo u can cancel the setting process with the
fo llowing actions:
R Tap on thePositioning seat and steering
wheel. Please tap to cancel. warning on
th e media displa y.
R Press one of the seat operating buttons
in the driver's door. MBUX multimedia sy
stem 365
Page 393 of 729
Setting
the da te #
Select Set date . #
Set a da te.
% Invehicles with GPS, a date cannot be set
eve n wi thactive manual time adjustments.
The date is then set automatically thro ugh
th e selected time zone. Ac
tivating/deactivating voice amplification
to rear Long wheelbase
vehicles only
Re quirements:
R Your vehicle is equipped with the Burmes ter®
sur round sound sy stem or the Burmes ter®
high-end 3D sur round sound sy stem.
R The ignition is switched on.
R Doors, side windo wsand the panorama slid‐
ing sunroof are closed.
R Atleast one seat belt is fastened on there ar
ben chseat. Multimedia sy
stem:
4 © 5
Settings 5
System 5
Audio
5 Voice amplification
The function supports communication between
th e driver and front passenger with passengers
in there ar compartment. When voice amplifica‐
tion torear is activated, the signals pic ked up by
th e microphone are amplified and pla yed back
ov er the speakers in there ar compartment,
depending upon vehicle noise le vels. An auto‐
matic adjustment occurs based on speaker vol‐
ume and ambient noise in order toimpr ove
speech intelligibility and maintain the natural‐
ness of speech. #
Activate or deacti vate the function.
Setting the intensity of thevo ice amplifica‐
tion #
Select Voice amplification - intensity. #
Set the intensity on the control.
Depending on the intensity set, thevo ice
amplification tothere ar is inc reased or
re duced. Connectivity
Switching transmission of
theve hicle posi‐
tion on/off
Multimedia sy stem:
4 © 5
Settings 5
System
5 Wi-Fi & Bluetooth #
Select Transmit vehicle position . #
Activate or deacti vate the function. Blue
tooth ® Information about Blu
etoo th®
Bl ue tooth ®
tech nology is a standard for short-
ra nge wi reless data transfer up toappr oximately
10 m.
Yo u can use Blue tooth®
to connect your mobile
phone tothe multimedia sy stem and use thefo l‐
lowing functions, forex ample:
R Hands-free sy stem with access tothefo llow‐
ing options:
- Contacts (/ page 461)
- Call lists (/ page 465) 390
MBUX multimedia sy stem
Page 520 of 729
Ac
tivating/deactivating volume adjustment
in the Bu rmester ®
sur round sound sy stem
Multimedia sy stem:
4 © 5
Media 5
Z 5
Burmester
5 Volume
Au tomatic volume adjustment compensates for
dif fering volumes when changing between audio
sources and within an audio source. #
Swit chAutomatic adjustment on or off.
Ad justing the balance/ fader in the
Burmes ter®
sur round sound sy stem
Multimedia sy stem:
4 © 5
Media 5
Z 5
Burmester
5 Balance and Fader
Ad justing the balance #
Movethevo lume distribution between the
ri ght and left sides of theve hicle in the grid
shown.
The volume is distributed between the speak‐
ers on the left and right sides in theve hicle. Ad
justing the fader #
Movethevo lume distribution between the
front and rear of theve hicle in the grid
shown.
The volume is distributed between the speak‐
ers in the front and rear of theve hicle.
Selecting a sound profile in the Bu rmester ®
sur round sound sy stem
Multimedia sy stem:
4 © 5
Media 5
Z 5
Burmester
5 Sound profiles
The following profiles are available:
R Pure
R Surround sound #
Select a sound profile. Ad
justing the sound focus in the Bu rmester ®
sur round sound sy stem
Multimedia sy stem:
4 © 5
Media 5
Z 5
Burmester
5 Sound focus #
Select a position forth e sound focus or All
seats. Burmes
ter®
high-end 3D sur round sound
sy stem Information on
the Bu rmester ®
high-end 3D
sur round sound sy stem
The Burmes ter®
high-end 3D sur round sound
sy stem has a total output of 1610 watts and is
equipped wi th26 spea kers. It is available for all
functions in thera dio and media modes. MBUX multimedia sy
stem 517