engine oil MERCEDES-BENZ GLS SUV 2019 Owners Manual
[x] Cancel search | Manufacturer: MERCEDES-BENZ, Model Year: 2019, Model line: GLS SUV, Model: MERCEDES-BENZ GLS SUV 2019Pages: 729, PDF Size: 12.03 MB
Page 198 of 729
#
Touse braking ef fect of the engine,
shift toa lo werge ar in good time. *
NO
TEDama getothe driv etra in and
engine when pulling away #
Do not warm upthe engine while the
ve hicle is stationar y.Pull away immedi‐
atel y. #
Avoid high engine speeds and driving at
full thro ttle until the engine has reached
its operating temp erature. *
NO
TEDama getothe catalytic con verter
due tonon-combu sted fuel The engine is not
running smo othly and is
misfiring.
Non-combus ted fuel may get into the cata‐
lytic con verter. #
Only depress the accelera tor pedal
slightl y. #
Have the cause rectified immediately at
a qu alified specialist workshop. Limited braking ef
fect on salt-trea tedro ads:
R due tosalt build-up on the brake disks and
brakepads, the braking dis tance can increase
conside rably or result in braking only on one
side
R maintain a much greater safe dis tance tothe
ve hicle in front
To preve nt salt build-up:
R brake occasionally while paying attention to
th e tra ffic conditions
R carefully depress the brake pedal at the end
of the journey and when starting the next
journey Note
s on off-road driving &
WARNING Risk of accident if you do not
ke ep toline of fall on inclines
If yo u drive at an angle or turn on an incline,
th eve hicle could slip side ways, tip and roll‐
ove r. #
Alw ays drive on inclines in the line of
fa ll (straight up or down) and do not
turn. &
WARNING Risk offire due toflammable
materials on hot parts of theex haust
sy stem
Flammable material such as lea ves, grass or
twigs may ignite if they come into contact
wi th hot parts of theex haust sy stem. #
When driving on unpa vedro ads or off-
ro ad, regular lych eck theve hicle under‐
side. #
Remo vetrapped plants or other flam‐
mable material, in particular. #
Ifth ere is damage, consult a qualified
specialist workshop immediately. When driving off-road, subs
tances su chas sand,
mud and water orwate r mixed with oil may get
into the brakes. This may lead toare duction in
braking ef fect or total brake failure as a result of
increased wear. The braking characteristics will
va ry depending on the material that has entered Driving and parking
19 5
Page 199 of 729
th
e sy stem. Clean the brakes af ter driving off-
ro ad. If youth en notice reduced braking ef fect
or hear scraping noises, ha vethe brake sy stem
ch ecked at a qualified specialist workshop.
Ad just your driving style to thech anged braking
ch aracteristics.
* NO
TEDama gecaused bydriving over
obs tacles The
vehicle can be damaged by:
R driving up on high kerbs or unpa ved
ro ads.
R quickly driving over obs tacles su chas
ke rbs, speed bumps or po tholes.
R heavy objects hitting the underbody or
ch assis components. #
Do not drive over obs tacles that could
damage theve hicle. #
Check theve hicle regular lyfor dama ge
during off-road driving. #
Adjust theve hicle speed tosuit the
ro ad sur face conditions. #
Ifth ere is damage, consult a qualified
specialist workshop immediately. +
ENVIRONMENTAL
NOTEEnvironmental
dama gedue tonon-obser vance of pro‐
hibition signs Environmental pr
otection has priority. Treat
nature with respect. #
Be sure toobser veprohibition signs. Checklist before driving off-road
Check
thefo llowing points before driving off-
ro ad:
R Fuel le vel
R Vehicles with a diesel engine: AdBlue ®
le vel
R Engine oil le vel:fill engine oil up tothe maxi‐
mum le velto ensure full gradeability
(/ page 534).
R Tyre-change tool kit and spare wheel
R Tyres and wheels %
Information about special all-ter rain tyres for
re trofitting is available from any qualified
specialist workshop.
Off-road driving
Re ad this section before driving your vehicle off-
ro ad. Practise bydriving over more gentle off-
ro ad terrain firs t.
R Obse rveth e no tes on the cross-country ABS
(/ page 229).
R If necessar y,select theF orG drive
program (vehicles with an Off-road pac kage)
before driving off-road (/ page 204).
R Before driving off-road, shift the transfer
case totheLO W RANGE off-roadgear (vehi‐
cles with an Offroad pac kage ) (/ page 211).
R Select a vehicle le vel suitable for off-road ter‐
ra in (/ page 265). Toavo id damaging the
ve hicle, make sure there is alw ays suf ficient
ground clearance.
R Alw ayske ep the engine running and in gear
when driving on downhill gradients and
slopes. Obse rveth e no tes on driving in
mountainous terrain. 19 6
Driving and pa rking
Page 216 of 729
&
WARNING Risk offire from fuel mixture
Ve hicles with a diesel engine:
If yo u mix diesel fuel with petrol, theflash
point of the fuel mixture is lo werth an that of
pure diesel fuel.
While the engine is running, component
pa rts in theex haust sy stem may overheat
without warning. #
Neverre fuel using petrol. #
Never mix petrol with diesel fuel. *
NO
TEDama gecaused bythe wrong fuel Ve
hicles with a petrol engine:
Even small amounts of the wrong fuel could
re sult in damage tothe fuel sy stem, the
engine and the emission control sy stem. #
Only refuel using unleaded, sulphu r-free
fuel that con form sto European EN 228,
or an equi valent specification. #
The RONrequ irement is located in the
fuel filler flap. Fu
el of this specification may con tain up to
10 %ethanol. Your vehicle is suitable for use
with E10 fuel.
Ne verre fuel using any of thefo llowing fuels:
R diesel
R regular petrol with an octane number
lo we rth an 91 RON
R petrol with more than 10%ethanol byvol‐
ume, e.g. E15, E30, E85, E100
R petrol with more than 3% me thanol by
vo lume, e.g. M15, M30
R petrol with additives con taining me tal
If yo u acciden tally refuel with the wrong fuel: #
Do not switch the ignition on. #
Consult a qualified specialist workshop. *
NO
TEDama gecaused bythe wrong fuel Ve
hicles with a diesel engine:
Even small amounts of the wrong fuel could
re sult in damage tothe fuel sy stem, the
engine and the emission control sy stem. #
Only refuel using sulphu r-free diesel
fuel that con form sto European stand‐
ard EN 590, or an equivalent specifica‐
tion.
In countries without sulphur-f ree diesel
fuel, refuel using only lo w-sulphur diesel
fuel with a sulphur content less than
50 ppm.
Ne verre fuel using any of thefo llowing fuels:
R petrol
R marine diesel
R heating oil
R pure bio-diesel fuel or vege table oil
R paraf fin or kerosene
If yo u accidentally refuel with the wrong fuel: #
Do not switch the ignition on. #
Consult a qualified specialist workshop. Driving and parking
213
Page 231 of 729
%
Standby mode is automatically deactivated
when the ignition is switched on.
Ac tivating/deactivating standby mode (park‐
ing up theve hicle)
Re quirements:
R The engine is switched off.
Multimedia sy stem:
4 © 5
Settings 5
Fahrzeug (Vehicle) #
Switch Standby mode on or off.
When you activate the function, a prom pt
appears. #
Select Yes.
St andby mode is activated. Driving and driving saf
ety sy stems Driving sy
stems and your responsibility Yo
ur vehicle is equipped with driving sy stems
which assist you in driving, parking and manoeu‐
vring theve hicle. The driving sy stems are aids
and do not relie ve you of your responsibility per‐
ta ining toroad traf fic la w.Pay attention tothe traf
fic conditions at all times and inter vene
when necessa ry. Be aware of the limitations
re ga rding the safe use of these sy stems. Information about
radar senso rs Some driving and driving sa
fety sy stems use
ra dar sensors tomonitor the area in front of,
behind or next totheve hicle (depending on the
ve hicle's equipment).
Depending on theve hicle's equipment, thera dar
sensors are integrated behind the bumpers
and/or behind the Mercedes star. Keep these
parts free of dirt, ice and slush (/ page545).
The se nsors mu stnot be co vered, forex ample
by cycle rack s, overhanging loads, sticke rs,fo il
or foils toprotect against stone chipping. In the
eve nt of dama getothe bumpers or radiator
grille, or following a collision impacting the
bumpers or radiator grille, ha vethe function of
th era dar sensors checked at a qualified special‐
ist workshop. The driving sy stems and driving
saf ety sy stems may no longer function proper ly
in such cases. Overview of driving sy
stems and driving
saf ety sy stems In
this section, you will find information about
th efo llowing driving sy stems and driving saf ety
sy stems:
R 360° Camera (/ page 289)
R ABS (Anti-lock Braking System)
(/ page 229)
R Active Dis tance Assi stDISTRONIC
(/ page 247)
R Adaptive Brake Lights (/ page241)
R AIRMATIC (/ page 262)
R Active Brake Assi st (/ page 235)
R Active Lane Keeping Assist (/ page 309)
R ATTENTION ASSIST (/ page 300)
R BAS (Brak eAssist System) (/ page 229)
R Hill Start Assist (/ page 259)
R E-AC TIVE BODY CONTROL (/ page 269)
R EBD ( Electronic Brakeforc eDistribution)
(/ page 235) 228
Driving and parking
Page 328 of 729
#
Turn brightness control 1up or down.
The lighting of the instrument display and in
th e control elements of theve hicle interior is
adjus ted. Menus and submenus
Fu
nctions on the service menu of the on-
board compu ter On-board computer:
4 Service #
Toselect the function: swipe upwards or
down wards on the left-hand Touch Control. #
Press the left-hand Touch Control.
Fu nctions on theService menu:
R Message memory (/ page611)
R AdBlue: Adblue ®
ra nge and fill le vel
R Tyres:
- Restarting the tyre pressure loss warning
sy stem (/ page579)
- Che cking tyre pressure with the tyre
pressure monitor (/ page573) -
Restarting the tyre pressure monitor
(/ page 574)
R ASSYST PLUS : calls upthe service due date
(/ page 531)
R Coolant: coolant temp erature display
R Engine oil level: engine oil le vel
R Consumption info: fuel life cycle consump‐
tion Calling up
the assistant display On-board computer:
4 Assistance
The following displa ysare available on the assis‐
ta nt displ aymenu:
R Assis tant displ ay
R Attention le vel (/ page 300)
R Full-sur face menu displ ay #
Toswitch between the displa ys:swipe
upwards or down wards on the left-hand
To uch Control. St
atus displa yson the assis tant displ ay:
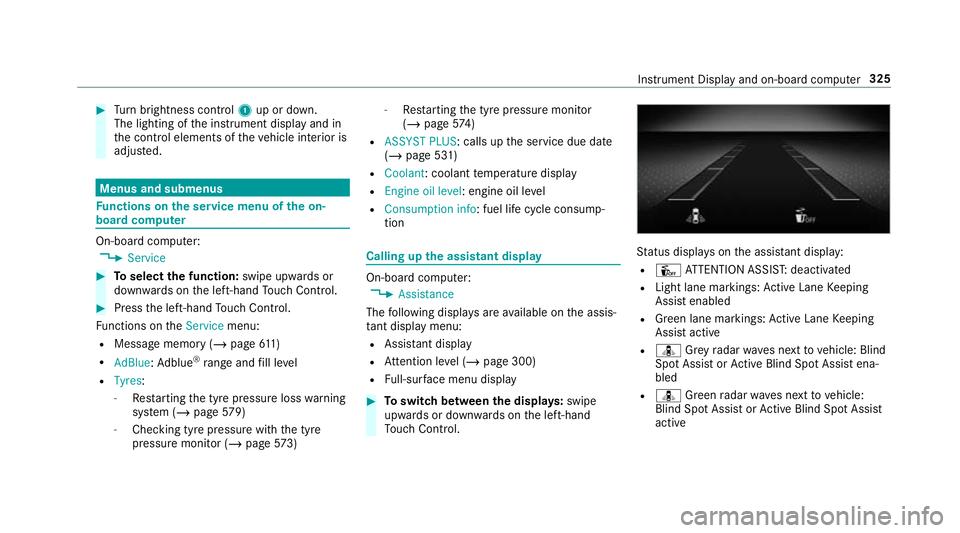
R Û ATTENTION ASSIS T:deactivated
R Light lane markings: Active Lane Keeping
Assist enabled
R Green lane markings: Active Lane Keeping
Assist active
R ¸ Grey radar waves next tovehicle: Blind
Spot Assist or Active Blind Spot Assi stena‐
bled
R ¸ Green radar waves next tovehicle:
Blind Spot Assist or Active Blind Spot Assi st
active In
stru ment Display and on-board computer 325
Page 535 of 729
fi
ed based on the actual operating conditions
and/or loads.
Examples of arduous operating conditions:
R regular city driving with frequent intermedi‐
ate stops
R mainly short-dis tance driving
R frequent operation in mountainous terrain or
on poor road sur faces
R when the engine is of ten le ftidling for long
periods
R operation in particula rly dusty conditions
and/or if air-recirculation mode is frequently
used
In these or similar operating conditions, ha vethe
interior air filter, engine air cleaner, engine oil
and oil filter etc. changed more frequent ly. The
ty re s must be checked more frequently if the
ve hicle is operated under increased loads. Fur‐
th er information can be obtained at a qualified
specialist workshop. Battery disconnection periods
The ASS
YST PLUS se rvice inter val display
can only calculate the service due da tewhen
th e bat tery is connected. #
Notedown the service due date displa yed on
th e instrument display before disconnecting
th e battery (/ page 531). Engine compartment
Opening/closing
the bonnet &
WARNING Risk of accident due todriv‐
ing with the engine bonn etunlo cked
An unloc ked engine bonn etmay open up
when theve hicle is in motion and block your
vie w. #
Never unlock the engine bonn etwhen
driving. #
Before every trip, ensure that the
engine bonn etis loc ked. &
WARNING Risk of accident and inju ry
when opening and closing the engine
bonn et
When opening or closing the engine bonn et,
it may suddenly drop into the end position.
There is a risk of injury for an yone in the
engine bonn et's range of mo vement. #
Only open or close the engine bonn et
when there are no persons in the
engine bonn et's range of mo vement. &
WARNING Danger of bu rns when open‐
ing the bonn et
If yo u open the engine bonn etwhen the
engine has overheated or during a fire inthe
engine compartment, you could come into
contact with hot gases or other escaping
operating fluids. #
Before opening the bonn et, allow the
engine tocool down. 532
Maintenance and care
Page 537 of 729
Opening
the bonnet #
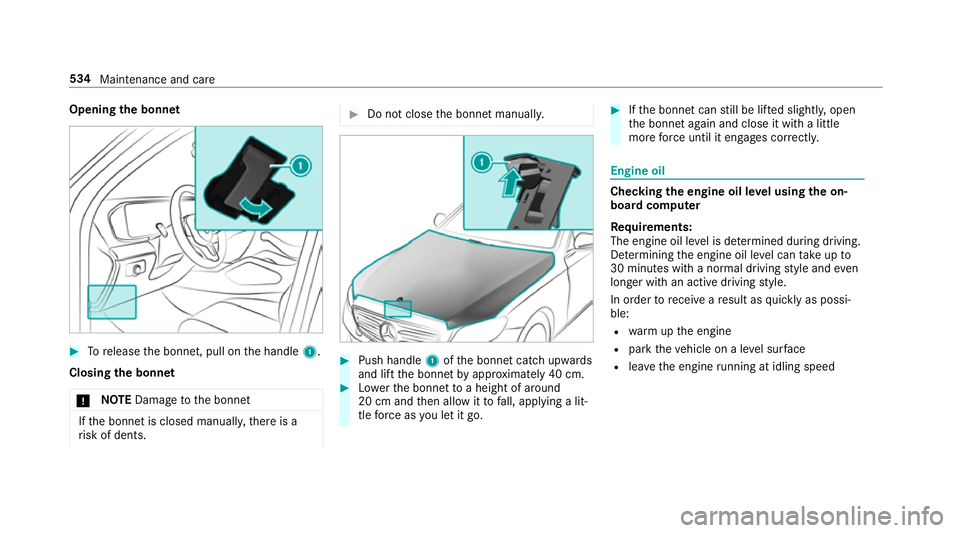
Torelease the bonn et, pull on the handle 1.
Closing the bonnet
* NO
TEDama getothe bonn et If
th e bonn etis closed manuall y,there is a
ri sk of dents. #
Do not close the bonn etmanually. #
Push handle 1ofthe bonn etcatch up wards
and lift the bonn etby appr oximately 40 cm. #
Lowe rth e bonn etto a height of around
20 cm and then allow it tofall, applying a lit‐
tle forc e as you let it go. #
Ifth e bonn etcan still be lif ted slightl y,open
th e bonn etagain and close it with a little
more forc e until it engages cor rectly. Engine oil
Che
cking the engine oil le vel using the on-
board compu ter
Re quirements:
The engine oil le vel is de term ined during driving.
De term ining the engine oil le vel can take up to
30 minutes with a normal driving style and even
longer with an active driving style.
In order torecei veare sult as quickly as possi‐
ble:
R warm upthe engine
R park theve hicle on a le vel sur face
R leave the engine running at idling speed 534
Maintenance and care
Page 538 of 729
On-board computer:
4 Service 5
Engine oil level
Yo u will see one of thefo llowing messages on
th e multifunction display:
R Engine oil level Measuring now : measure‐
ment of the oil le vel is not yet possible. #
Repeat there qu est af ter a maximum of
30 minutes driving.
R Engine oil level OK andthe bar display for
indicating the oil le vel on the multifunction
display is green and is between "min" and
"max": the oil le vel is cor rect.
R Engine oil level Add 1,0 l andthe bar display
fo r indicating the oil le vel on the multifunc‐
tion display is orange and is below "min": #
Top up with 1 l engine oil.
R Reduce engine oil level andthe bar display
fo r indicating the oil le vel on the multifunc‐
tion display is orange and is abo ve"max": #
Drain off excess engine oil that has been
added. Consult a qualified specialist work‐
shop.
R For engine oil level turn on ignition: #
switch on the ignition tocheck the engine oil
le ve l.
R Engine oil level System inoperative : sensor
fa ulty or not inser ted. #
Consult a qualified specialist workshop.
R Engine oil level System currently unavail. : #
close the bonn et.
To pping up engine oil &
WARNING Risk of bu rns from hot com‐
ponent parts in the engine compartment
Cer tain components in the engine compart‐
ment can be very hot, e.g. the engine, the
ra diator and parts of theex haust sy stem. #
Allow the engine tocool down and only
to uch co mponent parts described in
th efo llowing. &
WARNING Risk offire and injury from
engine oil
If engine oil comes into con tact wi thhot
component parts in the engine compart‐
ment, it may ignite. #
Make sure that no engine oil is spilled
next tothefiller opening. #
Allow the engine tocool off and thor‐
oughly clean the engine oil from compo‐
nent parts before starting theve hicle. *
NO
TEEngine dama gecaused byan
incor rect oil filter, incor rect oil or addi‐
tives #
Do not use engine oils or oil filters
which do not cor respond tothe specifi‐
cations explicitly prescribed forthe
service inter vals. #
Do not alter the engine oil or oil filter in
order toachie velonger change inter vals
th an presc ribed. #
Do not use additives. Maintenance and care
535
Page 539 of 729
#
Follow the instructions in the service
inter val display rega rding the oil
ch ange. *
NO
TEDama gecaused bytopping up too
much engine oil To
o much engine oil can damage the engine
or the catalytic con verter. #
Have excess engine oil remo ved at a
qu alified specialist workshop. #
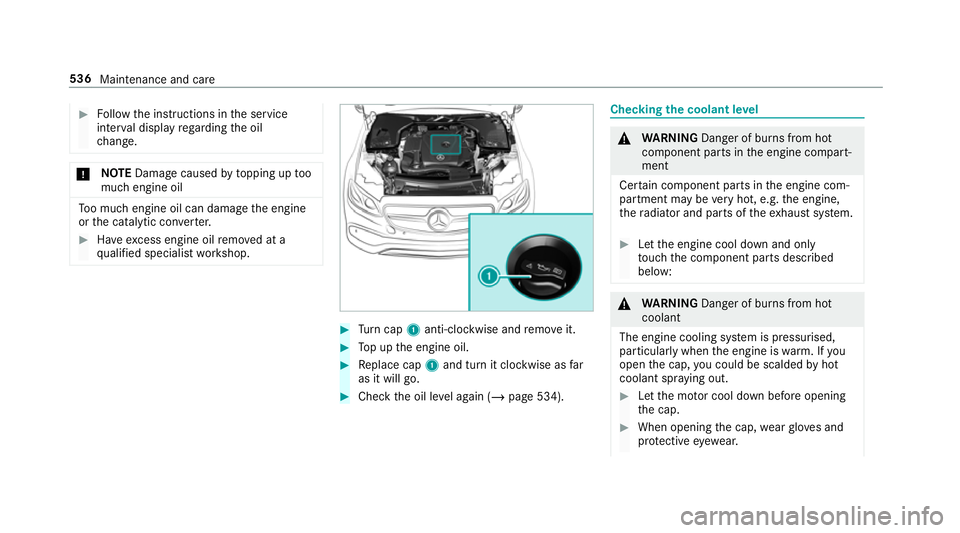
Turn cap 1anti-clockwise and remo veit. #
Top up the engine oil. #
Replace cap 1and turn it clockwise as far
as it will go. #
Check the oil le vel again (/ page 534). Checking
the coolant le vel &
WARNING Danger of bu rns from hot
component parts in the engine compart‐
ment
Cer tain component parts in the engine com‐
partment may be very hot, e.g. the engine,
th era diator and parts of theex haust sy stem. #
Let the engine cool down and only
to uch the component parts described
below: &
WARNING Danger of bu rns from hot
coolant
The engine cooling sy stem is pressurised,
particularly when the engine is warm. If you
open the cap, you could be scalded byhot
coolant spr aying out. #
Let the mo tor cool down before opening
th e cap. #
When opening the cap, wearglove s and
pr otective eyew ear. 536
Maintenance and care
Page 543 of 729
Ac
tivating/deactivating automatic car wash
mode Re
quirements:
R theve hicle is stationary
R the engine is running.
Multimedia sy stem:
4 © 5
Settings
5 Schnellzugriff (Quick access)
Ac tivating automatic car wash mode #
Select Automatic car wash mode. #
Select Start.
If one of the settings cann otbe selected, this is
displa yedby a% behind there spective set‐
ting.
% For an overview of the settings made when
activating automatic car wash mode
(/ page 538).
Deactivating automatic car wash mode #
Select Stop.
The automatic car wash settings are reset. %
The automatic car wash mode is automati‐
cally deactivated as soon as a speed of
10 km/h is exceeded. Information on using a high-p
ressure cleaner &
WARNING Risk of an accident when
using high-pressure cleane rswith circu‐
lar jet nozzles
The wate r jet of a circular jet nozzle (dirt
grinder) can cause extern ally invisible dam‐
age tothe tyres or chassis parts.
Components damaged in this wa y may unex‐
pec tedly fail. #
Do not use high-pressure cleaners with
circular jet nozzles toclean theve hicle. #
Have damaged tyres or chassis parts
re placed immediatel y. To
avo id damage to yourvehicle, obser vethefo l‐
lowing when using a high-pressure cleaner:
R keep theke y at least 3 m away from theve hi‐
cle. Otherwise theta ilgate could open unin‐
te ntional ly.
R maintain a dis tance of at least 30 cm tothe
ve hicle.
R vehicles with deco rative foil: parts of your
ve hicle are co vered with a decorative foil.
Maintain a dis tance of at least 70 cm
between thefo il-c ove red parts of theve hicle
and the nozzle of the high-pressure cleaner.
Mo vethe high-pressure cleaner nozzle
around whilst cleaning. The waterte mp era‐
ture of the high-pressure cleaner must not
exc eed 60 °C.
R obser vethe information on the cor rect dis‐
ta nce in the equipment manufacturer's oper‐
ating instructions.
R do not point the nozzle of the high-pressure
cleaner directly at sensitive parts such as
tyres, slits, electrical components, bat teries,
light bulbs and ventilation sl ots. 540
Maintenance and care