MERCEDES-BENZ GLS SUV 2020 Owners Manual
Manufacturer: MERCEDES-BENZ, Model Year: 2020, Model line: GLS SUV, Model: MERCEDES-BENZ GLS SUV 2020Pages: 549, PDF Size: 9.9 MB
Page 111 of 549
Ad
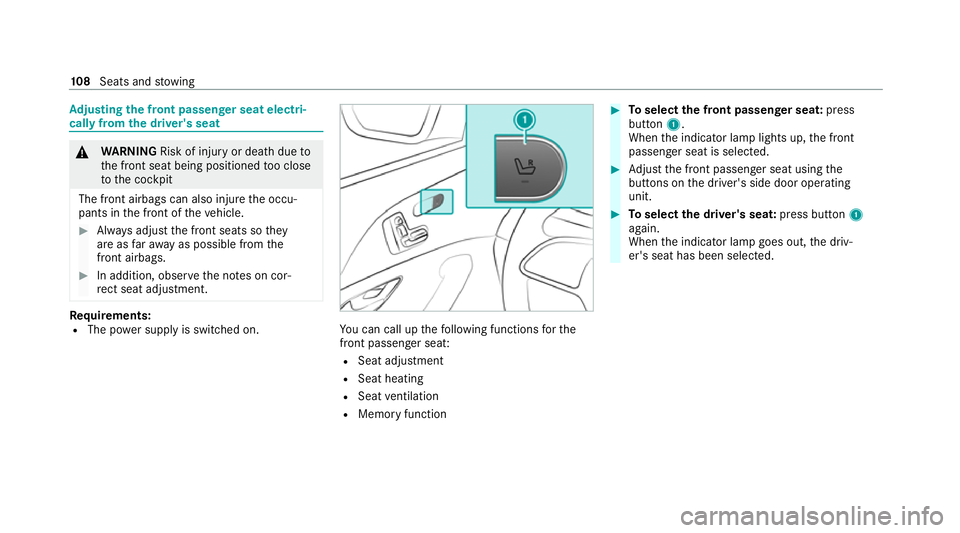
justing the front passen ger seat electri‐
cally from the driver's seat &
WARNING Risk of inju ryor death due to
th e front seat being positioned too close
to the cockpit
The front airbags can also injure the occu‐
pants in the front of theve hicle. #
Alw ays adjust the front seats so they
are as faraw ay as possible from the
front airbags. #
In addition, obse rveth e no tes on cor‐
re ct seat adjustment. Re
quirements:
R The po wer supply is switched on. Yo
u can call up thefo llowing functions forthe
front passenger sea t:
R Seat adjustment
R Seat heating
R Seat ventilation
R Memory function #
Toselect the front passenger seat: press
button 1.
When the indicator lamp lights up, the front
passenger seat is selected. #
Adjust the front passenger seat using the
buttons on the driver's side door operating
unit. #
Toselect the driver's seat: press button1
again.
When the indicator lamp goes out, the driv‐
er's seat has been selected. 108
Seats and stowing
Page 112 of 549
Ad
justing the front passen ger seat electri‐
cally from the rear #
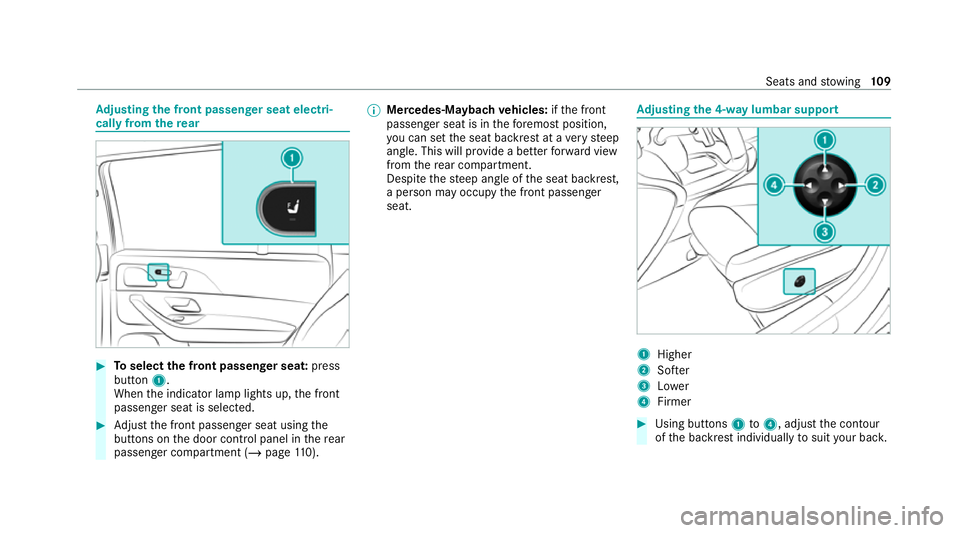
Toselect the front passenger seat: press
button 1.
When the indicator lamp lights up, the front
passenger seat is selected. #
Adjust the front passenger seat using the
buttons on the door control panel in there ar
passenger compartment (/ page110). %
Mercedes-Mayba chvehicles: ifth e front
passenger seat is in thefo re most position,
yo u can set the seat backrest at a very steep
angle. This will pr ovide a better forw ard view
from there ar compartment.
Despite thesteep angle of the seat backrest,
a person may occupy the front passenger
seat. Ad
justing the 4-w aylumbar support 1
Higher
2 Softer
3 Lower
4 Firmer #
Using buttons 1to4 , adjust the conto ur
of the backrest individually tosuit your bac k. Seats and
stowing 109
Page 113 of 549
Ad
justing the rear seats electrical ly*
NO
TEDama getothere ar seat armrest
when folding the cent reseat backrest
fo rw ard If
th ere ar seat armrest is folded down, it can
be damaged when the cent reseat backrest
is folded forw ard. #
Foldthere ar seat armrest upwards
before folding the cent reseat backrest
fo rw ard. The middle seat backrest is adjus
tedto ge ther
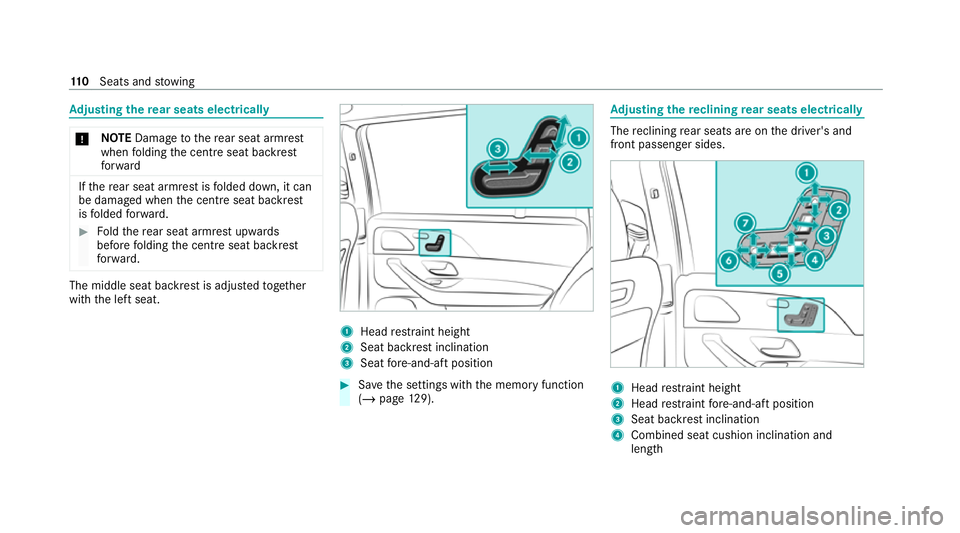
with the left seat. 1
Head restra int height
2 Seat backrest inclination
3 Seat fore -and-aft position #
Save the settings with the memory function
(/ page 129). Ad
justing the reclining rear seats electrical ly The
reclining rear seats are on the driver's and
front passenger sides. 1
Head restra int height
2 Head restra int fore -and-aft position
3 Seat ba ckrest inclination
4 Combined seat cushion inclination and
length 11 0
Seats and stowing
Page 114 of 549
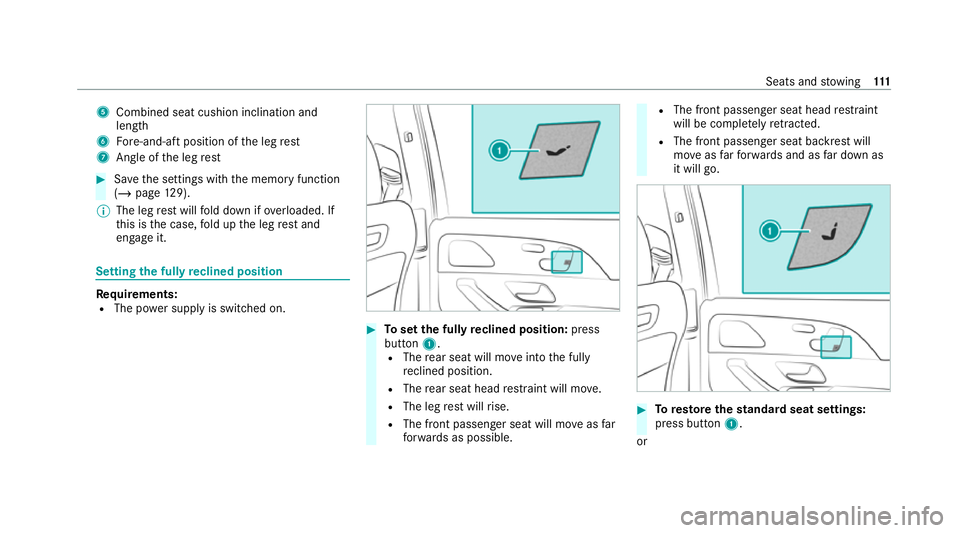
5
Combined seat cushion inclination and
length
6 Fore-and-aft position of the leg rest
7 Angle of the leg rest #
Save the settings with the memory function
(/ page 129).
% The leg rest will fold down if overloaded. If
th is is the case, fold up the leg rest and
engage it. Setting
the fully reclined position Re
quirements:
R The po wer supply is switched on. #
Toset the fully reclined position: press
button 1.
R The rear seat will mo veinto the fully
re clined position.
R The rear seat head restra int will mo ve.
R The leg rest will rise.
R The front passenger seat will mo veas far
fo rw ards as possible. R
The front passenger seat head restra int
will be comple tely retracted.
R The front passenger seat ba ckrest will
mo veas farfo rw ards and as far down as
it will go. #
Toresto rethest andard seat settings:
press button 1.
or Seats and
stowing 111
Page 115 of 549

#
Call up the settings with the memory func‐
tion (/ page129).
% You can use there ar-compartment child
saf ety lock todisable this function
(/ page 77).
% The leg rest will fold down if overloaded. If
th is is the case, fold up the leg rest and
engage it. At
taching and removing the additional cush‐
ion of the leg rest Use
the additional cushion only when theve hicle
is stationar y.The additional cushion is in the
ve hicle. #
Toattach: placethe additional cushion on
th e leg rest. #
Pull theru bber stra ps laterally overth e leg
re st. #
Toremo ve:re mo vetheru bber stra ps from
th e leg rest and stow the additional cushion
safely in theve hicle. Fo
lding there ar seats on the second row of
seats forw ards and back electrical ly &
WARNING Risk of inju rydue toseat
backrest folded forw ards
If th ere ar seat backrest is folded forw ards,
persons in theth ird row of seats could col‐
lide with parts of the seat adjustment mech‐
anism, in particular in theeve nt of an acci‐
dent, sudden braking or an ab rupt change of
direction. #
Ifth ere is a person in theth ird row of
seats, there ar seat in front of that per‐
son must be folded back into the driv‐
ing position before starting the journe y. #
People in theth ird row of seats must
not place their legs on a rear seat back‐
re st that has been folded forw ards. Alw
ays ensure that all vehicle occupants ha ve
th eir seat belts fastened cor rectly and are sitting
prope rly. Pa rticular attention must be paid to
ch ildren. 11 2
Seats and stowing
Page 116 of 549

If
yo u no lon gerre qu ire the seat backrest tobe
fo lded down for loading or forge tting in and out,
fo ld it back into place. &
WARNING Risk of becoming trapped if
th e seat is not engaged
The seat does not engage when folded for‐
wa rds. The seat can fold backwards unex‐
pectedl y,e.g. when accelerating, braking or
in theev ent of an abrupt change of direction
or an accident.
Pe ople in the seat's sweep can become trap‐
ped. #
If a seat is folded forw ards, alw aysfo ld
it back before driving off. #
Make sure that the seat is engaged. If a seat on
the second rowof seats is not
engaged, this will be shown on the multifunction
display on the instrument clus ter.
Re quirements:
R The area into which there ar seat is folded is
clear. R
The rear seat has been folded up.
R Vehicles with comfort seating: the cent re
armrest is folded up.
R Vehicles with an extended centre console:
th estow age compartment in the cent recon‐
sole is closed.
R Vehicles with a folding rear armres t:there ar
armrest has been folded up.
R Vehicles with centre seat backrests:the
centre seat ba ckrest has been folded up.
Fo lding there ar seat into the front position
Yo u can fold the seats on the second row of
seats forw ards forth efo llowing situations:
R For easier access tothe luggage compart‐
ment
R Vehicles with a third row of seats: forge tting
in or out
Ve hicles with a centre seat backrest:the cent re
re ar seat folds forw ards and backwards toge ther
with the left rear seat. Depending on
theve hicle equipment, you can
fo ld there ar seats forw ards as follo ws:
R Six-seater: on theright-hand side of theve hi‐
cle only
R Seven-sea ter with centre seat backres t:bo th
sides
% Toinc rease the size of the luggage compart‐
ment, you can mo vethe seat backrests into
th e luggage compartment floor position
(/ page 136). Seats and
stowing 11 3
Page 117 of 549
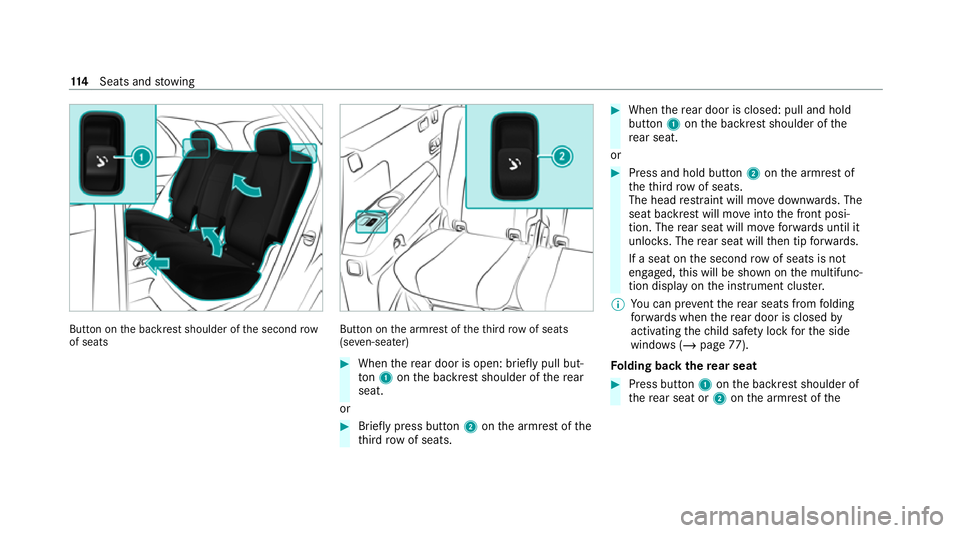
Button on
the backrest shoulder of the second row
of seats Button on
the armrest of theth ird row of seats
(se ven-sea ter) #
When there ar door is open: brief lypull but‐
to n1 onthe backrest shoulder of there ar
seat.
or #
Brief lypress button 2onthe armrest of the
th ird row of seats. #
When there ar door is closed: pull and hold
button 1onthe backrest shoulder of the
re ar seat.
or #
Press and hold button 2onthe armrest of
th eth ird row of seats.
The head restra int will mo vedown wards. The
seat backrest will mo veinto the front posi‐
tion. The rear seat will mo veforw ards until it
unlo cks. The rear seat will then tip forw ards.
If a seat on the second rowof seats is not
engaged, this will be shown on the multifunc‐
tion display on the instrument clus ter.
% You can pr eventthere ar seats from folding
fo rw ards when there ar door is closed by
activating thech ild saf ety lock forth e side
windo ws (/page 77).
Fo lding back there ar seat #
Press button 1onthe backrest shoulder of
th ere ar seat or 2onthe armrest of the 11 4
Seats and stowing
Page 118 of 549
th
ird row of seats and hold it down until the
re ar seat audibly engages.
The rear seat will tip down wards and mo ve
bac k.The seat backrests and head restra int
will then mo veinto a suitable seat position
automaticall y.
If a seat on the second rowof seats is not
engaged, this will be shown on the multifunc‐
tion display on the instrument clus ter. #
Tointer rupt thefo lding procedure before
engagement, let go of button 1.Tocontinue
th efo lding procedure, press and hold button
1 again.
Fo lding there ar seats forw ards mechanically
(eme rgency release)
Yo u can also fold there ar seats forw ards
mechanically using release loops. The release
loops are located on the outer sides and rear
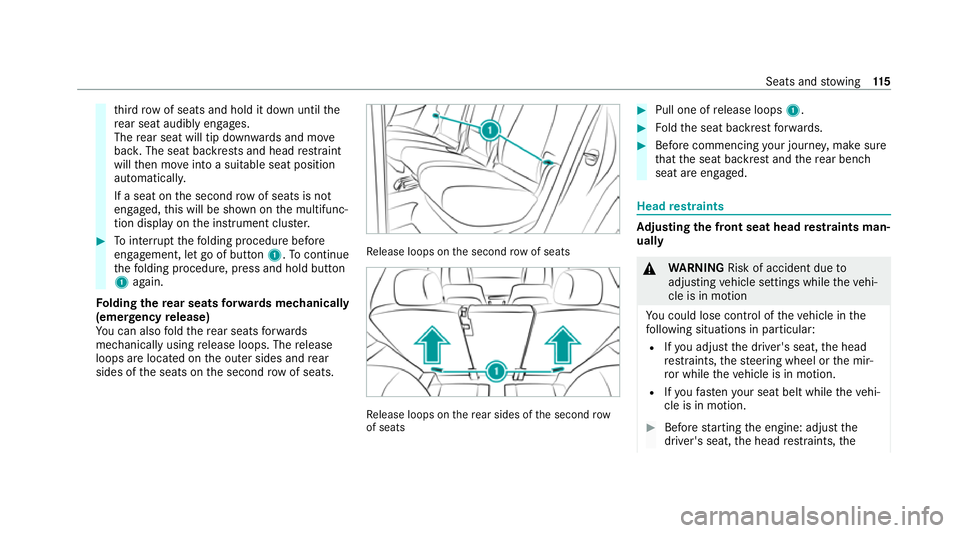
sides of the seats on the second rowof seats. Re
lease loops on the second row of seats Re
lease loops on there ar sides of the second row
of seats #
Pull one of release loops 1. #
Foldthe seat backrest forw ards. #
Before commencing your journe y,make sure
th at the seat backrest and there ar ben ch
seat are engaged. Head
restra ints Ad
justing the front seat head restra ints man‐
ually &
WARNING Risk of accident due to
adjusting vehicle settings while theve hi‐
cle is in motion
Yo u could lose cont rol of theve hicle in the
fo llowing situations in particular:
R Ifyo u adjust the driver's seat, the head
re stra ints, thesteering wheel or the mir‐
ro r while theve hicle is in motion.
R Ifyo ufast enyour seat belt while theve hi‐
cle is in motion. #
Before starting the engine: adjust the
driver's seat, the head restra ints, the Seats and
stowing 11 5
Page 119 of 549
st
eering wheel and the mir ror and fas‐
te nyo ur seat belt. &
WARNING Risk of inju rydue tohead
re stra ints not being fitted or being adjus‐
te d incor rectly
If head restra ints ha venot been ins talled or
ha ve not been adjus ted cor rectly, there is an
increased risk of injury in the head and neck
area, e.g. in theev ent of an accident or when
braking. #
Alw ays drive with the head restra ints
fi tted. #
Before driving off, ma kesure forev ery
ve hicle occupant that the cent reofthe
head restra int supports the back of the
head at about eye le vel. Do not inter
change the head restra ints of the
front and rear seats. Otherwise, you will not be
able toadjust the height and angle of the head
re stra ints cor rectl y. Ad
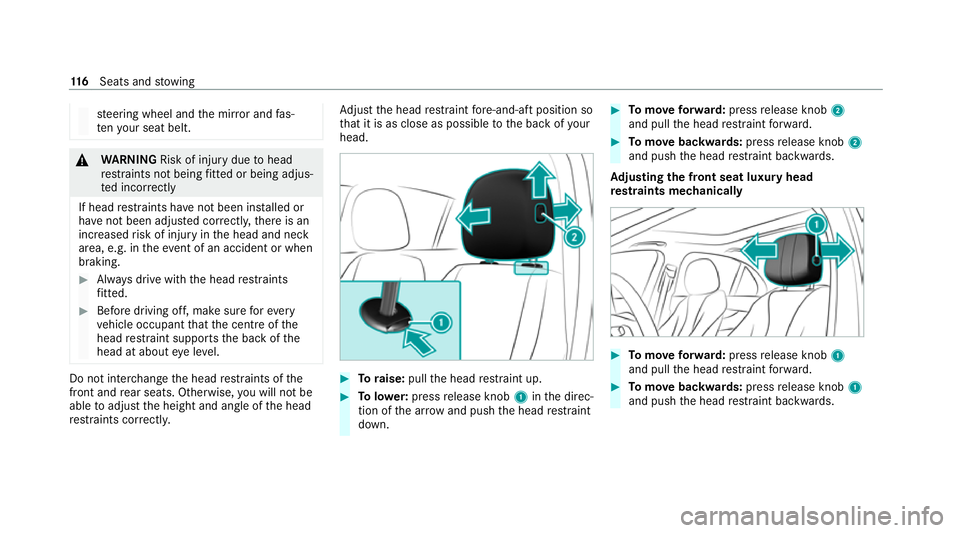
just the head restra int fore -and-aft position so
th at it is as close as possible tothe back of your
head. #
Toraise: pullthe head restra int up. #
Tolowe r:press release knob 1inthe direc‐
tion of the ar row and push the head restra int
down. #
Tomo veforw ard: press release knob 2
and pull the head restra int forw ard. #
Tomo vebackwards: pressrelease knob 2
and push the head restra int backwards.
Ad justing the front seat luxury head
re stra ints mechanically #
Tomo veforw ard: press release knob 1
and pull the head restra int forw ard. #
Tomo vebackwards: pressrelease knob 1
and push the head restra int backwards. 11 6
Seats and stowing
Page 120 of 549
Ad
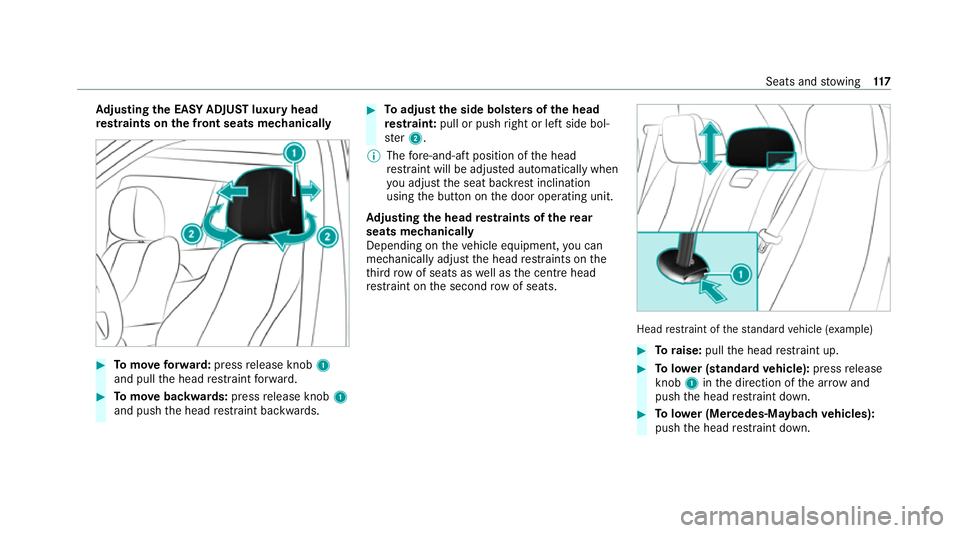
justing the EA SYADJUST luxury head
re stra ints on the front seats mechanically #
Tomo veforw ard: press release knob 1
and pull the head restra int forw ard. #
Tomo vebackwards: pressrelease knob 1
and push the head restra int backwards. #
Toadjust the side bols ters of the head
re stra int: pull or push right or left side bol‐
st er 2.
% The fore -and-aft position of the head
re stra int will be adjus ted automatically when
yo u adjust the seat backrest inclination
using the button on the door operating unit.
Ad justing the head restra ints of there ar
seats mechanically
Depending on theve hicle equipment, you can
mechanically adjust the head restra ints on the
th ird row of seats as well as the cent rehead
re stra int on the second rowof seats. Head
restra int of thest andard vehicle (e xamp le) #
Toraise: pullthe head restra int up. #
Tolowe r (standard vehicle): pressrelease
knob 1inthe direction of the ar row and
push the head restra int down. #
Tolowe r (Mercedes-Mayba chvehicles):
push the head restra int down. Seats and
stowing 117