heating MERCEDES-BENZ GLS SUV 2020 Owner's Manual
[x] Cancel search | Manufacturer: MERCEDES-BENZ, Model Year: 2020, Model line: GLS SUV, Model: MERCEDES-BENZ GLS SUV 2020Pages: 549, PDF Size: 9.9 MB
Page 267 of 549
R
The vehicle is set tooff-road le vel +1.
R When driving at speeds abo veappr oximately
80 km/h, theve hicle is lo wered.
R When driving at speeds below appr oximately
45 km/h, theve hicle is raised.
Individual suspension settings can be called up
in drive prog ram = (/page 203).
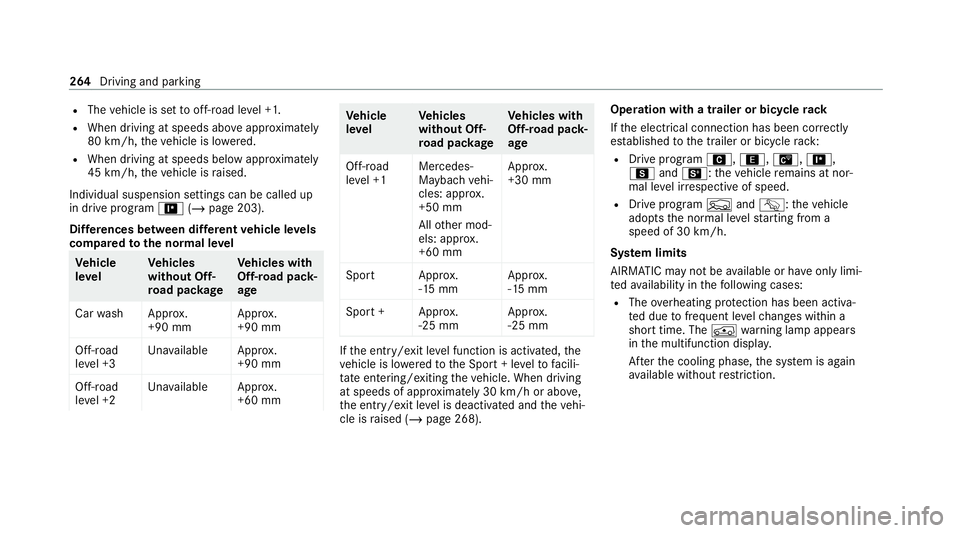
Dif fere nces between dif fere nt vehicle le vels
compared tothe normal le vel Ve
hicle
le vel Ve
hicles
without Off-
ro ad pac kage Ve
hicles with
Off-road pack‐
age
Car wash Appr ox.
+90 mm Appr
ox.
+90 mm
Off-road
le ve l +3 Una
vailable Appr ox.
+90 mm
Off-road
le ve l +2 Una
vailable Appr ox.
+60 mm Ve
hicle
le vel Ve
hicles
without Off-
ro ad pac kage Ve
hicles with
Off-road pack‐
age
Off-road
le ve l +1 Mercedes-
Maybach
vehi‐
cles: appr ox.
+50 mm
All other mod‐
els: appr ox.
+60 mm Appr
ox.
+30 mm
Spor tA pprox.
-15 mm App
rox.
-15 mm
Spo rt+A pprox.
-25 mm App
rox.
-25 mm If
th e entry /exit le vel function is activated, the
ve hicle is lo weredto the Sport + le velto facili‐
ta te entering/exiting theve hicle. When driving
at speeds of appr oximately 30 km/h or abo ve,
th e entry /exit le vel is deactivated and theve hi‐
cle is raised (/ page 268). Operation with a trailer or bicycle
rack
If th e electrical connection has been cor rectly
es tablished tothe trailer or bicycle rack:
R Drive program A,;, £,=,
C andB: theve hicle remains at nor‐
mal le vel ir respective of speed.
R Drive program FandG: theve hicle
adopts the normal le velst arting from a
speed of 30 km/h.
Sy stem limits
AIRMATIC may not be available or ha veonly limi‐
te dav ailability in thefo llowing cases:
R The overheating pr otection has been activa‐
te d due tofrequent le velch anges within a
short time. The Áwarning lamp appears
in the multifunction displa y.
Af terth e cooling phase, the sy stem is again
av ailable without restriction. 264
Driving and pa rking
Page 367 of 549

Ke
eping the air-water duct free #
Keep the area between the bonn etand the
windscreen free of deposits, e.g. ice, sn ow
and lea ves. Cleaning and care
Information on
washing theve hicle in a car
wa sh &
WARNING Risk of an accident due to
re duced braking po wer af terwa shing the
ve hicle
Braking ef ficiency is reduced af terwa shing
th eve hicle. #
Afterth eve hicle has been washed,
brake carefully while paying attention to
th e traf fic conditions until braking
po we r has been fully restored. *
NO
TEDama gefrom auto matic braking If one of
thefo llowing functions is switched
on, theve hicle brakes automatically in cer‐
ta in situations:
R Active Brake Assi st
R Active Dis tance Assi stDISTRONIC
R HOLD function
R Active Parking Assist
To avo id damage totheve hicle, deactivate
th ese sy stems in thefo llowing or similar sit‐
uations: #
during towing #
in a car wash *
NO
TEDama gedue tounsuitable car
wa sh #
Before driving into a car wash make
sure that the car wash is suitable for
th eve hicle dimensions. #
Ensure there is suf ficient ground clear‐
ance between the underbody and the
guide rails of the car wash. #
Ensure that the clearance width of the
car wash, in particular the width of the
guide rails, is suf ficient. To
avo id damage to yourvehicle when using a
car wash, ensure thefo llowing beforehand:
R Active Dis tance Assi stDISTRONIC is deacti‐
va ted.
R the HOLD function is switched off.
R the 360° Camera or there ve rsing camera is
switched off.
R the side windo wsand sliding sun roof are
comple tely closed.
R the outside mir rors are folded in.
R the blo werfo rth eve ntilation/heating is
switched off.
R the windscreen wiper switch is in position
g. 364
Maintenance and care
Page 373 of 549
acidic alloy wheel cleaners
toremo vebrake
dust. The aluminium trim inserts could other‐
wise be damaged.
Re versing camera and 360° Camera
R open the camera co ver with the multimedia
sy stem (/ page 283).
R use clean water and a soft clo thtoclean the
came ralens.
R do not use a high-pressure cleaner.
Ta ilpipes
R clean with a cleaning agent recommended
fo r Mercedes-Benz, especial lyin the winter
and af terwa shing theve hicle.
R do not use acidic cleaning agents.
Tr ailer hitch
R obse rveth e no tes on care in the trailer hitch
manufacturer's operating instructions.
R do not clean the ball neck with a high-pres‐
sure cleaner or solvent.
R remo vetraces of rust on the ball, e.g. with a
wire brush.
R remo vedirt with a lint-free clo th.R
afte r cleaning, lightly oil or grease the ball
head.
% Before using trailers with anti- torsional cou‐
pling, obser vethe manufacturer's operating
instructions. Note
s on care of the interior &
WARNING Risk of inju ryfrom pla stic
parts breaking off af terth e use of sol‐
ve nt-based care products
Ca reand cleaning products con taining sol‐
ve nts can cause su rfaces in the cockpit to
become porous. When the airbags are
deplo yed, plastic parts may break away. #
Do not use any care or cleaning prod‐
ucts containing sol vents toclean the
cockpit. &
WARNING Risk of inju ryor death from
bleached seat belts
Bleaching or dyeing seat belts can se verely
we aken them. This can,
forex ample, cause seat belts to
te ar or fail in an accident. #
Never blea chor dye seat belts. To
avo id damage totheve hicle, obser vethefo l‐
lowing no tes on cleaning and care:
Seat belts R clean with luk ewarmand soapy water.
R do not use chemical cleaning agents.
R do not dry byheating them toove r 80°C or
ex posing them todirect sunlight.
Display
R switch off the display and let it cool down.
R clean the sur face carefully wi tha mic rofibre
clo thand a suitable display care product
(TF T-LC D).
R do not use any other agents.
Plastic trim R clean with a damp microfibre clo th.
R for heavy soiling: use a cleaner recommen‐
ded for Mercedes-Benz. 37 0
Maintenance and care
Page 380 of 549
Obser
vethefo llowing if you come into con‐
ta ct wi th the tyre sealant: #
Rinse off the tyre sealant from your skin
using water immediatel y. #
If tyre sealant gets into your eyes, thor‐
oughly rinse them using clean water
immediatel y. #
If tyre sealant has been swallowe d,
th oroughly rinse out your mouth imme‐
diately and drink plenty of water.Do not
induce vomiting and seek medical
attention immediately. #
Change out of clo thing which has come
into con tact wi thtyre sealant immedi‐
ately. #
If an alle rgic reaction occurs, seek med‐
ical attention immediatel y.*
NO
TEOverheating due tothe tyre infla‐
tion compressor running too long #
Do not runth e tyre inflation compres‐
sor for longer than ten minu tes without
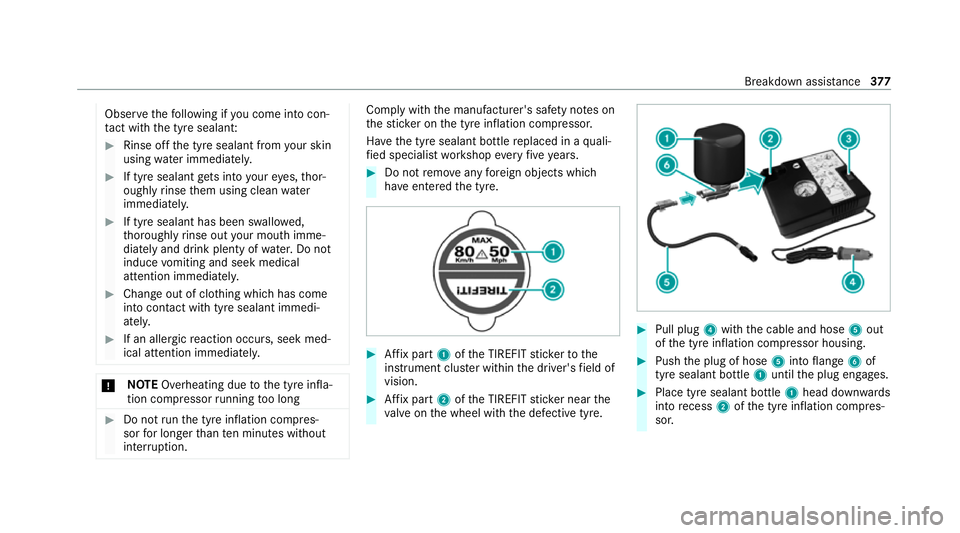
inter ruption. Comply with
the manufacturer's saf ety no tes on
th est icke r on the tyre inflation compressor.
Ha ve the tyre sealant bottle replaced in a quali‐
fi ed specialist workshop every five years. #
Do not remo veany fore ign objects which
ha ve entered the tyre. #
Affix pa rt1 ofthe TIREFIT sticke rto the
instrument clus ter within the driver's field of
vision. #
Affix pa rt2 ofthe TIREFIT sticke r near the
va lve on the wheel with the defective tyre. #
Pull plug 4with the cable and hose 5out
of the tyre inflation compressor housing. #
Push the plug of hose 5into flange 6of
tyre sealant bottle 1until the plug engages. #
Place tyre sealant bottle 1head down wards
into recess 2ofthe tyre inflation compres‐
sor. Breakdown assis
tance 377
Page 411 of 549
shop. The new wheel must ha
vethe
cor rect dimensions. %
The emergency spa rewheel is fastened in
th e load compartment under the load com‐
partment floor.
% Not for Mercedes-Maybach vehicles.
Obser vethefo llowing no tes on fitting an emer‐
ge ncy spa rewheel:
R Check the tyre pressure of the emer gency
spa rewheel fitted. Co rrect the pressure as
necessar y.
R The maximum permissible speed with an
emer gency spa rewheel fitted is 80 km/h.
R Do not fit th e emer gency spa rewheel with
sn ow ch ains.
R Replace the emer gency spa rewheel af ter six
ye ars at the latest, rega rdless of wear.
% Ve
hicles with a tyre pressure monitoring
sy stem: if an emer gency spa rewheel is fit‐
te dth e tyre pressure monitoring sy stem can‐
not function reliabl y.Fo r a few minutes af ter
an emer gency spa rewheel is fitted, the sys‐ te
m may still display the tyre pressure of the
re mo ved wheel. Only restart the sy stem
again when the emer gency spa rewheel has
been replaced with a new wheel.
Be sure toalso obse rveth efo llowing fur ther
re lated subjects:
R Notes on tyre pressure (/ page 394)
R Tyre pressure table (/ page 395)
R Notes on fitting tyres (/ page 397) Inflating
the emer gency spare wheel *
NO
TEOverheating due tothe tyre infla‐
tion compressor running too long #
Do not runth e tyre inflation compres‐
sor for longer than ten minu tes without
inter ruption. Re
quirements:
Comply with the manufacturer's saf ety no tes on
th est icke r of the emer gency spa rewheel and on
th e tyre inflation compressor. #
Remo vethest icke r with the label 80 km/h
from the tyre inflation compressor housing
and af fix it tothe instrument clus ter within
th e driver's field of vision. #
Remo vethe tyre inflation compressor from
th estow age space under the luggage com‐
partment floor (/ page376). #
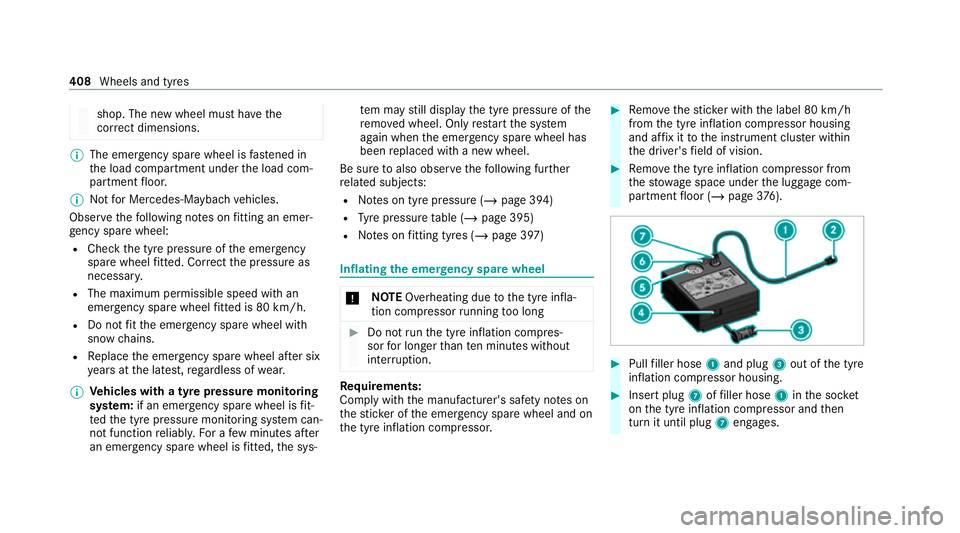
Pull filler hose 1and plug 3out of the tyre
inflation compressor housing. #
Insert plug 7offiller hose 1inthe soc ket
on the tyre inflation compressor and then
turn it until plug 7engages. 408
Wheels and tyres
Page 415 of 549
#
Inflate the collapsible spare wheel using
th e tyre inflation compressor before
lo we ring theve hicle. *
NO
TEOverheating due tothe tyre infla‐
tion compressor running too long #
Do not runth e tyre inflation compres‐
sor for longer than ten minu tes without
inter ruption. #
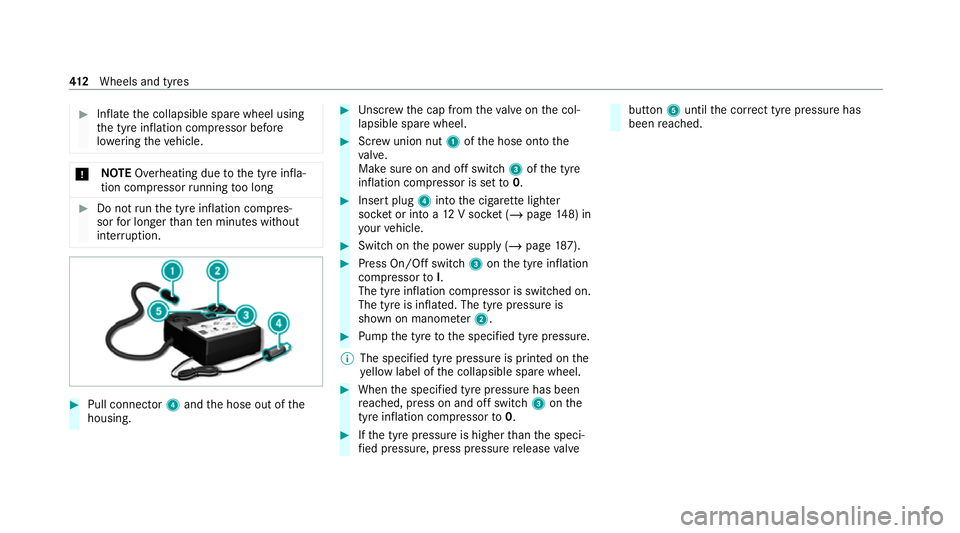
Pull connec tor4 and the hose out of the
housing. #
Unscr ew the cap from theva lve on the col‐
lapsible spare wheel. #
Screw union nut 1ofthe hose onto the
va lve.
Make sure on and off switch 3ofthe tyre
inflation compressor is set to0. #
Insert plug 4into the cigar ette lighter
soc ket or into a 12V soc ket (/ page 148) in
yo ur vehicle. #
Switch on the po wer supp ly (/ page 187). #
Press On/Off switch 3onthe tyre inflation
compressor toI.
The tyre inflation compressor is switched on.
The tyre is inflated. The tyre pressure is
shown on manome ter2. #
Pump the tyre tothe specified tyre pressure.
% The specified tyre pressure is printed on the
ye llow label of the collapsible spare wheel. #
When the specified tyre pressure has been
re ached, press on and off swit ch3 onthe
tyre inflation compressor to0. #
Ifth e tyre pressure is higher than the speci‐
fi ed pressure, press pressure release valve bu
tton 5until the cor rect tyre pressure has
been reached. 412
Wheels and tyres
Page 423 of 549
The
recommended octane number foryo ur vehi‐
cle can also be found on the instruction label in
th e fuel filler flap (/ page211).
As a temp orary measure, if there commended
fuel is not available, you may also use regular
unleaded petrol with at least 91RON. This may
re duce engine output and increase fuel con‐
sum ption.
Ne verre fuel using petrol with an even lo wer
RO N.
Fu rther information on fuel can be obtained at a
fi lling station or a qualified specialist workshop.
Information on additives in petrol
Obser vethe no tes on operating fluids
(/ page 417).
* NO
TEDama gefrom use of unsuitable
additives Even small amounts of
the wrong additive
may lead tomalfunctions occur ring. #
Only add cleaning additives recommen‐
ded byMercedes-Benz tothe fuel. Mercedes-Benz
recommends that you use
brand-name fuels with additives.
In some count ries, the fuel available may not
ha ve suf ficient additives. Residue could build up
in the fuel injection sy stem as a result. In this
case, in consultation with a Mercedes-Benz
service centre, mix the fuel with the cleaning
additive recommended byMercedes-Benz.
Obser vethe no tes and mixing ratios indica ted
on theta nk.
In fo rm ation on fuel grades forve hicles with
a diesel engine
Gene ral no tes
Obser vethe no tes on operating fluids
(/ page 417). &
WARNING Risk offire from fuel mixture
If yo u mix diesel fuel with petrol, theflash
point of the fuel mixture is lo werth an that of
pure diesel fuel. #
Neverre fuel using petrol in diesel
engines. #
Never mix petrol with diesel fuel. *
NO
TEDama gecaused bythe wrong fuel Even small amounts of
the wrong fuel could
re sult in damage tothe fuel sy stem, the
engine and the emission control sy stem. #
Only refuel using sulphu r-free diesel
fuel that con form sto European stand‐
ard EN 590, or an equivalent specifica‐
tion.
In countries without sulphur-f ree diesel
fuel, refuel using only lo w-sulphur diesel
fuel with a sulphur content less than
50 ppm.
Ne verre fuel with one of thefo llowing fuels:
R petrol
R marine diesel
R heating oil
R pure bio-diesel fuel or vege table oil
R paraf fin or kerosene
If yo u ha veacciden tally refuelled with the
wrong fuel: #
Do not swit ch the ignition on. 420
Tech nical da ta
Page 428 of 549
#
Thoroughly clean the antif reeze from
component parts before starting the
ve hicle. *
NO
TEDama gecaused byincor rect cool‐
ant #
Only use coolant that has been pre‐
mixed with therequ ired antifreeze pro‐
te ction.
Information on coolant is available at thefo l‐
lowing locations:
R inthe Mercedes-Benz Specification for
Operating Fluids 310.1
- at https://be vo.mercedes-benz.com
- inthe Mercedes-Benz BeVo app
R at a qualified specialist workshop *
NO
TEOverheating at high outside tem‐
peratures If an inapp
ropriate coolant is used, the
engine cooling sy stem is not suf ficiently pro‐ te
cted against overheating and cor rosion at
high outside temp eratures. #
Alw ays use coolant appr ovedby
Mercedes-Benz. #
Obser vethe instructions in the
Mercedes-Benz Specifications for Oper‐
ating Fluids 310.1. Ha
ve the coolant regularly replaced at a qualified
specialist workshop.
Proportion of antifreeze concentrate in the
engine cooling sy stem:
R a minimum of 50% (antifreeze pr otection
down toappr oximately -37°C)
R a maximum of 55% (antifreeze pr otection
down to-45°C) Note
s on windscreen washer fluid Obser
vethe no tes on operating fluids
(/ page 417). &
WARNING ‑ Risk of fire and injury due to
windscreen washer concentrate
Wi ndsc reen washer concentrate is highly
fl ammable. It could ignite if it comes into
con tact wi thhot engine component parts or
th eex haust sy stem. #
Make sure that no windsc reen washer
concentrate spills out next tothefiller
opening. *
NO
TEDama getotheex terior lighting
due tounsuitable windsc reen washer
fl uid Uns
uitable windsc reen washer fluids may
damage the plastic sur face of theex terior
lighting. #
Only use windscreen washer fluids
which are also suitable for use on plas‐
tic sur faces, e.g. MB SummerFit or MB
Wi nterFit. Te
ch nical da ta425
Page 446 of 549

Display messages
Possible causes/consequences and M
MSolutions
d Vehicle is operational
Switch off ignition before
exiting *Y
ou are leaving theve hicle when it is in a ready-to-drive state. #
When you lea vetheve hicle, switch off the ignition, secure theve hicle against rolling away and take theke y with
yo u. #
Ifyo u do not lea vetheve hicle, switch off the electrical consumers, e.g. the seat heating. Otherwise, the12 V
battery may dischar geand it will then be possible tostart theve hicle only with the aid of a second battery
(s ta rting assis tance).
ï Operation only possible in
transmission position P *
The ball neck will not swivel because transmission position h,kor neutral iis selected. #
Dep ress the brake pedal. #
Enga gepark position j.
ï
Trailer coupling extending… *T
he ball neck will retract/ extend.
Do not attem pttospeed up, slow down or initiate the swivel mo vement using your hand, foot or other aids. During
th e swivel mo vement, do not couple a trailer.
When the ball neck has reached an operational position, the display message will disappear.
ï
Check trailer hitch lock *T
he trailer hitch is not operational during a journey with a trailer. &
WARNING Risk of an accident if the ball neck is not loc ked
The trailer may become de tach ed. Display messages and
warning/indicator lamps 443
Page 458 of 549
Display messages
Possible causes/consequences and M
MSolutions #
Consult a qualified specialist workshop.
Stop vehicle Leave engine
running Wait Transmission
cooling *T
he transmission is overheating. Pulling away may be temp orarily impaired or not possible. #
Stop theve hicle immediately in accordance with the traf fic conditions. Do not continue driving. #
Lea vethe engine running. #
Wait until the display message disappears before pulling away.
Auxiliary battery malfunc-
tion *T
he auxiliary batteryforth e transmission is no longer being charge d. #
Consult a qualified specialist workshop. #
Untilthen, alw ays select park position jmanually before you swit choff the engine. #
Before leaving theve hicle, apply the electric parking brake. Brakes
Display messages
Possible causes/consequences and M MSolutions
! Parking brake See Owner's
Manual *
The yellow ! indicator lamp is lit. The elect ric pa rking brake is malfunctioning.
To appl y: #
Switch the ignition off and switch it back on. #
Apply the electric parking brake manually (/ page 222).
If it is not possible toapply the electric parking brake: Display messages and
warning/indicator lamps 455