water pump MERCEDES-BENZ GLS SUV 2020 Owners Manual
[x] Cancel search | Manufacturer: MERCEDES-BENZ, Model Year: 2020, Model line: GLS SUV, Model: MERCEDES-BENZ GLS SUV 2020Pages: 549, PDF Size: 9.9 MB
Page 217 of 549
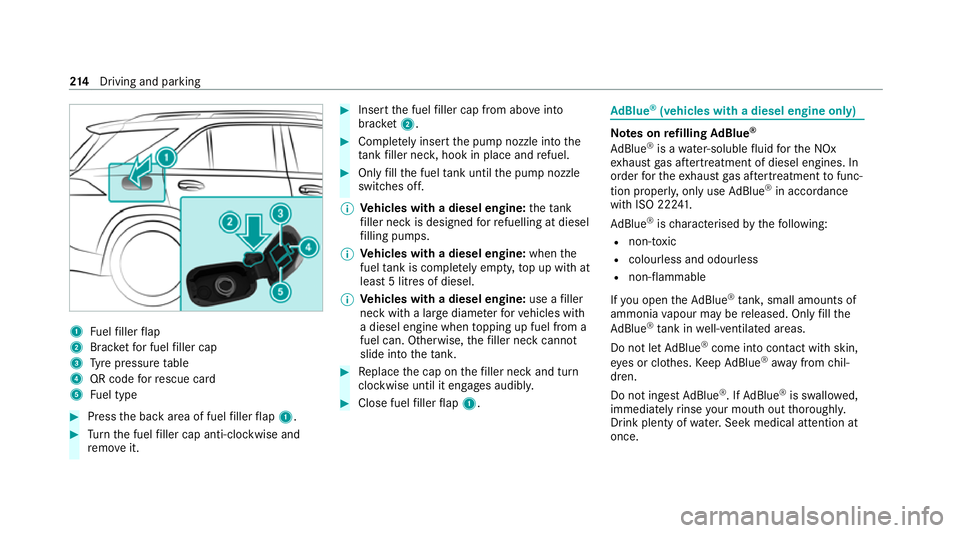
1
Fuelfiller flap
2 Brac ketfo r fuel filler cap
3 Tyre pressure table
4 QR code forre scue card
5 Fuel type #
Press the back area of fuel filler flap 1. #
Turn the fuel filler cap anti-clockwise and
re mo veit. #
Insert the fuel filler cap from abo veinto
brac ket2. #
Comp lete ly inse rtthe pump nozzle into the
ta nk filler nec k,hook in place and refuel. #
Only fill th e fuel tank until the pump nozzle
switches off.
% Vehicles with a diesel engine: theta nk
fi ller neck is designed forre fuelling at diesel
fi lling pumps.
% Vehicles with a diesel engine: whenthe
fuel tank is compl etely em pty, top up with at
least 5 litres of diesel.
% Vehicles with a diesel engine: use afiller
neck with a lar gediame terfo rve hicles with
a diesel engine when topping up fuel from a
fuel can. Otherwise, thefiller neck cannot
slide into theta nk. #
Replace the cap on thefiller neck and turn
clockwise until it engages audibl y. #
Close fuel filler flap 1. Ad
Blue ®
(vehicles with a diesel engine on ly) Note
s onrefilling AdBlue ®
Ad Blue ®
is a wate r-soluble fluid forth e NOx
ex haust gas af tertre atment of diesel engines. In
order forth eex haust gas af tertre atment tofunc‐
tion proper ly, only use AdBlue ®
in acco rdance
with ISO 22 241.
Ad Blue ®
is ch aracterised bythefo llowing:
R non-t oxic
R colourless and odourless
R non-flammable
If yo u open theAd Blue ®
tank, small amounts of
ammonia vapour may be released. Only fill the
Ad Blue ®
tank in well-ventilated areas.
Do not let AdBlue ®
come into contact wi thskin,
ey es or clo thes. Keep AdBlue ®
aw ay from chil‐
dren.
Do not ingest AdBlue ®
. If AdBlue ®
is swallo wed,
immediately rinse your mouth out thoroughly.
Drink plenty of water.Seek medical attention at
once. 214
Driving and pa rking
Page 381 of 549
#
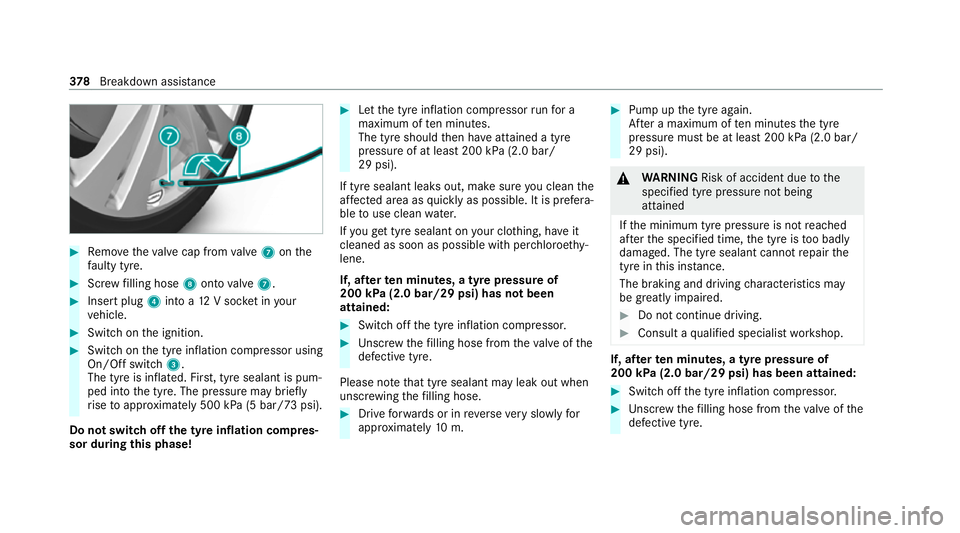
Remo vetheva lve cap from valve 7 onthe
fa ulty tyre. #
Screw filling hose 8onto valve 7. #
Insert plug 4into a 12V soc ket in your
ve hicle. #
Switch on the ignition. #
Switch on the tyre inflation compressor using
On/Off switch 3.
The tyre is inflated. Fir st, tyre sealant is pum‐
ped into the tyre. The pressure may brief ly
ri se toappr oximately 500 kPa (5 bar/73 psi).
Do not switch off the ty reinflation compres‐
sor during this phase! #
Let the tyre inflation compressor runfo r a
maximum of ten minu tes.
The tyre should then ha veattained a tyre
pressure of at least 200 kPa (2.0 bar/
29 psi).
If tyre sealant leaks out, make sure you clean the
af fected area as quickly as possible. It is prefera‐
ble touse clean water.
If yo uge t tyre sealant on your clo thing, ha veit
cleaned as soon as possible with per chloroe thy‐
lene.
If, af terte n minutes, a tyre pressure of
200 kPa (2.0 bar/29 psi) has not been
attained: #
Switch off the tyre inflation compressor. #
Unscr ew thefilling hose from theva lve of the
defective tyre.
Please no tethat tyre sealant may leak out when
unscr ewing thefilling hose. #
Drive forw ards or in reve rseve ry slowly for
appr oximately 10m. #
Pump up the tyre again.
Af ter a maximum of ten minu testh e tyre
pressure must be at least 200 kPa (2.0 bar/
29 psi). &
WARNING Risk of accident due tothe
specified tyre pressure not being
attained
If th e minimum tyre pressure is not reached
af te rth e specified time, the tyre is too badly
damaged. The tyre sealant cannot repair the
tyre in this ins tance.
The braking and driving characteristics may
be great lyimpaired. #
Do not continue driving. #
Consult a qualified specialist workshop. If, af
terte n minutes, a tyre pressure of
200 kPa (2.0 bar/29 psi) has been attained: #
Switch off the tyre inflation compressor. #
Unscr ew thefilling hose from theva lve of the
defective tyre. 378
Breakdown assis tance