remote control MERCEDES-BENZ M-Class 2012 W166 Comand Manual
[x] Cancel search | Manufacturer: MERCEDES-BENZ, Model Year: 2012, Model line: M-Class, Model: MERCEDES-BENZ M-Class 2012 W166Pages: 234, PDF Size: 6.74 MB
Page 10 of 234
R
Radio mode
Swi tching to<0021002100210021002100210021002100210021002100210021002100210021
0021002100210021002100210021002100210021002100210021002100210021
002100210021> 144
Radio station
Storing <0021002100210021002100210021002100210021002100210021002100210021
0021002100210021002100210021002100210021002100210021002100210021
00210021002100210021002100210021002100210021> 146
Read-alo udfunc tion <0021002100210021002100210021002100210021002100210021002100210021
002100210021002100210021002100210021002100210021V 93
Read-alo udspee d
Setting <0021002100210021002100210021002100210021002100210021002100210021
0021002100210021002100210021002100210021002100210021002100210021
0021002100210021002100210021002100210021002100210021> 42
Real-ti metraffic reports <0021002100210021002100210021002100210021002100210021002100210021
00210021002100210021V 88
Rear-co mpartm entscre ens.............. 209
Rear SeatEntertainment System
Adjusting soundsettings ............... 214
Adjusting thebrightness ................ 214
Adjusting thecolor <0021002100210021002100210021002100210021002100210021002100210021
00210021002100210021002100210021V 214
Adjusting thecontrast <0021002100210021002100210021002100210021002100210021002100210021
002100210021V 214
AUX mode .............. ........................228
CD/DVD audio and MP3 mode ......216
Cha nging thebatteri es<0021002100210021002100210021002100210021002100210021002100210021
00210021V 212
Cha nging thepictu reforma t.......... 215
Cord lessh eadphones <0021002100210021002100210021002100210021002100210021002100210021
0021002100210021V 211
Mul tipleusers <0021002100210021002100210021002100210021002100210021002100210021
0021002100210021002100210021002100210021002100210021002100210021V 214
Opera tingwith the headpho nes..... 213
System settings <0021002100210021002100210021002100210021002100210021002100210021
0021002100210021002100210021002100210021002100210021V 215
Using themainloudspeaker ..........213
Vid eoDVD mode <0021002100210021002100210021002100210021002100210021002100210021
00210021002100210021002100210021002100210021V 221
Reco rding theroute
View ingthe route onthe map .......... 86
Redial ............................ ......................122
Remote control
Rea rSeat Entertainment System...209
Rese t<0021002100210021002100210021002100210021002100210021002100210021
0021002100210021002100210021002100210021002100210021002100210021
0021002100210021002100210021002100210021002100210021002100210021
0021002100210021V 47
Route
Calcul ating <0021002100210021002100210021002100210021002100210021002100210021
0021002100210021002100210021002100210021002100210021002100210021
0021002100210021002100210021> 57
Estimated timeofarri val <0021002100210021002100210021002100210021002100210021002100210021
00210021V 83
Reco rding <0021002100210021002100210021002100210021002100210021002100210021
0021002100210021002100210021002100210021002100210021002100210021
00210021002100210021002100210021> 85
Rou teovervi ew<0021002100210021002100210021002100210021002100210021002100210021
0021002100210021002100210021002100210021002100210021002100210021V 84
Route calcul ation
Starting <0021002100210021002100210021002100210021002100210021002100210021
0021002100210021002100210021002100210021002100210021002100210021
002100210021002100210021002100210021002100210021> 57
Route display <0021002100210021002100210021002100210021002100210021002100210021
0021002100210021002100210021002100210021002100210021002100210021
0021002100210021002100210021> 84
Route guidan ce....... ..................... ........77
Canc eling.<0021002100210021002100210021002100210021002100210021002100210021
0021002100210021002100210021002100210021002100210021002100210021
00210021002100210021002100210021> 81
Continu ing<0021002100210021002100210021002100210021002100210021002100210021
0021002100210021002100210021002100210021002100210021002100210021
0021002100210021002100210021> 81
Destinati onreach ed....... ....... ....... ....81
Lane recomme ndations<0021002100210021002100210021002100210021002100210021002100210021
002100210021V 79
Off-road <0021002100210021002100210021002100210021002100210021002100210021
0021002100210021002100210021002100210021002100210021002100210021
00210021002100210021002100210021002100210021> 87
Traffi creports <0021002100210021002100210021002100210021002100210021002100210021
0021002100210021002100210021002100210021002100210021002100210021
00210021> 88Route
options
Setting <0021002100210021002100210021002100210021002100210021002100210021
0021002100210021002100210021002100210021002100210021002100210021
0021002100210021002100210021002100210021002100210021> 52
Route overview .................................... 84
Route type
Setting <0021002100210021002100210021002100210021002100210021002100210021
0021002100210021002100210021002100210021002100210021002100210021
0021002100210021002100210021002100210021002100210021> 52 S
Safety notes
Audi oCD/DVD andMP3 mode .....154
Using thetelep hone ..................... ..114
Vid eoDVD mode <0021002100210021002100210021002100210021002100210021002100210021
00210021002100210021002100210021002100210021V 186
SatRadio <0021002100210021002100210021002100210021002100210021002100210021
0021002100210021002100210021002100210021002100210021002100210021
0021002100210021002100210021002100210021002100210021> 148
Displ aying informa tion<0021002100210021002100210021002100210021002100210021002100210021
002100210021V 153
Reg isteri ng<0021002100210021002100210021002100210021002100210021002100210021
0021002100210021002100210021002100210021002100210021002100210021
0021002100210021> 149
Sele cting acate gor y.<0021002100210021002100210021002100210021002100210021002100210021
00210021002100210021V 150
Switchi ngto<0021002100210021002100210021002100210021002100210021002100210021
0021002100210021002100210021002100210021002100210021002100210021
002100210021> 149
Scre en
Sele cting forremote operation...... 210
SD memory card
Ejecting .............. ..................... ....... 157
Inserting <0021002100210021002100210021002100210021002100210021002100210021
0021002100210021002100210021002100210021002100210021002100210021
00210021002100210021002100210021> 157
Searc h&Send.................................... .. 76
SIRIUS weatherdisp lay
5- day forecas t........................ ........ 197
Daily forecas t........................ .........1 97
Detail informa tion<0021002100210021002100210021002100210021002100210021002100210021
0021002100210021002100210021002100210021V 197
Informati onchart <0021002100210021002100210021002100210021002100210021002100210021
00210021002100210021002100210021002100210021V 196
Sele cting thearea forthe wea ther
foreca st<0021002100210021002100210021002100210021002100210021002100210021
0021002100210021002100210021002100210021002100210021002100210021
002100210021002100210021002100210021> 197
Switchi ngon/off <0021002100210021002100210021002100210021002100210021002100210021
00210021002100210021002100210021002100210021V 196
Wea ther map <0021002100210021002100210021002100210021002100210021002100210021
0021002100210021002100210021002100210021002100210021002100210021
0021> 200
Skippin gback
CD/DVD mode<0021002100210021002100210021002100210021002100210021002100210021
00210021002100210021002100210021002100210021002100210021V 161
Skippin gforw ards
CD/DVD mode<0021002100210021002100210021002100210021002100210021002100210021
00210021002100210021002100210021002100210021002100210021V 161
SMS
Rea daloud ....... ..............................133
Soun d
Switchi ngon/off ............................ ..33
Soun dsettings .................................... .3 4
Speed diallist
Stor ingaphone bookentryin the
speed diallist<0021002100210021002100210021002100210021002100210021002100210021
0021002100210021002100210021002100210021002100210021002100210021V 131
State/pro vince
Sele cting ...................................... .. .. 54 8
In
dex
Page 126 of 234
X
Sel ect symbo l: byturni ngcVd the
CO MAND controllera nd pre ssW to
confi rm.
or
X Pre ssthe ; button onCOMAND.
X Enter thephone num ber:
R ma nua lly (Y page 121)
R us ing the phone book (Ypage 125)
R from thecalllists (Ypage 129)
R us ing speeddial (Y page 122)
Cal lwa iting Yo
ucan switch back and forth betwe encalls
wi th thisfu nctio n.The functio nisavail able if
your mobile phonesupports thetoggling
function (viaBluetooth ®
).
You canusethefunction ifyou areanswering
a second callormaking asecond call.
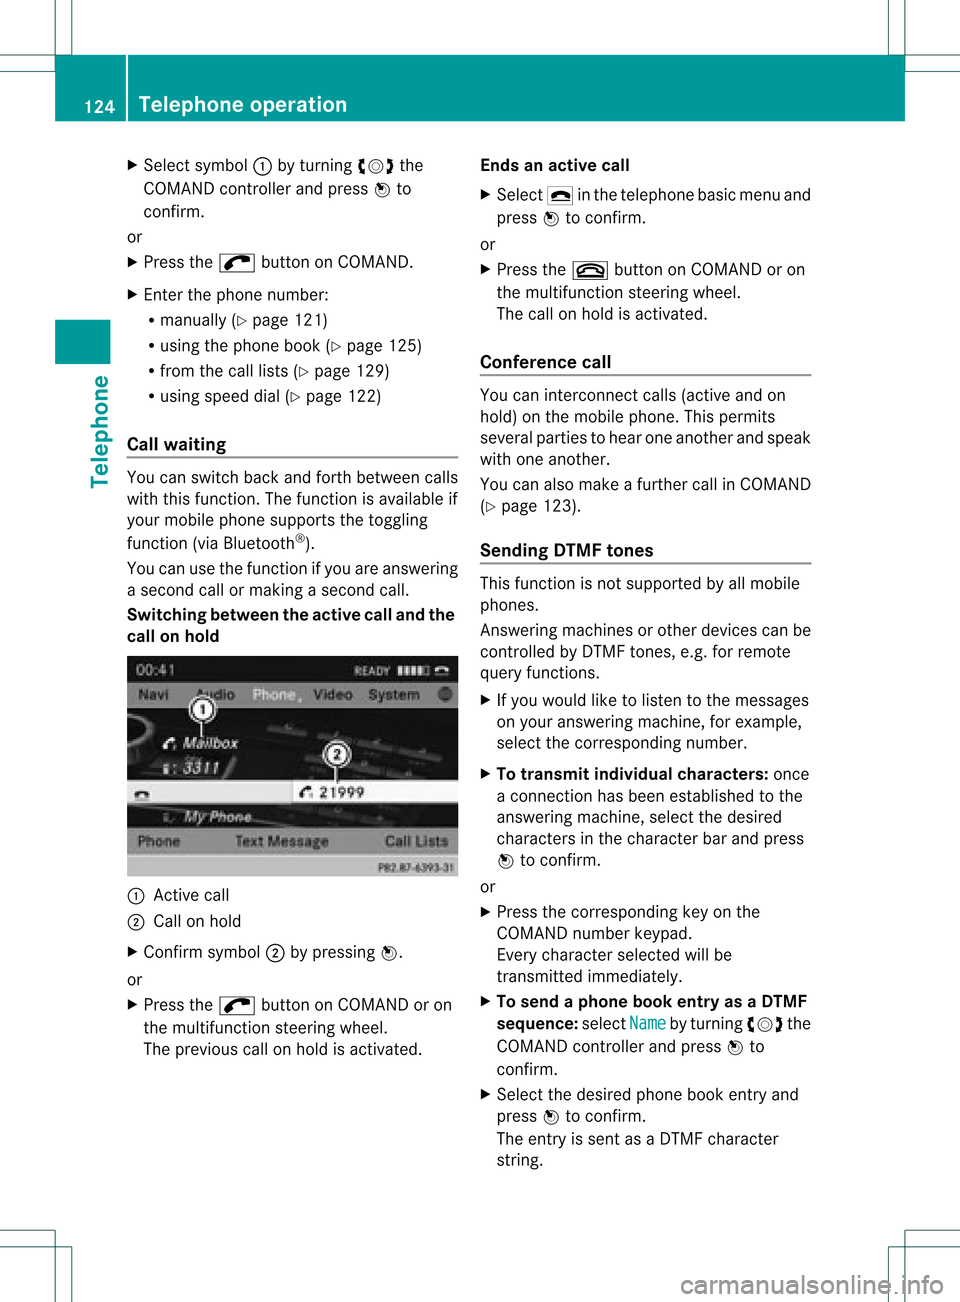
Switching betweenthe active calland the
call onhold :
Active call
; Callon hold
X Confirm symbol;bypressing W.
or
X Press the; button onCOMAND oron
the multifunction steeringwheel.
The previous callonhold isactivated. Ends
anactive call
X Select ¢inthe telephone basicmenu and
press Wtoconfirm.
or
X Press the~ button onCOMAND oron
the multifunction steeringwheel.
The callonhold isactivated.
Confe rence call You
canintercon nectcalls (active andon
hold) onthe mobile phone. Thispermits
several partiestohear oneanother andspeak
with oneanother.
You canalso make afurther callinCOMAND
(Y page 123).
Sending DTMFtones This
function isnot supported byallmobile
phones.
Answering machinesorother devices canbe
cont rolled byDTMF tones, e.g.forremote
query function s.
X Ifyou woul dlike tolisten tothe messages
on your answering machine,forexample,
select thecorresponding number.
X To transmit individual characters: once
a conn ection hasbeen established tothe
answering machine,selectthedesired
characters inthe character barand press
W toconfirm.
or
X Press thecorresponding keyonthe
COMAND numberkeypad.
Every character selectedwillbe
transmitt edimmediately .
X To send aphone bookentry asaDTMF
sequence :select Name by
turning cVdthe
COMAND controller andpress Wto
confirm.
X Select thedesired phonebookentry and
press Wtoconfirm.
The entry issent asaDTMF character
string. 124
Telephone
operationTelephone
Page 174 of 234
X
To select opti ons:sw itch tothe MUSI C
REG ISTER (Ypage 168) .
X Sel ect Mus ic Reg
ister by
slid ing VÆ and
tur ning cVd theCOMAND controller and
pre ssW toconfi rm.
The optio ns list appe ars. The #dot
ind icates the optio ns elected.
X Select anoption andpress Wtocon firm.
The option isswitch edon. For alloption s
exc ept Normal TrackSequenc e ,
you will
see acorr espondin gdisplay inthe display/
select ionwindow.
i The Normal TrackSequenc e option
is
automatic allyselect edwhen youchange
the disc youarecurren tlylisten ingtoor
when youselect adifferen tmedium. Ifan
option isselect ed,itremains selectedafter
COMAND isswitch edon oroff. Bluet
ooth®
aud iomode Connecting
Bluetooth®
aud iodevices
Conditions Bluet
ooth®
aud iodevice
Bluetoot h®
audio mode requires a
Bluetoot h®
-c apable audiodevice.
i Not allBluetoot h®
audio devices available
on the market areequally suitable. For
more detailed information onsuitable
Bluetoot h®
audio devices andon
con nectingBluetoot h®
audio devices to
COMAND ,visit
htt p://ww w.mbu sa-mobile.com (for
USA ).Alt ernat ively, calltheMercedes- Benz
Customer AssistanceCenter at
1-8 00- FOR-ME RCedes (1-800-367 -6372)
(for USA )or Customer Relationsat
1-8 00- 387 -0100(for Canada). Befor
eusing Bluetoot h®
audio mode, you
should checkyour Bluetooth ®
audio device
for the following (seetheBluetooth ®
audio
device's operating instructions):
R Bluetooth ®
audio profile
The Bluetooth ®
audio device mustsupport
the A2D Pand AVRCP Bluetooth ®
audio
profiles.
R Bluetooth ®
visibility
On cert ainBluetooth ®
audio devices, as
well asactivatin gthe Bluetooth ®
funct ion,
the device itselfmust alsobemade
"visible" toother devices (seethe
Bluetooth ®
audio device's operating
instr uctions).
R Bluetooth ®
device name
This device nameispredetermin edbut can
usual lybe changed. Tomake aclear
selection ofthe Bluetooth ®
device
possible, Mercedes-B enzrecomm ends
that youcustomiz ethe device name(see
the Bluetooth ®
audio device's operating
instr uctions).
i A2D P(Advanced AudioDistribution
Profile): Bluetooth ®
audio profile foraudio
data trans mission
AVRCP (AudioVideoRemote Control
Profile): Bluetooth ®
audio profile foraudio
data playb ack
X Act ivate Bluetooth ®
and Bluetooth ®
visibility onthe Bluetooth ®
audio device.
On COMAND
X Act ivate theBluetooth ®
funct ionin
COMAND (Ypage 45).
General information Before
usingyourBluetooth ®
audio device
with COMAND forthe first time, youwillneed
to authorize it.
When youauthorize anew Bluetooth ®
audio
device, itis conn ected automatically.
Connect ioninvolves firstsearching fora 172
Bluetooth ®
aud iomodeAudio
Page 180 of 234
Media
Interface mode Co
nne ctio noption s
Overvi ew The
connection socketsareloca tedinthe
stowa gecompartme ntinthe center console.
Device-spe cificadapter cables,inclu dedwith
the Medi aInterface, arerequ iredtoconnect
external devicestothe Medi aInterface.
i Store individualparts inas afe plac e.
On lyuse genuine Mercedes-Ben z
co nn ect ion cabl es.
You canconn ect thefoll owin gdat amedi ato
COMA NDviatheMedia Inte rface:
R iPod ®
R cer tain MP3 player s
i iPod ®
is areg istere dtrademar kofApple
Inc .,Cupertino ,California, USA.
Supp orted devices For
details andalist ofsupported devices,
visit http://www .mbusa- mobile.com.
Alt ernat ively, calltheMercede s-Benz
Customer AssistanceCente rat
1-800-FOR-MERC edes(1-800-367-6372)
(for USA) orCu stomer Relatio nsat
1-800-387-0100 (forCanada ). Co
nne ctin gan exte rnal device
i Donot leaveexternal devicesinthe
vehi cle,astheir correct function cannotbe
gua ranteed ifthey aresubjected to
extreme temperatures,e.g.from expos ure
to dire ctsunl ight orvery lowoutsi de
tempera tures(seetheoper ating
instructio nsofthe respe ctivedevice).
Merced es-Benz USA,LLCaccep tsno
lia bil ity for dam agetoexternal devices.
Never connect morethanonedeviceata
time. Youwillotherw isenot beableto pla y
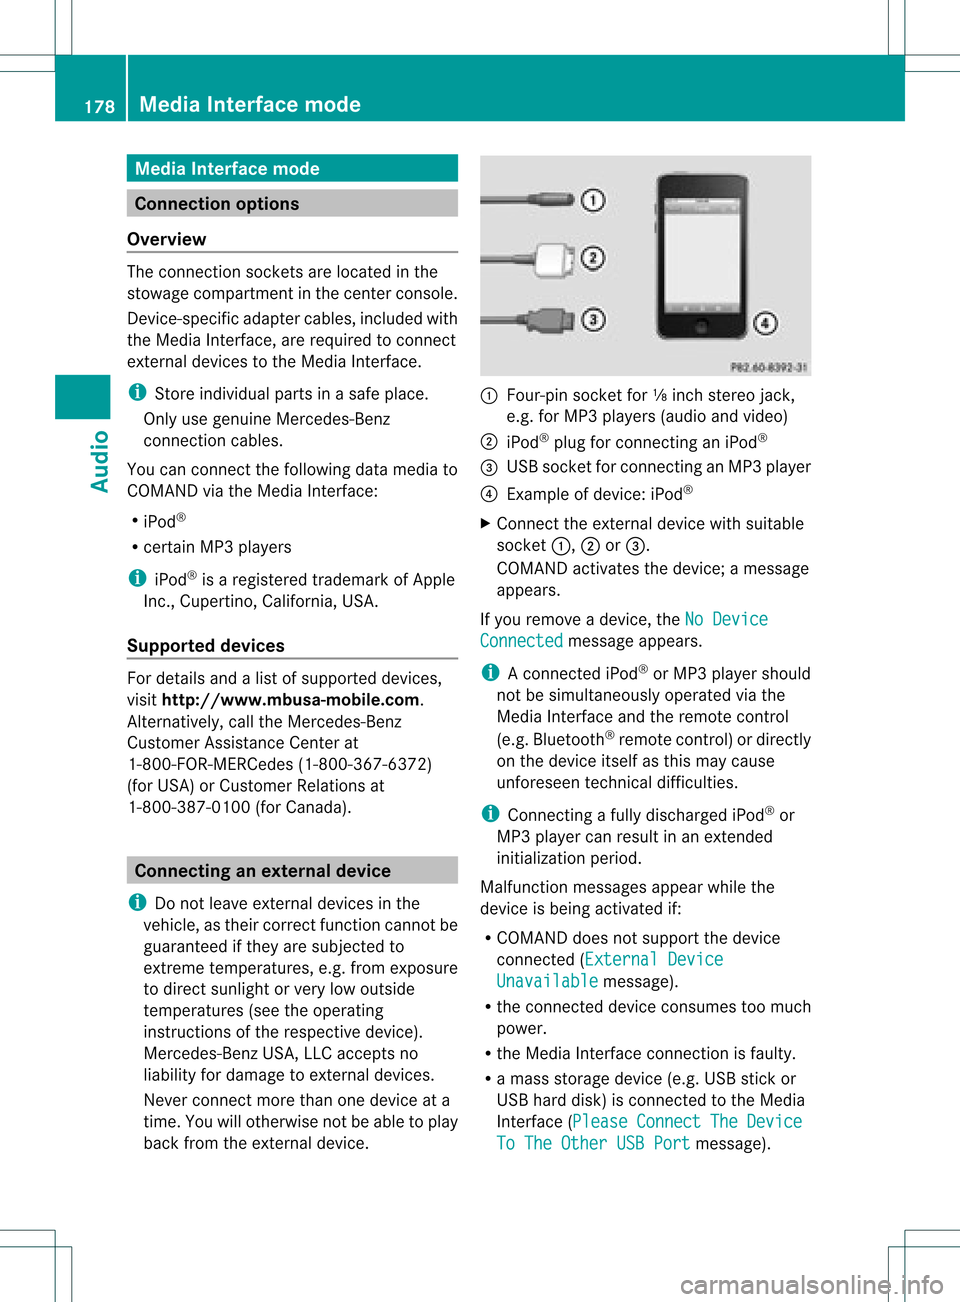
back fromtheexternal device. :
Four-p insocket for⅛inch stereo jack,
e.g. forMP3 players (audi oand video)
; iPod®
plu gfor connecting aniPo d®
= USB socket forconnecting anMP3 player
? Exampl eof devi ce:iPod®
X Connect theexternal devicewith sui tabl e
socket :,;or=.
COM AND activa testhe devi ce;amessa ge
app ears .
If you remove adevi ce,the NoDevice Connec
ted messa
geapp ears .
i Aconnected iPod®
or MP3 players hould
not besimultaneously operatedviathe
Media Interface andtheremote control
(e.g. Bluetooth ®
remote control)ordirectly
on the device itselfasthis may cause
unforeseen technicaldifficulties.
i Connect ingafully discharged iPod®
or
MP3 playercan result inan exten ded
initialization period.
Malfunction messagesappearwhile the
device isbeing activated if:
R COMAND doesnotsupport thedevice
conn ected (External Device Unavailable message).
R the conn ected device consumes toomuch
power.
R the Media Interface connection isfaulty.
R amass storage device(e.g.USBstick or
USB hard disk) isconn ected tothe Media
Int erface (Please Connect The Device
To
The Other USBPort message).178
Media
Interface modeAudio
Page 212 of 234
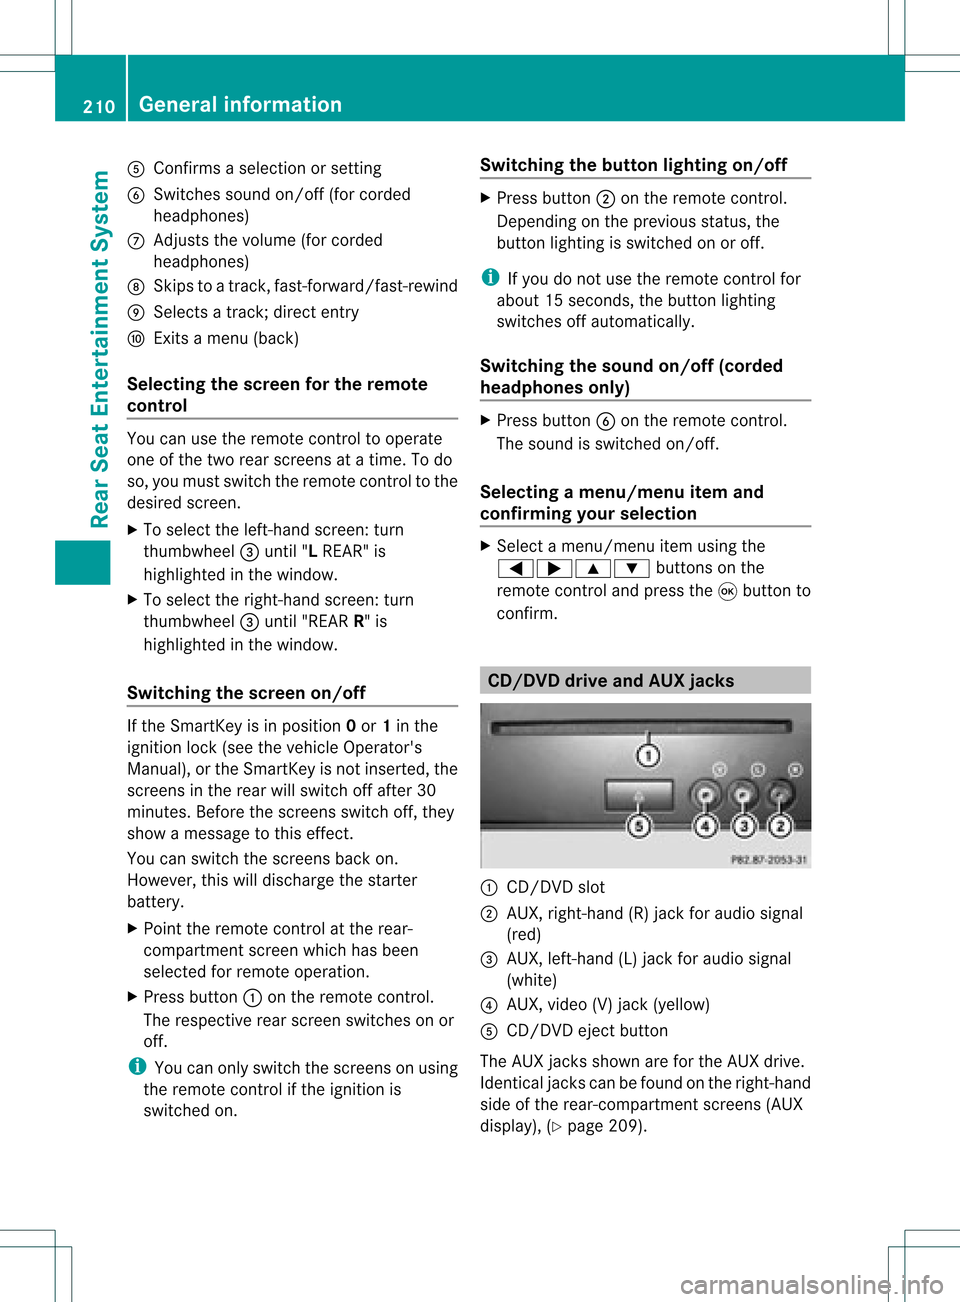
A
Con firms asele ction orset ting
B Swit ches soun don /o ff(fo rcorded
headphones)
C Adjust sthe volume (forcorded
headphones)
D Skips toatrack, fast-forwa rd/fast-rew ind
E Selects atrack; directentry
F Exits amenu (back)
Sel ecting thescre enfor the remote
co ntrol You
canusetheremote controltoopera te
one ofthe two rear screens atatime. Todo
so, you must switch the remote controltothe
desi redscreen.
X To sele ctthe left-hand screen:turn
thumbw heel=until "LREAR" is
high lighted inthe windo w.
X To sele ctthe right-hand screen:turn
thumbw heel=until "REAR R"is
high lighted inthe windo w.
Swi tching thescre enon/ off If
the SmartKey isin posi tion 0or 1in the
ignitio nlock (see thevehicle Operator's
Manual), orthe Smart Keyisnot insert ed,the
screen sin the rear willswitch offafter 30
minutes. Beforethescreen sswitch off,they
show amessage tothis effect .
You canswitch thescreen sback on.
How ever,this will disc harg eth est art er
bat tery.
X Poin tth erem oteco ntrol attherear -
co mpar tments cree nwhich hasbeen
selected forremote operation.
X Press button :onthe remote control.
The respective rearscreen switches onor
off.
i You canonly switch thescreens onusing
the remote controlifthe ignition is
switched on. Switching
thebutt onlighting on/off X
Press button ;onthe remote control.
Depending onthe previous status,the
button lighting isswitched onoroff.
i Ifyou donot use theremote controlfor
about 15seconds, thebutton lighting
switches offautomatically .
Switching thesound on/off(corded
headph onesonly) X
Press button Bonthe remote control.
The sound isswitched on/off.
Selec tingamenu/m enuitem and
confir mingyour select ion X
Sele ctamen u/m enuitemusin gth e
=;9 :buttonson the
rem otecon trol and pres sth e9 butt onto
con firm. CD/DVD
drive and AUX jacks :
CD/ DVDslot
; AUX,righ t-han d(R) jackfor audio signal
(red)
= AUX, left-hand (L)jack foraudio signal
(white)
? AUX, video (V)jack (yellow )
A CD/D VDeject button
The AUX jacksshown areforthe AUX drive.
Ident icaljack scan befound onthe right- hand
side ofthe rear-com partmentscreen s(AUX
display ),(Y page 209). 210
General
informationRearSeatEntert ainment System
Page 213 of 234
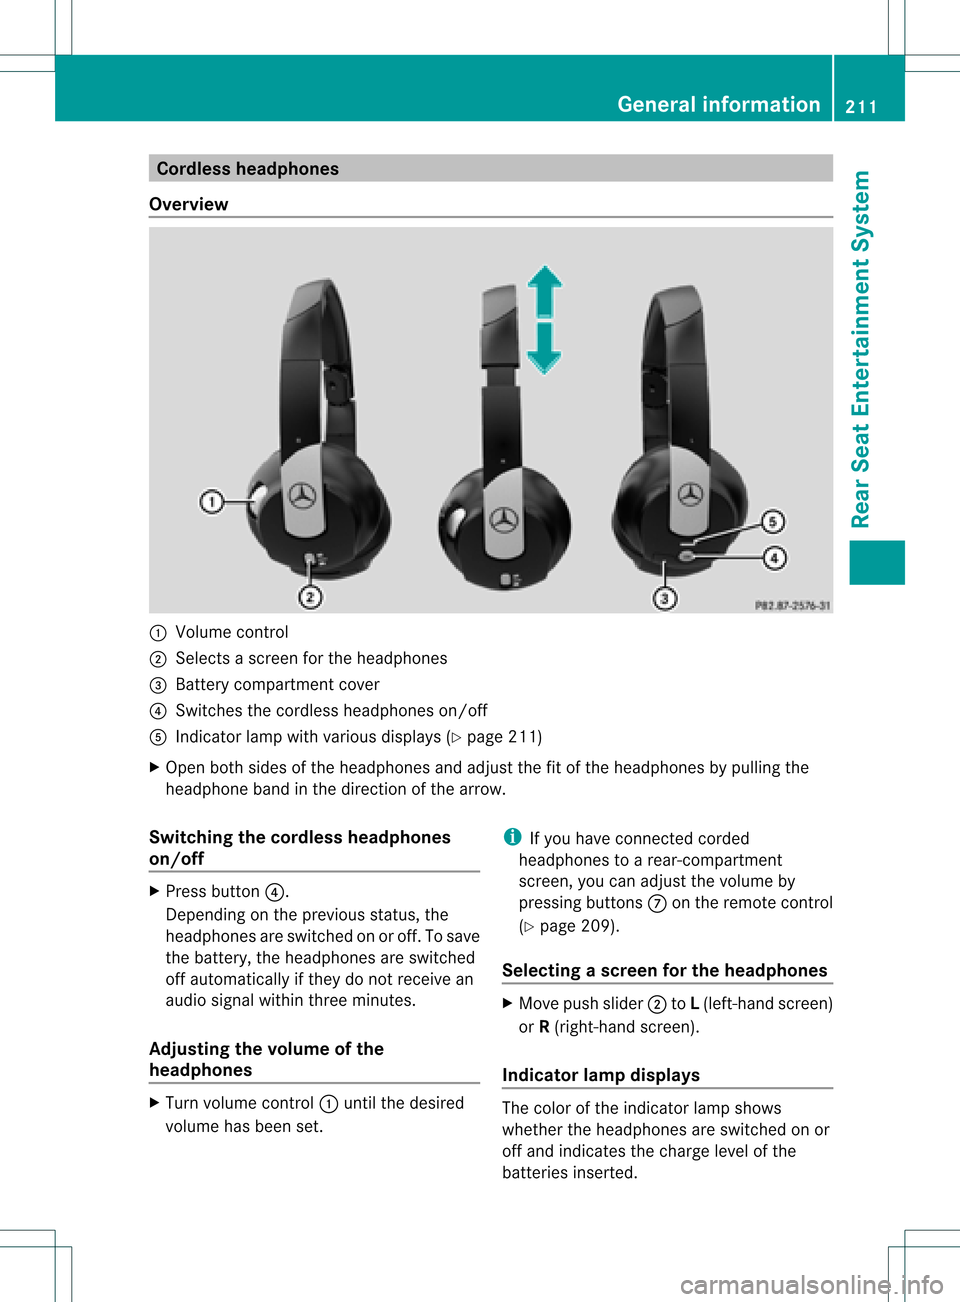
Cord
lessheadphones
Over view :
Volum eco ntrol
; Select sa sc ree nfor the headphones
= Batt erycompart mentcover
? Switches thecordless headphones on/off
A Indicat orlamp withvarious displays(Y page 211)
X Open bothsides ofthe headphones andadjust thefitofthe headphones bypulling the
headphone bandinthe direction ofthe arrow.
Switching thecordless headphones
on/off X
Press button ?.
Dependin gon the previous status,the
headphones areswitched onoroff. Tosave
the battery, theheadphones areswitched
off automatically ifthey donot receive an
audio signal within threeminutes.
Adjust ingthe volume ofthe
headp hones X
Turn volume control: until thedesired
volume hasbeen set. i
Ifyou have connected corded
headphones toarear-com partment
screen ,you can adjust thevolume by
pressing buttonsC onthe remote control
(Y page 209).
Selecting ascree nfor thehea dphones X
Mov epush slider; toL(lef t-han dsc ree n)
or R(rig ht-hand scree n).
Ind icat orlam pdis pla ys The
color oftheind icat orlamp shows
whet hertheheadp honesare swit ched on or
off and indicat esthech arge levelof the
bat teries inserted. Gener
alinfor mation
211RearSe at Ent ertai nme ntSyste m Z
Page 214 of 234
LED
disp lay St
atus Green The
batteries arefine. Red The
batteries arealmos t
disc harge d. Lit
con tinuous
ly The
headph onesare swit ched
on and connected toas cree n. Fla
shing The
headph ones are
sea rchi ngfor the connecti on
to ascree n. No
displ ay
(d ark) The
headph ones areswitched
off orthe batterie sare
di scha rged. Co
nne cting additi onalheadpho nes You
canconnect oneadditiona lset ofcord ed
hea dph ones toeach ofthe two rearscree ns
(Y page 209). Thesocke tisdesigned for
headphones witha3.5 mm stereo jackplug
and animpedance of32 ohms. Changing
batteries
Notes Batteries
arerequired forthe remote control
and forthe two sets ofcordless headphones. G
WARNING
Keep thebatteries outofthe reach of
children. Consultadoctor immediately ifa
child should swallowabattery.
Do not dismantle, short-circuitorburn a
battery. H
Environmental
note
Dispose ofdischarged batteriesinan
environment allyresponsible manner. On
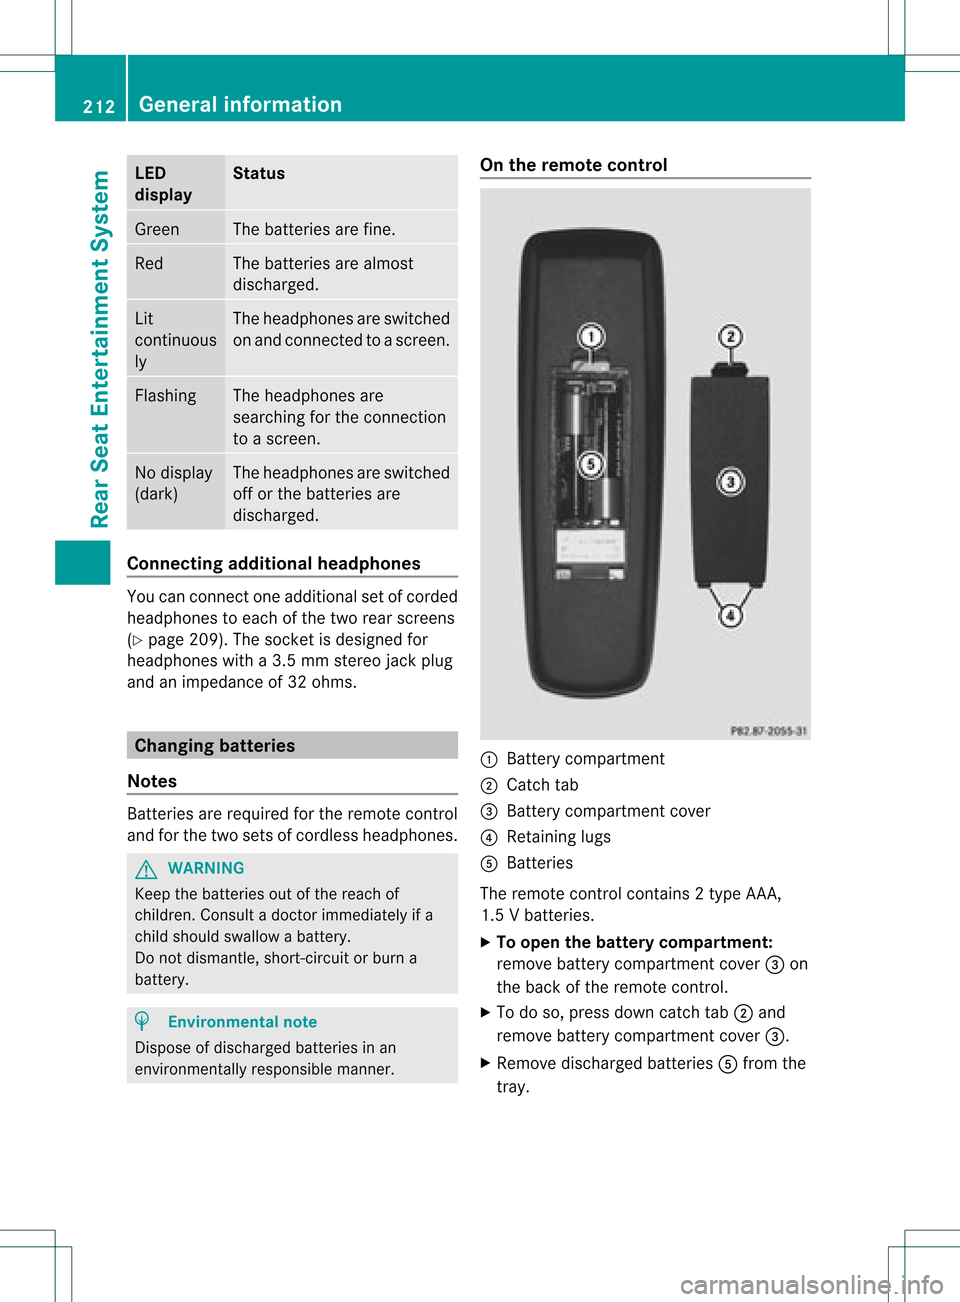
the remote control :
Battery compartment
; Catch tab
= Battery compartment cover
? Retaining lugs
A Batteries
The remote controlcont ains 2type AAA,
1.5 Vbatteries.
X To open thebatter ycompart ment:
remove batterycompartment cover=on
the back ofthe remote control.
X To do so, press downcatch tab;and
remove batterycompartment cover=.
X Remove discharged batteriesAfrom the
tray. 212
General
informat ionRearSeatEntertainm entSystem
Page 218 of 234
Setting
thebrightness
X Select Settings with
the: button and
press the9button toconf irm.
X Select Brightness using
the9:
buttons andpress the9button toconf irm.
As caleap pea rs.
X Adju stthe brightne ssusing the 9:
bu ttons andpressthe 9button toconfi rm.
The brightne ssbarm oves upordown. The
picture becomes lighterordarker in
accordanc ewith thescale. Showing/hiding
thepictur e
X To hide thepictur e:select Display Off in
the system menuusingthe:;
button son the remote controland press
the 9button toconf irm.
The picture ishidden.
X To display thepictur e:press the9
button . Audio
CD/DVDand MP3 mode Safety
note G
WARNIN
G
The RSE CD/D VDplayer isaClass 1laser
prod uct.There isadanger ofinvisible laser
radiation whenyouopen ordamage thecover.
Do not remove thecover. TheRSE CD/DVD
play erdoes notcont ainany parts which can
be serviced bythe user. Forsafety reasons,
have anynecessary serviceworkperformed
by qual ified personnel. General
informat ion
You willfind information onthe following
topics inthe Audio section:
R notes onCDs/DV Ds(Ypage 165)
R notes onMP3 mode (Ypage 164)
R notes oncopyright (Ypage 165) Inserting
aCD/DVD
De pen dingon themo del and theveh icle
equip ment,th eCD /DVD drive isloc ated:
R beh ind th ece nter console inafo ldin g
co mpa rtmen t,or
R in thece nter und ertherea rseat s,or
R in thearm restbetween therear seats :
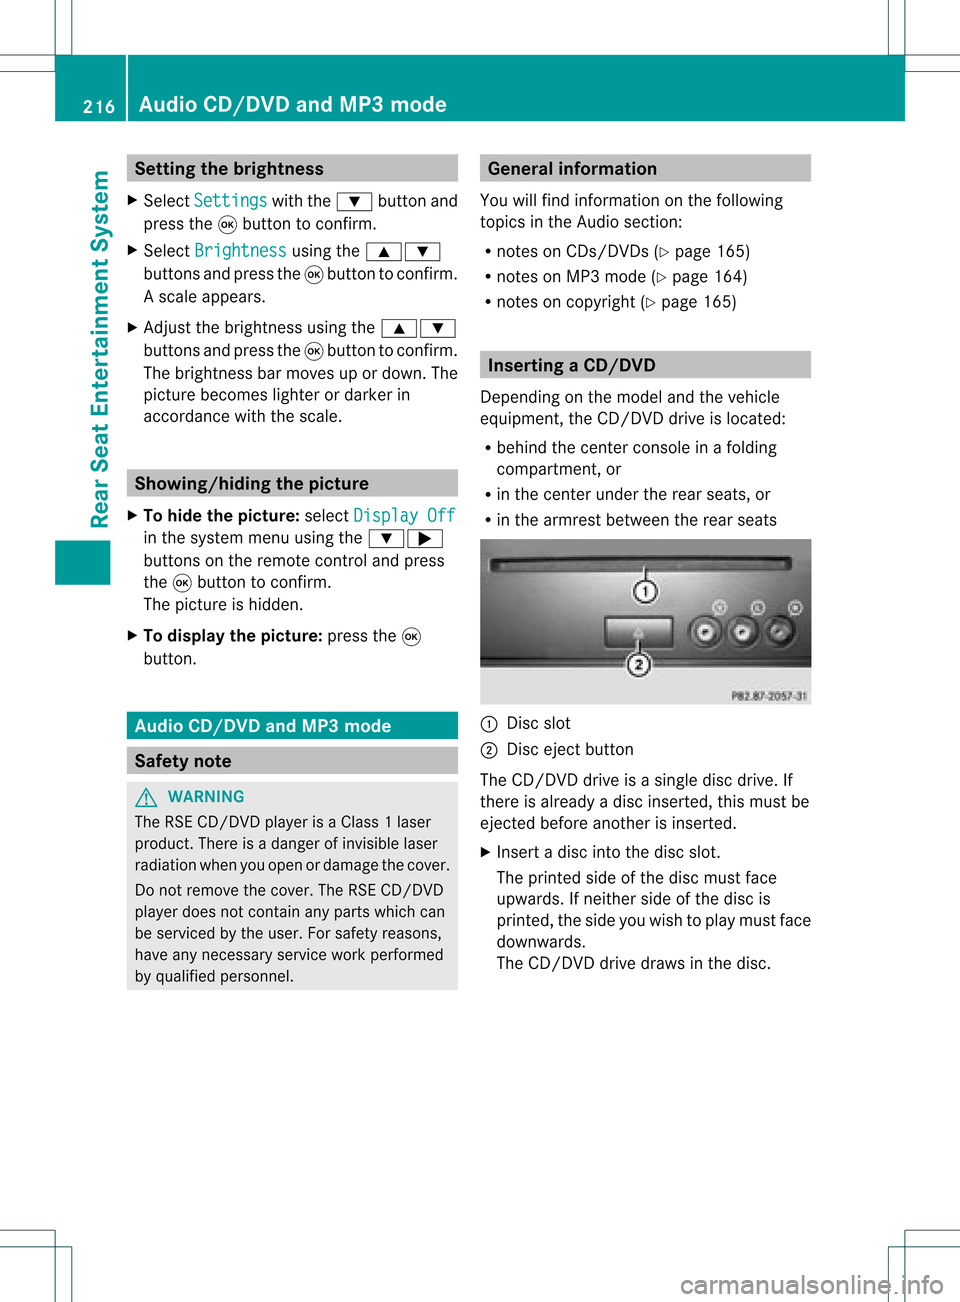
Disc slot
; Disc ejectbutton
The CD/D VDdrive isasingle discdrive. If
ther eis already adisc insert ed,this must be
ejec tedbefore anotherisinsert ed.
X Inser tadisc intothe disc slot.
The print edside ofthe disc must face
upwards. Ifneit her side ofthe disc is
print ed,the side youwish toplay must face
downwards.
The CD/D VDdrive draws inthe disc. 216
Audio
CD/DVDand MP3 modeRear SeatEntert ainmentSyst em
Page 221 of 234
Making
aselection byenter ingthetr ack
num berdirectly X
Pres sth eh buttonon therem ote
con trol.
The track entrydisplay appears .
Ex ample: track 2
X Pres snum berbutt on2.
Ex ample: track 12
X Pres sth ecor respon ding numberkeys in
rapid successio n.
i Itis no tp ossible toenter numbers that
exceed thenumber oftrack son the CDor
in the current lyactive folder.
X Wait forapproximately threeseconds after
making theentr y.
You willhear thetrack which hasbeen
enter ed.The correspon dingbasic menu
then reappears. Fast
forward ing/rewinding
X With thedisplay /select ionwindow active,
press the= or; button onthe
remote controlrepeatedly untilyoureach
the desired position.
or
X Press andhold theE orF button
until thedesired position isreached. Selecting
afolder
This function ison lyavailable inMP3 mode .
X Sele ctFol der in
MP3 mode using
th e:=; buttonson therem ote
con troller andpres sth e9 butt onto
con firm.
or
X Pres sth e9 butt onwhen thedisplay/
selec tionw indow isselec ted.
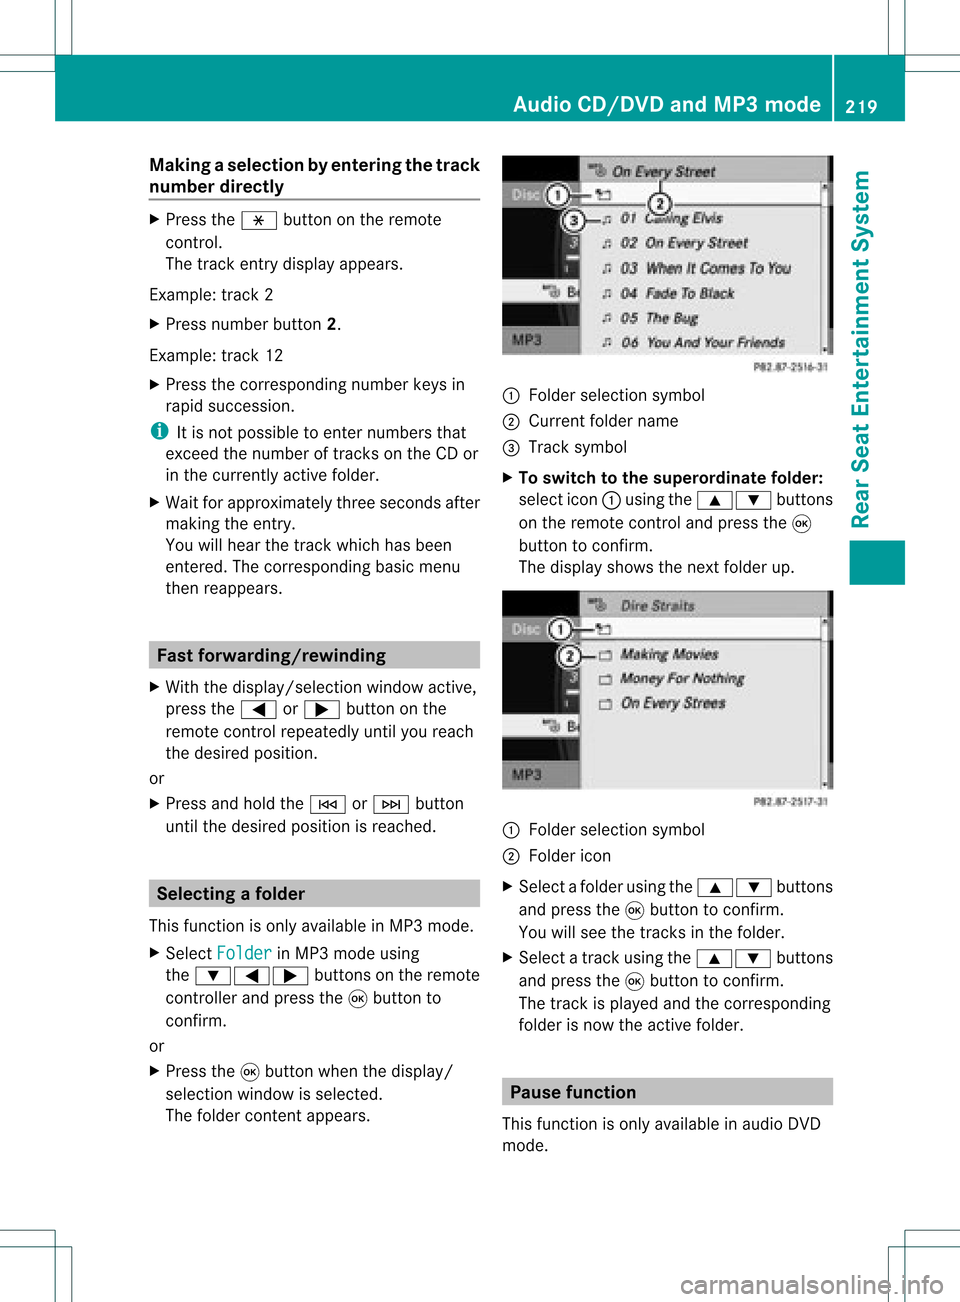
The folder contentappears. :
Folder selectionsymbol
; Current foldername
= Track symbol
X To switch tothe super ordina tefolder :
select icon:using the9: buttons
on the remot econ troland press the9
butt ontocon firm.
The display showsthenextfolder up. :
Folder selection symbol
; Folder icon
X Select afolder usingthe9: buttons
and press the9button toconf irm.
You willsee thetrack sin the folder.
X Select atrack using the9: buttons
and press the9button toconf irm.
The track isplaye dand thecorrespon ding
folder isnow theactive folder. Pause
function
This funct ionisonly availa bleinaudio DVD
mode. Audio
CD/DVD andMP3 mode
219RearSeatEntert ainment System Z
Page 222 of 234
X
To paus eplay back:sel ect Ë using
the :=; buttons onthe rem ote
contro land pressthe 9button toconfi rm.
The Ë displ aycha nge sto Ì.
X To conti nue playback:sel ect Ì and
pre ssthe 9button toconfi rm.
The Ì displ aycha nge sto Ë. Sto
pfuncti on
This function isonly available inaudio DVD
mode.
X To inte rrupt playbac k:sele ctÉ using
the :=; buttonsonthe remote
control andpress the9button toconfirm.
The Ë displaychange sto Ì.
X To continue playbac k:sele ctÌ and
press the9button toconfirm.
Pla yback continues fromthepointwhe reit
wa sinterrup ted.
X To stop playbac k:whi lepla yback is
interrup ted,selectÉ againand press
the 9button toconfirm.
Pla yback stops andreturns tothe
begi nning ofthe DVD. Ì ishigh lighted.
X To restart playbac k:sele ctÌ and
press the9button toconfirm.
Pla yback starts fromthebegi nning ofthe
DVD. Settin
gthe audio format
Further informationonaudio formats is
ava ilable inthe "Aud io"section
(Y pag e163).
X Select DVD-A usi
ng the :=;
buttons onthe remote controlle rand pre ss
9 toconfi rm.
X Sel ect Group us
ing the 9: buttons
and pressthe 9button toconfi rm.
The list of availabl eau dioform atsappe ars.
The #dotind icates the form atcur rentl y
sel ecte d. X
Sel ect anaudio form atusing the
9: buttons andpressthe 9button
to confi rm.
X To exitthe men u:pre ssthe =
or ; button. Pl
ayb acko ptio ns
Fur ther informa tion onplay ba ck opti ons is
ava ilab lein the "Audio" secti on
(Y page 163) .
X Sel ect CD ,
DVD -A or
MP3 us
ing
the :=; buttons onthe remo te
control andpressthe 9button toconfi rm.
The options list appe ars .The # dot
indicates theoption current lyselected.
X Select Normal Track Sequence ,
Random Tracks or
Random Folder using
the
9: buttonsandpress the9button
to confirm .
The option isswitched on.For alloptions
except Normal TrackSequence ,
you will
see acorresponding displayin the displa y/
selection window.
i Ifyou change thedisc, theNormal Track
Sequence option
isactivated
automatically .Ifa no ption isselect ed,it
remains selectedafter theRear Seat
En tert ainmen tSyst emisswitc hedonor
off. Switching
track inform ationon/off
(MP3 mode only)
If the func tionisswitc hedon,folder andtrack
names aredisplayed.
If the func tion isswitc hedoff,disc andfile
names aredisplayed.
X Select MP3 using
the:=;
butt ons onthe remot econ troller and press
the 9butt ontocon firm. 220
Audio
CD/DVDand MP3 modeRear SeatEntert ainmentSyst em