MERCEDES-BENZ M-Class 2012 W166 Owners Manual
Manufacturer: MERCEDES-BENZ, Model Year: 2012, Model line: M-Class, Model: MERCEDES-BENZ M-Class 2012 W166Pages: 396, PDF Size: 14.48 MB
Page 91 of 396
Opera
tingthesliding sunroof
Opening andclosing i
You
cancontinue tooperate thesliding
sunroof afterswitchin goff the engin eor
removin gthe Smart Keyfrom theignition
lock. Thisfunctionisavailable foruptofive
minut esoruntil thedriver's orfron t-
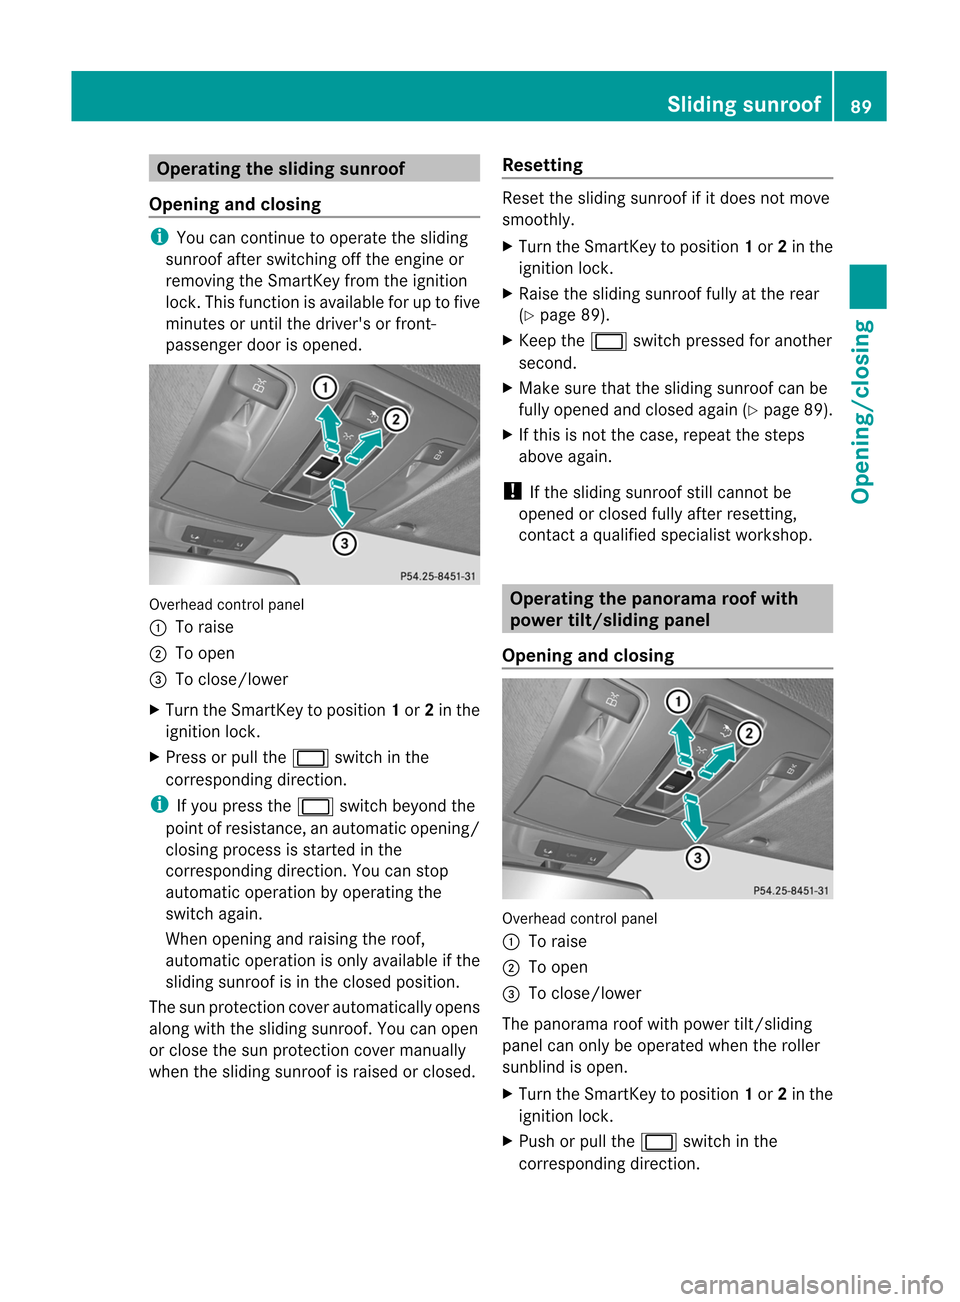
passenger doorisopened. Overhead
control panel
: Toraise
; Toopen
= Toclose/lower
X Turn theSmart Keytoposition 1or 2in the
ignition lock.
X Press orpull the2 switch inthe
corr espondin gdirect ion. i
If
you press the2 switch beyond the
point ofresist ance, anautomatic opening/
closing process isstart edinthe
corr espondin gdirect ion.You canstop
automatic operationbyoperatin gthe
switch again.
When opening andraising theroof,
automatic operationisonly available ifthe
sliding sunroof isin the closed position .
The sunprotec tioncover automatic allyopens
along withthesliding sunroof .You can open
or close thesun protec tioncover manually
when thesliding sunroof israised orclosed. Resetting Reset
thesliding sunroof ifit does notmove
smoothly.
X Turn theSmart Keytoposition 1or 2in the
ignition lock.
X Raise thesliding sunroof fullyatthe rear
(Y page 89).
X Keep the2 switch pressed foranother
second.
X Make surethatthesliding sunroof canbe
fully opened andclosed again(Ypage 89).
X Ifthis isnot thecase, repeat thesteps
above again.
! Ifthe sliding sunroof stillcann otbe
opened orclosed fullyafter resett ing,
cont actaquali fiedspecialist workshop. Operat
ingthe panora maroof with
power tilt/sliding panel
Opening andclosin g Overhead
controlpanel
: Toraise
; Toopen
= Toclose/lower
The panorama roofwith power tilt/sliding
panel canonly beoperated whentheroller
sunblind isopen.
X Turn theSmart Keytoposition 1or 2in the
ignition lock.
X Push orpull the2 switch inthe
correspon dingdirection . Sliding
sunroof
89Opening/closing Z
Page 92 of 396
i
If
you press the2 switch beyond the
point ofresistance, anautoma ticopening/
closing process isstarted inthe
corresponding direction.Youcanstop
automa ticopera tionbyopera tingthe
switch again.
When raisingthe roof, automa ticopera tion
is only availableifthe sliding sunroof isin
the closed position. Operating
thesunbli ndsforthe
panorama roofwith powe rtilt/slid ing
pa nel
Gener alnotes The
roller sunblin dsshield thevehic leint erior
from sunligh t.The two roller sunblin dscan
only beopen edand close dtog eth erwhen the
panor amaroofwith power tilt/slidin gpanel
is close d. G
WARN
ING When
extendin gthe roller sunblin ds,make
sure noone isin danger ofbeing injured by
the extendin gproc edure. Theextendin gof the
roller sunblin dscan beimmediat elyhalted by
releasin gthe switc h.
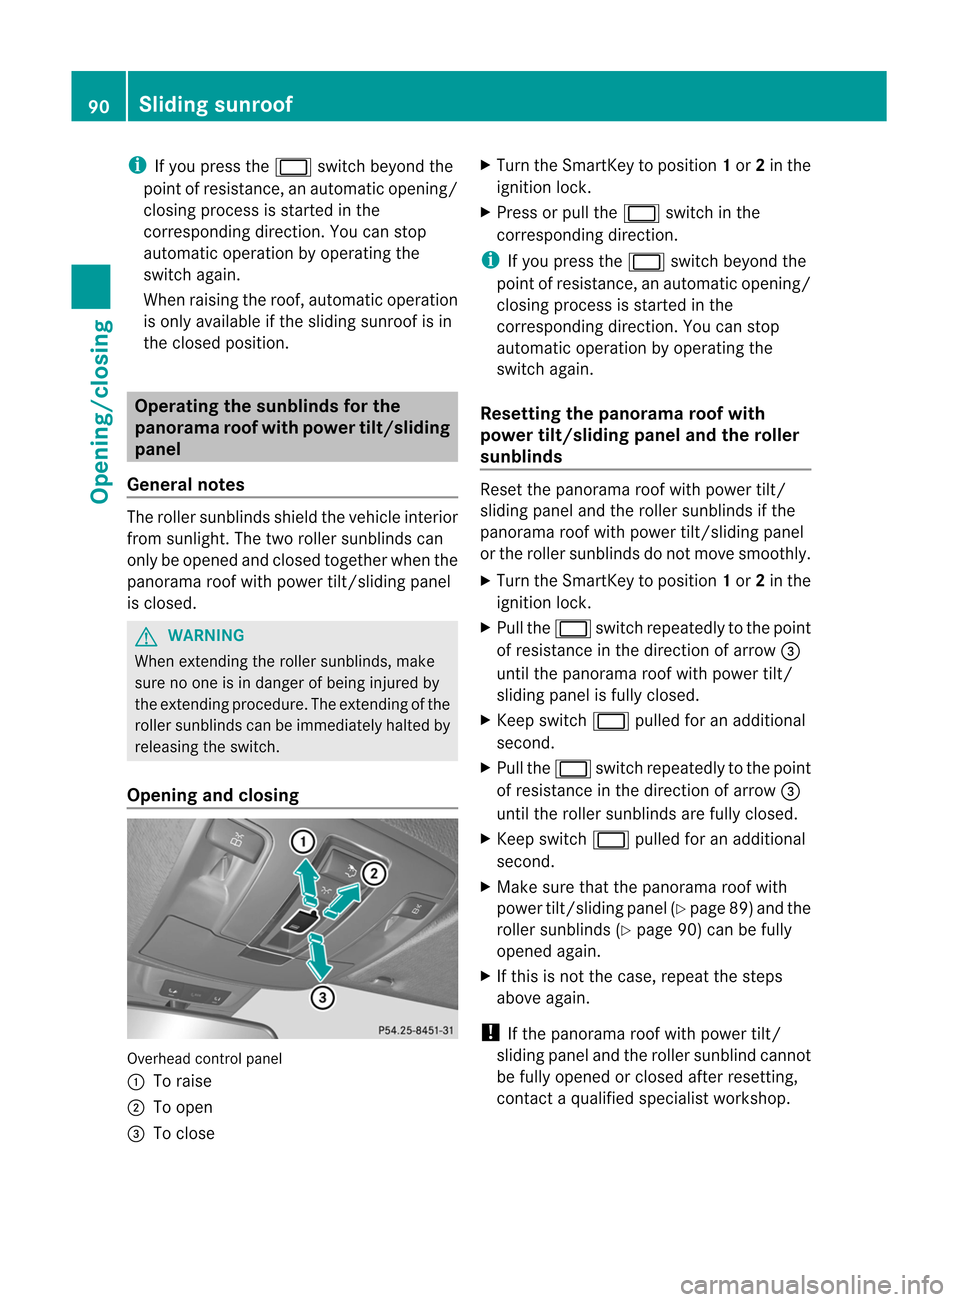
Opening andclosing Over
head control panel
: Toraise
; Toopen
= Toclose X
Turn theSmar tKey toposit ion1or 2in the
ignit ionlock .
X Press orpull the2 switchin the
cor respo ndingdirec tion. i
If
you press the2 switchbeyond the
point ofresist ance,an automat icopen ing/
closin gproc essisstar ted inthe
cor respon dingdirec tion.You can stop
automatic operationbyoperating the
switch again.
Resetting thepanora maroof with
power tilt/sliding panelandtheroller
sunblinds Reset
thepanorama roofwith power tilt/
sliding panelandtheroller sunblinds ifthe
panorama roofwith power tilt/sliding panel
or the roller sunblinds donot move smoothly.
X Turn theSmart Keytoposition 1or 2in the
ignition lock.
X Pull the2 switch repeatedly tothe point
of resistanc ein the direction ofarrow =
until thepanorama roofwith power tilt/
sliding panelisfully closed.
X Keep switch 2pulled foranadditional
second.
X Pull the2 switch repeatedly tothe point
of resistanc ein the direction ofarrow =
until theroller sunblinds arefully closed.
X Keep switch 2pulled foranadditional
second.
X Make surethatthepanorama roofwith
power tilt/sliding panel(Ypage 89)and the
roller sunblinds (Ypage 90)can befully
opened again.
X Ifthis isnot thecase, repeat thesteps
above again.
! Ifthe panorama roofwith power tilt/
sliding panelandtheroller sunblind cannot
be fully opened orclosed afterresett ing,
cont actaquali fiedspecialist workshop. 90
Sliding
sunroofOpening/closing
Page 93 of 396
Problems
withthesliding sunroof
Your vehicle maybeequipp edwith asliding
sunroof orapanorama roofwith power tilt/
sliding panel.Inthe following section,the
term "slidingsunroof" referstoboth types of
sliding sunroof.
Problem: thesunroof cannotbeclose d
and youcannot seethecause. G
WARNING You
could beseverely oreven fatally injured
when closing thesliding sunroof with
increased closingforceorifthe anti-
entr apment featureisdeactivated. Makesure
that nobody canbecome trappedwhen
closing thesliding sunroof.
If the sliding sunroof isobstruct edduring
closing andreopens againslightly:
X Immediately afterthesliding sunroof
blocks, pullthe2 switch inthe
overhead controlpanel downtothe point
of resistance andhold ituntil thesliding
sunroof isclosed.
The sliding sunroof isclosed withincreased
force.
If the sliding sunroof isobstruct edagain
during closing andreopens againslightly:
X Immediately afterthesliding sunroof
blocks, pullthe2 switch inthe
overhead controlpanel downtothe point
of resistance andhold ituntil thesliding
sunroof isclosed.
The sliding sunroof isclosed without the
anti-en trapment feature. G
WARNING Pressing
andholding thesliding sunroof
switch toclose thesliding sunroof
immediately afterithad been blocked two
times willcause thesliding sunroof toclose
without theanti-en trapment featureforas
long asyou hold theswitch.
! Ifthe sliding sunroof stillcannot be
opened orclosed asaresult ofa malfunction
,cont actaqual ified specialist
workshop. Sliding
sunroof
91Opening/closing Z
Page 94 of 396

92
Page 95 of 396
Useful
information.............................. 94
Correct driver's seatposition ............ 94
Seats .................................................... 95
Steering wheel.................................. 100
Mirr ors............................................... 103
Memor yfunction .............................. 105 93Seats, steering wheel and mirrors
Page 96 of 396
Useful
information
i This
Operat or'sManual describesall
models andallstan dard andoption al
equipment ofyour vehicle available atthe
time ofpublication ofthe Operat or's
Manual. Country-specificdiffer encesare
possible. Pleasenotethat your vehicle may
not beequipped withallfeature s
descr ibed. Thisalso applies tosafet y-
related systemsand func tions. i
Please
readtheinfor mation onqualified
specialist workshops(Ypage 25). Correct
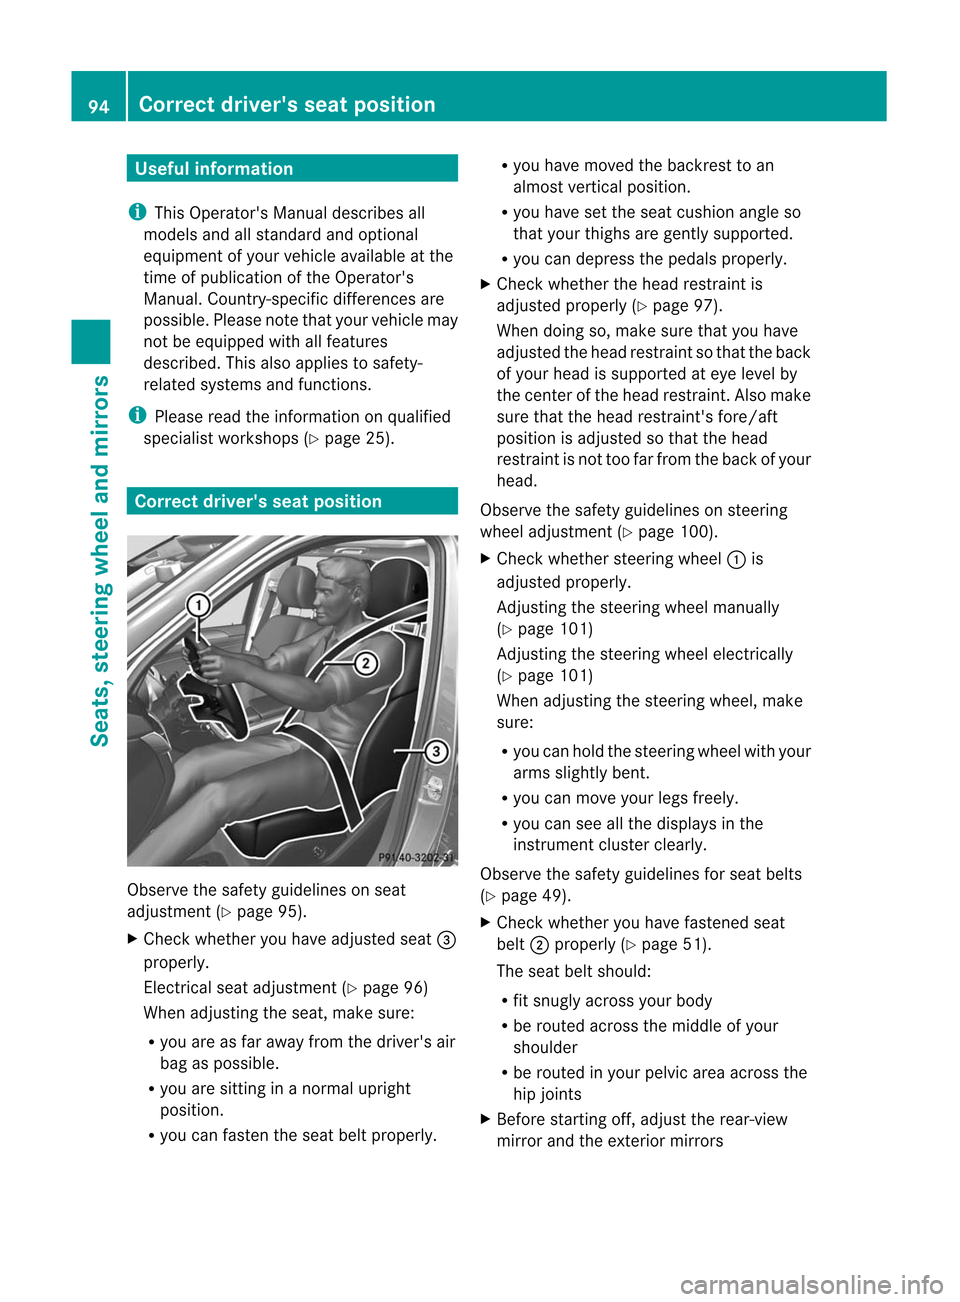
driver's seatposition Observ
ethe safet yguidelines onseat
adjust ment(Ypage 95).
X Check whether youhave adjust edseat =
properly.
Elec tricalseat adjust ment(Ypage 96)
When adjustingthe seat, make sure:
R you areasfar away fromthedriver' sair
bag aspossible.
R you aresitting inanor mal upright
position .
R you can faste nthe seat beltproperly. R
you have moved thebackrest toan
almost vertical position.
R you have setthe seat cushion angleso
that your thighs aregently supported.
R you can depress thepedals properly.
X Check whether thehead restraint is
adjusted properly(Ypage 97).
When doingso,make surethatyouhave
adjusted thehead restraint sothat theback
of your head issupported ateye level by
the cent erofthe head restraint .Also mak e
sure thatthehead restraint 'sfor e/af t
posit ionisadjust edsothat thehead
rest raint isnot too farfromt heback ofyour
head.
Observe thesafety guidelinesonsteering
wheel adjustment (Ypage 100).
X Check whether steeringwheel:is
adjusted properly.
Adjustin gthe steering wheelmanually
(Y page 101)
Adjustin gthe steering wheelelectrically
(Y page 101)
When adjusting thesteering wheel,make
sure:
R you can hold thesteering wheelwithyour
arms slightly bent.
R you can move yourlegsfreely.
R you can seeallthe displa ysinthe
instrumen tcluste rclearly.
Obser vethe safet yguideline sfor seat belts
(Y page 49).
X Check whetheryou have fastened seat
belt ;proper ly(Y page 51).
The seat beltshould:
R fit snug lyacro ssyour body
R be rout edacro ssthe middle ofyour
shoulder
R be rout edinyour pelvic areaacrossthe
hip joints
X Bef ore start ing off,adjust therear- view
mirr orand theexterior mirrors 94
Corr
ectdriver' sseat posit ionSeats, steering wheel and mirrors
Page 97 of 396
(
Y page 103)in such away that youhave
a good viewofroad andtrafficcon dition s.
X Vehicles withamem oryfunct ion:save
the seat, steeringwheel andexterior mirror
sett ings (Ypage 105). Seats
Impor
tantsafet ynotes G
WARN
ING In
order toavoid possible lossofvehicle
con trol,all seat, head restraint ,steer ing
wheel andrear view mirror adjustm ents,as
well asfasten ingofseat belts, mustbedone
before settingthe vehicle inmot ion. G
WARN
ING Do
not adjust thedriver' sseat while driving.
Adj ustin gthe seat while drivingcould cause
the driver tolose controlof the vehicle.
Never travelin amovin gvehicle withtheseat
backr estinan exc essively reclinedposition as
this canbedangerous. Youcould slideunder
the seat beltinacollision .Ify ou slide under
it, the seat beltwould applyforceatthe
abdomen orneck .This could cause serious or
fatal injuries. Theseat backrest andseat belts
provide thebest restraint whenthewearer is
in aposition thatisas upright aspossible and
seat belts areproperly positioned onthe
body. G
WARNING Your
seatbeltmust beadjusted sothat you
can correct lyfasten yourseatbelt.
Observe thefollowing points:
R adjust theseat backrest untilyour arms are
slightly angledwhenholding thesteering
wheel.
R adjust theseat toacomfort ableseating
position thatstillallow syou toreach the
accelerator/brake pedalsafely. The
position shouldbeasfar back aspossible with
thedriver stillable tooperate the
cont rolsproperly.
R adjust thehead restraint sothat itis as
close tothe head aspossible andthecent er
of the head restraint supports theback of
the head ateye level.
R never placehands undertheseat ornear
any moving partswhile aseat isbeing
adjusted.
Failure todo socould result inan accident
and/or serious personal injury. G
WARNING The
electrically adjustableseatscanbe
operated atany time. Therefore, donot leave
children unattended inthe vehicle, orwith
access toan unlocked vehicle.Achild's
unsupervised accesstoavehicle couldresult
in an accident and/orserious personal injury. G
WARNING Acc
ording toaccident statistics,children are
safer when properly restrained inthe rear
seating positions thaninthe front seating
position. Thus,westron glyrecommen dthat
children beplaced inthe rear seats whenever
possible. Regardlessofseating position,
children 12years oldand under mustbe
seated andproperly securedinan
appropriately sizedinfant restraint ,toddler
restraint ,or booster seatrecommen dedfor
the size andweight ofthe child. Foradditional
information, see"Chil dren inthe vehicle".
Ac hild's riskofserious orfatal injuries is
significantly increasedifthe child restraint s
are not properly securedinthe vehicle and/
or the child isnot properly securedinthe child
restraint . G
WARNING For
your protect ion,drive onlywith properly
positioned headrestraint s.
Adjust thehead restraint sothat itis as close
to the head aspossible andthecent erofthe
head restraint supports theback ofthe head
at eye level. Thiswillreduce thepotent ialfor Seats
95Seats, steering wheel and mirrors
Z
Page 98 of 396
inj
ury tothe head andneckint he event ofan
accident orsimilar situation.
Do not drive thevehicle without theseat head
restraint s.Head restraint sare intended to
help reduce injuries duringanaccident.
! Toavoid damage tothe seats andtheseat
heating, observethefollowing information :
R do not spill anyliqui dson the seats. If
liqui dis spilled onthe seats, drythem as
soon aspossible.
R ifthe seat covers aredamp orwet, donot
switch onthe seat heating. Theseat
heating shouldalsonottobe used todry
the seats.
R clean theseat covers asrecommen ded;
see the"Interior care"section.
R do not transport heavyloadsonthe
seats. Donot place sharp object son the
seat cushions, e.g.knives, nailsortools.
The seats should onlybeoccupied by
passengers, ifpossible.
R when theseat heating isin operation, do
not cover theseats withinsulating
materials, e.g.blankets, coats,bags,
seat covers, childseats orbooster seats.
! When youmove theseats, makesurethat
there arenoobject sin the footwell or
behind theseats. Otherwise, youcould
damage theseats andtheobject s.
! When therear bench seatisfolded
forwards, thefront seats cannot bemoved
to their rearmost position.Youcould
otherwise damagetheseats andtherear
bench seat.
! Make surethatthesun visor isfolded up
before adjusting thebackrest andhead
restraint height.Thehead restraint andsun
visor could otherwise collidewhenthehead
restraint isfully exten ded. i
It
is not possible toremove thehead
restraint sfrom thefront seats. Therear-
compartmen thead restraint scan be
removed (Ypage 98). Please
contactanauthorized Mercedes-
Benz Center formore information . i Other
topics:
R cargo compartmen tenlargement
(folding therear bench seatforwards)
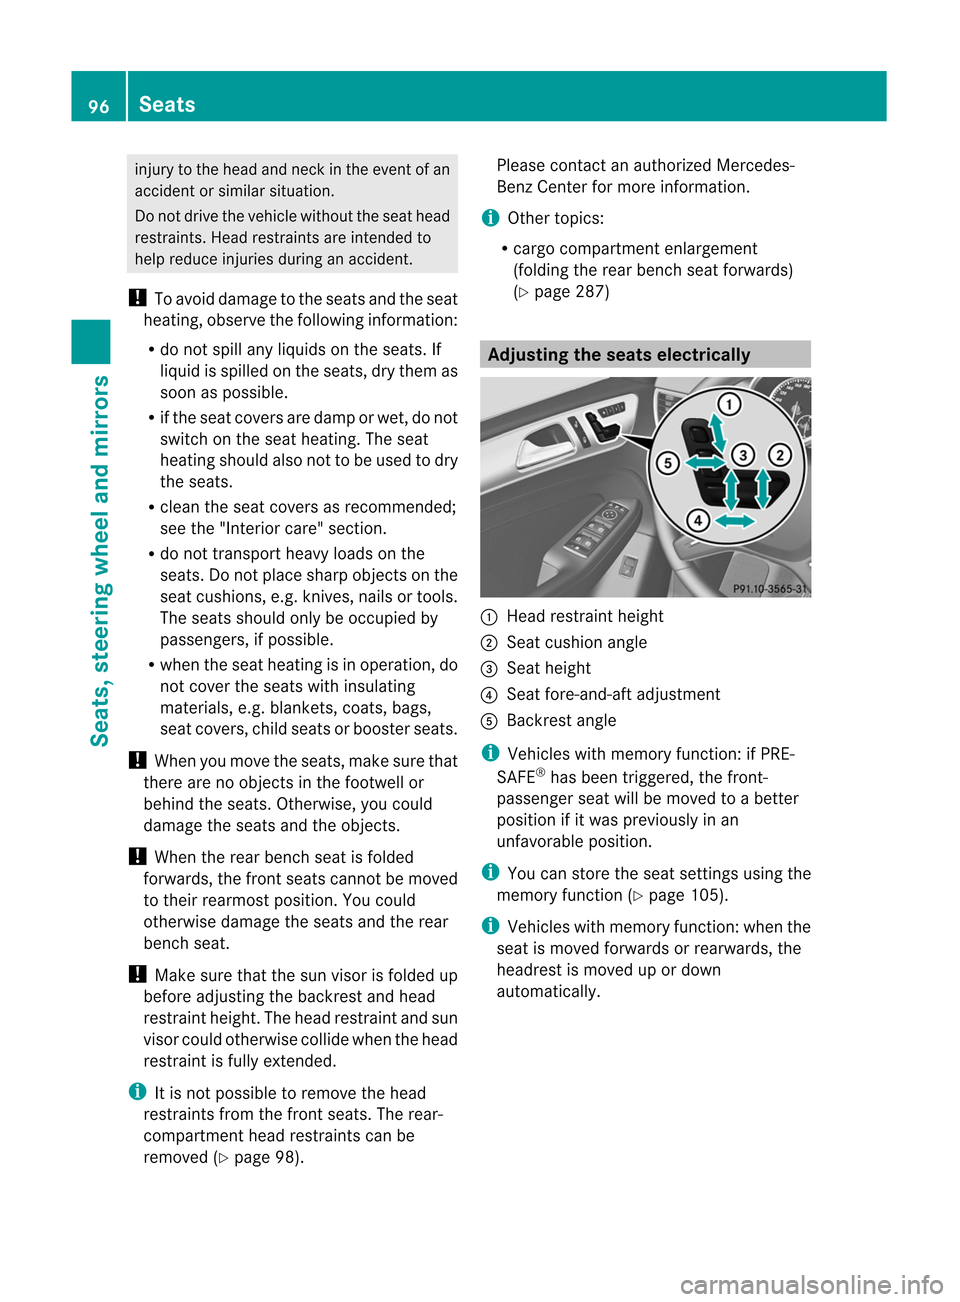
(Y page 287) Adjust
ingthe seats electrically :
Head restraint height
; Seat cushion angle
= Seat height
? Seat fore-and- aftadjustment
A Backrest angle i
Vehicles
withmemory function:ifPRE-
SAF E®
has been triggered, thefront -
passenger seatwillbemoved toabetter
position ifit was previously inan
unfavorable position. i
You
canstore theseat settin gsusing the
memory function(Ypage 105). i
Vehicles
withmemory function:when the
seat ismoved forwards orrearwards, the
headrest ismoved upordown
automatically .96
SeatsSeats, steering wheel and mirrors
Page 99 of 396
Adj
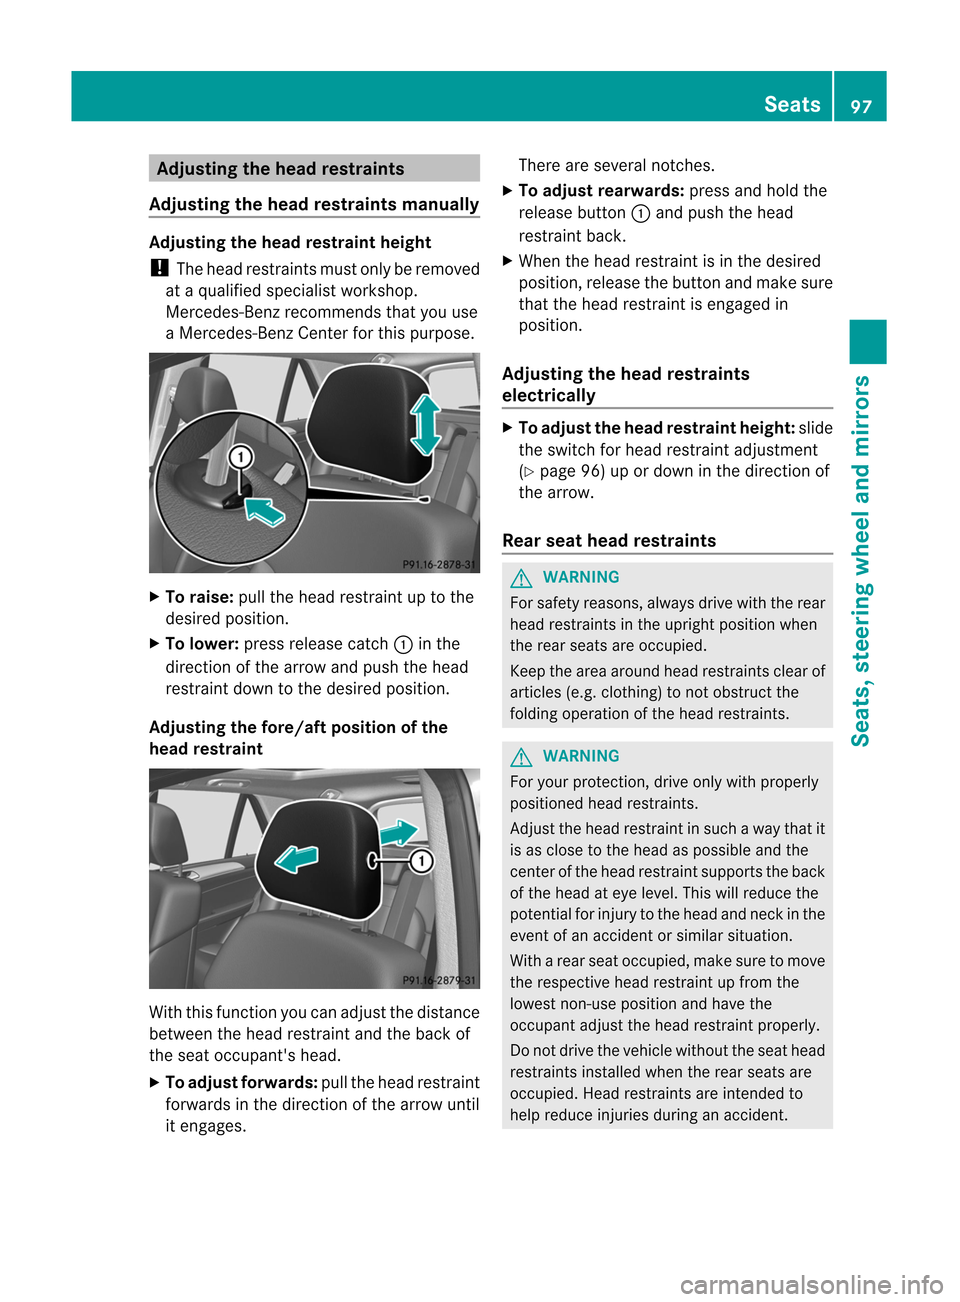
usting thehea dres train ts
Adj usting thehea dres train tsma nua lly Adj
usting thehea dres train theig ht
! The head restrain tsmus tonly berem oved
at aqu alifi ed spe cialist wo rksh op.
Mer cedes-B enzreco mme ndsthatyou use
a Mercedes-B enzCenter forthis purpose. X
To raise: pullthehead restraintuptothe
desired position.
X To lowe r:press release catch: inthe
direction ofthe arrow andpush thehead
restr aintdown tothe desired position.
Adjust ingthe fore/aft position ofthe
head restraint With
thisfunct ionyou can adjust thedistance
between thehead restraintandtheback of
the seat occupant 'shead.
X To adj ust forward s:pull thehead restraint
forwards inthe direction ofthe arrow until
it engages. There
areseveral notches.
X To adj ust rear wards: pressandhold the
release button:and push thehead
restr aintback.
X When thehead restraintisin the desired
position, releasethebutton andmake sure
that thehead restraintisengaged in
position.
Adjust ingthe head restraints
elec trically X
To adj ust the head restraintheight: slide
the switch forhead restraintadjustmen t
(Y page 96)upordown inthe direction of
the arrow.
Rear seathead restraints G
WARNIN
G For
safety reasons, alwaysdrive withtherear
head restraint sin the upright position when
the rear seats areoccupied.
Keep thearea around headrestraint sclear of
articles (e.g.clothin g)to not obstruct the
folding operation ofthe head restraint s. G
WARNIN
G For
your protect ion,drive onlywith properly
positioned headrestraint s.
Adjust thehead restraint insuch away that it
is as close tothe head aspossible andthe
cent erofthe head restraint supports theback
of the head ateye level. Thiswillreduce the
potent ialfor injury tothe head andneck inthe
event ofan accident orsimilar situation.
With arear seat occupied, makesuretomove
the respect ivehead restraint upfrom the
lowest non-useposition andhave the
occupant adjustthehead restraint properly.
Do not drive thevehicle without theseat head
restraint sinstalled whentherear seats are
occupied. Headrestraint sare inten dedto
help reduce injuries duringanaccident . Seats
97Seats, steering wheel and mirrors Z
Page 100 of 396
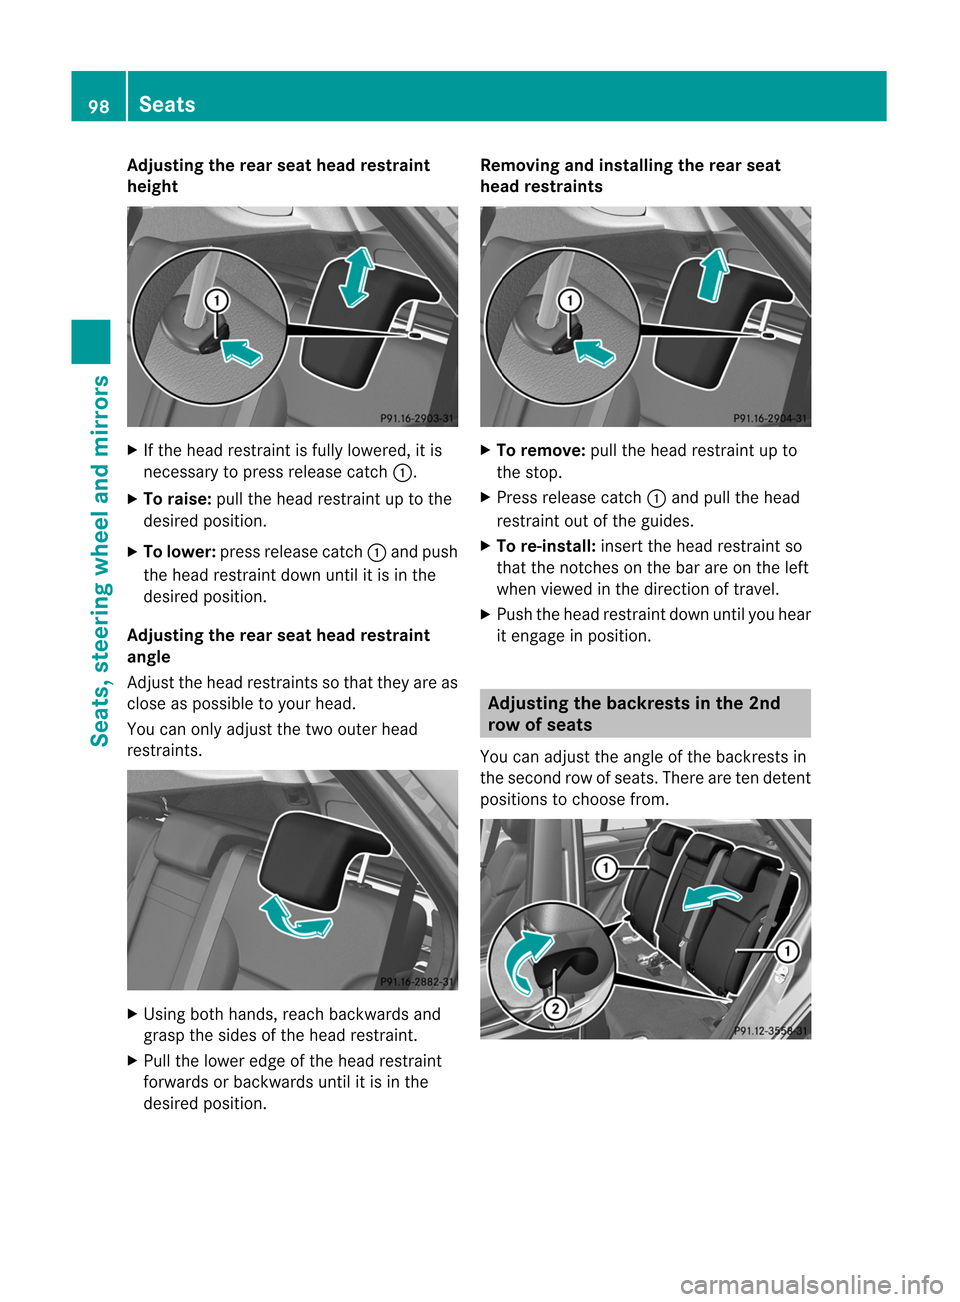
Adj
usting therea rseat headres train t
heig ht X
Ifth ehead restraint isfully lower ed,itis
ne ces sary topre ssrele ase catch:.
X To raise: pullthehead restraint uptothe
desi redposi tion .
X To lower :pre ssrele ase catch: and push
th ehead restraint down untilit is in the
desi redposi tion .
Adj usting therea rseat headres train t
ang le
Ad jus tthe head restraint ssothat they areas
close aspossible toyour head.
You canonly adjust thetwo outer head
restr aints. X
Using bothhands, reachbackwards and
grasp thesides ofthe head restraint.
X Pull thelower edgeofthe head restraint
forwards orbackwards untilitis in the
desired position. Removing
andinstalling therear seat
head restraints X
To remove: pullthehead restraintupto
the stop.
X Press release catch: and pullthehead
restr aintoutofthe guides.
X To re-insta ll:insert thehead restraintso
that thenotches onthe bar areonthe left
when viewed inthe direction oftravel.
X Push thehead restraintdown untilyouhear
it engage inposition. Adjust
ingthe backrests inthe 2nd
row ofseats
You canadjust theangle ofthe backrest sin
the second rowofseats. Thereareten detent
positions tochoose from. 98
SeatsSeats, steering wheel and mirrors