steering MERCEDES-BENZ M-Class 2012 W166 Repair Manual
[x] Cancel search | Manufacturer: MERCEDES-BENZ, Model Year: 2012, Model line: M-Class, Model: MERCEDES-BENZ M-Class 2012 W166Pages: 396, PDF Size: 14.48 MB
Page 268 of 396
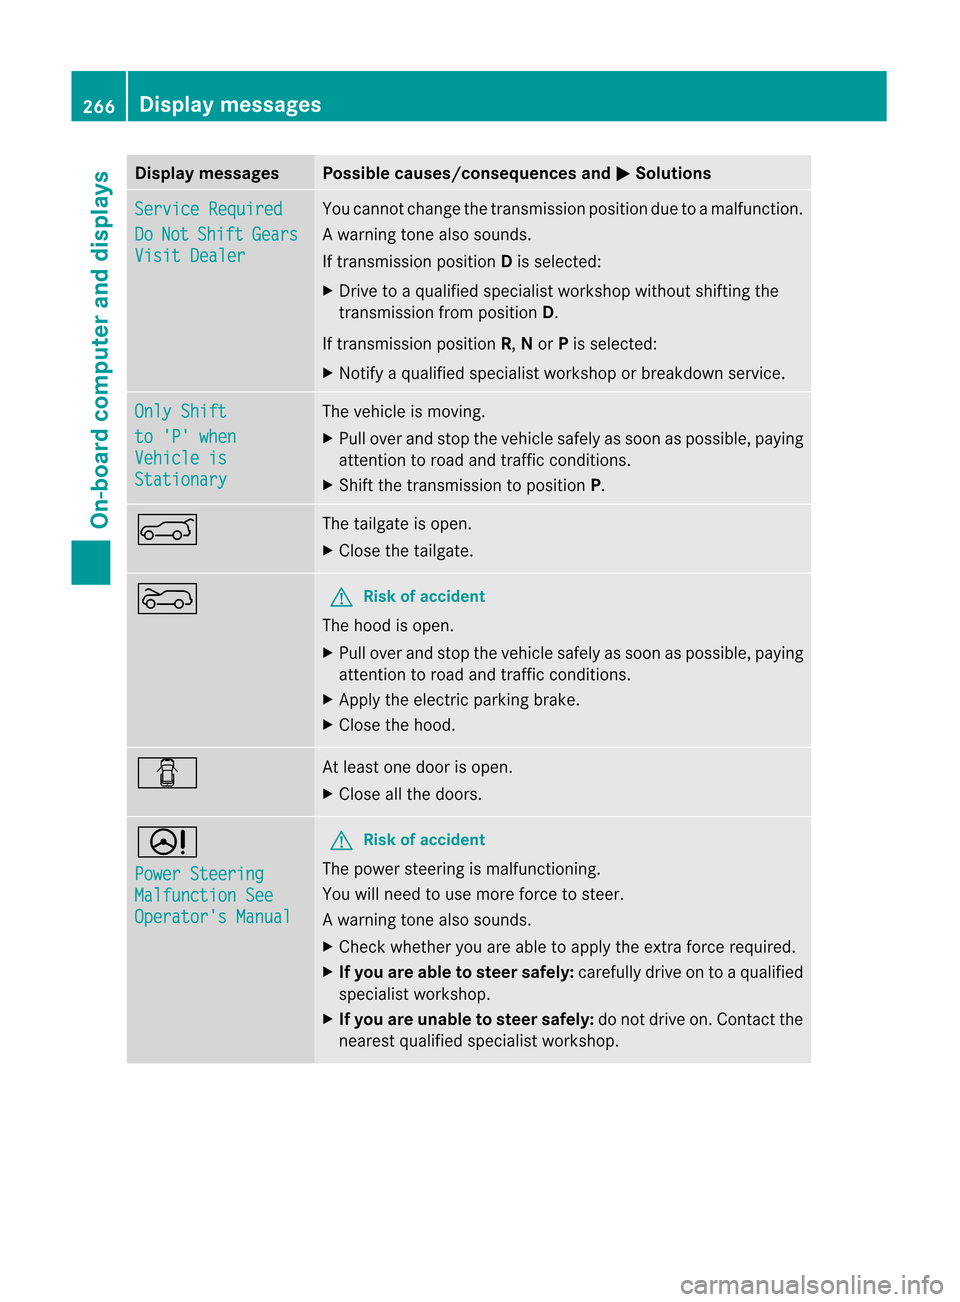
Disp
laymessa ges Poss
iblecauses/c onseq uences and M Solu
tions Ser
viceReq uired Do Not Shi
ft Gea
rs Vis
itDealer You
cannotchange thetransmission positionduetoamalfunction.
Aw arning tone also soun ds.
If trans mis sion positionD is selec ted:
X Dr ive toaqualifi edspec ialist workshopwit hout shiftingth e
tr ans mis sion from posi tionD.
If trans mis sion positionR, Nor Pis selec ted:
X Not ifyaqualifi edspec ialist workshopor break down service. Onl
yShi ft to
'P' when Veh
icleis Sta
tionary The
vehicle ismov ing.
X Pull overand stop thevehiclesa fel yas soo naspossible ,pay ing
attent iontoroad andtraffic conditions.
X Shift thetransmission toposition P. A The
tailgate isopen.
X Close thetailgate. ? G
Risk
ofaccident The
hood isopen.
X Pull over andstop thevehicle safelyassoon aspossible ,pay ing
attent iontoroad andtraffic conditions.
X Apply theelectric parking brake.
X Close thehood. C At
least onedoor isopen.
X Close allthe doors. D
Power
Steering Malfunction
See Operator's
Manual G
Risk
ofaccident The
power steering ismalfunctioning.
You willneed touse more forcetosteer.
Aw arning tone also soun ds.
X Chec kwhether youareable toapply theextr aforce required.
X Ifyou areable tosteer safely: carefully driveontoaqual ified
specialist workshop.
X Ifyou areunable tosteer safely: donot drive on.Contact the
nearest qualified specialist workshop. 266
Display
messagesOn-board computer and displays
Page 274 of 396
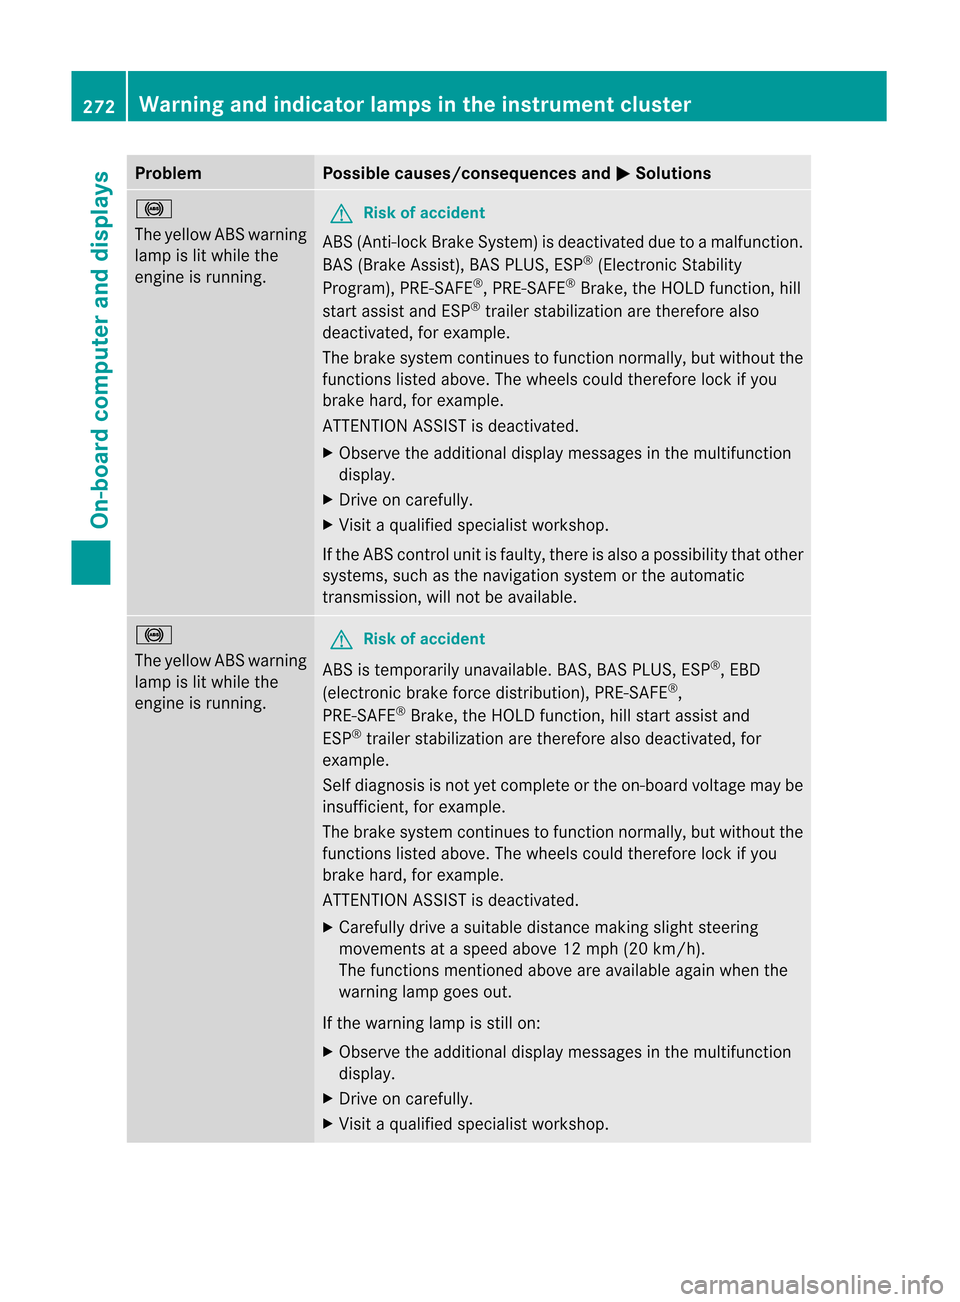
Problem Possible
causes/co nsequences andM Solutions
!
The
yello wABS warning
lamp islit while the
engine isrunning. G
Risk
ofaccident ABS
(Anti-lock Brake System) isdeactivated duetoamalfunction .
BAS (Brake Assist), BASPLUS, ESP®
(Electr onicStability
Program), PRE-SAFE®
,PRE-SA FE®
Brake, theHOLD function,hill
start assist andESP®
trailer stabilization aretherefore also
deactivated, forexample.
The brake system continues tofunct ionnormally, butwithout the
funct ionslisted above. Thewheels couldtherefore lockifyou
brake hard,forexample.
ATTENTI ONASS ISTisdeactivated.
X Observe theadditional displaymessages inthe multifunct ion
display .
X Drive oncarefully.
X Visit aqual ified specialist workshop.
If the ABS controlunit isfaulty, thereisalso apossibili tythat other
systems, suchasthe navigation systemorthe automatic
transm ission,willnotbeavaila ble. !
The
yello wABS warning
lamp islit while the
engine isrunning. G
Risk
ofaccident ABS
istemporarily unavailable.BAS,BAS PLUS, ESP®
,EBD
(electronic brakeforcedistribution), PRE-SAFE®
,
PRE-SA FE®
Brake, theHOLD function,hillstart assist and
ESP ®
trailer stabilization aretherefore alsodeactivated, for
example.
Self diagnosis isnot yetcomplete orthe on-board voltagemaybe
insufficient ,for example.
The brake system continues tofunct ionnormally, butwithout the
funct ionslisted above. Thewheels couldtherefore lockifyou
brake hard,forexample.
ATTENTI ONASS ISTisdeactivated.
X Carefull ydrive asuitable distance makingslightsteering
movement sat aspeed above12mph (20km/ h).
The funct ionsment ioned above areavaila bleagain whenthe
warning lampgoesout.
If the warning lampisstill on:
X Observe theadditional displaymessages inthe multifunct ion
display .
X Drive oncarefully.
X Visit aqual ified specialist workshop. 272
War
ning andindicator lampsin the instrum entclusterOn-board computer and displays
Page 277 of 396
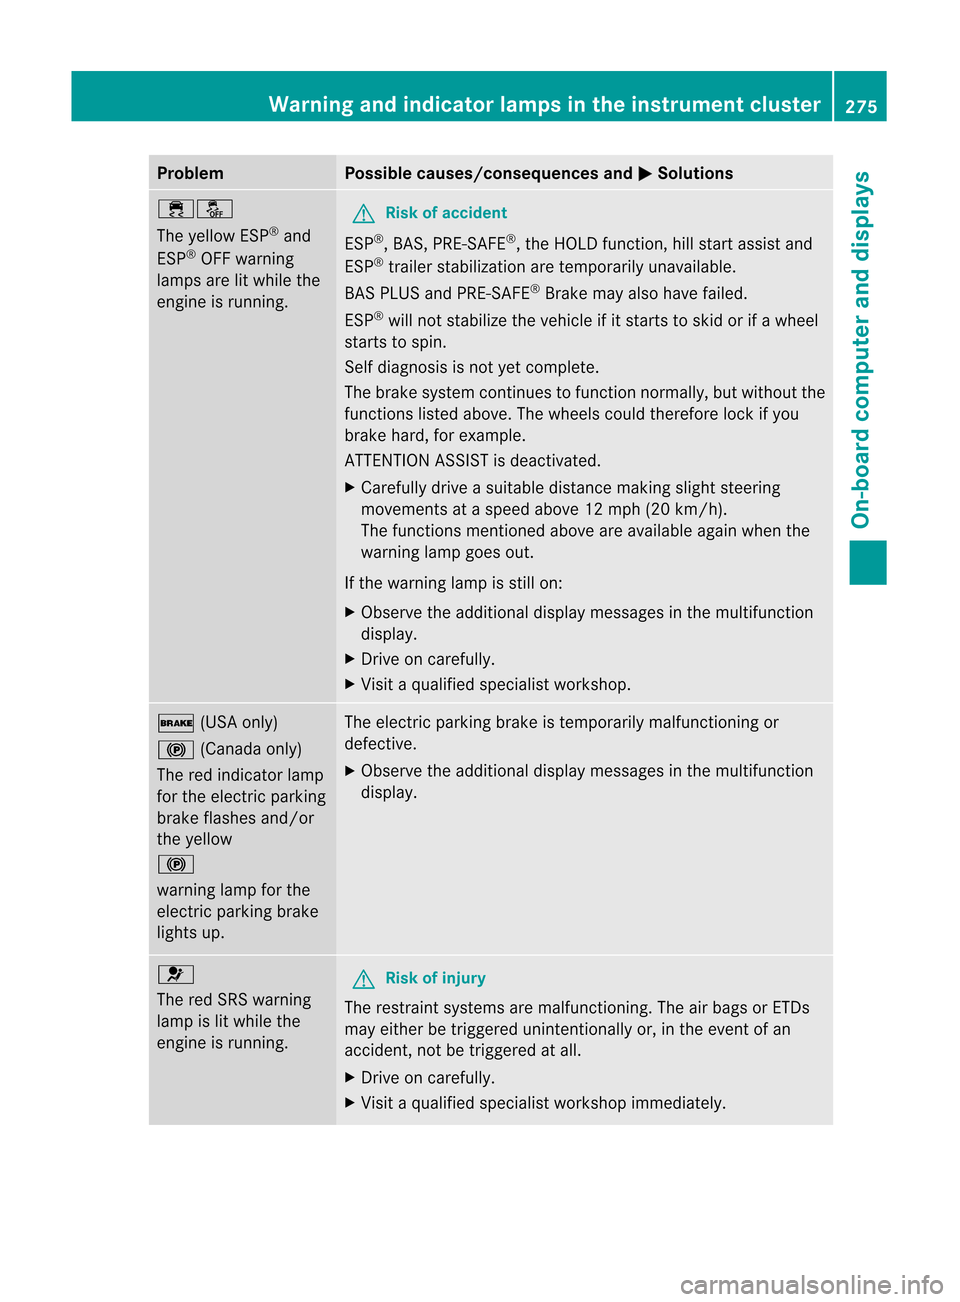
Problem Possible
causes/co nsequences andM Solutions
֌
The
yello wESP ®
and
ESP ®
OFF warning
lamps arelitwhile the
engine isrunning. G
Risk
ofaccident ESP
®
,BAS ,PRE-SA FE®
,the HOLD function,hillstart assist and
ESP ®
trailer stabilization aretemporarily unavailable.
BAS PLUS andPRE-SA FE®
Brake mayalsohave failed.
ESP ®
will notstabilize thevehicle ifit starts toskid orifawheel
starts tospin.
Self diagnosis isnot yetcomplete.
The brake system continues tofunct ionnormally, butwithout the
funct ionslisted above. Thewheels couldtherefore lockifyou
brake hard,forexample.
ATTENTI ONASS ISTisdeactivated.
X Carefull ydrive asuitable distance makingslightsteering
movement sat aspeed above12mph (20km/ h).
The funct ionsment ioned above areavaila bleagain whenthe
warning lampgoesout.
If the warning lampisstill on:
X Observe theadditional displaymessages inthe multifunct ion
display .
X Drive oncarefully.
X Visit aqual ified specialist workshop. $
(USAonly)
! (Canada only)
The redindicator lamp
for the electric parking
brake flashes and/or
the yello w
!
warning lampforthe
electric parking brake
lights up. The
electric parking brakeistemporarily malfunctioningor
defective.
X Observe theadditional displaymessages inthe multifunct ion
display . 6
The
redSRS warning
lamp islit while the
engine isrunning. G
Risk
ofinjury The
restraint systemsaremalfunction ing.Theairbags orETDs
may either betriggered unintentionally or,inthe event ofan
accident, notbetriggered atall.
X Drive oncarefully.
X Visit aqual ified specialist workshop immediately. War
ning andindicator lampsin the instrum entcluster
275On-board computer and displays Z
Page 298 of 396
Asht
ray
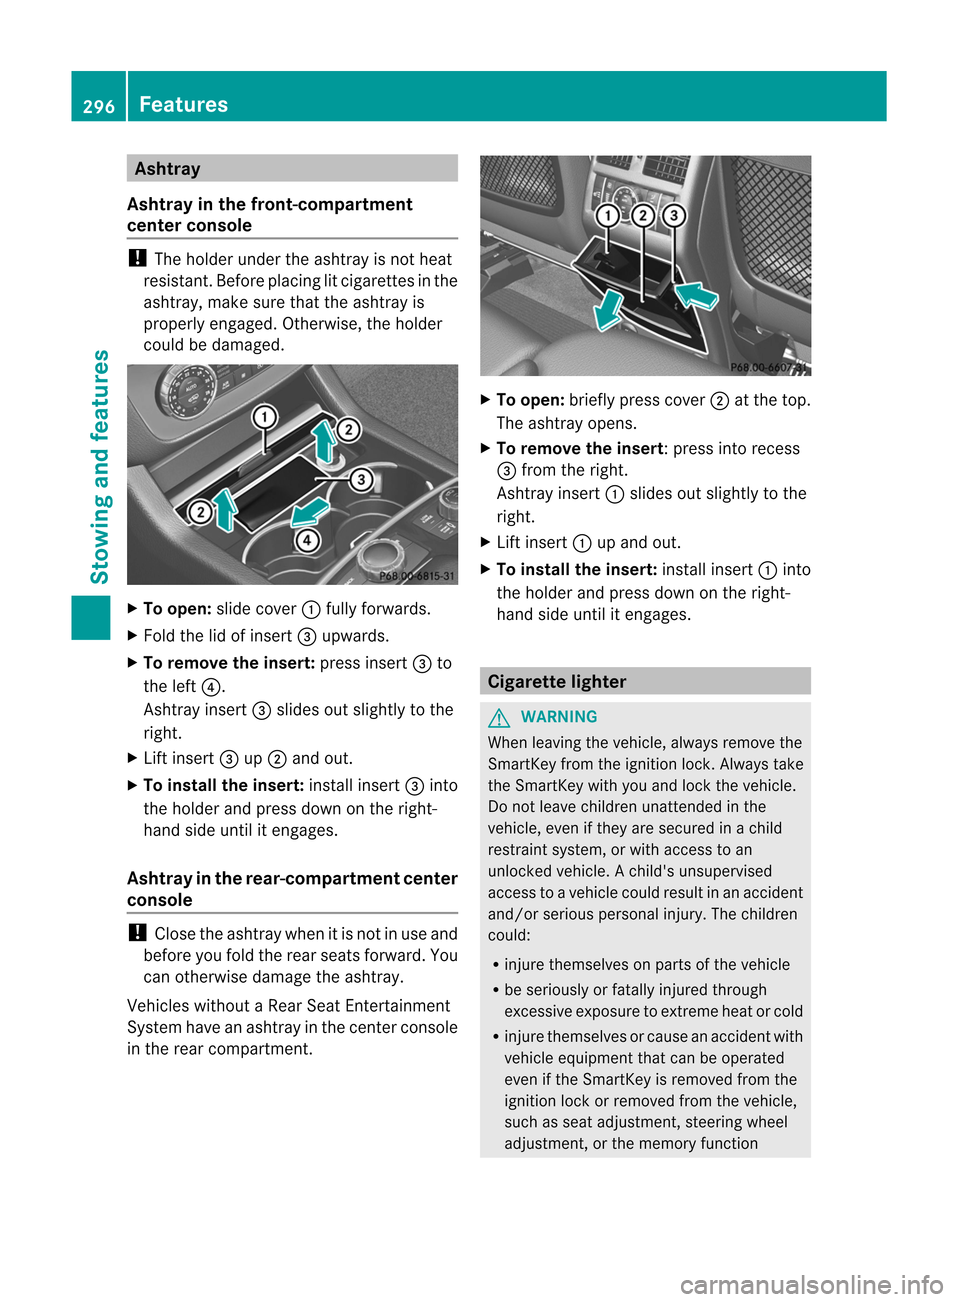
Asht rayin thefront -com partmen t
cent erconsole !
The hold erund ertheasht rayisno th eat
resist ant.Befor eplacing litcigaret tesinthe
ashtray, makesurethattheashtray is
properly engaged. Otherwise, theholder
could bedamaged. X
To open: slidecover :fully forwards.
X Fold thelidofinsert =upwards.
X To rem ove theinsert: pressinsert =to
the left ?.
Asht rayinsert =slides outslightly tothe
right.
X Lift insert =up; and out.
X To install theinsert: installinsert =into
the holder andpress downonthe right-
hand sideuntil itengages.
Ashtr ayinthe rear -comp artment center
console !
Close theashtray whenitis not inuse and
before youfold therear seats forward. You
can other wisedamage theashtray.
Vehicles withoutaRear SeatEntert ainmen t
System haveanashtray inthe centercon sole
in the rear compart ment. X
To open: briefly presscover ;atthe top.
The ashtray opens.
X To rem ove theinsert:p ressintorecess
= from theright.
Ashtray insert:slid esout slightly tothe
right.
X Lift insert :upand out.
X To install theinse rt:install insert:into
the hold erand press downonthe right-
hand sideuntil itengages. Cigarette
lighter G
WARNING When
leaving thevehicle, alwaysremove the
SmartK eyfrom theignition lock.Always take
the SmartK eywith youand lock thevehicle.
Do not leave children unattendedinthe
vehicle, evenifthey aresecured inachild
restraint system,orwith access toan
unlocked vehicle.Achild's unsupervised
access toavehicle couldresult inan accident
and/or serious personal injury.Thechildren
could:
R injure themselves onparts ofthe vehicle
R be seriously orfatally injured through
excessive exposuretoextrem eheat orcold
R injure themselves orcause anaccident with
vehicle equipment thatcanbeoperated
even ifthe SmartKey isremoved fromthe
ignition lockorremoved fromthevehicle,
such asseat adjustment ,steering wheel
adjustment ,or the memory function 296
FeaturesStowing and features
Page 305 of 396
This
may bebecause thecorrespon ding
mobile phonenetwork isnot availab le.
The Call
Failed message
appearsinthe
multifunct iondisplay .
X To end acall: press the~ button onthe
mul tifunctio nstee ring wheel.
or
X Pre ssthe corr espo ndi ng button forend ing
a ph one callon the audio sy ste mo ron
COMA ND.
Call prior ity When
servicecall sare active, e.g. Roadsi de
As sist anc eor MB Info call s,an eme rgency
call can still be initia ted. Inthis cas e,an
eme rgencycall willtakeprio rityand override
all other active calls.
The indicat orlamp oftheres pec tive but ton
flas hes untilth ecall isen ded. Aneme rgency
call can onlybe term inat edbytheMer cedes-
Ben zCust omerAs sist anc eCen ter. All other
call scan beended bypre ssin gth e~
but tono nthe multifunction steeringwheelor
the corresponding buttonforending a
telephone callonthe audi osystem oron
COMAND. i
If
an mbrace callisinitiated, audiooutput
is muted. Themobile phoneisno longer
conn ected toCOMAND. However,ifyou
want touse your mobile phone, we
recommen dthat youdothis only when the
vehicle isstationary andinasafe location.
Dow nloading destinations i
Inform
ationonthe componen tsand
operating principles ofCOMAND canbe
found inthe separate COMAND operating
instruct ions. i
You
canonly usetheDestin ation
Download functionifthe vehicle is
equipp edwith anavigation system.
Destin ationDownload givesyouaccess toa
database withover 15million pointsof
interest (POIs)/important destinationsthatcan
bedownloaded ontothenavigation
system ofyour vehicle. Ifyou know the
destination, youcan download theaddress or
obtain thelocation ofpoints ofinterest
(POIs)/important destinationsinthe
surrounding area.
You areprompted toconfirm routeguidance
to the address entered.
The system calculates theroute and
subsequ entlystarts theroute guidancewith
the address entered. i
If
you select No ,
the address canbestored
in the address book. i
The
Destin ationDownload functionis
availa bleifthe corresponding mobile
phone network isavaila bleand data
transf erispossible.
Route Assistance
This service ispart ofthe mbrace PLUS
Package andcannot bepurchased
separately. i
You
canalso usetheRoute Assistanc e
funct ionifyour vehicle isnot equipp edwith
a navigation system.
Within theframework ofthis service, you
receive aprofessional andreliabl eform of
navigation supportwithouthavingtoleave
your vehicle.
The customer servicerepresentat ive
determines asuitable drivingroutebased on
your current vehicleposition andthedesired
destination andguides youlivethrough the
current sections ofthe route.
Search &Send "Sear
ch&Sen d"isadest inationentry
ser vice.You canfindfurt her inform ationon
"Sear ch&S end" inthe separate COMAND
operatin ginst ruct ions. Featur
es
303Stowing and features Z
Page 326 of 396
plastic
trim.This maintains thehigh-quali ty
look ofthe surfaces.
X Wipe theplastic trimwith adamp, lint-free
cloth, e.g.amicrofiber cloth.
X Heavy soiling:use carcare andcleaning
products recommen dedandapproved by
Mercedes-Ben z.
The surface maychange colortemporarily.
Wait untilthesurface isdry again.
Cleanin gthe steering wheelandgear or
selec torlever X
Thoroughly wipewithadamp clothoruse
leather careagents thathave been
recommen dedandapproved byMercedes-
Benz .
Cleanin ggenuine woodand trim
elements X
Wipe thewooden trimandtrim pieces with
a damp, lint-free cloth ,e.g. amicr ofiber
clo th.
X Hea vysoilin g: usecar care andcleani ng
pro ducts reco mmend edand appro ved by
Mer cedes-Be nz.
! Donot usesol vent-b ased cleani ngagents
su ch astar remo ver,wheelcleaner s,
polishes orwaxes. Thereisoth erwise arisk
of damagin gthe surface.
! Donot use chrome polish ontrim pieces .
The trim pieces haveachr ome lookbutare
most lymade ofanodiz edaluminum and
can lose theirshin eif chr ome polish is
used. Useadamp, lint-free clothinst ead
when cleaningthe trim pieces .
If the chrome- plated trim pieces arevery
dirt y,you can useachr ome polish. Ifyou
are unsur eas towhet herthetrim pieces
are chrome- plated ornot ,con sult an
author izedMerc edes- BenzCent er. Cleaning
theseat covers !
Donot use microf iberclothstoclean
genuine leather,artificialleather or
Alcan tara® covers.Ifused often,these can
damage thecover .
! Observe thefollowing whencleanin g:
R clean genuine leathercoverscaref ully
wit hadamp clothand then wipe the
co ver sdown withadry cloth.M ake sure
th at theleat her does notb ecome
soaked. Itmay other wisebecome rough
and crack ed.Only useleather care
agents thathave been testedand
approved byMercedes- Benz.You can
obtain thesefromaqualified specialist
worksho p,e.g. aMercedes- BenzService
cen ter.
R clean artificialleather coverswith aclot h
moisten edwith asolution containin g1%
detergen t(e.g. dish washing liquid).
R clean clothcover swith amicrof ibercloth
moisten edwith asolution containin g1%
detergen t(e.g. dish washing liquid).Rub
carefully andalway swipe entireseat
sect ions toavoid leaving visiblelines.
Leave theseat todry afterwards.
Cleaning resultsdepend onthe type of
dirt and how long ithas been there.
R clean Alcantara® coverswith adamp
clot h.Make sureyouwipe entireseat
sect ions toavoid leaving visiblelines. i
Note
thatregular careisessent ialto
ensure thattheappearance andcomf ortof
the cover sis retain edover time.
Cleaning theseat belts X
Use clean, lukewarm waterandsoap
solution.
! Donot clean theseat belts using chemic al
cleanin gagents .Donot drythe seat belts
by warming themabove 176‡(80 †)or
placing themindirect sunlight. 324
CareMaintenance and care
Page 345 of 396
Tow
ingand tow-starti ng Impo
rtant safety notes G
WA
RNING If
yo utow thevehicle, youmu stusearig id
tow ingbarif:
R the engine isnot running.
R there isabrake system malfunction.
R there isamal function inthe pow ersup ply
or the vehicl e'selectrical system .
The pow erassi stance forthe steering andthe
brake forcebooste rdo not work when the
engine isnot running. Youwillneed more
force tosteer andbrake, youmay have to
depre ssthe brake pedalwith maximu mforce.
Before towing away,make surethatthe
steering canbemoved andisnot locked.
If you tow ortow-st artanother vehicle,its
weight mustnotexceed themaximum
permissible grossvehicle weightofyour
vehicle. G
WARNING The
vehicle isbraked whentheHOLD function
or DIS TRONIC PLUSisactivated. Therefore,
deactivate HOLDandDISTRONIC PLUSifthe
vehicle isto be towed.
It is better tohave thevehicle transported
than tohave ittowed.
! You may onlytowthevehicle amaximum
distance of30 miles (50km). Atowing
speed of30 mph (50km/ h)must notbe
exceeded.
For towing distances over30miles
(50 km), thevehicle mustloaded ontoa
trans porter.
! Make surethattheelectric parking brake
is released. Ifthe electric parking brakeis
faulty, visitaquali fiedspecialist workshop.
! Only secure thetow rope ortow baratthe
towing eyes.Otherwise, thevehicle could
be damaged. !
Donot use thetowing eyeforrecovery,
as this could damage thevehicle. Ifin
doubt, recover thevehicle withacrane.
! When towing, pullaway slowly and
smoothly. Ifthe tract ivepower istoo high,
the vehicles couldbedamaged.
! Donot tow with sling-t ypeequipment.
This could damage thevehicle.
! When towing vehicles withKEYLE SS-GO,
use thekey instead ofthe Start /Stop
button .Othe rwise, the automa tic
tra nsmi ssion mayshi ftto positio nP wh en
the driver 'sor fro nt-pa ssenge rdo or are
op ene d,wh ich cou ldlead todama getothe
tra nsmi ssion.
! Vehicle swi th diffe renti allocks: make
su re tha tthe differential locksarein
automatic mode.Whentowing, the
differential locksmustnotbeswitched on
by hand. Thiscould otherwise damagethe
transmission.
If the vehicle hassuffered transmission
damage, haveittransport edon atransport er
or trailer.
The automatic transmission mustbein
position Nwhen thevehicle isbeing towed.
The battery mustbeconn ected andcharged.
Otherwise, you:
R cannot turntheSmartK eytoposition 2in
the ignition lock
R cannot shifttheautomatic transmission to
position N i
Before
thevehicle istowed, switchoffthe
automatic lockingfeature(Ypage 235).
You could otherwise belocked outwhen
pushing ortowing thevehicle. Installing/
removingthetowing eye
Installing thetowing eye Vehicles
withatrailer towhitch: ifpossible,
secure thetowing deviceonthe trailer tow
hitch (Ypage 210). Towing
andtow-star ting
343Breakdown assistance Z
Page 359 of 396
Check
ingthetir epr essu res
Imp ortant safety notes G
WAR
NING Fol
low recomm ended tireinf lati onpres sures.
Do notunde rinflat etir es. Underi nflate dtir es
wear exces sively and /or unevenly,adve rsely
aff ect handlingand fuel economy, and are
mor elik ely tofail from bein gove rheated.
Do notoverinfla tetires. Overinfla tedtires can
adve rsely affect handlingand ride comfort,
wea runeve nly,incre asestop ping dista nce,
and resulti ns udden deflation (blowo ut)
bec ause they are mor elik ely tobec ome
pun ctured ordamag edbyroad debris,
pot hole set c.
Do noto verloa dthe tires byexceedi ngthe
specifi edloadlimi tasindicated onthe Tire
and Loading Information placardonthe
driver's doorB-pillar. Overloading thetires
can overheat them,possibly causinga
blowou t.Overloading thetires canalso result
in handling orsteering problems, orbrake
failu re.
Check thetire pressure atleast once amonth.
Only check andcorrect tirepressures when
the tires arecold (Ypage 353).
Checki ngtire pressures manually To
determine andsetthe correct tire
pressure, proceedasfollows:
X Remove thevalve capofthe tire that isto
be checked.
X Press thetire pressure gaugesecurely onto
the valve.
X Read thetire pressure andcompare itwith
the recommended valueonthe Tire and
Loading Information placardonthe
B-pillar onthe driver's sideofyour vehicle.
X Ifnecessary, increasethetire pressure to
the recommended value(Ypage 353).
X Ifthe tire pressure istoo high, release air
by pressing downthemetal pininthe valve
using thetipofapen, forexample. Then check
thetire pressure againusing thetire
pressure gauge.
X Screw thevalve caponto thevalve.
X Repea tthese steps forthe other tires. Tire
pressur eloss warning system
(Canada only)
Import antsafety notes While
thevehicle isin motion, thetire
pressure losswarning systemmonitors the
set tire pressure usingtherotational speedof
the wheels. Thisenables thesystem todetect
significant pressurelossinatire. Ifthe speed
of rotation ofawheel changes asaresult of
a loss ofpressure, acorresponding warning
message willappea rint he multifunction
displa y. G
WARNING If
the Check Tire Pressure Soon message
appears inthe multifunction display,one or
more tiresaresignificantly underinflated.
Stop thevehicle assoon aspossible and
inflate thetires tothe pressure specified on
the vehicle's TireandLoading Information
placard or(where available)inthe tire
pressure table.
Driving onasignificantly underinflated tire
causes thetire tooverheat andcanlead to
tire failure. Underinflation alsoreduces fuel
efficiency andtiretread life,and may affect
the vehicle's handlingandstopping ability.
Check alltires when cold,including thespare
tire, atleast once amont h.The tires should
be inflated tothe recommen dedpressure.
This information canbefound:
R on the Tire andLoading Informationplacard
on the B-pillar onthe driver's side
or
R in the table forthe tire pressure onthe
inside ofthe fuel filler flap Tire
pressure
357Wheels and tires Z
Page 362 of 396
repla
cingoneormore tiresorwhee lson you r
vehicl eto ensure thattherepla cement or
alterna tetires andwhee lsall ow the TPMS to
continue tofunction properly. i
USA
only:
If the tire pressu remonitor is
malfu nctioning, itmay take more than
10 minutes forthe tire pressu rewarni ng
lamp toinform youofthe malfu nction by
flas hing for60seconds andthen remai ning
lit.
When themalfu nction hasbeen rectified ,
the tire pressu rewarni nglamp goesout
after drivingfor afew minutes.
Information ontire pressu resisdisp layed in
the multi function display.After afew minutes
of drivi ng,the current tirepress ureofeach
tire isshow nint he multifunction display. i
The
tirepressure valuesindicated bythe
on-board computer maydiffer fromthose
measured atagas station withapressure
gauge. Thetirepressures shownbythe on-
board computer refertothose measured at
sea level. Athigh altitudes, thetire pressure
values indicated byapressure gaugeare
higher thanthose shown bythe on-board
computer. Inthis case, donot reduce the
tire pressures. i
The
operation ofthe tire pressure monitor
can beaffected byinterfer encefromradio
transmit tingequipment (e.g.radio
headphones, two-wayradios)thatmay be
being operated inor near thevehicle. i
USA
only:
This device complies withPart15ofthe
FCC Rules. Operation issubject tothe
following twocondition s:
1. This device maynotcause interfer ence,
and
2. this device mustaccept anyinterfer ence
received, includinginterferencethatmay
cause undesired operation. Any
unauthorized modificationtothis
device couldvoidtheuser’s authority to
operate theequipment. i
Canada
only:
This device complies withRSS-2 10of
Industry Canada.Operation issubjec tto
the followi ng two cond itions :
1. Thisde vice ma ynot causeinte rferenc e,
and
2. thi sde vice mu stacc eptany inte rference
rece ived,incl uding inte rference thatm ay
caus eunde sired oper ationofthe device.
Any unauthorized modificationtothis
device couldvoidtheuser’s authority to
operate theequipment.
Checking tirepressur eelec tronically X
Make surethattheSmartK eyisin position
2 (Y page 139)inthe ignition lock.
X Press the= or; button onthe
steering wheeltoselect the Serv. menu.
X Press the9 or: button toselect Tire
Pressure .
X Press thea button.
The current tirepressure foreach wheel will
be displa yedinthe multifunction display.
If the vehicle hasbeen parked forlonger than
20 minutes, the Tire
pressure willbe displayed
afterdriving afew minutes message
appearsinthe displa y.
Aft erateach-in period,thetire pressure
monitor automatically recognizesnew wheels
or new sensors. Ifac lear allocat ionofthe tire
press urevalues tothe indiv idual wheels isnot
possible ,the Tire
Pressure Monitor Acti
ve mess
ageisshown instead ofthe tire
press uredisplay. Thetirepress uresare
already beingmonitored. i
If
aspare wheel/ emergencyspare wheel
is moun ted,thesyst emmay continue to
show thetirepress ureofthe wheel thathas
been removedforafew minutes .If this
occ urs, notethat thevalue displayed for
the posit ionwhere thespare tireis 360
Tir
epr essur eWheels and tires
Page 364 of 396
Load
ingthevehicle Inst
ruction labels fortires and loads G
WAR
NING Do
not over load thetir es by exc eedin gth e
spec ified loadlimit asindi catedon theTire
and Loadin gIn for mat ionplacar don the
driv er'sdoor B-pillar .Overloa dingthetires
can overhea tthem, possibly causinga
blowou t.Overloading thetires canalso result
in handling orsteering problems, orbrake
failure.
Two instruct ionlabel son your vehicle show
the maximum possibleload.
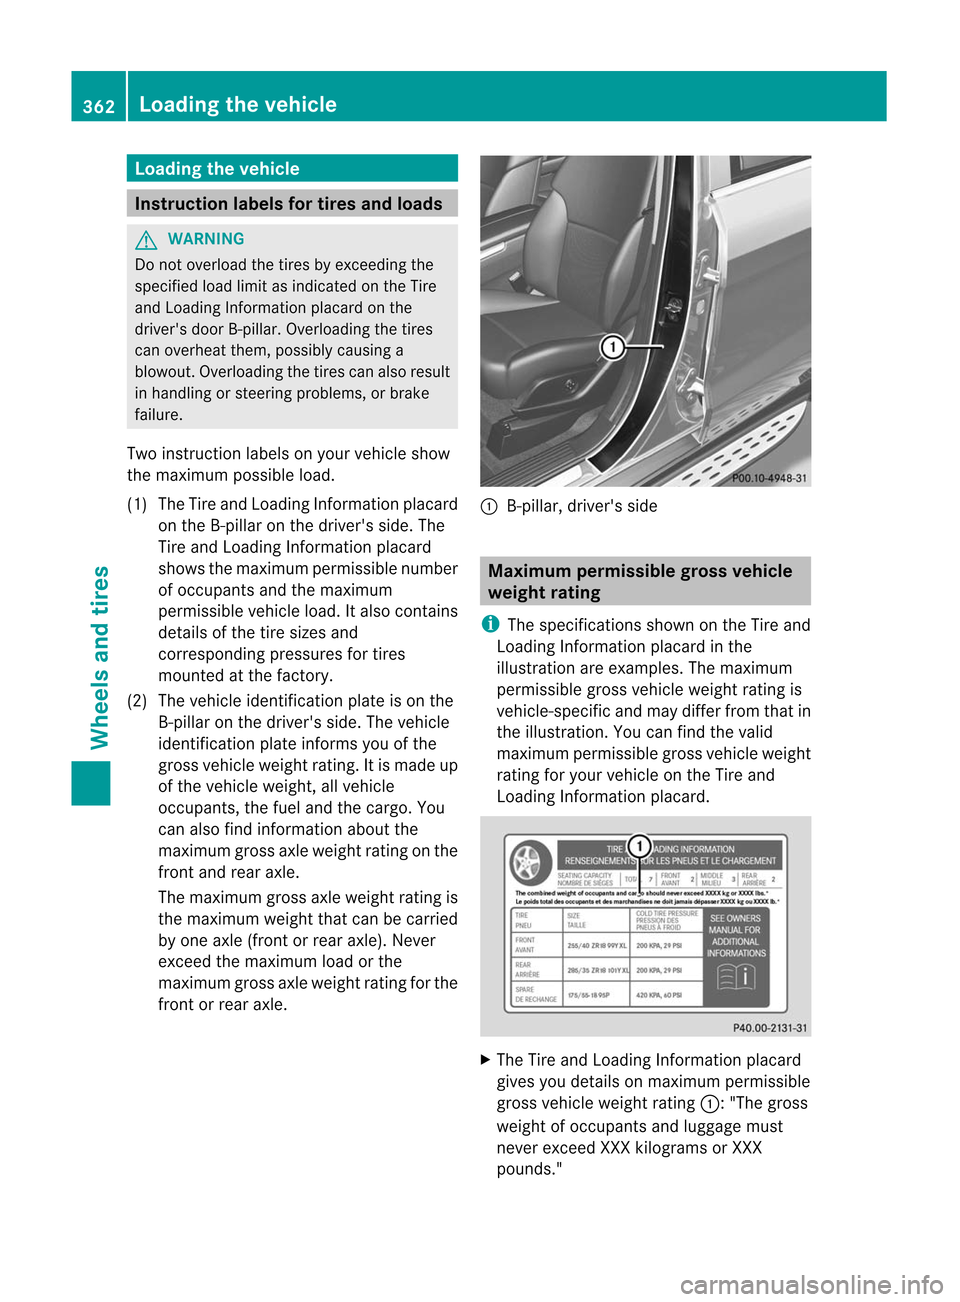
(1) TheTire andLoading Informationplacard
on the B-pillar onthe driver's side.The
Tire andLoading Informationplacard
shows themaximum permissible number
of occupants andthemaximum
permissible vehicleload.Italso contains
details ofthe tire sizes and
corresponding pressuresfortires
mounted atthe factory.
(2) The vehicle identification plateison the
B-pillar onthe driver's side.Thevehicle
identification plateinforms youofthe
gross vehicle weightrating.Itis made up
of the vehicle weight, allvehicle
occupants, thefuel andthecargo. You
can also findinformation aboutthe
maximum grossaxleweight ratingonthe
front andrear axle.
The maximum grossaxleweight ratingis
the maximum weightthatcanbecarried
by one axle (front orrear axle). Never
exceed themaximum loadorthe
maximum grossaxleweight ratingforthe
front orrear axle. :
B-pillar, driver'sside Maximum
permissible grossvehicle
weig htrat ing i
The
specifications shownonthe Tire and
Loading Informationplacard inthe
illu stration areexamples. Themaximum
permissible grossvehicle weightratingis
vehicle-specific andmay differ fromthatin
the illustration .You can find thevalid
maximum permissible grossvehicle weight
rating foryour vehicle onthe Tire and
Loading Information placard. X
The Tire andLoading Information placard
gives youdetails onmaximum permissible
gross vehicle weightrating::"Thegross
weight ofoccupant sand luggage must
never exceed XXXkilograms orXXX
pounds." 362
Loading
thevehicleWheels and tires