ground MERCEDES-BENZ M-Class 2013 W166 Owner's Manual
[x] Cancel search | Manufacturer: MERCEDES-BENZ, Model Year: 2013, Model line: M-Class, Model: MERCEDES-BENZ M-Class 2013 W166Pages: 458, PDF Size: 6.24 MB
Page 22 of 458
GAWR (Gross Axle Weigh
tRating)
(definition) ..................................... 419
GTW (Gross Trailer Weight)
(definition) ..................................... 419
GVW (Gross Vehicle Weight)
(definition) ..................................... 419
GVWR (Gross Vehicle Weight
Rating) (definition) .........................419
Important safety notes ..................398
Increased vehicle weight due to
optional equipment (definition) ......419
Kilopascal (kPa) (definition) ...........419
Labeling (overview )........................ 415
Load bearing index (definition) ......420
Load index ..................................... 417
Load index (definition) ...................420
M+S tires ....................................... 400
Maximum loaded vehicle weight
(definition) ..................................... 419
Maximum load on a tire
(definition) ..................................... 420
Maximum permissible tire
pressure (definition) ....................... 420
Maximum tire loa d......................... 417
Maximum tire load (definition) .......420
MOExtended tires ..........................400
Optional equipment weight
(definition) ..................................... 420
PSI (pounds per square inch)
(definition) ..................................... 420
Replacing ....................................... 421
Service life ..................................... 400
Sidewall (definition) .......................420
Speed rating (definition) ................419
Storing ........................................... 422
Structure and characteristics
(definition) ..................................... 418
Temperature .................................. 414
TIN (Tire Identification Number)
(definition) ..................................... 420
Tire bea d(definition) ...................... 420
Tire pressure (definition) ................420
Tire pressures (recommended )...... 419
Tire size (data) ............................... 426
Tire size designation, load-bearing
capacity, speed rating .................... 415
Tire tread ....................................... 399
Tire tread (definition) .....................420Total load limit (definition)
.............421
Traction ......................................... 414
Traction (definition) .......................421
Trea dwear ..................................... 414
TWR (permissible trailer drawbar
noseweight) (definition) .................421
Uniform Tire Quality Grading
Standard s...................................... 413
Uniform Tire Quality Grading
Standard s(definition) .................... 419
Unladen weight (definition) ............420
Wea rindicato r(definition) .............421
Whee lrim (definition ).................... 419
see Flat tire
Top Tether ............................................ 63
Towing Important safety guidelines ...........391
Installing the towing eye ................392
Removing the towing eye. ..............393
With the rear axle raised ................393
Towing atrailer
Activ eParking Assist ..................... 221
Axle load, permissible ....................455
Cleaning the trailer tow hitch ......... 374
Coupling up atrailer ...................... 257
Decoupling atrailer ....................... 258
Driving tips .................................... 253
ESP ®
(Electronic Stability
Program) .......................................... 72
Important safety notes ..................253
Installing the ball coupling .............255
Mounting dimensions ....................454
Power supply ................................. 260
Pulling away with a trailer ..............160
Removing the ball coupling ............259
Shift range ..................................... 168
Storing the ball coupling ................260
Trailer drive program .....................245
Trailer loads ................................... 455
Towing away
With both axles on the ground .......393
Tow-starting
Emergency engine starting ............394
Important safety notes ..................391
Trailer coupling
see Towing atrailer
Trailer loads and drawbar
noseweights ...................................... 25920
Index
Page 28 of 458
Mercedes-Benz USA, LLC
European Delivery Department
One Mercedes Drive
Montvale, NJ 07645-0350
In Canada
Mercedes-Ben zCanada, Inc.
European Delivery Department
98 Vanderhoof Avenue
Toronto, Ontario M4G 4C9 Sports Utilit
yVehicle G
WARNING
This Sport Utility Vehicle is designed for both
on-road and off-road use. It can go places and
perform tasks for which conventional 2-wheel
drive passenger cars are not intended. This
vehicle will handle and maneuver differently
from conventional passenger cars in driving
conditions which may occur on streets,
highways and off-road use.
This vehicle has a highe rground clearance
and a higher center of gravity than many
passenger cars. As with other vehicles of this
type, if you make sharp turns at excessive
speeds or abrupt maneuvers, the vehicle may
roll over or may go out of control and crash.
Utility vehicles have a significantly higher
rollover rate than other types of vehicles.
Failure to operate this vehicle safely may
resul tinana ccident, rollover of the vehicle,
and severe or fatal injury.
Before you star tto drive this vehicle, read the
Operator's Manual. Take time to become
familiar with the driving characteristics of this
vehicle. Be sure you are familiar with all
vehicle controls. Learn how your vehicle
handles on different road surfaces. Do not
attempt sharp turns at excessive speeds or
abrupt maneuvers or other unsafe driving
actions that can cause loss of vehicle control.
When driving off-road or working the vehicle
hard, do not overload it. And, always wear
your seat belts at all times. In a rollover crash, an unbelted person is significantly more likely
to die than a person wearing a seat belt.
Operating safety
Important safety notes
G
WARNING
Work improperly carried out on electronic
components and associated software could
cause them to cease functioning. Because the
vehicle's electronic components are
interconnected, any modifications made may
produce an undesired effect on other
systems. Electronic malfunctions could
seriously impair the operating safety of your
vehicle.
Contact an authorized Mercedes-Benz Center
for repairs or modifications to electronic
components.
Other improper work or modifications on the
vehicle could also have a negative impact on
the operating safety of the vehicle.
Some safety systems only function when the
engine is running. You should therefore never
turn off the engine while driving. G
WARNING
Heavy blows against the vehicle underbody or
tires/wheels may cause serious damage and
impair the operating safety of your vehicle.
Such blows can be caused, for example, by
running over an obstacle, road debris or a
pothole.
If you feel a sudden significant vibration or
ride disturbance, or you suspect that damage
to your vehicle has occurred:
R turn on your hazard warning flashers.
R slow down carefully.
R drive with caution to an area which is a safe
distance from the road.
Inspect the vehicle underbody and tires/
wheels for possible damage. If the vehicle
appears unsafe, have it towed to the nearest
authorized Mercedes-Benz Center or other 26
Introduction
Page 179 of 458
DEF (BlueTEC vehicles only)
Important notes on use To function properly, BlueTEC exhaus
tgas
aftertreatment must be operated with the
reducing agent DEF.
When the supply of DE Fis almost used up,
the Check Additive See Operator's Manual message is shown in the
multifunction display.
When the DEF supply drops to a minimum, the
Remaining Starts: 16 message is shown
in the multifunction display.
If the Remaining Starts: 16 message
appears in the multifunction display, you can
start the engine another 16 times. If DEF is
not refilled, you will subsequently be unable
to start the engine. Add DEF tank with
approximately 1gal (3. 8l) DEF. Have the DEF
tan krefilled at a qualified specialist
workshop.
i If you drive the vehicle faster than
10 mph (16 km/h), the Check Additive See Operator's Manual message goes
out after approximately one minute.
If the outside temperature is lower than
12 ‡ (0020 11) †, damage may occur when
adding DEF. If DEF is frozen and there is an
active warning indicator, it may not be
possible to add DEF. Park the vehicle in a
warmer place, e.g. in a garage, until DEF has
become fluid again. It will then be possible to
add DEF again. Alternatively, have the DEF
tank refilled at a qualified specialist
workshop.
Further information about BlueTEC exhaust
gas aftertreatment and DEF is available at any
authorized Mercedes-Benz Center. Important safety notes on the refilling
procedure DEF is a water-soluble fluid for the exhaust
gas aftertreatment of diesel engines. It is:
R
not poisonous
R colorless and odorless
R not flammable
When you open the DEF container, small
amounts of ammonia vapor may be released.
Ammonia vapors have a pungent odor and are
particularly irritating to the skin, to mucous
membranes and to the eyes. You may
experience a burning sensation in you reyes,
nose and throat. Coughing and watering of
the eyes are possible.
Do not inhale ammonia vapors. Fill the DEF
tank only in well-ventilated areas.
DEF must not come into contact with your
skin, eyes or clothing and mus tnot be
swallowed. Keep DEFa way fromchildren.
If you or other persons come into contact with
DEF, observe the following:
R Rinse DEF from your skin immediately with
soap and water.
R If DEF comes into contact with your eyes,
immediately rinse them thoroughly with
clean water. Seek medical assistance
without delay.
R If DEF has been swallowed, rinse your
mouth out immediately. Drink plenty of
water. Seek medical assistance without
delay.
R Change out of clothing contaminated with
DEF immediately.
! Only use DEF in accordance with
ISO 22241. Do not mix any additives with
DEF, and do not dilute DEF with water. This
may destroy the BlueTEC exhaust gas
aftertreatment system.
! The vehicle must be parked on level
ground to fill the DEF tank. The DEF tank
can only be filled as intended with the
vehicle parked on a level surface. This
avoids false level readings. Filling the tank Refueling
177Driving and parking Z
Page 188 of 458
Fording
depth Steel-sprung vehicles
20 in
(50 cm) Vehicles with the
AIRMATIC package and
AMG vehicles
Raised level 20 in
(50 cm) R
Establish how deep the wate ris and the
characteristics of the body of water before
fording.
R Vehicles with the AIRMATIC package:
select the highest possible vehicle level.
R Restrict the shift range to 1or 2.
R Avoid high engine speeds.
R Enter and exit the water at a flat place and
at a steady walking pace.
R Drive slowly and at an even speed through
the water.
R Do not stop.
R Water offers a high degree of resistance,
and the ground is slippery and in some
cases unstable. Therefore, it is difficult and
dangerous to pull away in the water.
R Ensure that a bow wave does not form as
you drive.
R Clean any mud from the tire tread after
fording.
R Apply the brakes to dry them after fording. Winter driving
General notes G
WARNING
If you shift down on a slippery road surface in
an attempt to increase the engine's braking
effect, the drive wheels could lose their grip.
There is an increased danger of skidding and
accidents. Do not shift down for additional engine
braking on a slippery road surface.
G
DANGER
If the exhaust pipe is blocked or adequate
ventilation is not possible, poisonous gases
such as carbon monoxide (CO) may enter the
vehicle. This is the case, e.g. if the vehicle
becomes trapped in snow. There is a risk of
fatal injury.
If you leave the engine or the auxiliary heating
running, make sure the exhaust pipe and area
around the vehicle are clear of snow. To
ensure an adequate supply of fresh air, open
a window on the side of the vehicle that is not
facing into the wind.
Have your vehicle winterproofed at a qualified
specialist workshop at the onset of winter.
i Vehicles with adiesel engine: do not
cover the radiator, e.g. with a protective
cover. The measuring function of the
onboard diagnosis syste mmay otherwise
provide inaccurate values .Some of these
values are required by law and must
therefore always be accurate.
Observe the notes in the "Winter operation"
section (Y page 400).
Driving with summer tires Observe the notes in the "Winter operation"
section (Y
page 400).
Slippery road surfaces G
WARNING
If you shift down on a slippery road surface in
an attempt to increase the engine's braking
effect, the drive wheels could lose their grip.
There is an increased danger of skidding and
accidents.
Do not shift down for additional engine
braking on a slippery road surface. 186
Driving tipsDriving and parking
Page 190 of 458
damaging the vehicle, make sure there is
always sufficient ground clearance.
R Check that items of luggage and loads are
stowed safely and are well secured
(Y page 337).
R Always keep the engine running and in gear
when driving on a downhill gradient.
Activate DSR( Ypage 246).
R Always keep the doors, tailgate, windows
and sliding sunroof closed while driving.
R Adapt your speed to the terrain. The
rougher, steeper or more ruts on the
terrain, the slower your speed should be.
R Drive slowly and at an even speed through
the water. Ensure that a bow wave does not
form as you drive.
R Drive with extreme care on unfamiliar off-
road routes where visibility is poor. For
safety reasons, get out of the vehicle first
and survey the off-road route.
R Look out for obstacles, such as rocks,
holes, tree stumps and furrows.
R Check the depth of water before fording
rivers and streams.
R When fording, do not stop and do not
switch off the engine.
R On sand, drive quickly to overcome the
rolling resistance. Otherwise the vehicle's
wheels could become stuc kinloose
ground.
R Do not jump with the vehicle as this will
interrupt the vehicle's propulsion.
R Always keep the engine running and in gear
when driving on a slope.
R Do not shift the automatic transmission to
transmission position N.
i Do not use the HOLD function when
driving off-road, on steep uphill or downhill
gradients or on slippery or loose surfaces.
The HOLD function cannot hold the vehicle
on such surfaces. Checklist before driving off-road !
If the engine oil warning lamp lights up
while the vehicle is in motion, stop the
vehicle in a safe place as soon as possible.
Check the engine oil level. The engine oil
warning lamp warning must not be ignored.
Continuing the journey while the symbol is
displayed could lead to engine damage.
X Engine oil level: check the engine oil level
and add oil if necessary.
When driving on steep gradients, the
engine oil level must be sufficiently high to
ensure a correc toil supply in the vehicle.
X DEF tank (BlueTEC vehicles): check the
fluid level and, if necessary, refill to the
maximum (13 l) (Y page 177).
X Wheel-changing tool kit: check that the
jac kis working and make sure you have the
lug wrench, a robust tow cable and a folding
spade in the vehicle.
X Wheels and tires: check the tire tread
depth and tire pressure.
X Check for damage and remove any foreign
objects, e.g. small stones, from the
wheels/tires.
X Replace any missing valve caps.
X Replace dented or damaged wheels.
X Rims: dented or bent rims can result in a
loss of tire pressure and damage the tire
bead. Therefore, check your rims before
driving off-road and replace them as
required.
Checklist after driving off-road !
If you detect damage to the vehicle after
driving off-road, have the vehicle checked
immediately at a qualified specialist
workshop.
X Deactivate DSR (Y page 246).
X Vehicles with the AIRMATIC package:
lower the vehicle to a ride height suitable
for the road conditions, e.g. to the
highway/high-speed level. 188
Driving tipsDriving and parking
Page 191 of 458
X
Clean the headlamps and rear lights and
check for damage.
X Clean the fron tand rea rlicense plates.
X Clean the wheels/tires with a water jet and
remove any foreign objects.
X Clean the wheels, wheel housings and the
vehicle underside with a water jet; check
for any foreign objects and damage.
X Check whether twigs or other parts of
plants have become trapped. These
increase the risk of fire and can damage
fuel pipes, brake hoses or the rubber
bellows of the axle joints and propeller
shafts.
X After the trip, examine without fail the
entire undercarriage, wheels, tires, brakes,
bodywork structure, steering, chassis and
exhaust system for damage.
X After driving for extended periods across
sand, mud, gravel, water or in similarly dirty
conditions, have the brake discs, wheels,
brake pads/linings and axle joints checked
and cleaned.
X If you detect strong vibrations after off-road
travel, check for foreign objects in the
wheels and drive train and remove the mif
necessary .Foreign objects can disturb the
balance and cause vibrations.
Driving over rough terrain places greater
demands on your vehicle than driving on
normal roads. After driving off-road, check
the vehicle. This allows you to detect damage
promptly and reduce the risk of an accident
to yourself and other road users.
Driving on sand Observe the following rules when driving on
sand:
R vehicles with the AIRMATIC package:
select a raised vehicle level.
R avoid high engine speeds.
R select a shift range appropriate to the
terrain. R
drive quickly to overcom ethe rolling
resistance. Otherwise the vehicle's wheels
could become stuck in loose ground.
R drive in the tracks of other vehicles if
possible. Make sure that:
-the tire ruts are not too deep.
- the sand is sufficiently firm.
- the ground clearance of the vehicle is
sufficient.
Tire ruts and gravel roads !
Check that the ruts are not too deep and
that your vehicle has sufficient clearance.
Otherwise, your vehicle could be damaged
or bottom out and get stuck.
Observe the following rules when driving
along ruts in off-road terrain or on roads with
loose gravel:
R vehicles with the AIRMATIC package:
select a raised vehicle level.
R avoid high engine speeds.
R select shift range 1.
R drive slowly.
R where ruts are too deep, drive with the
wheels of one side on the center grassy
area, if possible.
Crossing obstacles !
Obstacles could damage the floor of the
vehicle or components of the chassis. Ask
passengers for guidance when driving over
large obstacles. The passenger should
always keep a safe distance from the
vehicle when doing so in order to avoid
injury as a result of unexpected vehicle
movements. After driving off-road or over
obstacles, check the vehicle for possible
damage, especially to the underbody and
the components of the chassis. Driving tips
189Driving and parking Z
Page 193 of 458
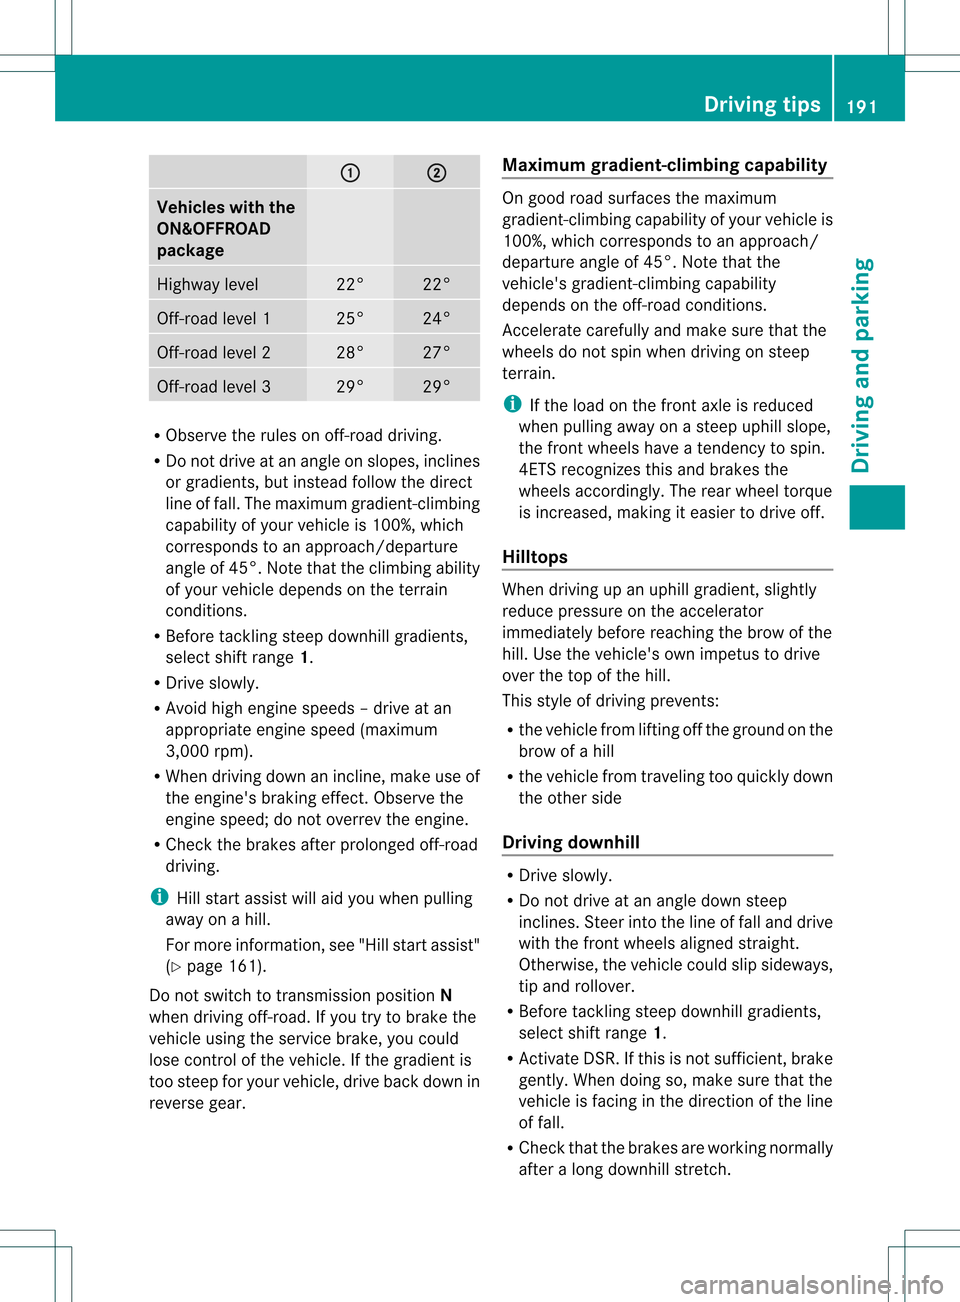
0002 0003
Vehicles with the
ON&OFFROAD
package
Highway level 22° 22°
Off-road level 1 25° 24°
Off-road level 2 28° 27°
Off-road level 3 29° 29°
R
Observe the rules on off-road driving.
R Do not drive at an angle on slopes, inclines
or gradients, bu tinstead follow the direct
line of fall .The maximum gradient-climbing
capability of your vehicle is 100%, which
corresponds to an approach/departure
angle of 45°. Note that the climbing ability
of your vehicle depends on the terrain
conditions.
R Before tackling steep downhill gradients,
select shift range 1.
R Drive slowly.
R Avoid high engine speeds –drive at an
appropriate engine speed (maximum
3,000 rpm).
R When driving downani ncline, make use of
the engine's braking effect. Observe the
engine speed; do not overre vthe engine.
R Check the brakes after prolonged off-road
driving.
i Hill start assist will aid you when pulling
away on a hill.
For more information, see "Hill start assist"
(Y page 161).
Do not switch to transmission position N
when driving off-road. If you try to brake the
vehicle using the service brake, you could
lose control of the vehicle. If the gradient is
too steep for your vehicle, drive back down in
reverse gear. Maximum gradient-climbing capability On good road surfaces the maximum
gradient-climbing capability of your vehicle is
100%, which corresponds to an approach/
departure angle of 45°. Note that the
vehicle's gradient-climbing capability
depends on the off-road conditions.
Accelerate carefully and make sure that the
wheels do not spin when driving on steep
terrain.
i
If the load on the front axle is reduced
when pulling away on a steep uphill slope,
the front wheels have a tendency to spin.
4ETS recognizes this and brakes the
wheels accordingly. The rear wheel torque
is increased, making it easier to drive off.
Hilltops When driving up an uphill gradient, slightly
reduce pressure on the accelerator
immediately before reaching the brow of the
hill. Use the vehicle's own impetus to drive
over the top of the hill.
This style of driving prevents:
R
the vehicle from lifting off the ground on the
brow of a hill
R the vehicle from traveling too quickly down
the other side
Driving downhill R
Drive slowly.
R Do not drive at an angle down steep
inclines. Steer into the line of fall and drive
with the front wheels aligned straight.
Otherwise, the vehicle could slip sideways,
tip and rollover.
R Before tackling steep downhill gradients,
select shift range 1.
R Activate DSR. If this is not sufficient, brake
gently. When doing so, make sure that the
vehicle is facing in the direction of the line
of fall.
R Check that the brakes are working normally
after a long downhill stretch. Driving tips
191Driving and parking Z
Page 194 of 458

i
The special off-road ABS setting enables
a precise, brief and repeated locking of the
frontw heels. This causes them to dig into
loose earth. Be aware that the front wheels
easily skid across the ground surface if
completely braked and therefore lose their
ability to steer. Driving systems
Cruise control
Important safety notes If you fail to adapt your driving style, cruise
control can neither reduce the risk of an
accident nor override the laws of physics.
Cruise control cannot take into account the
road, traffic and weather conditions. Cruise
control is only an aid. You are responsible for
the distance to the vehicle in front, for vehicle
speed, for braking in good time and for
staying in your lane.
Do not use cruise control:
R
in road and traffic conditions which do not
allow you to maintain a constant speed e.g.
in heavy traffic or on winding roads
R on slippery road surfaces. Braking or
accelerating could cause the drive wheels
to lose traction and the vehicle could then
skid
R when there is poor visibility, e.g. due to fog,
heavy rain or snow
If there is a change of drivers, advise the new
driver of the speed stored.
General notes Cruise control maintains a constant road
speed for you. It brakes automatically in order
to avoid exceeding the set speed. On long and
steep downhill gradients, especially if the
vehicle is laden or towing a trailer, you must
select shift range 1,2or 3in good time. By
doing so, you will make use of the braking
effect of the engine, which relieves the load on the brake system and prevents the brakes
from overheating and wearing too quickly.
Use cruise control only if road and traffic
conditions make it appropriate to maintain a
steady speed for a prolonged period. You can
store any road speed above 20 mph
(30 km/h).
i
Cruise control should not be activated
during off-road driving.
Cruise control lever 0002
To activate or increase speed
0003 To activate or reduce speed
001F To deactivate cruise control
001E To activate at the current speed/last
stored speed
When you activate cruise control, the stored
speed is shown in the multifunction display
for five seconds. In the multifunction display,
the segments between the stored speed and
the maximum speed light up.
Activation conditions To activate cruise control, all of the following
activation conditions must be fulfilled:
R
the electric parking brake must be
released.
R you are driving faster than 20mph
(30 km/h).
R ESP ®
must be active, but not intervening.
R the transmission must be in position D.192
Driving systemsDriving and parking
Page 206 of 458
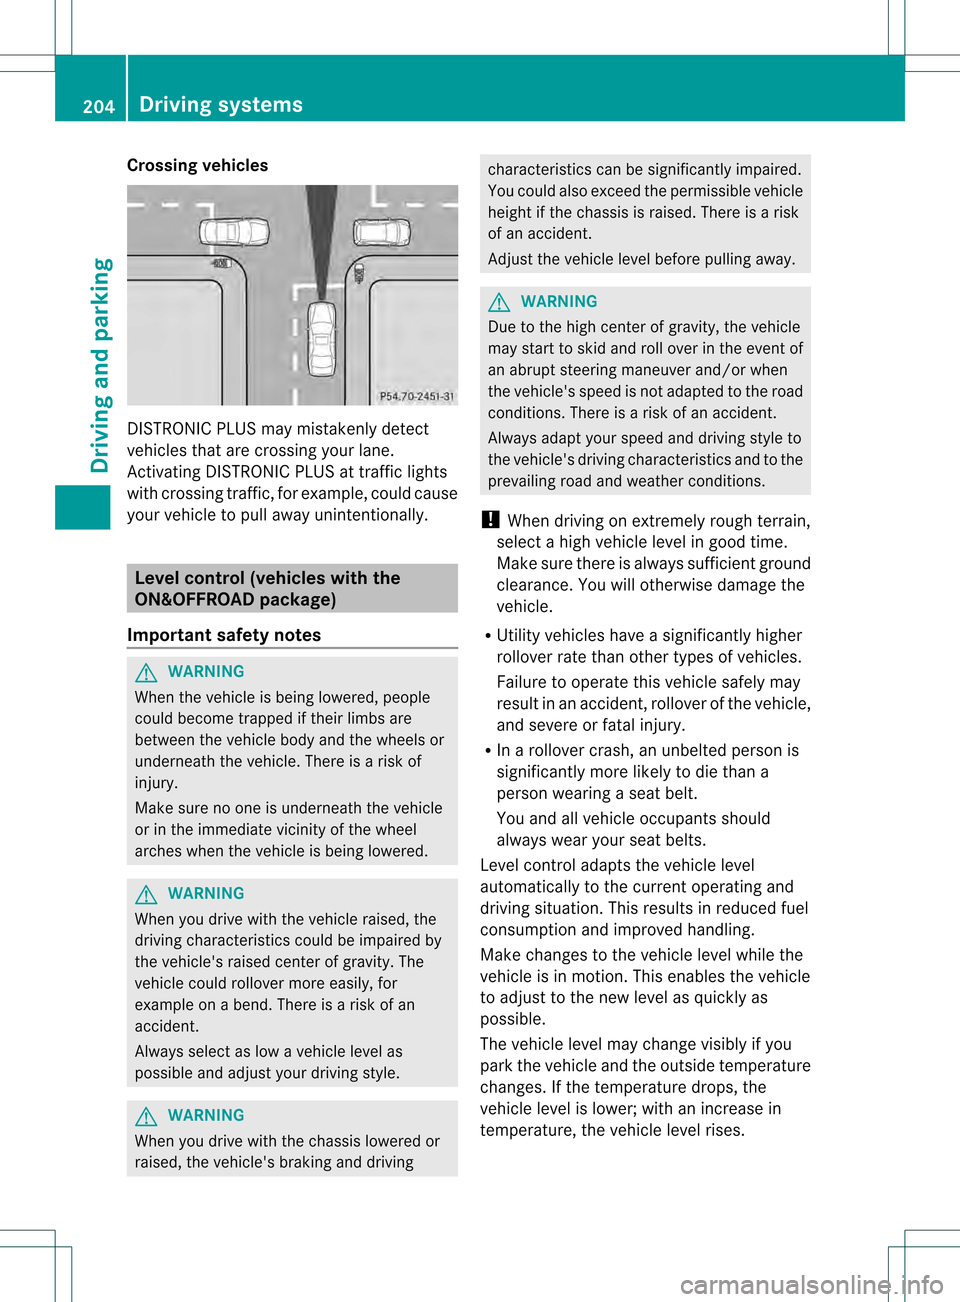
Crossing vehicles
DISTRONIC PLUS may mistakenly detect
vehicles that are crossing your lane.
Activating DISTRONIC PLUS at traffic lights
with crossing traffic, for example, could cause
your vehicle to pull away unintentionally.
Level control (vehicles with the
ON&OFFROAD package)
Important safety notes G
WARNING
When the vehicle is being lowered, people
could become trapped if their limbs are
between the vehicle body and the wheels or
underneath the vehicle .There is a risk of
injury.
Make sure no one is underneath the vehicle
or in the immediate vicinity of the wheel
arches when the vehicle is being lowered. G
WARNING
When you drive with the vehicle raised, the
driving characteristics could be impaired by
the vehicle's raised center of gravity. The
vehicle could rollover more easily, for
example on a bend. There is a risk of an
accident.
Always select as low a vehicle level as
possible and adjust your driving style. G
WARNING
When you drive with the chassis lowered or
raised, the vehicle's braking and driving characteristics can be significantly impaired.
You could also exceed the permissible vehicle
height if the chassis is raised. There is a risk
of an accident.
Adjust the vehicle level before pulling away.
G
WARNING
Due to the high center of gravity, the vehicle
may start to skid and roll over in the event of
an abrupt steering maneuver and/or when
the vehicle's speed is not adapted to the road
conditions. There is a risk of an accident.
Always adapt your speed and driving style to
the vehicle's driving characteristics and to the
prevailing road and weather conditions.
! When driving on extremely rough terrain,
select a high vehicle level in good time.
Make sure there is always sufficient ground
clearance. You will otherwise damage the
vehicle.
R Utility vehicles have a significantly higher
rollover rate than other types of vehicles.
Failure to operate this vehicle safely may
result in an accident, rollover of the vehicle,
and severe or fatal injury.
R In a rollover crash, an unbelted person is
significantly more likely to die than a
person wearing a seat belt.
You and all vehicle occupants should
always wear your seat belts.
Level control adapts the vehicle level
automatically to the current operating and
driving situation. This results in reduced fuel
consumption and improved handling.
Make changes to the vehicle level while the
vehicle is in motion. This enables the vehicle
to adjust to the new level as quickly as
possible.
The vehicle level may change visibly if you
park the vehicle and the outside temperature
changes. If the temperature drops, the
vehicle level is lower; with an increase in
temperature, the vehicle level rises. 204
Driving systemsDriving and parking
Page 207 of 458
If you unlock the vehicle or open a door, the
vehicle begins to compensate for load
discrepancies while still parked. However, for
significant level changes, such as after the
vehicle has been stationary for a long period,
the engine must be on. For safety reasons,
the vehicle is only lowered when the doors are
closed. Lowering is interrupted if a door is
opened, and it continues once the door has
been closed.
For information aboutd riving off-road, see
(Y page 187).
Basic settings The extent to which the vehicle is raised or
lowered depends on the basic setting
selected.
Select:
R highway/high-speed level for driving on
normal roads
R off-road level 1for driving on easily
negotiable off-road terrain
R off-road level 2 for driving on normal off-
road terrain
R off-road level 3for freeing the vehicle in
particularly rough terrain at low speeds
only
The individual vehicle levels differ from
highway level as follows:
R highway level: +/–0 in (+/–0 mm)
R high-speed level: –0.6 in (–15 mm)
R off-road level 1: + 1.2 in (+30 mm)
R off-road level 2: + 2.3 in (+60 mm)
R off-road level 3: + 3.6 in (+ 90 mm)
Highway/high-speed level !
Make sure that there is enough ground
clearance when the vehicle is being
lowered. It could otherwise hit the ground,
damaging the underbody. 0002
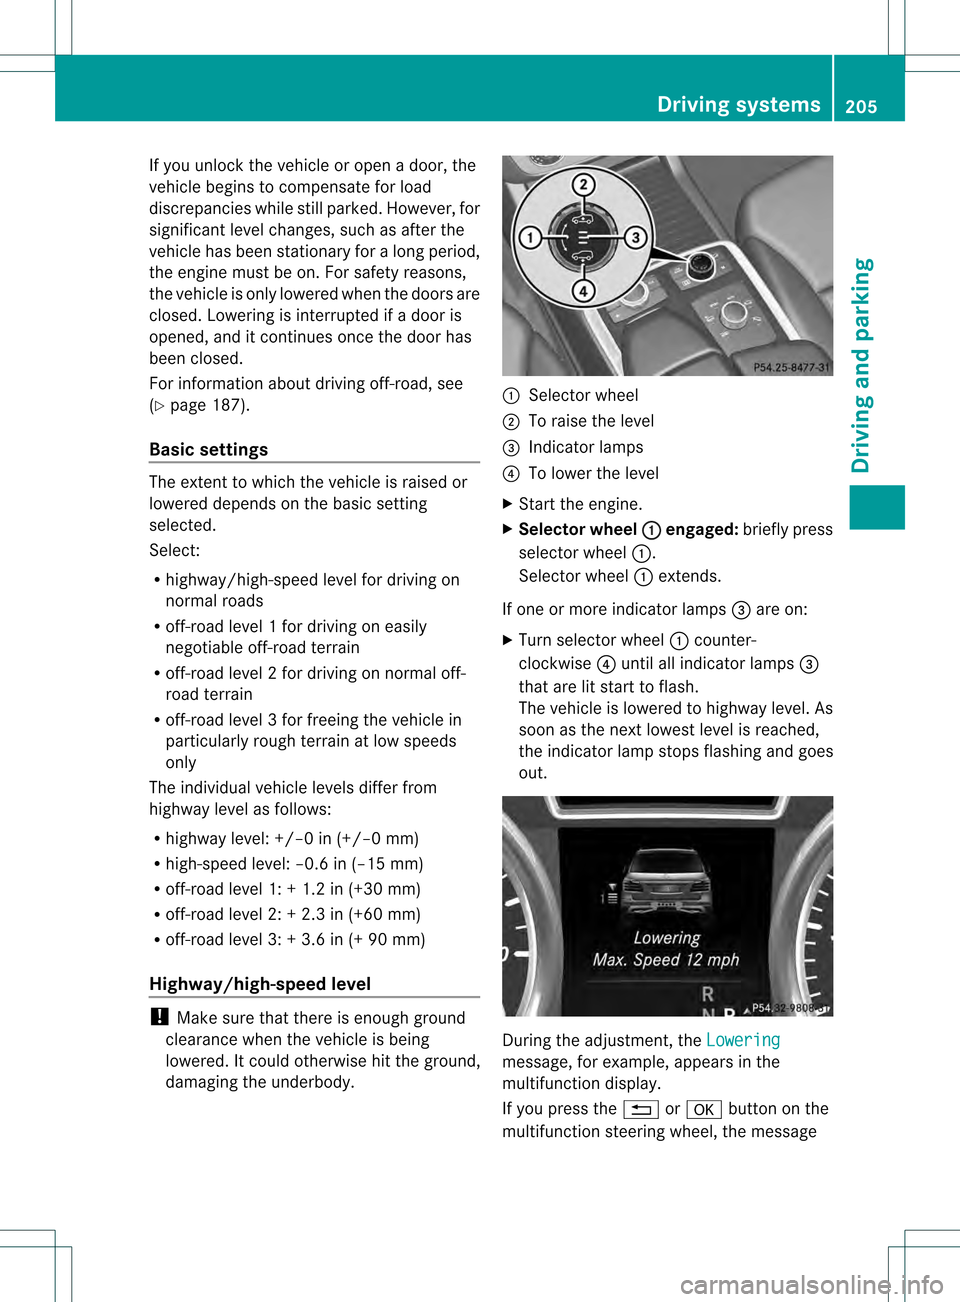
Selector wheel
0003 To raise the level
001F Indicator lamps
001E To lower the level
X Start the engine.
X Selector wheel 0002 engaged:
briefly press
selector wheel 0002.
Selector wheel 0002extends.
If one or more indicator lamps 001Fare on:
X Turn selector wheel 0002counter-
clockwise 001Euntil all indicator lamps 001F
that are lit start to flash.
The vehicle is lowered to highway level. As
soon as the next lowest level is reached,
the indicator lamp stops flashing and goes
out. During the adjustment, the
Lowering message, for example, appears in the
multifunction display.
If you press the
0007or000B button on the
multifunction steering wheel, the message Driving systems
205Driving and parking Z