CD player MERCEDES-BENZ M-Class 2014 W166 Comand Manual
[x] Cancel search | Manufacturer: MERCEDES-BENZ, Model Year: 2014, Model line: M-Class, Model: MERCEDES-BENZ M-Class 2014 W166Pages: 270, PDF Size: 5.76 MB
Page 7 of 270
C
Call Accepting/ending/rejecting .......... 132
Connecting .................................... 132
see Telephone
Call lists
Displaying details ........................... 141
Opening and selecting an entry .....141
Saving an entry in the address
book .............................................. 141
Car pool lanes ...................................... 62
Category list (music search) ............200
CD Copy protection ............................. 200
Fast forward/fast rewind ...............196
General information .......................200
Inserting ........................................ 188
Inserting/loading (Rear Seat
Entertainment System) ..................242
Mode, switching to ........................191
Multisession .................................. 199
Notes on discs ............................... 200
Pause function ............................... 193
Player/changer operation
(COMAND) ..................................... 188
Removing/ejecting (Rear Seat
Entertainment System) ..................242
Safety notes .................................. 187
Selecting a media type ..................193
Selecting a track ............................ 195
Sound settings (balance, bass,
treble) .............................................. 30
CD/DVD
Ejecting (DVD drive )....................... 189
Inserting (DVD changer )................ 188
Inserting (single DVD drive) ...........188
Removing (single DVD drive) .......... 188
CD mode
Playback options ........................... 198
Changing direction
Announcement phase ......................88
Change of direction phase ...............88
Preparation phase ............................ 88
Changing the character set ................37
Channel presets ................................ 180Characters
Changing the character set .............. 35
Changing the language ....................35
Deleting ........................................... 35
Entering ........................................... 36
Entering (address book, phone
book) ............................................... 34
Entering (navigation) ........................36
Moving the cursor ............................ 35
Switching to letters ..........................35
Clear button ......................................... 27
Color, setting (TV, video) ..................224
COMAND Active multicontour sea t.................. 52
Basic functions ................................ 29
Calling up drive status regulator
(ABC) ............................................... 52
Display ............................................. 21
Examples of operation .....................27
Importing POIs ............................... 163
Menu overview ................................. 22
Multicontour seat ............................ 52
Seat functions .................................. 52
Settings ......................................... 175
Switching on/off .............................. 29
COMAND controller .............................26
COMAND control panel .......................25
COMAND display Cleaning instructions .......................24
Setting ............................................. 42
Switching on/off .............................. 24
Compass function ............................. 117
Connecting a USB device .................191
Contacts Deleting ......................................... 154
Importing ....................................... 152
Contrast, setting (TV, video) ............224
Copy protection (CD/DVD) ...............200
Country-specific information (nav-
igation) ............................................... 118 D
Data medium Audio DVD ..................................... 198
CD/DVD ........................................ 200 Index
5
Page 9 of 270
G
Google™ local search Importing a destination/route .......160
Popular Searche s........................... 161
Search ........................................... 159
Search history ............................... 162
Selecting a search position ............160
Using as the destination ................160
GPS reception ...................................... 60
Gracenote ®
Media Database ............196 H
Harman/kardon ®
Logic 7 ®
sur-
round sound system see Surround sound (harman/
kardon ®
surround sound system)
Heading up (navigation) ...................109
Headphones Changing batteries ........................238
Highway information ........................112
Home address Entering and saving .........................69
Selecting from the destination
memory ........................................... 70I
Incident (traffic report) .......................99
Indicator lamp Remote control .............................. 238
Interface (USB, iPod ®
)
see Media Interface
Internet
Calling up the carousel view ..........168
Conditions for access ....................158
Creating favorites .......................... 173
Entering the URL ............................ 168
Favorites manager .........................173
Favorites menu .............................. 174
Menu functions .............................. 171
Opening favorites .......................... 172
Selecting favorites .........................169
Internet radio
Calling up ....................................... 167
Searching for stations .................... 167 iPod
®
Alphabetical track selection ..........218
Connecting to the Media Inter-
face ............................................... 214
Selecting a category/playlis t......... 216
iTunes ®
............................................... 218 L
Lane recommendations Explanation ...................................... 90
Presentation .................................... 90
Load/eject button .............................188
Lumbar support Adjusting (COMAND) .......................53 M
Map (navigation) Adjusting the scale ........................108
Arrival time/distance to the des-
tination .......................................... 111
City mode l..................................... 112
Geo-coordinate displa y.................. 111
Heading ......................................... 109
Information in the display ..............111
Map settings .................................. 109
Moving ........................................... 108
North orientation ........................... 109
Notes ............................................. 108
Point of interest symbols ...............110
Road displa y.................................. 111
Saving the crosshair position .........109
Showing the map data version ....... 118
Topographical map ........................112
Updating ........................................ 118
Updating process ........................... 119
Media Interface
Alphabetical track selection ..........218
Basic menu .................................... 215
Connecting an external audio
source ............................................ 214
Connection options .......................213
iPod ®
............................................. 213
Mode ............................................. 213
MP3 player. ................................... 214
Notes for the MP3 player ...............219
Playback options ........................... 219 Index
7
Page 193 of 270
i
Not all memory cards available on the
market are designed for the temperatures
which may be reached in the vehicle.
If the SD memory card is no longer in use,
you should remove it from COMAND. High
temperatures can damage the card.
Due to the wide range of SD memory cards
available on the market, playback cannot
be guaranteed for all brands of SD memory
card.
The readable storage capacity depends on
the memory card used. You can obtain fur-
ther information at any authorized
Mercedes-Benz Center.
Inserting an SD memory card X
Insert the memory card into the slot on the
control panel until it engages in place. The
side with the contacts must face down-
wards and point towards the slot.
If no MP3 tracks can be found, you will see
a message to this effect.
The first 100 MP3 tracks are loaded. The
first MP3 track is then played. Further
tracks are loaded in the background; this is
indicated by an hourglass symbol.
Ejecting an SD memory card X
Press the memory card.
The memory card is ejected.
X Remove the memory card from slot. Connecting a USB device
The USB port is located in the stowage com-
partment in the center console.
Electrical consumption at this connection
must not exceed a continuous current of
500 mA. If the electrical consumption is
higher, use a separate source to provide
power for the USB device (e.g.
12 V power supply). X
Connect the USB device (e.g. USB stick) to
the USB port.
If no MP3 tracks can be found, you will see
a message to this effect.
The first 100 MP3 tracks are loaded. The
first MP3 track is then played. Further
tracks are loaded in the background; this is
indicated by an hourglass symbol.
i Due to the wide range of USB devices
available on the market, playback cannot
be guaranteed for all brands of USB device.
Information about suitable USB devices
can be obtained from an authorized
Mercedes-Benz Center.
MP3 players must support Media Transfer
Protocol (MTP). The MTP mode must be
active. Switching to audio CD/DVD or MP3
mode
Inserting or connecting a medium X
Insert CDs/DVDs (Y page 188)
or
X Insert an SD memory card (Y page 191)
or
X Connect a USB device (Y page 191).
COMAND loads the medium inserted and
starts to play it.
Switching modes using the function
button X
Press the 003Afunction button one or more
times.
By pressing the function button repeatedly,
you can change the operating mode in the
following order:
R CD/audio DVD/video DVD/MP3 CD/MP3
DVD in the DVD changer or single DVD
drive (disc mode)
R Memory card mode
R MUSIC REGISTER CD/audio DVD and MP3 mode
191Audio Z
Page 210 of 270
This device name is predetermined but can
usually be changed. To make a clear selec-
tion of the Bluetooth ®
device possible,
Mercedes-Benz recommends that you cus-
tomize the device name.
i A2DP (Advanced AudioDistribution
Profile): Bluetooth ®
audio profile for audio
data transmission
AVRCP (Audio VideoRemote Control
Profile): Bluetooth ®
audio profile for audio
data playback.
i Not all Bluetooth ®
audio devices available
on the market are equally suitable. To
obtain more information about suitable
Bluetooth ®
audio devices and about con-
necting Bluetooth ®
audio devices to
COMAND, visit
http://www.mbusa-mobile.com (USA).
Or call the Mercedes-Benz Customer Assis-
tance center at 1-800-FOR-MERCedes
(1-800-367-6372)( USA) or Customer Rela-
tions at 1-800-387-0100 (Canada).
X Activate Bluetooth ®
and Bluetooth ®
visibil-
ity on the Bluetooth ®
audio device. Preconditions in COMAND
X Activate the Bluetooth ®
function in
COMAND (Y page 45). Connecting Bluetooth
®
audio devices
General information Before using your Bluetooth
®
audio device
with COMAND for the first time, you will need
to authorize it.
When you authorize a new Bluetooth ®
audio
device, it is connected automatically. Con-
nection involves first searching for a Blue-
tooth ®
audio device and then authorizing it.
You can authorize up to fifteen Bluetooth ®
devices. i
If you authorize a mobile phone that sup-
ports Bluetooth ®
audio, the A2DP and
AVRCP Bluetooth ®
audio profiles are con-
nected automatically.
The mobile phone is then entered:
R in the Bluetooth ®
telephone list
(Y page 128)
R in the Bluetooth ®
device list
(Y page 208).
Mercedes-Benz recommends authorizing a
mobile phone in Bluetooth ®
telephony
(Y page 128).
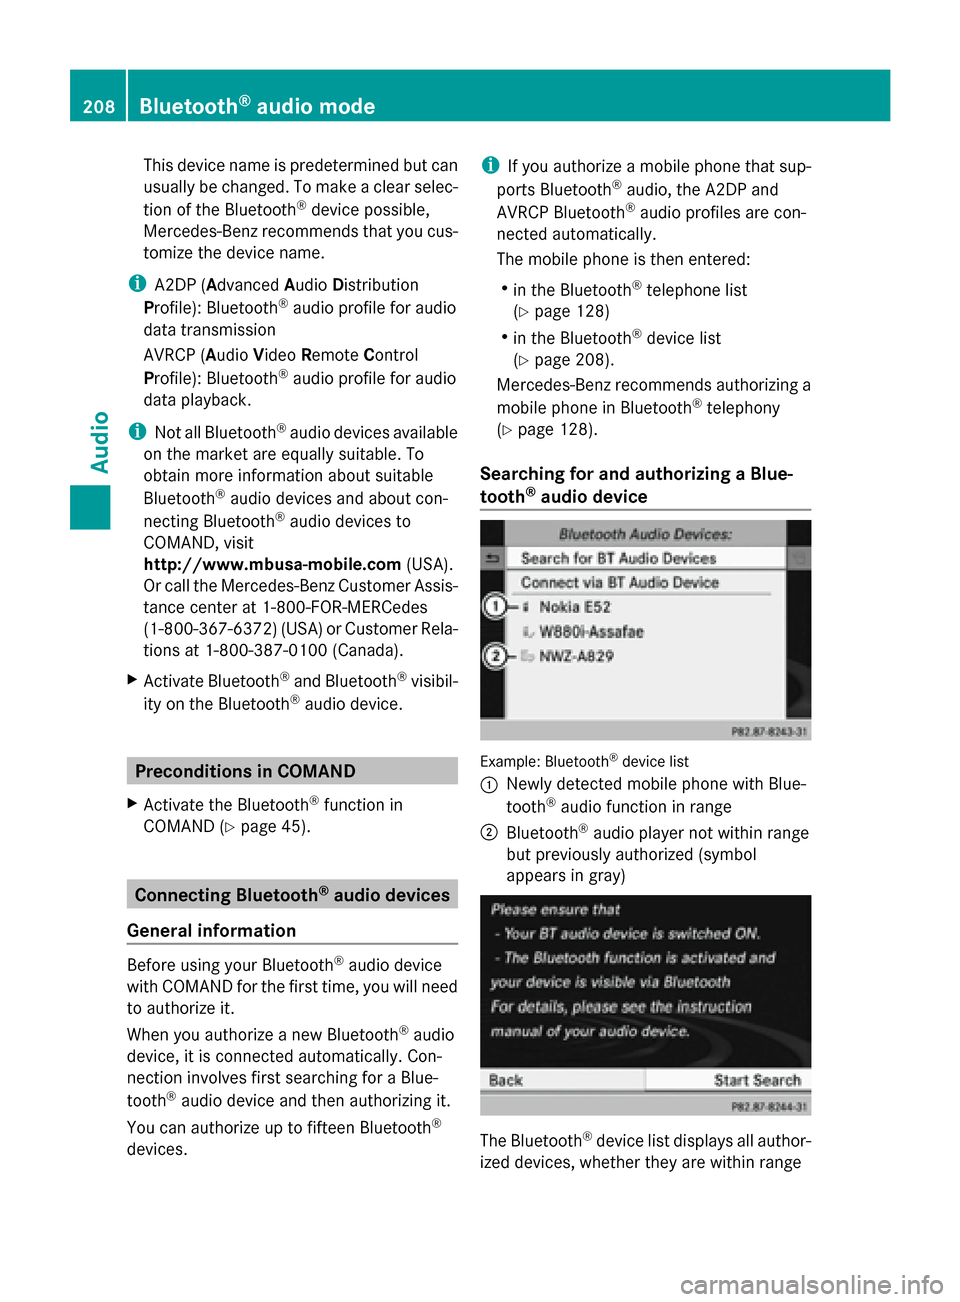
Searching for and authorizing a Blue-
tooth ®
audio device Example: Bluetooth
®
device list
0043 Newly detected mobile phone with Blue-
tooth ®
audio function in range
0044 Bluetooth ®
audio player not within range
but previously authorized (symbol
appears in gray) The Bluetooth
®
device list displays all author-
ized devices, whether they are within range 208
Bluetooth ®
audio modeAudio
Page 212 of 270
X
To search: confirmConnect via BT
Connect via BT
Audio Device
Audio Device by pressing the COMAND
controller 0098.
The duration of the search depends on the
number of Bluetooth ®
audio devices within
range and their characteristics.
X To authorize: start the authorization on
the Bluetooth ®
audio device, see the oper-
ating instructions of the Bluetooth ®
audio
device.
After successful authorization, the Blue-
tooth ®
audio device is connected and
starts playing.
i With some Bluetooth ®
audio devices,
playback must first be started on the device
itself so that COMAND can play the audio
files.
Reconnecting a Bluetooth ®
audio
device The Bluetooth
®
audio profiles are connected
automatically under the following circum-
stances:
R one of the last two mobile phones to have
been connected has also been used as a
Bluetooth ®
audio player (if this function is
supported by the mobile phone).
R the mobile phone takes over the automatic
connection itself.
A Bluetooth ®
audio player without telephone
functions is not automatically reconnected,
even if it was the last device connected.
If the No Bluetooth Audio Device Con‐ No Bluetooth Audio Device Con‐
nected
nected message appears, you have two
options to connect a Bluetooth ®
audio
device: Connecting last device
X
Confirm Connect Last Device
Connect Last Device in the
basic display by pressing 0098the COMAND
controller.
If COMAND can locate the Bluetooth ®
audio device, it will be connected and start
playing.
i With some Bluetooth ®
audio devices,
playback must first be started on the device
itself so that COMAND can play the audio
files.
Connecting a device from a list
X Select BT Audio
BT Audio by turning 00790052007Athe
COMAND controller and press 0098to con-
firm.
X Confirm Bluetooth Audio Device List
Bluetooth Audio Device List
by pressing 0098the COMAND controller.
X Select a Bluetooth ®
audio device by turning
00790052007A the COMAND controller and press
0098 to confirm.
If COMAND can locate the Bluetooth ®
audio device, it will be connected and start
playing.
i With some Bluetooth ®
audio devices,
playback must be initially started on the
device itself so that COMAND can play the
audio files.
Bluetooth ®
audio device and simultane-
ous search for mobile phones During the search for mobile phones, the con-
nection with the Bluetooth ®
audio device is
terminated (Y page 127). In the Bluetooth ®
audio basic display, you will see the No NoBlue‐
Blue‐
tooth Audio Device Connected
tooth Audio Device Connected message
and the Connect Last Device
Connect Last Device menu item
cannot be selected.
Displaying details X
Select a Bluetooth ®
audio device in the
Bluetooth ®
device list.
X Select the symbol to the right of the Blue-
tooth ®
audio device by sliding 00520096the210
Bluetooth ®
audio modeAudio
Page 215 of 270
Selecting a track
The function is not supported by all Blue-
tooth ®
audio devices.
X To skip forward or back to a track: press
the 0048 or0049 button on COMAND.
or
X Press the 0063or0064 button briefly on
the multifunction steering wheel.
X Rapid scroll: press and hold the 0063
or 0064 button on the multifunction steer-
ing wheel until the desired track is reached.
If you press and hold the 0063or0064 but-
ton, the rapid scrolling speed is increased. Selecting playback options
If the Bluetooth ®
audio device supports the
corresponding function, the following options
are available:
R Normal Track Sequence Normal Track Sequence
The tracks are played in the normal order
(e.g. track 1, 2, 3, etc.).
Audio data playback is determined by the
order in which the tracks are written to the
data carrier. Alphabetical order is the most
common. Once all the tracks in a folder
have been played, the tracks in the next
folder are played.
R Random Tracks
Random Tracks
All the tracks on the medium are played in
random order (e.g. track 3, 8, 5 etc.).
X Select BT BTAudio
Audio by sliding 00520064and turning
00790052007A the COMAND controller and press
0098 to confirm.
The 003Bdot indicates the option selected.
X Select the option by turning 00790052007Athe
COMAND controller and press 0098to con-
firm.
If you select Random Tracks
Random Tracks, you will see
a corresponding symbol in the display/
selection window. Increasing the volume on COMAND
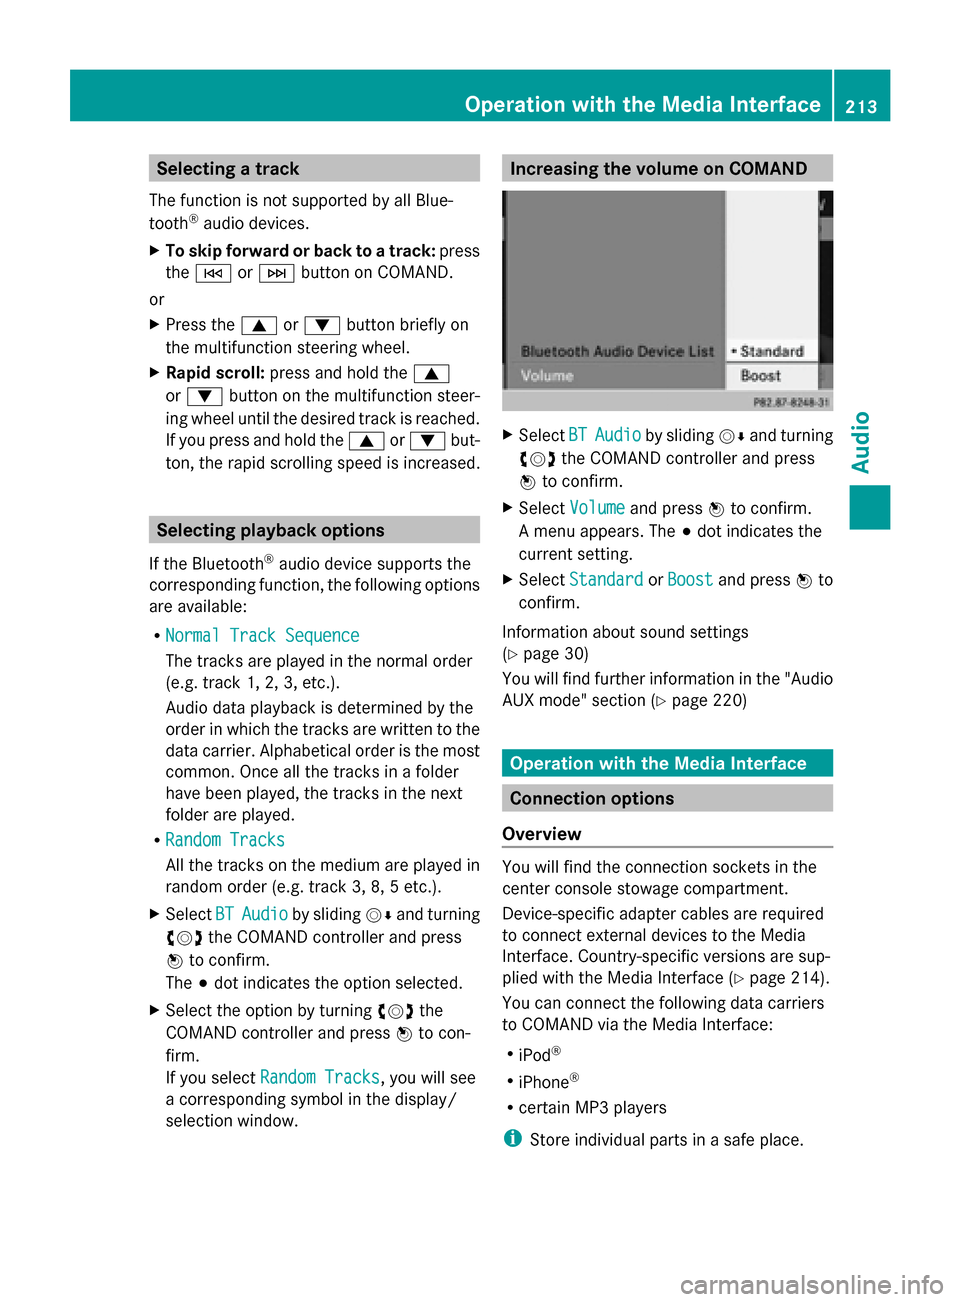
X
Select BT
BT Audio Audio by sliding 00520064and turning
00790052007A the COMAND controller and press
0098 to confirm.
X Select Volume
Volume and press 0098to confirm.
A menu appears. The 003Bdot indicates the
current setting.
X Select Standard
Standard orBoost
Boost and press 0098to
confirm.
Information about sound settings
(Y page 30)
You will find further information in the "Audio
AUX mode" section (Y page 220) Operation with the Media Interface
Connection options
Overview You will find the connection sockets in the
center console stowage compartment.
Device-specific adapter cables are required
to connect external devices to the Media
Interface. Country-specific versions are sup-
plied with the Media Interface (Y
page 214).
You can connect the following data carriers
to COMAND via the Media Interface:
R iPod ®
R iPhone ®
R certain MP3 players
i Store individual parts in a safe place. Operation with the Media Interface
213Audio Z
Page 216 of 270
Only use genuine Mercedes-Benz connec-
tion cables.
i iPod ®
and iPhone ®
are registered trade-
marks of Apple Inc., Cupertino, California,
USA.
i MP3 players that support MTP ( Media
Transfer Protocol) can be used.
This allows the MP3 player to be easily con-
nected to the Media Interface and removed
after use. Audio data is played without
problem.
On some MP3 players, you have to activate
the relevant function; see the MP3 player
operating instructions.
Supported devices For details and a list of supported devices,
visit http://www.mbusa-mobile.com. Or
call the Mercedes-Benz Customer Assistance
Center at 1-800-FOR-MERCedes
(1-800-367-6372) (for the USA) or Customer
Relations at 1-800-387-0100 (for Canada). Connecting an external device
Do not leave external devices in the vehicle.
They may malfunction in extreme tempera-
tures; see the operating instructions for the
respective device. Examples of extreme tem-
peratures are direct sunlight or very low out-
side temperatures. Mercedes-Benz USA, LLC
accepts no liability for damage to external
devices.
i Never connect more than one device at a
time. You will otherwise not be able to play
back from the external device.
USB hubs (devices with several USB con-
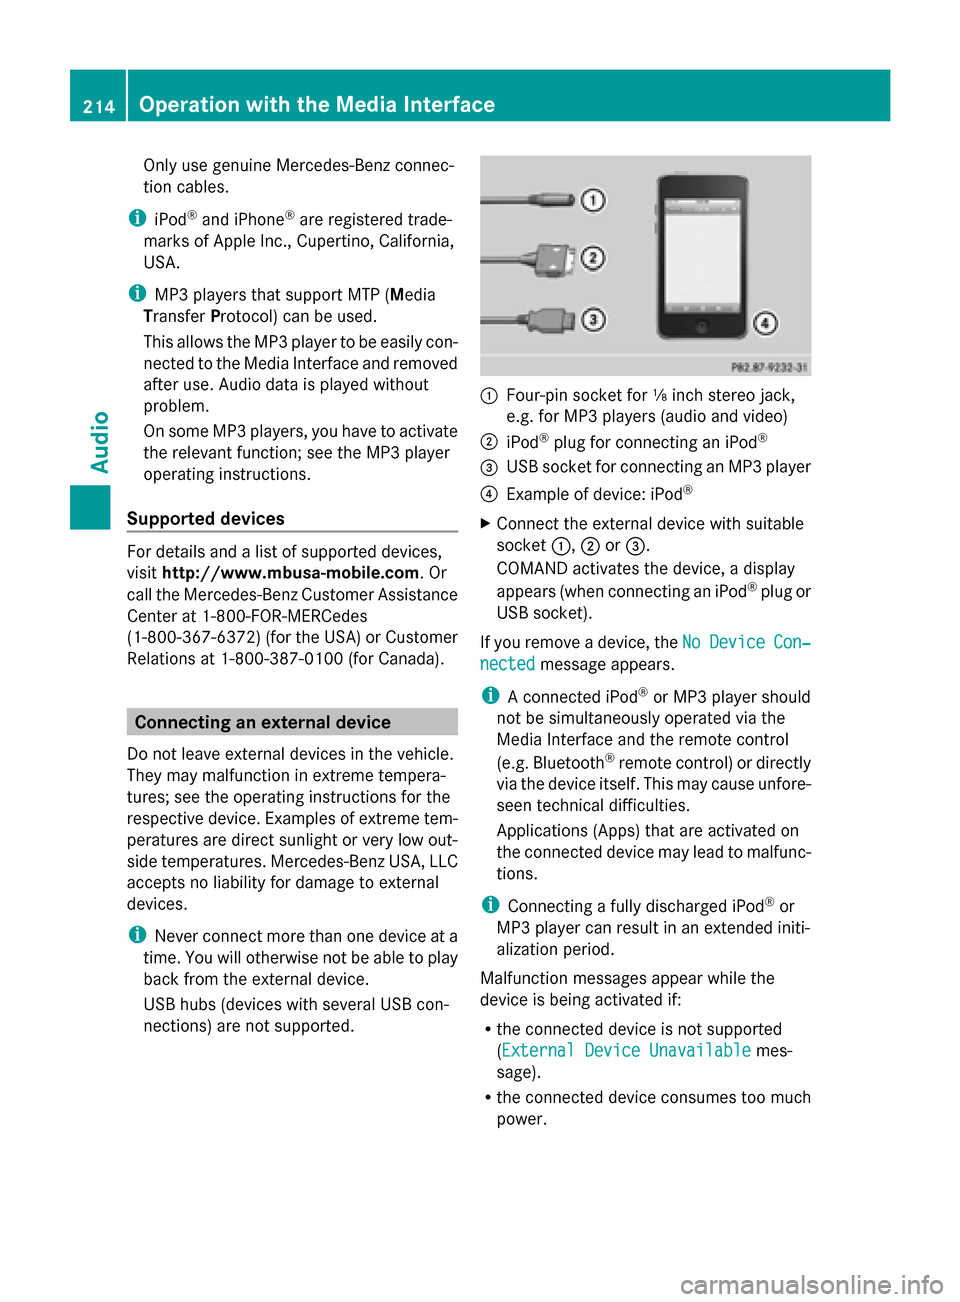
nections) are not supported. 0043
Four-pin socket for ⅛ inch stereo jack,
e.g. for MP3 players (audio and video)
0044 iPod ®
plug for connecting an iPod ®
0087 USB socket for connecting an MP3 player
0085 Example of device: iPod ®
X Connect the external device with suitable
socket 0043,0044or0087.
COMAND activates the device, a display
appears (when connecting an iPod ®
plug or
USB socket).
If you remove a device, the No NoDevice
Device Con‐
Con‐
nected
nected message appears.
i A connected iPod ®
or MP3 player should
not be simultaneously operated via the
Media Interface and the remote control
(e.g. Bluetooth ®
remote control) or directly
via the device itself. This may cause unfore-
seen technical difficulties.
Applications (Apps) that are activated on
the connected device may lead to malfunc-
tions.
i Connecting a fully discharged iPod ®
or
MP3 player can result in an extended initi-
alization period.
Malfunction messages appear while the
device is being activated if:
R the connected device is not supported
(External Device UnavailableExternal Device Unavailable mes-
sage).
R the connected device consumes too much
power. 214
Operation with the Media InterfaceAudio
Page 217 of 270
R
the Media Interface connection is faulty.
R a mass storage device (e.g. a USB memory
stick or USB hard drive) is connected to the
Media Interface.
In this case the Please connect the
Please connect the
device to the other USB port
device to the other USB port mes-
sage appears.
i The separate USB connection ensures
quick access and expanded media content
options.
i Consult an authorized Mercedes-Benz
Center if you have further questions.
Disconnecting an iPod ®
X Press the release buttons on iPod ®
plug 0044and pull the iPod ®
cable from the
iPod ®
, see the separate cable kit instruc-
tions. Switching to Media Interface mode
General notes In extreme cases, starting up individual func-
tions can take up to several minutes – this
depends on the external device and its con-
tent (e.g. video podcasts).
Only use the original software to save files on
iPods ®
or MP3 players. Otherwise, some or
all functions may not be available.
Switching on automatically X
Connect an external device (Y page 214).
COMAND activates the device (if con-
nected via the iPod ®
connector or USB
socket). The basic display then appears.
Switching modes using the function
button The external device is connected to the Media
Interface.
X Press the 003Afunction button one or more
times. By pressing the function button repeatedly,
you can change the operating mode in the
following order:
R
CD/audio DVD/MP3 (disc)
R Memory card mode
R MUSIC REGISTER
R USB storage device
R Media Interface or audio AUX mode
R Bluetooth ®
audio mode
Switching on using a number key X
Press the 007Fnumber key (for a DVD
changer) or the 0085number key (for a
single DVD drive).
This selects the connected external audio
device directly.
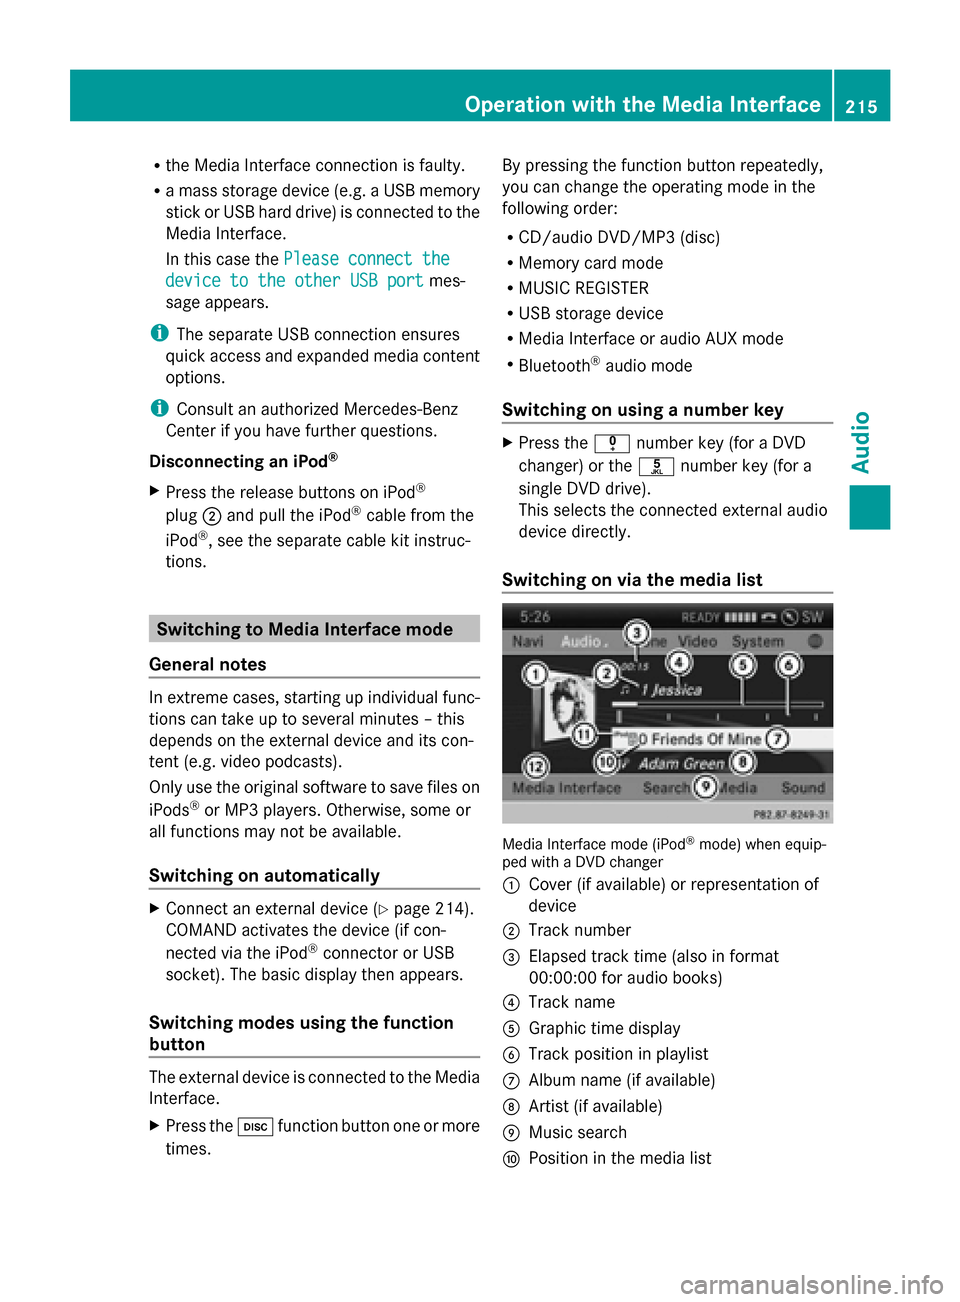
Switching on via the media list Media Interface mode (iPod
®
mode) when equip-
ped with a DVD changer
0043 Cover (if available) or representation of
device
0044 Track number
0087 Elapsed track time (also in format
00:00:00 for audio books)
0085 Track name
0083 Graphic time display
0084 Track position in playlist
006B Album name (if available)
006C Artist (if available)
006D Music search
006E Position in the media list Operation
withthe Media Interface
215Audio Z
Page 218 of 270
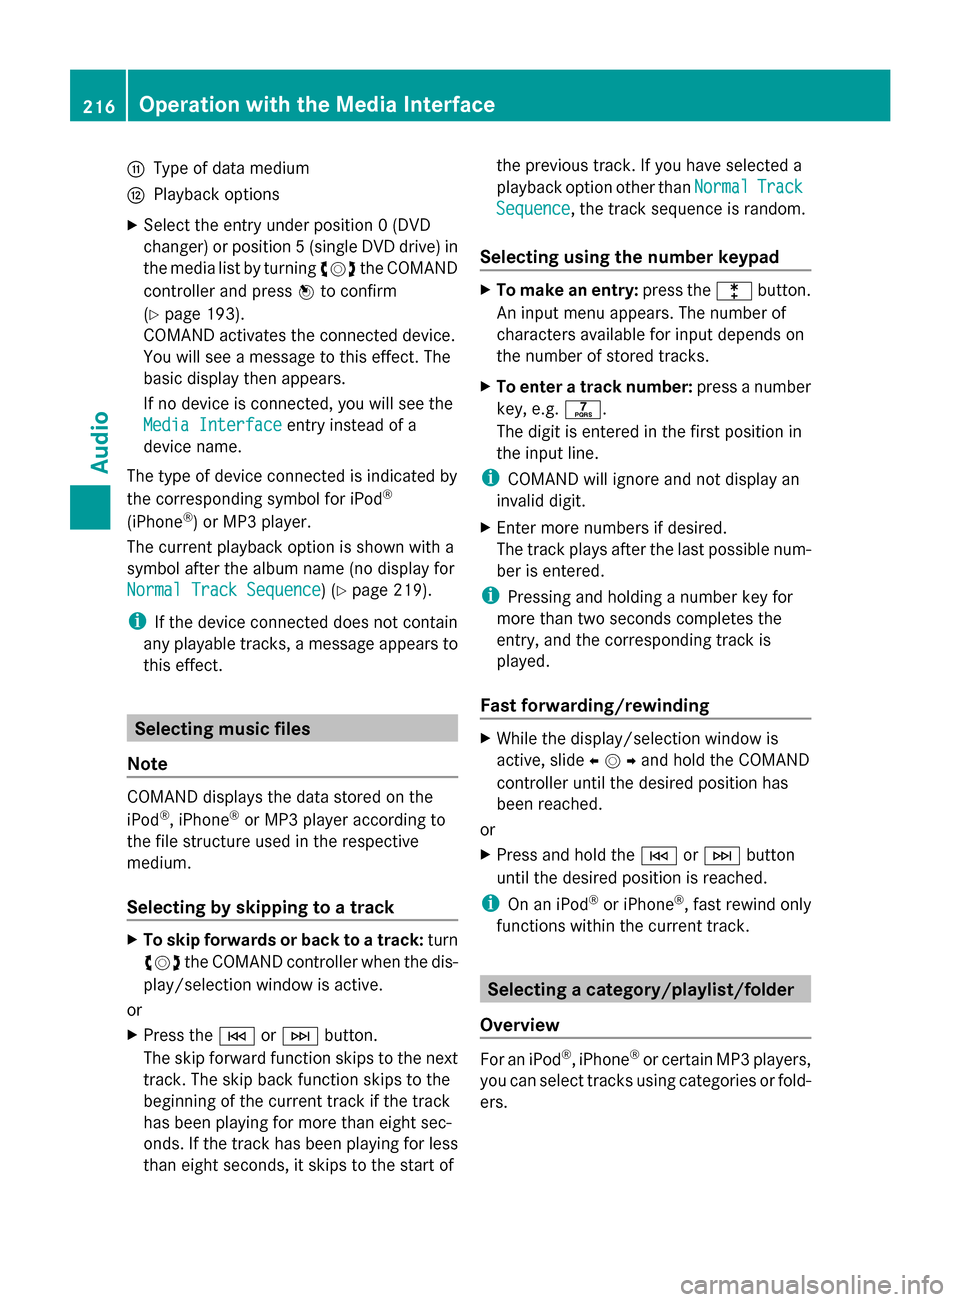
006F
Type of data medium
0070 Playback options
X Select the entry under position 0 (DVD
changer) or position 5 (single DVD drive) in
the media list by turning 00790052007Athe COMAND
controller and press 0098to confirm
(Y page 193).
COMAND activates the connected device.
You will see a message to this effect. The
basic display then appears.
If no device is connected, you will see the
Media Interface
Media Interface entry instead of a
device name.
The type of device connected is indicated by
the corresponding symbol for iPod ®
(iPhone ®
) or MP3 player.
The current playback option is shown with a
symbol after the album name (no display for
Normal Track Sequence
Normal Track Sequence) (Y page 219).
i If the device connected does not contain
any playable tracks, a message appears to
this effect. Selecting music files
Note COMAND displays the data stored on the
iPod ®
, iPhone ®
or MP3 player according to
the file structure used in the respective
medium.
Selecting by skipping to a track X
To skip forwards or back to a track: turn
00790052007A the COMAND controller when the dis-
play/selection window is active.
or
X Press the 0048or0049 button.
The skip forward function skips to the next
track. The skip back function skips to the
beginning of the current track if the track
has been playing for more than eight sec-
onds. If the track has been playing for less
than eight seconds, it skips to the start of the previous track. If you have selected a
playback option other than
Normal
Normal Track Track
Sequence
Sequence, the track sequence is random.
Selecting using the number keypad X
To make an entry: press the003Ebutton.
An input menu appears. The number of
characters available for input depends on
the number of stored tracks.
X To enter a track number: press a number
key, e.g. 0087.
The digit is entered in the first position in
the input line.
i COMAND will ignore and not display an
invalid digit.
X Enter more numbers if desired.
The track plays after the last possible num-
ber is entered.
i Pressing and holding a number key for
more than two seconds completes the
entry, and the corresponding track is
played.
Fast forwarding/rewinding X
While the display/selection window is
active, slide 009500520096and hold the COMAND
controller until the desired position has
been reached.
or
X Press and hold the 0048or0049 button
until the desired position is reached.
i On an iPod ®
or iPhone ®
, fast rewind only
functions within the current track. Selecting a category/playlist/folder
Overview For an iPod
®
, iPhone ®
or certain MP3 players,
you can select tracks using categories or fold-
ers. 216
Operation with the Media InterfaceAudio
Page 220 of 270
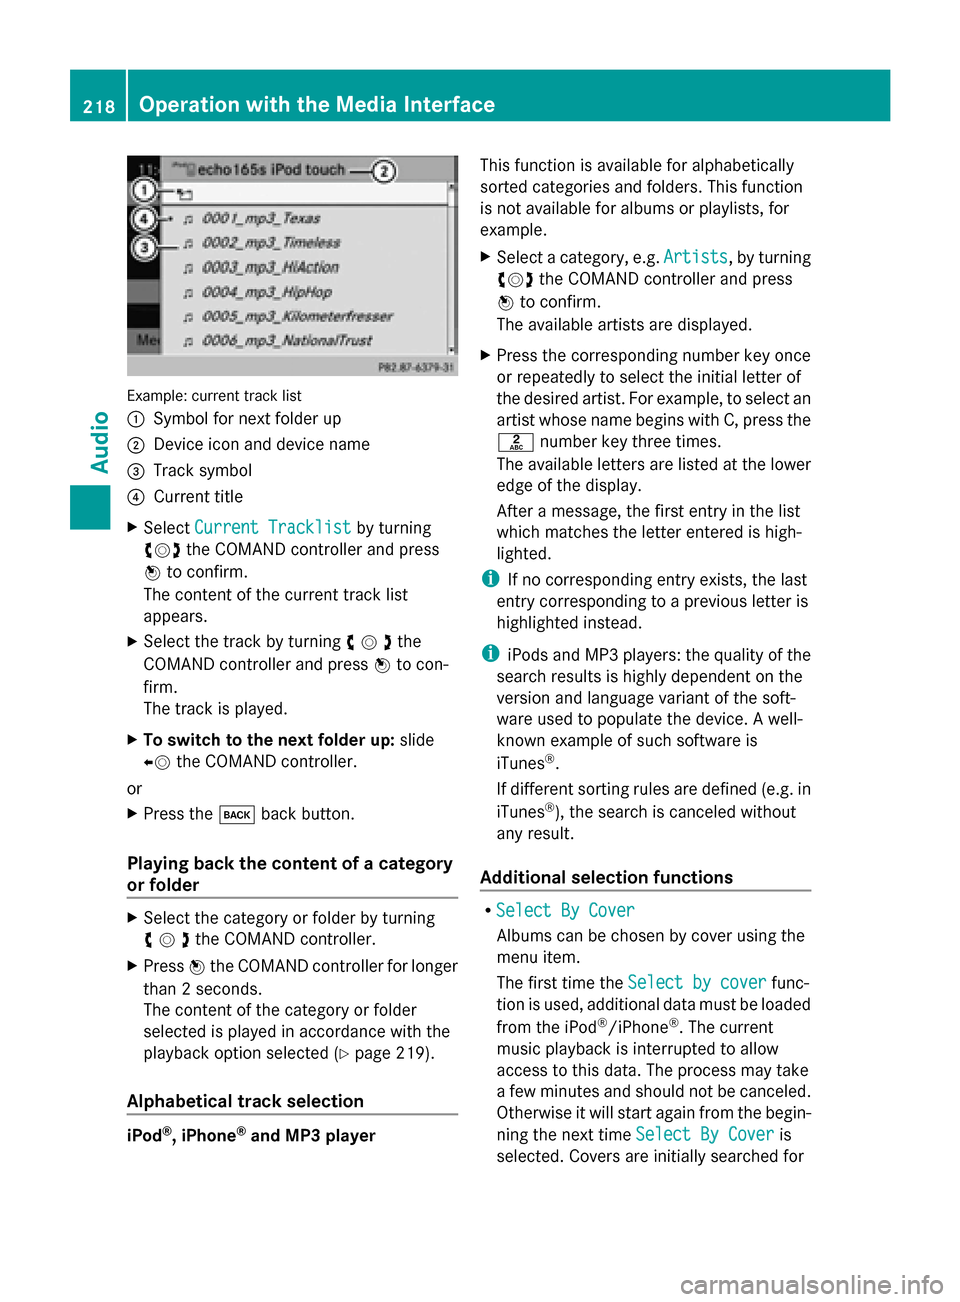
Example: current track list
0043
Symbol for next folder up
0044 Device icon and device name
0087 Track symbol
0085 Current title
X Select Current Tracklist Current Tracklist by turning
00790052007A the COMAND controller and press
0098 to confirm.
The content of the current track list
appears.
X Select the track by turning 00790052007Athe
COMAND controller and press 0098to con-
firm.
The track is played.
X To switch to the next folder up: slide
00950052 the COMAND controller.
or
X Press the 003Dback button.
Playing back the content of a category
or folder X
Select the category or folder by turning
00790052007Athe COMAND controller.
X Press 0098the COMAND controller for longer
than 2 seconds.
The content of the category or folder
selected is played in accordance with the
playback option selected (Y page 219).
Alphabetical track selection iPod
®
, iPhone ®
and MP3 player This function is available for alphabetically
sorted categories and folders. This function
is not available for albums or playlists, for
example.
X
Select a category, e.g. Artists
Artists, by turning
00790052007A the COMAND controller and press
0098 to confirm.
The available artists are displayed.
X Press the corresponding number key once
or repeatedly to select the initial letter of
the desired artist. For example, to select an
artist whose name begins with C, press the
0082 number key three times.
The available letters are listed at the lower
edge of the display.
After a message, the first entry in the list
which matches the letter entered is high-
lighted.
i If no corresponding entry exists, the last
entry corresponding to a previous letter is
highlighted instead.
i iPods and MP3 players: the quality of the
search results is highly dependent on the
version and language variant of the soft-
ware used to populate the device. A well-
known example of such software is
iTunes ®
.
If different sorting rules are defined (e.g. in
iTunes ®
), the search is canceled without
any result.
Additional selection functions R
Select By Cover Select By Cover
Albums can be chosen by cover using the
menu item.
The first time the Select by cover Select by cover func-
tion is used, additional data must be loaded
from the iPod ®
/iPhone ®
. The current
music playback is interrupted to allow
access to this data. The process may take
a few minutes and should not be canceled.
Otherwise it will start again from the begin-
ning the next time Select By Cover Select By Cover is
selected. Covers are initially searched for 218
Operation
withthe Media InterfaceAudio