ignition MERCEDES-BENZ M-Class 2014 W166 Owner's Guide
[x] Cancel search | Manufacturer: MERCEDES-BENZ, Model Year: 2014, Model line: M-Class, Model: MERCEDES-BENZ M-Class 2014 W166Pages: 462, PDF Size: 6.23 MB
Page 100 of 462

!
Only open the sliding sunroof if it is free
of snow and ice. Otherwise, malfunctions
may occur.
Do not allow anything to protrude from the
sliding sunroof. Otherwise, the seals could
be damaged.
i Resonance noises can occur in addition
to the usual airflow noises when the sliding
sunroof is open. They are caused by minor
pressure fluctuations in the vehicle interior.
Change the position of the sliding sunroof
or open a side window. The noise will be
reduced or eliminated. Sliding sunroof reversing feature
The sliding sunroof is equipped with an
automatic reversing feature. If a solid object
blocks or restricts the sliding sunroof during
the closing process, the sliding sunroof opens
againa utomatically. However, the automatic
reversing feature is only an aid and does not
relieve you of the responsibility of paying
attention when closing the sliding sunroof. G
WARNING
The reversing feature does no treact:
R to soft, light and thin objects, e.g. small
fingers
R over the last 1/6 in(4 mm) of the closing
movement
R during resetting
R when closing the sliding sunroof again
manually immediately after automatic
reversing
This means that the reversing feature cannot
preven tsomeone being trapped in these
situations. There is a risk of injury.
Make sure that no body parts are in close
proximity during the closing procedure.
If somebody becomes trapped:
R release the switch immediately, or
R during automatic operation, push the
switch briefly in any direction The closing process is stopped.
Operating the sliding sunroof
Opening and closing Overhead control panel
0002
To raise
0003 To open
0023 To close/lower
X Turn the SmartKey to position 1or 2in the
ignition lock.
X Press or pull the 0002switch in the
corresponding direction.
i If you press the 0002switch beyond the
point of resistance, an automatic opening/
closing process is started in the
corresponding direction .You can stop
automatic operation by operating the
switch again.
When opening and raising the roof,
automatic operation is only available if the
sliding sunroof is in the closed position.
The sun protection cover automatically opens
along with the sliding sunroof. You can open
or close the sun protection cover manually
when the sliding sunroof is raised or closed.
i You can continue to operate the sliding
sunroof after switching off the engine or
removing the SmartKey from the ignition
lock. This function is available for up to five
minutes or until the driver's or front-
passenger door is opened. 98
Sliding sunroofOpening and closing
Page 101 of 462

Resetting
!
If the sliding sunroof still canno tbe
opened or closed fully after resetting,
contact a qualified specialist workshop.
Reset the sliding sunroof if it does not move
smoothly.
X Turn the SmartKey to position 1or 2in the
ignition lock.
X Raise the sliding sunroof fully at the rear
(Y page 98).
X Keep the 0002switch pressed for another
second.
X Make sure that the sliding sunroof can be
fully opened and closed again (Y page 98).
X If this is not the case, repeat the steps
above again. Operating the panorama roof with
power tilt/sliding panel Overhead control panel
0002
To raise
0003 To open
0023 To close/lower
The panorama roof with power tilt/sliding
panel can only be operated when the roller
sunblind is open (Y page 100).
X To open and close: turn the SmartKey to
position 1or 2in the ignition lock.
X Press or pull the 0002switch in the
corresponding direction.
i If you press the 0002switch beyond the
point of resistance, an automatic opening/ closing process is started in the
corresponding direction
.You can stop
automatic operation by operating the
switch again.
The automatic raising feature is available
only when the sliding sunroof is closed. Operating the roller sunblinds for the
panorama roof with power tilt/sliding
panel
Important safety notes G
WARNING
When opening or closing the roller sunblind,
parts of the body could be trapped between
the roller sunblind and the frame or sliding
sunroof. There is a risk of injury.
When opening or closing make sure that no
parts of the body are in the sweep of the roller
sunblind.
If somebody becomes trapped:
R release the switch immediately, or
R during automatic operation, push the
switch briefly in any direction
The opening or closing procedure will be
stopped.
The roller sunblinds shield the vehicle interior
from sunlight. The roller sunblinds can only
be opened and closed together when the
panorama roof with power tilt/sliding panel
is closed.
Roller sunblind reversing feature The roller sunblinds are equipped with an
automatic reversing feature. If a solid object
blocks or restricts a roller sunblind during the
closing process, the roller sunblind opens
again automatically. However, the automatic
reversing feature is only an aid and does not
relieve you of the responsibility of paying
attention when closing the roller sunblinds. Sliding sunroof
99Opening and closing Z
Page 102 of 462

G
WARNING
The reversing feature especially does not
react to soft, light and thin objects such as
small fingers. This means that the reversing
feature cannot prevent someone being
trapped in these situations. There is a risk of
injury.
When closing make sure that no parts of the
body are in the sweep of the roller sunblind.
If somebody becomes trapped:
R release the switch immediately, or
R during automatic operation, push the
switch briefly in any direction
The closing process is stopped.
Opening and closing the roller
sunblinds Overhead control panel
0002
To open
0003 To open
0023 To close
X Turn the SmartKey to position 1or 2in the
ignitio nlock.
X Press or pull the 0002switch in the
corresponding direction.
i If you press the 0002switch beyond the
point of resistance, an automatic opening/
closing process is started in the
corresponding direction .You can stop
automatic operation by operating the
switch again. Resetting the panorama roof with
power tilt/sliding panel and the roller
sunblinds !
If the panorama roof with power tilt/
sliding panel and the roller sunblinds
cannot be fully opened or closed after
resetting, contact a qualified specialist
workshop. Overhead control panel
0002
To open
0003 To open
0023 To close
Reset the panorama roof with power tilt/
sliding panel and the roller sunblinds if the
panorama roof with power tilt/sliding panel
or the roller sunblinds do not move smoothly.
X Turn the SmartKey to position 1or 2in the
ignition lock.
X Pull the 0002switch repeatedly to the point
of resistance in the direction of arrow 0023
until the panorama roof with power tilt/
sliding panel is fully closed.
X Keep the 0002switch pulled for an
additional second.
X Pull the 0002switch repeatedly to the point
of resistance in the direction of arrow 0023
until the roller sunblinds are fully closed.
X Keep the 0002switch pulled for an
additional second.
X Make sure that the panorama roof with
power tilt/sliding panel (Y page 99) and the100
Sliding sunroofOpening and closing
Page 111 of 462
0023
To lower the backrest contour
0022 To harden the backrest contour
You can adjust the contour of the front seat
backrests individually to provide optimum
support for your back. Switching the seat heating on/off
Activating/deactivating G
WARNING
Repeatedly switching on the seat heating can
cause the seat cushion and backrest pads to
become very hot. The health of persons with
limited temperature sensitivity or a limited
ability to react to excessively high
temperatures may be affected or they may
even suffer burn-like injuries. There is a risk
of injury.
Therefore, do not switch the seat heating on
repeatedly. Driver's and front-passenger seat
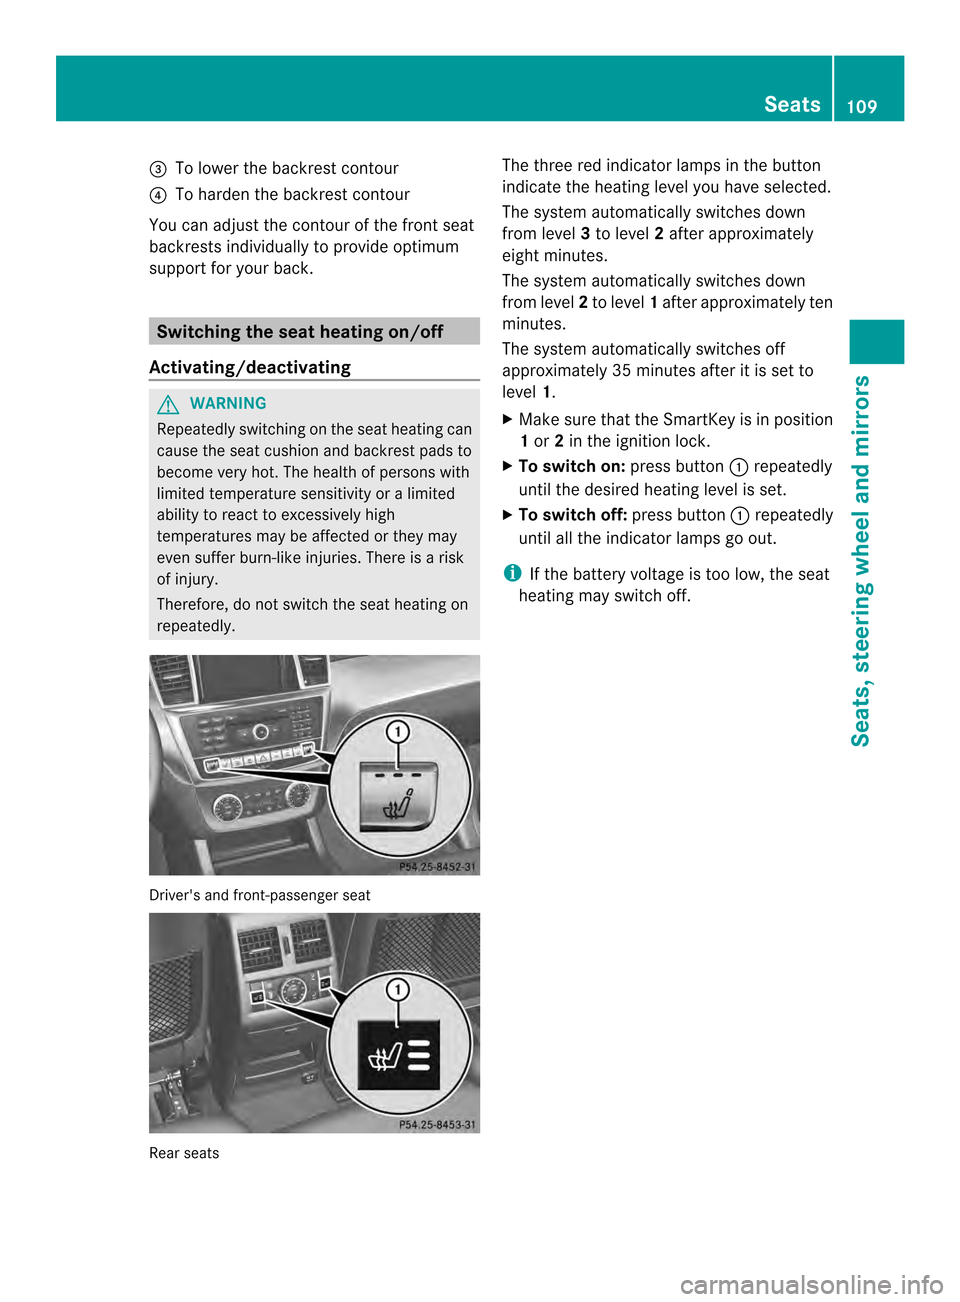
Rear seats The three red indicator lamps in the button
indicate the heating level you have selected.
The system automatically switches down
from level
3to level 2after approximately
eight minutes.
The system automatically switches down
from level 2to level 1after approximately ten
minutes.
The system automatically switches off
approximately 35 minutes after it is set to
level 1.
X Make sure that the SmartKey is in position
1or 2in the ignition lock.
X To switch on: press button0002repeatedly
until the desired heating level is set.
X To switch off: press button0002repeatedly
until all the indicator lamps go out.
i If the battery voltage is too low, the seat
heating may switch off. Seats
109Seats, steering wheel and mirrors Z
Page 112 of 462
Problems with the seat heating
Problem Possible causes/consequences and
0001 Solutions
The seat heating has
switched off
prematurely or cannot
be switched on. The on-board voltage is too low because too many electrical
consumers are switched on.
X
Switch off electrical consumers that you do not need, such as
the rear window defroster or interior lighting.
Once the battery is sufficiently charged, the seat heating will
switch back on automatically. Switching the seat ventilation on/off
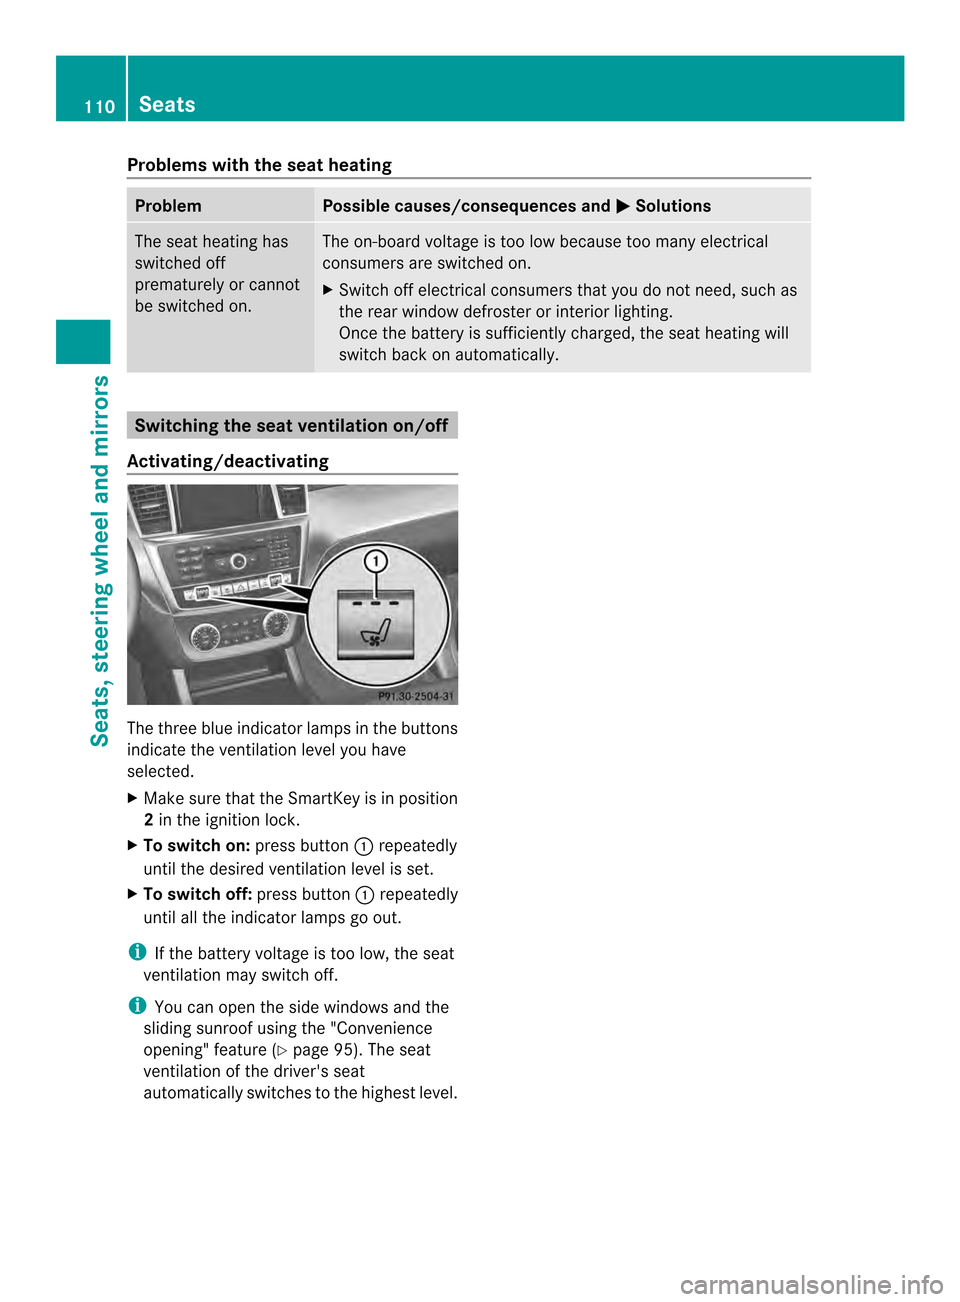
Activating/deactivating The three blue indicator lamps in the buttons
indicate the ventilation level you have
selected.
X
Make sure that the SmartKey is in position
2in the ignition lock.
X To switch on: press button0002repeatedly
until the desired ventilation level is set.
X To switch off: press button0002repeatedly
until all the indicator lamps go out.
i If the battery voltage is too low, the seat
ventilation may switch off.
i You can open the side windows and the
sliding sunroof using the "Convenience
opening" feature (Y page 95). The seat
ventilation of the driver's seat
automatically switches to the highest level. 110
SeatsSeats, steering wheel and mirrors
Page 114 of 462

Adjusting the steering wheel
electrically
0002
To adjust the steering wheel height
0003 To adjust the steering wheel position
(fore-and-aft adjustment)
The steering wheel can also be adjusted when
the SmartKey is removed from the ignition
lock.
i Further related subjects:
R EASY-ENTRY/EXIT feature
(Y page 113)
R Storing settings (Y page 117)Steering wheel heating
Activating/deactivating X
Make sure that the SmartKey is in position
2in the ignition lock.
X To switch on/off: turn the lever in the
direction of arrow 0002or0003.
Indicato rlamp 0023lights up or goes out. Vehicles without KEYLESS-GO
:when you
remove the SmartKey from the ignition lock,
the steering wheel heating is deactivated.
Vehicles with KEYLESS-GO: when you switch
off the ignition and open the driver's door, the
steering wheel heating is deactivated. 112
Steering wheelSeats, steering wheel and mirrors
Page 115 of 462
Problems with the steering wheel heating
Problem Possible causes/consequences and
0001 Solutions
The steering wheel
heating has switched
off prematurely or
cannot be switched on. The on-board voltage is too low because too many electrical
consumers are switched on.
X
Switch off electrical consumers that you do not need, such as
the rear window defroster or interior lighting. EASY-ENTRY/EXIT feature
Important safety notes G
WARNING
When the EASY-ENTRY/EXIT feature adjusts
the steering wheel, you and other vehicle
occupants –particularly childre n–could
become trapped. There is a risk of injury.
While the EASY-ENTRY/EXIT feature is
making adjustments, make sure that no one
has any body parts in the sweep of the
steering wheel.
If somebody becomes trapped:
R press one of the memory function position
buttons, or
R move the switch for steering wheel
adjustmen tinthe opposite direction to that
in which the steering wheel is moving.
The adjustment process is stopped. G
WARNING
If children activate the EASY-ENTRY/EXIT
feature, they can become trapped,
particularly when unattended. There is a risk
of injury.
When leaving the vehicle, always take the
SmartKey with you and lock the vehicle. Never
leave children unsupervised in the vehicle. G
WARNING
If you drive off while the EASY-ENTRY/EXIT
feature is making adjustments, you could lose
control of the vehicle. There is a risk of an
accident. Always wait until the adjustment process is
complete before driving off.
The EASY-ENTRY/EXIT feature makes getting
in and out of your vehicle easier.
You can activate and deactivate the EASY-
ENTRY/EXIT feature in the on-board
computer (Y page 277).
Position of the steering wheel when the
EASY-ENTRY/EXIT featurei s active The steering wheel swings upwards when
you:
R
remove the SmartKey from the ignition lock
R open the driver's door with KEYLESS-GO in
position 1
R open the driver's door and the SmartKey is
in position 0or 1in the ignition lock
i The steering wheel only moves upwards if
it has not already reached the upper end
stop.
Position of the steering wheel for
driving The steering wheel is moved to the last
selected position when:
R
the driver's door is closed
R you insert the SmartKey into the ignition
lock
or
R you press the Start/Stop button once on
vehicles with KEYLESS-GO
When you close the driver's door with the
ignition switched on, the steering wheel is Steering wheel
113Seats, steering wheel and mirrors Z
Page 116 of 462

also automatically moved to the previously
set position.
The last positio
nofthe steering wheel is
stored when you switch off the ignition or
when you store the settingw ith the memory
function (Y page 117).
Crash-responsive EASY-EXIT feature If the crash-responsive EASY-EXIT feature is
triggered in an accident, the steering column
will move upwards when the driver's door is
opened. This occurs irrespective of the
position of the SmartKey in the ignition lock.
This makes it easier to exit the vehicle and
rescue the occupants.
The crash-responsive EASY-EXIT feature is
only operational if the EASY-EXIT/ENTRY
feature is activated in the on-board computer
(Y page 277). Mirrors
Rear-view mirror
X
Anti-glare mode: flick anti-glare lever 0002
forwards or back. Exterior mirrors
Adjusting the exterior mirrors G
WARNING
The exterior mirror on the front-passenger
side reduces the size of the image. Visible
objects are actually closer than they appear. This means that you could misjudge the
distance fro
mroad users traveling behind,
e.g. when changing lane. There is a risk of an
accident.
For this reason, always make sure of the
actual distance from the road users traveling
behind by glancing over your shoulder. X
Make sure that the SmartKey is in position
1or 2in the ignition lock.
X Press button 0002for the left-hand exterior
mirror or button 0003for the right-hand
exterior mirror.
The indicator lamp in the corresponding
button lights up in red.
The indicator lamp goes out again after
some time. You can adjust the selected
mirror using adjustment button 0023as long
as the indicator lamp is lit.
X Press adjustmen tbutton 0023up, down, or
to the left or right until you have adjusted
the exterior mirror to the correct position.
You should have a good overview of traffic
conditions.
The convex exterio rmirrors provide a larger
field of vision.
The exterior mirrors are heated automatically
if the rear window defroster is switched on
and the outside temperature is low. 114
MirrorsSeats, steering wheel and mirrors
Page 117 of 462

Folding the exterior mirrors in or out
electrically X
Make sure that the SmartKey is in position
1 or 2in the ignition lock.
X Briefly press button 0002.
Both exterior mirrors fold in or out.
i Make sure that the exterior mirrors are
always folded out fully while driving .They
could otherwise vibrate.
i If you are driving faster than
30 mph (47 km/h), you can no longer fold
in the exterior mirrors.
Setting the exterior mirrors If the battery has been disconnected or
completely discharged, the exterior mirrors
must be reset. The exterior mirrors will
otherwise not fold in when you select the
"Fold in mirrors when locking" function in the
on-board computer (Y page 277).
X Make sure that the SmartKey is in
position 1in the ignition lock.
X Briefly press button 0002.
Folding the exterior mirrors in or out
automatically If the "Fold in mirrors when locking" function
is activated in the on-board computer:
(Y page 277) R
the exterior mirrors fold in automatically as
soon as you lock the vehicle from the
outside.
R the exterior mirrors fold out again
automatically as soon as you unlock the
vehicle and then open the driver's or front-
passenger door.
Exterior mirror pushed out of position If an exterior mirror has been pushed out of
position, proceed as follows:
X
Vehicles without electrically folding
exterior mirrors: move the exterior mirror
into the correct position manually.
X Vehicles with electrically folding
exterior mirrors: press and hold button for
folding the mirrors 0002(Ypage 115) until you
hear a click and then the mirror engage in
position.
The mirror housing is engaged again and
you can adjust the exterior mirrors as usual
(Y page 114). Automatic anti-glare mirrors
The rear-view mirror and the exterior mirror
on the driver's side automatically go into anti-
glare mode if the following conditions are met
simultaneously:
R the ignition is switched on and
R incident light from headlamps strikes the
sensor in the rear-view mirror.
i The mirrors do not go into anti-glare mode
if reverse gear is engaged or if the interior
lighting is switched on. Mirrors
115Seats, steering wheel and mirrors Z
Page 118 of 462
Parking position for the exterior
mirror on the front-passenger side
Setting and storing the parking position Using reverse gear
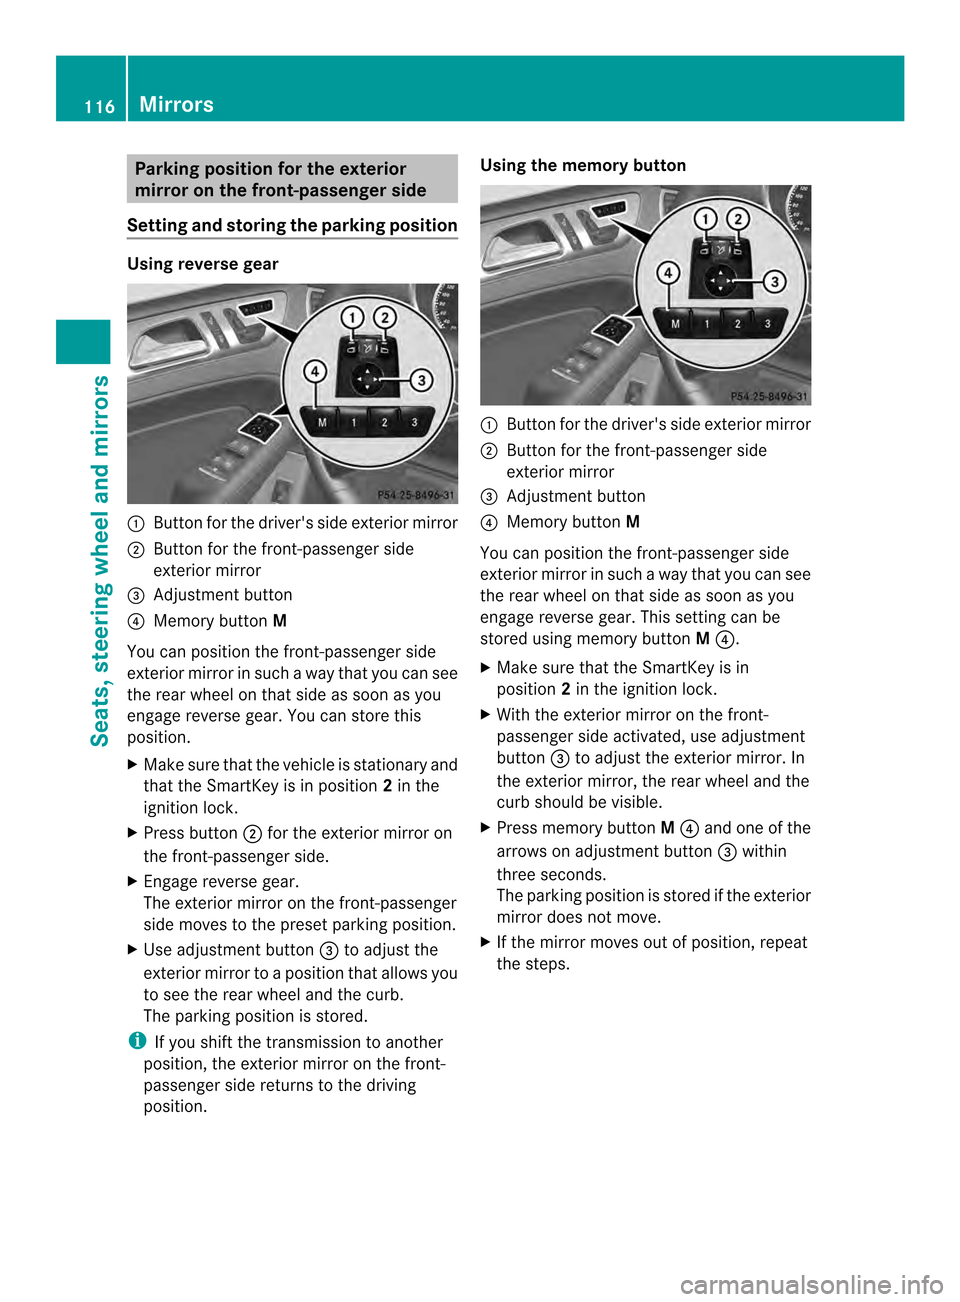
0002
Button for the driver's side exterior mirror
0003 Button for the front-passenger side
exterior mirror
0023 Adjustment button
0022 Memory button M
You can position the front-passenger side
exterior mirror in such a way that you can see
the rear wheel on that side as soon as you
engage reverse gear. You can store this
position.
X Make sure that the vehicle is stationary and
that the SmartKey is in position 2in the
ignition lock.
X Press button 0003for the exterior mirror on
the front-passenger side.
X Engage reverse gear.
The exterior mirror on the front-passenger
side moves to the preset parking position.
X Use adjustment button 0023to adjust the
exterior mirror to a position that allows you
to see the rear wheel and the curb.
The parking position is stored.
i If you shift the transmission to another
position, the exterior mirror on the front-
passenger side returns to the driving
position. Using the memory button
0002
Button for the driver's side exterior mirror
0003 Button for the front-passenger side
exterior mirror
0023 Adjustment button
0022 Memory button M
You can position the front-passenger side
exterior mirror in such a way that you can see
the rear wheel on that side as soon as you
engage reverse gear. This setting can be
stored using memory button M0022.
X Make sure that the SmartKey is in
position 2in the ignition lock.
X With the exterior mirror on the front-
passenger side activated, use adjustment
button 0023to adjust the exterior mirror. In
the exterior mirror, the rear wheel and the
curb should be visible.
X Press memory button M0022 and one of the
arrows on adjustment button 0023within
three seconds.
The parking position is stored if the exterior
mirror does not move.
X If the mirror moves out of position, repeat
the steps. 116
MirrorsSeats, steering wheel and mirrors