oil MERCEDES-BENZ M-Class 2014 W166 Owner's Guide
[x] Cancel search | Manufacturer: MERCEDES-BENZ, Model Year: 2014, Model line: M-Class, Model: MERCEDES-BENZ M-Class 2014 W166Pages: 462, PDF Size: 6.23 MB
Page 376 of 462

X
Clean the plastic lenses of the mirror turn
signals in the exterio rmirro rhousing using
a wet sponge and mild cleaning agent, e.g.
Mercedes-Benz car shampoo or cleaning
cloths.
Cleaning the sensors !
If you clean the sensors with a power
washer, make sure that you keep a
distance of at least 11.8in( 30 cm) between
the vehicle and the power washer nozzle.
Information about the correct distance is
available from the equipment
manufacturer. X
Clean sensors 0002of the driving systems
with water, car shampoo and a soft cloth.
Cleaning the rear view camera !
Do not clea nthe camera lens and the area
around the rear view camera with a power
washer. X
Use clear water and a soft cloth to clean
camera lens 0002.
Cleaning the exhaust pipe !
Do not clean the exhaust pipe with acid-
based cleaning agents such as sanitary
cleansers or wheel cleaners.
Impurities combined with the effects of road
grit and corrosive environmental factors may
cause flash rust to form on the surface. You
can restore the original shine of the exhaust
pipe by cleaning it regularly, especially in
winter and after washing.
X Cleant he exhaust pipe with a chrome care
product tested and approved by Mercedes-
Benz.
Cleaning the trailer tow hitch H
Environmental note
Dispose of rags soaked in oil and grease in an
environmentally responsible manner.
! Do not clean the ball coupling with a
power washer. Do not use solvents.
! Observe the note on care provided by the
trailer manufacturer. 374
CareMaintenance and care
Page 377 of 462
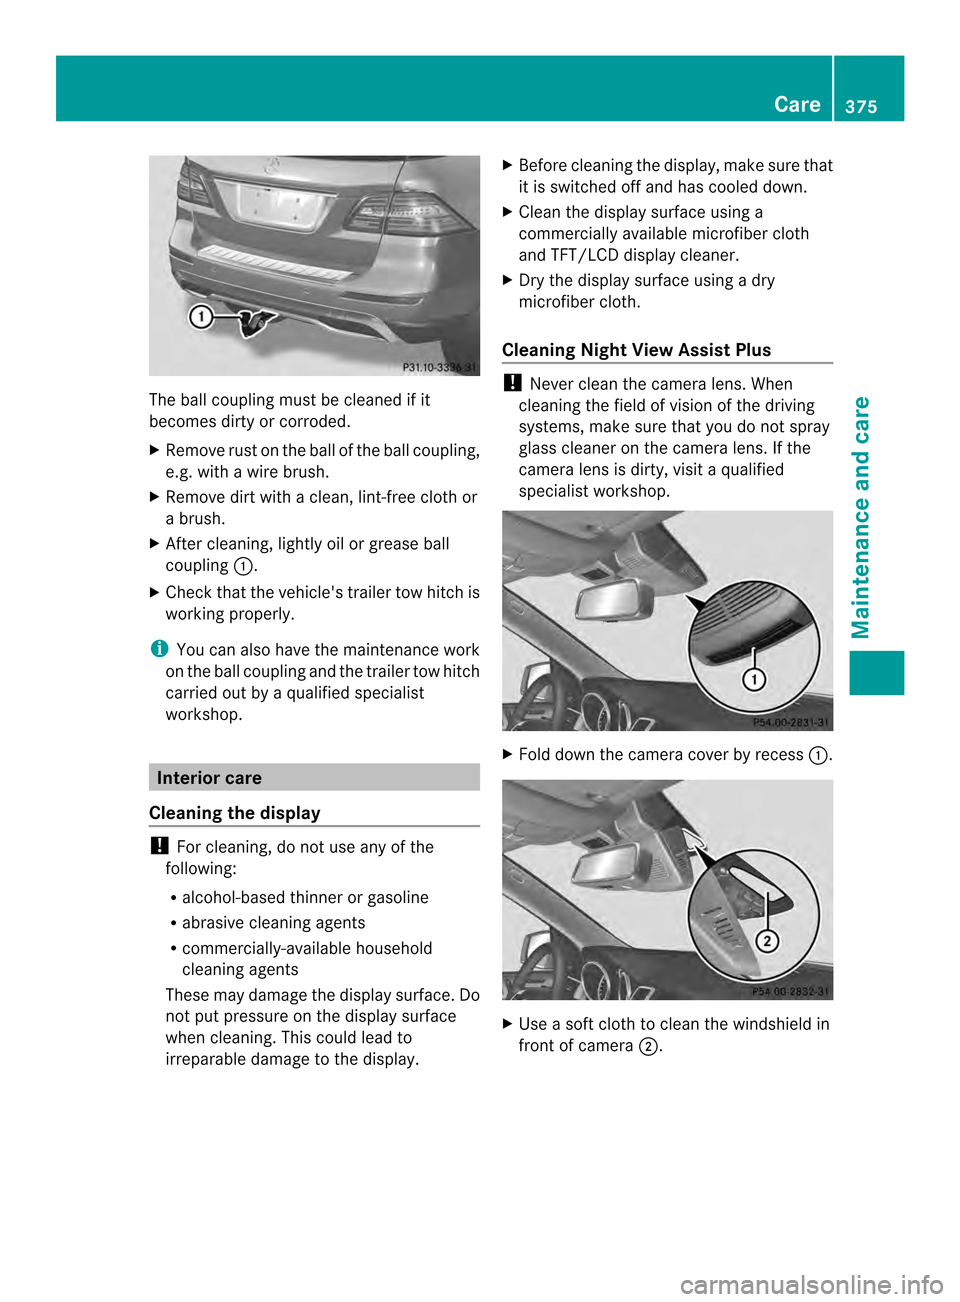
The ball coupling must be cleaned if it
becomes dirty or corroded.
X Remove rust on the ball of the ball coupling,
e.g. with a wire brush.
X Remove dirt with a clean, lint-free cloth or
a brush.
X After cleaning, lightly oil or grease ball
coupling 0002.
X Check that the vehicle's trailer tow hitch is
working properly.
i You can also have the maintenance work
on the ball coupling and the trailer tow hitch
carried out by a qualified specialist
workshop. Interior care
Cleaning the display !
For cleaning, do not use any of the
following:
R alcohol-based thinner or gasoline
R abrasive cleaning agents
R commercially-available household
cleaning agents
These may damage the display surface. Do
not put pressure on the display surface
when cleaning. This could lead to
irreparable damage to the display. X
Before cleaning the display, make sure that
it is switched off and has cooled down.
X Clean the display surface using a
commercially available microfiber cloth
and TFT/LCD display cleaner.
X Dry the display surface using a dry
microfiber cloth.
Cleaning Night View Assist Plus !
Never clean the camera lens. When
cleaning the field of vision of the driving
systems, make sure that you do not spray
glass cleaner on the camera lens. If the
camera lens is dirty, visit a qualified
specialist workshop. X
Fold down the camera cover by recess 0002. X
Use a soft cloth to clean the windshield in
front of camera 0003. Care
375Maintenance and care Z
Page 378 of 462
Cleaning the plastic trim
G
WARNING
Care products and cleaning agents containing
solvents cause surfaces in the cockpit to
become porous. As a result, plastic parts may
come loose in the event of air bag
deployment. There is a ris kofinjury.
Do not use any care products and cleaning
agents to clean the cockpit.
! Do not affix the following to plastic
surfaces:
R stickers
R films
R scented oil bottles or similar items
You can otherwise damage the plastic.
! Do not allow cosmetics, insect repellent
or sunscreen to come into contact with the
plastic trim .This maintains the high-quality
look of the surfaces.
X Wipe the plastic trim with a damp, lint-free
cloth, e.g. a microfiber cloth.
X Heavy soiling: use care and cleaning
products recommended and approved by
Mercedes-Benz.
The surface may change color temporarily.
Wait until the surface is dry again.
Cleaning the steering wheel and gear or
selector lever X
Thoroughly wipe with a damp cloth or use
leather care agents that have been
recommended and approved by Mercedes-
Benz.
Cleaning genuine wooda nd trim
elements !
Do not use solvent-based cleaning agents
such as tar remover, wheel cleaners,
polishes or waxes. There is otherwise a risk
of damaging the surface.
! Do not use chrome polish on trim pieces.
The trim pieces have a chrome look but are mostly made of anodized aluminum and
can lose their shine if chrome polish is
used. Use a damp, lint-free cloth instead
when cleaning the trim pieces.
If the chrome-plated trim pieces are very
dirty, you can use a chrome polish. If you
are unsure as to whether the trim pieces
are chrome-plated or not, consult an
authorized Mercedes-Benz Center.
X Wipe the wooden trim and trim pieces with
a damp, lint-free cloth ,e.g. a microfiber
cloth.
X Heavy soiling: use car care and cleaning
products recommended and approved by
Mercedes-Benz.
Cleaning the seat covers General notes
!
Do not use microfibe rcloths to clean
genuine leather, artificial leathe ror
Alcantara® covers. If used often, these can
damage the cover.
i Note tha tregular care is essential to
ensure that the appearance and comfort of
the covers is retained over time.
Genuine leather seat covers
! To retain the natural appearance of the
leather, observe the following cleaning
instructions:
R Clean genuine leather covers carefully
with a damp cloth and then wipe the
covers down with a dry cloth.
R Make sure that the leather does not
become soaked. It may otherwise
become rough and cracked.
R Only use leather care agents that have
been tested and approved by Mercedes-
Benz. You can obtain these from a
qualified specialist workshop.
Leather is a natural product.
It exhibits natural surface characteristics, for
example: 376
CareMaintenance and care
Page 386 of 462

X
Pull plug 0022with the cable and hose 0020out
of the housing.
X Screw hose 0020onto flange 0021of tire
sealant bottle 0002.
X Place tire sealant bottle 0002head
downwards into recess 0003of the tire
inflation compressor. X
Remove the cap from valve 0014on the faulty
tire.
X Screw filler hose 0015onto valve 0014.
X Insert connector 0022into a 12 V socket in
your vehicle.
Observe the notes on sockets
(Y page 347).
X Turn the SmartKey to position 1in the
ignition lock (Y page 157).
X Press on/of fswitch 0023on the tire inflation
compressor to I.
The tire inflatio ncompressor is switched
on. The tire is inflated.
i First, tire sealant is pumped into the tire.
The pressure can briefly rise to
approximately 500 kPa (5 bar/73 psi).
Do not switch off the tire inflation
compressor during this phase.
X Allow the tire inflation compressor to run
for five minutes. The tire should then have
attained a pressure of at least 180 kPa
(1.8 bar/26 psi).
If at ire pressure of 180 kPa (1.8 ba r/26 psi)
has bee nattained after five minutes:
(Y page 384). If
at ire pressure of 180 kPa (1.8 ba r/26 psi)
has not bee nattained after five minutes:
(Y page 384).
i If tire sealant leaks out, allow it to dry .It
can then be removed like a laye roffilm.
If your clothes are soiled with tire sealant,
have the mcleaned with perchloroethylene
at a dry cleaner as soon as possible.
Tire pressure not reached If
ap ressure of 180 kPa (1.8 ba r/26 psi) has
not bee nachieved afte rfive minutes:
X Switch off the tire inflation compressor.
X Unscrew the filler hose fro mthe valve of
the faulty tire.
X Very slowly drive forwards or reverse
approximately 30 ft (10 m).
X Pump up the tire again.
After a maximum of five minutes the tire
pressure must be at least 180 kPa (1.8 bar/
26 psi). G
WARNING
If the required tire pressure is not reached
after the specified time, the tire is too badly
damaged. The tire sealant cannot repair the
tire in this instance. Damaged tires and a tire
pressure that is too low can significantly
impair the vehicle's braking and driving
characteristics. There is a risk of accident.
Do not continue driving. Contact a qualified
specialist workshop.
Tire pressure reached G
WARNING
At ire temporarily sealed with tire sealant
impairs the driving characteristics and is not
suitable for higher speeds. There is a risk of
accident.
You should therefore adapt your driving style
accordingly and drive carefully. Do not exceed
the specified maximum speed with a tire that
has been repaired using tire sealant. 384
Flat tireBreakdown assistance
Page 422 of 462
Load index
In addition to the load-bearing index, the load
inde
xmay also be imprinted on the sidewall
of the tire. This specifie sthe load-bearing
capacity more precisely.
Curb weight
The weight of a vehicle with standard
equipment including the maximum capacity
of fuel, oil and coolant. It also includes the air-
conditioning system and optional equipment
if these are installed in the vehicle, but does
not include passengers or luggage.
Maximum load rating
The maximum tire load is the maximum
permissible weight in kilograms or lbs for
which a tire is approved.
Maximum permissible tire pressure
Maximum permissible tire pressure for one
tire.
Maximum load on one tire
Maximum load on one tire. This is calculated
by dividing the maximum axle load of one axle
by two.
PSI (pounds per square inch)
As tandard uni tofmeasure for tire pressure.
Aspect ratio
Relationship between tire height and tire
width in percent.
Tire pressure
This is pressure inside the tire applying an
outward force to each square inch of the tire's
surface. The tire pressure is specified in
pounds per square inch (psi), in kilopascal
(kPa) or in bar. The tire pressure should only
be corrected when the tires are cold. Cold tire pressure
The tires are cold:
R
if the vehicle has been parked without
direct sunlight on the tires for at least three
hours and
R if the vehicle has been driven for less than
1 mile (1.6 km).
Tread
The part of the tire that comes into contact
with the road.
Bead
The tire bead ensures that the tire sits
securely on the wheel. There are several steel
wires in the bead to prevent the tire from
coming loose from the wheel rim.
Sidewall
The part of the tire between the tread and the
bead.
Weight of optional extras
The combined weight of those optional extras
that weigh more than the replaced standard
parts and more than 2.3 kilograms (5 lbs).
These optional extras, such as high-
performance brakes, level control, a roof rack
or a high-performance battery, are not
included in the curb weight and the weight of
the accessories.
TIN (Tire Identification Number)
This is a unique identifier which can be used
by a tire manufacturer to identify tires, for
example for a product recall, and thus identify
the purchasers. The TIN is made up of the
manufacturer's identity code, tire size, tire
type code and the manufacturing date.
Load bearing index
The load bearing index (also load index) is a
code that contains the maximum load bearing
capacity of a tire. 420
All about wheels and tiresWheels and tires
Page 424 of 462

Direction of rotation
Tires with a specified direction of rotation
have additional benefits, e.g. if there is a risk
of hydroplaning .You will only gain these
benefits if the correct direction of rotation is
observed.
An arrow on the sidewall of the tire indicates
its correct direction of rotation. Storing wheels
Store wheels that are not being used in a cool,
dry and preferably dark place. Protec tthe
tires from oil, grease, gasoline and diesel. Cleaning the wheels
G
WARNING
The water jet from a circular jet nozzle (dirt
blasters) can cause invisible exterior damage
to the tires or chassis components.
Components damaged in this way may fail
unexpectedly. There is a risk of an accident.
Do not use power washers with circular jet
nozzles to clean the vehicle. Have damaged
tires or chassis components replaced
immediately. Mounting
awheel
Preparing the vehicle X
Vehicle with emergency spare wheel:
whe nmounting the emergency spare
wheel in the event of a flat tire, follow the
additional notes on vehicle preparation
under "Flat tire" (Y page 381).
X Stop the vehicle on solid, non-slippery and
level ground.
X Unload heavy luggage.
X Apply the electric parking brake manually.
X Bring the front wheels into the straight-
ahead position.
X Shift the transmission to position P.X
Vehicles with the AIRMATIC package:
make sure that highway level is selected
(Y page 207).
X Switch off the engine.
X Vehicles without KEYLESS-GO: remove
the SmartKey from the ignition lock.
X Vehicles with KEYLESS-GO: open the
driver's door.
The on-board electronics now have status
0.T his is the same as the SmartKey having
been removed.
X Vehicles with KEYLESS-GO: remove the
Start/Stop button from the ignition lock
(Y page 158).
X If included in the vehicle equipment,
remove the tire-change tool kit from the
vehicle.
X Secure the vehicle to prevent it from rolling
away.
i Apart from certain country-specific
variations, vehicles are not equipped with
a tire-change tool kit. For information on
which tools are required to perform a wheel
change on your vehicle, consult an
authorized Mercedes-Ben zCenter.
Necessary wheel-changing tools can
include, for example:
R jack
R wheel chock
R lug wrench
Securing the vehicle to prevent it from
rolling away 422
Changing
awheelWheels and tires
Page 427 of 462

Example
X
Make sure the foot of the jack is directly
beneath the jacking point.
X Turn ratchet wrench 0022until jack 0023sits
completely on jacking point 0003and the
base of the jack lies evenly on the ground.
X Turn ratchet wrench 0022until the tire is
raised amaximum of 1.2 in (3 cm )from the
ground.
Removing awheel !
Do not place wheel bolts in sand or on a
dirty surface. The bol tand wheel hub
threads could otherwise be damaged when
you screw them in. X
Unscrew the uppermost wheel bolt
completely.
X Screw alignment bolt 0002into the thread
instead of the wheel bolt.
X Unscrew the remaining whee lbolts fully.
X Remove the wheel. Mounting
anew wheel G
WARNING
Oiled or greased wheel bolts or damaged
wheel bolts/hub threads can cause the wheel
bolts to come loose .As a result, you could
lose a wheel while driving. There is a risk of
accident.
Never oil or grease wheel bolts. In the event
of damage to the threads, contact a qualified
specialist workshop immediately.H ave the
damaged wheel bolts or hub threads
replaced/renewed. Do no tcontinue driving. G
WARNING
If you tighten the wheel bolts or wheel nuts
when the vehicle is raised, the jack could tip
over. There is a risk of injury.
Only tighten the wheel bolts or wheel nuts
when the vehicle is on the ground.
! To prevent damage to the paintwork, hold
the wheel securely against the wheel hub
while screwing in the first wheel bolt.
Always pay attention to the instructions and
safety notes in the "Changing a wheel"
section (Y page 421).
Only use wheel bolts that have been designed
for the wheel and the vehicle. For safety
reasons, Mercedes-Benz recommends that
you only use wheel bolts which have been
approved for Mercedes-Benz vehicles and the
respective wheel.
! Always use wheel bolts 0003to mount the
"Minispare" emergency spare wheel. Using
other wheel bolts to mount the "Minispare"
emergency spare wheel could damage the
brake system. Changing
awheel
425Wheels and tires Z
Page 444 of 462
Useful information
i This Operator's Manual describes all
models and all standard and optional
equipment of your vehicle available at the
time of publication of the Operator's
Manual. Country-specific differences are
possible. Please note that your vehicle may
not be equipped with all features
described. This also applies to safety-
related systems and functions.
i Read the information on qualified
specialist workshops: (Y page 28).Information regarding technical data
General information
i The data stated here specifically refers to
a vehicle with standard equipment .Consult
an authorized Mercedes-Benz Center for
the data for all vehicle variants and trim
levels. Information in the printed Operator's
Manual
In the printed Operator's Manual you can find
information about:
R Vehicle data
R Tailgate opening dimensions
R Tank capacity
R Coolant (engine)
R Engine oil approval and capacity
R DEF filling capacity
R Refrigerant filling capacity and PAG oil
R Towing a trailer
R Off-road driving (fording depth, approach/
departure angle) Warranty
Your vehicle is covered under the terms of the
warranties printed in the Service and
Warranty Information booklet.
Your authorized Mercedes-Benz Center will
replace and repair all factory-installed parts
in accordance with the following warranty
terms and conditions:
R New Vehicle Limited Warranty
R Emission Systems Warranty
R Emission Performance Warranty
R California, Connecticut, Maine,
Massachusetts, New York, Pennsylvania,
Rhode Island and Vermont Emission
Control System Warranty
R State warranty enforcement laws (Lemon
Laws)
Replacement parts and accessories are
covered by the Mercedes-Benz Parts and
Accessories warranties. These are available
at any authorized Mercedes-Benz Center.
i If you lose the Service and Warranty
Information booklet, contact an authorized
Mercedes-Benz Center to arrange a
replacement .Itwill be mailed to you. Identification plates
Vehicle identification plate with
vehicle identification number (VIN)
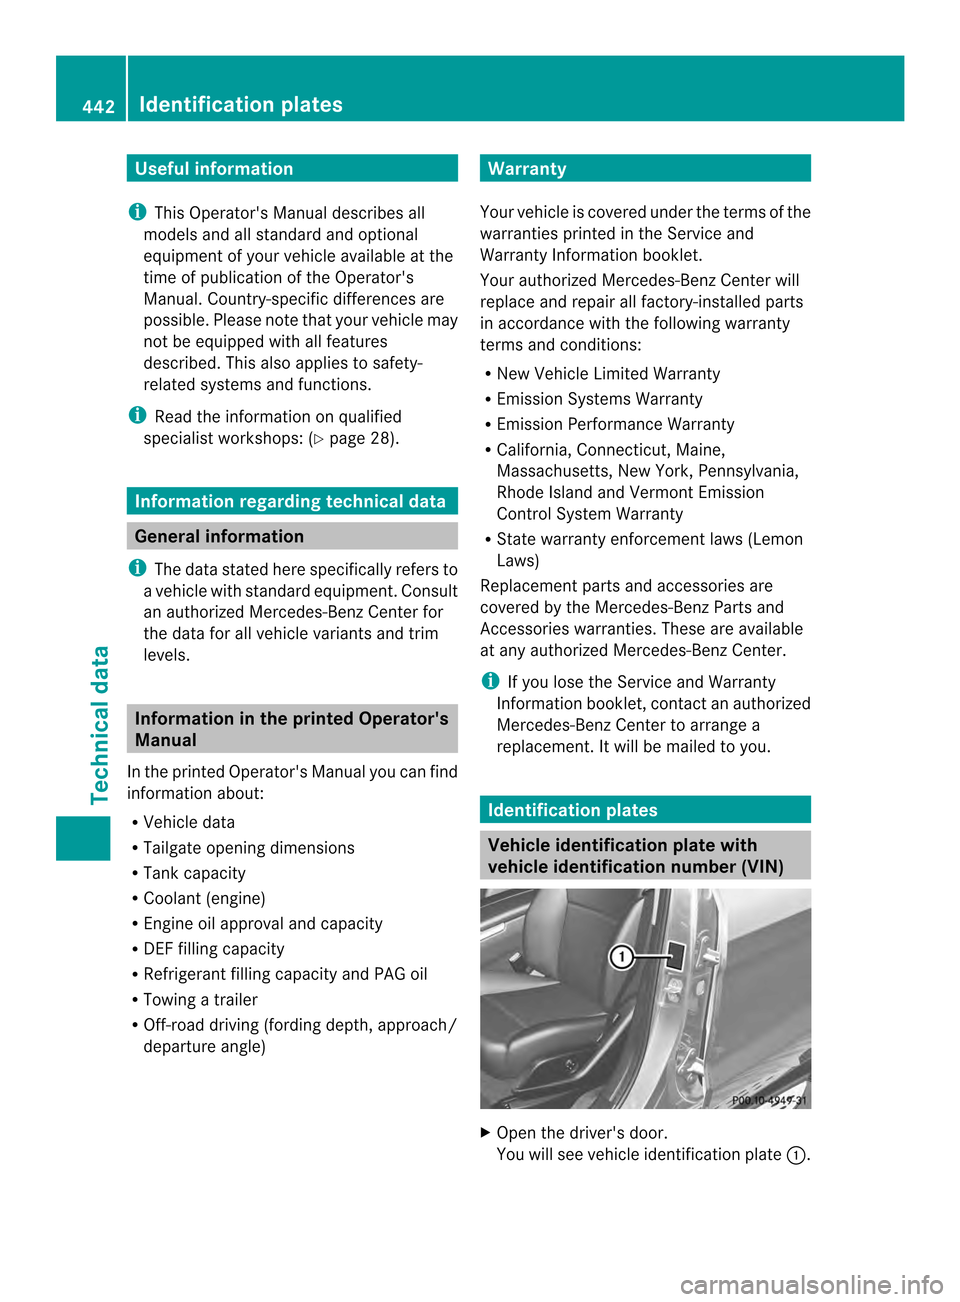
X
Open the driver's door.
You will see vehicle identification plate 0002.442
Identification platesTechnical data
Page 446 of 462
Service products and filling
capacities Important safety notes
G
WARNING
Service products may be poisonous and
hazardous to health. There is a risk of injury.
Comply with instructions on the use, storage
and disposal of service products on the labels
of the respective original containers. Always
store service products sealed in their original
containers. Always keep service products out
of the reach of children. H
Environmental note
Dispose of service products in an
environmentally responsible manner.
Service products include the following:
R Fuels (e.g. gasoline, diesel)
R Exhaust gas aftertreatment additives, e.g.
DEF
R Lubricants (e.g. engine oil, transmission oil)
R Coolant
R Brake fluid
R Windshield washer fluid
R Climate control system refrigerant
Comply with all valid regulations with respect
to handling, storing, and disposing of service
fluids.
Components and service products must be
matched. You should therefore only use
products that have been tested and approved
by Mercedes-Benz.
Information on tested and approved products
can be obtained at an authorized Mercedes-
Benz Center or on the Internet at
http://bevo.mercedes-benz.com.
You can recognize service products approved
by Mercedes-Benz by the following
inscription on the containers:
R MB-Freigabe (e.g. MB-Freigabe 229.51)
R MB Approval (e.g. MB Approval 229.51) Other designations or recommendations
indicate a level of quality or a specification in
accordance with an MB Sheet number (e.g.
MB 229.5). They have not necessarily been
approved by Mercedes-Benz. Fuel
Important safety notes G
WARNING
Fuel is highly flammable. If you handle fuel
incorrectly, there is a risk of fire and
explosion.
You must avoid fire, open flames, creating
sparks and smoking. Switch off the engine
and, if applicable, the auxiliary heating before
refueling. G
WARNING
Fuel is poisonous and hazardous to health.
There is a risk of injury.
You must make sure that fuel does not come
into contact with your skin, eyes or clothing
and that it is not swallowed. Do not inhale fuel
vapors. Keep fuel away from children.
If you or others come into contact with fuel,
observe the following:
R Wash away fuel from skin immediately
using soap and water.
R If fuel comes into contact with your eyes,
immediately rinse them thoroughly with
clean water. Seek medical assistance
without delay.
R If fuel is swallowed, seek medical
assistance without delay.Don ot induce
vomiting.
R Immediately change out of clothing which
has come into contact with fuel. 444
Service products and filling capacitiesTechnical data
Page 448 of 462
Additives
!
Operating the engine with fuel additives
added later can lead to engine failure. Do
no tm ix fuel additives with fuel. This does
not include additives for the removal and
prevention of residue buildup. gasoline
must only be mixed with additives
recommended by Mercedes-Benz. Comply
with the instructions for use on the product
label. More information about
recommended additives can be obtained
fro ma ny authorized Mercedes-Benz
Center.
Mercedes-Benz recommends tha tyou use
fuel brands that have the additives.
The quality of the fuel available in some
countries may not be sufficient .Residue
could build up as a result. In such cases, and
in consultation with an authorized Mercedes-
BenzC enter, the gasoline may be mixed with
the cleaning additive recommended by
Mercedes-Benz (part no. A000989254512).
You must observe the notes and mixing ratios
specified on the container.
Diesel Fuel grade
G
WARNING
If you mix diesel fuel with gasoline, the flash
point is lower than that of pure diesel fuel.
When the engine is running, exhaust system
components could overheat without being
noticed. There is a risk of fire.
Never refuel with gasoline. Never mix gasoline
with diesel fuel.
! Only use commercially available vehicular
ULTRA-LOW SULFUR DIESEL FUEL (ULSD,
15 ppm maximum sulfur content) that
meets the ASTM D975 standard. If you do
not refuel with ULSD ,you may damage the
BlueTEC exhaust gas aftertreatment
system of the vehicle.
! Do not use gasoline to refuel vehicles with
a diesel engine. Do not mix diesel fuel with gasoline, kerosene or paraffin. This may
otherwise result in damage to the fuel
system and engine.
You will usually find information about the fuel
grade on the pump. If you cannot find the
label on the pump, ask the staff for
assistance.
i For further information, consult a
qualified specialist workshop or on the
Internet at http://www.mbusa.com (USA
only).
Information on refueling (Y page 174).
Bio-diesel -FAME (fatt yacid methyl ester)
Mercedes-Ben zUSA approves the use of bio-
diesel B5 for all BlueTEC diesel engines. The
concentration of bio-diesel in the ULSD may
not exceed 5% by volume.
Pure bio-diesel and diesel fuel with a higher
percentage of bio-diesel, such as B20, can
damage the engine and the fuel system. For
this reason, they are not approved.
For more information, consult the gas station
staff. The bio-diesel B5 label on the gasoline
pump mus tclearly state that the standard for
ULS Dhas been fulfilled. If the label is not
clear, do no trefuel the vehicle.
Do not refuel your vehicle with fuels unless
they have been approved by Mercedes-Benz.
Information on refueling (Y page 174).
Low outside temperatures
i Diesel fuel with improved cold flow
properties is available during the winter
months. Further information about fuel
properties can be obtained from oil
companies, e.g. at gas stations.
Flow improver
To improve the low-temperature resistance of
diesel fuel, a flow improver can be attached.
The effectiveness of a flow improver is not
guaranteed for every fuel.
Only use flow improvers tested and approved
by Mercedes-Benz. Durin guse, please
observe the information on operation. 446
Service products and filling capacitiesTechnical data