warning lights MERCEDES-BENZ M-Class 2014 W166 Owner's Guide
[x] Cancel search | Manufacturer: MERCEDES-BENZ, Model Year: 2014, Model line: M-Class, Model: MERCEDES-BENZ M-Class 2014 W166Pages: 462, PDF Size: 6.23 MB
Page 135 of 462

!
Intermittent wiping with rain sensor: due
to optical influences and the windshield
becoming dirty in dry weather conditions,
the windshield wipers may be activated
inadvertently. This could then damage the
windshield wiper blades or scratch the
windshield.
For this reason, you should always switch
off the windshield wipers in dry weather. Combination switch
0005
0008 Windshield wiper off
0006 0001 Intermittent wipe, low (rain sensor
set to low sensitivity)
0007 0002 Intermittent wipe, high (rain sensor
set to high sensitivity)
000C 0018 Continuous wipe, slow
000D 0012 Continuous wipe, fast
0021 0007 Single wipe
0014 0008 To wipe with washer fluid
X Switch on the ignition.
X Turn the combination switch to the
corresponding position.
In the 0001or0002 position, the appropriate
wiping frequency is set automatically
according to the intensity of the rain. In
the 0002 position, the rain sensor is more
sensitive than in the 0001position, causing
the windshield wipers to wipe more
frequently.
If the wiper blades are worn, the windshield
will no longer be wiped properly.T his could
prevent you from observing the traffic
conditions. Replace the wiper blades twice a
year, ideally in spring and fall. Switching the rear window wiper on/
off
Combination switch
0002
0001 Rear window wiper switch
0006 0005 To wipe with washer fluid
0007 ITo switch on intermittent wiping
000C 0To switch off intermittent wiping
000D 000E To wipe with washer fluid
X Turn the SmartKey to position 1or 2in the
ignition lock (Y page 157).
X Turn switch 0002on the combination switch
to the corresponding position.
When the rear window wiper is switched on,
the icon appears in the instrumentc luster. Replacing the wiper blades
Important safety notes G
WARNING
If the windshield wipers begin to move while
you are changing the wiper blades, you could
be trapped by the wiper arm. There is a risk
of injury.
Always switch off the windshield wipers and
ignition before changing the wiper blades.
! Neve ropen the hood/tailgate if a wiper
arm has been folded away from the
windshield/rear window.
Never fold a windshield wiper arm without
a wiper blade back onto the windshield/
rear window. Windshield wipers
133Lights and windshield wipers Z
Page 154 of 462

It is possible to make use of the residual heat
of the engine to continue heating the
stationary vehicle for up to 30 minutesafter
the engine has been switched off. The heating
time depends on the temperature that has
been set.
X
To activate: press the0003/0005 button.
The indicator lamp in the 0003/0005
button lights up.
i The blower will run at a low speed
regardless of the airflow setting.
i If you activate the residual heat function
at high temperatures, only the ventilation
will be activated. The blower runs at
mediums peed.
X To deactivate: press the0003/0005
button.
The indicator lamp in the 0003/0005
button goes out.
Residual heat is deactivated automatically:
R after approximately 30 minutes
R when the ignition is switched on
R if the battery voltage drops Setting the air vents
Important safety notes
G
WARNING
Very hot or very cold air can flow from the air
vents. This could result in burns or frostbite in
the immediate vicinity of the air vents. There
is a risk of injury. Make sure that all vehicle occupants always
maintain a sufficient distance to the air
outlets. If necessary, redirec
tthe airflow to
another area of the vehicle interior.
In order to ensure the direct flow of fresh air
through the air vents into the vehicle interior,
please observe the following notes:
R keep the air inlet grille on the hood and in
the engine compartment on the front-
passenger side free of blockages, such as
ice, snow or leaves.
R never cover the air vents or air intake grilles
in the vehicle interior.
i For virtually draft-free ventilation, adjust
the sliders of the air vents to the center
position. Setting the center air vents
0002
Center air vent, left
0003 Center air vent, right
0023 Center vent thumbwheel, right
0022 Center vent thumbwheel, left
X To open/close: turn thumbwheels 0023
and 0022to the right or left. 152
Setting the air ventsClimate control
Page 159 of 462

G
WARNING
If you switch off the ignitio nwhile driving,
safety-relevant functions are only available
with limitations, or not at all. This could affect,
for example, the power steering and the brake
boosting effect.Y ou will require considerably
more effort to steer and brake. There is a risk
of an accident.
Do not switch off the ignition while driving. G
WARNING
If the parking brake has not been fully
released when driving, the parking brake can:
R overheat and cause a fire
R lose its hold function.
There is a risk of fire and an accident .Release
the parking brake fully before driving off.
! Warm up the engine quickly. Do not use
the engine's full performance until it has
reached operating temperature.
Only shift the automatic transmission to
the desired drive position when the vehicle
is stationary.
Where possible, avoid spinning the drive
wheels when pulling away on slippery
roads. You could otherwise damage the
drive train.
! AMG vehicles: at low engine oil
temperatures below 68 ‡(+20 †), the
maximu mengine speed is restricted in
order to protect the engine .To protec tthe
engine and maintain smooth engine
operation, avoid driving at full throttle when
the engine is cold. Key positions
SmartKey 000E
To remove the SmartKey
0005 Power supply for some consumers, such
as the windshield wipers
0006 Ignition (power supply for all consumers)
and drive position
0007 To start the engine
As soon as the ignition is switched on, all the
indicator lamps in the instrumentc luster light
up. If an indicator lamp does not go out after
starting the engine or lights up while driving,
see (Y page 318).
If the SmartKey is in position 0in the ignition
lock for an extended period of time, it can no
longer be turned in the ignition lock .The
steering is then locked. To unlock, remove the
SmartKey and reinsert it into the ignition lock.
The steering is locked when you remove the
SmartKey from the ignition lock.
X Remove the SmartKey when the engine is
switched off.
The starter battery could otherwise be
discharged.
If you cannot turn the SmartKey in the ignition
lock, the starter battery may not be charged
sufficiently.
X Check the starter battery and recharge if
necessary (Y page 388).
or
X Jump-start the vehicle (Y page 389). Driving
157Driving and parking Z
Page 162 of 462

(Y
page 157) and release it as soon as the
engine is running.
X To start adiesel engine: turn the
SmartKey to position 2in the ignition lock
(Y page 157).
The 000F preglow indicator lamp in the
instrumen tcluster lights up.
X When the 000Fpreglow indicator lamp
goes out, tur nthe SmartKey to position
3(Y page 157) and release it as soon as the
engine is running.
i You can start the engine without preglow
if the engine is warm.
Using KEYLESS-GO to startt he engineX
Depress the brake pedal and keep it
depressed.
X To start agasoline engine: press the
Start/Stop button (Y page 158) once.
The engine starts.
X To start adiesel engine: press the Start/
Stop button (Y page 158) once.
Preglow is activated and the engine starts.
i The Start/Stop button can be used to
star tthe vehicle without inserting the
SmartKey into the ignition lock. The Start/
Stop button must be inserted in the ignition
lock and the SmartKey must be in the
vehicle. This mode for starting the engine
operates independently of the ECO start/
stop automatic engine start function. Pulling away
Automatic transmission G
WARNING
If the engine speed is above the idling speed
and you engage transmission position Dor
R, the vehicle could pull away suddenly. There
is a risk of an accident.
When engaging transmission position Dor R,
always firmly depress the brake pedal and do
not simultaneously accelerate. X
Depress the brake pedal and keep it
depressed.
X Shift the transmission to position Dor
R(Y page 165).
X Release the brake pedal.
X Carefully depress the accelerator pedal.
The electric parking brake (Y page 180) is
automatically released.
The red 0007(USA only) or 000C(Canada
only) indicator lamp in the instrument
cluster goes out.
i It is only possible to shift the transmission
from position Pto the desired position if
you depress the brake pedal. Only then is
the parking lock released. If you do not
depress the brake pedal, you can move the
DIRECT SELECT lever but the parking lock
remains engaged.
i The vehicle locks centrally once you have
pulled away.T he locking knobs in the doors
drop down.
You can open the doors from the inside at
any time.
You can also deactivate the automatic
locking feature (Y page 276).
i Upshifts take place at higher engine
speeds after a cold start. This helps the
catalytic converter to reach its operating
temperature more quickly.
Pulling away with a trailer 160
DrivingDriving and parking
Page 182 of 462

Switching off the engine
Important safety notes G
WARNING
The automatic transmission switches to
neutral position Nwhen you switch off the
engine. The vehicle may roll away.T here is a
risk of an accident.
After switching off the engine, always switch
to parking position P. Prevent the parked
vehicle from rolling away by applying the
parking brake.
Using the SmartKey X
Apply the electric parking brake.
X Shift the transmission to position P.
X Turn the SmartKey to position 0in the
ignition lock and remove it.
The immobilizer is activated.
i If you turn off the engine with the
SmartKey and then remove it from the
ignition lock or open a front door, the
automatic transmission shifts to P
automatically.
Using KEYLESS-GO X
Apply the electric parking brake.
X Shift the transmission to position P.
X Press the Start/Stop button (Y page 158).
The engine stops and all the indicator
lamps in the instrumentc luster go out.
i If you use the Start/Stop button to switch
off the engine, the automatic transmission
shifts to Nautomatically. If you the nopen
one of the fron tdoors, the automatic
transmission shifts to P.
i In the event of an emergency, the engine
can be turned off while the vehicle is in
motion by pressing and holding the Start/
Stop button for three seconds. Electric parking brake
General notes G
WARNING
If you leave children unsupervised in the
vehicle, they could set it in motion by, for
example:
R releasing the parking brake
R shifting the automatic transmission out of
the parking position P
R starting the engine.
They could also operate the vehicle's
equipment. There is a risk of an accident and
injury.
When leaving the vehicle, always take the
SmartKey with you and lock the vehicle. Never
leave children unsupervised in the vehicle.
i The electric parking brake performs a
function test at regular intervals while the
engine is switched off. The sounds that can
be heard while this is occurring are normal.
Applying/releasing manually X
To engage: push handle 0002.
When the electric parking brake is
engaged, the 0007(USA only) or 000C
(Canada only) red indicator lamp lights up
in the instrument cluster.
i The electric parking brake can also be
applied when the SmartKey is removed. 180
ParkingDriving and parking
Page 183 of 462

X
To release: pull handle0002.
The red 0007(USA only) or 000C(Canada
only) indicator lamp in the instrument
cluster goes out.
i The electri cparking brake can only be
released:
R if the SmartKey is in position 1in the
ignition loc kor
R if the ignition was switched on using the
Start/Stop button.
To ensure that you do not roll backwards
when pulling away on an uphill slope, engage
the electric parking brake (Y page 160).
Applying automatically The electric parking brake is applied
automatically:
R
if DISTRONIC PLUS brings the vehicle to a
standstill or
R if the HOL Dfunction is keeping the vehicle
stationary
In addition, at least on eofthe following
conditions must be fulfilled:
R the engine is switched off.
R the driver's door is open and the seat belt
is not fastened.
R the vehicle is stationary for a lengthy
period.
The red 0007(USA only) or 000C(Canada
only) indicator lamp in the instrumentc luster
lights up.
Releasing automatically The electric parking brake is released
automatically when all of the following
conditions are fulfilled:
R the engine is running.
R the transmission is in position Dor R.
R the seat belt has been fastened.
R you depress the accelerator pedal.
If the transmission is in position R, the trunk
lid must be closed. If your seat belt is not fastened, the following
conditions must be fulfilled to automatically
release the electric parking brake:
R
the driver's door is closed.
R you have shifted out of transmission
position Por you have previously driven
faster than 2 mph (3 km/h)
Emergency braking X
While driving, push handle 0002of the electric
parking brake.
The vehicle can also be braked during an
emergency by using the electric parking
brake.
i The vehicle is braked for as long as the
handle of the electric parking brake is
pressed. The longer the electric parking
brake handle is depressed, the greater the
braking force.
During braking:
R a warning tone sounds.
R the Release Park. Brake message
appears
R the red 0007(USA only) or 000C(Canada
only) indicator lamp in the instrument
cluster flashes.
When the vehicle has been braked to a
standstill, the electric parking brake is
engaged. Parking
181Driving and parking Z
Page 187 of 462
R
Brake occasionally to remove any possible
salt residue. Make sure that you do not
endanger othe rroad users when doing so.
R Carefully depress the brake pedal and the
beginning and end of a journey.
R Maintain a greater distance to the vehicle
ahead.
Servicing the brakes !
If the red brake warning lamp lights up in
the instrument cluster and you hear a
warning tone while the engine is running,
the brake fluid level may be too low.
Observe additional warning messages in
the multifunction display.
The brake fluid level may be too low due to
brake pad wear or leaking brake lines.
Have the brake system checked
immediately. This work should be carried
out at a qualified specialist workshop.
! A function or performance test should
only be carried out on a2-axle
dynamometer. If you are planning to have
the vehicle tested on such a dynamometer,
contact an authorized Mercedes-Benz
Center to obtain further information first.
Otherwise, you could damage the drive
train or the brake system.
! Because ESP ®
is an automatic system,
the engine and ignition must be switched
off (SmartKey in position 0or 1or Start/
Stop button in position 0or 1) when the
electri cparking brake is being tested on a
brake dynamomete r(maximum
10 seconds).
Braking triggered automatically by ESP ®
may seriously damage the brake system.
All checks and maintenance work on the
brake system must be carried out at a
qualified specialist workshop .Consult a
qualified specialist workshop to arrange this.
Have brake pads installed and brake fluid
replaced at a qualified specialist workshop. If the brake system has only been subject to
moderate loads, you should test the
functionality of your brakes at regular
intervals. To do so, press firmly on the brake
pedal when driving at a high speed. This
improves the grip of the brake pads.
You can find a description of Brake Assist
(BAS) on (Y
page 67) or of BAS PLUS on
(Y page 68).
Mercedes-Benz recommends that you only
have brake pads/linings installed on your
vehicle which have been approved for
Mercedes-Benz vehicles or which correspond
to an equivalent quality standard. Brake
pads/linings which have not been approved
for Mercedes-Benz vehicles or which are not
of an equivalent quality could affect your
vehicle's operating safety.
Mercedes-Benz recommends that you only
use brake fluid that has been specially
approved for your vehicle by Mercedes-Benz,
or which corresponds to an equivalent quality
standard. Brake fluid which has not been
approved for Mercedes-Benz vehicles or
which is not of an equivalent quality could
affect your vehicle's operating safety.
High-performance brake system for
AMG vehicles The high-performance brake system is
installed only on the ML 63 AMG.
The high-performance brake system is
designed for heavy loads. This may lead to
noise when braking. This will depend on:
R
Speed
R Braking force
R Environmental conditions, such as
temperature and humidity
The wear of individual components of the
brake system, such as the brake pads/linings
or brake discs, depends on the individual
driving style and operating conditions.
For this reason, it is impossible to state a
mileage that will be valid under all
circumstances. An aggressive driving style Driving tips
185Driving and parking Z
Page 191 of 462
R
Do not jump with the vehicle as this will
interrupt the vehicle's propulsion.
R Always keep the engine running and in gear
when driving on a slope.
R Do not shift the automatic transmission to
transmission position N.
i Do not use the HOLD function when
driving off-road, on steep uphill or downhill
gradients or on slippery or loose surfaces.
The HOLD functio ncannot hold the vehicle
on such surfaces.
Checklist before driving off-road !
If the engine oil warning lamp lights up
while the vehicle is in motion, stop the
vehicle in a safe place as soon as possible.
Chec kthe engine oil level. The engine oil
warning lamp warning must not be ignored.
Continuing the journey while the symbol is
displayed could lead to engine damage.
X Engine oil level: check the engine oil level
and add oil if necessary.
When driving on steep gradients, the
engine oil level must be sufficiently high to
ensure a correct oil supply in the vehicle.
X DEF tank (BlueTEC vehicles): check the
level and top up if necessary (Y page 177).
X Tire-changing tool kit: check that the jack
is working and make sure you have the lug
wrench, a robust tow cable and a folding
spade in the vehicle.
X Wheels and tires: check the tire tread
depth and tire pressure.
X Check for damage and remove any foreign
objects, e.g. small stones, from the
wheels/tires.
X Replace any missing valve caps.
X Replace dented or damaged wheels.
X Rims: dented or bent rims can result in a
loss of tire pressure and damage the tire
bead. Therefore, check your rims before
driving off-road and replace them as
required. Checklist after driving off-road !
If you detect damage to the vehicle after
driving off-road, have the vehicle checked
immediately at a qualified specialist
workshop.
X Deactivate DSR (Y page 246).
X Vehicles with the AIRMATIC package:
lower the vehicle to a ride height suitable
for the road conditions, e.g. to the
highway/high-speed level.
X Cleant he headlamps and rear lights and
check for damage.
X Cleant he front and rear license plates.
X Cleant he wheels/tires with a water jet and
remove any foreign objects.
X Cleant he wheels, wheel housings and the
vehicle underside with a water jet; check
for any foreign objects and damage.
X Check whether twigs or other parts of
plants have become trapped. These
increase the risk of fire and can damage
fuel pipes, brake hoses or the rubber
bellows of the axle joints and propeller
shafts.
X After the trip, examine without fail the
entire undercarriage, wheels, tires, brakes,
bodywork structure, steering, chassis and
exhaust system for damage.
X After driving for extended periods across
sand, mud, gravel, water or in similarly dirty
conditions, have the brake discs, wheels,
brake pads/linings and axle joints checked
and cleaned.
X If you detect strong vibrations after off-road
travel, check for foreign objects in the
wheels and drive train and remove them if
necessary. Foreign objects can disturb the
balance and cause vibrations.
Driving over rough terrain places greater
demands on your vehicle than driving on
normal roads. After driving off-road, check
the vehicle. This allows you to detect damage
promptly and reduce the risk of an accident
to yourself and other road users. Driving tips
189Driving and parking Z
Page 207 of 462
Only select an off-road level when this is
appropriate for road conditions. Otherwise,
fuel consumption increases and handling may
be affected.
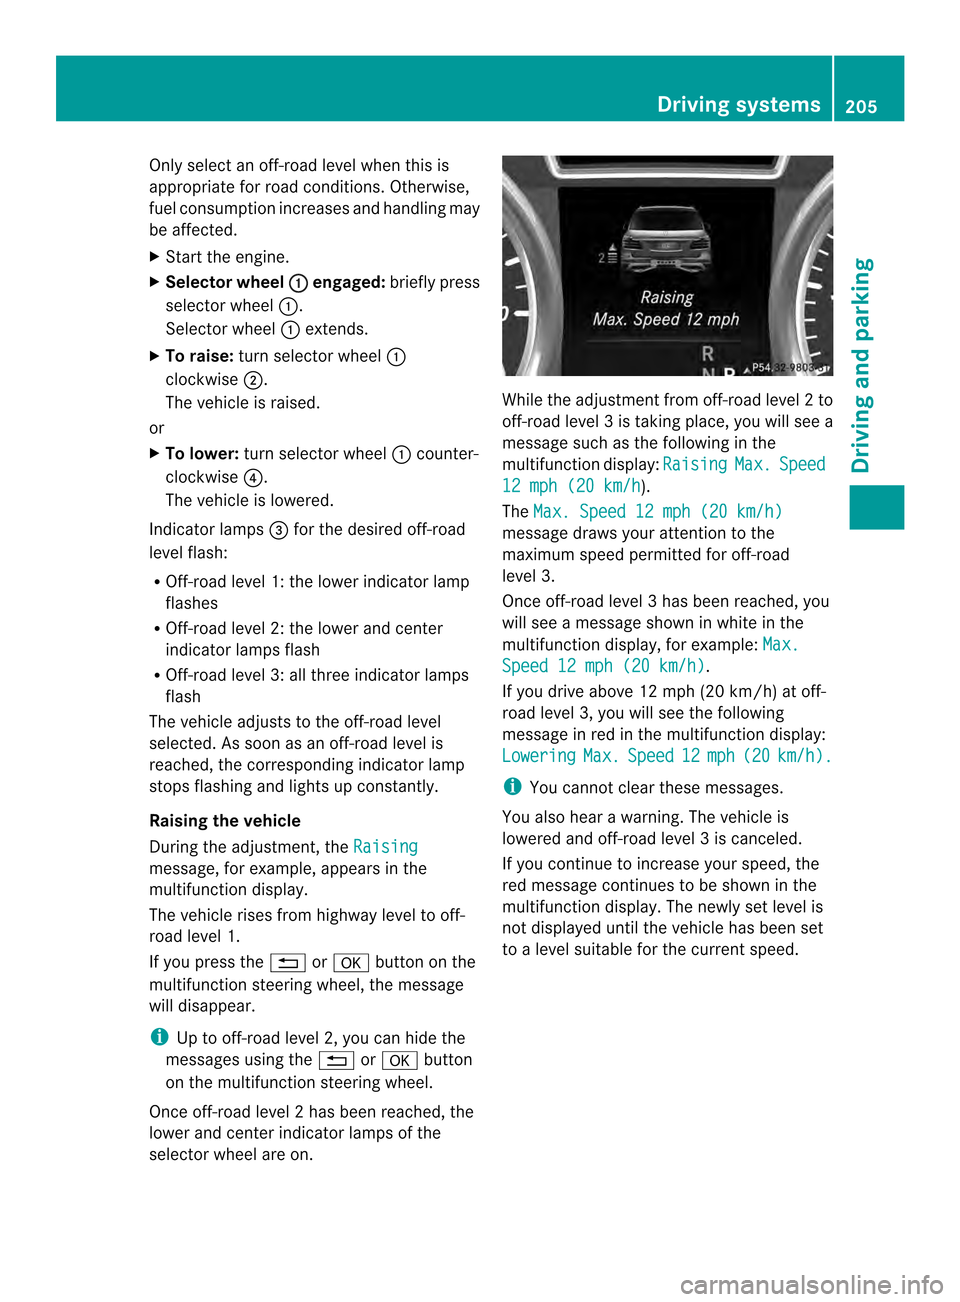
X Start the engine.
X Selector wheel 0002 engaged:
briefly press
selector wheel 0002.
Selector wheel 0002extends.
X To raise: turn selector wheel 0002
clockwise 0003.
The vehicle is raised.
or
X To lower: turn selector wheel 0002counter-
clockwise 0022.
The vehicle is lowered.
Indicator lamps 0023for the desired off-road
level flash:
R Off-road level 1: the lower indicator lamp
flashes
R Off-road level 2: the lower and center
indicator lamps flash
R Off-road level 3: all three indicator lamps
flash
The vehicle adjusts to the off-road level
selected. As soon as an off-road level is
reached, the corresponding indicator lamp
stops flashing and lights up constantly.
Raising the vehicle
During the adjustment, the Raisingmessage, for example, appears in the
multifunction display.
The vehicle rises from highwayl
evel to off-
road level 1.
If you press the 0007or000B button on the
multifunction steering wheel, the message
will disappear.
i Up to off-road level 2, you can hide the
messages using the 0007or000B button
on the multifunction steering wheel.
Once off-road level 2has been reached, the
lower and cente rindicato rlamps of the
selecto rwheel are on. While the adjustment from off-road level
2to
off-road level 3is taking place, you will see a
message such as the following in the
multifunction display: Raising Max. Speed
12 mph (20 km/h ).
The Max. Speed 12 mph (20 km/h) message draws your attention to the
maximum speed permitted for off-road
level 3.
Once off-road level
3has been reached, you
will see a message shown in white in the
multifunction display, for example: Max. Speed 12 mph (20 km/h) .
If you drive abov e12 mph (20 km/h) at off-
road level 3, you will see the following
message in red in the multifunctio ndisplay:
Lowering Max. Speed 12 mph (20 km/h ).
i
You cannot clear these messages.
You also hear a warning. The vehicle is
lowered and off-road level 3is canceled.
If you continue to increase your speed, the
red message continues to be shown in the
multifunction display. The newly set level is
not displayed until the vehicle has been set
to a level suitable for the current speed. Driving systems
205Driving and parking Z
Page 217 of 462

yellow segments showing operational
readiness 0023ligh tup.
The selected transmission position and the
direction in which the vehicle is rolling
determine which warning display is active
when the engine is running. Transmission
position Warning display
D
Front area activated
R,
Nor the vehicle
is rolling
backwards Rear and front areas
activated
P
No areas activated
One or more segments light up as the vehicle
approaches an obstacle, dependin gonthe
vehicle's distance from the obstacle.
From the:
R sixth segment onwards, you will hear an
intermittent warning tone for
approximately two seconds.
R seventh segment onwards, you will hear a
warning tone for approximately two
seconds. This indicates that you have now
reached the minimum distance.
Deactivating/activating PARKTRONIC 0002
Indicator lamp
0003 Deactivating/activating PARKTRONIC
If indicator lamp 0002lights up, PARKTRONIC is
deactivated. Active Park Assist is then also
deactivated. i
PARKTRONIC is automatically activated
when you turn the SmartKey to position 2
in the ignition lock.
Towing atrailer !
Fold in the ball coupling if the trailer tow
hitch is not required .PARKTRONIC
measures the minimu mdetection range to
an obstacle from the bumper, not the ball
coupling.
PARKTRONIC is deactivated for the rear area
when you establish an electrical connection
between your vehicle and a trailer. Driving systems
215Driving and parking Z