tow bar MERCEDES-BENZ M-Class 2014 W166 Owner's Manual
[x] Cancel search | Manufacturer: MERCEDES-BENZ, Model Year: 2014, Model line: M-Class, Model: MERCEDES-BENZ M-Class 2014 W166Pages: 462, PDF Size: 6.23 MB
Page 22 of 462
Direction of rotatio
n...................... 422
Display message ............................ 310
Distributio nofthe vehicle
occupants (definition) ....................421
DOT, Tire Identification Number
(TIN) .............................................. .418
DOT (Department of
Transportation) (definition) ............419
GAWR (Gross Axle Weight Rating)
(definition) ..................................... 419
GTW (Gross Trailer Weight)
(definition) ..................................... 419
GVW (Gross Vehicle Weight)
(definition) ..................................... 419
GVWR (Gross Vehicle Weight
Rating) (definition) .........................419
Important safety notes ..................398
Increased vehicle weight due to
optional equipment (definition) ......419
Kilopascal (kPa) (definition) ...........419
Labeling (overview )........................ 415
Load bearing index (definition) ......420
Load index ..................................... 417
Load index (definition) ...................420
M+S tires ....................................... 400
Maximum loaded vehicle weight
(definition) ..................................... 419
Maximum load on a tire (definition) 420
Maximum permissible tire
pressure (definition) ....................... 420
Maximum tire loa d......................... 417
Maximum tire load (definition) .......420
MOExtended tires ..........................400
Optional equipment weight
(definition) ..................................... 420
PSI (pounds per square inch)
(definition) ..................................... 420
Replacing ....................................... 421
Service life ..................................... 400
Sidewall (definition) .......................420
Speed rating (definition) ................419
Storing ........................................... 422
Structure and characteristics
(definition) ..................................... 418
Temperature .................................. 414
TIN (Tire Identification Number)
(definition) ..................................... 420
Tire bea d(definition) ...................... 420Tire pressure (definition)
................420
Tire pressures (recommended )...... 419
Tire size (data) ............................... 426
Tire size designation, load-bearing
capacity, speed rating .................... 415
Tire tread ....................................... 399
Tire tread (definition) .....................420
Total load limit (definition) .............421
Traction ......................................... 414
Traction (definition) .......................421
Trea dwear ..................................... 414
TWR (permissible trailer drawbar
noseweight) (definition) .................421
Uniform Tire Quality Grading
Standard s...................................... 413
Uniform Tire Quality Grading
Standard s(definition) .................... 419
Unladen weight (definition) ............420
Wea rindicato r(definition) .............421
Whee lrim (definition ).................... 419
see Flat tire
Tool
see Vehicle tool kit
Top Tether ............................................ 64
Towing Important safety guidelines ...........391
Installing the towing eye ................392
Removing the towing eye. ..............393
With the rear axle raised ................393
Towing atrailer
Activ eParking Assist ..................... 220
Axle load, permissible ....................456
Cleaning the trailer tow hitch ......... 374
Coupling up atrailer ...................... 256
Decoupling atrailer ....................... 258
Driving tips .................................... 253
ESP ®
(Electronic Stability Program) .73
Important safety notes ..................253
Installing the ball coupling .............255
Mounting dimensions ....................455
Power supply ................................. 259
Pulling away with a trailer ..............160
Removing the ball coupling ............259
Storing the ball coupling ................259
Trailer drive program .....................245
Trailer loads ................................... 456
Towing away
With both axles on the ground .......393 20
Index
Page 23 of 462
Tow-starting
Emergency engine starting ............394
Important safety notes ..................391
Trailer coupling
see Towing atrailer
Trailer loads and drawbar
noseweights ...................................... 259
Trailer towing Active Blind Spot Assist .................240
Active Lane Keeping Assist ............243
Blind Spot Assist ............................ 235
PARKTRONI C................................. 215
Permissible trailer loads and
drawba rnoseweights ..................... 259
Transfer case ..................................... 173
Transmission see Automatic transmission
Transmission position display .........165
Transmission position display
(DIRECT SELECTl ever)...................... 165
Transporting the vehicle ..................393
Traveling uphill Brow of hill ..................................... 191
Driving downhill ............................. 191
Maximum gradient-climbing
capability ....................................... 191
Trim pieces (cleaning instructions) .376
Trip computer (on-board computer) 266
Trip odometer Calling up ....................................... 266
Resetting (on-board computer) ......267
Trunk
see Tailgate
Turn signals
Display message ............................ 295
Switching on/off ........................... 123
TWR (Tongue Weight Rating)
(definition) ......................................... 421
Type identification plate see Vehicle identification plate U
Unlocking Emergency unlocking .......................88
From inside the vehicle (central
unlocking button) ............................. 87 V
Vanity mirror (in the sun visor) ........345
Vehicle Correct use ...................................... 28
Data acquisition ............................... 29
Display message ............................ 312
Equipment ....................................... 24
Individua lsettings .......................... 274
Limited Warranty ............................. 29
Loading .......................................... 409
Locking (in an emergency) ...............88
Locking (SmartKey) .......................... 80
Lowering ........................................ 426
Maintenance .................................... 25
Parking for a long period ................ 182
Pulling away ................................... 160
Raising ........................................... 423
Reporting problems .........................28
Securing from rolling away ............422
Towing away .................................. 391
Transporting .................................. 393
Unlocking (in an emergency) ...........88
Unlocking (SmartKey) ......................80
Vehicle data ................................... 452
Vehicle battery
see Battery (vehicle)
Vehicle data ....................................... 452
Vehicle data (off-road driving) Approach/departure angl e............ 454
Fording depth ................................ 454
Maximum gradient climbing ability 455
Vehicle dimensions ...........................452
Vehicle emergency locking ................88
Vehicle identification number see VIN
Vehicle identification plate ..............442
Vehicle level AMG adaptive sport suspension
system ........................................... 212
Vehicle level (display message) .......302
Vehicle tool kit .................................. 380
Video Operating the DVD ......................... 270
VIN ...................................................... 442 Index
21
Page 223 of 462
parking. When maneuvering or parking, make
sure that there are no persons, animals or
objects in the area in which you are
maneuvering.
Under the following circumstances, the rear
view camera will not function, or will function
in a limited manner:
R the tailgate is open
R in heavy rain, snow or fog
R at night or in very dark places
R if the camera is exposed to very bright light
R if the area is lit by fluorescent light or LED
lighting (the display may flicker)
R if there is a sudden change in temperature,
e.g. when driving into a heated garage in
winter
R if the camera lens is dirty or obstructed
R if the rear of your vehicle is damaged. In
this event, have the camera position and
setting checked at a qualified specialist
workshop
Activating/deactivating the rear view
camera X
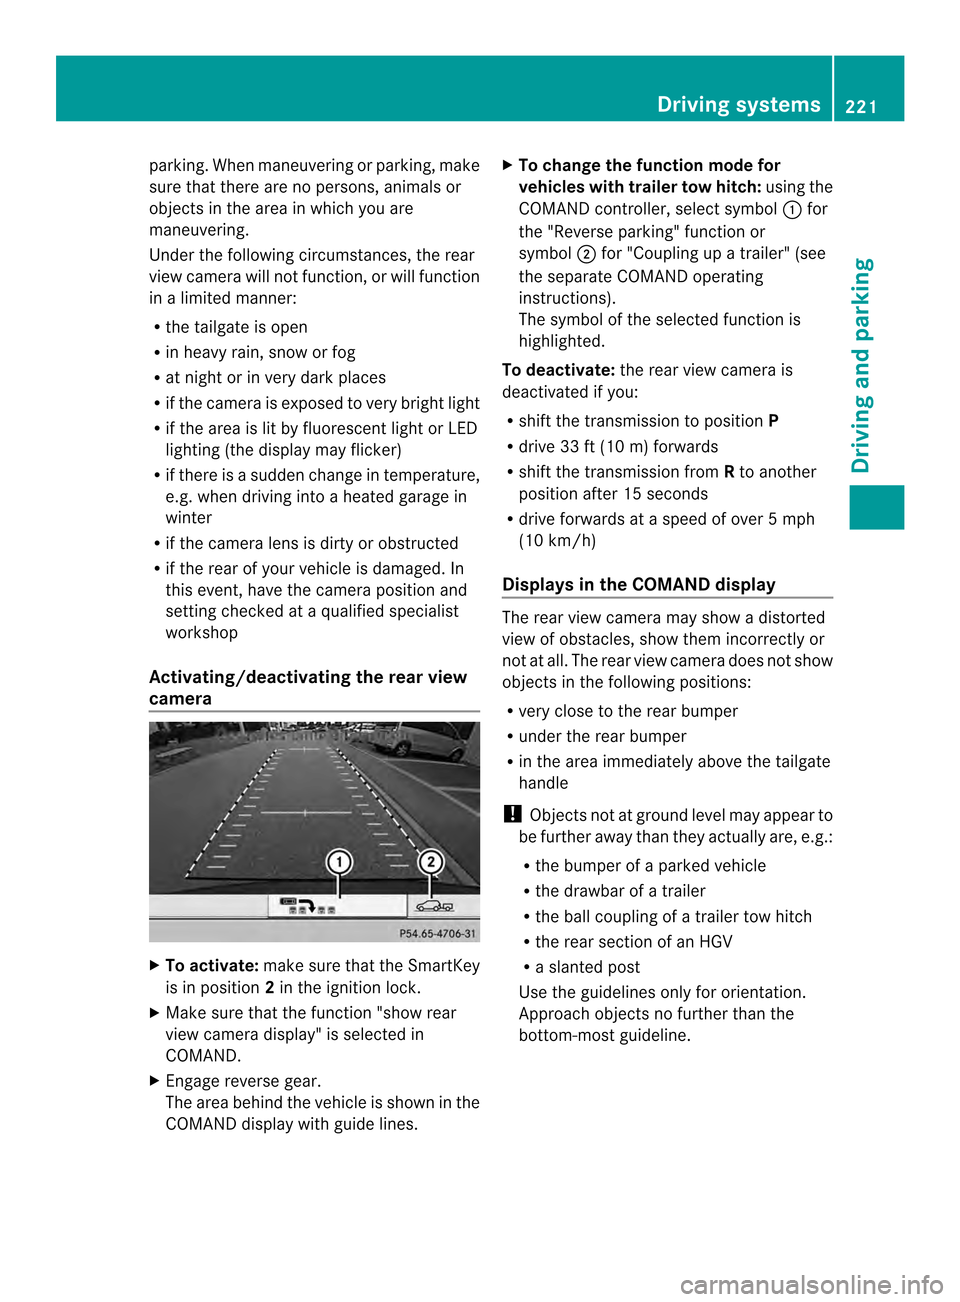
To activate: make sure that the SmartKey
is in position 2in the ignition lock.
X Make sure that the function "show rear
view camera display" is selected in
COMAND.
X Engage reverse gear.
The area behind the vehicle is shown in the
COMAND display with guide lines. X
To change the function mode for
vehicles with trailer tow hitch: using the
COMAND controller, select symbol 0002for
the "Reverse parking" function or
symbol 0003for "Coupling up a trailer" (see
the separate COMAND operating
instructions).
The symbol of the selected function is
highlighted.
To deactivate: the rear view camera is
deactivated if you:
R shift the transmission to position P
R drive 33 ft (10 m) forwards
R shift the transmission from Rto another
position after 15 seconds
R drive forwards at a speed of over 5mph
(10 km/h)
Displays in the COMAND display The rear view camera may show a distorted
view of obstacles, show them incorrectly or
not at all. The rear view camera does not show
objects in the following positions:
R
very close to the rear bumper
R under the rear bumper
R in the area immediately above the tailgate
handle
! Objects not at ground level may appear to
be further away than they actually are, e.g.:
R the bumper of a parked vehicle
R the drawbar of a trailer
R the ball coupling of a trailer tow hitch
R the rear section of an HGV
R a slanted post
Use the guidelines only for orientation.
Approach objects no further than the
bottom-most guideline. Driving systems
221Driving and parking Z
Page 226 of 462
0002
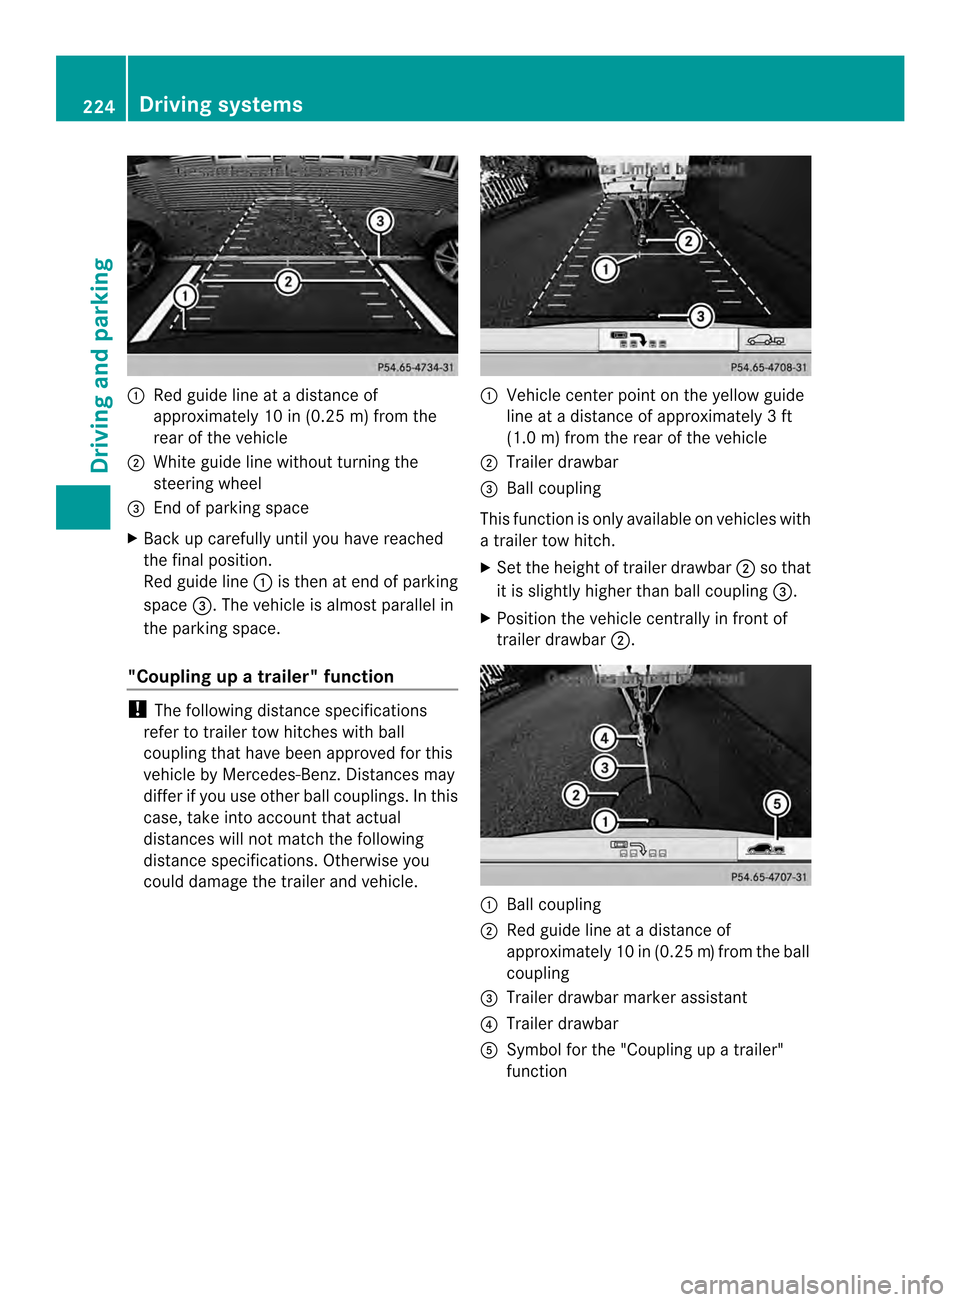
Red guide line at a distanc eof
approximately 10 in (0.25 m) from the
rear of the vehicle
0003 White guide line without turning the
steering wheel
0023 End of parking space
X Bac kup carefully until you have reached
the final position.
Red guide line 0002is then at end of parking
space 0023.The vehicle is almost parallel in
the parking space.
"Coupling up a trailer" function !
The following distance specifications
refer to trailer tow hitches with ball
coupling that have been approved for this
vehicle by Mercedes-Benz. Distances may
differ if you use other ball couplings. In this
case, take into account that actual
distances will not match the following
distance specifications. Otherwise you
could damage the trailer and vehicle. 0002
Vehicle center point on the yellow guide
line at a distance of approximately 3ft
(1.0 m) from the rear of the vehicle
0003 Trailer drawbar
0023 Ball coupling
This function is only available on vehicles with
a trailer tow hitch.
X Set the height of trailer drawbar 0003so that
it is slightly higher than ball coupling 0023.
X Position the vehicle centrally in fron tof
trailer drawbar 0003. 0002
Ball coupling
0003 Red guide line at a distance of
approximately 10 in (0.25 m)from the ball
coupling
0023 Trailer drawbar marker assistant
0022 Trailer drawbar
0020 Symbol for the "Coupling up a trailer"
function 224
Driving systemsDriving and parking
Page 227 of 462
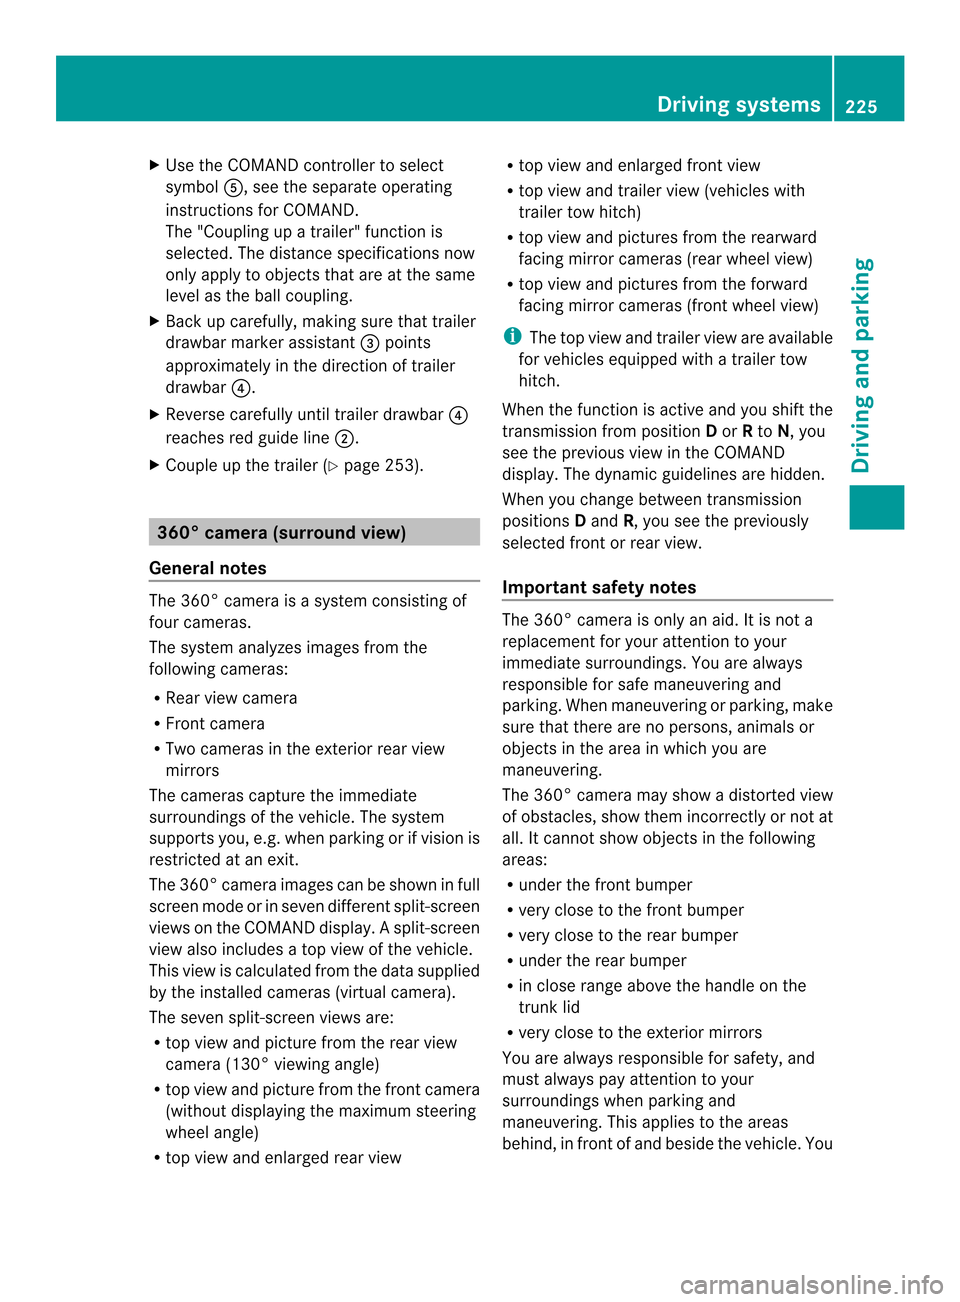
X
Use the COMAND controller to select
symbol 0020, see the separate operating
instructions for COMAND.
The "Coupling up a trailer" function is
selected. The distance specifications now
only apply to objects that are at the same
level as the ball coupling.
X Back up carefully, making sure that trailer
drawbarm arker assistant 0023points
approximately in the direction of trailer
drawbar 0022.
X Reverse carefully until trailer drawbar 0022
reaches red guide line 0003.
X Couple up the trailer (Y page 253).360° camera (surround view)
General notes The 360° camera is a system consisting of
four cameras.
The system analyzes images from the
following cameras:
R Rear view camera
R Front camera
R Two cameras in the exterior rear view
mirrors
The cameras capture the immediate
surroundings of the vehicle .The system
supports you, e.g. when parking or if vision is
restricted at an exit.
The 360° camera images can be shown in full
screen mode or in seven different split-screen
views on the COMAND display. Asplit-screen
view also includes a top view of the vehicle.
This view is calculated from the data supplied
by the installed cameras (virtual camera).
The seven split-screen views are:
R top view and picture from the rear view
camera (130 °viewing angle)
R top view and picture fro mthe front camera
(without displaying the maximum steering
wheel angle)
R top view and enlarged rear view R
top view and enlarged front view
R top view and trailer view (vehicles with
trailer tow hitch)
R top view and pictures from the rearward
facing mirror cameras (rear wheel view)
R top view and pictures from the forward
facing mirror cameras (front wheel view)
i The top view and trailer view are available
for vehicles equipped with a trailer tow
hitch.
When the function is active and you shift the
transmission from position Dor Rto N, you
see the previous view in the COMAND
display. The dynamic guidelines are hidden.
When you change between transmission
positions Dand R, you see the previously
selected front or rear view.
Important safety notes The 360° camera is only an aid. It is not a
replacement for your attention to your
immediate surroundings. You are always
responsible for safe maneuvering and
parking. When maneuvering or parking, make
sure that there are no persons, animals or
objects in the area in which you are
maneuvering.
The 360° camera may show a distorted view
of obstacles, show them incorrectly or not at
all. It cannot show objects in the following
areas:
R
under the front bumper
R very close to the front bumper
R very close to the rear bumper
R under the rear bumper
R in close range above the handle on the
trunk lid
R very close to the exterior mirrors
You are always responsible for safety, and
must always pay attention to your
surroundings when parking and
maneuvering. This applies to the areas
behind, in front of and beside the vehicle. You Driving systems
225Driving and parking Z
Page 229 of 462
X
To switc hto full screen mode: select
Full Screen by turning
000E0002000Fthe
COMAND controller and press 000Cto
confirm.
Displays in the COMAND display Important safety notes
!
Objects not at ground level may appear to
be further away than they actually are, e.g.:
R the bumper of a parked vehicle
R the drawbar of a trailer
R the ball coupling of a trailer tow hitch
R the rear section of an HGV
R a slanted post
Use the guidelines only for orientation.
Approach objects no further than the
bottom-mos tguideline.
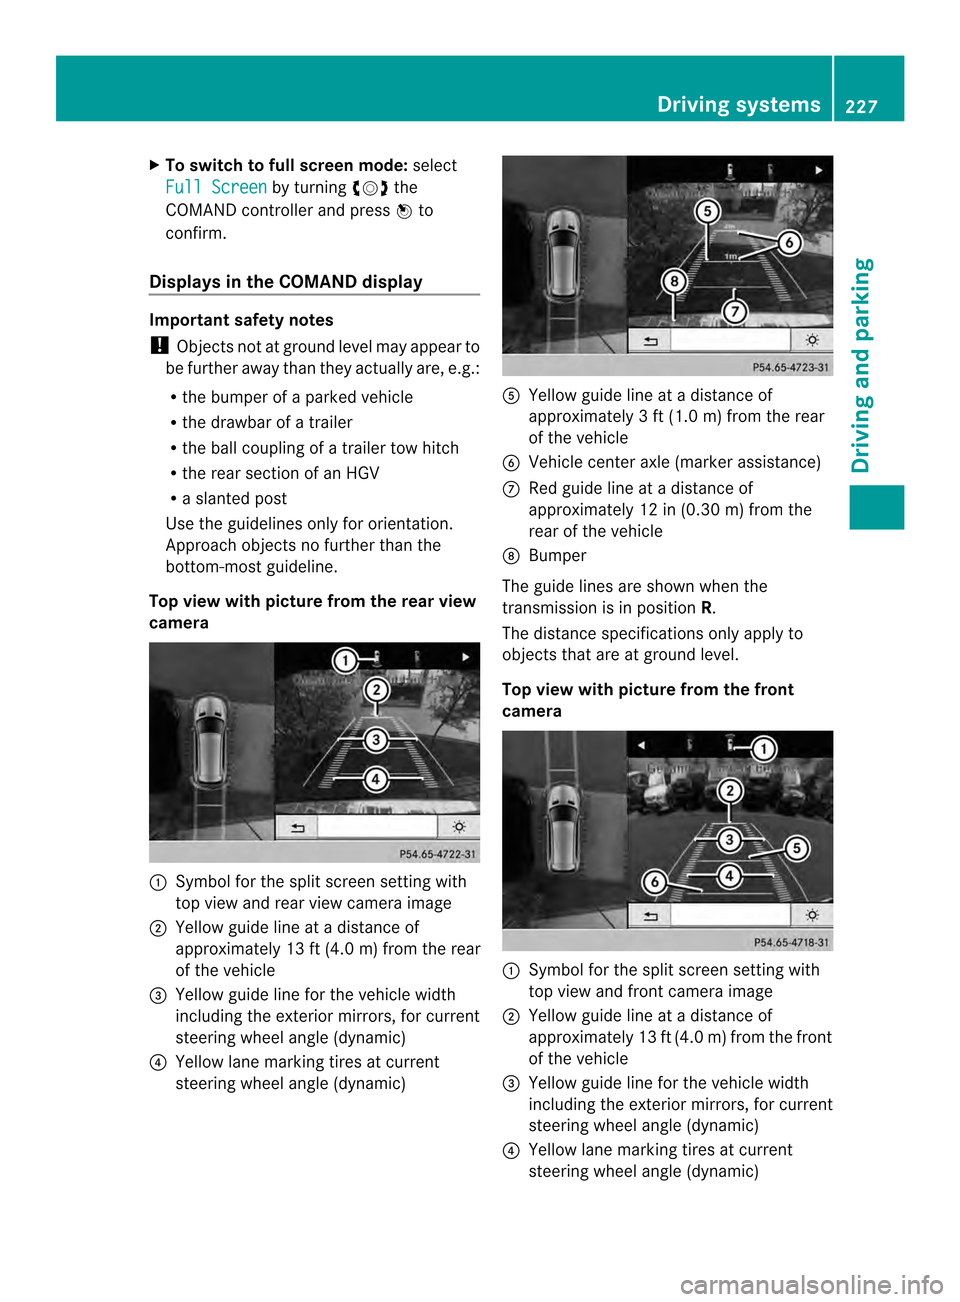
Top view with picture from the rear view
camera 0002
Symbol for the split scree nsetting with
top view and rear view camera image
0003 Yellow guide line at a distance of
approximately 13 ft (4.0 m) from the rear
of the vehicle
0023 Yellow guide line for the vehicle width
including the exterior mirrors, for current
steering wheel angle (dynamic)
0022 Yellow lane marking tires at current
steering wheel angle (dynamic) 0020
Yellow guide line at a distance of
approximately 3 ft (1.0 m) from the rear
of the vehicle
0021 Vehicle center axle (marker assistance)
0014 Red guide line at a distance of
approximately 12 in (0.30 m) from the
rear of the vehicle
0015 Bumper
The guide lines are show nwhen the
transmission is in position R.
The distance specifications only apply to
objects that are at ground level.
Top view with picture from the front
camera 0002
Symbol for the split screen setting with
top view and front camera image
0003 Yellow guide line at a distance of
approximately 13 ft (4.0 m) from the front
of the vehicle
0023 Yellow guide line for the vehicle width
including the exterior mirrors, for current
steering wheel angle (dynamic)
0022 Yellow lane marking tires at current
steering wheel angle (dynamic) Driving systems
227Driving and parking Z
Page 242 of 462
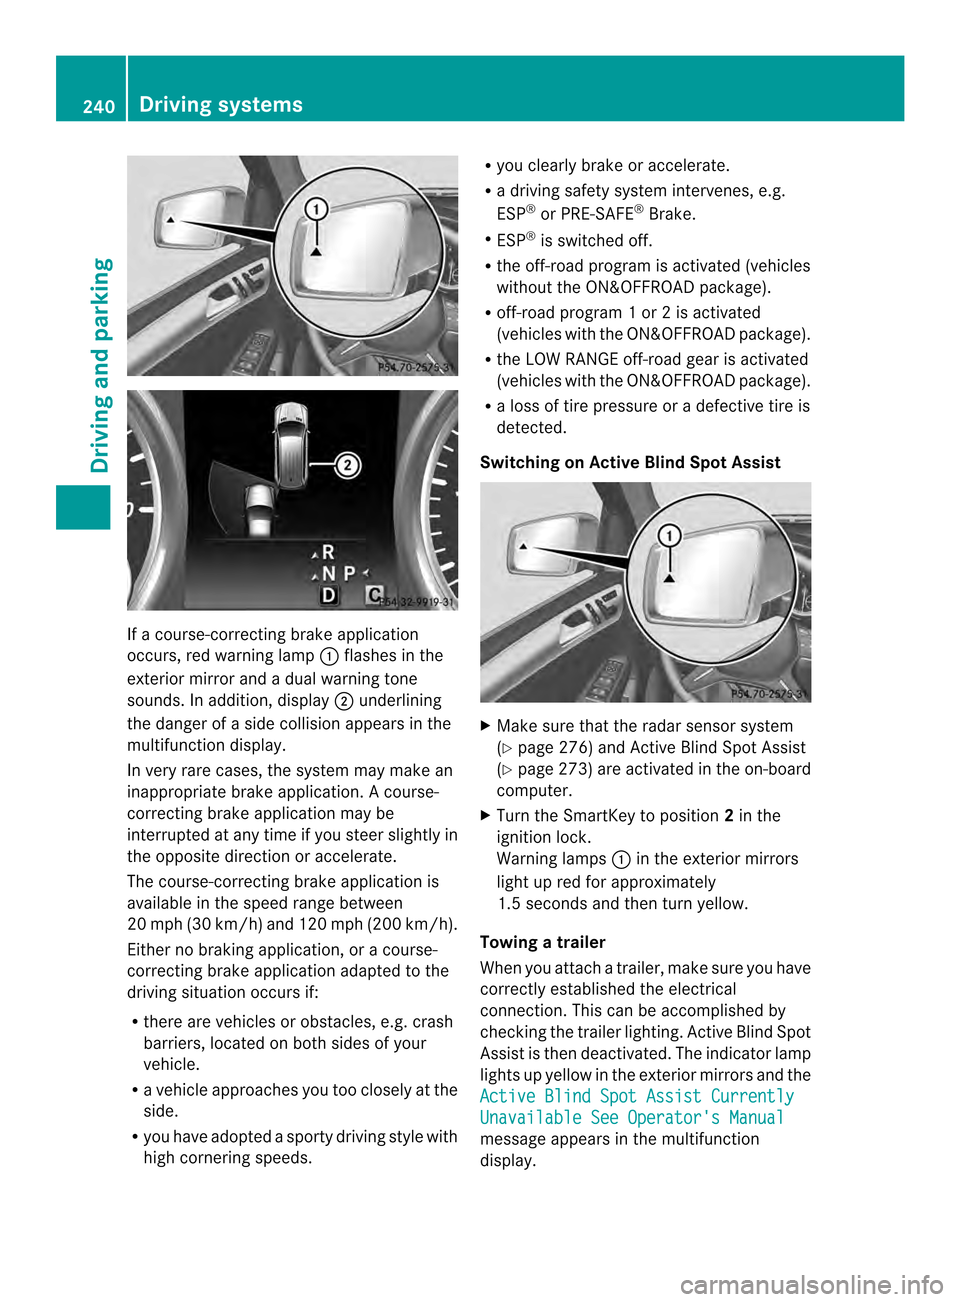
If a course-correcting brake application
occurs, red warning lamp
0002flashes in the
exterior mirror and a dual warning tone
sounds. In addition, display 0003underlining
the danger of a side collision appears in the
multifunction display.
In very rare cases, the system may make an
inappropriate brake application. Acourse-
correcting brake application may be
interrupted at any time if you steer slightly in
the opposite direction or accelerate.
The course-correcting brake application is
available in the speed range between
20 mph (30 km/h) and 120 mph (200 km/h).
Either no braking application, or a course-
correcting brake application adapted to the
driving situation occurs if:
R there are vehicles or obstacles, e.g. crash
barriers, located on both sides of your
vehicle.
R a vehicle approaches you too closely at the
side.
R you have adopted a sporty driving style with
high cornering speeds. R
you clearly brake or accelerate.
R a driving safety system intervenes, e.g.
ESP ®
or PRE-SAFE ®
Brake.
R ESP ®
is switched off.
R the off-road program is activated (vehicles
without the ON&OFFROAD package).
R off-road program 1 or 2 is activated
(vehicles with the ON&OFFROAD package).
R the LOW RANGE off-road gear is activated
(vehicles with the ON&OFFROAD package).
R a loss of tire pressure or a defective tire is
detected.
Switching on Active Blind Spot Assist X
Make sure that the radar sensor system
(Y page 276) and Active Blind Spot Assist
(Y page 273) are activated in the on-board
computer.
X Turn the SmartKey to position 2in the
ignition lock.
Warning lamps 0002in the exterior mirrors
light up red for approximately
1.5 seconds and then turn yellow.
Towing atrailer
When you attach a trailer, make sure you have
correctly established the electrical
connection. This can be accomplished by
checking the trailer lighting .Active Blind Spot
Assist is then deactivated. The indicator lamp
lights up yellow in the exterior mirrors and the
Active Blind Spot Assist Currently Unavailable See Operator's Manual
message appears in the multifunction
display. 240
Driving systemsDriving and parking
Page 255 of 462
R
uphill or downhill gradien tinpercentage
R on-road/off-road program selected
R condition of the differential lock for the
transfer case
R the LOW RANGE off-road gear is selected
R condition of the LOW RANGE off-road
gear
R the on-road trailer program is selected Towing
atrailer Notes on towing
atrailer
Important safety notes G
WARNING
If you install a ball coupling other tha nthe one
delivered with the vehicle, the trailer tow hitch
and the rear axle may be overloaded. This
applies especially if the ball coupling in
question is longer or angled differently. This
could seriously impair the driving
characteristics and the trailer can come
loose. There is a risk of an accident.
Only install the ball coupling delivered with
the vehicle or a ball coupling that is designed
to meet your trailer towing requirements. Do
not modify the ball coupling or the trailer tow
hitch. G
WARNING
If the ball coupling is not installed correctly or
not secured with the bolt provided and the
corresponding spring cotter, the trailer may
come loose. There is a risk of an accident.
Always install and secure the ball coupling as
described. Before every journey, ensure that
the ball coupling is secured with the bolt and
the corresponding spring cotter. G
WARNING
If you rest your foot on the brake pedal while
driving, the braking system can overheat. This
increases the stopping distance and can even cause the braking system to fail. There is a
risk of an accident.
Never use the brake pedal as a footrest.N
ever
depress the brake pedal and the accelerator
pedal at the same time. G
WARNING
When the vehicle/trailer combination begins
to lurch, you could lose control of it. The
vehicle/trailer combination could even
rollover. There is a risk of an accident.
On no account should you attempt to
straighten up the vehicle/trailer combination
by increasing the speed. Reduce vehicle
speed and do not countersteer .Apply the
brake as necessary.
! Depressing the brake pedal constantly
results in excessive and premature wear to
the brake pads.
Please observe the manufacturer's operating
instructions for the trailer coupling if a
detachable trailer coupling is used.
Couple and uncouple the trailer carefully. If
you do not couple the trailer to the towing
vehicle correctly, the trailer could become
detached.
Make sure that the following values are not
exceeded:
R the permissible trailer drawbar noseweight
R the permissible trailer load
R the permissible rear axle load of the towing
vehicle
R the maximum permissible gross vehicle
weight of both the towing vehicle and the
trailer
The applicable permissible values, which
must not be exceeded, can be found:
R in the vehicle documents
R on the identification plates of the trailer tow
hitch, the trailer and the vehicle
If the values differ, the lowest value applies.
You will find the values approved by the
manufacturer on the vehicle identification Towing
atrailer
253Driving an d parking Z
Page 256 of 462
plates and those for the towing vehicle under
"Technical data" (Y
page 456).
When towing a trailer, your vehicle's handling
characteristics will be differen tincomparison
with when driving without atrailer.
The vehicle/trailer combination:
R is heavier
R is restricted in its acceleration and
gradient-climbing capability
R has an increased braking distance
R is affected more by strong crosswinds
R demands more sensitive steering
R has a larger turning radius
This could impair the handling
characteristics.
When towing a trailer, always adjust your
speed to the current road and weather
conditions. Do not exceed the maximum
permissible speed for yourv ehicle/trailer
combination.
General notes R
Do not exceed the legally prescribed
maximum speed for vehicle/trailer
combinations in the relevant country.
This lowers the risk of an accident.
R Only install an approved trailer coupling on
your vehicle.
Further information on availability and on
installation is available from any authorized
Mercedes-Benz Center.
R The bumpers of your vehicle are not
suitable for installing detachable trailer
couplings.
R Do not install hired trailer couplings or
other detachable trailer couplings on the
bumpers of your vehicle.
R If you no longer need the ball coupling,
remove it from the ball coupling recess.
This will reduce the risk of damage to the
ball coupling.
i When towing a trailer, set the tire
pressure on the rear axle of the towing vehicle for a maximum load; see the tire
pressure table in the fuel filler flap
(Y
page 419).
Please note that when towing a trailer,
PARKTRONIC ( Ypage 213) and Blind Spot
Assist (Y page 233) are only available with
limitations, or not at all.
i On vehicles without level control, the
height of the ball coupling will alter
according to the load placed on the vehicle.
If necessary, use a trailer with a height-
adjustable drawbar.
You will find installing dimensions and loads
under "Technical data" (Y page 455).
Driving tips i
Observe the information on ESP ®
trailer
stabilization (Y page 73) and on pulling
away with a trailer (Y page 160).
The maximum permissible speed for vehicle/
trailer combinations depends on the type of
trailer. Before beginning the journey, check
the trailer's documents to see what the
maximum permissible speed is. Observe the
legally prescribed maximum speed in the
relevant country.
For certain Mercedes-Benzv ehicles, the
maximum permissible rear axle load is
increased when towing a trailer. See
"Technical data" to find out whether this
applies to your vehicle (Y page 456). If you
utilize any of the added maximum rear axle
load when towing a trailer, the vehicle/trailer
combination may not exceed a maximum
speed of 60 mph (100 km/h) for reasons
concerning the operating permit .This also
applies in countries in which the permissible
maximum speed for vehicle/trailer
combinations is above 60 mph (100 km/h).
When towing a trailer, your vehicle's handling
characteristics will be different in comparison
with when driving without atrailer.
Use the left-hand paddle shifter to shift into
a lower gearing ood time on long and steep
downhill gradients. 254
Towing
atrailerDriving an d parking
Page 259 of 462
of the towing vehicle, as the latter is
equipped with an anti-lock brake system.
Doing so will result in a loss of function of
the brake systems of both the vehicle and
the trailer.
X Make sure that the automatic transmission
is set to position P.
X Apply the vehicle's electric parking brake.
X Start the engine.
X Vehicles with the AIRMATIC package:
select highway level.
X Vehicles with ADS: set ADS toAUTOor
COMF.
X Switch off the engine.
X Close all doors and the tailgate.
X Couple up the trailer.
X Establish all electrical connections.
X Check that the trailer lighting system is
working.
i Vehicles with the AIRMATIC package:
with a trailer attached, the vehicle will
always remain at highway level. When
coupling up a trailer, please observe the
following:
R Unless highway level has been set
manually, the vehicle is automatically
lowered to highway level. This is the case
if a speed of 5mph(8km/h) is reached.
R High-speed level is not available.
These restrictions apply to all accessories
powered through a connectio nto the trailer
power socket of your vehicle, e.g. a bicycle
carrier.
Observe the maximum permissible trailer
dimensions (width and length).
Most U.S. states and all Canadia nprovinces
require by law:
R Safety chains between the towing vehicle
and the trailer. The chains should be cross-
wound under the trailer drawbar. They must
be fastened to the vehicle's trailer
coupling, not to the bumper or the axle. Leave enough play in the chains to make
tight cornering possible.
R As eparate brake system for certain types
of trailer.
R As afety switch for braked trailers. Check
the specific legal requirements applicable
to your state.
If the trailer detaches from the towing
vehicle, the safety switch applies the
trailer's brakes. Towing
atrailer
There are numerous legal requirements
concerning the towing of a trailer, e.g .speed
restrictions. Make sure that your vehicle/
trailer combination complies with the local
requirements not only in your area of
residence but also at any location to which
you are traveling. The police and local
authorities can provide reliable information.
Please observe the following when towing a
trailer:
R In order to accumulate driving experience
and accustom yourself to the new handling
characteristics, practice the following at a
location where there is no traffic:
-Cornering
- Stopping
- Backing up
R Before driving, check:
-the trailer tow hitch
- the safety switch for braked trailers
- the safety chains
- electrical connections
- the lights
- the wheels
R Adjust the exterior mirrors to provide an
unobstructed view of the rear section of the
trailer.
R If the trailer has electronically controlled
brakes, pull away carefully. Brake manually
using the brake controller and check
whether the brakes function correctly. Towing
atrailer
257Driving an d parking Z