trim MERCEDES-BENZ M-Class 2014 W166 Owner's Manual
[x] Cancel search | Manufacturer: MERCEDES-BENZ, Model Year: 2014, Model line: M-Class, Model: MERCEDES-BENZ M-Class 2014 W166Pages: 462, PDF Size: 6.23 MB
Page 8 of 462
Battery (vehicle)
Charging ........................................ 388
Display message ............................ 299
Important safety notes ..................385
Jump starting ................................. 389
Overview ........................................ 385
Belt force limiter
Activation ......................................... 59
Function .......................................... .59
Blind Spo tAssist
Activating/deactivating .................273
Display message ............................ 306
Notes/function .............................. 233
Trailer towing ................................. 235
see Active Blind Spot Assist
BlueTEC
Adding DEF .................................... 177
BlueTEC (DEF) .................................... 447
Brake Assist see BAS (Brake Assist System)
Brake fluid
Display message ............................ 289
Notes ............................................. 449
Brake lamps
Changing bulbs .............................. 132
Display message ............................ 296
Brakes
ABS .................................................. 67
Adaptive Brake Assist ......................70
BAS .................................................. 67
BAS PLUS ........................................ 68
Brake fluid (notes) .........................449
Display message ............................ 283
Driving tips .................................... 184
High-performance brake system ....185
Important safety notes ..................184
Maintenance .................................. 185
Parking brake ................................ 180
Warning lamp ................................. 318
Breakdown
see Flat tire
see Towing away
Bulbs
see Changing bulbs C
California Important notice for retail
customers and lessees ....................25
Calling up a malfunction
see Display messages
Car
see Vehicle
Care
Carpets .......................................... 377
Car wash ........................................ 370
Display ........................................... 375
Exhaus tpipe .................................. 374
Exterior lights ................................ 373
Gea rors electo rlever .................... 376
Interior ........................................... 375
Matte finish ................................... 372
Nigh tView Assist Plus ...................375
Notes ............................................. 370
Paint .............................................. 372
Plastic trim .................................... 376
Power washer ................................ 371
Rea rview camera .......................... 374
Roof lining ...................................... 377
Seat bel t........................................ 377
Seat cover ..................................... 376
Sensors ......................................... 374
Steering wheel ............................... 376
Trim pieces .................................... 376
Washing by hand ........................... 371
Wheels ........................................... 373
Windows ........................................ 373
Wiper blades .................................. 373
Wooden trim .................................. 376
Cargo compartment cover
Notes/ho wtouse......................... 338
Cargo compartment enlargement
Important safety notes ..................335
Cargo compartment floor
Opening/closing ............................ 342
Stowag ewell (under) ..................... 342
Cargo net
Attaching ....................................... 340
Important safety information .........340
Cargo tie down rings .........................337
Car keys see SmartKey 6
Index
Page 17 of 462
Off-road ABS
.................................... 67
Off-road ESP ®
.................................. 73
Off-road programs (vehicle swith
the ON&OFFROAD package) ..........248
Oil
see Engine oil
On and Offroad menu (on-board
computer) .......................................... 278
On-board computer AMG menu ..................................... 278
Assistance menu ........................... 272
Audi omenu ................................... 269
Convenience submenu ..................277
Displaying a service message ........369
Display messages ..........................282
DISTRONI CPLUS ........................... 201
Factory settings submenu .............278
Important safety notes ..................262
Instrument cluster submenu ..........274
Lighting submenu .......................... 274
Menu overview .............................. 266
Message memory .......................... 282
Navigation menu ............................ 268
On and Offroa dmenu .................... 278
Operation ....................................... 264
RACETIMER ................................... 279
Service menu ................................. 273
Settings menu ............................... 274
Standard displa y............................ 266
Telephone menu ............................ 270
Trip menu ...................................... 266
Vehicle submenu ........................... 276
Video DVD operatio n..................... 270
On-road programs
AUTO program ............................... 244
Function/notes ............................. 243
Snow program ............................... 245
SPORT program ............................. 244
Trailer program .............................. 245
Opening and closing the side trim
panels ................................................. 132
Operating safety Declaratio nofconformity ................ 27
Important safety notes ....................26
Operating system
see On-board computer
Operator's Manual
Vehicle equipment ...........................24Outside temperature display
...........264
Overhead control panel ......................39
Override feature Rea rside windows ........................... 66 P
Pain tcode number ............................ 442
Paintwork (cleaning instructions) ...372
Panic alarm .......................................... 42
Panorama roof with power tilt/
sliding panel
Opening/closing .............................. 99
Opening/closing the roller
sunblind ......................................... 100
Problem (malfunction) ...................102
Resetting ....................................... 100
Panorama sliding sunroof
Important safety notes ....................97
Parking ............................................... 179
Important safety notes ..................179
Parking brake ................................ 180
Position of exterior mirror, front-
passenger side ............................... 116
Rea rview camera .......................... 220
see PARKTRONIC
Parking aid
Active Parking Assist .....................216
see Exterior mirrors
see PARKTRONIC
Parking brake
Display message ............................ 286
Electric parking brake ....................180
Warning lamp ................................. 324
Parking lamps
Switching on/off ........................... 122
Parking lamps (changing bulbs) ......131
PARKTRONIC Deactivating/activating .................215
Driving system ............................... 213
Function/notes ............................. 213
Important safety notes ..................213
Problem (malfunction) ...................216
Range of the sensors .....................214
Trailer towing ................................. 215
Warning displa y............................. 214 Index
15
Page 18 of 462
PASSENGER AIR BAG OFF
Problem (malfunction) .....................53
Problems (malfunction) .................. 293
PASSENGE RAIR BAG OFF indicator
lamp ...................................................... 49
Plastic trim (cleaning instructions) .376
Power closing feature .........................88
Power washers .................................. 371
Power windows see Side windows
PRE-SAFE ®
(anticipatory occupant
protection) Display message ............................ 289
Operation ........................................ .54
PRE-SAFE ®
Brake
Activating/deactivating .................272
Display message ............................ 291
Function/notes ................................ 74
Warning lamp ................................. 328
Program selector button ..................169
Protection of the environment General notes .................................. 23
Pulling away
Trailer ............................................ 160
Pulling away (automatic
transmission) ..................................... 160 Q
Qualifie dspecialis tworkshop ...........28 R
RACETIMER (on-board computer) ....279
Radar sensor system Activating/deactivating .................276
Display message ............................ 304
Radiator cover ................................... 365
Radio Selecting astation ......................... 269
see separate operating instructions
Radio-controlled devices (installing) 362
Radio-wave reception/
transmission in the vehicle
Declaratio nofconformity ................ 27
Reading lamp ..................................... 127
Rear compartment Setting the airv ents...................... 153Rear fog lamp
Switching on/off ........................... 122
Rear seats
Adjusting ....................................... 108
Rear view camera
Cleaning instructions .....................374
Function/notes ............................. 220
Switching on/off ........................... 221
Rear-view mirror
Anti-glare (manual )........................ 114
Dipping (automatic) .......................115
Rear window defroster
Problem (malfunction) ...................151
Switching on/off ........................... 150
Rear window wiper
Replacing the wiper blade .............. 134
Switching on/off ........................... 133
Refrigerant (air-conditioning
system)
Important safety notes ..................451
Refueling
Fuel gauge ............................... 33, 263
Important safety notes ..................173
Refueling proces s.......................... 174
see Fuel
Remote control
Programming (garage door opener) 359
Reporting safety defects ....................28
Reserve (fuel tank) see Fuel
Reserve fuel
Display message ............................ 300
Warning lamp ................................. 325
see Fuel
Residual heat (climate control) ........151
Restraint system see SRS (Supplemental Restraint
System)
Reversing feature
Panorama sliding sunroo f................ 98
Roller sunblinds ............................... 99
Side windows ................................... 94
Sliding sunroo f................................. 98
Tailgate ............................................ 90
Reversing lamps (display message) 297
Roadside Assistance (breakdown) ....25 16
Index
Page 23 of 462
Tow-starting
Emergency engine starting ............394
Important safety notes ..................391
Trailer coupling
see Towing atrailer
Trailer loads and drawbar
noseweights ...................................... 259
Trailer towing Active Blind Spot Assist .................240
Active Lane Keeping Assist ............243
Blind Spot Assist ............................ 235
PARKTRONI C................................. 215
Permissible trailer loads and
drawba rnoseweights ..................... 259
Transfer case ..................................... 173
Transmission see Automatic transmission
Transmission position display .........165
Transmission position display
(DIRECT SELECTl ever)...................... 165
Transporting the vehicle ..................393
Traveling uphill Brow of hill ..................................... 191
Driving downhill ............................. 191
Maximum gradient-climbing
capability ....................................... 191
Trim pieces (cleaning instructions) .376
Trip computer (on-board computer) 266
Trip odometer Calling up ....................................... 266
Resetting (on-board computer) ......267
Trunk
see Tailgate
Turn signals
Display message ............................ 295
Switching on/off ........................... 123
TWR (Tongue Weight Rating)
(definition) ......................................... 421
Type identification plate see Vehicle identification plate U
Unlocking Emergency unlocking .......................88
From inside the vehicle (central
unlocking button) ............................. 87 V
Vanity mirror (in the sun visor) ........345
Vehicle Correct use ...................................... 28
Data acquisition ............................... 29
Display message ............................ 312
Equipment ....................................... 24
Individua lsettings .......................... 274
Limited Warranty ............................. 29
Loading .......................................... 409
Locking (in an emergency) ...............88
Locking (SmartKey) .......................... 80
Lowering ........................................ 426
Maintenance .................................... 25
Parking for a long period ................ 182
Pulling away ................................... 160
Raising ........................................... 423
Reporting problems .........................28
Securing from rolling away ............422
Towing away .................................. 391
Transporting .................................. 393
Unlocking (in an emergency) ...........88
Unlocking (SmartKey) ......................80
Vehicle data ................................... 452
Vehicle battery
see Battery (vehicle)
Vehicle data ....................................... 452
Vehicle data (off-road driving) Approach/departure angl e............ 454
Fording depth ................................ 454
Maximum gradient climbing ability 455
Vehicle dimensions ...........................452
Vehicle emergency locking ................88
Vehicle identification number see VIN
Vehicle identification plate ..............442
Vehicle level AMG adaptive sport suspension
system ........................................... 212
Vehicle level (display message) .......302
Vehicle tool kit .................................. 380
Video Operating the DVD ......................... 270
VIN ...................................................... 442 Index
21
Page 24 of 462
W
Warning and indicator lamps ABS ................................................ 319
Brakes ........................................... 318
Check Engine ................................. 325
Coolant .......................................... 326
Distance warning ........................... 328
DISTRONI CPLUS ........................... 328
ESP ®
.............................................. 321
ESP ®
OFF ....................................... 322
Fuel tank ........................................ 325
Overview .................................. 34, 316
PASSENGER AIRBAG OFF ................49
Reserve fuel ................................... 325
Seat bel t........................................ 317
SRS ................................................ 324
Tire pressure monitor ....................329
Warranty ............................................ 442
Washer fluid Display message ............................ 314
Wheel bol ttightening torque ...........426
Wheel chock ...................................... 422
Wheels Changing awheel .......................... 421
Checking ........................................ 399
Cleaning ......................................... 373
Cleaning (warning) .........................422
Emergency spare wheel .................436
Important safety notes ..................398
Interchanging/changing ................421
Mounting anew wheel ................... 425
Mounting awheel .......................... 422
Overview ........................................ 398
Removing awheel .......................... 425
Storing ........................................... 422
Tightening torque ........................... 426
Whee lsize/tir esize ....................... 426
Window curtain air bag
Display message ............................ 292
Operation ........................................ .48
Windows
see Side windows
Windshield
Defrosting ...................................... 149
Infrared reflective .......................... 362
Windshiel dwasher fluid
see Windshield washer system Windshiel
dwasher system
Adding washer fluid .......................368
Notes ............................................. 451
Windshiel dwipers
Problem (malfunction) ...................136
Rea rwindow wiper ........................ 133
Replacing the wiper blades ............133
Switching on/off ........................... 132
Winte rdriving
Slippery roa dsurface s................... 187
Snow chains .................................. 401
Winter operation
General notes ................................ 400
Overview ........................................ 400
Radiator cover ............................... 365
Snow drive program ....................... 245
Winter tires
M+S tires ....................................... 400
Wiper blades
Cleaning ......................................... 373
Important safety notes ..................133
Replacing ....................................... 133
Replacing (rea rwindow) ................ 134
Replacing (windshield )................... 134
Wooden trim (cleaning instructions) 376
Workshops see Qualified specialist workshop Z
ZONE function Switching on/off ........................... 14922
Index
Page 46 of 462
R
Do not install additional trim material, seat
covers, badges, etc. to the:
-padded steering wheel boss
- knee bag covers
- front-passenge rair bag cover
- outer side of front seat bolsters
- outer side of rear bench seat backrest
seat bolsters
- roof lining trim
R Do not install additional electrical/
electronic equipment on or near SRS
components and wiring.
R Keep area betwee nair bags and occupants
free of objects (e.g. packages, purses,
umbrellas, etc.).
R Do not hang items such as coat hangers
from the coat hooks or handles over the
door. These items may be thrown around in
the vehicle and cause head and other
injuries when the window curtain air bag is
deployed.
R Air bag system components will be hot after
an air bag has inflated. Do not touch them.
R Never place your feet on the instrument
panel, dashboard, or on the seat. Always
keep both feet on the floor in front of the
seat.
R Improper repair work on the SRS creates a
risk of rendering the SRS inoperative or
causing unintended air bag deployment.
Work on the SRS must therefore only be
performed by qualified technicians.
Contact an authorized Mercedes-Benz
Center.
R For your protection and the protection of
others, when scrapping the air bag unit or
ETD, our safety instructions must be
followed. These instructions are available
fro ma ny authorized Mercedes-Benz
Center.
R Given the considerable deployment speed,
required inflation volume, and the material
of the ai rbags, there is the possibility of
abrasions or other, potentially more serious
injuries resulting from air bag deployment. If you sell your vehicle
,Mercedes-Benz
strongly recommends that you inform the
subsequent owner that the vehicle is
equipped with SRS. Also, refer them to the
applicable section in the Operator's Manual. Air bags
Important safety notes G
WARNING
Using unsuitable seat cover scould restric tor
even preven tdeployment of the air bags
integrated into the seats. Consequently, the
air bags cannot protec tvehicle occupants as
they are designed to do. In addition, the
function of the air bag deactivation system
could be restricted. This poses an increased
risk of injury or even fatal injury.
You should only use seat covers that have
been approved for the respective seat by
Mercedes-Benz. G
WARNING
The air bag parts are hot after the airbag has
been deployed. There is a risk of injury.
Do not touch the air bag parts. Have the
deployed air bags replaced at a qualified
specialist workshop as soon as possible. G
WARNING
Air bags are designed to reduce the incidence
of injuries and fatalities in certain situations:
R frontal impacts (driver's and front-
passenger fron tair bags and driver's knee
bag)
R side impacts (side impact air bags and
window curtain air bags)
R rollover (window curtain air bags)
However, no system available today can
completely eliminate injuries and fatalities.
When the air bags are deployed, a small
amount of powder is released .The powder
generally does not constitute a health hazard
and does not indicate that there is a fire in the 44
Occupant safetySafety
Page 60 of 462

Belt height adjustment
You can adjus
tthe seat belt height on the
front seats. Adjust the belt to a height that
allows the upper part of the seat belt to be
routed across the center of your shoulder.
X To raise: slide the belt sash guide upwards.
The belt sash guide engages in various
positions.
X To lower: press and hold belt sash guide
release 0002.
X Slide the belt sash guide downwards.
X Release belt sash guide release 0002and
make sure that the belt sash guide has
engaged.
Releasing seat belts !
Make sure that the seat belt is fully rolled
up. Otherwise, the seat belt or belt tongue
will be trapped in the door or in the seat
mechanism. This could damage the door,
the door trim panel and the seat belt.
Damaged seat belts can no longer fulfill
their protective function and must be
replaced. Visit a qualified specialist
workshop. 0002
Belt sash guide
0003 Seat belt tongue
0023 Buckle
0022 Release button
X Press release button 0022and guide belt
tongue 0003back towards belt sash
guide 0002.
Belt warning for the driver and front
passenger Every time the engine is started, the
0020
seat belt warning lamp lights up for six
seconds. It lights up regardless of whether
the driver's and front-passenger seat belts
have already been fastened. If the driver's
and front-passenger seat belts have already
been fastened, the 0020seat belt warning
lamp then goes out.
If the driver's seat belt is not fastened when
the engine is started, an additional warning
tone will sound. This warning tone stops after
a maximum of six seconds or once the
driver's seat belt is fastened.
If after six seconds, the driver or front
passenger have not fastened their seat belts
and the doors are closed:
R the 0020 seat belt warning lamp remains lit
as long as the driver's or front-passenger's
seat belt is not fastened 58
Occupant safetySafety
Page 350 of 462
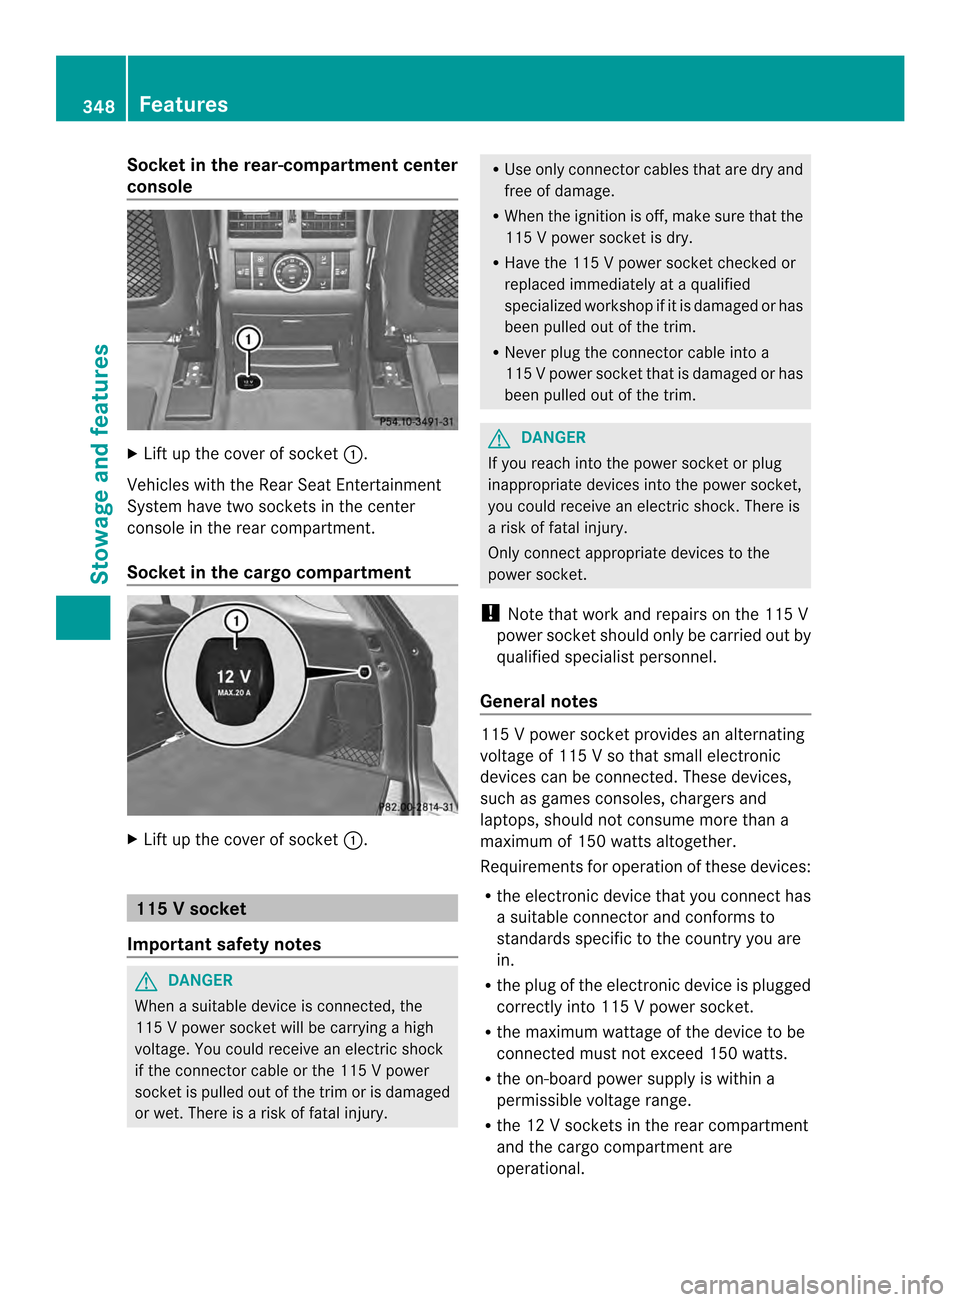
Socket in the rear-compartment center
console X
Lift up the cover of socket 0002.
Vehicles with the Rear Seat Entertainment
System have two sockets in the center
console in the rear compartment.
Socket in the cargo compartment X
Lift up the cover of socket 0002.115
Vsocket
Important safety notes G
DANGER
When a suitable device is connected, the
11 5Vp ower socket will be carrying a high
voltage. You could receive an electric shock
if the connector cable or the 115 V power
socket is pulled out of the trim or is damaged
or wet. There is a risk of fatal injury. R
Use only connector cables that are dry and
free of damage.
R When the ignition is off, make sure that the
115 V power socket is dry.
R Have the 115 V power socket checked or
replaced immediately at a qualified
specialized workshop if it is damaged or has
been pulled out of the trim.
R Never plug the connector cable into a
115 Vpower socket that is damaged or has
been pulled out of the trim. G
DANGER
If you reach into the power socket or plug
inappropriate devices into the power socket,
you could receive an electric shock. There is
a risk of fatal injury.
Only connect appropriate devices to the
power socket.
! Note that work and repairs on the 115 V
power socket should only be carried out by
qualified specialist personnel.
General notes 115 V power socket provides an alternating
voltage of 115 V so that small electronic
devices can be connected. These devices,
such as games consoles, chargers and
laptops, should not consume more than a
maximum of 150 watts altogether.
Requirements for operation of these devices:
R the electronic device that you connect has
a suitable connector and conforms to
standards specific to the country you are
in.
R the plug of the electronic device is plugged
correctly into 115 V power socket.
R the maximum wattage of the device to be
connected must not exceed 150 watts.
R the on-board power supply is within a
permissible voltage range.
R the 12 V sockets in the rear compartment
and the cargo compartment are
operational. 348
FeaturesStowage and features
Page 374 of 462
R
battery
R connectors
R lights
R seals
R trim
R ventilation slots
Damaged seals or electrical components
can lead to leaks or failures.
Cleaning the paintwork !
Do not affix:
R stickers
R films
R magnetic plates or similar items
to painted surfaces .You could otherwise
damage the paintwork.
Scratches, corrosive deposits, areas affected
by corrosion and damage caused by
inadequate care cannot always be completely
repaired. In such cases, visit a qualified
specialist workshop.
X Remove dirt immediately, where possible,
while avoiding rubbing too hard.
X Soak insect remains with insect remover
and rinse off the treated areas afterwards.
X Soak bird droppings with water and rinse
off the treated areas afterwards.
X Remove coolant, brake fluid, tree resin,
oils, fuels and greases by rubbing gently
with a cloth soaked in petroleum ether or
lighter fluid.
X Use tar remover to remove tar stains.
X Use silicone remover to remove wax.
If water no longer forms "beads" on the paint
surface, use the paint care products
recommended and approved by Mercedes-
Benz.T his is the case approximately every
three to five months, depending on the
climate conditions and the care product used.
If dirt has penetrated the paint surface or if
the paint has become dull, the paint cleaner
recommended and approved by Mercedes-
Benz should be used. Do not use these care products in the sun or
on the hood while the hood is hot.
X
Use a suitable touch-up stick, e.g. MB
Touch-Up Stick, to repair slight damage to
the paintwork quickly and provisionally.
Matte finish care !
Never polish the vehicle or the light alloy
wheels. Polishing causes the finish to
shine.
! The following may cause the paint to
become shiny and thus reduce the matte
effect:
R Vigorous rubbing with unsuitable
materials.
R Frequent use of car washes.
R Washing the vehicle in direct sunlight.
! Never use paint cleaner, buffing or
polishing products, or gloss preserver, e.g.
wax. These products are only suitable for
high-gloss surfaces. Their use on vehicles
with matte finish leads to considerable
surface damage (shiny, spotted areas).
Always have paintwork repairs performed
at a qualified specialist workshop, e.g. an
authorized Mercedes-Ben zCenter.
! Do not use wash programs with a hot wax
treatment under any circumstances.
Observe these notes if your vehicle has a
clear matte finish. This will help you to avoid
damage to the paintwork due to incorrect
treatment.
These notes also apply to light alloy wheels
with a clear matte finish.
i The vehicle should preferably be washed
by hand using a soft sponge, car shampoo
and plenty of water.
i Use only insec tremover and car shampoo
from the range of recommended and
approved Mercedes-Benzc are products.372
CareMaintenance and care
Page 378 of 462
Cleaning the plastic trim
G
WARNING
Care products and cleaning agents containing
solvents cause surfaces in the cockpit to
become porous. As a result, plastic parts may
come loose in the event of air bag
deployment. There is a ris kofinjury.
Do not use any care products and cleaning
agents to clean the cockpit.
! Do not affix the following to plastic
surfaces:
R stickers
R films
R scented oil bottles or similar items
You can otherwise damage the plastic.
! Do not allow cosmetics, insect repellent
or sunscreen to come into contact with the
plastic trim .This maintains the high-quality
look of the surfaces.
X Wipe the plastic trim with a damp, lint-free
cloth, e.g. a microfiber cloth.
X Heavy soiling: use care and cleaning
products recommended and approved by
Mercedes-Benz.
The surface may change color temporarily.
Wait until the surface is dry again.
Cleaning the steering wheel and gear or
selector lever X
Thoroughly wipe with a damp cloth or use
leather care agents that have been
recommended and approved by Mercedes-
Benz.
Cleaning genuine wooda nd trim
elements !
Do not use solvent-based cleaning agents
such as tar remover, wheel cleaners,
polishes or waxes. There is otherwise a risk
of damaging the surface.
! Do not use chrome polish on trim pieces.
The trim pieces have a chrome look but are mostly made of anodized aluminum and
can lose their shine if chrome polish is
used. Use a damp, lint-free cloth instead
when cleaning the trim pieces.
If the chrome-plated trim pieces are very
dirty, you can use a chrome polish. If you
are unsure as to whether the trim pieces
are chrome-plated or not, consult an
authorized Mercedes-Benz Center.
X Wipe the wooden trim and trim pieces with
a damp, lint-free cloth ,e.g. a microfiber
cloth.
X Heavy soiling: use car care and cleaning
products recommended and approved by
Mercedes-Benz.
Cleaning the seat covers General notes
!
Do not use microfibe rcloths to clean
genuine leather, artificial leathe ror
Alcantara® covers. If used often, these can
damage the cover.
i Note tha tregular care is essential to
ensure that the appearance and comfort of
the covers is retained over time.
Genuine leather seat covers
! To retain the natural appearance of the
leather, observe the following cleaning
instructions:
R Clean genuine leather covers carefully
with a damp cloth and then wipe the
covers down with a dry cloth.
R Make sure that the leather does not
become soaked. It may otherwise
become rough and cracked.
R Only use leather care agents that have
been tested and approved by Mercedes-
Benz. You can obtain these from a
qualified specialist workshop.
Leather is a natural product.
It exhibits natural surface characteristics, for
example: 376
CareMaintenance and care