Distronic MERCEDES-BENZ M-Class 2015 W166 Owner's Guide
[x] Cancel search | Manufacturer: MERCEDES-BENZ, Model Year: 2015, Model line: M-Class, Model: MERCEDES-BENZ M-Class 2015 W166Pages: 466, PDF Size: 8.92 MB
Page 260 of 466
i
This also applies if you have activated
cruise control or DISTRONIC PLUS.
This will use the braking effect of the engine,
so that less braking will be required to main-
tain the speed. This relieves the load on the
brake system and prevents the brakes from
overheating and wearing too quickly. If you
need additional braking, depress the brake
pedal repeatedly rather than continuously.
Driving tips If the trailer swings from side to side:
X Do not accelerate.
X Do not counter-steer.
X Brake if necessary.
R Maintain a greater distance from the vehi-
cle in front than when driving without a
trailer.
R Avoid braking abruptly. If possible, brake
gently at first to allow the trailer to run on.
Then, increase the braking force rapidly.
R The values given for gradient-climbing
capabilities from a standstill refer to sea
level. When driving in mountainous areas,
note that the power output of the engine
and, consequently, the vehicle's gradient-
climbing capability, decreases with
increasing altitude. Installing the ball coupling
G
WARNING
If the ball coupling is not correctly installed
and secured, it can come loose during the
journey and endanger other road users. There is a risk of an accident and injury.
Always install and secure the ball coupling as
described. Before every journey, ensure that
the ball coupling is secured with the bolt and
the corresponding spring cotter. G
WARNING
If the ball coupling is not installed correctly or not secured with the bolt provided and the corresponding spring cotter, the trailer may
come loose. There is a risk of an accident.
Always install and secure the ball coupling as described. Before every journey, ensure that
the ball coupling is secured with the bolt and
the corresponding spring cotter. G
WARNING
If the ball coupling is not installed and secured
correctly the trailer may come loose. There is
a risk of an accident.
Install and secure the ball coupling as descri-
bed in the ball coupling installation instruc-
tions. Make sure that the ball coupling is
installed and secured correctly before every
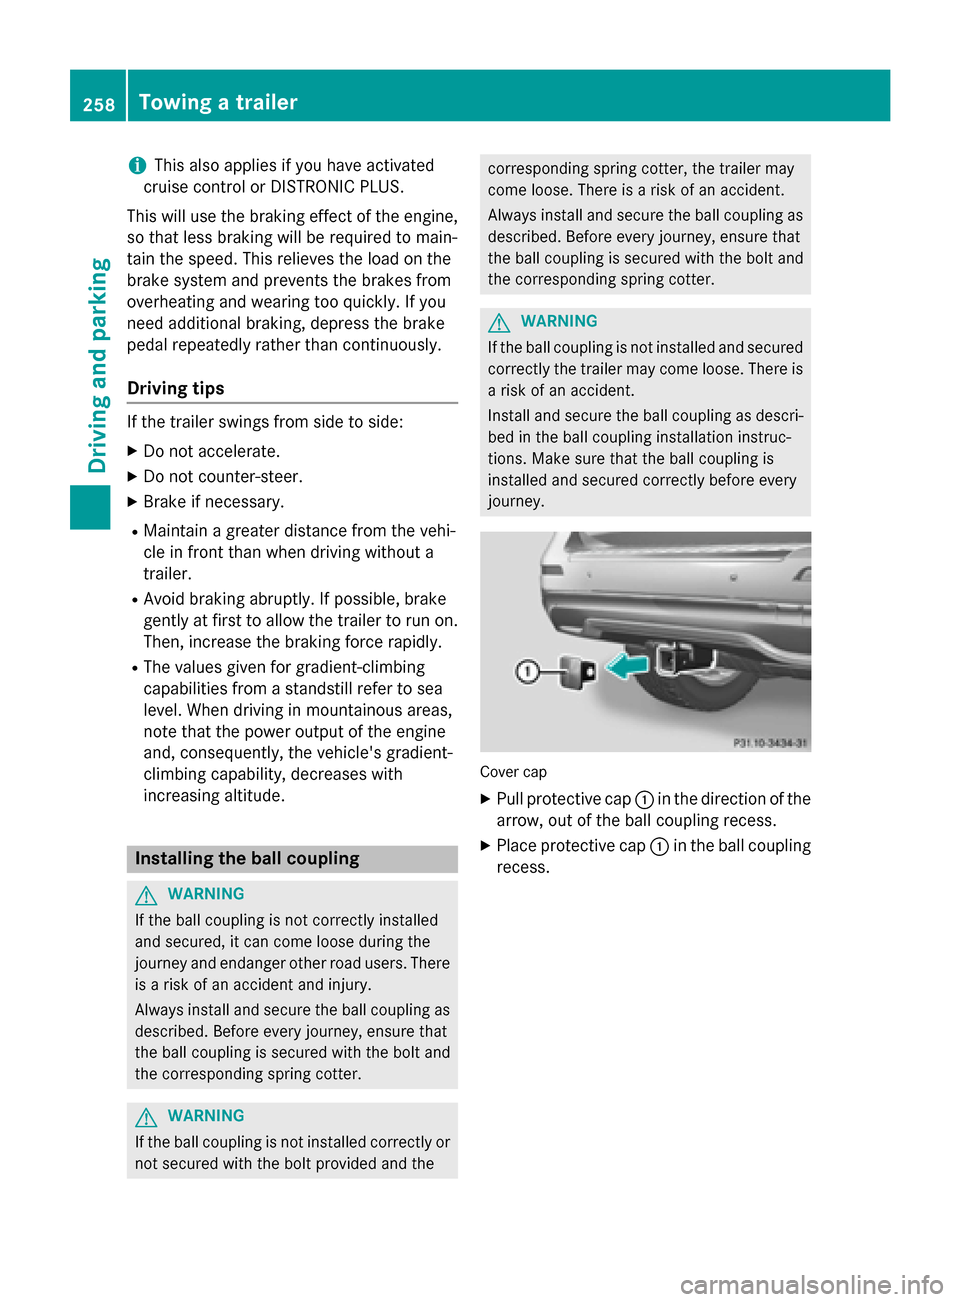
journey. Cover cap
X Pull protective cap 0043in the direction of the
arrow, out of the ball coupling recess.
X Place protective cap 0043in the ball coupling
recess. 258
Towing a trailerDriving and parking
Page 269 of 466
The coolant temperature gauge is in the
instrument cluster on the right-hand side
(Y page 35).
Under normal operating conditions and with
the specified coolant level, the coolant tem-
perature may rise to 248 ‡ (120 †). Tachometer
! Do not drive in the overrevving range, as
this could damage the engine.
The red band in the tachometer indicates the
engine's overrevving range.
The fuel supply is interrupted to protect the
engine when the red band is reached. Outside temperature display
You should pay special attention to road con-
ditions when temperatures are around freez-
ing point.
Bear in mind that the outside temperature
display indicates the temperature measured
and does not record the road temperature.
The outside temperature display is in the mul- tifunction display (Y page 268).
Changes in the outside temperature are dis-
played after a short delay. Speedometer with segments
The segments in the speedometer indicate
which speed range is available.
R Cruise control activated (Y page 195):
The segments light up from the stored
speed to the maximum speed.
R DISTRONIC PLUS activated (Y page 198):
One or two segments in the set speed
range light up.
R DISTRONIC PLUS detects a vehicle in front:
The segments between the speed of the
vehicle in front and the stored speed light
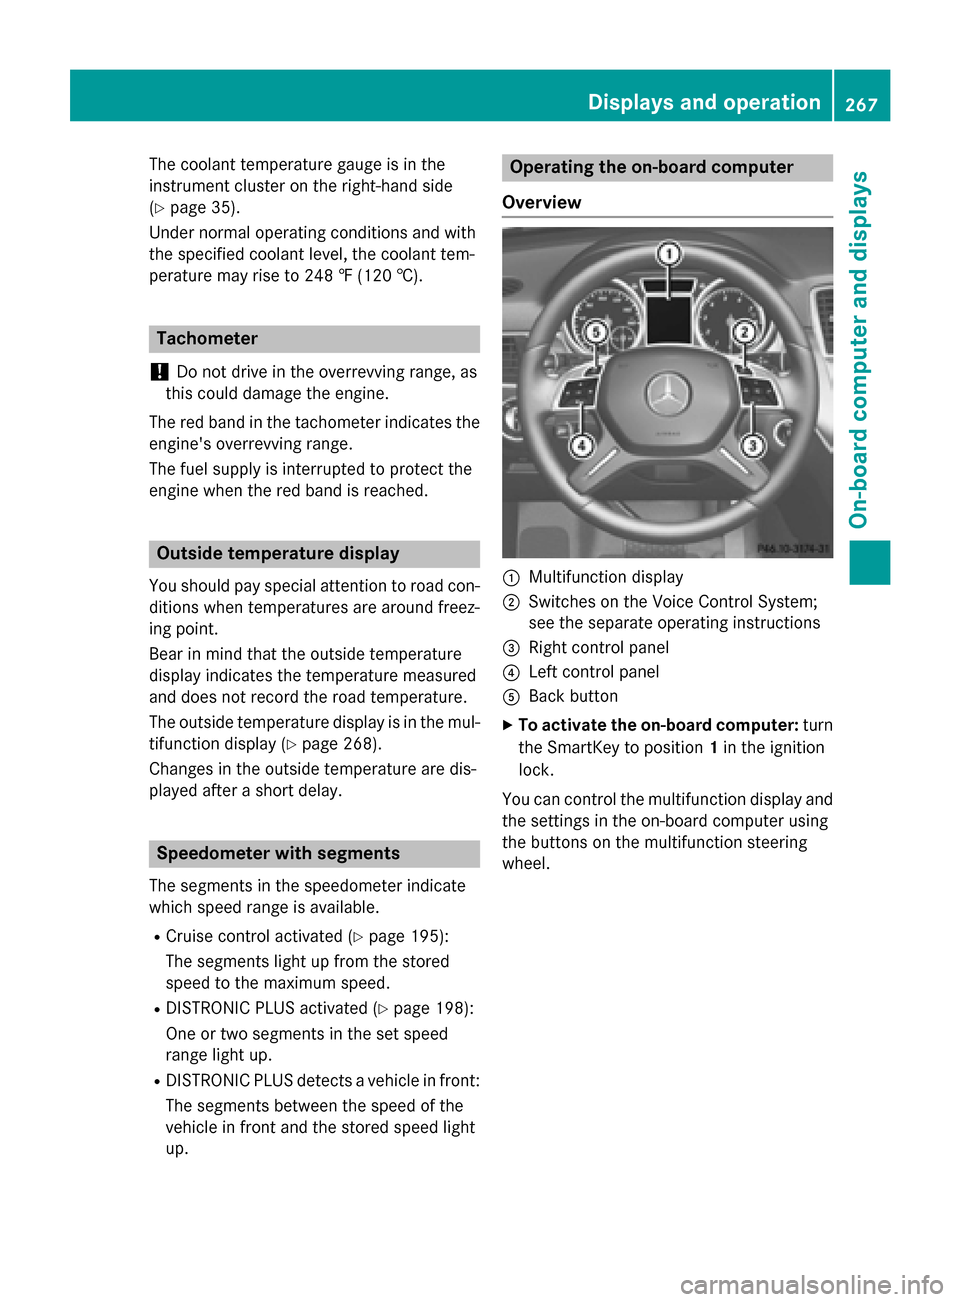
up. Operating the on-board computer
Overview 0043
Multifunction display
0044 Switches on the Voice Control System;
see the separate operating instructions
0087 Right control panel
0085 Left control panel
0083 Back button
X To activate the on-board computer: turn
the SmartKey to position 1in the ignition
lock.
You can control the multifunction display and
the settings in the on-board computer using
the buttons on the multifunction steering
wheel. Displays and operation
267On-board computer and displays Z
Page 277 of 466
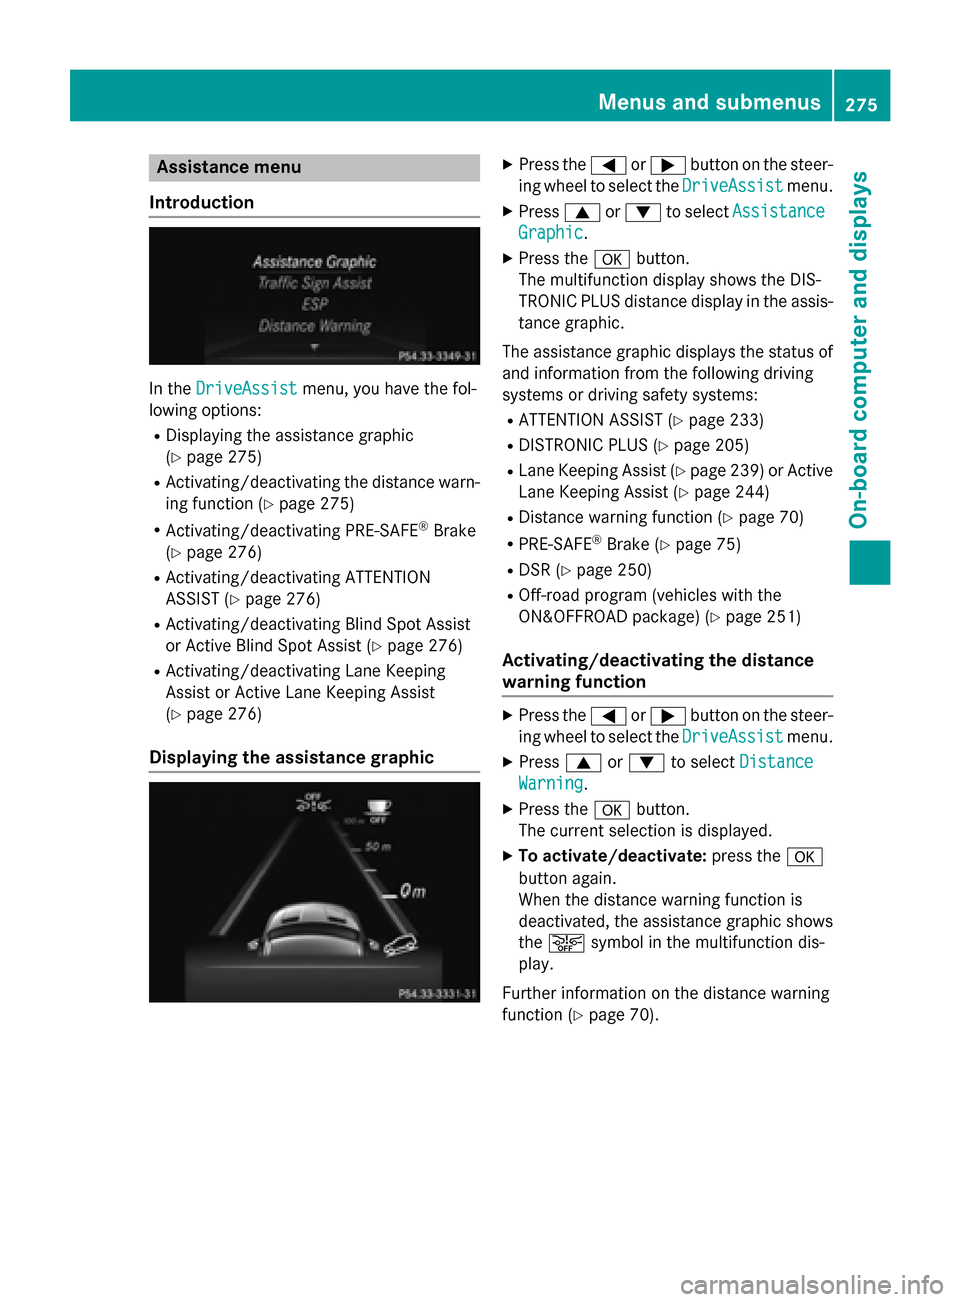
Assistance menu
Introduction In the
DriveAssist
DriveAssist menu, you have the fol-
lowing options:
R Displaying the assistance graphic
(Y page 275)
R Activating/deactivating the distance warn-
ing function (Y page 275)
R Activating/deactivating PRE-SAFE ®
Brake
(Y page 276)
R Activating/deactivating ATTENTION
ASSIST (Y page 276)
R Activating/deactivating Blind Spot Assist
or Active Blind Spot Assist (Y page 276)
R Activating/deactivating Lane Keeping
Assist or Active Lane Keeping Assist
(Y page 276)
Displaying the assistance graphic X
Press the 0059or0065 button on the steer-
ing wheel to select the DriveAssist DriveAssistmenu.
X Press 0063or0064 to select Assistance Assistance
Graphic
Graphic.
X Press the 0076button.
The multifunction display shows the DIS-
TRONIC PLUS distance display in the assis- tance graphic.
The assistance graphic displays the status of and information from the following driving
systems or driving safety systems:
R ATTENTION ASSIST (Y page 233)
R DISTRONIC PLUS (Y page 205)
R Lane Keeping Assist (Y page 239) or Active
Lane Keeping Assist (Y page 244)
R Distance warning function (Y page 70)
R PRE-SAFE ®
Brake (Y page 75)
R DSR (Y page 250)
R Off-road program (vehicles with the
ON&OFFROAD package) (Y page 251)
Activating/deactivating the distance
warning function X
Press the 0059or0065 button on the steer-
ing wheel to select the DriveAssist DriveAssistmenu.
X Press 0063or0064 to select Distance
Distance
Warning
Warning.
X Press the 0076button.
The current selection is displayed.
X To activate/deactivate: press the0076
button again.
When the distance warning function is
deactivated, the assistance graphic shows
the 00D4 symbol in the multifunction dis-
play.
Further information on the distance warning
function (Y page 70). Menus and sub
menus
275On-board computer and displays Z
Page 278 of 466
Activating/deactivating PRE-SAFE
®
Brake PRE
‑SAFE ®
Brake is only available in vehicles
with DISTRONIC PLUS.
X Press 0059or0065 on the steering wheel
to select the DriveAssist
DriveAssist menu.
X Press the 0063or0064 button to select
PRE-SAFE Brake
PRE-SAFE Brake.
X Press the 0076button.
The current selection is displayed.
X To activate/deactivate: press the0076
button again.
When PRE-SAFE ®
Brake is deactivated, the
assistance graphic shows the 00D4symbol
in the multifunction display.
For more information on PRE‑SAFE ®
Brake,
see (Y page 75).
Activating/deactivating ATTENTION
ASSIST X
Press the 0059or0065 button on the steer-
ing wheel to select the DriveAssist DriveAssistmenu.
X Press the 0063or0064 button to select
ATTENTION ASSIST
ATTENTION ASSIST .
X Press the 0076button.
The current selection is displayed.
X To activate/deactivate: press the0076
button again.
When ATTENTION ASSIST is deactivated,
the 00D7 symbol appears in the multifunc-
tion display in the assistance graphics dis-
play.
For further information about ATTENTION
ASSIST, see (Y page 233).
Activating/deactivating Blind Spot
Assist X
Press 0059or0065 on the steering wheel
to select the DriveAssist
DriveAssist menu.
X Press the 0063or0064 button to select
Blind Spot Assist
Blind Spot Assist . X
Press the 0076button.
The current selection is displayed.
X To activate/deactivate: press the0076
button again.
For further information about Active Blind
Spot Assist, see (Y page 241).
Activating/deactivating Lane Keeping
Assist X
Press 0059or0065 on the steering wheel
to select the DriveAssist DriveAssist menu.
X Press 0063or0064 to select Lane Keep‐
Lane Keep‐
ing Assist
ing Assist .
X Press the 0076button.
The current selection is displayed.
X Press 0076to confirm.
X Press the 0064or0063 button to set Off
Off,
Standard
Standard orAdaptive
Adaptive.
When Lane Keeping Assist or Active Lane
Keeping Assist is activated, the multifunc-
tion display shows the lane markings as
bright lines in the assistance graphic.
X Press the 0076button to save the setting.
For further information about Lane Keeping
Assist, see (Y page 239).
For further information about Active Lane
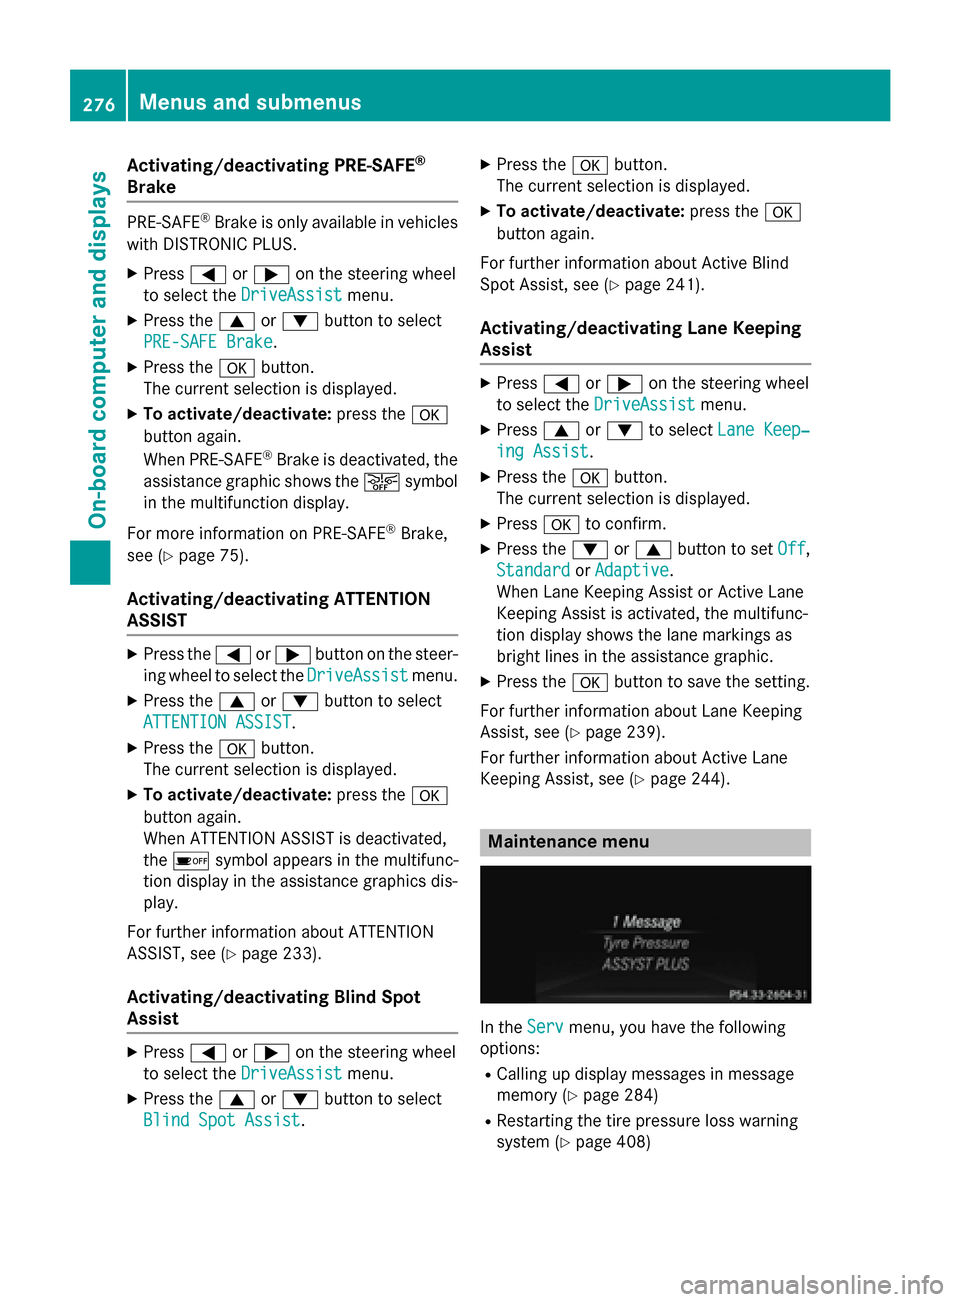
Keeping Assist, see (Y page 244). Maintenance menu
In the
Serv Servmenu, you have the following
options:
R Calling up display messages in message
memory (Y page 284)
R Restarting the tire pressure loss warning
system (Y page 408) 276
Menus and sub
menusOn-board computer and displays
Page 279 of 466
R
Checking the tire pressure electronically
(Y page 408)
R Calling up the service due date
(Y page 371) Settings menu
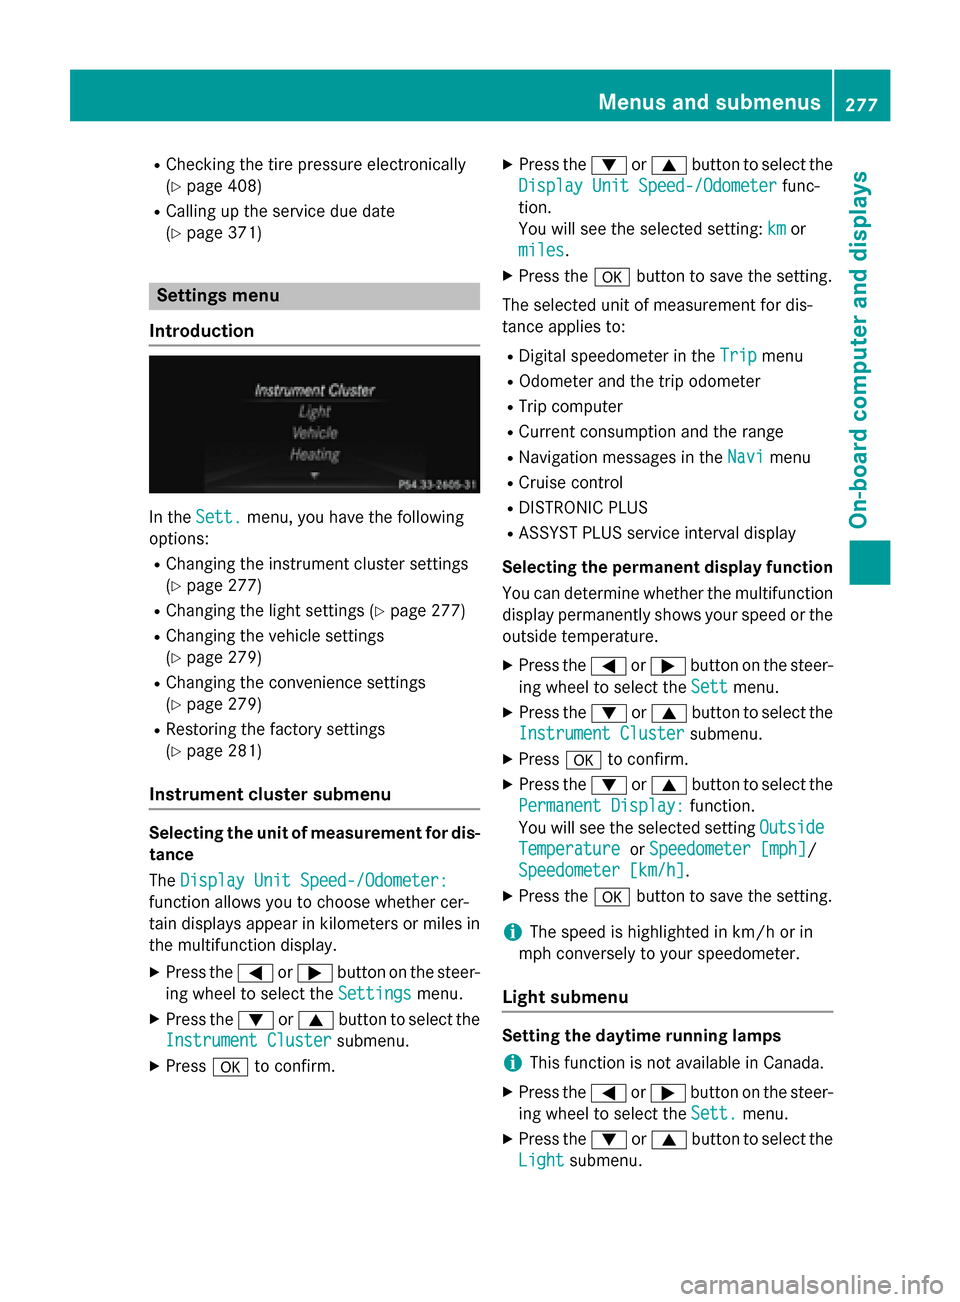
Introduction In the
Sett. Sett. menu, you have the following
options:
R Changing the instrument cluster settings
(Y page 277)
R Changing the light settings (Y page 277)
R Changing the vehicle settings
(Y page 279)
R Changing the convenience settings
(Y page 279)
R Restoring the factory settings
(Y page 281)
Instrument cluster submenu Selecting the unit of measurement for dis-
tance
The Display Unit Speed-/Odometer: Display Unit Speed-/Odometer:
function allows you to choose whether cer-
tain displays appear in kilometers or miles in the multifunction display.
X Press the 0059or0065 button on the steer-
ing wheel to select the Settings Settingsmenu.
X Press the 0064or0063 button to select the
Instrument Cluster Instrument Cluster submenu.
X Press 0076to confirm. X
Press the 0064or0063 button to select the
Display Unit Speed-/Odometer Display Unit Speed-/Odometer func-
tion.
You will see the selected setting: km kmor
miles
miles.
X Press the 0076button to save the setting.
The selected unit of measurement for dis-
tance applies to: R Digital speedometer in the Trip
Trip menu
R Odometer and the trip odometer
R Trip computer
R Current consumption and the range
R Navigation messages in the Navi Navimenu
R Cruise control
R DISTRONIC PLUS
R ASSYST PLUS service interval display
Selecting the permanent display function
You can determine whether the multifunction
display permanently shows your speed or the outside temperature.
X Press the 0059or0065 button on the steer-
ing wheel to select the Sett Settmenu.
X Press the 0064or0063 button to select the
Instrument Cluster
Instrument Cluster submenu.
X Press 0076to confirm.
X Press the 0064or0063 button to select the
Permanent Display:
Permanent Display: function.
You will see the selected setting Outside
Outside
Temperature
Temperature orSpeedometer [mph]
Speedometer [mph]/
Speedometer [km/h]
Speedometer [km/h] .
X Press the 0076button to save the setting.
i The speed is highlighted in km/h or in
mph conversely to your speedometer.
Light submenu Setting the daytime running lamps
i This function is not available in Canada.
X Press the 0059or0065 button on the steer-
ing wheel to select the Sett.
Sett.menu.
X Press the 0064or0063 button to select the
Light
Light submenu. Menus and submenus
277On-board computer and displays Z
Page 281 of 466
R
Parking lamps
R Daytime running lamps
R Side marker lamps
R Surround lighting in the exterior mirrors
Activating/deactivating the interior light-
ing delayed switch-off
If you activate the Interior Lighting
Interior Lighting
Delay Delay function, the interior lighting remains
on for 20 seconds after you remove the
SmartKey from the ignition lock.
X Press the 0059or0065 button on the steer-
ing wheel to select the Sett
Sett menu.
X Press the 0064or0063 button to select the
Light Light submenu.
X Press 0076to confirm.
X Press the 0064or0063 button to select the
Interior Lighting Delay
Interior Lighting Delay function.
If the Interior
Interior Lighting
LightingDelay
Delayfunction
has been switched on, the vehicle interior is
displayed in orange in the multifunction
display.
X Press the 0076button to save the setting.
Vehicle submenu Activating/deactivating the automatic
door locking mechanism
If you activate the Automatic Door Lock Automatic Door Lock
function, the vehicle is centrally locked above
a speed of approximately 9 mph (15 km/h).
X Press the 0059or0065 button on the steer-
ing wheel to select the Sett
Settmenu.
X Press the 0064or0063 button to select the
Vehicle
Vehicle submenu.
X Press 0076to confirm.
X Press the 0064or0063 button to select the
Automatic Door Lock
Automatic Door Lock function.
When the Automatic
Automatic Door
DoorLock
Lockfunction
is activated, the vehicle doors are displayed
in orange in the multifunction display.
X Press the 0076button to save the setting.
For further information on the automatic lock- ing feature, see (Y page 88). Activating/deactivating the acoustic
locking verification signal
If you switch on the
Acoustic AcousticLock
Lockfunction,
an acoustic signal sounds when you lock the
vehicle.
X Press the 0059or0065 button on the steer-
ing wheel to select the Sett.
Sett. menu.
X Press 0064or0063 to select the Vehicle Vehicle
submenu.
X Press 0076to confirm.
X Press the 0064or0063 button to select the
Acoustic Lock
Acoustic Lock function.
If the Acoustic
Acoustic Lock
Lockfunction is activated,
the 0037 symbol in the multifunction dis-
play lights up orange.
X Press the 0076button to save the setting.
Activating/deactivating the radar sensor
system
X Press the 0059or0065 button on the steer-
ing wheel to select the Sett.
Sett. menu.
X Press 0064or0063 to select the Vehicle Vehicle
submenu.
X Press 0076to confirm.
X Press the 0063or0064 button to select
Radar Sensor (See Oper. Manual):
Radar Sensor (See Oper. Manual):.
You will see the selected setting: Enabled
Enabled
or Disabled Disabled.
X Press the 0076button to save the setting.
The following systems are switched off when the radar sensor system is deactivated:
R DISTRONIC PLUS (Y page 198)
R BAS PLUS (Y page 69)
R PRE-SAFE ®
Brake (Y page 75)
R Blind Spot Assist (Y page 237)
R Active Blind Spot Assist (Y page 241)
Convenience submenu Activating/deactivating the EASY-
ENTRY/EXIT feature
G
WARNING
When the EASY-ENTRY/EXIT feature adjusts
the steering wheel, you and other vehicle Menus and submenus
279On-board computer and displays
Z
Page 311 of 466
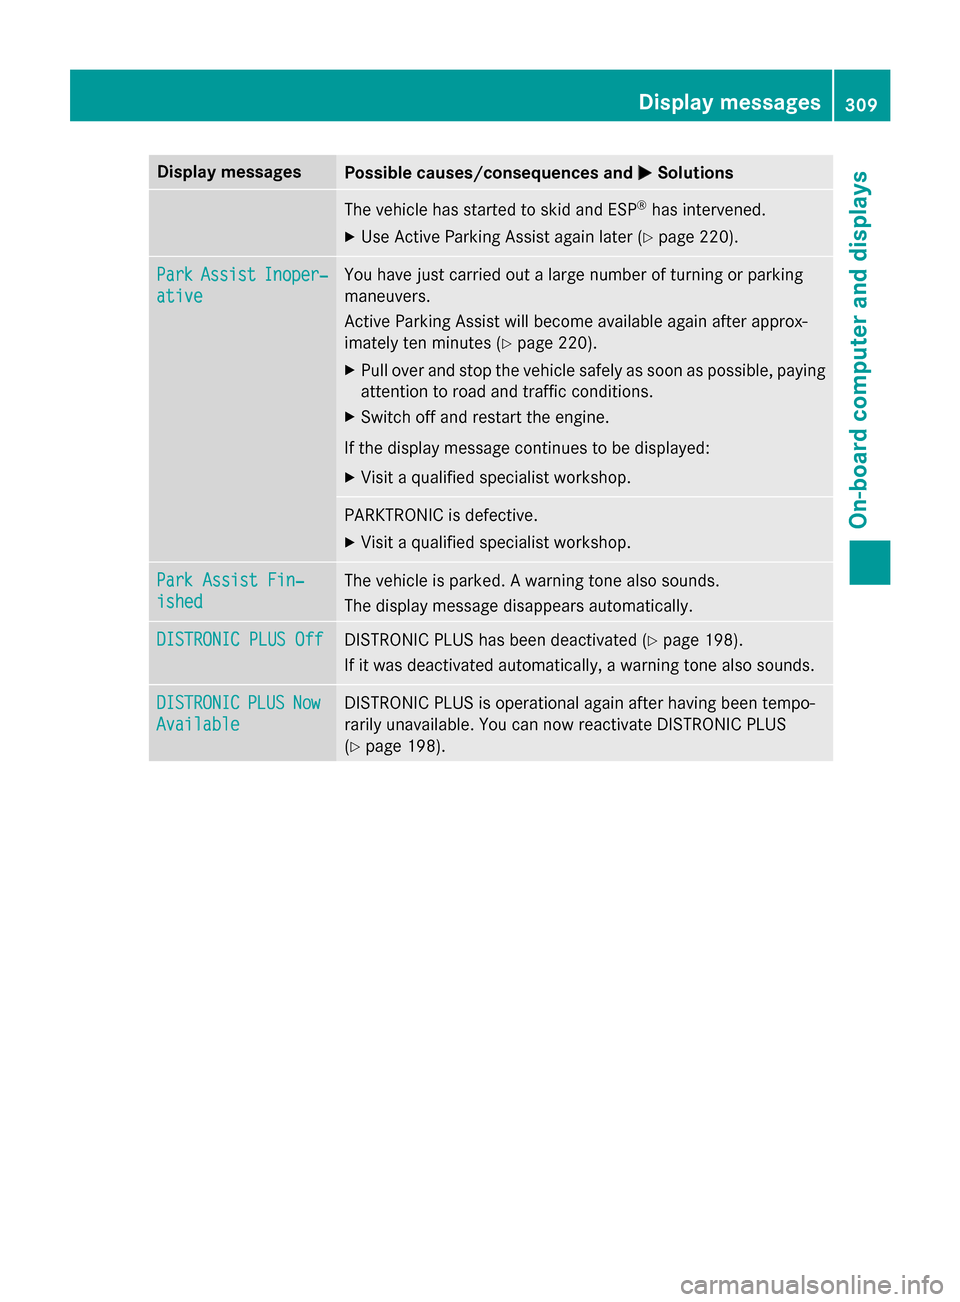
Display messages
Possible causes/consequences and
0050
0050Solutions The vehicle has started to skid and ESP
®
has intervened.
X Use Active Parking Assist again later (Y page 220).Park
Park
Assist
Assist Inoper‐
Inoper‐
ative
ative You have just carried out a large number of turning or parking
maneuvers.
Active Parking Assist will become available again after approx-
imately ten minutes (Y
page 220).
X Pull over and stop the vehicle safely as soon as possible, paying
attention to road and traffic conditions.
X Switch off and restart the engine.
If the display message continues to be displayed: X Visit a qualified specialist workshop. PARKTRONIC is defective.
X Visit a qualified specialist workshop. Park Assist Fin‐ Park Assist Fin‐
ished ished The vehicle is parked. A warning tone also sounds.
The display message disappears automatically.
DISTRONIC PLUS Off DISTRONIC PLUS Off DISTRONIC PLUS has been deactivated (Y
page 198).
If it was deactivated automatically, a warning tone also sounds. DISTRONIC
DISTRONIC
PLUS
PLUSNow
Now
Available
Available DISTRONIC PLUS is operational again after having been tempo-
rarily unavailable. You can now reactivate DISTRONIC PLUS
(Y
page 198). Display
messages
309On-board computer and displays Z
Page 312 of 466
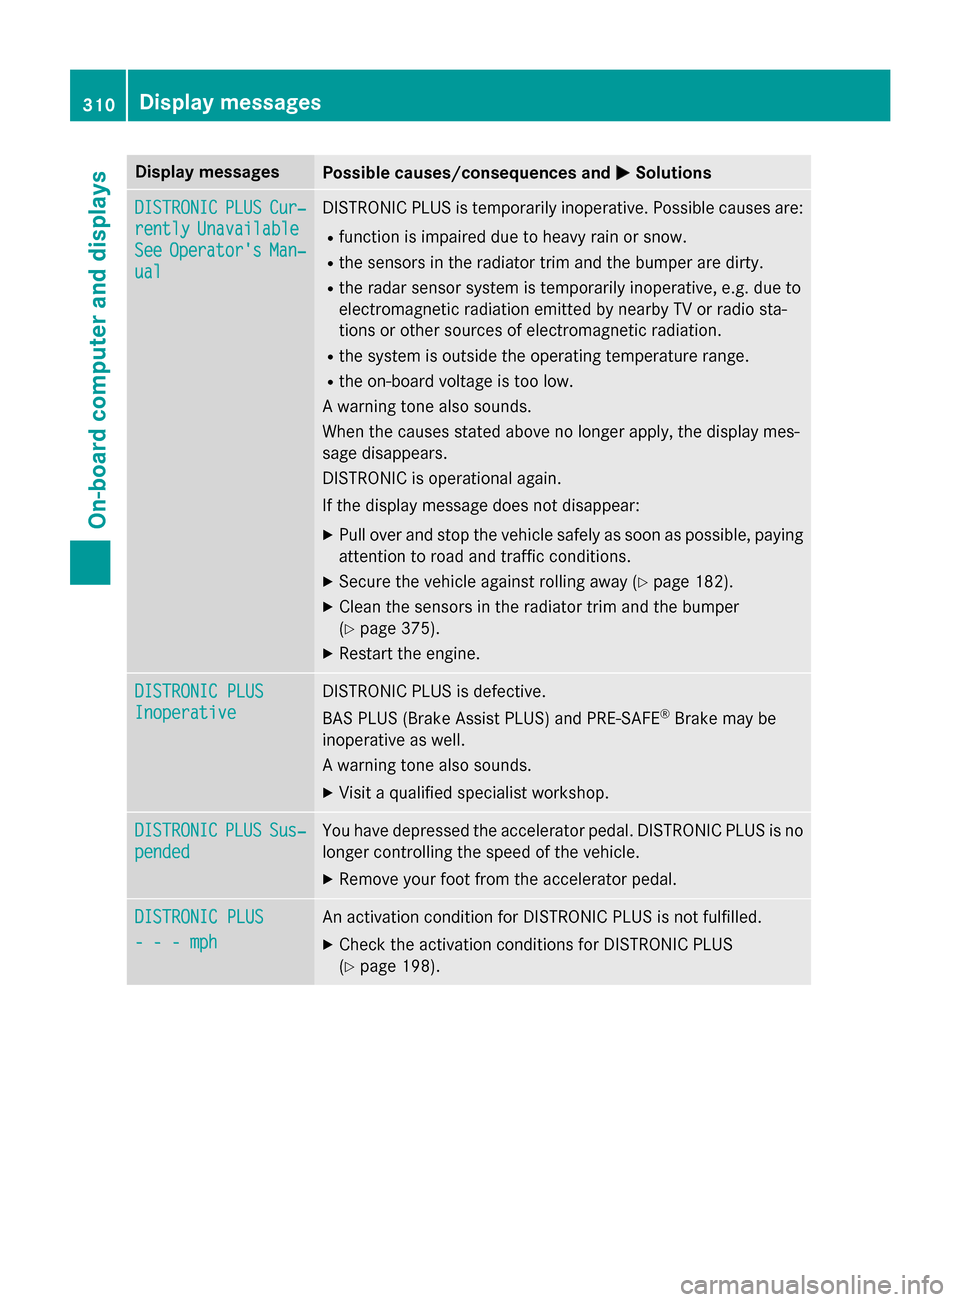
Display messages
Possible causes/consequences and
0050
0050Solutions DISTRONIC
DISTRONIC
PLUS
PLUSCur‐
Cur‐
rently
rently Unavailable
Unavailable
See
See Operator's
Operator's Man‐
Man‐
ual
ual DISTRONIC PLUS is temporarily inoperative. Possible causes are:
R function is impaired due to heavy rain or snow.
R the sensors in the radiator trim and the bumper are dirty.
R the radar sensor system is temporarily inoperative, e.g. due to
electromagnetic radiation emitted by nearby TV or radio sta-
tions or other sources of electromagnetic radiation.
R the system is outside the operating temperature range.
R the on-board voltage is too low.
A warning tone also sounds.
When the causes stated above no longer apply, the display mes-
sage disappears.
DISTRONIC is operational again.
If the display message does not disappear:
X Pull over and stop the vehicle safely as soon as possible, paying
attention to road and traffic conditions.
X Secure the vehicle against rolling away (Y page 182).
X Clean the sensors in the radiator trim and the bumper
(Y page 375).
X Restart the engine. DISTRONIC PLUS DISTRONIC PLUS
Inoperative Inoperative DISTRONIC PLUS is defective.
BAS PLUS (Brake Assist PLUS) and PRE-SAFE
®
Brake may be
inoperative as well.
A warning tone also sounds.
X Visit a qualified specialist workshop. DISTRONIC DISTRONIC
PLUS
PLUSSus‐
Sus‐
pended
pended You have depressed the accelerator pedal. DISTRONIC PLUS is no
longer controlling the speed of the vehicle.
X Remove your foot from the accelerator pedal. DISTRONIC PLUS
DISTRONIC PLUS
- - - mph - - - mph An activation condition for DISTRONIC PLUS is not fulfilled.
X Check the activation conditions for DISTRONIC PLUS
(Y page 198). 310
Display
messagesOn-board computer and displays
Page 326 of 466
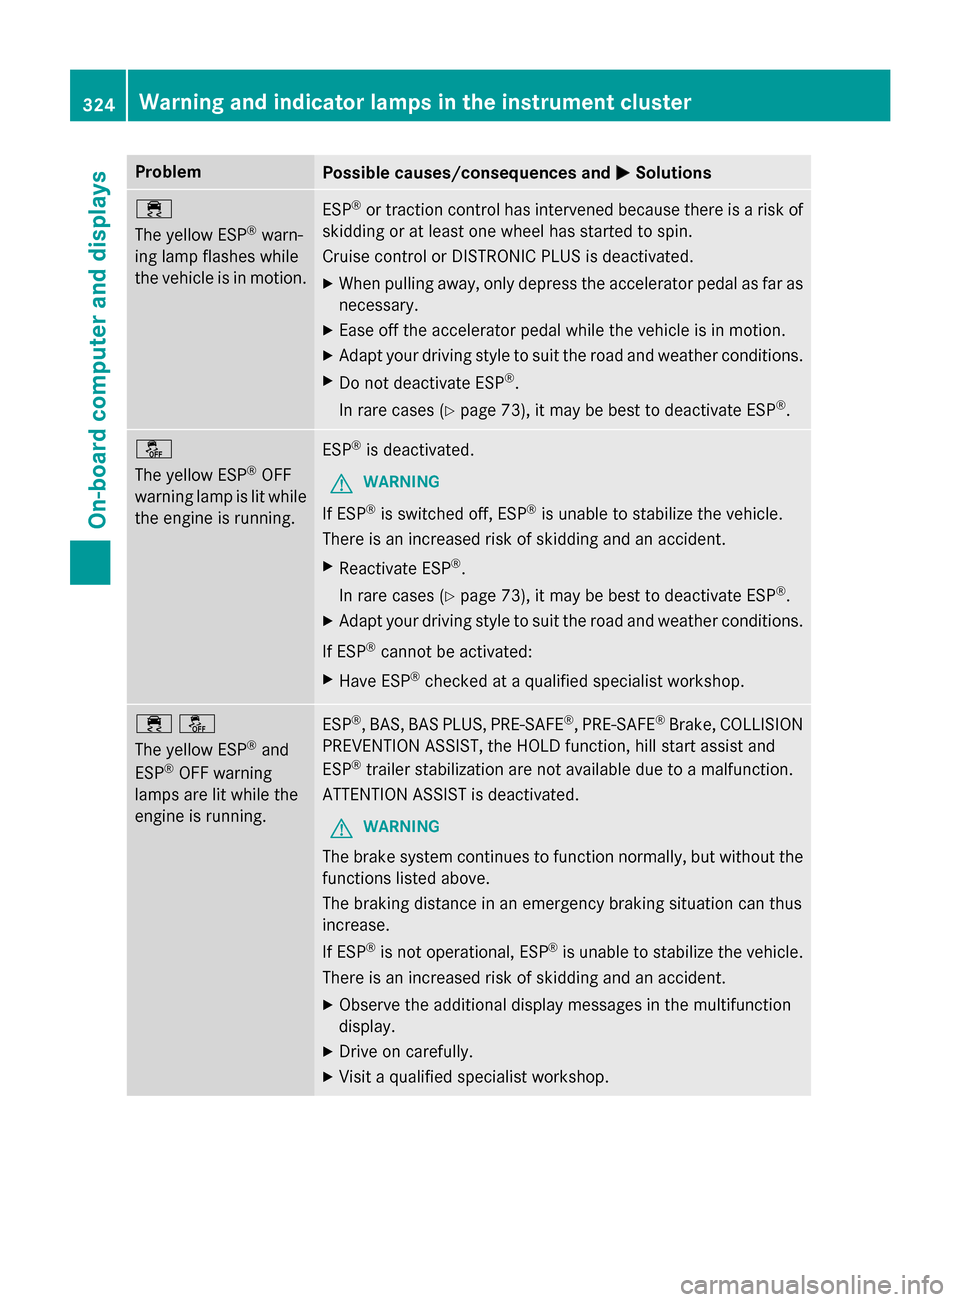
Problem
Possible causes/consequences and
0050
0050Solutions 00E5
The yellow ESP
®
warn-
ing lamp flashes while
the vehicle is in motion. ESP
®
or traction control has intervened because there is a risk of
skidding or at least one wheel has started to spin.
Cruise control or DISTRONIC PLUS is deactivated.
X When pulling away, only depress the accelerator pedal as far as
necessary.
X Ease off the accelerator pedal while the vehicle is in motion.
X Adapt your driving style to suit the road and weather conditions.
X Do not deactivate ESP ®
.
In rare cases (Y page 73), it may be best to deactivate ESP ®
. 00BB
The yellow ESP
®
OFF
warning lamp is lit while the engine is running. ESP
®
is deactivated.
G WARNING
If ESP ®
is switched off, ESP ®
is unable to stabilize the vehicle.
There is an increased risk of skidding and an accident.
X Reactivate ESP ®
.
In rare cases (Y page 73), it may be best to deactivate ESP ®
.
X Adapt your driving style to suit the road and weather conditions.
If ESP ®
cannot be activated:
X Have ESP ®
checked at a qualified specialist workshop. 00E500BB
The yellow ESP
®
and
ESP ®
OFF warning
lamps are lit while the
engine is running. ESP
®
, BAS, BAS PLUS, PRE-SAFE ®
, PRE-SAFE ®
Brake, COLLISION
PREVENTION ASSIST, the HOLD function, hill start assist and
ESP ®
trailer stabilization are not available due to a malfunction.
ATTENTION ASSIST is deactivated.
G WARNING
The brake system continues to function normally, but without the functions listed above.
The braking distance in an emergency braking situation can thus
increase.
If ESP ®
is not operational, ESP ®
is unable to stabilize the vehicle.
There is an increased risk of skidding and an accident.
X Observe the additional display messages in the multifunction
display.
X Drive on carefully.
X Visit a qualified specialist workshop. 324
Warning and indicator lamps in the instrument clusterOn-board computer and displays
Page 332 of 466
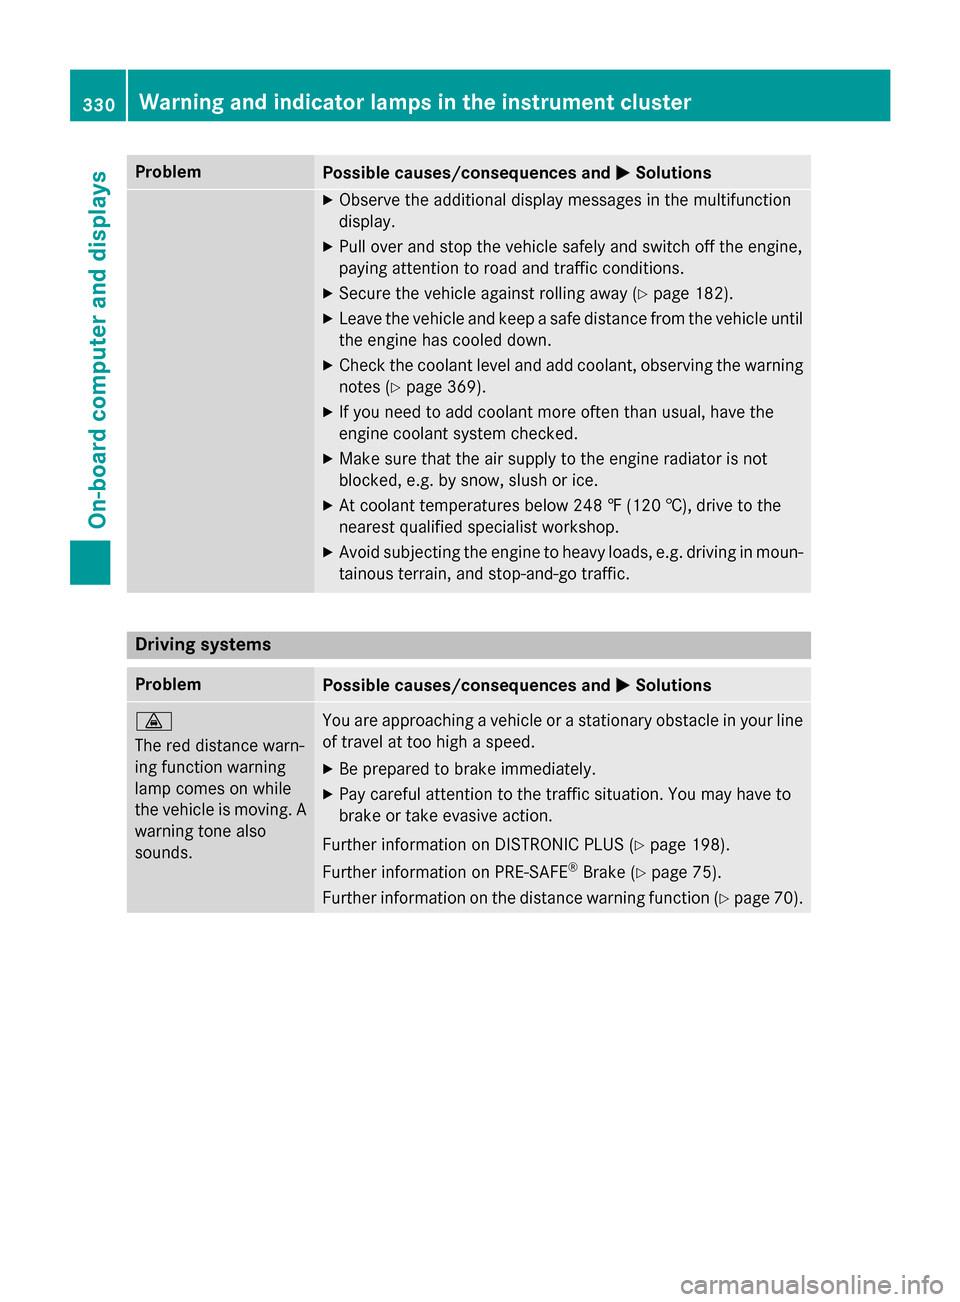
Problem
Possible causes/consequences and
0050
0050Solutions X
Observe the additional display messages in the multifunction
display.
X Pull over and stop the vehicle safely and switch off the engine,
paying attention to road and traffic conditions.
X Secure the vehicle against rolling away (Y page 182).
X Leave the vehicle and keep a safe distance from the vehicle until
the engine has cooled down.
X Check the coolant level and add coolant, observing the warning
notes (Y page 369).
X If you need to add coolant more often than usual, have the
engine coolant system checked.
X Make sure that the air supply to the engine radiator is not
blocked, e.g. by snow, slush or ice.
X At coolant temperatures below 248 ‡ (120 †), drive to the
nearest qualified specialist workshop.
X Avoid subjecting the engine to heavy loads, e.g. driving in moun-
tainous terrain, and stop-and-go traffic. Driving systems
Problem
Possible causes/consequences and
0050 0050Solutions 00BA
The red distance warn-
ing function warning
lamp comes on while
the vehicle is moving. A
warning tone also
sounds. You are approaching a vehicle or a stationary obstacle in your line
of travel at too high a speed.
X Be prepared to brake immediately.
X Pay careful attention to the traffic situation. You may have to
brake or take evasive action.
Further information on DISTRONIC PLUS (Y page 198).
Further information on PRE‑ SAFE®
Brake (Y page 75).
Further information on the distance warning function (Y page 70).330
Warning and indicator lamps in the instrument clusterOn-board computer and displays