Tail MERCEDES-BENZ M-Class 2015 W166 Service Manual
[x] Cancel search | Manufacturer: MERCEDES-BENZ, Model Year: 2015, Model line: M-Class, Model: MERCEDES-BENZ M-Class 2015 W166Pages: 466, PDF Size: 8.92 MB
Page 417 of 466

Step 3
Example 1 Example 2 Example 3
Permissible load
(maximum gross vehi-
cle weight rating from
the Tire and Loading
Information placard
minus the gross
weight of all occu-
pants) 1500 lbs (680 kg)
00F8750 lbs (340 kg) =
750 lbs (340 kg) 1500 lbs (680 kg)
00F8540 lbs (245 kg)
=960 lbs (435 kg) 1500 lbs (680 kg)
00F8150 lbs (68 kg) =
1350 lbs (612 kg)
Vehicle identification plate
Even if you have calculated the total cargo
carefully, you should still make sure that the
gross vehicle weight rating and the gross axle weight rating are not exceeded. Details can
be found on the vehicle identification plate on the B-pillar on the driver's side of the vehicle
(Y page 412).
Permissible gross vehicle weight: the
gross weight of the vehicle, all passengers,
load and trailer load/noseweight (if applica-
ble) must not exceed the permissible gross
vehicle weight.
Gross axle weight rating: the maximum per-
missible weight that can be carried by one
axle (front or rear axle).
To ensure that your vehicle does not exceed
the maximum permissible values (gross vehi-
cle weight and maximum gross axle weight
rating), have your loaded vehicle (including
driver, occupants, cargo, and full trailer load if applicable) weighed on a suitable vehicle
weighbridge. Trailer load/noseweight
The trailer load/noseweight affects the gross
weight of the vehicle. If a trailer is attached,
the trailer load/noseweight is included in the
load along with occupants and luggage. The
trailer load/noseweight is usually approx-
imately 8% of the gross weight of the trailer
and its cargo. All about wheels and tires
Uniform Tire Quality Grading Stand-
ards
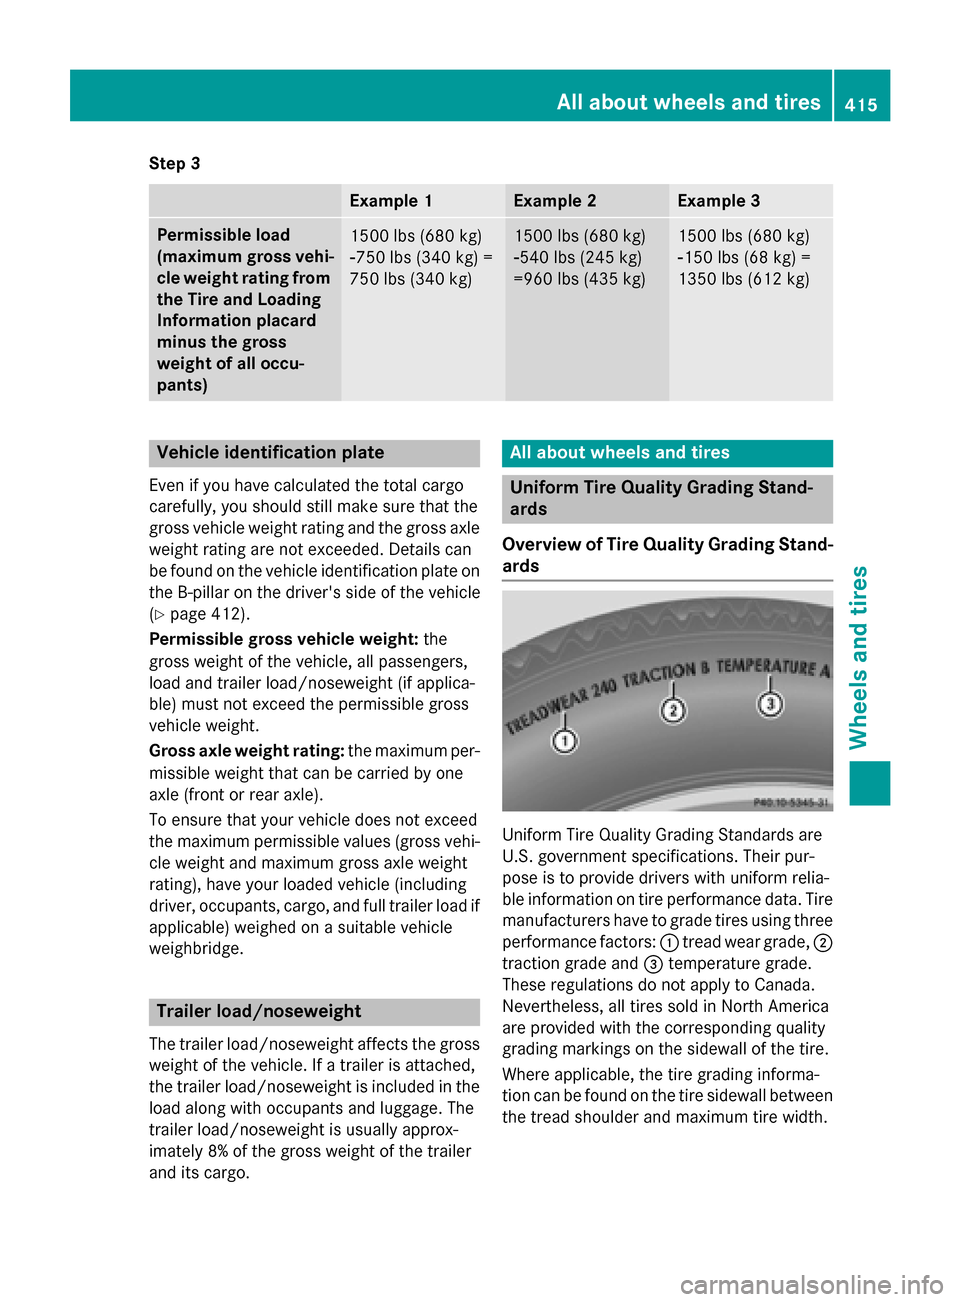
Overview of Tire Quality Grading Stand- ards Uniform Tire Quality Grading Standards are
U.S. government specifications. Their pur-
pose is to provide drivers with uniform relia-
ble information on tire performance data. Tire
manufacturers have to grade tires using three
performance factors: 0043tread wear grade, 0044
traction grade and 0087temperature grade.
These regulations do not apply to Canada.
Nevertheless, all tires sold in North America
are provided with the corresponding quality
grading markings on the sidewall of the tire.
Where applicable, the tire grading informa-
tion can be found on the tire sidewall between
the tread shoulder and maximum tire width. All about wheels and tires
415Wheels and tires Z
Page 422 of 466

ble load can be found on the vehicle's Tire and
Loading Information placard on the B-pillar on
the driver's side (Y page 412).
i The actual values for tires are vehicle-
specific and may deviate from the values in
the illustration.
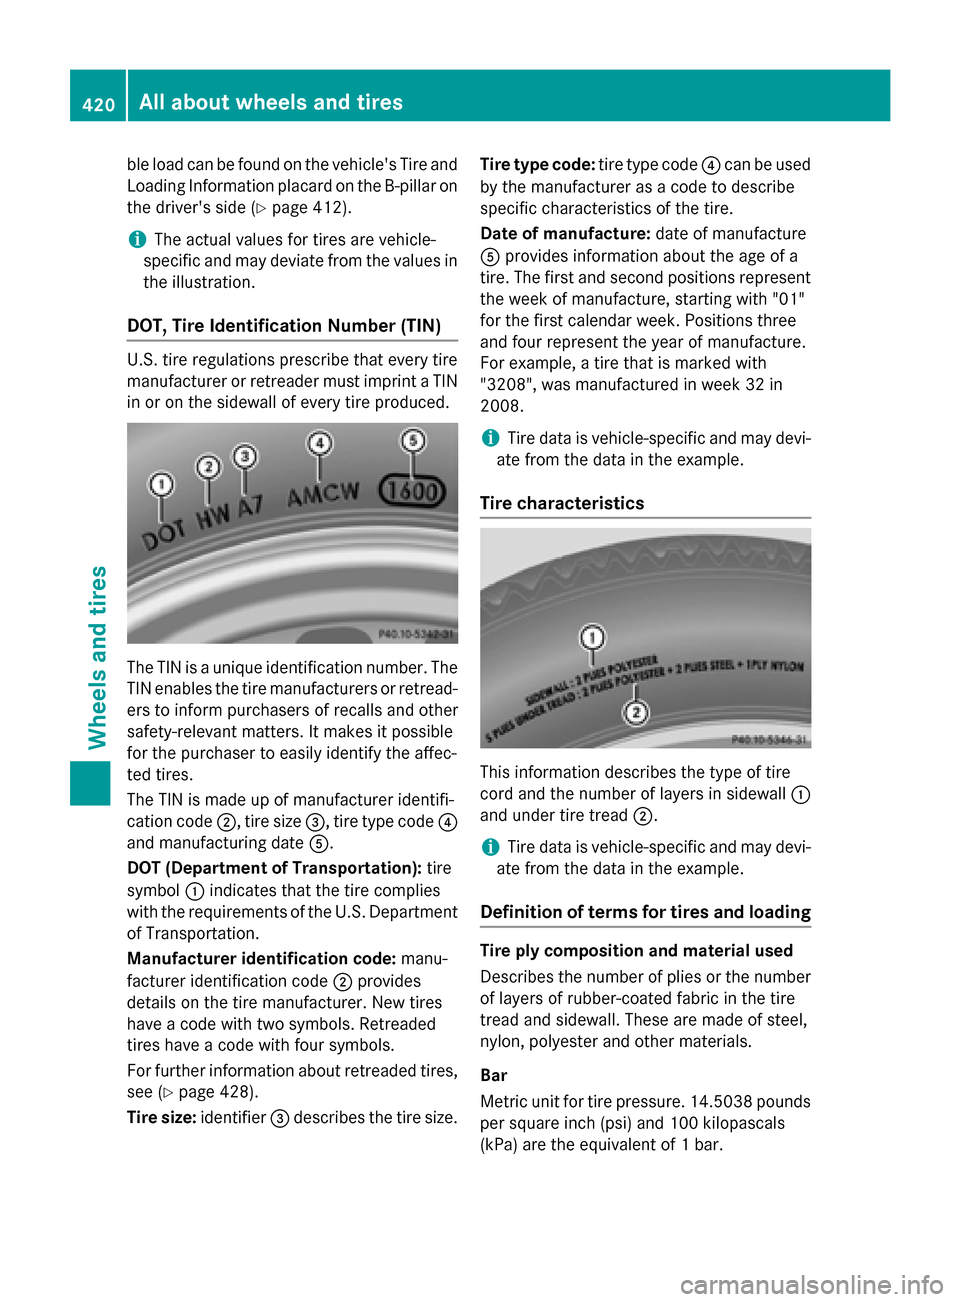
DOT, Tire Identification Number (TIN) U.S. tire regulations prescribe that every tire
manufacturer or retreader must imprint a TIN
in or on the sidewall of every tire produced. The TIN is a unique identification number. The
TIN enables the tire manufacturers or retread- ers to inform purchasers of recalls and other
safety-relevant matters. It makes it possible
for the purchaser to easily identify the affec-
ted tires.
The TIN is made up of manufacturer identifi-
cation code 0044, tire size0087, tire type code 0085
and manufacturing date 0083.
DOT (Department of Transportation): tire
symbol 0043indicates that the tire complies
with the requirements of the U.S. Department
of Transportation.
Manufacturer identification code: manu-
facturer identification code 0044provides
details on the tire manufacturer. New tires
have a code with two symbols. Retreaded
tires have a code with four symbols.
For further information about retreaded tires,
see (Y page 428).
Tire size: identifier0087describes the tire size. Tire type code:
tire type code0085can be used
by the manufacturer as a code to describe
specific characteristics of the tire.
Date of manufacture: date of manufacture
0083 provides information about the age of a
tire. The first and second positions represent the week of manufacture, starting with "01"
for the first calendar week. Positions three
and four represent the year of manufacture.
For example, a tire that is marked with
"3208", was manufactured in week 32 in
2008.
i Tire data is vehicle-specific and may devi-
ate from the data in the example.
Tire characteristics This information describes the type of tire
cord and the number of layers in sidewall
0043
and under tire tread 0044.
i Tire data is vehicle-specific and may devi-
ate from the data in the example.
Definition of terms for tires and loading Tire ply composition and material used
Describes the number of plies or the number of layers of rubber-coated fabric in the tire
tread and sidewall. These are made of steel,
nylon, polyester and other materials.
Bar
Metric unit for tire pressure. 14.5038 pounds
per square inch (psi) and 100 kilopascals
(kPa) are the equivalent of 1 bar. 420
All about wheels and tiresWheels and tires
Page 428 of 466

R
Do not use wooden blocks or similar
objects as a jack underlay. Otherwise, the
jack will not be able to achieve its load-
bearing capacity due to the restricted
height.
R Make sure that the distance between the
underside of the tires and the ground does
not exceed 1.2 in (3 cm).
R Do not place your hands or feet under the
raised vehicle.
R Do not lie under the vehicle.
R Do not start the engine when the vehicle is
raised.
R Never open or close a door or the tailgate
when the vehicle is raised.
R Make sure that no persons are present in
the vehicle when the vehicle is raised. X
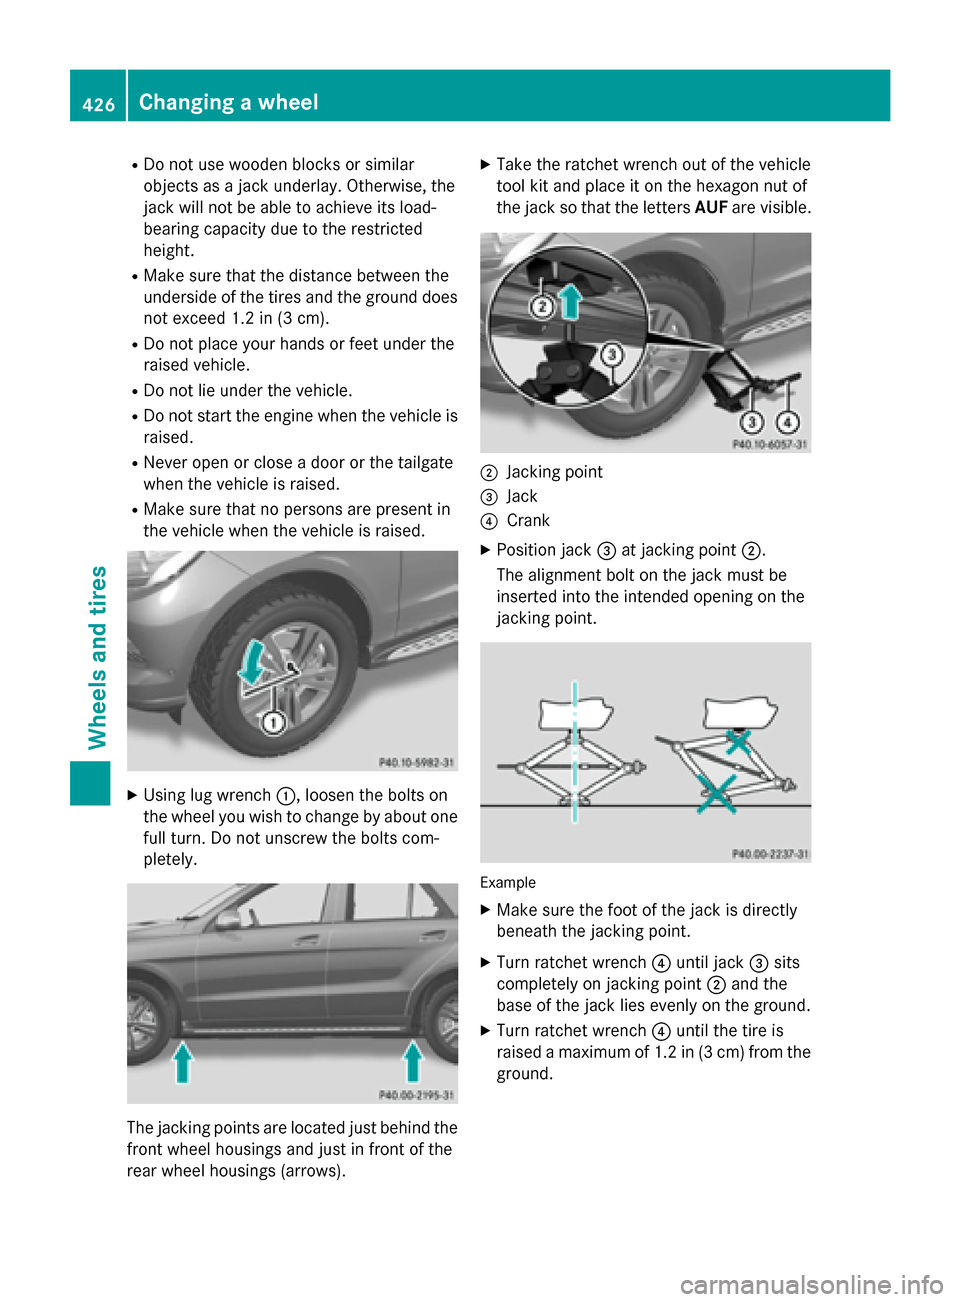
Using lug wrench 0043, loosen the bolts on
the wheel you wish to change by about one full turn. Do not unscrew the bolts com-
pletely. The jacking points are located just behind the
front wheel housings and just in front of the
rear wheel housings (arrows). X
Take the ratchet wrench out of the vehicle
tool kit and place it on the hexagon nut of
the jack so that the letters AUFare visible. 0044
Jacking point
0087 Jack
0085 Crank
X Position jack 0087at jacking point 0044.
The alignment bolt on the jack must be
inserted into the intended opening on the
jacking point. Example
X Make sure the foot of the jack is directly
beneath the jacking point.
X Turn ratchet wrench 0085until jack 0087sits
completely on jacking point 0044and the
base of the jack lies evenly on the ground.
X Turn ratchet wrench 0085until the tire is
raised a maximum of 1.2 in (3 cm) from the ground. 426
Changing a
wheelWheels and tires
Page 444 of 466

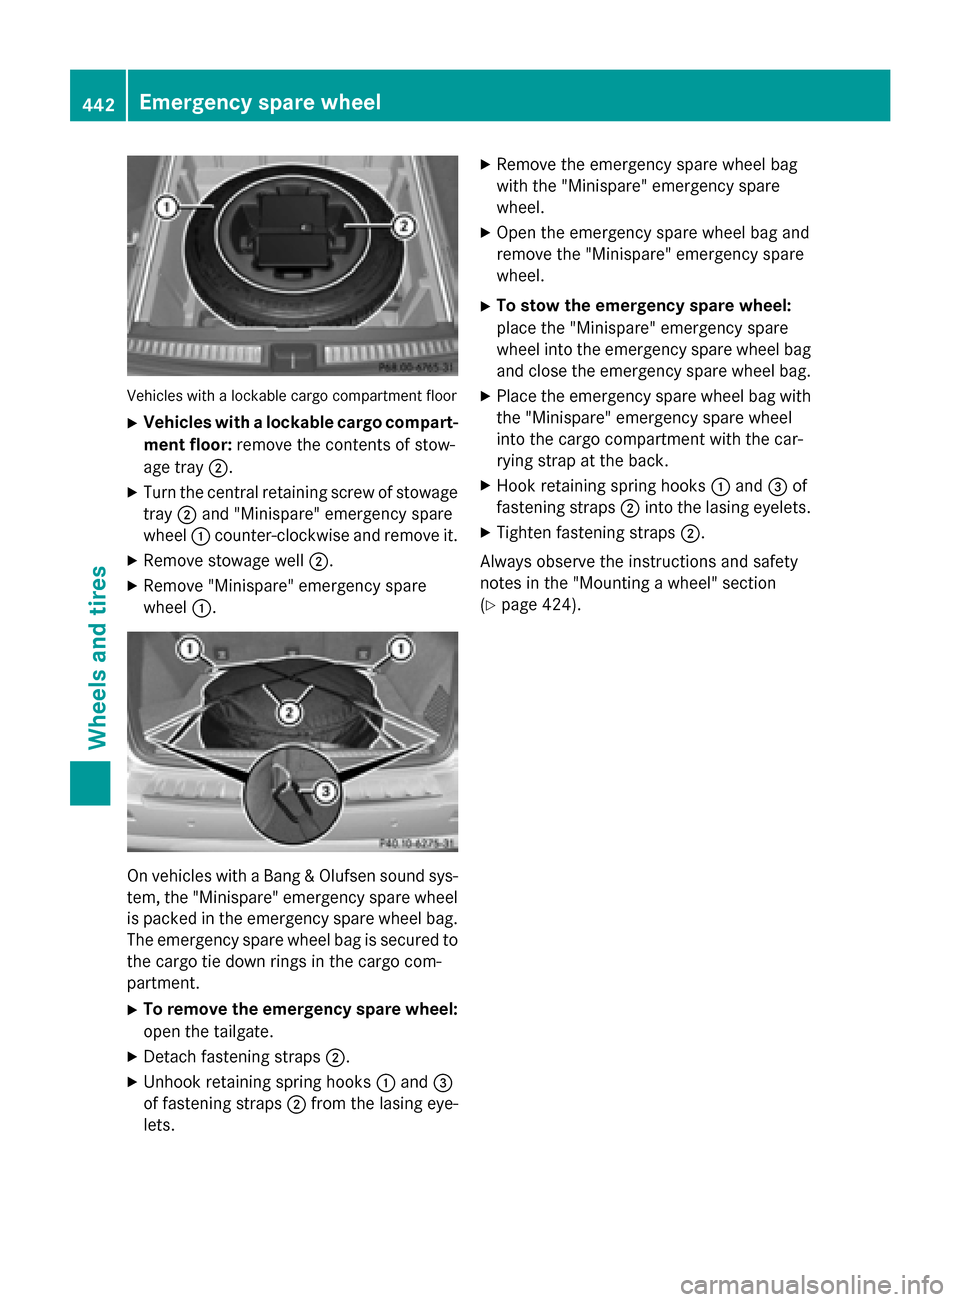
Vehicles with a lockable cargo compartment floor
X Vehicles with a lockable cargo compart-
ment floor: remove the contents of stow-
age tray 0044.
X Turn the central retaining screw of stowage
tray 0044and "Minispare" emergency spare
wheel 0043counter-clockwise and remove it.
X Remove stowage well 0044.
X Remove "Minispare" emergency spare
wheel 0043. On vehicles with a Bang & Olufsen sound sys-
tem, the "Minispare" emergency spare wheel
is packed in the emergency spare wheel bag. The emergency spare wheel bag is secured tothe cargo tie down rings in the cargo com-
partment.
X To remove the emergency spare wheel:
open the tailgate.
X Detach fastening straps 0044.
X Unhook retaining spring hooks 0043and 0087
of fastening straps 0044from the lasing eye-
lets. X
Remove the emergency spare wheel bag
with the "Minispare" emergency spare
wheel.
X Open the emergency spare wheel bag and
remove the "Minispare" emergency spare
wheel.
X To stow the emergency spare wheel:
place the "Minispare" emergency spare
wheel into the emergency spare wheel bag
and close the emergency spare wheel bag.
X Place the emergency spare wheel bag with
the "Minispare" emergency spare wheel
into the cargo compartment with the car-
rying strap at the back.
X Hook retaining spring hooks 0043and 0087of
fastening straps 0044into the lasing eyelets.
X Tighten fastening straps 0044.
Always observe the instructions and safety
notes in the "Mounting a wheel" section
(Y page 424). 442
Emergency spare wheelWheels and tires