Electric mirrors MERCEDES-BENZ M-Class 2015 W166 Owner's Manual
[x] Cancel search | Manufacturer: MERCEDES-BENZ, Model Year: 2015, Model line: M-Class, Model: MERCEDES-BENZ M-Class 2015 W166Pages: 466, PDF Size: 8.92 MB
Page 13 of 466
Engine
Check Engine warning lamp .......... .327
Display message ............................ 300
ECO start/stop function ................ 162
Engine number ............................... 447
Irregular running ............................ 167
Jump-starting ................................. 391
Starting problems .......................... 167
Starting the engine with the
SmartKey ....................................... 160
Starting with KEYLESS-GO ............. 160
Switching off .................................. 183
Tow-starting (vehicle) ..................... 396
Engine electronics
Problem (malfunction) ................... 167
Engine jump starting
see Jump starting (engine)
Engine oil
Adding .......................................... .368
Additives ........................................ 453
Checking the oil level ..................... 367
Checking the oil level using the
dipstick .......................................... 367
Display message ............................ 302
Filling capacity ............................... 452
Notes about oil grades ................... 452
Notes on oil level/consumption .... 367
Temperature (on-board com-
puter) ............................................. 281
Viscosity ........................................ 453
ESP ®
(Electronic Stability Pro-
gram) AMG menu (on-board computer) ... 281
Characteristics ................................. 73
Deactivating/activating ................... 73
Display message ............................ 285
ETS/4ETS ........................................ 72
Function/notes ................................ 72
General notes .................................. 72
Important safety information ........... 73
Trailer stabilization ........................... 74
Warning lamp ................................. 323
ETS/4ETS (Electronic Traction Sys-
tem) ...................................................... 72
Exhaust check ................................... 186
Exhaust pipe (cleaning instruc-
tions) ................................................. .376 Exterior lighting
see Lights
Exterior mirrors
Adjusting ....................................... 114
Dipping (automatic) ....................... 115
Folding in/out (automatically) ....... 115
Folding in/out (electrically) ........... 115
Folding in when locking (on-board computer) ...................................... 280
Out of position (troubleshooting) ... 115
Setting ........................................... 115
Storing settings (memory func-
tion) ............................................... 116
Storing the parking position .......... 116
Eyeglasses compartment ................. 336 F
Filler cap see Fuel filler flap
Flat tire
MOExtended tire s.......................... 383
Preparing the vehicle ..................... 383
TIREFIT kit ...................................... 384
see Emergency spare wheel
Floormats ........................................... 364
Folding the rear bench seat for-
wards/back ....................................... 337
Fording Off-road ......................................... 190
On flooded roads ........................... 190
Fuel
Additives ........................................ 449
Consumption statistics .................. 269
Displaying the current consump-
tion ................................................ 270
Displaying the range ...................... 270
Driving tips .................................... 186
Flexible fuel vehicles ...................... 450
Fuel gaug e....................................... 35
Grade (gasoline )............................ 448
Important safety notes .................. 448
Low outside temperature s............. 450
Premium-grade unleaded gaso-
line ................................................. 448
Problem (malfunction) ................... 180
Quality (diesel )............................... 449 Index
11
Page 18 of 466
Opening and closing the side trim
panels .................................................1 32
Operating safety Declaration of conformity ................ 28
Important safety notes .................... 27
Operating system
see On-board computer
Operator's Manual
Vehicle equipment ........................... 25
Outside temperature display ........... 267
Overhead control panel ......................41
Override feature Rear side windows ........................... 67 P
Paint code number ............................446
Paintwork (cleaning instructions) ... 373
Panic alarm .......................................... 44
Panorama roof with power tilt/
sliding panel
Important safety notes .................... 97
Opening/closing .............................. 99
Opening/closing the roller sun-
blind ............................................... 100
Problem (malfunction) ................... 101
Resetting ....................................... 100
Parking
Important safety notes .................. 182
Parking brake ................................ 184
Position of exterior mirror, front-
passenger side ............................... 116
Rear view camera .......................... 224
see PARKTRONIC
Parking aid
Active Parking Assist ..................... 220
see Exterior mirrors
see PARKTRONIC
Parking assistance
see PARKTRONIC
Parking brake
Display message ............................ 288
Electric parking brake .................... 184
Warning lamp ................................. 326
Parking lamps
Switching on/off ........................... 122
Parking lamps (changing bulbs) ...... 131PARKTRONIC
Deactivating/activating ................. 219
Driving system ............................... 217
Function/notes ............................ .217
Important safety notes .................. 217
Problem (malfunction) ................... 220
Range of the sensors ..................... 217
Trailer towing ................................. 219
Warning displa y............................. 218
PASSENGER AIR BAG OFF
Indicator lamp .................................. 45
Problems (malfunction) .................. 295
Pets in the vehicle ............................... 67
Plastic trim (cleaning instruc-
tions) .................................................. 378
Power closing feature ......................... 88
Power washers .................................. 373
Power windows see Side windows
PRE-SAFE ®
(anticipatory occupant
protection) Display message ............................ 291
Operation ......................................... 60
PRE-SAFE ®
Brake
Activating/deactivating ................. 276
Display message ............................ 293
Function/note s................................ 75
Warning lamp ................................. 330
Program selector button .................. 172
Protection of the environment General notes .................................. 24
Pulling away
Trailer ............................................ 161
Pulling away (automatic transmis-
sion) .................................................... 160 Q
Qualified specialist workshop ........... 29 R
RACETIMER (on-board computer) .... 282
Radar sensor system Activating/deactivating ................. 279
Display message ............................ 307
Radiator cover ................................... 36716
Index
Page 106 of 466
Useful information
i This Operator's Manual describes all
models and all standard and optional equip- ment of your vehicle available at the time of
publication of the Operator's Manual.
Country-specific differences are possible.
Please note that your vehicle may not be
equipped with all features described. This
also applies to safety-related systems and
functions.
i Read the information on qualified special-
ist workshops (Y page 29). Correct driver's seat position
G
WARNING
You could lose control of your vehicle if you do the following while driving:
R adjust the driver's seat, head restraint,
steering wheel or mirrors
R fasten the seat belt
There is a risk of an accident.
Adjust the driver's seat, head restraint, steer-
ing wheel and mirror and fasten your seat belt before starting the engine. X
Observe the safety guidelines on seat
adjustment (Y page 105).
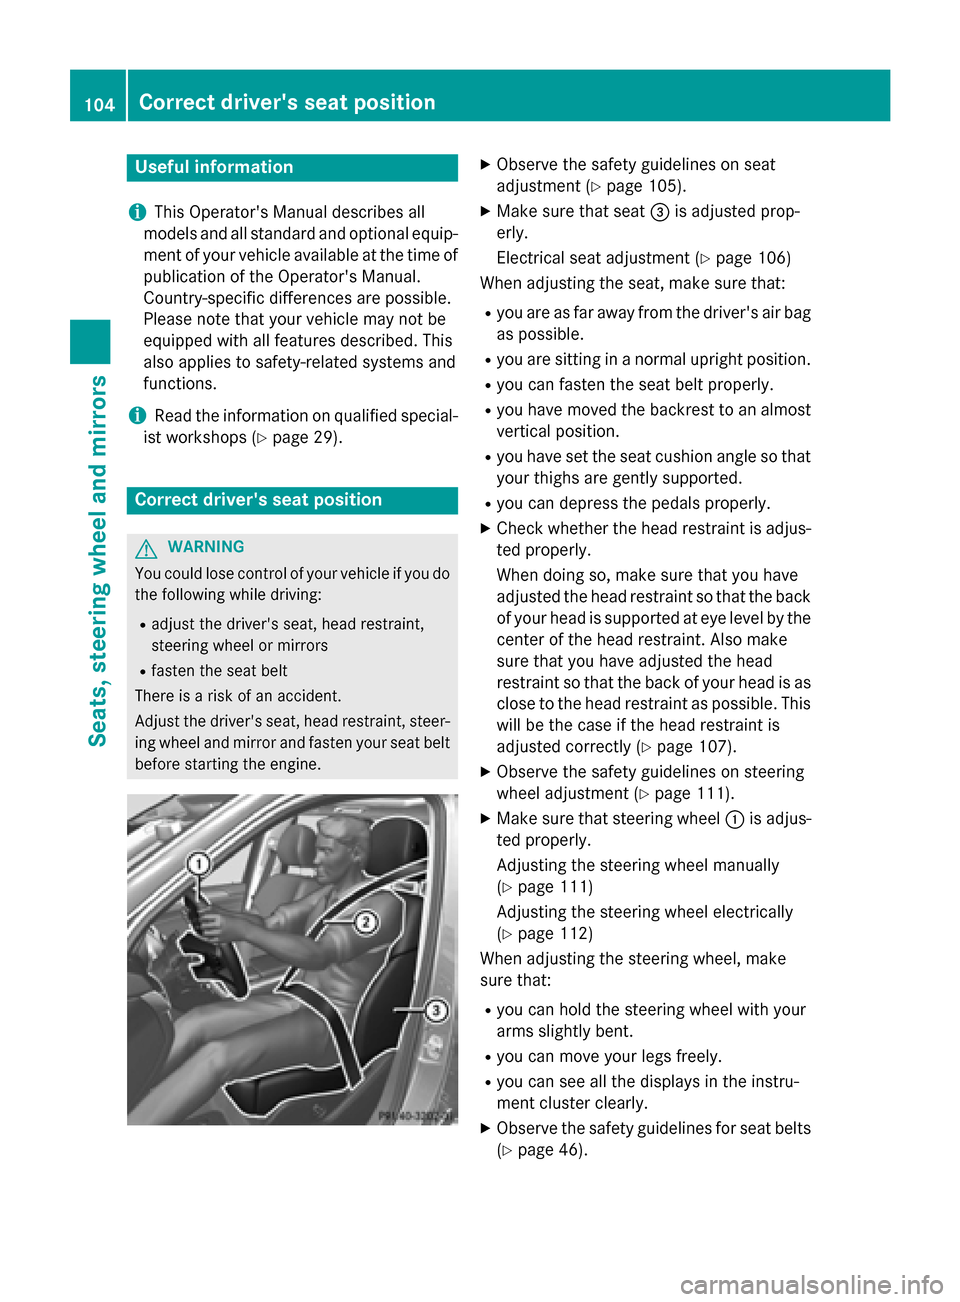
X Make sure that seat 0087is adjusted prop-
erly.
Electrical seat adjustment (Y page 106)
When adjusting the seat, make sure that:
R you are as far away from the driver's air bag
as possible.
R you are sitting in a normal upright position.
R you can fasten the seat belt properly.
R you have moved the backrest to an almost
vertical position.
R you have set the seat cushion angle so that
your thighs are gently supported.
R you can depress the pedals properly.
X Check whether the head restraint is adjus-
ted properly.
When doing so, make sure that you have
adjusted the head restraint so that the back of your head is supported at eye level by the
center of the head restraint. Also make
sure that you have adjusted the head
restraint so that the back of your head is as close to the head restraint as possible. Thiswill be the case if the head restraint is
adjusted correctly (Y page 107).
X Observe the safety guidelines on steering
wheel adjustment (Y page 111).
X Make sure that steering wheel 0043is adjus-
ted properly.
Adjusting the steering wheel manually
(Y page 111)
Adjusting the steering wheel electrically
(Y page 112)
When adjusting the steering wheel, make
sure that:
R you can hold the steering wheel with your
arms slightly bent.
R you can move your legs freely.
R you can see all the displays in the instru-
ment cluster clearly.
X Observe the safety guidelines for seat belts
(Y page 46). 104
Correct driver's seat positionSeats, steering wheel and mirrors
Page 107 of 466
X
Check whether you have fastened seat
belt 0044properly (Y page 48).
The seat belt should:
R fit snugly across your body
R be routed across the middle of your shoul-
der
R be routed in your pelvic area across the hip
joints
X Before starting off, adjust the rear-view mir-
ror and the exterior mirrors in such a way
that you have a good view of road and traf-
fic conditions (Y page 114).
X Vehicles with a memory function: save
the seat, steering wheel and exterior mirror settings with the memory function
(Y page 116). Seats
Important safety notes
G
WARNING
Children could become trapped if they adjust the seats, particularly when unattended.
There is a risk of injury.
When leaving the vehicle, always take the
SmartKey with you and lock the vehicle. Never leave children unsupervised in the vehicle. G
WARNING
You could lose control of your vehicle if you do the following while driving:
R adjust the driver's seat, head restraint,
steering wheel or mirrors
R fasten the seat belt
There is a risk of an accident.
Adjust the driver's seat, head restraint, steer-
ing wheel and mirror and fasten your seat belt before starting the engine. G
WARNING
If you adjust the seat height carelessly, you or other vehicle occupants could be trapped andthereby injured. Children in particular could accidentally press the electrical seat adjust-
ment buttons and become trapped. There is a
risk of injury.
While moving the seats, make sure that your
hands or other body parts do not get under the
lever assembly of the seat adjustment sys-
tem. G
WARNING
When you adjust a seat, you or other vehicle
occupants could become trapped, e.g. on the seat guide rail. There is a risk of injury.
Make sure when adjusting a seat that no one
has any body parts in the sweep of the seat. G
WARNING
If head restraints are not installed and adjus-
ted correctly, they cannot provide protection
as intended. There is an increased risk of
injury in the head and neck area, e.g. in the
event of an accident or when braking.
Always drive with the head restraints instal-
led. Before driving off, make sure for every
vehicle occupant that the center of the head
restraint supports the back of the head at
about eye level. G
WARNING
The seat belt does not offer the intended level of protection if you have not moved the back-
rest to an almost vertical position. When brak-
ing or in the event of an accident, you could
slide underneath the seat belt and sustain
abdomen or neck injuries, for example. This
poses an increased risk of injury or even fatal injury.
Adjust the seat properly before beginning
your journey. Always ensure that the backrest
is in an almost vertical position and that the
shoulder section of your seat belt is routed
across the center of your shoulder. G
WARNING
According to accident statistics, children are
safer when properly restrained on the rear
seats than on the front-passenger seat. Thus, Seats
105Seats, steering wheel and mirrors
Z
Page 108 of 466
we strongly recommend that children be
placed in the rear seat whenever possible.
Regardless of seating position, children 12
years old and under must be seated and prop- erly secured in an appropriately sized child
restraint system or booster seat recommen-
ded for the size and weight of the child. For
additional information, see the "Children in
the vehicle" section.
A child's risk of serious or fatal injuries is sig- nificantly increased if the child restraints are
not properly secured in the vehicle and/or thechild is not properly secured in the child
restraint.
! To avoid damage to the seats and the seat
heating, observe the following information:
R keep liquids from spilling on the seats. If
liquid is spilled on the seats, dry them as soon as possible.
R if the seat covers are damp or wet, do not
switch on the seat heating. The seat
heating should also not be used to dry
the seats.
R clean the seat covers as recommended;
see "Interior care".
R do not transport heavy loads on the
seats. Do not place sharp objects on the seat cushions, e.g. knives, nails or tools. The seats should only be occupied by
passengers, if possible.
R when the seat heating is in operation, do
not cover the seats with insulating mate-
rials, e.g. blankets, coats, bags, seat cov- ers, child seats or booster seats.
! Make sure that there are no objects in the
footwell under or behind the seats when
moving the seats back. There is a risk that
the seats and/or the objects could be dam- aged.
i It is not possible to remove the head
restraints from the front seats. The rear-
compartment head restraints, however,
can be removed (Y page 108). For more information, contact a qualified
specialist workshop.
i Further related subjects:
R Important safety notes on air bags
(Y page 50)
R Cargo compartment enlargement (fold-
ing down the rear bench seat)
(Y page 337)
R Securing children in the vehicle
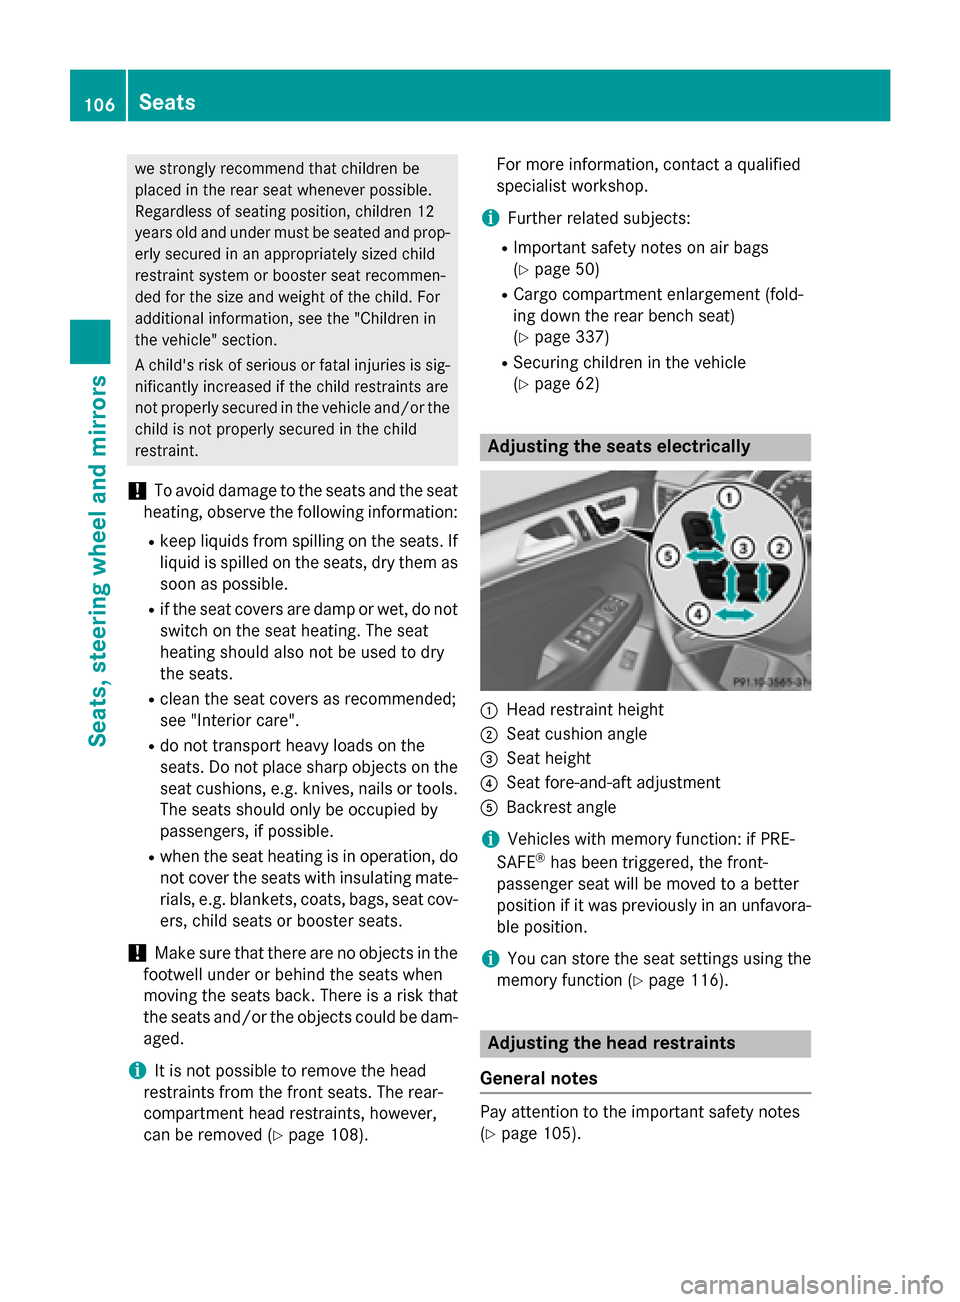
(Y page 62) Adjusting the seats electrically
0043
Head restraint height
0044 Seat cushion angle
0087 Seat height
0085 Seat fore-and-aft adjustment
0083 Backrest angle
i Vehicles with memory function: if PRE-
SAFE ®
has been triggered, the front-
passenger seat will be moved to a better
position if it was previously in an unfavora- ble position.
i You can store the seat settings using the
memory function (Y page 116). Adjusting the head restraints
General notes Pay attention to the important safety notes
(Y
page 105). 106
SeatsSeats, steering wheel and mirrors
Page 112 of 466
Problems with the seat heating
Problem
Possible causes/consequences and
0050
0050Solutions The seat heating has
switched off prema-
turely or cannot be
switched on. The on-board voltage is too low because too many electrical con-
sumers are switched on.
X Switch off electrical consumers that you do not need, such as
the rear window defroster or interior lighting.
Once the battery is sufficiently charged, the seat heating will
switch back on automatically. Switching the seat ventilation on/off
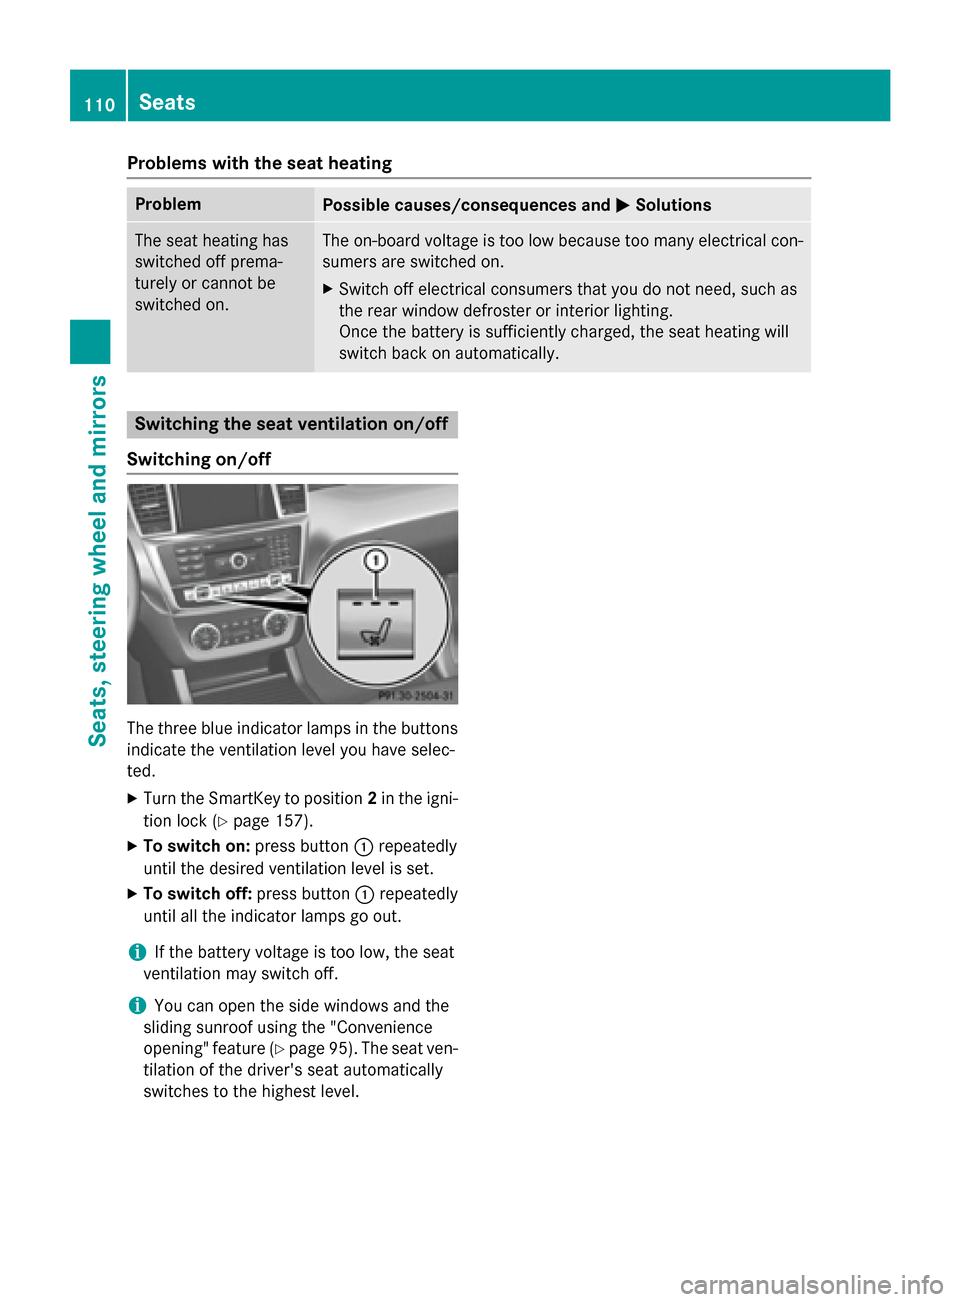
Switching on/off The three blue indicator lamps in the buttons
indicate the ventilation level you have selec-
ted.
X Turn the SmartKey to position 2in the igni-
tion lock (Y page 157).
X To switch on: press button0043repeatedly
until the desired ventilation level is set.
X To switch off: press button0043repeatedly
until all the indicator lamps go out.
i If the battery voltage is too low, the seat
ventilation may switch off.
i You can open the side windows and the
sliding sunroof using the "Convenience
opening" feature (Y page 95). The seat ven-
tilation of the driver's seat automatically
switches to the highest level. 110
SeatsSeats, steering wheel and mirrors
Page 113 of 466
Problems with the seat ventilation
Problem
Possible causes/consequences and
0050
0050Solutions The seat ventilation has
switched off prema-
turely or cannot be
switched on. The on-board voltage is too low because too many electrical con-
sumers are switched on.
X Switch off electrical consumers that you do not need, such as
the rear window defroster or interior lighting.
Once the battery is sufficiently charged, the seat ventilation will
switch back on automatically. Steering wheel
Important safety notes
G
WARNING
You could lose control of your vehicle if you do the following while driving:
R adjust the driver's seat, head restraint,
steering wheel or mirrors
R fasten the seat belt
There is a risk of an accident.
Adjust the driver's seat, head restraint, steer-
ing wheel and mirror and fasten your seat belt before starting the engine. G
WARNING
Children could injure themselves if they
adjust the steering wheel. There is a risk of
injury.
When leaving the vehicle, always take the
SmartKey with you and lock the vehicle. Never leave children unsupervised in the vehicle. Adjusting the steering wheel man-
ually
G
WARNING
If the steering wheel is unlocked while the
vehicle is in motion, it could change position
unexpectedly. This could cause you to lose
control of the vehicle. There is a risk of an
accident. Before starting off, make sure the steering
wheel is locked. Never unlock the steering
wheel while the vehicle is in motion.
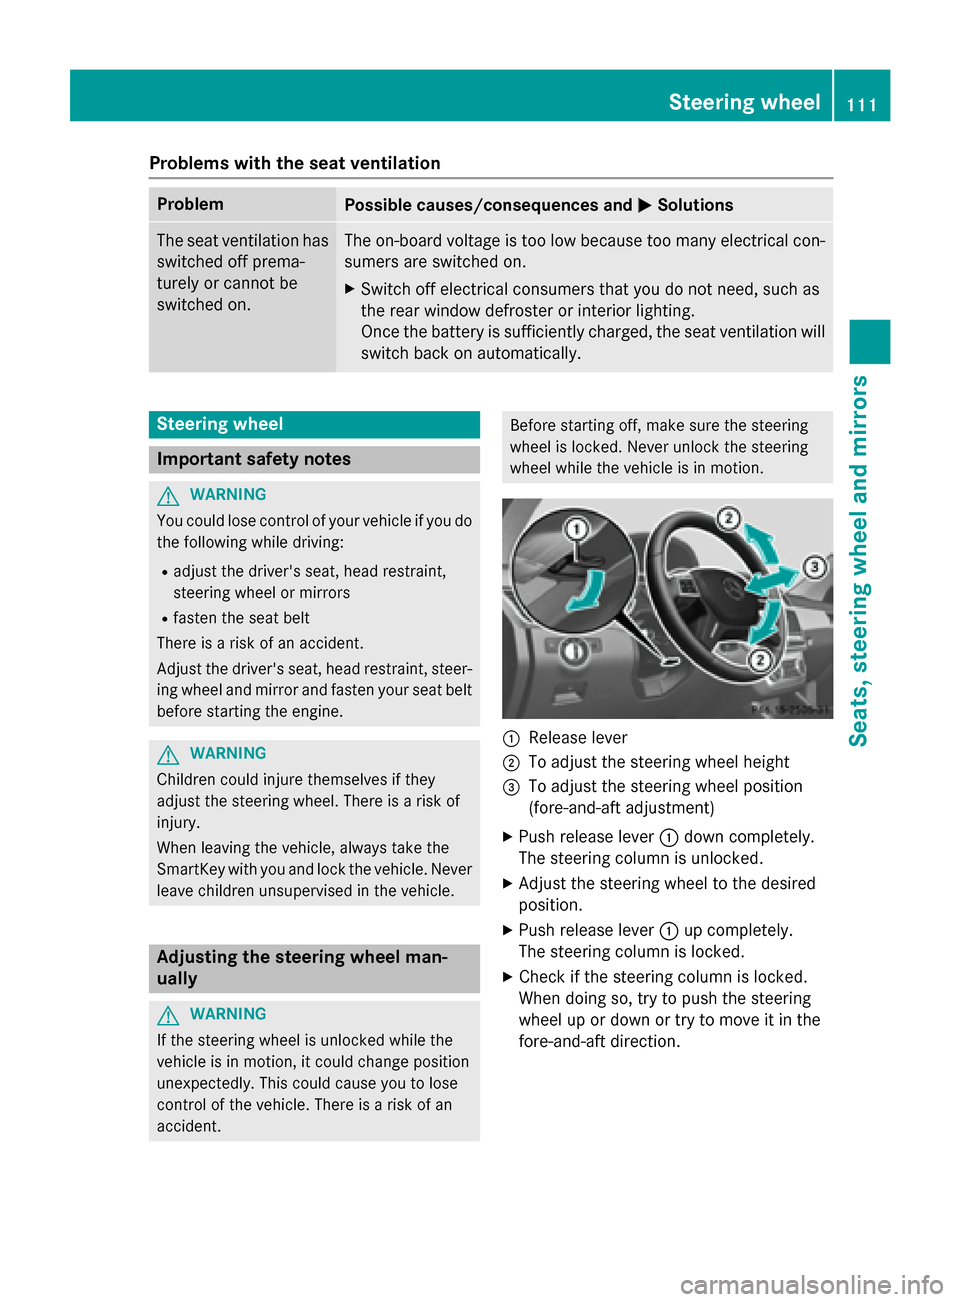
0043
Release lever
0044 To adjust the steering wheel height
0087 To adjust the steering wheel position
(fore-and-aft adjustment)
X Push release lever 0043down completely.
The steering column is unlocked.
X Adjust the steering wheel to the desired
position.
X Push release lever 0043up completely.
The steering column is locked.
X Check if the steering column is locked.
When doing so, try to push the steering
wheel up or down or try to move it in the
fore-and-aft direction. Steering wheel
111Seats, steering wheel and mirrors Z
Page 115 of 466
Problems with the steering wheel heating
Problem
Possible causes/consequences and
0050
0050Solutions The steering wheel
heating has switched
off prematurely or can-
not be switched on. The on-board voltage is too low because too many electrical con-
sumers are switched on.
X Switch off electrical consumers that you do not need, such as
the rear window defroster or interior lighting. EASY-ENTRY/EXIT feature
Important safety notes G
WARNING
When the EASY-ENTRY/EXIT feature adjusts
the steering wheel, you and other vehicle
occupants – particularly children – could
become trapped. There is a risk of injury.
While the EASY-ENTRY/EXIT feature is mak-
ing adjustments, make sure that no one has
any body parts in the sweep of the steering
wheel.
Move the steering wheel adjustment lever if
there is a risk of entrapment by the steering
wheel. The adjustment process is stopped.
Press one of the memory function position
buttons. This function is only available on
vehicles with memory function. G
WARNING
If children activate the EASY-ENTRY/EXIT fea- ture, they can become trapped, particularly
when unattended. There is a risk of injury.
When leaving the vehicle, always take the
SmartKey with you and lock the vehicle. Never leave children unsupervised in the vehicle. G
WARNING
If you drive off while the EASY-ENTRY/EXIT
feature is making adjustments, you could lose
control of the vehicle. There is a risk of an
accident.
Always wait until the adjustment process is
complete before driving off. The EASY-ENTRY/EXIT feature makes getting
in and out of your vehicle easier.
You can activate and deactivate the EASY-
ENTRY/EXIT feature in the on-board com-
puter (Y page 279).
Position of the steering wheel when the
EASY-ENTRY/EXIT feature is active The steering wheel swings upwards when
you:
R remove the SmartKey from the ignition lock
R open the driver's door with KEYLESS-GO in
position 1
R open the driver's door and the SmartKey is
in position 0or 1in the ignition lock
i The steering wheel only moves upwards if
it has not already reached the upper stop.
Position of the steering wheel for driv-
ing The steering wheel is moved to the last selec-
ted position when:
R the driver's door is closed
R you insert the SmartKey into the ignition
lock
or
R you press the Start/Stop button once on
vehicles with KEYLESS-GO
When you close the driver's door with the
ignition switched on, the steering wheel is
also automatically moved to the previously
set position.
The last position of the steering wheel is
stored when you switch off the ignition or Steering wheel
113Seats, steering wheel and mirrors Z
Page 117 of 466
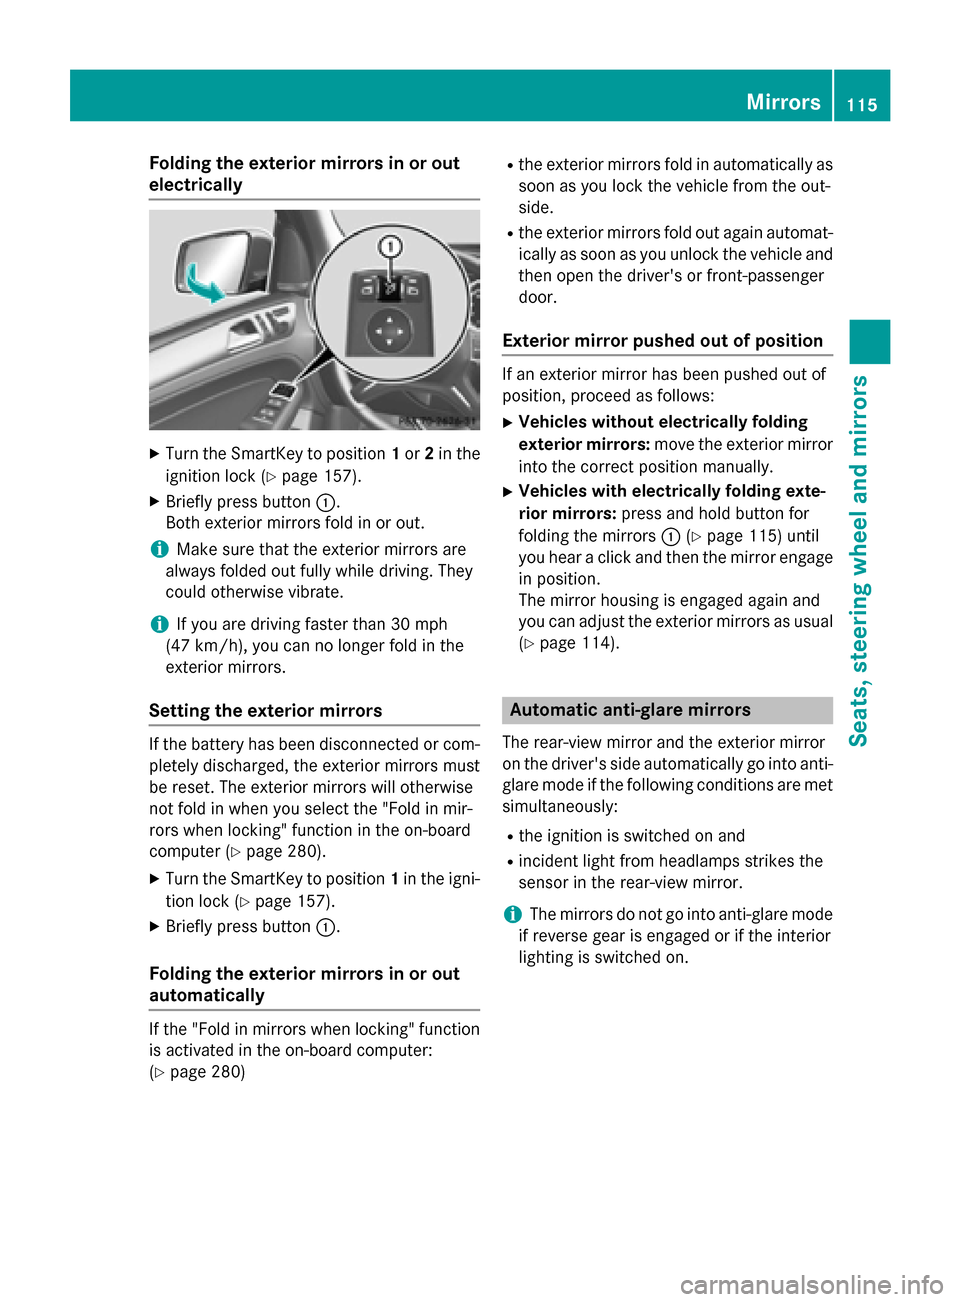
Folding the exterior mirrors in or out
electrically X
Turn the SmartKey to position 1or 2in the
ignition lock (Y page 157).
X Briefly press button 0043.
Both exterior mirrors fold in or out.
i Make sure that the exterior mirrors are
always folded out fully while driving. They
could otherwise vibrate.
i If you are driving faster than 30 mph
(47 km/h), you can no longer fold in the
exterior mirrors.
Setting the exterior mirrors If the battery has been disconnected or com-
pletely discharged, the exterior mirrors must
be reset. The exterior mirrors will otherwise
not fold in when you select the "Fold in mir-
rors when locking" function in the on-board
computer (Y page 280).
X Turn the SmartKey to position 1in the igni-
tion lock (Y page 157).
X Briefly press button 0043.
Folding the exterior mirrors in or out
automatically If the "Fold in mirrors when locking" function
is activated in the on-board computer:
(Y page 280) R
the exterior mirrors fold in automatically as
soon as you lock the vehicle from the out-
side.
R the exterior mirrors fold out again automat-
ically as soon as you unlock the vehicle and
then open the driver's or front-passenger
door.
Exterior mirror pushed out of position If an exterior mirror has been pushed out of
position, proceed as follows:
X Vehicles without electrically folding
exterior mirrors: move the exterior mirror
into the correct position manually.
X Vehicles with electrically folding exte-
rior mirrors: press and hold button for
folding the mirrors 0043(Ypage 115) until
you hear a click and then the mirror engage
in position.
The mirror housing is engaged again and
you can adjust the exterior mirrors as usual
(Y page 114). Automatic anti-glare mirrors
The rear-view mirror and the exterior mirror
on the driver's side automatically go into anti- glare mode if the following conditions are met simultaneously:
R the ignition is switched on and
R incident light from headlamps strikes the
sensor in the rear-view mirror.
i The mirrors do not go into anti-glare mode
if reverse gear is engaged or if the interior
lighting is switched on. Mirrors
115Seats, steering wheel and mirrors Z
Page 241 of 466
sponding side lights up red. This warning is
always emitted when a vehicle enters the
blind spot monitoring range from behind or
from the side. When you overtake a vehicle,
the warning only occurs if the difference in
speed is less than 7 mph (12 km/h).
The yellow indicator lamp goes out if reverse gear is engaged. In this event, Blind Spot
Assist is no longer active.
The brightness of the indicator/warning
lamps is adjusted automatically according to
the ambient light.
Collision warning
If a vehicle is detected in the monitoring range
of Blind Spot Assist and you switch on the
corresponding turn signal, a double warning
tone sounds. Red warning lamp 0043flashes. If
the turn signal remains on, detected vehicles
are indicated by the flashing of red warning
lamp 0043. There are no further warning tones.
Switching on Blind Spot Assist
X Make sure that the radar sensor system
(Y page 279) and Blind Spot Assist
(Y page 276) are activated in the on-board
computer.
X Turn the SmartKey to position 2in the igni-
tion lock.
Warning lamps 0043in the exterior mirrors
light up red for approximately 1.5 seconds
and then turn yellow.
Towing a trailer
When you attach a trailer, make sure you have correctly established the electrical connec-
tion. This can be accomplished by checking
the trailer lighting. In this event, Blind Spot
Assist is deactivated. The indicator lamp in
the exterior mirrors lights up yellow, and the
Blind
Blind Spot SpotAssist
Assist Currently
Currently Unavail‐
Unavail‐
able See Operator's Manual
able See Operator's Manual message
appears in the multifunction display.
i You can deactivate the indicator lamps in
the exterior mirrors. To do so, switch off Blind Spot Assist when:
R the SmartKey is in position 2in the igni-
tion lock
R the engine is not running
R the electrical connection to the trailer
has been established
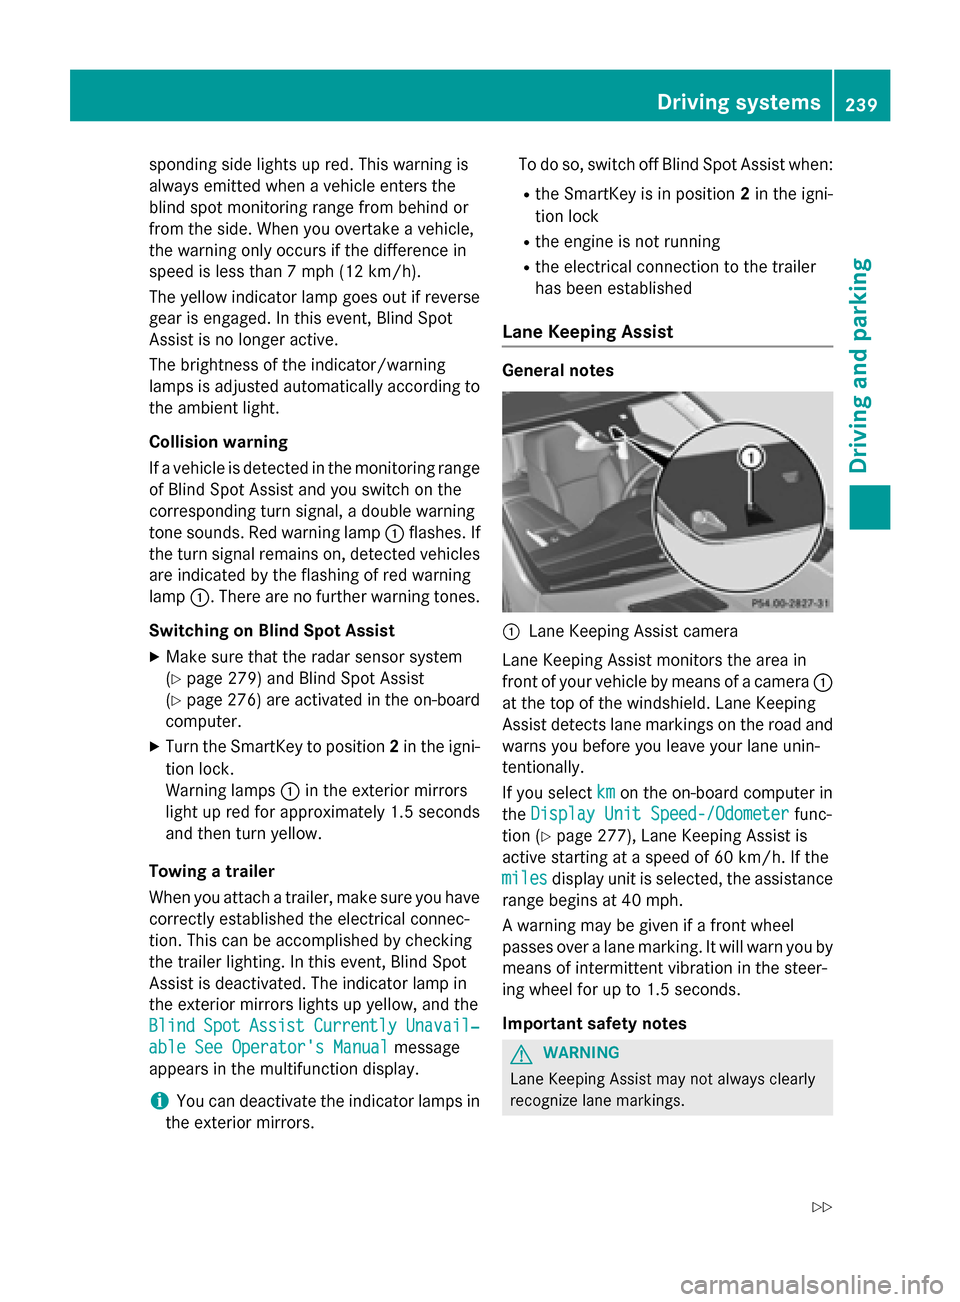
Lane Keeping Assist General notes
0043
Lane Keeping Assist camera
Lane Keeping Assist monitors the area in
front of your vehicle by means of a camera 0043
at the top of the windshield. Lane Keeping
Assist detects lane markings on the road and
warns you before you leave your lane unin-
tentionally.
If you select km kmon the on-board computer in
the Display Unit Speed-/Odometer
Display Unit Speed-/Odometer func-
tion (Y page 277), Lane Keeping Assist is
active starting at a speed of 60 km/h. If the
miles miles display unit is selected, the assistance
range begins at 40 mph.
A warning may be given if a front wheel
passes over a lane marking. It will warn you by means of intermittent vibration in the steer-
ing wheel for up to 1.5 seconds.
Important safety notes G
WARNING
Lane Keeping Assist may not always clearly
recognize lane markings. Driving systems
239Driving and parking
Z