side mirror MERCEDES-BENZ M-CLASS SUV 2011 Owners Manual
[x] Cancel search | Manufacturer: MERCEDES-BENZ, Model Year: 2011, Model line: M-CLASS SUV, Model: MERCEDES-BENZ M-CLASS SUV 2011Pages: 389, PDF Size: 9.22 MB
Page 18 of 389
Off-road 4ETS
.................................. 64
Off-road ABS .................................... 62
Off-road ESP ®
.................................. 65
Off-road program (ve hicle without
the ON&OFFR OADp ackage) ..........222
Off-road programs (ve hicle with
the ON&OFFR OADp ackage) ..........222
Oil
seeE ngine oil
On and Offroad menu (on-board
computer) .......................................... 252
On-board computer Assistance menu ........................... 244
Aud iomen u................................... 241
Convenience su bmenu .................. 251
Displaying aserv icem essage ........323
Display message s.......................... 253
DISTRONI CPLUS ........................... 177
Factory settin gsubmenu ............... 252
Heating su bmenu ...... ..................... 250
Important safety note s.................. 234
Instrumen tcluster submenu ..........246
Lig ht subm enu............................... 247
Menu overview .............................. 238
Mess agem emor y.......................... 253
Navigation menu ............................ 240
On and Offro admen u.................... 252
Operating the TV ............................ 242
Operating vid eoDVD ..................... 242
Operatio n....................................... 235
Service menu ................................. 246
Setting smenu ............................... 246
Standard di splay. ........................... 239
Te lephon emenu ............................ 242
Tri pm enu ...................................... 239
Veh icle submenu ........................... 249
On-board diag nostic interface ...........24
On-road programs AUTO program ............................... 218
Function/notes ............................. 218
Sno wprogram ............................... 219
SPORT program ............................. 218
Traile rprog ram .............................. 219
Ope ning and closing th eside trim
panels ................................................ .115
Operatin gsafety
On-bo ardd iagnostic interface .......... 24 Operatin
gsyst em
se eO n-board computer
Outside temperature display ...........234
Ov erhead control panel ......................36
Ov erride feature
Rea rside windows ........................... 60 P
Pai nt code .......................................... 372
Pai ntwork (cleaning instructions) ...326
Pan orama sl iding sunroof
Important safety information ...........86
Opening/closing .............................. 87
Opening/closing the rol lers un-
blind ...... ........................................... 88
Problem (malfunction) .....................89
Rain closing feat ure. ........................ 88
Resetting ......................................... 88
Parking ............................................... 160
Important safety notes ..................160
Positio nofexterio rmirror, front-
passenger sid e............................... 102
Reversing camera ..........................197
se eP ARKTRONIC
Parking aid
Active Parking Assist .....................194
se eE xterior mirrors
see PARKTRONIC
Parking brake
Disp laym essage ............................ 256
Electric parking brak e.................... 161
Parking lamps
Changing bulbs .............................. 115
Display message ............................ 264
Switch ingo n/off ........................... 106
Parking lamps (chang ingb ulbs) ......115
PARKTRONIC Deactivating/activating .................192
Driving sy stem ............................... 191
Function/notes ............................. 191
Pro blem (fault) ............................... 194
Sensor rang e................................. 191
Traile rtowing ................................. 193
Warn ingd ispla y............................. 192
PA SSENGER AIRBAG OF Fwarning
lamp ...................................................... 52 Index
15
Page 19 of 389
Permanent four-wheel drive
see 4MATIC (permanen tfour-
wheel drive)
Petrol .................................................. 152
Plastic trim (cleaning instructions) .329
Po we rw indows
see Side windows
PRE-SAFE ®
(preventive occupant
safety system) Display message ............................ 259
Operatio n......................................... 45
PRE-SAFE ®
Brake (vehicles with
DISTRONI CPLUS)
Display message ............................ 260
Function/notes ................................ 66
PRE-SAFE ®
Brake (v ehicles with
DISTRONI CPLUS)
Switching on/off ........................... 245
Warn ingl am p................................. 293
Prev entive occupant safety sys-
tem
see PRE-SAFE ®
(preventive occu-
pant safety system)
Program selector button ..................148
Pul ling away
Automatic transmission .................141
Traile r............................................ 141Q
Qual ified specialist wor kshop ........... 24 R
Radar se nsor system
Activating/deactivating .................249
Co untry overview ........................... 380
Display message ............................ 272
Radiato rcover ................................... 320
Radio Selecting astation ......................... 241
se es eparat eoperating instructions
Radio- controlled device s(fitting) ....316
Rain clos ingf eature
Panorama sliding sunroo f................ 88
Sli ding sunroo f................................. 87
Readi nglamp ..................................... 112Rear compartment
Setting the ai rvent s...................... 136
Setting the temperature ................126
Rear-c ompartment seat bel tsta-
tus indicator ........................................ 49
Rear foglamp Display message ............................ 264
Switch ingo n/off ........................... 107
Rear seat
Adjusting ......................................... 96
Rear-vie wmirror
Anti-dazzle mode (automatic) ........102
Dipping (manual )........................... 100
Rear windo wheating
Problem (fault) ............................... 128
Switch ingo n/off ........................... 128
Rear windo wwiper
Replacing the wiper blade .............. 118
Switching on/off ........................... 117
Refuell ing
Fuel gauge ....................................... 30
Important safety notes ..................152
Refuellin gproce ss......................... 154
se eF uel
Remote control
Auxiliary heating/ventilatio n.......... 131
Changing the batteries (auxiliary
heating) ......................................... 132
Garage door opene r....................... 313
Replacin gthe battery (aux iliary
heating remot econt rol) .................... 132
Reserve (fuel tank) see Fuel
Reserve fuel
Disp laym essage ............................ 267
Warn ingl am p................................. 291
Residual heat (climate control) ........129
Restrain tsyst em
se eS RS (Supplemental Restraint
System)
Rev counter ........................................ 234
Reversing camera Cleaning instructions .....................327
Function/notes ............................. 197
Rev ersing lamps
Display message ............................ 26416
Index
Page 40 of 389
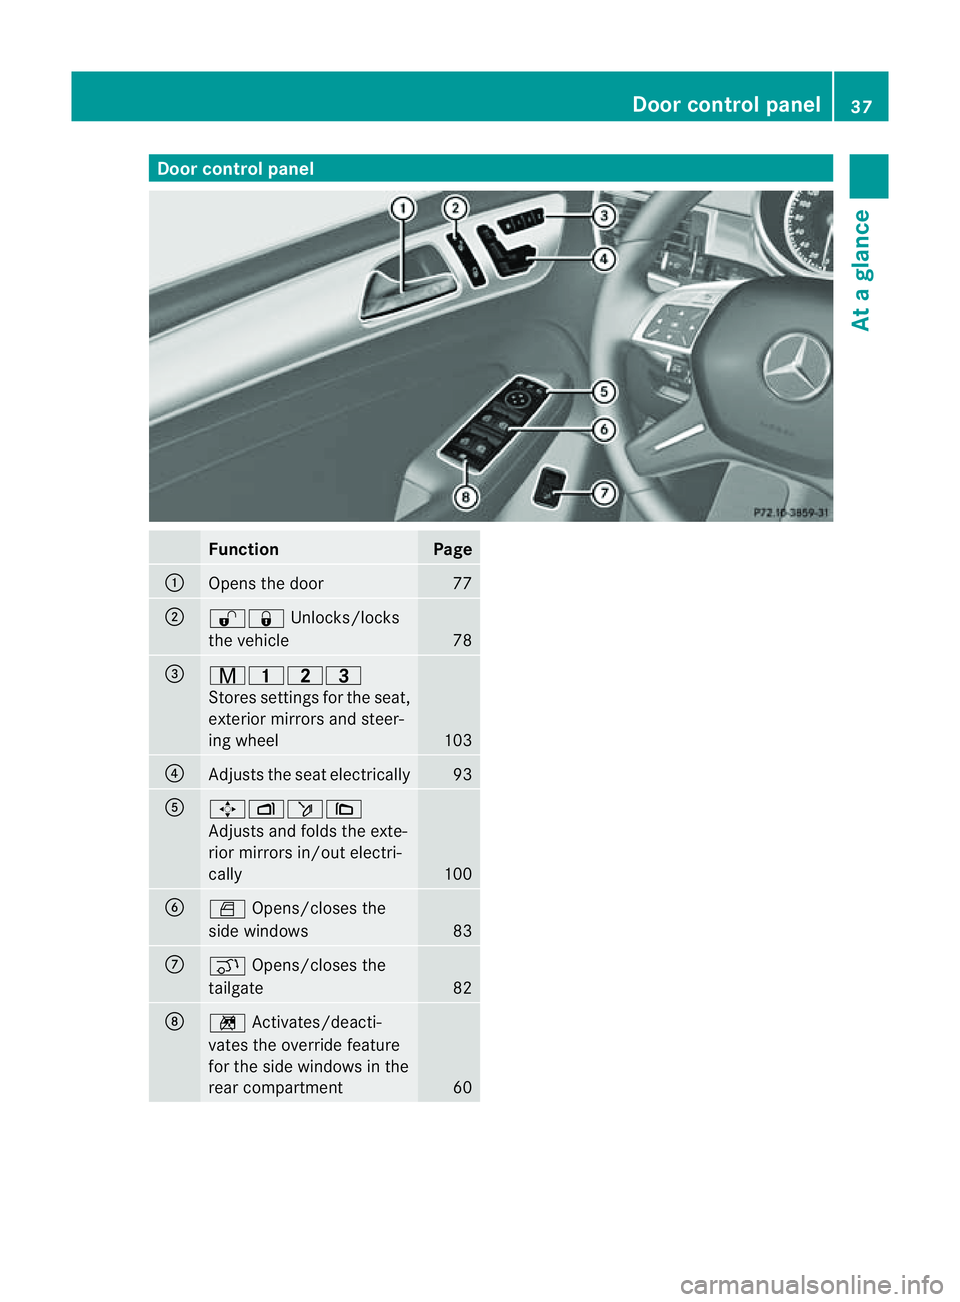
Door control panel
Function Page
:
Opens th
edoor 77
;
%&
Unlocks/locks
th ev ehicle 78
=
r4
5=
Stores se ttingsfor theseat,
exterior mirrors and steer-
ing wheel 103
?
Adjusts the seat electrically 93
A
7Zö\
Adjusts and folds the exte-
rio
rm irrors in/out electri-
cally 100
B
W
Opens/closes the
side windows 83
C
q
Opens/closes the
tailgate 82
D
n
Activates/deacti-
vates the override feature
for the side windows in the
rear compartment 60 Doo
rcontrol panel
37Atag lan ce
Page 98 of 389
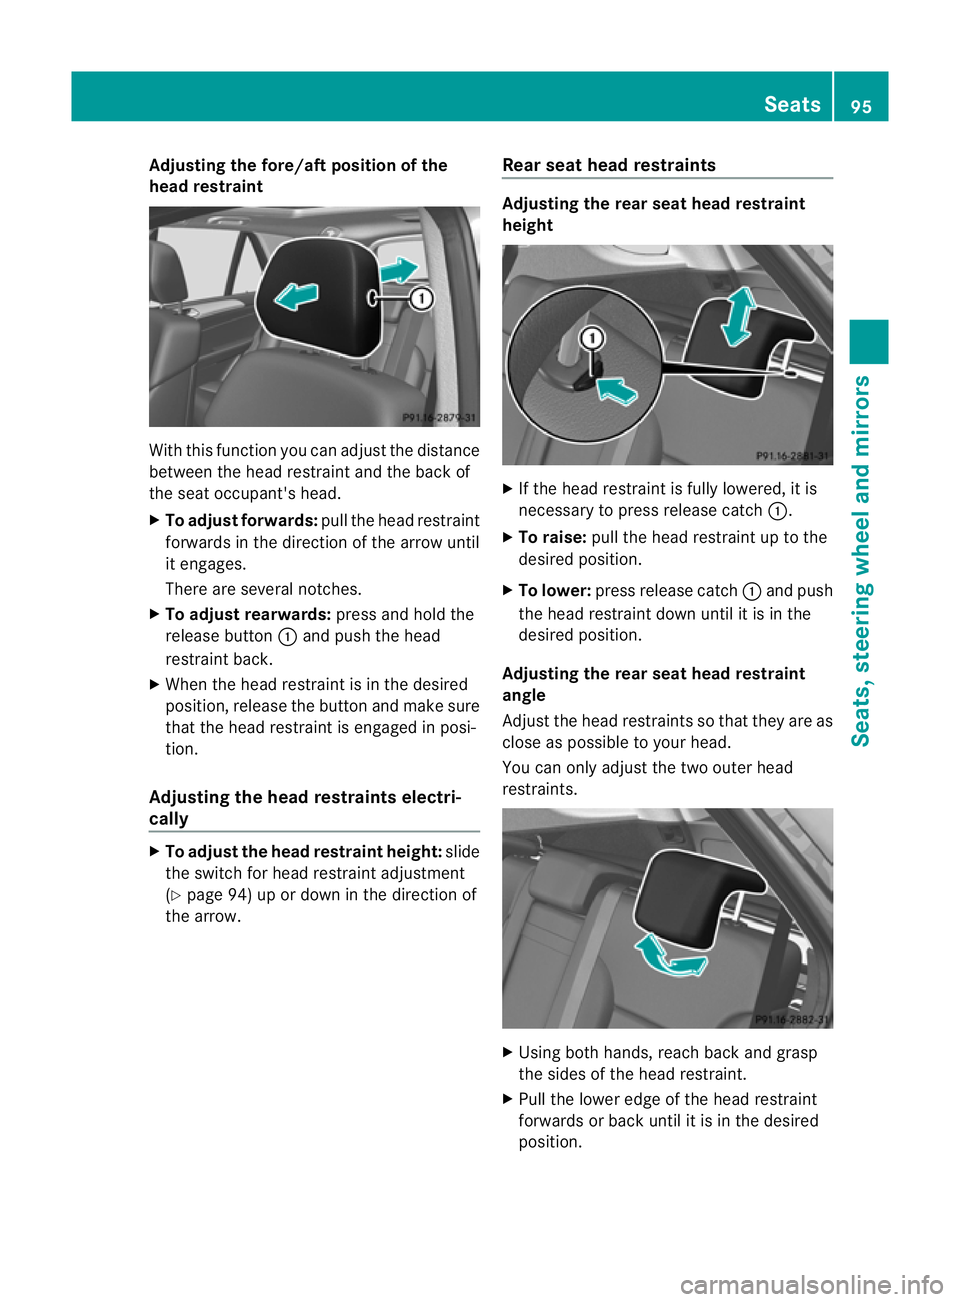
Adjusting th
efore/af tposit ionoft he
head restraint With this functio
nyou can adjust th edistance
between th ehead restraint and th eback of
the seat occupant' shead.
X To adjust forwards: pull thehead restraint
forwards in th edirection of th earrow until
it engages.
There are se veral notches.
X To adjust rearwards: pressand hol dthe
re lease button :and push th ehead
restraint back.
X When th ehead restraint is in th edesired
position ,release th ebutton and make sure
th at the head restraint is engage dinposi-
tion.
Adjusting th ehead restraints electri-
cally X
To adjust the head restraint height: slide
the switch for head restrain tadjustment
(Y page 94 )upord own in the direction of
the arrow. Rea
rseat head restraints Adjusting the rear seat head restraint
height
X
If the head restrain tisf ully lowered, it is
necessary to press release catch :.
X To raise: pull the head restraint up to the
desired position.
X To lower: press release catch :and push
the head restraint down until it is in the
desired position.
Adjusting the rear seat head restraint
angle
Adjust the head restraint ssothat they ar eas
clos easp ossible to your head.
You can only adjust the two outer head
rest raints. X
Using both hands, reach back and grasp
the sides of the head restraint.
X Pull the lower edge of the head restraint
forwards or back until it is in the desired
position. Seats
95Seats,steerin gwhee land mirrors Z
Page 100 of 389
i
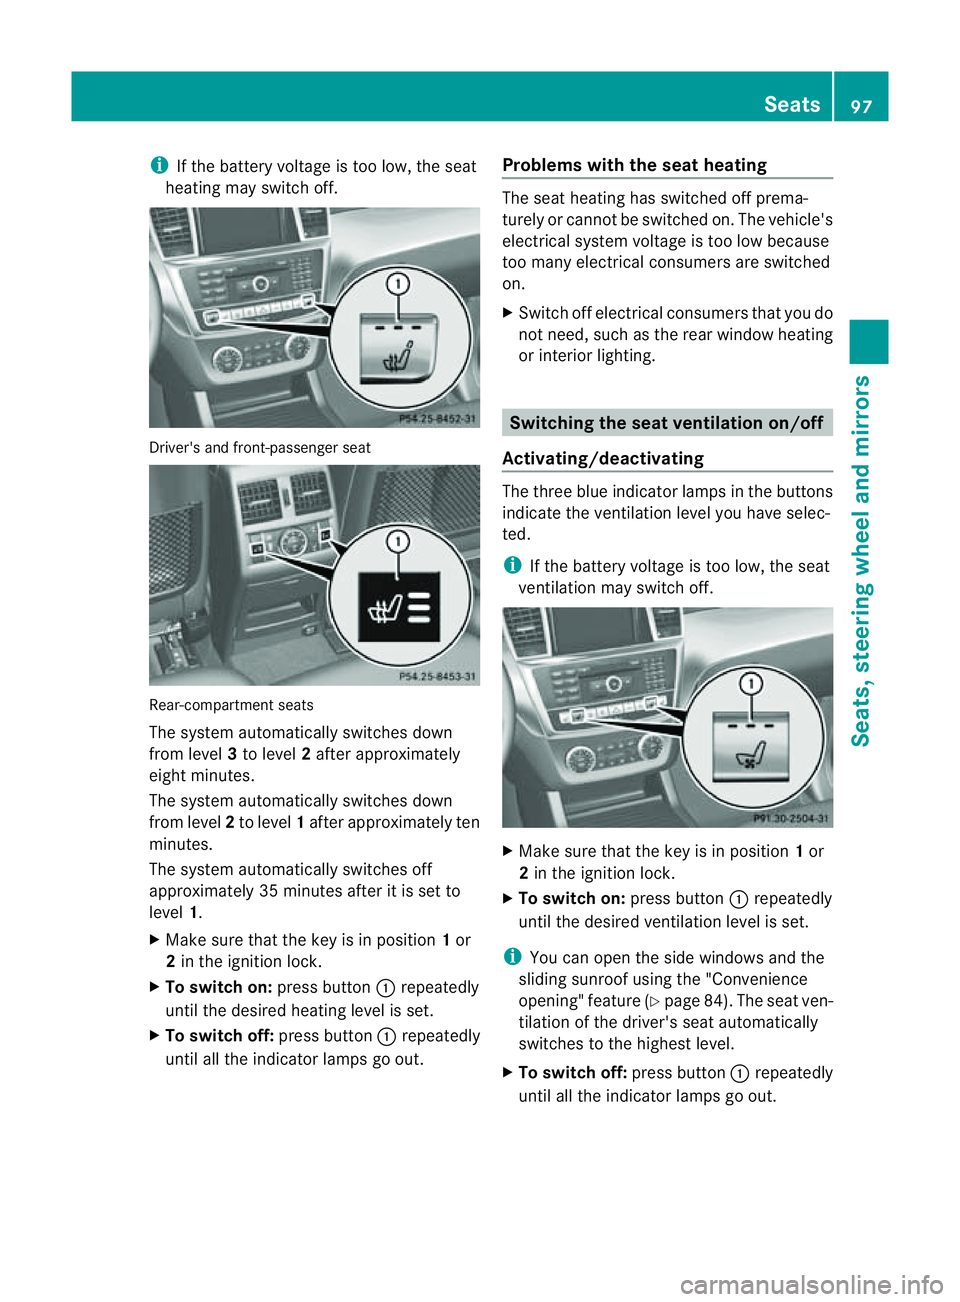
If th ebattery voltage is too low, the seat
heating may switch off. Driver's and front-passenger seat
Rear-compartment seats
The system automaticall
yswitches down
from level 3to level 2after approximately
eight minutes.
The system automaticall yswitches down
from level 2to level 1after approximately ten
minutes.
The system automatically switches off
approximately 35 minutes after it is set to
level 1.
X Make sure that the key is in position 1or
2 in the ignition lock.
X To switch on: press button:repeatedly
until the desire dheatin glevel is set.
X To switch off: press button:repeatedly
until all the indicator lam psgo out. Problems with th
eseat heating The seat heating has switched off prema-
turely or cannot be switched on. The vehicle's
electrical system voltage is too low because
too many electrical consumer sare switched
on.
X Switch off electrica lconsumers that you do
not need, such as the rea rwindow heating
or interior lighting. Switching the seat ventilation on/off
Activating/deactivating The three blu
eindicato rlamps in the buttons
indicate the ventilation level you have selec-
ted.
i If the battery voltage is too low, the seat
ventilation may switch off. X
Make sure that the key is in position 1or
2 in the ignition lock.
X To switch on: press button:repeatedly
until the desire dventilation level is set.
i You can open the side windows and the
sliding sunroof using the "Convenience
opening" featur e(Ypage 84). The seat ven-
tilation of the driver' sseat automatically
switches to the highest level.
X To switc hoff:press button :repeatedly
until all th eindicato rlamps go out. Seats
97Seats,steeri ngwheel and mirrors Z
Page 103 of 389
Position of th
esteerin gwheel for driv-
ing Th
es teering whee lismoved to the previously
set position if:
R the driver's door is closed.
R you inser tthe key int othe ignition lock.
or
R you press the Star t/Stop butto nonce on
vehicles with KEYLESS-GO.
If you clos ethe driver's door with the key
inserted int othe ignition lock ,the steering
wheel is automatically moved to the previ-
ously set position.
The last position of the steering wheel is
stored when you switc hoff th eignition or
when you stor ethe setti ngwith the memory
function (Y page 103).
Crash-responsive EASY-EXIT fea tureIf th
ecrash-resp onsive EASY-EXIT feature is
trig gere dinana ccident,the steeri ngcolu mn
will mov eupwards when the driv er'sdoor is
opened. This occurs irrespective of the posi-
tion of the key in the ignition lock .This makes
it easier to exit the vehicle and rescue the
occupants.
The crash-responsive EASY-EXIT featur eis
only operational if the EASY-EXIT/ENTRY fea-
tur eisa ctivate dinthe on-boar dcomputer. Mirrors
Rear-view mirror
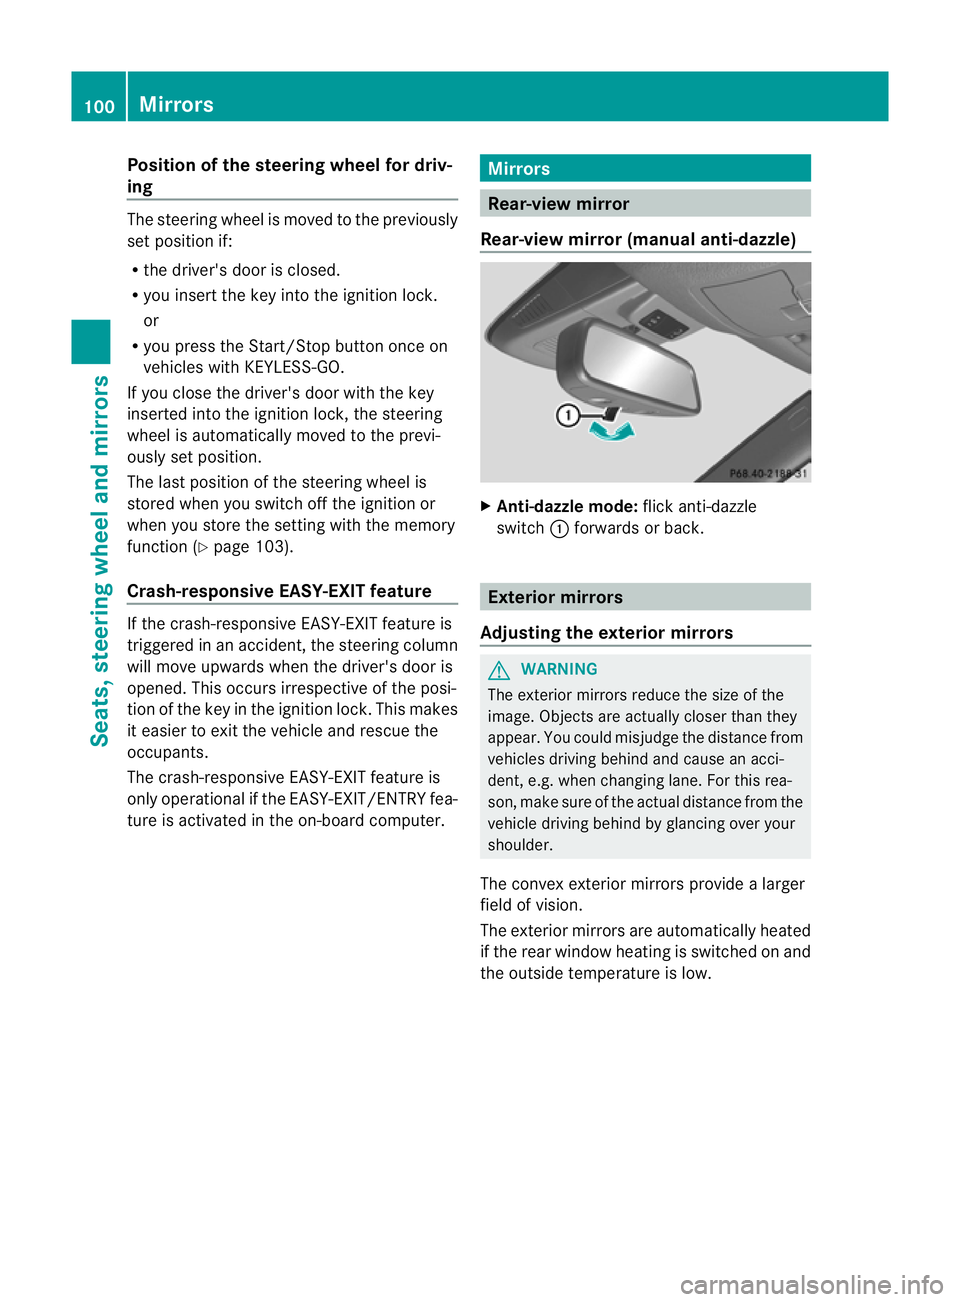
Rear-view mirror (manua lanti- daz zle) X
Anti-dazzle mode: flick anti-dazzle
switch :forward sorback. Exterior mirrors
Adjusting the exterior mirrors G
WARNING
The exterior mirrors reduce the size of the
image. Objects are actually closer than they
appear. You could misjudge the distance from
vehicles driving behind and cause an acci-
dent, e.g. when changing lane. For this rea-
son, make sure of the actual distance from the
vehicle driving behind by glancing over your
shoulder.
The convex exterior mirrors provide alarger
field of vision.
The exterior mirrors are automatically heated
if the rear window heating is switched on and
the outside temperature is low. 100
MirrorsSeats
,steering wheel and mirrors
Page 104 of 389
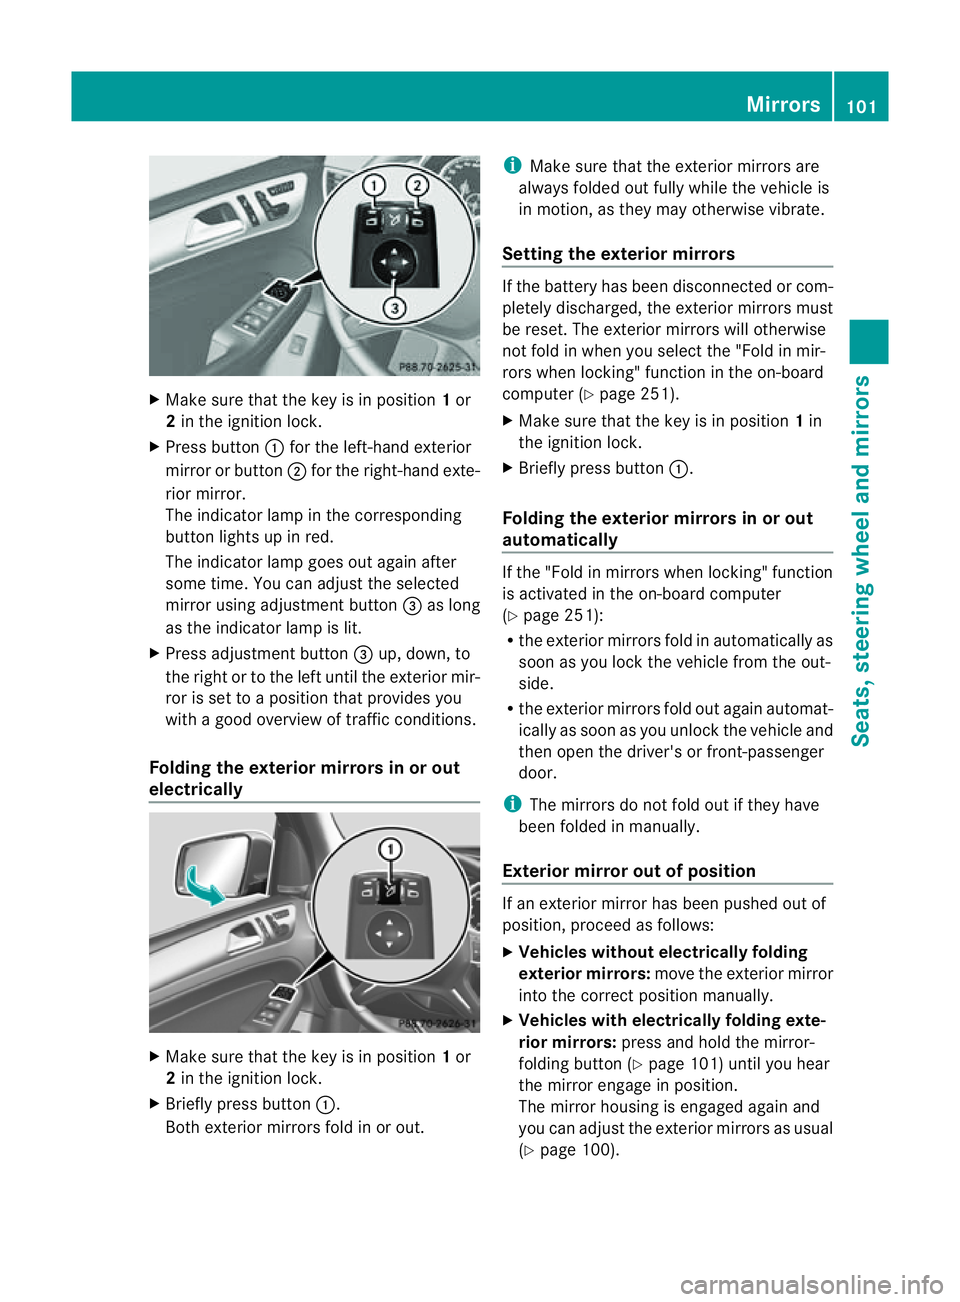
X
Make sur ethat the key is in position 1or
2 in the ignition lock.
X Press button :for the left-hand exterior
mirror or button ;for the right-hand exte-
rior mirror.
The indicator lam pint he corresponding
button lights up in red.
The indicator lam pgoes out again after
some time. You can adjust the selected
mirror using adjustment button =as long
as the indicator lam pislit.
X Press adjustment button =up, down, to
the right or to the left until the exterior mir-
ror is set to aposition that provides you
with agood overview of traffic conditions.
Folding th eexterior mir rors in or out
electrically X
Make sure that the key is in position 1or
2 in the ignitio nlock.
X Briefl ypres sbutton :.
Both exterior mirrors fold in or out. i
Make sure that the exterior mirrors are
always folded out fully while the vehicle is
in motion, as they may otherwis evibrate.
Setting the exterior mirrors If the battery has been disconnected or com-
pletely discharged, the exterior mirrors must
be reset. The exterior mirrors will otherwise
not fold in when you select the "Fold in mir-
rors when locking" func tion in the on-board
computer (Y page 251).
X Make sure that the key is in position 1in
the ignition lock.
X Briefl ypres sbutton :.
Folding the exterior mirrors in or out
automatically If the "Fold in mirrors when locking" function
is activated in the on-board computer
(Y page 251):
R the exterior mirrors fold in automatically as
soo nasyou lock the vehicle from the out-
side.
R the exterior mirror sfold out again automat-
ically as soon as you unloc kthe vehicle and
then open the driver's or front-passenger
door.
i The mirrors do not fol dout if they have
been folded in manually.
Exterior mirror out of position If an exterior mirror has been pushed out of
position, proceed as follows:
X Vehicles without electrically folding
exterior mirrors: move the exterior mirror
into the correct position manually.
X Vehicles with electrically folding exte-
rior mirrors: press and hold the mirror-
folding button (Y page 101)until you hear
the mirror engage in position.
The mirror housing is engaged agai nand
you can adjus tthe exterior mirrors as usual
(Y page 100). Mir
rors
101Seats ,steeri ngwheel and mirrors Z
Page 105 of 389
Automati
canti-dazzle mirrors G
WA
RNING
If inciden tlight fro mheadlamps is prevented
from striking the sensor in the rear-view mir-
ror ,for instance, by luggage piled too high in
the vehicle, the mirror's automatic anti-dazzle
fun ction will not operate.
Incident light could then blind you. This may
distrac tyou from the traffic condition sand,
as aresult, you may cause an accident.
The rear-view mirror and the exterior mirror
on the driver' sside automatically go into anti-
dazzle mode if the ignition is switched on and
inciden tlight from headlamps strikes the sen-
sor in the rear-view mirror.
The mirror sdonot go int oanti-dazzle mode if
reverse gea risengaged or if the interior light-
ing is switched on. Parking position for the exterior mir-
ror on the front-passenge rside
Setting and storing the parking position You can position the front-passenger side
exterior mirror in such away that you can see
the rear wheel on that side as soon as you
engage revers egear. You can stor ethis posi-
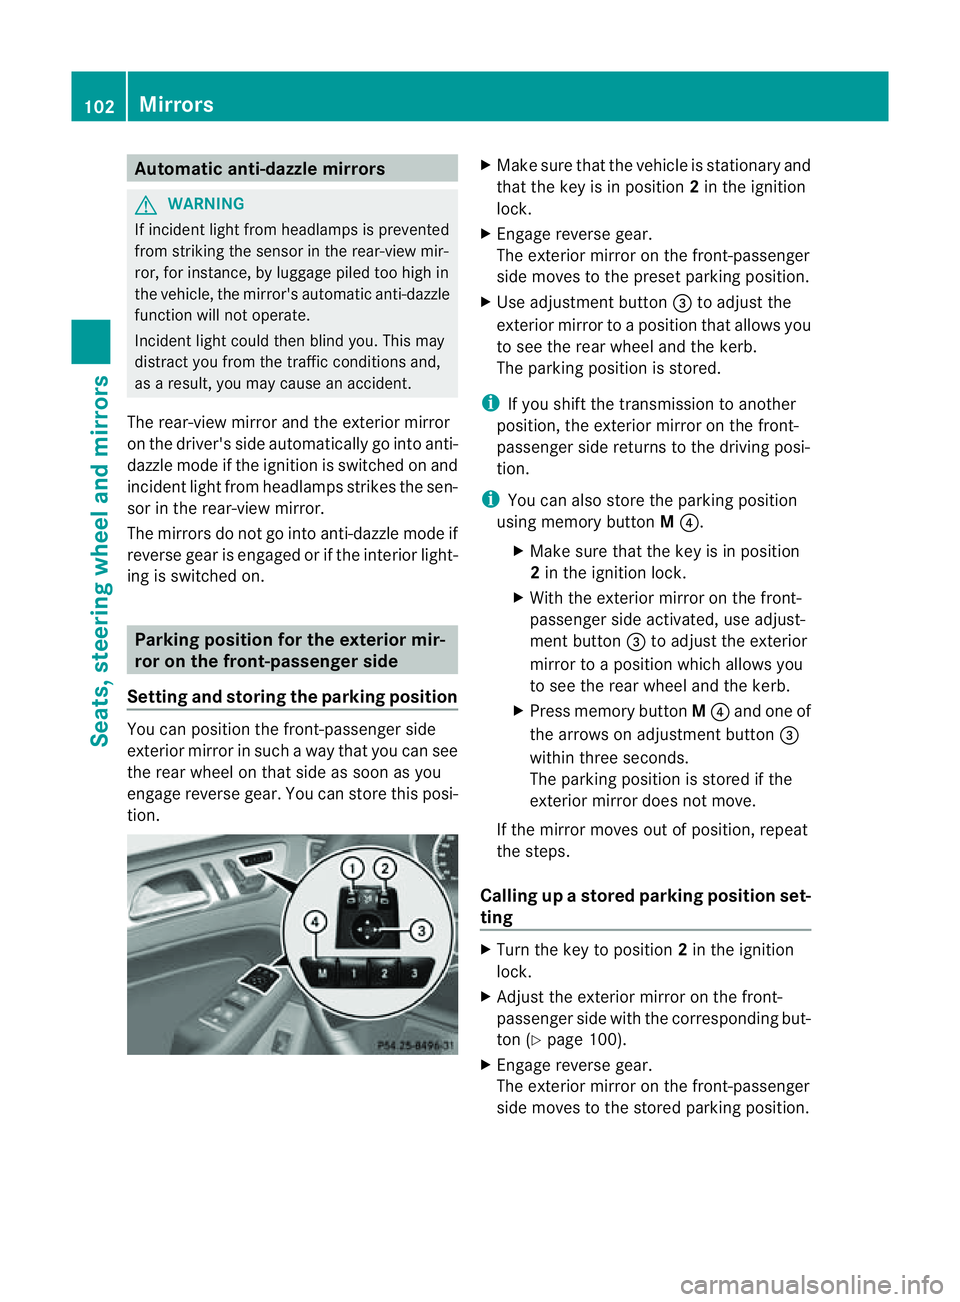
tion. X
Make sur ethat the vehicle is stationary and
that the key is in position 2in the ignition
lock.
X Engage revers egear.
The exterior mirror on the front-passenger
side moves to the preset parkin gposition.
X Use adjustment button =to adjust the
exterior mirror to aposition that allows you
to see the rea rwheel and the kerb.
The parkin gposition is stored.
i If you shift the transmission to anot her
po sition ,the exterior mirror on the front-
passenger side retur nsto the driving posi-
tion.
i You can also store the parking position
using memory button M?.
X Make sure that the key is in position
2in the ignitio nlock.
X With the exterior mirror on the front-
passenger side activa ted, use adjust-
ment button =to adjust the exterior
mirror to aposition which allows you
to see the rea rwheel and the kerb.
X Press memory button M? and one of
the arrow sonadjustment button =
within three seconds.
The parkin gposition is stored if the
exterior mirror does not move.
If the mirror moves out of position ,repeat
the steps.
Calling up astore dparkin gposition set-
ting X
Turn the key to position 2in the ignition
lock.
X Adjus tthe exterior mirror on the front-
passenger side with the correspondin gbut-
ton (Y page 100).
X Engage reverse gear.
The exterior mirror on the front-passenger
side moves to the stored parking position. 102
MirrorsSeats, steerin
gwhee land mirrors
Page 106 of 389
The exterior mirror on the front-passenger
side moves back to its original position:
R
as soon as you exceed aspeed of
15 km/h
R about ten seconds after you have disen-
gaged reverse gear
R if you press button :for the exterior mir-
ror on the driver' sside Memory function
Storing settings
With the memor yfunction, you can store up
to three different settings, e.g. for three dif-
ferent people.
The following settings are stored as asingle
memor ypreset:
R positio nofthe seat, backrest and head
rest raint
R driver's side: steerin gwheel position
R driver's side: position of the exterior mir-
ror sont he driver's and front-passenger
sides G
WARNING
The memory func tion can still be used when
the key has been removed. For this reason,
children should never be left unsupervised in
the vehicle. They coul dotherwis ebecome
trapped when adjusting the seat or the steer-
ing wheel. G
WARNING
Only use the memory function on the driver's
side when the vehicle is stationary .Other-
wise ,you coul dbedistracted from the traf fic
conditions by the steering wheel and seat
moving of their own accord ,and as aresult
cause an accident. X
Adjust the seat (Y page 94).
X On the driver' sside, adjust the steering
wheel (Y page 98) and the exterior mirrors
(Y page 100).
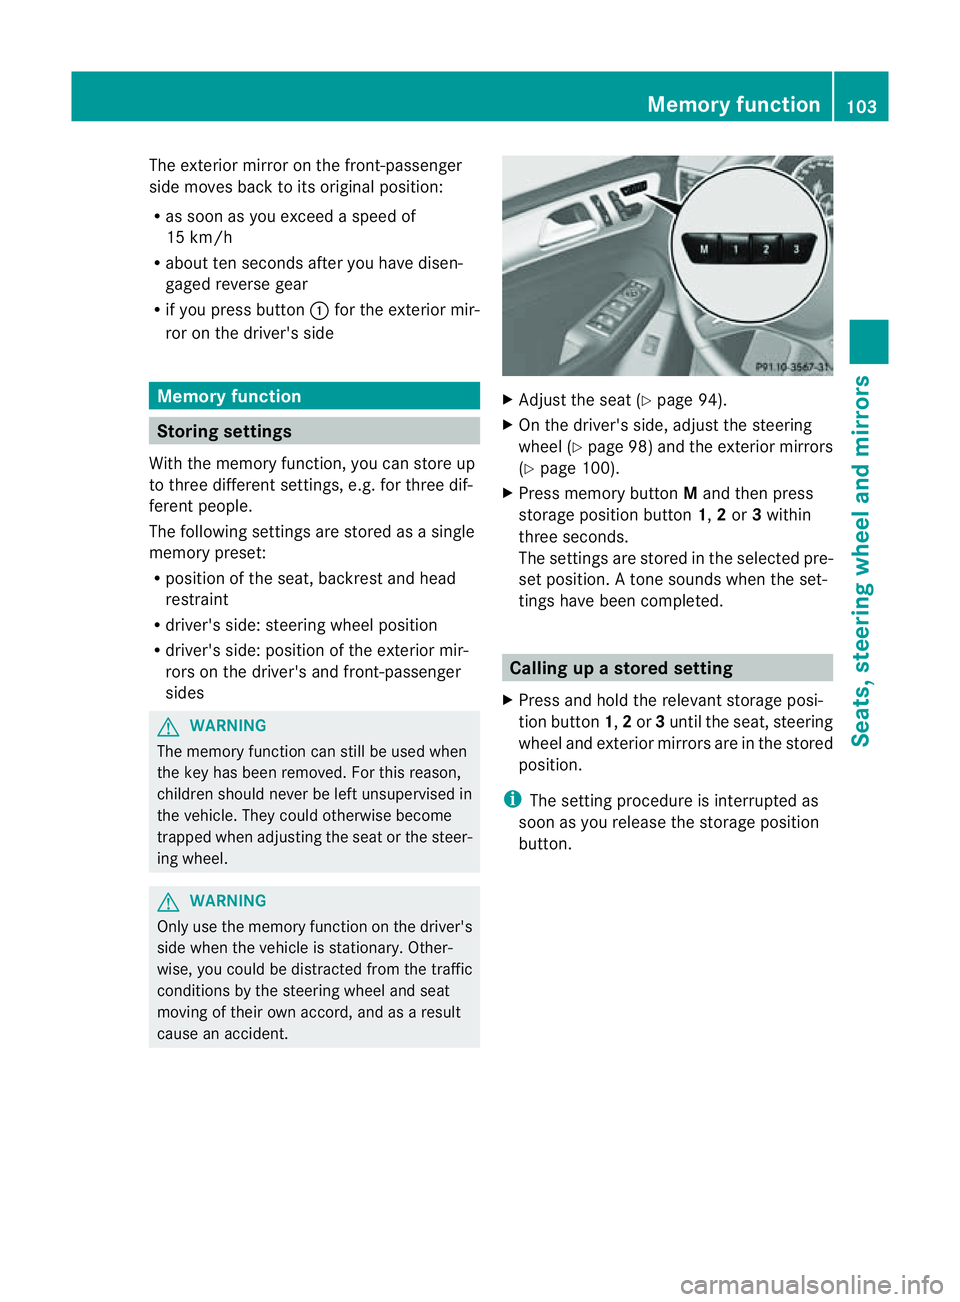
X Press memor ybutton Mand then press
storage position button 1,2or 3within
three seconds.
The settings are stored in the selected pre-
set position. Atone sounds when the set-
tings have been completed. Calling up
astore dsetting
X Pres sand hol dthe rele vant storage posi-
tion button 1,2or 3until the seat ,steering
wheel and exterio rmirror sare in th estored
position.
i The settin gprocedure is interrup tedas
soon as you release the storage position
but ton. Memory function
103Seats,steering wheeland mirrors Z
Page 211 of 389
Problems wit
hNight View Assist Plus Problem Possible causes/consequences and
M Solutions
The pictur
equality of
Night View Assis tPlus
has deteriorated. The windscreen wipers are smearin
gthe windscreen.
X Replace the wiper blades (Y page 117). The windscreen is smeared after the vehicle has been cleaned in
ac ar wash.
X Clea nthe windscreen (Y page 326). There is windscreen chip damage in the camera's field of vision.
X Replace the windscreen. The windscreen is misted up on the inside.
X Demist the windscreen (Y page 128). The windscreen is iced up.
X De-ice the windscreen (Y page 127). There is dir
tonthe insid eofthe windscreen.
X Clean the insid eofthe windscreen (Y page 326). Lan
eTracking package
General notes The Lane Tracking package consis
tsof Blind
Spot Assist (Y page 208) and Lane Keeping
Assist (Y page 210).
Blind Spot Assist Important safety notes
Blin dSpot Assist uses aradar senso rsystem
to monitor the areas on both side sofyour
vehicle. It supports you from speeds of
30 km/h. Awarning displ ay inthee xterior
mirrors draws your attention to vehicles
detected in the monitored area. If you then
switch on the corresponding turn signal to
chang elane, you will also receive an optical
and audible collisio nwarning. For monitoring,
Active Blind Spot Assis tuses sensor sinthe
rea rbumper. G
WARNING
Blind Spot Assis tiso nly an aid designe dto
assis tdriving. It may fail to detec tsome vehi-
cles and is no substitute for attentive driving.
Blin dSpot Assist cannot detect road and traf-
fic conditions. It may fail to detect narrow
vehicles, such as motor cycles or bicycles ,or
only detec tthem too late.
Monitorin gmay be affected by dirty sensors,
stron gspray or poor visibility caused by snow,
rain or mist, for example. In this case, vehicles
are detected late or not at all.
Alway spay attention to traffic conditions and
your surroundings. Otherwise ,you may fai lto
recognise dangers in time ,cause an accident
and injure yourself and others.
The radar senso rsystem is automatically
deactivated near radio telescope facilities
(Y page 380).
For Blind Spot Assist to assist you when driv-
ing, the radar sensor syste mmust be activa-
ted (Y page 249 )and operational. 208
Drivin
gsystemsDrivin gand parking