rear view mirror MERCEDES-BENZ M320 2000 W163 User Guide
[x] Cancel search | Manufacturer: MERCEDES-BENZ, Model Year: 2000, Model line: M320, Model: MERCEDES-BENZ M320 2000 W163Pages: 317, PDF Size: 10.4 MB
Page 76 of 317
73 Rear view mirrors
Te ch n ica l
data Instruments
and controlsOperationDrivingInstrument
cluster displayPractical hints Car care Index Exterior rear view mirrors
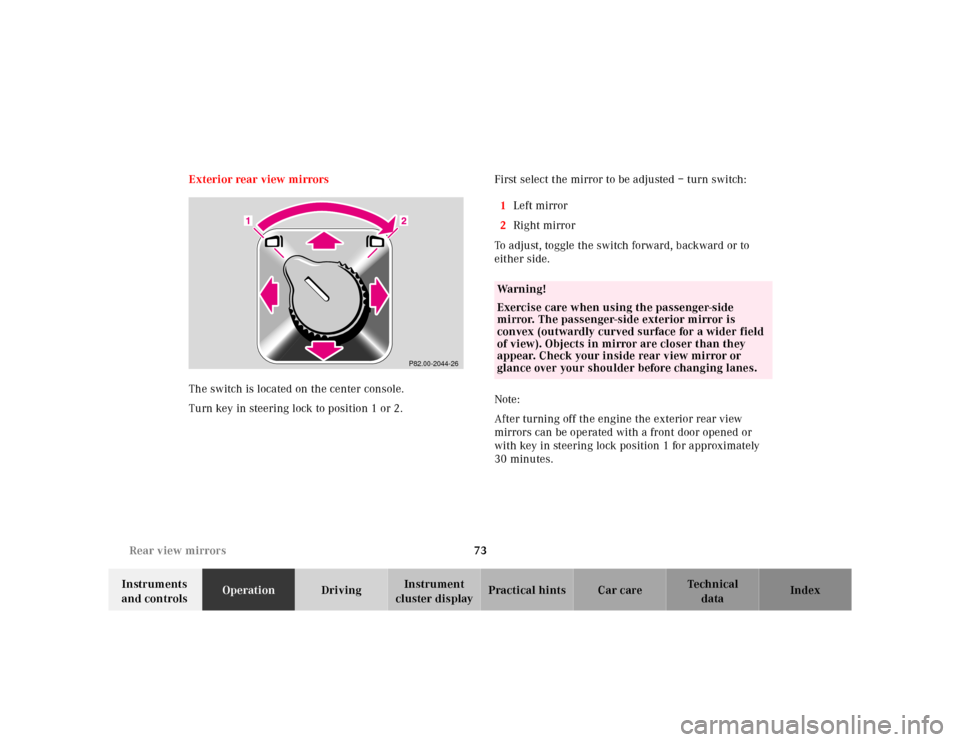
The switch is located on the center console.
Turn key in steering lock to position 1 or 2.First select the mirror to be adjusted – turn switch:
1Left mirror
2Right mirror
To adjust, toggle the switch forward, backward or to
either side.
Note:
After turning off the engine the exterior rear view
mirrors can be operated with a front door opened or
with key in steering lock position 1 for approximately
30 minutes.
P82.00-2044-26
Wa r n i n g !
Exercise care when using the passenger-side
mirror. The passenger-side exterior mirror is
convex (outwardly curved surface for a wider field
of view). Objects in mirror are closer than they
appear. Check your inside rear view mirror or
glance over your shoulder before changing lanes.
Page 77 of 317
74 Rear view mirrors
Te ch n ica l
data Instruments
and controlsOperationDrivingInstrument
cluster displayPractical hints Car care Index
Vehicles with automatic antiglare function:
With the key in steering lock position 2, the driver’s
side mirror reflection brightness responds to changes in
light sensitivity.
With gear selector lever in position “R”, or with the
interior lamps (except cargo compartment lamp)
switched on, the driver’s side mirror brightness does
not respond to changes in light sensitivity.Important!
Electrolyte drops coming into contact with the vehicle
paint finish can only be completely removed while in
their liquid state, by applying plenty of water.
Notes:
The exterior mirrors have electrically heated glass. The
heater switches on automatically, depending on outside
temperature.
If an exterior mirror housing is forcibly pivoted from its
normal position, it must be repositioned by applying
firm pressure until it snaps into place.
Wa r n i n g !
In the case of an accident liquid electrolyte may
escape the mirror housing when the mirror glass
breaks.Electrolyte has an irritating effect. Do not allow the
liquid come into contact with eyes, skin, clothing,
or respiratory system. In cases it does, immediately
flush affected area with water, and seek medical
help if necessary.
Page 78 of 317
75 Rear view mirrors
Te ch n ica l
data Instruments
and controlsOperationDrivingInstrument
cluster displayPractical hints Car care Index Exterior rear view mirror, electrically folding
(optional on ML 320 and ML 430)
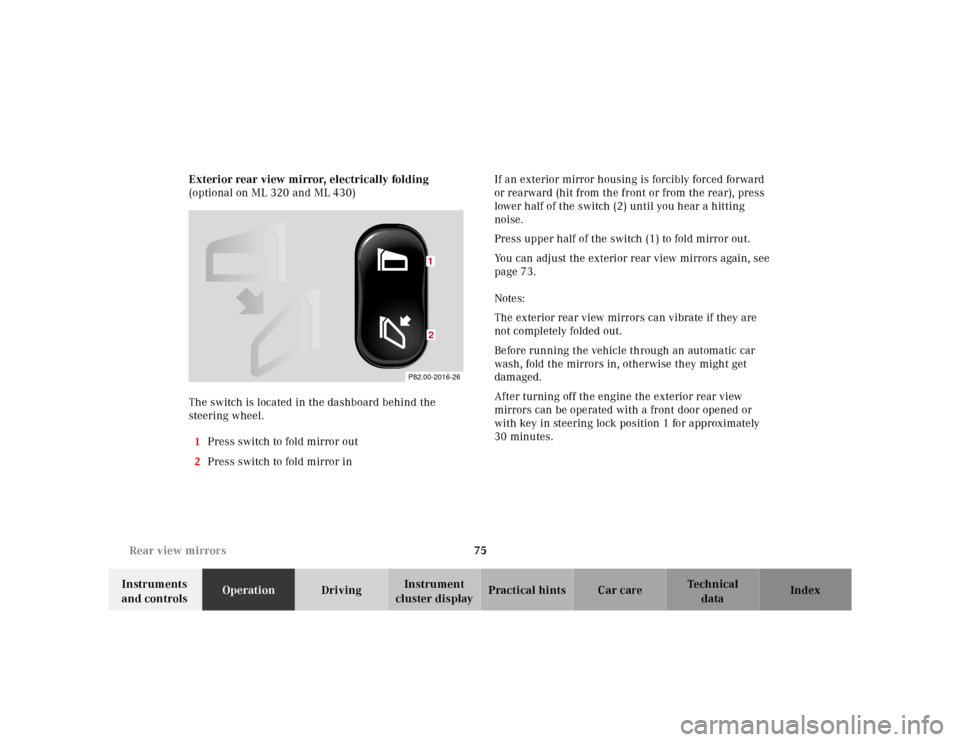
The switch is located in the dashboard behind the
steering wheel.
1Press switch to fold mirror out
2Press switch to fold mirror inIf an exterior mirror housing is forcibly forced forward
or rearward (hit from the front or from the rear), press
lower half of the switch (2) until you hear a hitting
noise.
Press upper half of the switch (1) to fold mirror out.
You can adjust the exterior rear view mirrors again, see
page 73.
Notes:
The exterior rear view mirrors can vibrate if they are
not completely folded out.
Before running the vehicle through an automatic car
wash, fold the mirrors in, otherwise they might get
damaged.
After turning off the engine the exterior rear view
mirrors can be operated with a front door opened or
with key in steering lock position 1 for approximately
30 minutes.
P82.00-2016-26
12
Page 113 of 317
110 Interior equipment
Te ch n ica l
data Instruments
and controlsOperationDrivingInstrument
cluster displayPractical hints Car care Index
Interior lighting
Lamps above instrument panel
Interior lamps above instrument panel are switched on,
and off (soft fade) delayed, when unlocking the vehicle,
or when opening a front door or closing front doors.
With doors closed, push on lamp lens to switch interior
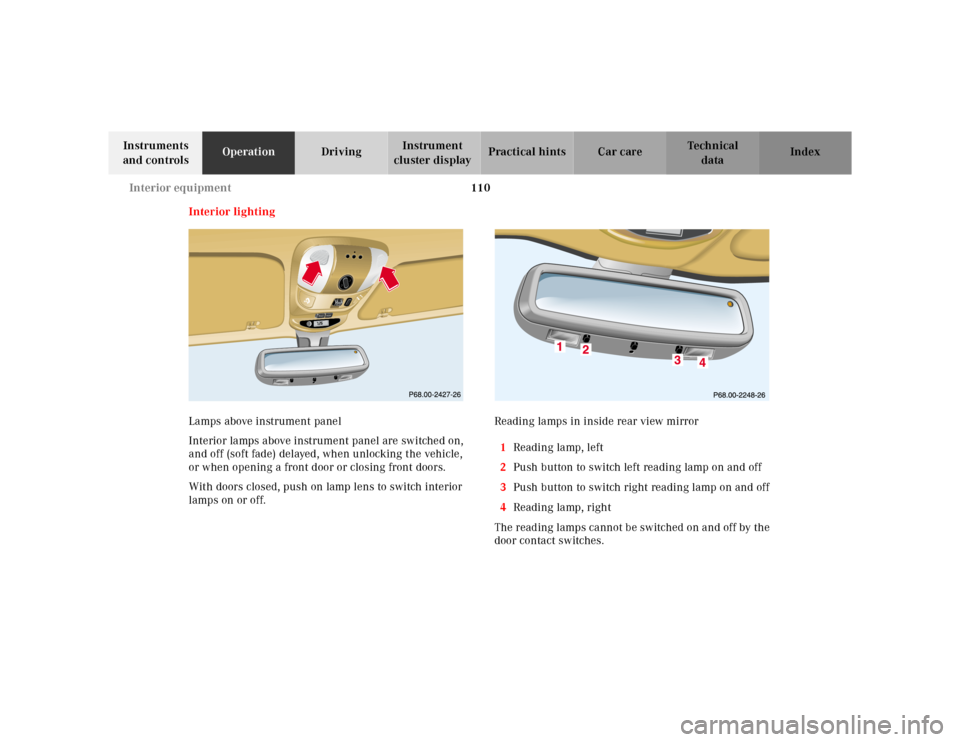
lamps on or off.Reading lamps in inside rear view mirror
1Reading lamp, left
2Push button to switch left reading lamp on and off
3Push button to switch right reading lamp on and off
4Reading lamp, right
The reading lamps cannot be switched on and off by the
door contact switches.
RESETMODE
Page 152 of 317
149 Tele Aid
Te ch n ica l
data Instruments
and controlsOperationDrivingInstrument
cluster displayPractical hints Car care Index Important!
Always make sure that the indicator lamps in the
“SOS” button, the Roadside Assistance button• and
the Information button¡do not remain illuminated
constantly in red and the message “TELE AID – VISIT
WORKSHOP” is not displayed in the MCS display after
the system self check.
If a malfunction is indicated as outlined above, have the
system checked at the nearest Mercedes-Benz Light
Truck Center as soon as possible.
Emergency calls
An emergency call is initiated automatically:
•following an accident in which the Emergency
Tensioning Retractors (ETR’s) or airbags deploy,
•if the antitheft alarm or the tow away alarm stays on
for more than 20 seconds, see pages 35 and 36.
An emergency call can also be initiated manually by
opening the cover next to the inside rear view mirror
labeled “SOS”, then pressing the button (for longer than
2 seconds) located under the cover. See below for
instructions on initiating an emergency call manually.Once the emergency call is in progress, the indicator
lamp in the “SOS” button will begin to f lash. The
message “EMERGENCY CALL – CONNECTING CALL”
appears in the MCS display. When the connection is
established, the message “EMERGENCY CALL – CALL
CONNECTED” appears in the MCS display. All
information relevant to the emergency, such as the
location of the vehicle (determined by the GPS satellite
location system), vehicle model, identification number
and color are generated.
A voice connection between the Response Center and
the occupants of the vehicle will be established
automatically soon after the emergency call has been
initiated. When a voice connection is established the
audio system mutes and the message “TELE AID –
EMERGENCY CALL ACTIVE” appears in the MCS
display. The Response Center will attempt to determine
more precisely the nature of the accident provided they
can speak to an occupant of the vehicle.
Page 197 of 317
194 Driving instructions
Te ch n ica l
data Instruments
and controlsOperationDrivingInstrument
cluster displayPractical hints Car care Index
Tow in g a t r ai le r
There are many different laws, including speed limit
restrictions, having to do with trailer towing. Make sure
t ha t your rig will be lega l, not only for w here you reside,
but also for where you will be driving. A good source for
this information can be the police or local authorities.
Before you start driving with the trailer, check the
trailer hitch, break-away switch, safety chains, electrical
connections, lighting and tires. Also adjust the mirrors
to permit unobstructed view beyond rear of trailer.
If the trailer has electric brakes, start your vehicle and
trailer moving slowly, and then apply only the trailer
brake controller by hand to be sure the brakes are
working properly.
When towing a trailer, check occasionally to be sure that
the load is secure, and that lighting and trailer brakes
(if so equipped) are functioning properly.
Always secure items in the trailer to prevent load shifts
while driving.
Take into consideration that when towing a trailer, the
handling characteristics are different and less stable
from those when operating the vehicle without a trailer.
It is important to avoid sudden maneuvers.The vehicle and trailer combination is heavier, and
therefore is limited in acceleration and climbing ability,
and requires longer stopping distances. It is more prone
to reacting to side wind gusts, and requires more
sensitive steering input.
In order to gain skill and an understanding of the
vehicle’s behavior, you should practice turning,
stopping and backing up in an area which is free from
traffic.
If possible, do not brake abruptly, but rather engage the
brake slightly at first to permit the trailer to activate its
brake. Then increase the braking force.
Caution!
If the trailer should begin to sway, reduce the vehicle’s
speed and use the brake controller by hand to straighten
out the vehicle and trailer. In no case should you
attempt to straighten out the tow vehicle and trailer by
increasing the speed or oversteering and stepping on
the brakes.
If the transmission hunts between gears on inclines,
manually shift to a lower gear (select “4”, “3”, “2”
or “1”). A lower gear and reduction of speed reduces the
chance of engine overloading and / or overheating.
Page 306 of 317
303 Index
Te ch n ica l
data Instruments
and controlsOperation DrivingInstrument
cluster displayPractical hints Car careIndex Emission control label ..................................................285
Engine compartment ..................................................... 231
Engine malfunction
CHECK ENGINE malfunction indicator lamp ....... 218
Engine oil additives .......................................................294
Engine oil consumption ................................................234
Engine oil level
Checking ............................................................. 89, 233
Warning ......................................................................224
Engine oil level indicator ................................................ 89
Engine oils ......................................................................294
Capacities ...................................................................292
Low engine oil level warning ..................................224
Engine overheating ......................................................... 81
Engine speed limit
Overrevving ................................................................. 82
Enlarged cargo area ....................................................... 131
Entrance lamps ...............................................................112
ESP
LOW RANGE — ESP ..................................................208
ESP (Electronic stability program) ..............................205
Control switch ...........................................................207
Malfunction indicator lamp ..................................... 221
Synchronizing ...........................................................206
Warning lamp ............................................................ 221ETR (Emergency tensioning retractor) .........................55
ETS (4-ETS+) .................................................................. 203
LOW RANGE – 4-ETS+ ............................................ 204
Exterior lamp switch .......................................................90
Exterior lamps ............................................................... 260
Adjusting headlamp aim ......................................... 268
Auxiliary fog lamp ............................................. 92, 264
Fog lamps .....................................................................93
Headlamp assembly ......................................... 261, 262
Headlamps .................................90, 261, 262, 268, 280
High mounted stop lamp ......................................... 267
License plate lamps ................................................. 267
Low and high beam ............................................90, 263
Parking lamp ...................................................... 90, 264
Replacing bulbs ........................................................ 260
Side marker lamp ..................................................... 264
Standing lamp .....................................................90, 264
Taillamp assemblies ................................................ 265
Turn signal lamp ................................................90, 264
Turn signal lamp, side ............................................. 266
Exterior rear view mirrors ..............................................73
Electrically folding ...................................................... 75
Page 309 of 317
306 Index
Te ch n ica l
data Instruments
and controlsOperation DrivingInstrument
cluster displayPractical hints Car careIndex
Parking lamp ...................................................... 90, 264
Replacing bulbs .........................................................260
Side marker lamp ......................................................264
Standing lamp .................................................... 90, 264
Taillamp assemblies .................................................265
Turn signal lamp ................................................ 90, 264
Turn signal lamp, side .............................................266
Layout of poly-V-belt ......................................................286
Liftgate ............................................................................... 34
Unlocking ..................................................................... 28
Lighter ..............................................................................119
Limp home mode (Automatic transmission) ............. 172
Loading instructions ..................................................... 136
Lockable storage compartment .....................................116
Locking and unlocking the vehicle ............................... 27
Low engine coolant level warning ..............................224
Low engine oil level warning .......................................224
LOW RANGE
Indicator lamp ........................................................... 221
LOW RANGE mode ........................................................209
LOW RANGE – 4-ETS+ .............................................204
LOW RANGE – ABS ..................................................202
LOW RANGE – ESP ...................................................208
MMaintenance ...................................................................147
Malfunction and indicator lamps in the instrument
cluster ......................................................................... 218
Manual locking/unlocking the doors ...........................29
Manual operation of Skyview Top .............................. 273
Manual operation of sliding/pop-up roof .................. 272
Manual seat, front ............................................................39
MCS, radio and telephone ............................................146
Mechanical keys ............................................................... 29
Memory .............................................................................42
Recalling ....................................................................... 42
Storing ........................................................................... 42
Mirror, exterior, adjusting ..............................................73
Mirror, exterior, rear view ..............................................73
Mirror, inside, rear view ................................................. 71
Mirrors, vanity ................................................................ 113
Page 310 of 317
307 Index
Te ch n ica l
data Instruments
and controlsOperation DrivingInstrument
cluster displayPractical hints Car careIndex
OObtaining replacement keys .......................................... 25
Odometer/Trip odometer ................................................ 80
Off-Road driving ............................................................. 183
On-board diagnostic system ......................................... 218
Operator’s manual ............................................................. 8
Outside temperature indicator ...................................... 82
Overhead control panel ................................................... 21PPanic button ...................................................................... 28
Parking .............................................................................176
Parking brake ....................... 118, 173, 175, 176, 219, 245
Partition net .................................................................... 133
Poly-V-belt
Layout .........................................................................286
Power assistance ............................................................ 175
Power seats, front ............................................................ 40
Memory ........................................................................ 42
Memory recalling ....................................................... 42
Memory storing ........................................................... 42Power windows ...............................................................104
Blocking of rear door windows ............................... 105
Express opening of front door windows ................ 105
Problems with your vehicle ............................................ 15
Product information .......................................................... 7
RRadio transmitters ......................................................... 146
Rain sensor
See windshield wiper/washer switch ......................95
Rear quarter windows ...................................................106
Rear seat bench ..............................................................120
Easy entry/exit feature ............................................123
Head restraints ..........................................................124
Rear seat head restraints ..............................................124
Adjusting ....................................................................125
Removal ......................................................................125
Rear view mirrors
Exterior ......................................................................... 73
Inside ............................................................................ 71
Rear window defroster .................................................. 103
Rear window wiper/washer ...........................................96