key MERCEDES-BENZ METRIS 2016 MY16 Operator’s Manual
[x] Cancel search | Manufacturer: MERCEDES-BENZ, Model Year: 2016, Model line: METRIS, Model: MERCEDES-BENZ METRIS 2016Pages: 310, PDF Size: 7.28 MB
Page 20 of 310
Cleaning .........................................259
Correct usage .................................. 45
Fastening ......................................... 46
Important safety guidelines ............. 45
Introduction ..................................... 44
Releasing ......................................... 47
Warning lamp ................................. 219
Warning lamp (function) ................... 47
Seats
Adjusting (manually). ....................... 84
Adjusting lumba rsuppo rt ................ 84
Adjusting the hea drestraint ............ 88
Armrest ............................................ 89
Cleaning the cove r......................... 259
Correct driver' sseatp osition ........... 83
Important safety notes .................... 83
Seath eating .................................... 89
Selecting gear
see Automati ctransmission
Selecto rlever
Cleaning ......................................... 259
see Automati ctransmission
Sensors (cleaning instructions) ....... 257
Servic ecenter
see Qualifie dspecialist workshop
Servic einterva ldisplay
Calling up the service du edate. ..... 248
Hiding service messages ............... 248
Note s............................................. 247
Servic emenu( on-board com-
puter) .................................................. 184
Servic ephon enumber ...................... 262
Servic eproducts
Brake fluid ..................................... 300
Coolant (engine) ............................ 300
Engine oil. ...................................... 298
Fue l................................................ 296
Important safety notes .................. 295
Power steering fluid ....................... 300
Refrigerant (air-conditioning sys-
tem) ............................................... 301
Transmission oil. .................... 299 ,300
Washe rfluid ................................... 302
Setting the air distribution ............... 113
Setting the airflow ............................ 113 Settings
Factory (vehicle with steering
wheelb uttons) ............................... 187
Factory (vehicle withou tsteering
wh eelb
uttons) ............................... 173
On-b
oard compute r(vehicle with
steering wheelb uttons) ................. 185
On-board compute r(vehicle with-
outs teering wheelb uttons) ........... 173
Side impac tair bag ............................. 49
Side windows
Cleaning ......................................... 256
Convenience closing feature ............ 81
Convenience opening feature .......... 81
Hinged sid ewindow s....................... 80
Important safety information ........... 80
Opening/closing .............................. 81
Overview .......................................... 80
Problem (malfunction) ..................... 82
Resetting ......................................... 81
Signal and ambien tlight
Changing abulb. .............................. 98
Sliding door
Child-proo floc ks .............................. 61
Cleaning ......................................... 258
Important safety notes .................... 73
Indicato rlam p................................ 227
Opening/closing from the inside ..... 74
Opening/closing from the out-
side .................................................. 73
see Electric sliding door
SmartKey
Changing the battery ....................... 69
Changing the programming ............. 68
Checking the battery ....................... 69
Convenience closing fea-
ture .......................................... 81 ,116
Convenience opening feature .......... 81
Door centra lloc king/unlocking ....... 67
Important safety notes .................... 67
Loss. ................................................ 71
Mechanical key ................................ 68
Problem (malfunction) ..................... 71
SmartKey position s(igni tion lock) .. 120
Sno wchains ...................................... 270
Sockets .............................................. 231
Spare wheel
Genera lnotes ................................ 291
18Index
Page 24 of 310
Permissible trailer loads and
drawbar noseweights ..................... 166
Transmission
see Automatic transmission
Transmission oil ........................ 299, 300
Transmission positions
Automatic transmission ................. 127
Display (DIRECT SELECT lever) ...... 127
Transmission programs
Automatic transmission ................. 128
Display (DIRECT SELECT lever) ...... 127
Transport
Lashing straps ...............................2 35
Loading guidelines ......................... 232
Stickers ......................................... 235
Vehicle ...........................................2 66
Transport by rail ................................ 136
Transportation
Rail ................................................ 136
Transportation aids
Load protectio nnet ....................... 237
Transporting
Cargo compartment variations ...... 234
Load distribution ............................ 233
Securing aloa d. ............................. 234
Trim pieces (cleaning instruc-
tions) ..................................................2 59
Trip computer
Displaying (vehicle with steering
wheel buttons) ............................... 178
Displaying (vehicle without steer-
ing wheel buttons) ......................... 171
Resetting (vehicle with steering
wheel buttons) ............................... 178
Resetting (vehicle without steer-
ing wheel buttons) ......................... 171
Selecting the displa yunits (vehi-
cle with steering wheel buttons) .... 185
Selecting the displa yunits (vehi-
cle without steering wheel but-
tons) .............................................. 174
Trip odometer
Displaying (vehicle with steering
wheel buttons) ............................... 177
Displaying (vehicle without steer-
ing wheel buttons) ......................... 171
Resetting (vehicle with steering
wheel buttons) ............................... 178 Resetting (vehicle without steer-
ing wheel buttons) ......................... 171
Setting the displa
yunit (vehicle
wi th steering w
he
el buttons) ......... 185
Setting the displa yunit (vehicle
without steering wheel buttons) .... 174
Turn signal
Changing bulbs (additional turn
signals) .......................................... 100
Turn signals
Display messages (vehicle with
steering wheel buttons) ................. 209
Display messages (vehicle with-
out steering wheel buttons) ........... 195
Replacing bulbs (front) ................... 100
Replacing bulbs (rear) .................... 101
Switching on/off .............................. 94
Trailer displa ymessages (vehicle
with steering wheel buttons) ......... 208
Trailer displa ymessages (vehicle
without steering wheel buttons) .... 194
Two-way radios
Typeapproval/frequency .............. 294
TWR (Tongue Weight Rating) (defi-
nition) ................................................. 286
Type identification plate
see Vehicle identification plate
U
UnlockingEmergency unlocking ....................... 69
From insid ethe vehicle (central
unlocking button) .............................7 2
With emergency key element ........... 68
USB (audio)
Playing ...........................................1 81
V
Vanity mirror
Changing abulb( mirror lamp) ......... 97
Sun viso r........................................ 229
Vehicle
Data acquisition ............................... 32
Display messages (vehicle with
steering wheel buttons) ................. 217
Display messages (vehicle with-
out steering wheel buttons) ........... 200
22Index
Page 25 of 310
Electronics .....................................294
Emergency unlocking ....................... 68
Equipment ....................................... 25
Limited Warranty .............................2 5
Loading .......................................... 278
Locking (in an emergency) ............... 69
Locking (SmartKey) .......................... 67
Lowering ........................................ 289
Maintenance .................................... 26
Operating safety .............................. 28
Parking for along period. ............... 134
Pulling awa y................................... 121
Raising ........................................... 287
Registration ..................................... 30
Reporting problems ......................... 30
Securing from rolling away ............ 132
Towing away .................................. 264
Transporting .................................. 266
Unlocking (i nanemergency) ........... 69
Unlocking (SmartKey )...................... 67
Vehicl ebattery
see Battery (vehicle)
Vehicl ebodies ..................................... 30
Body/equipment mounting direc-
tive sfor trucks ................................. 30
Vehicl echeck
see Preparing for ajourney
Vehicl edata ....................................... 303
Vehicl edimensions ........................... 303
Vehicl eemergencyl ocking ................ 69
Vehicl eidentificatio nnumber
see VIN
Vehicl eidentificatio nplate .............. 294
Vehicl ekey
see SmartKey
Vehicl etoolkit
in the sea tbase. ............................ 260
Scope. ........................................... 260
Storage location ............................ 260
Stowag ecompartment in the rea r..2 60
Stowag espace in the cargo com-
partment ........................................ 261
Ventilation
see Climate control
VIN
Engine compartment ..................... 295
Typeplate ...................................... 294W
Warning
Stickers ...........................................2 7
Warning and indicator lamps
ABS ................................................ 221
Brakes ...........................................2 20
Check Engine ................................. 223
COLLISION PREVENTION ASSIST .. 225
Coolant .......................................... 223
Distance warning ........................... 225
Door ............................................... 227
ESP
®.............................................. 221
ESP®OFF ....................................... 222
Fuel tank ........................................ 223
General notes ................................ 218
Overview (vehicle with steering
wheel buttons) ................................. 38
Overview (vehicle without steer-
ing wheel buttons) ........................... 36
Parking brake ................................ 133
PASSENGER AIR BAG OFF ...............4 4
Rear doo r....................................... 227
Reservef uel ................................... 223
Restraint system ............................ 222
Seat belt. ....................................... 219
Sliding door ................................... 227
Steering ......................................... 227
Tire pressure monitor .................... 226
Warranty .............................................. 25
Washer fluid
Adding ...........................................2 46
Capacities ...................................... 302
Display messages (vehicle with
steering wheel buttons) ................. 218
Display messages (vehicle with-
out steering wheel buttons) ........... 201
Notes ............................................. 302
Whee land tire combination
see Tires
Whee lboltt ightening torque ........... 289
Wheels
Changing awheel .......................... 286
Checking ........................................ 268
Cleaning ......................................... 256
Important safety notes .................. 267
Interchanging/changing ................ 286
Mounting anew wheel ................... 288
Index23
Page 48 of 310
All vehicleoccupants must fasten the sea tbelt
correctl ybefore setting off. Make sure thata ll
occupants ar eweari ng thei rseatb elts correctly
for the entire journey.
Whe nfastening the sea tbelt, make sure that:
RThe sea tbeltt ongu eisinserte dinto the belt
buckle thatb elongs to the seat.
RThe sea tbeltist ightene dacross your body.
Avoi dweari ng bulky clothing, e.g .awinter
coat.
RThe sea tbeltisn ot twisted.
Onlyt hen can the forces produced in the
event of an accident be evenly distributed
across the belt.
RThe shoulde rsectio noft he belt must always
be routed across the cente rofthe shoulder.
The shoulde rsectio noft he belt shoul dnot
come into contact with your neck and must
not be routed under the arm. Where possible,
adjus tthe sea tbelttot he appropriate height.
RThe la pbeltm ustbet auta nd as lo waspos-
sibl eovery ourlap .
The la pbeltm usta lway spassa cross your hip
joints and neve racross your stomach or
abdomen. Pregnant women must take partic-
ular care. If necessary,t he lapbeltc an be
pushe ddowna cross the hipj oints and pulled
tight using the shoulde rsection.
RThe sea tbeltisn ot routed ove rsharp, pointed
or fragile objects.
If the sei te
ms ar eonoriny ourc lothing, e.g.
eyeglasses ,pen s, keys, etc., stow thes eitems
in am ore suitabl eloc ation.
ROnlyo ne persons houlduseeach sea tbelta t
any one time.
On no account shoul dbabie sorc hildren
travel sitting on the la pofanother vehicle
occupant. During an accident, they could be
crushe dbetween the occupant and sea tbelt.
RObjects ar enot secured with aseatb eltift he
sea tbeltisb eing used by one of the vehicle’s
occupants.
Als om akes uret hatt hereareno objects, e.g.
cushions, between the occupant and the seat.
Sea tbelts ar esolel yintende dfor the protection
and restraint of the vehicl eoccupants. To
secur eobjects, luggage or loads, always
observe the "Loading guidelines" (
Ypage 232).
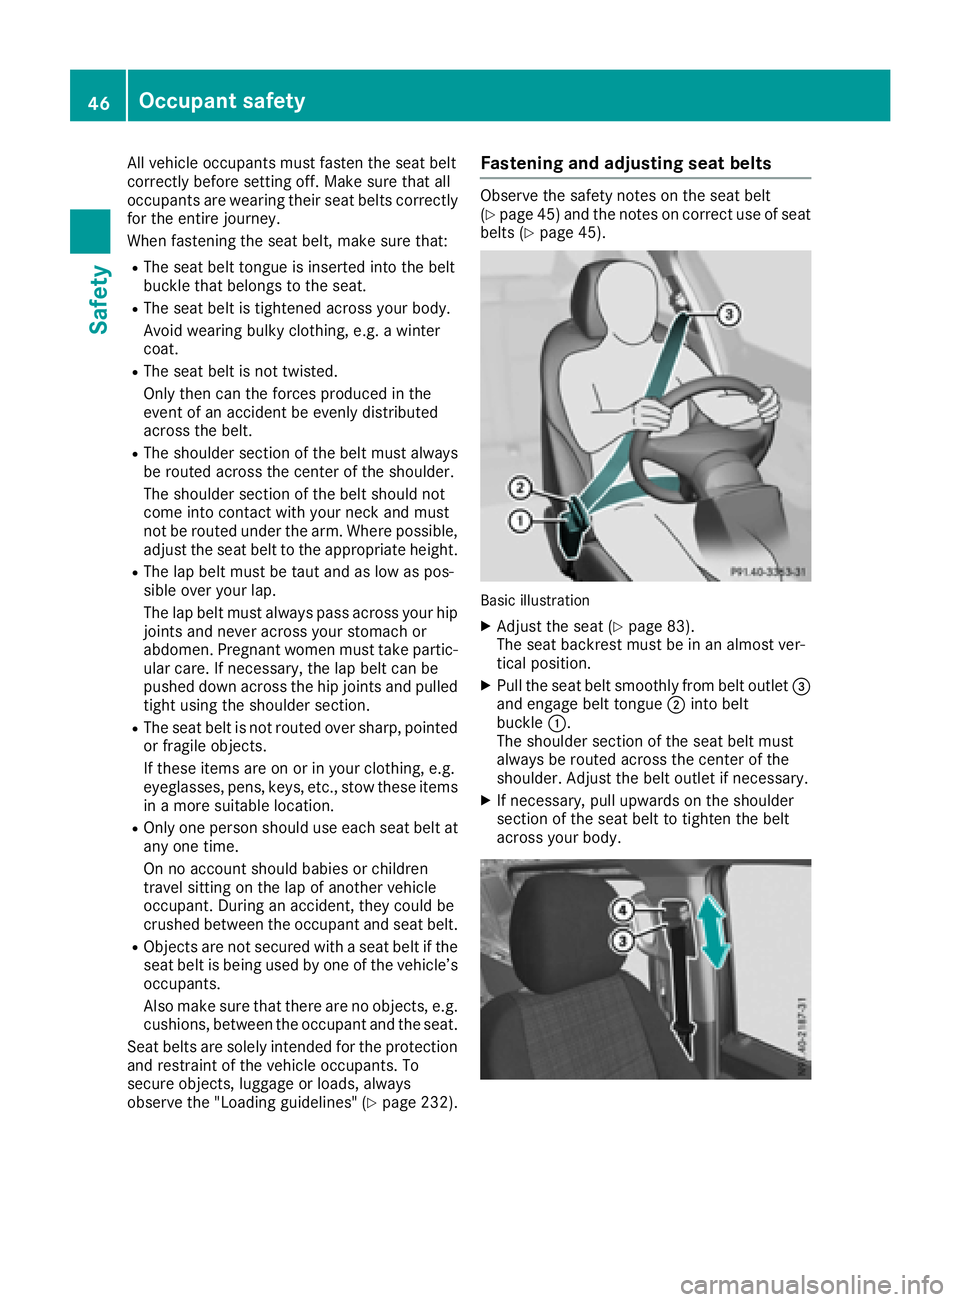
Fastenin gand adjusting seat belts
Observ ethe safety notes on the sea tbelt
(Ypage 45) and the notes on correct us eofseat
belts (Ypage 45).
Basic illustration
XAdjust the sea t(Ypage 83).
The sea tbackres tmustbeinana lmostv er-
tica lposit ion.
XPull the sea tbelts moothl yfrom belt outlet =
and engag ebeltt ongue ;into belt
buckle :.
The shoulde rsectio noft he sea tbeltm ust
always be routed across the cente rofthe
shoulder. Adjust the belt outle tifnecessary.
XIf necessary,p ullu pwar ds on the shoulder
sectio nofthe sea tbelttot ighten the belt
across your body.
46Occupant safety
Safety
Page 53 of 310
Occupant Classification System (OCS)
operation
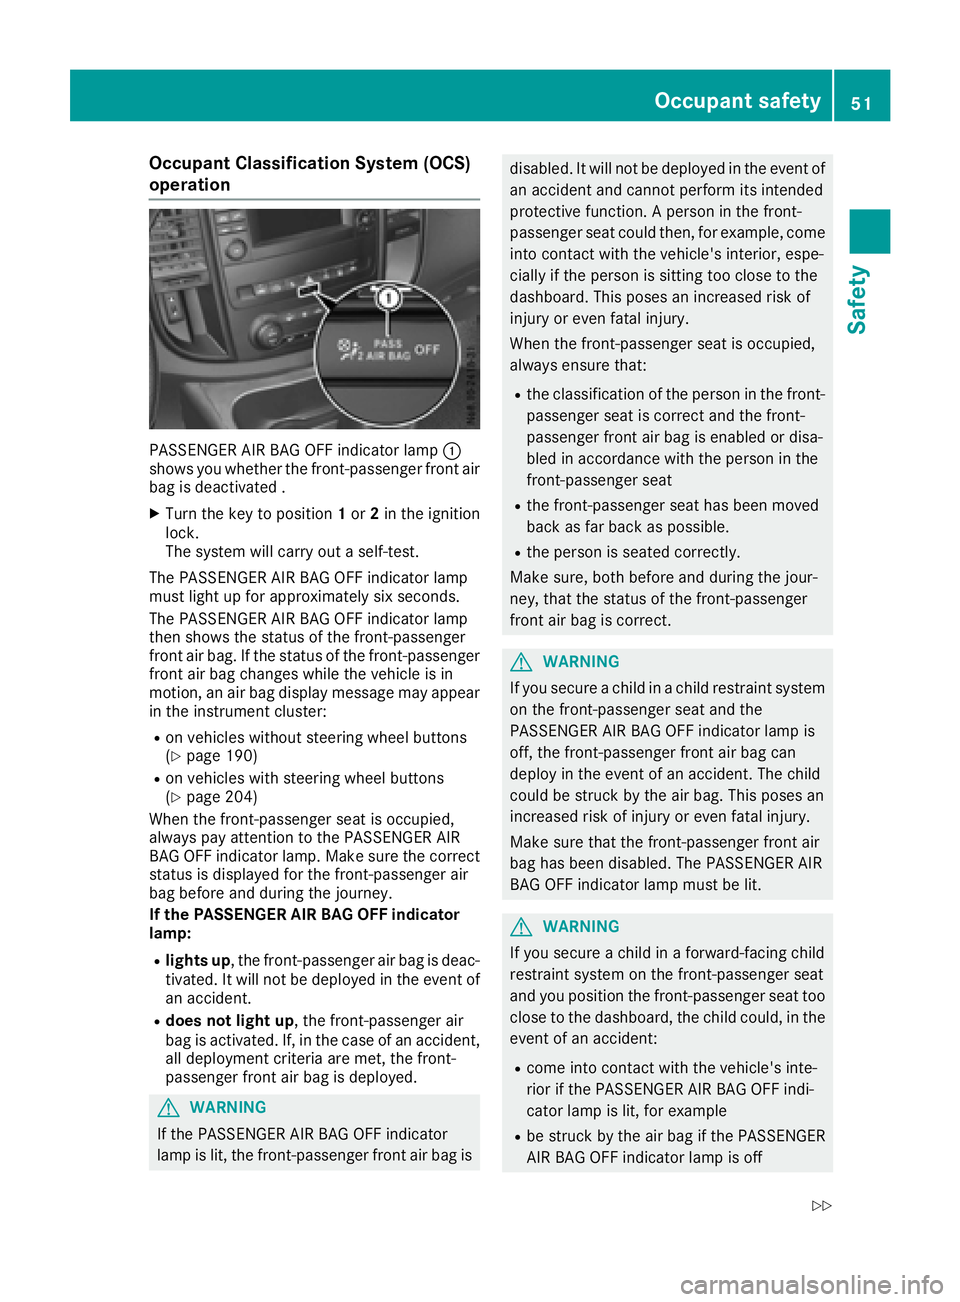
PASSENGER AIR BAG OFF indicator lamp:
shows you whether the front-passenger fronta ir
bag is deactivated .
XTurn the key to position 1or 2in the ignition
lock.
The system will carry out aself-test.
The PASSENGER AIR BAG OFF indicator lamp
must light up for approximately six seconds.
The PASSENGER AIR BAG OFF indicator lamp
then shows the status of the front-passenger
fronta ir bag. If the status of the front-passenger
fronta ir bag changes while the vehicle is in
motion ,anair bag display message may appear
in the instrument cluster:
Ron vehicles without steering wheel buttons
(Ypage 190)
Ron vehicles with steering wheel buttons
(Ypage 204)
When the front-passenger seat is occupied,
alwaysp ay attention to the PASSENGER AIR
BAG OFF indicator lamp. Make sure the correct
status is displayed for the front-passenger air
bag before and during the journey.
If the PASSENGER AIR BAG OFF indicator
lamp:
Rlights up ,the front-passenger air bag is deac-
tivated. It will not be deployed in the event of
an accident.
Rdoes not light up,t he front-passenger air
bag is activated. If, in the case of an accident,
all deployment criteria are met, the front-
passenger fronta ir bag is deployed.
GWARNING
If the PASSENGER AIR BAG OFF indicator
lamp is lit, the front-passenger fronta ir bag is
disabled. It will not be deployed in the event of
an accidenta nd cannot perform its intended
protective function .Aperson in the front-
passenger seat could then ,for example, come
into contact with the vehicle's interior, espe-
cially if the person is sitting too close to the
dashboard. This poses an increased risk of
injur yore ven fatal injury.
When the front-passenger seat is occupied,
alwayse nsure that:
Rthe classification of the person in the front-
passenger seat is correct and the front-
passenger fronta ir bag is enabled or disa-
bled in accordance with the person in the
front-passenger seat
Rthe front-passenger seat has been moved
back as far back as possible.
Rthe person is seated correctly.
Make sure, both before and during the jour-
ney, that the status of the front-passenger
fronta ir bag is correct.
GWARNING
If you secure achild in achild restraint system
on the front-passenger seat and the
PASSENGER AIR BAG OFF indicator lamp is
off, the front-passenger fronta ir bag can
deploy in the event of an accident. The child
could be struc kbythe air bag. This poses an
increased risk of injur yoreven fatal injury.
Make sure that the front-passenger fronta ir
bag has been disabled. The PASSENGER AIR
BAG OFF indicator lamp must be lit.
GWARNING
If you secure achild in aforward-facing child
restraint system on the front-passenger seat
and you position the front-passenger seat too close to the dashboard, the child could, in the
event of an accident:
Rcome into contact with the vehicle's inte-
rior if the PASSENGER AIR BAG OFF indi-
cator lamp is lit, for example
Rbe struck by the air bag if the PASSENGER
AIR BAG OFF indicator lamp is off
Occupant safety51
Safety
Z
Page 59 of 310
GWARNING
If you leave children unsupervised in the vehi-
cle, they coul dset it in motion by, for example:
Rrelease the parking brake.
Rshift the automatic transmission out of the
parking position P.
Rstart the engine.
In addition, they may operate vehiclee quip-
ment and become trapped. There is arisk of
an accident and injury.
When leaving the vehicle, alway stake the
SmartKey with you and lock the vehicle. Never
leave children unsupervised in the vehicle.
GWARNING
If persons, particularl ychildren are subjected
to prolonged exposure to extreme heato r
cold, there is arisk of injury ,possibly even
fatal .Never leave children unattended in the
vehicle.
GWARNING
If the child restraint system is subjected to
direct sunlight, parts may get very hot. Chil-
dren may burn themselves on these parts,
particularl yonthe metal parts of the child
restraint system. There is arisk of injury.
If you leave the vehicle, taking the child with
you ,alway sensure that the child restraint
system is not exposedtod irect sunlight. Pro-
tect it with ablanket, for example. If the child
restraint system has been exposedtod irect
sunlight, let it cool downb efore securing the
child in it. Never leave children unattended in
the vehicle.
Always make sure that all vehicleo ccupants are
positioned properly in their seats and have cor-
rectly fastened their seat belts. Take particular
care with children.
Please take note of the safety notes on seat
belts (
Ypag e45) and the notes on their correct
use (Ypag e45).
Ab ooster seat may be necessary to achieve
propers eat beltp ositioning for children over
41 lbs (18 kg )until they reach aheight where a lap/shoulder beltc
an be installed properly with-
out abooster seat.
Special seat bel tretractor
GWARNING
If the seat beltisr eleased while driving, the
child restraint system wil lnolonger be
secure dproperly.T he special seat beltr etrac-
tor is disableda nd the inertia real draw sina
portion of the seat belt. The seat beltc annot
be immediatel yrefastened. There is an
increased risk of injury ,possibly even fatal.
Stop the vehiclei mmediately, paying atten-
tion to road and traffic conditions. Reactivate
the special seat beltr etractor and secure the
child restraint system properly.
All seat belts in the vehicle, except the driver's
seat belt, are equipped with aspecial seat belt
retractor. When activated, the special seat belt
retractor ensure sthat the seat beltc annot
slacken once the child seat is secured.
Installing achild restraint system:
XMake sure you observe the child restraint
system manufacturer's installation instruc-
tions.
XPul lthe seat belts moothly from the belto ut-
let.
XEngage seat beltt ongue in beltbuckle.
Activating the special seat beltr etractor:
XPullthe seat belto ut fullyand let the inertia
reel retract it again.
Whil ethe seat beltisr etracting, you should
hear aratcheting sound .The special seat belt
retractor is enabled.
XPush the child restraint system downsot hat
the seat beltist ight and does not loosen.
Removing the child restraint system and deac-
tivating the special seat beltr etractor:
XMake sure you observe the child restraint
system manufacturer's installation instruc-
tions.
XPress the release button of the seat belt
buckle and guide the seat beltt ongue back
toward sthe belts ash guide.
The special seat beltr etractor is deactivated.
Children in the vehicle57
Safety
Z
Page 63 of 310
correctly routed from the vehicle beltoutlet to
the shoulder bel tguide on the chil drestraint
system. The shoulder bel tstrapm ustb erouted
forward sand downwards from the vehicle belt
outlet. If necessary, adjust the vehicle bel tout-
le ta nd the front-passenger seata ccordingly.
Alway sobserve the chil drestraint system man-
ufacturer's installation and operating instruc-
tions.
Override features/Child-proof locks
Important safety notes
GWARNING
If childre nare traveling in the vehicle ,they
could:
Rope ndoors, thus endangering otherp eople
or roadu sers
Rexit the vehicle and be caught by oncoming
traffic
Roperate vehicle equipment and become
trapped
There is ariskofana ccident and injury.
Alway sactivate the child-proof locks and
overrid efeature if childre nare traveling in the
vehicle .Whenl eaving the vehicle ,alway stake
the key with yo uand lock the vehicle .Never
leave childre nunattende dinthe vehicle.
Child-proof lock/override feature for:
RSliding doors (Ypage 61)
GWARNING
If yo ulea ve childre nunsupervised in the vehi-
cle ,they could set it in motio nby,for example:
Rrelease the parking brake.
Rshift the automatic transmission outoft he
parking position P.
Rstartthe engine.
In addition, they may operate vehicle equip-
ment and become trapped .There is arisko f
an accident and injury.
Whe nleaving the vehicle ,alway stake the
SmartKey with yo uand lock the vehicle .Never
leave childre nunsupervised in the vehicle.
GWARNING
If persons, particularly childre nare subjected
to prolonged exposure to extrem eheato r
cold ,there is ariskofi njury, possibly even
fatal. Neve rlea ve childre nunattende dinthe
vehicle.
GWARNING
If the chil drestraint system is subjecte dto
direct sunlight, parts may get very hot. Chil-
dre nm ay burn themselves on these parts,
particularly on the metalp arts of the child
restraint system. There is ariskofi njury.
If yo uleave the vehicle ,taking the chil dwith
you, always ensure that the chil drestraint
system is not exposed to direct sunlight. Pro- tect it with ablanket, for example. If the child
restraint system hasb eene xposed to direct
sunlight, le titcool dow nbefore securing the
chil dini t. Neve rlea ve childre nunattende din
the vehicle.
Child-proof lock for sliding door
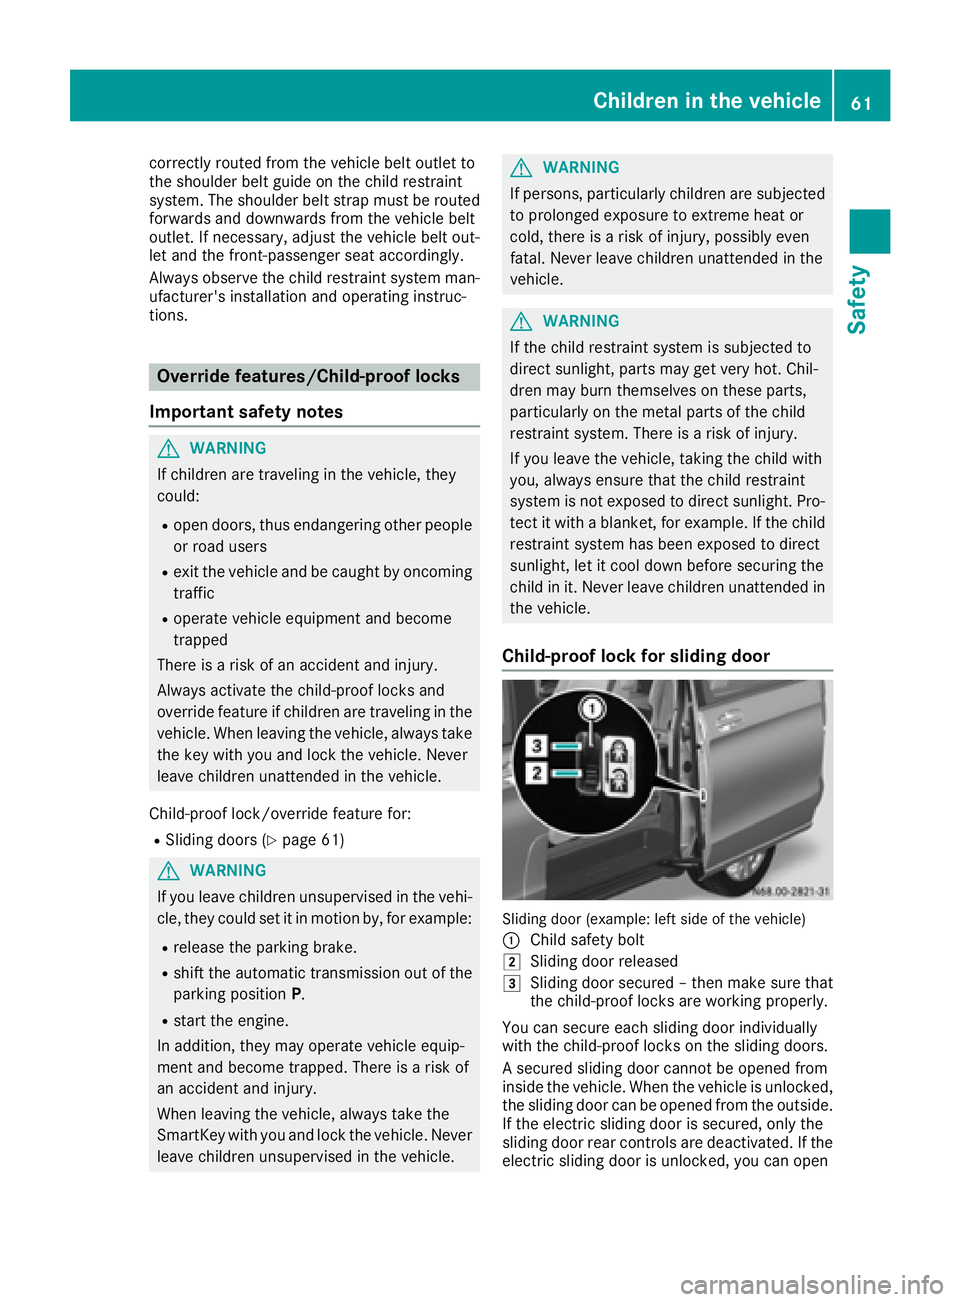
Sliding doo r(example: lef tsideoft he vehicle)
:
Chil dsafety bolt
2Sliding doo rreleased
3Sliding doo rsecured –then make sure that
the child-proof locks are working properly.
You can secure each sliding doo rindividually
with the child-proof locks on the sliding doors.
As ecured sliding doo rcannot be opened from
inside the vehicle .Whent he vehicle is unlocked,
the sliding doo rcan be opened from the outside.
If the electri csliding doo rissecured ,only the
sliding doo rrea rc ontrolsa re deactivated. If the
electrics liding doo risunlocked ,you can open
Children in the vehicle61
Safety
Z
Page 68 of 310
Theft deterrentlocking system
Immobilizer
XTo activate: remove the key fromt he ignition
lock.
XTo deactivate: turnthe key to position 2in
the ignition lock.
The immobilize rprevents your vehicl efrom
being started withou tthe correct key.
Alway stake the key with yo uand lock the vehi-
cle when leaving the vehicle. If yo uleave the key
in the vehicle, anyone can start the engine.
iThe immobilize risalwaysdeactivated when
yo us tart the engine.
ATA (Anti-Theft Alarm system)
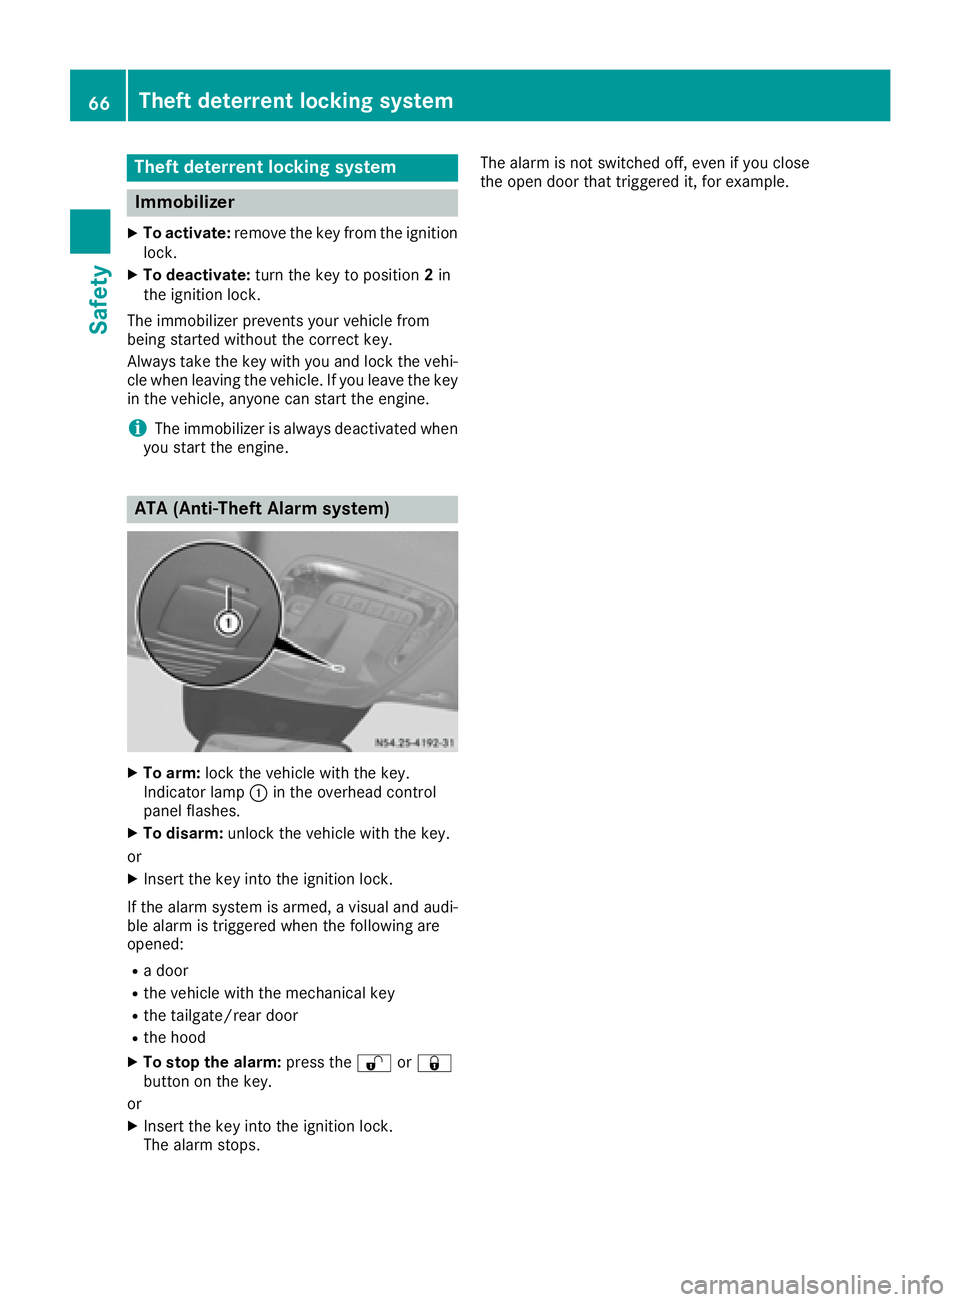
XTo arm: lock the vehicl ewitht he key.
Indicato rlam p: in the overhead control
panel flashes.
XTo disarm: unlock the vehicl ewitht he key.
or
XInsert the key into the ignition lock.
If the alar msystem is armed ,avisualand audi-
bl ea larm is triggered when the following are
opened:
Rad oor
Rthe vehicl ewitht he mechanical key
Rthe tailgate/rea rdoor
Rthe hood
XTo sto pthe alarm: press the%or&
button on the key.
or
XInsert the key into the ignition lock.
The alar mstops. The alar
misnot switched off ,evenify ouclose
the open door thatt riggered it, for example.
66Theftdeterrentl ockingsystem
Safety
Page 69 of 310
Useful information
This Operator's Manual describes all models as
well as standard and optional equipment of your
vehicle that were available at the time of going
to print.Country-specific variation sare possi-
ble. Note that your vehicle may not be equipped
with all of the described functions. This also
applies to system sand function srelevantt o
safety.
Read the information on qualified specialist
workshops (
Ypage 29).
Key
Important safetyn otes
GWARNING
If children are left unsupervised in the vehicle,
they could:
Ropen the doors, thus endangering other
people or road users.
Rget out and disrupt traffic.
Roperate the vehicle' sequipment.
Additionally, children could set the vehicle in
motion if, for example, they:
Rrelease the parkin gbrake.
Rshifting the automatic transmission out of
park position P
RStart the engine.
There is arisk of an acciden tand injury.
When leaving the vehicle, always tak ethe
SmartKey with you and lock the vehicle. Never
leave children or animals unattended in the
vehicle. Always keep the SmartKey out of
reach of children.
GWARNING
If you attach heavy or large objects to the
SmartKey, the SmartKey could be uninten-
tionally turned in the ignition lock .This could
cause the engin etobeswitched off. There is a
risk of an accident.
Do not attach any heavy or large objects to the
SmartKey. Remove any bulky key rings before
insertin gthe SmartKey int othe ignition lock.
!Keep the SmartKey away from strong mag-
netic fields. Otherwise, the remotec ontrol
function could be affected.
Strongm agnetic fields can occur in the vicin-
ity of powerful electrical installations.
Do not keep the key:
Rwith electronic devices,e .g.am obile phone
or another key
Rwith metallic objects, e.g. coinsorm etal foil
Rin metallic objects, e.g. metal cases
This can affectt he key's functionality.
Key functions
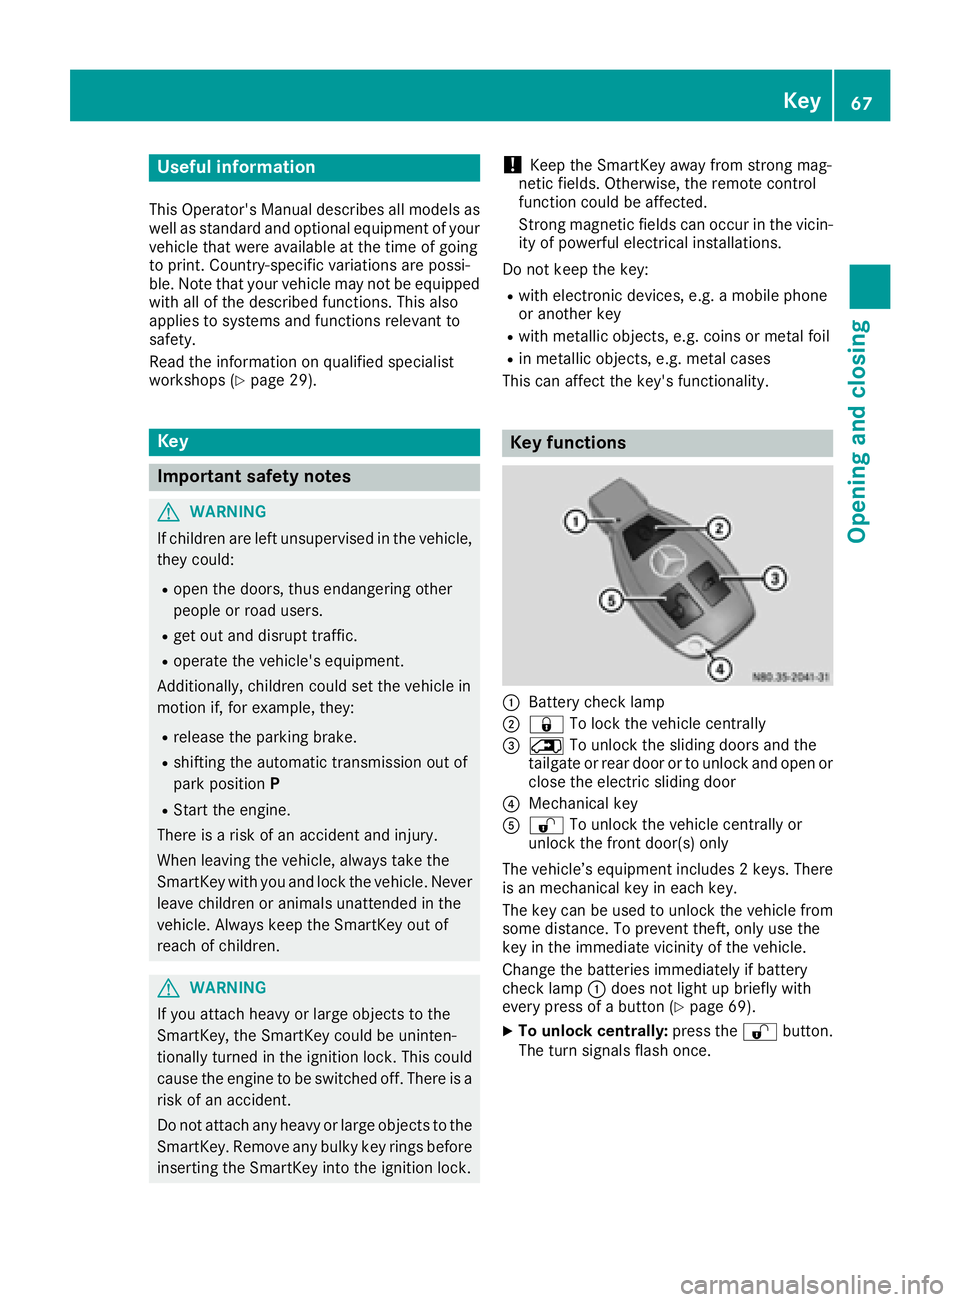
:Battery checklamp
;&To lock the vehicle centrally
=5To unlock the sliding doors and the
tailgate or rear door or to unlock and open or
close the electric sliding door
?Mechanical key
A% To unlock the vehicle centrally or
unlock the frontd oor(s) only
The vehicle’s equipment includes 2keys. There
is an mechanical key in each key.
The key can be used to unlock the vehicle from
some distance. To preventt heft, only use the
key in the immediatev icinity of the vehicle.
Change the batteries immediately if battery
checkl amp:does not light up briefly with
every press of abutton (
Ypage 69).
XTo unlock centrally: press the%button.
The turn signals flash once.
Key67
Opening and closing
Z
Page 70 of 310
XTo unlockthe sliding doors and the tail-
gate or rear doo ronly:p ress the 5but-
ton.
The turn signals flash once.
iIf yo udon ot open the vehicl ewithina pprox-
imately40s econds of unlocking:
Rthe vehicleislocked again.
Rthe anti-thef tprotection is armed again.
XTo lock centrally: press the&button.
The indicator lamps flash thre etime sif:
Rthe anti-thef tprotection is armed.
Rallt he doors and the tailgate or rea rdoor
are closed.
XCheck the locking knobs on al lthe doors.
The locking knobs must al lbeinthe lowered
position.
The key's factory setting enables yo utocen-
trally lock and unlock the following:
Rthe driver's and the front-passenger door
Rthe sliding doors
Rthe tailgate or rea rdoor
In an emergency, the driver's door can also be
unlocke dmanuall yusing the mechanical key
(
Ypage 68).
Yo uc an also set an audibl esignaltoc onfirm
thatt he vehicl ehasbeen locked .The audible
locking-verification signalc an be switched on/
off:
Rusing the on-board compute ronvehicles with
steering whee lbuttons (Ypage 187)
Rat as pecialist qualified workshop for vehicles
withou tsteering whee lbuttons
After unlocking using the remote control, the
surround lighting also goe sonint
he dark. For
ve
hicles with steering whee lbuttons, the sur-
round lighting can be activate dand deactivated
in the on-board compute r(
Ypage 186).
Changingthe settings of the locking
system
If yo utravel alone alot,y ou mayw ishtoc hange
the settings of the locking system .Press
the % button to unlock:
Rthe driver's and front-passenger door (Cargo
Van)
or
Rthe driver's door (Passenger Van)
XTo chang ethe setting: press and hol ddown
the % and& buttons simultaneously
unti lthe battery check lamp flashe stwice.
(
Ypage 67).
If the setting of the locking system is changed
withint he signalr angeoft he vehicle, press the
& or% button to:
Rlock or
Runlock the vehicle
The key now functions as follows:
XTo unloc kthe driver' sdoororf rontdoors:
press the %button once.
XTo unloc kcentrally: brieflypress the %
button twice.
XTo lock centrally: press the&button.
XTo restore factory settings: press and hold
down the %and& buttons simultane-
ouslyu ntilthe battery check lamp flashes
twice (
Ypage 67).
The key unlocks the vehicl ecentrall yagain .
Mechanical key
General notes
If the vehicl ecan no longer be locked or
unlocke dwitht he key,u sethe mechanical key.
The anti-thef talarm system (ATA) is triggered
when yo uunlock and open the vehicl eusing the
mechanical key (
Ypage 66).
The alarm can be disabled in the following two
ways:
XPress the %or& button on the key.
or
XInsert the key into the ignition lock.
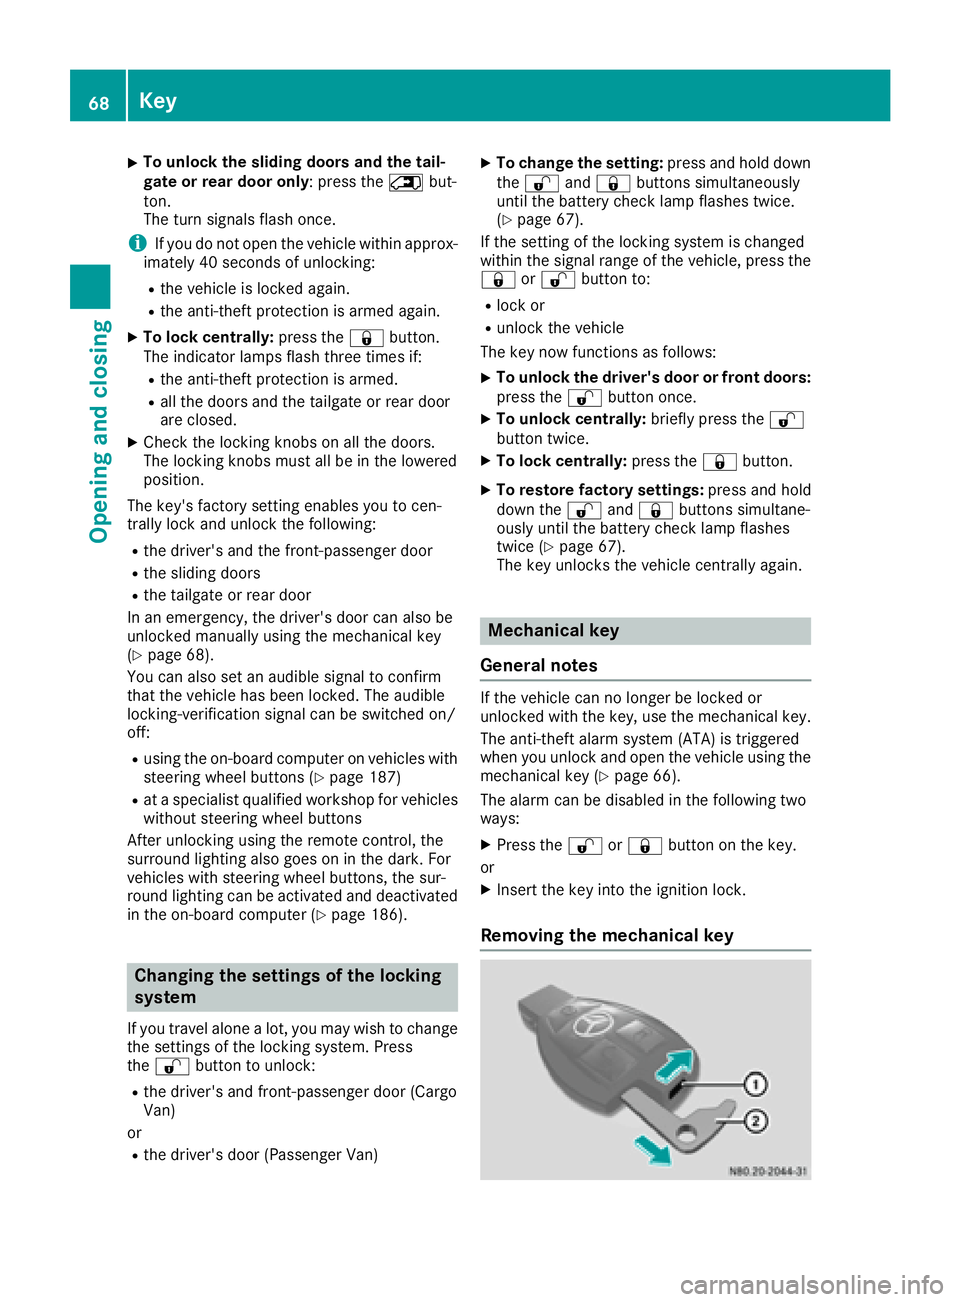
Removing the mechanical key
68Key
Opening and closing