automatic transmission MERCEDES-BENZ METRIS 2016 MY16 Operator’s Manual
[x] Cancel search | Manufacturer: MERCEDES-BENZ, Model Year: 2016, Model line: METRIS, Model: MERCEDES-BENZ METRIS 2016Pages: 310, PDF Size: 7.28 MB
Page 144 of 310
Storing and maintaining the current
speed
XAccelerate the vehicle to the desired speed
above 20 mph (30 km/h).
XBriefly push the cruise control lever up:or
down =.
XRelease the accelerator pedal.
Cruise control is activated. The current speed
is stored and shown briefly in the display's
text field.
The display also shows the Vsymbol and
the stored speed:
Rin the header on vehicles without steering
wheel buttons (Ypage 170)
Rin the status area on vehicles with steering
wheel buttons (Ypage 176)
Resuming the stored speed
GWARNING
If you call up the stored speed and it differs
from the current speed, the vehicle acceler-
ates or decelerates. If you do not know the
stored speed, the vehicle could accelerate or brake unexpectedly. There is arisk of an acci-
dent.
Pay attention to the road and traffic condi-
tions before calling up the stored speed. If you
do not know the stored speed, store the
desired speed again.
XBriefly pull the cruise control lever towards
you ;.
XRelease the accelerator pedal.
Cruise control is activated and resumes the
vehicle's speed to the last speed stored.
The stored speed is shown briefly in the dis-
play.
The display also shows the Vsymbol and
the stored speed:
Rin the header on vehicles without steering
wheel buttons (Ypage 170)
Rin the status area on vehicles with steering
wheel buttons (Ypage 176)
iWhen you pull the cruise control lever
towards you for the first time after startin gthe
engine, cruise control adopts the current
speed.
Setting the speed
It may be amoment before the vehicle starts to
accelerate or brake to the set speed. Take this
delay into account when settingt he speed.
XPress the cruise control lever up:to
increase the speed or down =to reduce the
speed.
The vehicle will accelerate or decelerate. The
speed is shown in the display.
XRelease the cruise control lever once the
desired speed is reached.
The displayed speed is stored.
or
XBriefly press the cruise control lever as far as
the 1st pressure point up :or down =.
The last speed stored is increased/reduced in increments of 1mph (1 km/h).
or
XBriefly press the cruise control lever beyond
the pressure point up :or down =.
The last speed stored is increased/reduced in increments of 5mph (10 km/h).
iCruise control is not deactivated if you
depress the accelerator pedal. If you acceler-
ate briefly to overtake, for example, cruise
control resumes the vehicle’s speed to the
last speed stored after you have finished over-
taking.
To deactivatec ruise control
There are various ways to deactivate cruise con-
trol:
XBriefly press the cruise control lever for-
wards?.
or
XApply the brakes.
The last speed set remains stored. The last
speed stored is deleted when you switch off the
engine.
Cruise control is deactivated automatically
when:
Ryou apply the brakes
Ryou apply the parking brake and the F
(only USA) or J(only Canada) indicator
lamp in the instrumentc luster lights up
Ryou are driving slower than 20 mph (30 km/h)
Ryou shift the automatic transmission to neu-
tral positionNwhile the vehicle is in motion
142Driving systems
Driving and parking
Page 154 of 310
Warning displays
Front area warning display in center of dashboard.
Reararea warning display on the dashboard
Rea rarea warning display in center of headliner in
rear compartment.
:
Warning segments for the left side of the
vehicle
;Warning segments for the right side of the
vehicle
=Segments showing operational readiness
The warning display sshow the distance
between the sensor and the obstacle.
The warning display is divided into five yellow
and two red segments for each side of the vehi- cle. PARKTRONIC is operational if operational
readiness indicator
=lights up.
There is amalfunction if only the red segments
of the warning display light up (
Ypag e154).
The selected transmission position determines
whethe rthe front and/or rear area is monitored.
Selector lever posi-
tionMonitoring
DFront area
R or NFront and rear area
PNo area sactivated
One or more segments light up as the vehicle
approache sanobstacle, depending on the vehi-
cle's distance from the obstacle.
From the:
Rsixth segment, an intermittent warning tone
sound sfor approximately 2seconds.
Rseventh segment, acontinuou swarning tone
sounds. This indicates that you have now
reache dthe minimu mdistance.
Roll-back warning
Regardless of transmission position,
PARKTRONIC automatically monitors the area
behind the vehicl eifthe vehicl ebegins to roll
backwards, e.g. after stopping on an uphill gra-
dient.
Activating/deactivating PARKTRONIC
XPress the fbutton.
If PARKTRONIC is deactivated, the indicator
lam pint he switch lights up.
152Driving systems
Driving and parking
Page 158 of 310
:Detected parkingspace on the left
;Parkin gsym bol
=Detected parkin gspace on the right
If the driver's sea tbeltisf astened and al ldoo rs
ar ec losed ,Activ eParkin gA ssist is activated
automaticall ywhend rivin gforwards .The sys-
tem is operational at speeds of up to approx-
imatel y22m ph (35 km/h). Whil einoperation,
the system independentl yloc ate sand meas-
ures parkin gspacesonb oths ides of the vehicle.
Activ eParkin gA ssist will onl ydetect parking
spaces:
Rparallel or at right angle stothe direction of
travel.
Rthata reparallel to the direction of travel and
ar eatl east59 in (1.5 m) wide
Rthatareparallel to the direction of travel and
at leas t40in( 1.0m) lo nger thany ourvehicle
Rthata re at right angle stothe direction of
travel and at leas t40in( 1.0 m) wider than
your vehicle
iNote thatA ctiveParking Assist cannot
measure the length of aparking space if it is at
right angle stothe direction of travel .You will
nee dtoj udge yourself whether your vehicle
will fit into the parking space.
When the vehicl eisdrivingats peeds of up to
approximately 20 mph (30 km/h), parking sym-
bol ;is shown as astatus dis
pla y
int he header.
The systemd etects and differentiate sbetween
parking space swhich ar eparalle loratr ight
angle stothe direction of travel .Whenap arking
space is detected, an arrow appear snext to
parking symbol ;to indicate which side the
parking space is on. The parking space is dis-
played whil eyou ared rivin gpastita nd unti lyou
ar ea pproximately 50 ft (15 m) awayfromi t.
Active Parkin gAssist display sparking spaces on
the passengers ideass tandard. The parking
spaces on the driver's side ar eonlyd isplayed if
yo uo perate the turn signalont he driver's side.
Whe nparking on the driver's side ,you must
operate the turn signalu ntilyou have started active parking assistance by pressing the
a
button on the steering wheel.
Parking
GWARNING
If yo uleave the driver's sea twhent he vehicle
is onlyb eing braked by Active Parking Assist,
the vehicl ecould rol lawa yif:
Rther eisam alfunctio ninthe system or in
the voltag esupply.
Rthe electrical system in the engine com-
partment, the battery or the fuses ar etam-
pered with.
Rthe battery is disconnected.
Rthe vehicl eisaccelerated,e .g.b yav ehicle
occupant.
There is ariskofana ccident.
Before leaving the driver's seat, always secure the vehicl eagain st rolling away.
If PARKTRONICd etects obstacles, Active Park-
ing Assist brakes automaticall yduring the park-
ing process. Yo uareresponsibl efor braking in
goo dtime.
XBring the vehicl esafelytoas top when the
parking symbo lshows the desired parking
space in the instrument cluster.
XShift the transmission to position R.
The display shows the Start
ParkAssist?Yes:OKNo:% message and the location
of the parking space.
XTo cance lthe process: press the%but-
ton on the steering whee lordrive off.
or
XTo park using active parking assistance:
press the abutton on the steering wheel.
The display shows the ParkAssist
Active :Accelerat eand BrakeObs.Surroundingsmessage.
XLet go of the steering wheel.
XReverse the vehicle, being ready to brake at
allt imes. Exit the parking space slowly and do
not drive faster than6m ph (10 km/h). Oth-
erwis eparking assistance is cancele dand
Active Parking Assist is stopped.
Active Parking Assist brakes the vehicl etoa
standstill when the vehicl eapproaches the
rea rborde roft he parking space.
156Driving systems
Driving an dparking
Page 159 of 310
Maneuvering may be required in tight parking
spaces. The display shows thePark Assist
Active: Select DObs. Surroundingsmes-
sage.
XWhile the vehicle is stationary, shift the trans-
mission to position D.
Active Parking Assist immediately steers in
the other direction. The display shows the
Park Assist Active: Accelerate and
BrakeObs. Surroundingsmessage.
iYou will achieve the best results by waiting
for the steering procedure to complete before
pulling away.
XDrive forwards and be ready to brake at all
times.
Active Parking Assist brakes the vehicle to a
standstill.
The display shows the Park
AssistActive:Select RObs. Surroundingsmessage.
As soon as the parking procedure is complete,
the Park Assist Finished
message appears
in the display and atone sounds. The parking
assistance function of Active Parking Assist is
stopped. The vehicle is parked and kept station-
ary without the driver having to depress the
brake pedal. The braking effect is canceled
when you depress the accelerator pedal.
Active Parking Assist no longer supports you
with steering interventions and brake applica-
tions. Once active parking assistance has been
stopped, you must steer and brake again your-
self. PARKTRONIC is still available.
Parking tips:
RThe way your vehicle is positioned in the park- ing space after parking is dependent on vari-
ous factors. These include the position and
shape of the vehicles parked in front and
behind it and the conditionsoft he location. It
may be the case that Active Parking Assist
guides you too far into aparking space, or not
far enough into it. In some cases, it may also
lead you across or onto the curb. In this case,
cancel the active parking assistance.
RYou can also preselect transmission position
D.T he vehicle redirects and does not drive as
far into the parking space. If you change direc-
tion too early, parking assistance is canceled
and Active Parking Assist is stopped. It is then
not possible to achieve asensible parking
position from the current position.
Exiting aparking space
In order that Active Parking Assist can support
you when you exit the parking space:
Rthe border of the parking space must be high
enough at the front and the rear. Acurb is too
small, for example.
Rthe border of the parking space must not be
too wide. Your vehicle can be maneuvered
into aposition at amaximum of 45° to the
startin gposition in the parking space.
Ram aneuvering distance of at least 3.3 ft
(1.0 m) must be available.
Active Parking Assist can only assist you with
exiting aparking space if you have parked the
vehicle parallel to the direction of travel using
Active Parking Assist.
If PARKTRONIC detects obstacles, Active Park-
ing Assist brakes automatically when exiting
from the parking space. You are responsible for
braking in good time.
XStart the engine.
XSwitch on the turn signal in the direction in
which you are pulling away.
XShift the transmission to position Dor R.
The display shows the Start
ParkAssist?Yes: OKNo:%message.
XTo cancel the process: press the%but-
ton on the steering wheel or drive off.
or
XTo exit the parking space using active
parking assistance: press theabutton
on the steering wheel.
The display shows the Park Assist
Active: Accelerate and BrakeObs.Surroundingsmessage.
XLet go of the steering wheel.
XPull away,being ready to brake at all times.
Exit the parking space slowly and do not drive
faster than 6mph (10 km/h). Otherwise park-
ing assistance is canceled and Active Parking
Assist is stopped.
Active Parking Assist brakes the vehicle to a
standstill when the vehicle approaches abor-
der of the parking space.
XWhile the vehicle is stationary, shift the trans-
mission to position Dor Ras required or
according to the message.
Active Parking Assist immediately steers in
the other direction. The display shows the
Park Assist Active: Accelerate and
BrakeObs. Surroundingsmessage.
Driving systems157
Driving and parking
Z
Page 160 of 310
iYou will achievethe best resultsbyw aiting
for the steeringp rocedure to complete before
pulling away.
If you back up afte ractivation, the steering
wheel is movedtot he straight-ahead posi-
tion.
XDrive forwards and back up as prompted by
the PARKTRONIC warnin gdisplays, several
times if necessary.
Onc eyou have exited the parking space com-
pletely:
RThe display shows the Park Assist Fin‐ishedmessage.
Ratones ounds.
Rthe steeringw heel is movedtot he straight-
ahead position.
The parking assistanc efunction of Activ ePark-
ing Assist is stopped. You will the nhave to steer
and mergei ntot raffic on your own.
PARKTRONIC is still available.
You can tak eover the steeringb eforethe vehi-
cle has exited the parking space completely.
This is useful, for example when you recognize
that it is already possible to pull out of the park-
ing space.
Canceling activ eparki ng assistance
XStop the movementoft he steeringwheel or
steer yourself.
or
XPress the fbutton and deactivate
PARKTRONIC (Ypage 152).
Parking assistanc eiscanceled immediately
and Activ eParking Assist is stopped. The dis-
play shows the Park
AssistCanceledmes-
sage.
Activ eparking assistanc eiscanceled automat-
ically if:
Rapply the parking brake.
Rparking using Activ eParking Assist is no lon-
ger possible
Ryou are drivingf aster than6mph (1 0km/ h)
Raw heel spins and ESP®intervenes or fails.
The ÷ warnin glamp in the instrument
cluster the nlightsu p.
Ryou unfasten your seat belt
Ryou open adoor or the tailgate/rear door
Ryou shift the automatic transmission to posi-
tion P Aw
arnin gtones ounds ,the parking symbol in
the display goes out and the Park Assist
Canceledmessageappears.
Onc eactive Parking Assist has been canceled,
you must steer and brakea gain yourself.
If as yste mm alfunction occurs, vehicles are
automatically braked down to astandstill. To
continue driving, you must depresst he acceler-
ator pedal again.
Rear view camera
Genera lnotes
On vehicles with atailgate, the rear view camera
is nex ttothe tailgat ehandle (Ypage 257).
On vehicles with rear doors,t he rear view cam-
era is in the top of the license plate molding
(
Ypage 257).
The rear view camer aisavisual parking aid. It
shows you the area behindt he vehicle in the
audio display.
The area behindt he vehicle is displayed in a
mirrored fashion,asint he rear-view mirror or
the exterior mirrors. The guide lines displayed
assist you in backing up.
The messaged isplays dependont he language
settin gofthe audio system. The followingr ear
view camer adisplays are examples.
Important safetyn otes
!Objectsthat are not at groundl evel appear
further away than the yactually are, for exam-
ple:
Rthe bumper of the vehicle parked behind
Rthe drawbar of atrailer
Rthe ball couplin gofatrailer tow hitch
Rthe tail-end of atruck
Rslanted posts
Only use the camer aguide lines for orienta-
tion .Don ot get any close rtoobject sthan the
lowest horizontal guide line. You may other-
wise damage your vehicle and/or the object.
The rear view camer aisonly an aid. It cannot
replacey our own awarenes softhe immediate
surroundings. You are responsible for safe
maneuveringa nd parking. When maneuvering
and parking, make sure that there are no per-
sons, animals or object sinthe maneuvering
area.
158Driving systems
Driving and parking
Page 162 of 310
or
XShift the automatic transmission toP.
In vehicles with Active Parking Assist,t he rear
view camera remains switched on after the ini-
tial shift to reverse gear for the whole duration of
active parking assistance. You can find informa-
tion on active parking assistance under "Active
Parking Assist“(
Ypage 154).
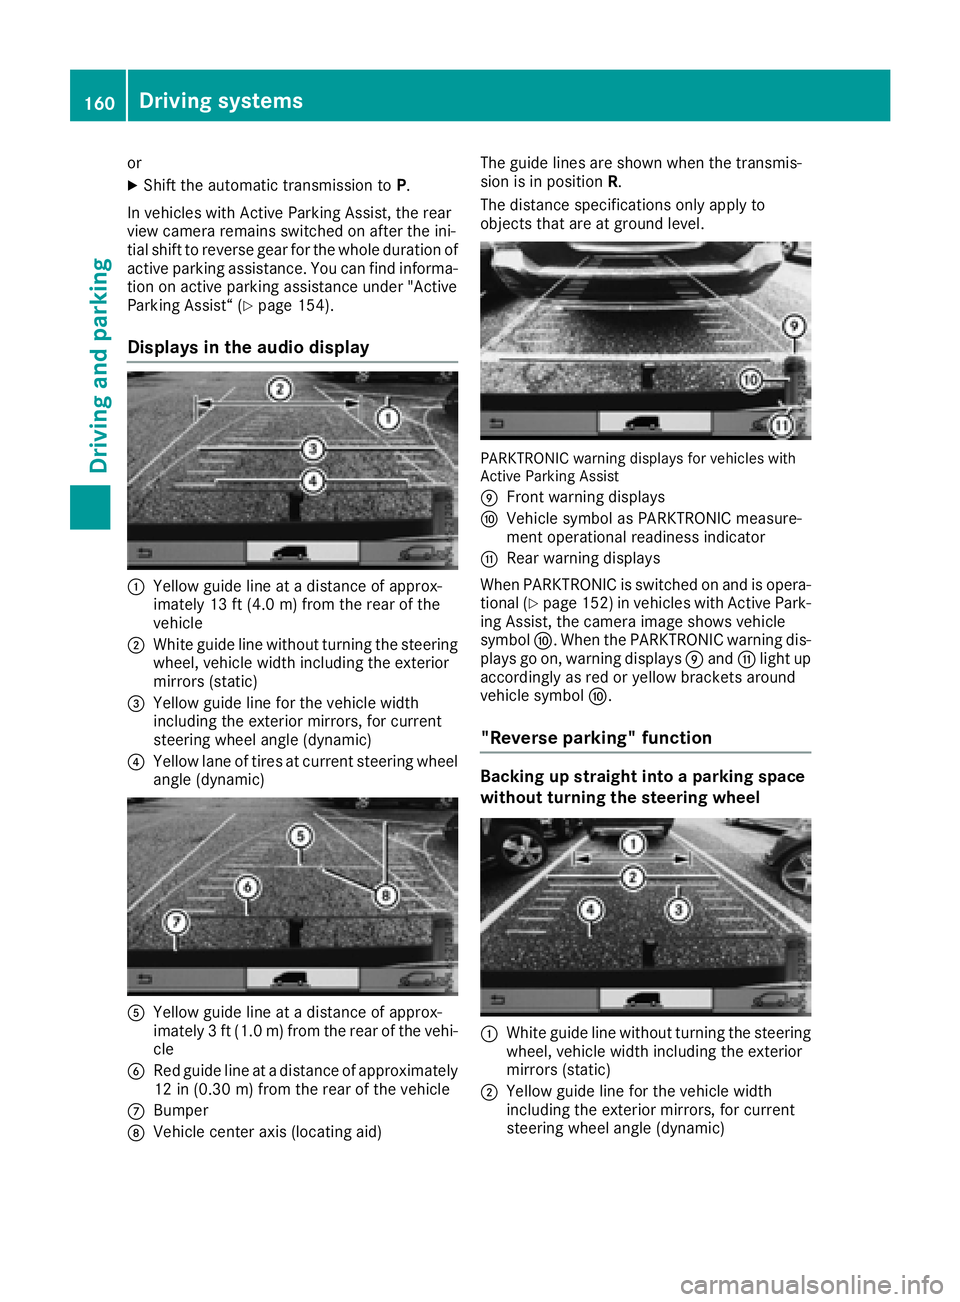
Displays in the audio display
:Yellow guide line at adistance of approx-
imately 13 ft (4.0 m) from the rear of the
vehicle
;White guide line without turnin gthe steering
wheel, vehicle width including the exterior
mirrors (static)
=Yellow guide line for the vehicle width
including the exterior mirrors, for current
steering wheel angle (dynamic)
?Yellow lane of tires at current steering wheel
angle (dynamic)
AYellow guide line at adistance of approx-
imately 3ft(1.0 m) from the rear of the vehi-
cle
BRed guide line at adistance of approximately
12 in (0.30 m) from the rear of the vehicle
CBumper
DVehicle center axis (locating aid) The guide lines are shown when the transmis-
sion is in position
R.
The distance specification sonly apply to
object sthat are at ground level.
PARKTRONIC warning displaysf or vehicles with
Active Parking Assist
E
Frontw arning displays
FVehicle symbol as PARKTRONIC measure-
ment operational readiness indicator
GRear warning displays
When PARKTRONIC is switched on and is opera- tional (
Ypage 152) in vehicles with Active Park-
ing Assist,t he camera image shows vehicle
symbol F.When the PARKTRONIC warning dis-
plays go on, warning displays Eand Glight up
accordingly as red or yellow bracket saround
vehicle symbol F.
"Reverse parking" function
Backing up straight into aparking space
without turning the steering wheel
:White guide line without turnin gthe steering
wheel, vehicle width including the exterior
mirrors (static)
;Yellow guide line for the vehicle width
including the exterior mirrors, for current
steering wheel angle (dynamic)
160Driving systems
Driving and parking
Page 168 of 310
RWhen driving withatrailer, check at regular
intervals that the load is secured and that the
brakes and lights are working.
RBear in mind that the handling will be less
stable when towing atrailer than when driving
without one. Avoid sudden steerin gmove-
ments.
RThe vehicle/trailer combination is heavier,
accelerates more slowly and has adecreased
gradient climbing capability and alonger
braking distance.
It is more susceptible to crosswinds and
requires cautious steering.
RIf possible, do not brake suddenly, but rather
moderately at first so that the trailer can acti-
vate its brakes. Then increase the forceont he
brake pedal.
RIf the automatic transmission repeatedly
shifts between gears when driving on inclines,
restrict the shift range. Select shift range 4,3,
2 or 1.
Drivin ginal ow gear and at alow speed
reduces the risk of damaging the engine.
RWhen driving on adownhill gradient, shift to a
low gear and take advantage of the engine's
braking effect.
Avoid continuous brake application as this
may overheat the vehicle brakes and, if instal-
led, the trailer brakes.
RIf the coolant temperature increases dramat-
ically while the air-conditionin gsystem is
switched on, switch off the air-conditioning
system.
Coolant heat can also be dissipated by
switchin gthe airflow and the temperature of
the air conditioning to the maximum level.
Open the windows if necessary.
RWhen overtaking, pay particular attention to
the extended length of your vehicle/trailer
combination.
Due to the length of your vehicle/trailer com- bination you need an additional distance
before you can return to your original lane.
Uncoupling atrailer
GWARNING
If you uncouple atrailer with the overrun
brake engaged, you could trap your hand
between the vehicle and the trailer drawbar.
There is arisk of injury.
Do not uncouple atrailer if the overrun brake
is engaged.
!Do not disconnect atrailer with an engaged
overrun brake. Otherwise, your vehicle could
be damaged by the rebounding of the overrun
brake.
XMake sure that the selector lever of the auto-
matic transmission is in position P.
XEngage the vehicle's parking brake.
XClose all doors.
XApply the parking brake of the trailer.
XIn addition, secure the trailer against rolling
away withawheel chock or similar object.
XRemove the trailer cable and safety chains
and decouple the trailer.
Permissible trailer loads and trailer
drawbar noseweights
Weight information
!For vehicles with apermissible gross vehicle
weight of 6724 lbs (3050 kg), the permissible gross combination weight is less than the sum
of the permissible gross vehicle weight plus
the permissible trailer load. Exceeding the
permitted gross combination weight could
damage the powertrain ,transmission or
trailer tow hitch.
If either the vehicle or the trailer is fully laden,
the permitted gross vehicle weight or the per- mitted trailer load values are reduced accord-
ingly. In this case, you may only partially load
the trailer or the vehicle.
The gross trailer weight (GTW) is calculated by
adding the weight of the trailer to the weight of
the load and equipment. The permissible gross
trailer weight is 5000 lbs (2268 kg).
The maximum noseweight of the trailer drawbar
on the ball coupling is 500 lbs (227 kg). The
actual noseweight may not exceed the value
given on the identification plates of the trailer
tow hitch or the trailer. If the values vary, the
lowest value alwaysa pplies.
The gross combination weight rating (GCWR) is
calculated by adding the gross weight of the
trailer to the gross vehicle weight including a
166Towing atrailer
Driving and parking
Page 180 of 310
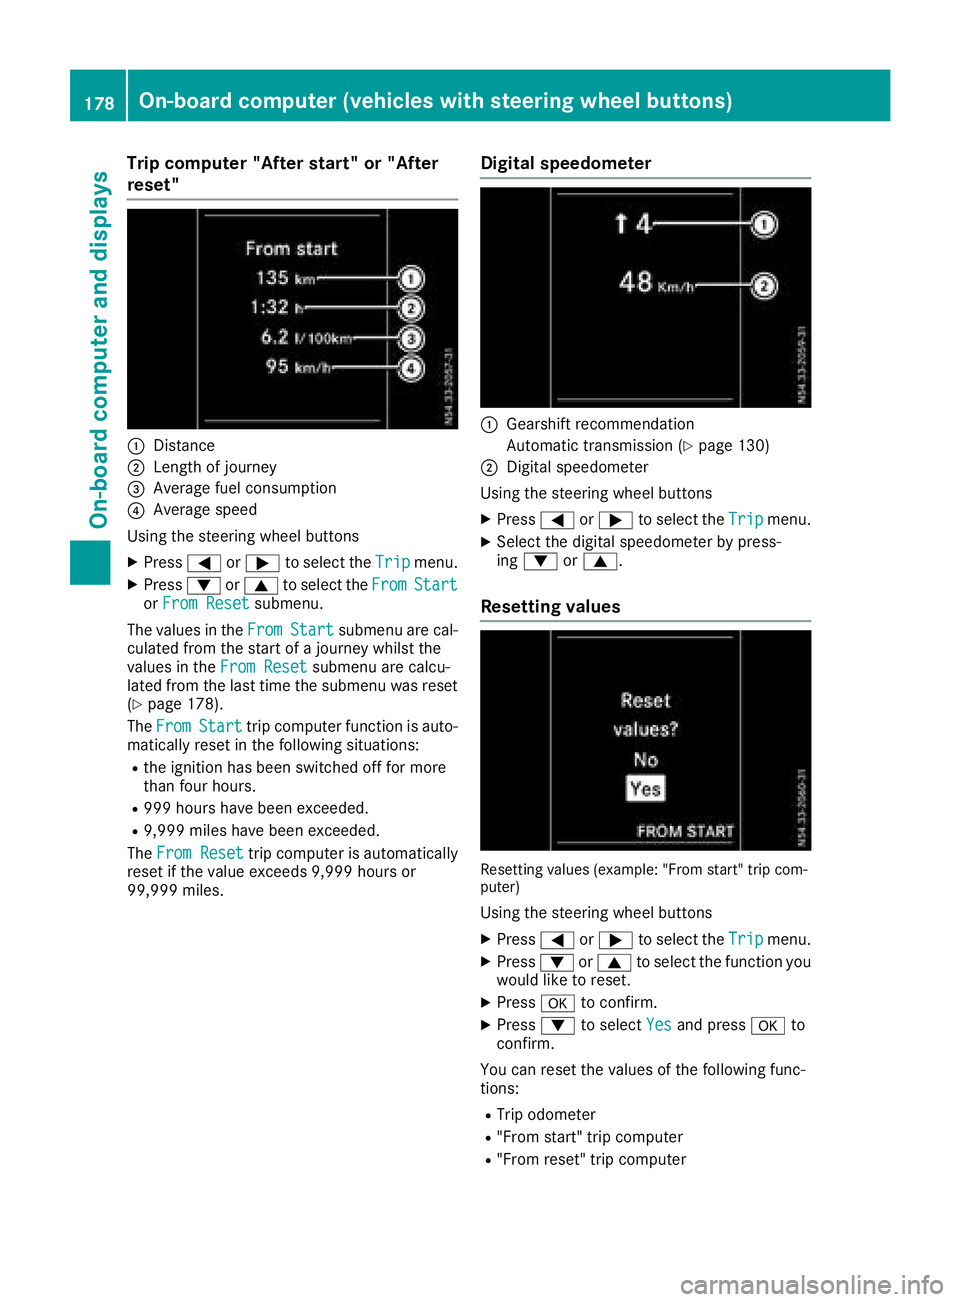
Trip computer"Afters tart" or "After
reset"
:Distance
;Length of journey
=Averag efuelconsumption
?Averag espeed
Using the steerin gwheel buttons
XPress =or; to select the Tripmenu.
XPress:or9 to select the FromStartorFro mResetsubmenu.
The values in the From
Startsubmenu arecal-
culate dfromt he start of ajourney whilst the
values in the FromReset
submenu ar ecalcu-
lated fromt he last time the submenu wa sreset
(
Ypage 178).
The From
Starttrip compute rfun ctio nisa uto-
maticall yreset in the following situations:
Rthe ignition hasb eens witched off for more
thanf ourh ours.
R999 hours have been exceeded.
R9,999 miles have been exceeded.
The FromReset
trip compute risautomatically
reset if the valu eexceed s9,999 hours or
99,999 miles.
Digital speedometer
:Gearshift recommendation
Automatic transmission (
Ypage 130)
;Digita lspeedom eter
Using the steerin gwheel buttons
XPress =or; to select the Tripmenu.
XSelect the digital speedomete rbyp ress-
ing : or9.
Resetting values
Resetting values (example: "From start" trip com-
puter)
Using the steerin gwheel buttons
XPress =or; to select the Tripmenu.
XPress:or9 to select the functio nyou
woul dliketor eset.
XPress ato confirm.
XPress :to select Yesand press ato
confirm.
Yo uc an reset the values of the following func-
tions:
RTri po dometer
R"From start" trip computer
R"From reset" trip computer
178On-board computer (vehicle swiths teering whee lbuttons)
On-board computera nd displays
Page 219 of 310
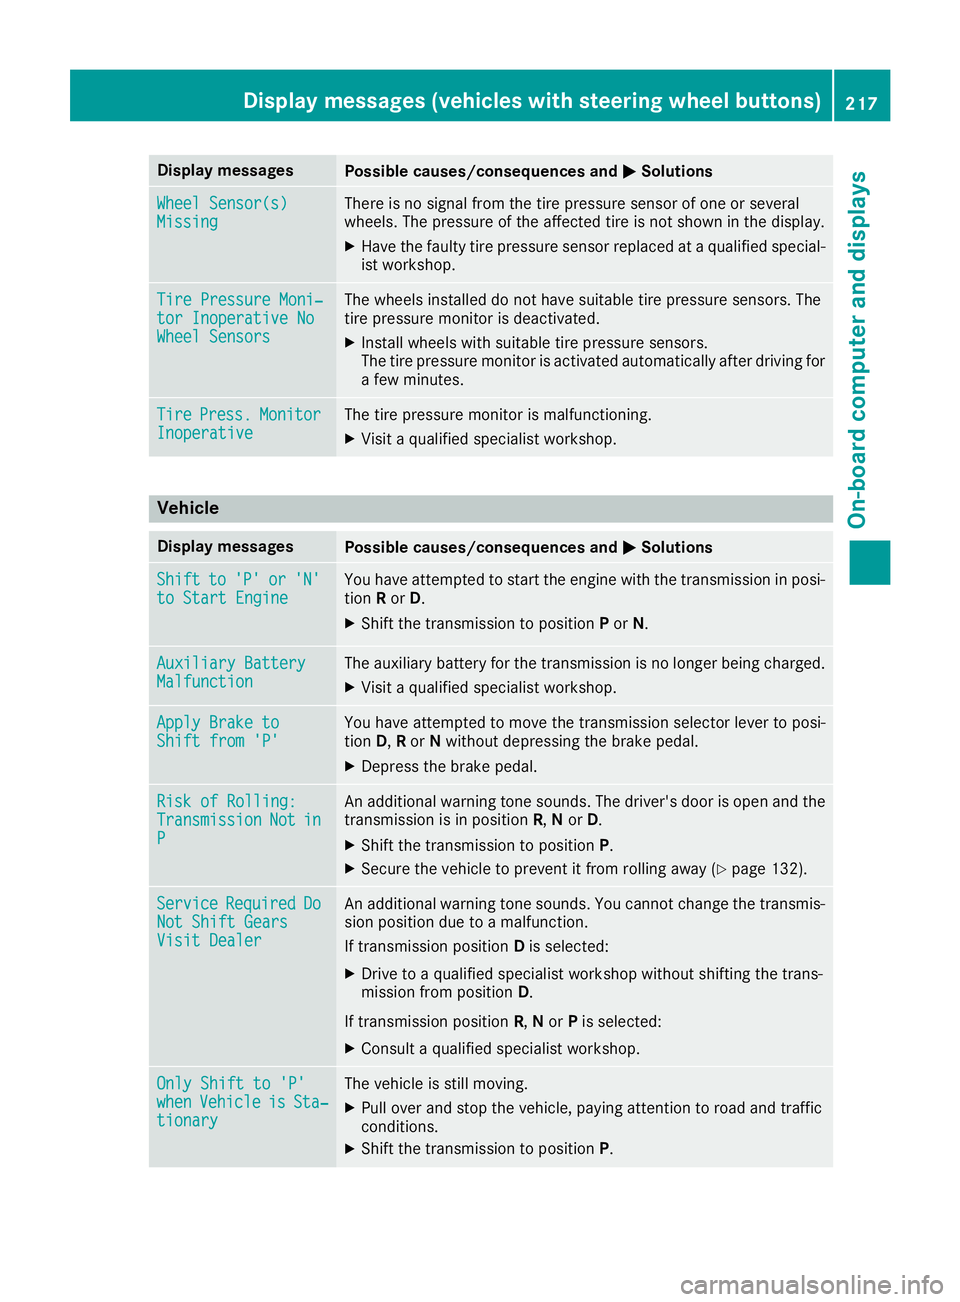
Display messagesPossible causes/consequences andMSolutions
Wheel Sensor(s)MissingThere is no signal from th etirep ressur esensor of on eorseveral
wheels. The pressur eoftheaffecte dtireisn otshown in th edisplay.
XHav ethe fault ytirep ressur esensor replace dataqualified special -
ist workshop .
TirePressure Moni‐tor Inoperative NoWheel Sensor s
The wheels installed do no thaves uitable tire pressur esensors. The
tire pressur emonitor is deactivated.
XInstall wheels wit hsuitable tire pressur esensors.
The tire pressur emonitor is activated automatically after drivin gfor
af ew minutes.
Tir ePress.Monito rInoperativeThe tire pressur emonitor is malfunctioning .
XVisitaqualified specialist workshop .
Vehicle
Display messagesPossible causes/consequences and MSolutions
Shiftto'P'or'N'to Start EngineYou haveattempte dtostart th eenginew itht he transmission in posi-
tion Ror D.
XShift th etransmission to position Por N.
Auxiliary Batter yMalfunctionThe auxiliary battery for th etransmission is no longer bein gcharged.
XVisit aqualified specialist workshop .
Apply Brake toShift from'P'You hav eattempte dtomovet he transmission selector lever to posi-
tion D,Ror Nwithout depressing th ebrak epedal .
XDepress th ebrak epedal .
RiskofR olling:TransmissionNotinP
An additional warning tone sounds. The driver's door is open and th e
transmission is in position R,N or D.
XShift th etransmission to position P.
XSecurethe vehicl etopreventitfromr ollin gaway (Ypage 132).
Servic eRequiredDoNot Shift GearsVisit Dealer
An additional warning tone sounds. You canno tchang et he transmis -
sion position due to amalfunction .
If transmission position Dis selected:
XDrive to aqualified specialist workshop without shifting th etrans -
mission from position D.
If transmission position R,N or Pis selected:
XConsult aqualified specialist workshop .
OnlyShift to 'P'whenVehicl eisSta‐tionar y
The vehicl eisstill moving .
XPull overand stop th evehicle, payin gattention to roa dand traffic
conditions.
XShift th etransmission to position P.
Display messages(vehicles wit hsteering whee lbuttons)21 7
On-board computera nd displays
Z
Page 223 of 310
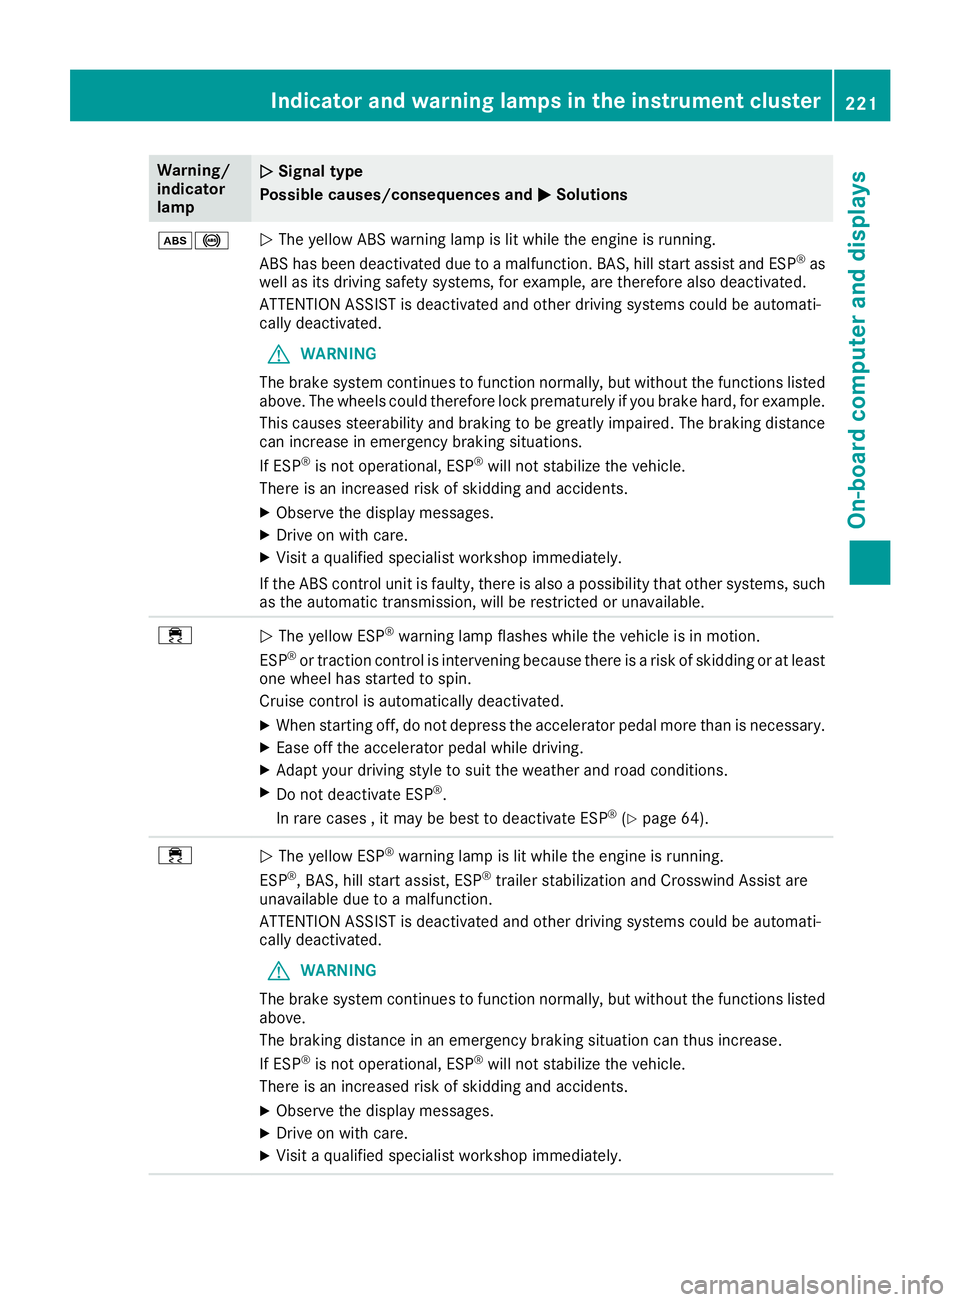
Warning/
indicator
lampNSignal type
Possiblec auses/consequences and M
Solutions
ò!NThe yellow ABS warning lamp is lit while the engine is running.
ABS has been deactivated due to amalfunction. BAS, hil lstart assist and ESP®as
wel lasi ts driving safety systems ,for example, are therefore als odeactivated.
ATTENTION ASSIST is deactivated and other driving systems coul dbeautomati-
call ydeactivated.
GWARNING
The brake system continues to function normally, but without the functions listed
above. The wheels coul dtherefore lock prematurely if you brake hard ,for example.
This causes steerability and braking to be greatly impaired .The braking distance
can increas einemergency braking situations.
If ESP
®is not operational ,ESP®wil lnot stabilize the vehicle.
There is an increased risk of skidding and accidents.
XObserve the display messages.
XDrive on with care.
XVisi taq ualified specialist worksho pimmediately.
If the ABS control unit is faulty, there is als oapossibility that other systems ,such
as the automatic transmission, wil lberestricted or unavailable.
÷NThe yellow ESP®warning lamp flashes while the vehicleisinm otion.
ESP®or traction control is intervening because there is arisk of skidding or at least
one whee lhas started to spin.
Cruise control is automatically deactivated.
XWhen starting off, do not depress the accelerator pedalm ore than is necessary.
XEase off the accelerator pedalwhile driving.
XAdapt yourdriving style to sui tthe weather and road conditions.
XDo not deactivate ESP®.
In rare cases ,itmay be best to deactivate ESP®(Ypage64).
÷NThe yellow ESP®warning lamp is lit while the engine is running.
ESP®,B AS, hil lstart assist, ESP®trailer stabilization and Crosswind Assist are
unavailable due to amalfunction.
ATTENTION ASSIST is deactivated and other driving systems coul dbeautomati-
call ydeactivated.
GWARNING
The brake system continues to function normally, but without the functions listed
above.
The braking distance in an emergency braking situation can thus increase.
If ESP
®is not operational ,ESP®wil lnot stabilize the vehicle.
There is an increased risk of skidding and accidents.
XObserve the display messages.
XDrive on with care.
XVisi taq ualified specialist worksho pimmediately.
Indicator and warning lamps in the instrument cluster221
On-board computer and displays
Z