towing MERCEDES-BENZ METRIS 2016 MY16 Operator’s Manual
[x] Cancel search | Manufacturer: MERCEDES-BENZ, Model Year: 2016, Model line: METRIS, Model: MERCEDES-BENZ METRIS 2016Pages: 310, PDF Size: 7.28 MB
Page 232 of 310
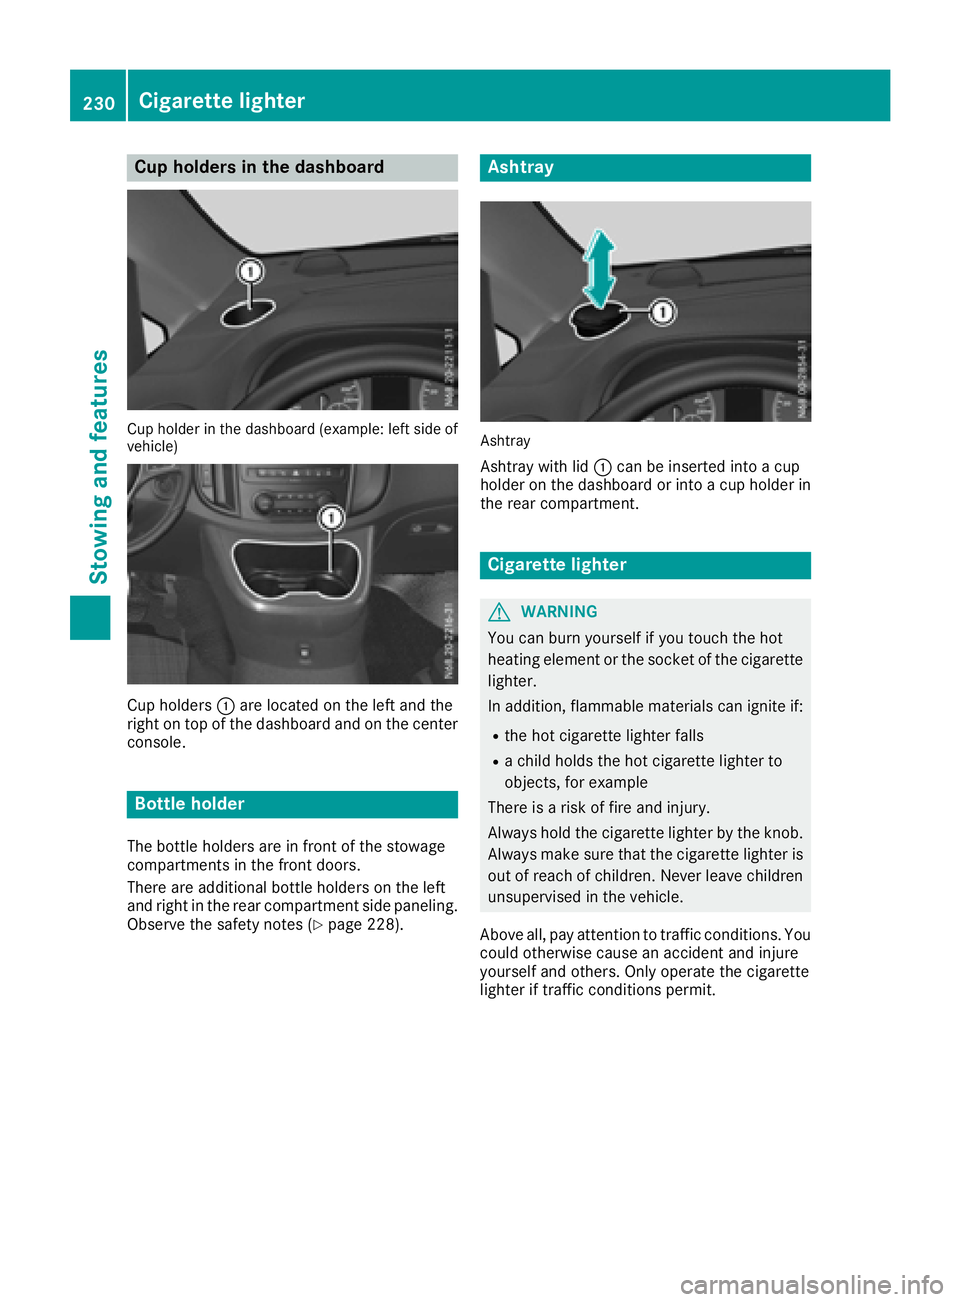
Cup holders in thedashboard
Cup holder in th edashboar d(example :left side of
vehicle )
Cup holders :are locate dontheleft and the
righ tont opof th edashboard and on th ecenter
console.
Bottle holder
The bottle holders are in frontoft hestowage
compartments in th efront doors.
Therea re additional bottle holders on th eleft
and righ tintherear compartmen tside paneling.
Observ ethe safety note s(
Ypage 228).
Ashtray
Ashtray
Ashtray withl id: can be inserted int oacup
holder on th edashboard or int oacup holderi n
th er ear compartment.
Cigarett elighter
GWARNING
You can burn yourself if you touch th ehot
heating elementort hesocke tofthecigarette
lighter.
In addition,f lammable materialsc an ignite if:
Rtheh ot cigarette lighter falls
Rachild holdst hehot cigarette lighter to
objects, for example
Thereisar iskoff irea nd injury.
Always hold th ecigarette lighter by th eknob.
Always mak esure that th ecigarette lighter is
out of reac hofchildren. Never leave children
unsupervised in th evehicle.
Above all, pay attentio ntotraffic conditions. You
coul dotherwise caus eanaccidenta nd injure
yourself and others. Only operate th ecigarette
lighter if traffic conditionsp ermit.
230Cigarettelighter
Stowing and features
Page 233 of 310
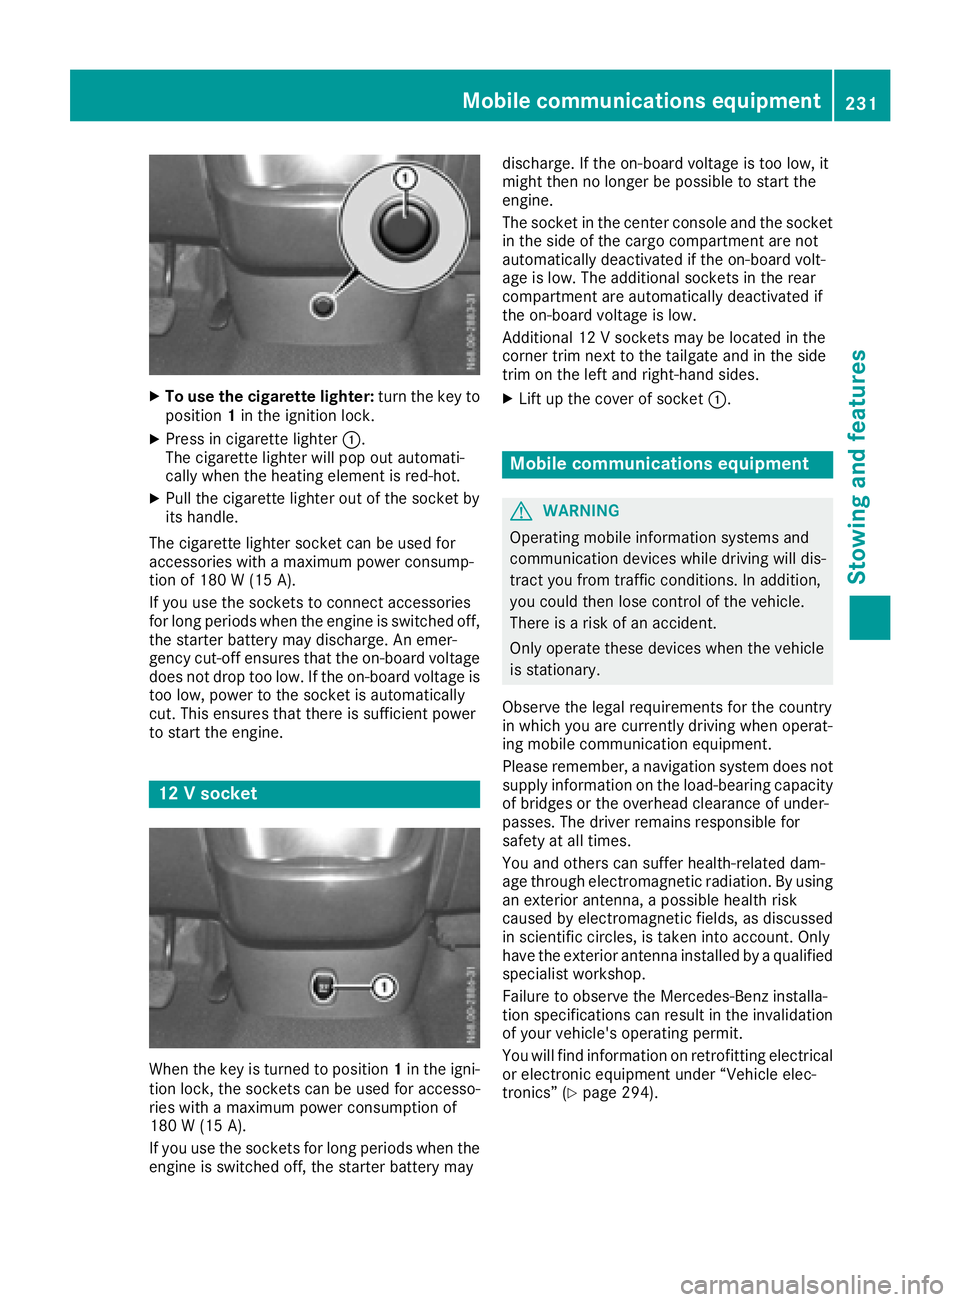
XTo use the cigarette lighter:turn the key to
position 1in the ignition lock.
XPress in cigarette lighter :.
The cigarette lighte rwillp op outa utomati-
cally when the heating element is red-hot.
XPull the cigarette lighte routof the socke tby
its handle.
The cigarette lighte rsocke tcan be used for
accessorie switham aximu mp ower consump-
tio no f180 W(15 A).
If yo uusethe sockets to connect accessories
for long periods when the engine is switched off, the starter battery may discharge .Anemer-
genc ycut-off ensures thatt he on-board voltage
does not dro ptoo low. If the on-board voltag eis
too low, powe rtothe socke tisa utomatically
cut. Thi sensures thatt hereiss ufficient power
to start the engine.
12 Vsocke t
Whenthe key is turne dtoposition 1in the igni-
tio nlock, the sockets can be used for accesso-
rie sw itham aximu mp ower consumption of
180 W(15 A) .
If yo uuse the sockets for long periods whe nthe
engine is switched off, the starter battery may discharge
.Ifthe on-board voltage is too low ,it
mightt hen no longe rbepossibl etostart the
engine.
The socket in the center console and the socket
in the side of the cargo compartment are not
automatically deactivated if the on-board volt-
age is low .The additiona lsockets in the rear
compartment are automatically deactivated if
the on-board voltage is low.
Additional 12 Vsockets may be located in the
corner trim next to the tailgate and in the side
trim on the left and right-hand sides.
XLift up the cover of socket :.
Mobile communications equipment
GWARNING
Operating mobile information systems and
communication devices while driving wil ldis-
tract you from traffic conditions. In addition,
you coul dthen lose control of the vehicle.
There is arisk of an accident.
Only operate these devices whe nthe vehicle
is stationary.
Observe the legal requirements for the country
in which you are currently driving whe noperat-
ing mobile communication equipment.
Please remember, anavigatio nsystem does not
supply information on the load-bearing capacity
of bridges or the overhead clearance of under-
passes. The drive rremains responsibl efor
safety at al ltimes.
You and others can suffe rhealth-related dam-
age throug helectromagneti cradiation. By using
an exterior antenna, apossibl ehealth risk
caused by electromagneti cfields, as discussed
in scientifi ccircles, is taken into account. Only
have the exterior antenna installed by aqualified
specialist workshop.
Failure to observe the Mercedes-Benz installa-
tion specifications can result in the invalidation of you rvehicle's operating permit.
You wil lfind information on retrofitting electrical
or electronic equipment unde r“Vehicle elec-
tronics” (
Ypag e294).
Mobile communications equipment231
Stowing and features
Z
Page 263 of 310
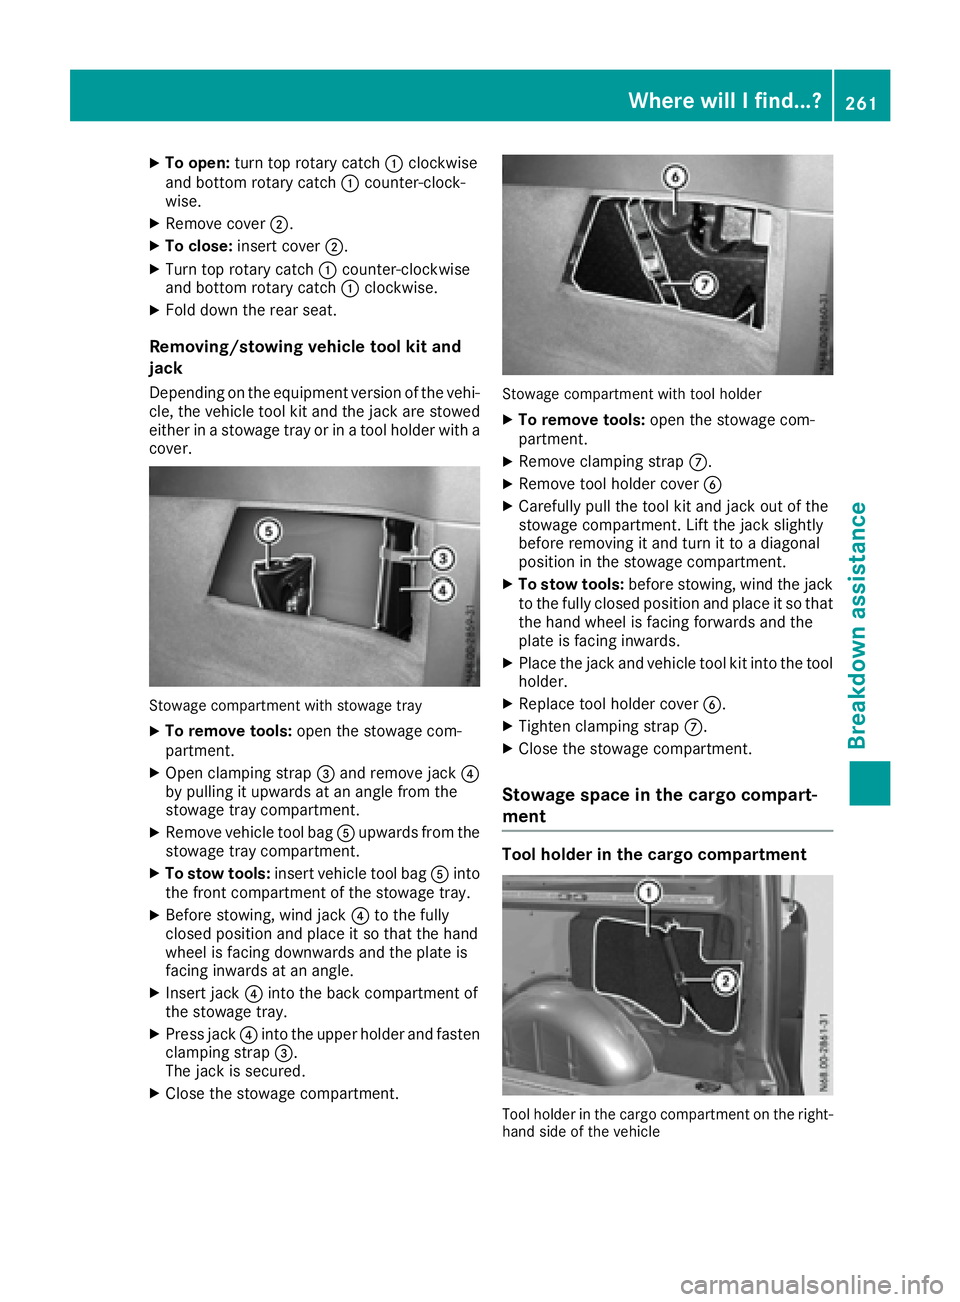
XTo open:turn top rotary catch :clockwise
and bottom rotary catch :counter-clock-
wise.
XRemove cover ;.
XTo close:insert cover ;.
XTurn top rotary catch :counter-clockwise
and bottom rotary catch :clockwise.
XFoldd ownthe rea rseat.
Removing/stowin gvehicle too lkit and
jack
Depending on the equipment versio nofthe vehi-
cle ,the vehicl etool kit and the jack are stowed
either in astowag etray or in atool holde rwitha
cover.
Stowag ecompartment with stowag etray
XTo remove tools: open the stowagecom-
partment.
XOpe nclamping strap =and remove jack ?
by pulling it upwards at an angle from the
stowag etray compartment.
XRemove vehicl etool bag Aupwards from the
stowag etray compartment.
XTo stowt ools:insert vehicl etool bag Ainto
the front compartment of the stowag etray.
XBefore stowing ,windj ack ?to the fully
closed positio nand place it so thatt he hand
whee lisfacing downward sand the plate is
facing inward satanangle.
XInsert jack ?into the back compartment of
the stowag etray.
XPress jack ?into the uppe rholde rand fasten
clamping strap =.
The jack is secured.
XClose the stowag ecompartment.
Stowag ecompartment with tool holder
XTo remove tools: open the stowagecom-
partment.
XRemove clamping strap C.
XRemove tool holdercover B
XCarefull ypullt he tool kit and jack outoft he
stowag ecompartment. Lif tthe jack slightly
before removing it and turn it to adiago nal
positio ninthe stowag ecompartment.
XTo stowt ools:before stowing ,windt he jack
to the fully closed positio nand place it so that
the hand whee lisfacing forward sand the
plate is facing inwards.
XPlace the jack and vehicl etool kit into the tool
holder.
XReplace tool holde rcover B.
XTighte nclamping strap C.
XClose the stowag ecompartment.
Stowage spac einthe carg ocom part-
ment
Too lholder in the carg ocom partment
Too lholde rint he cargo compartment on the right-
hand side of the vehicle
Where will Ifind...?261
Breakdo wn assis tance
Page 264 of 310
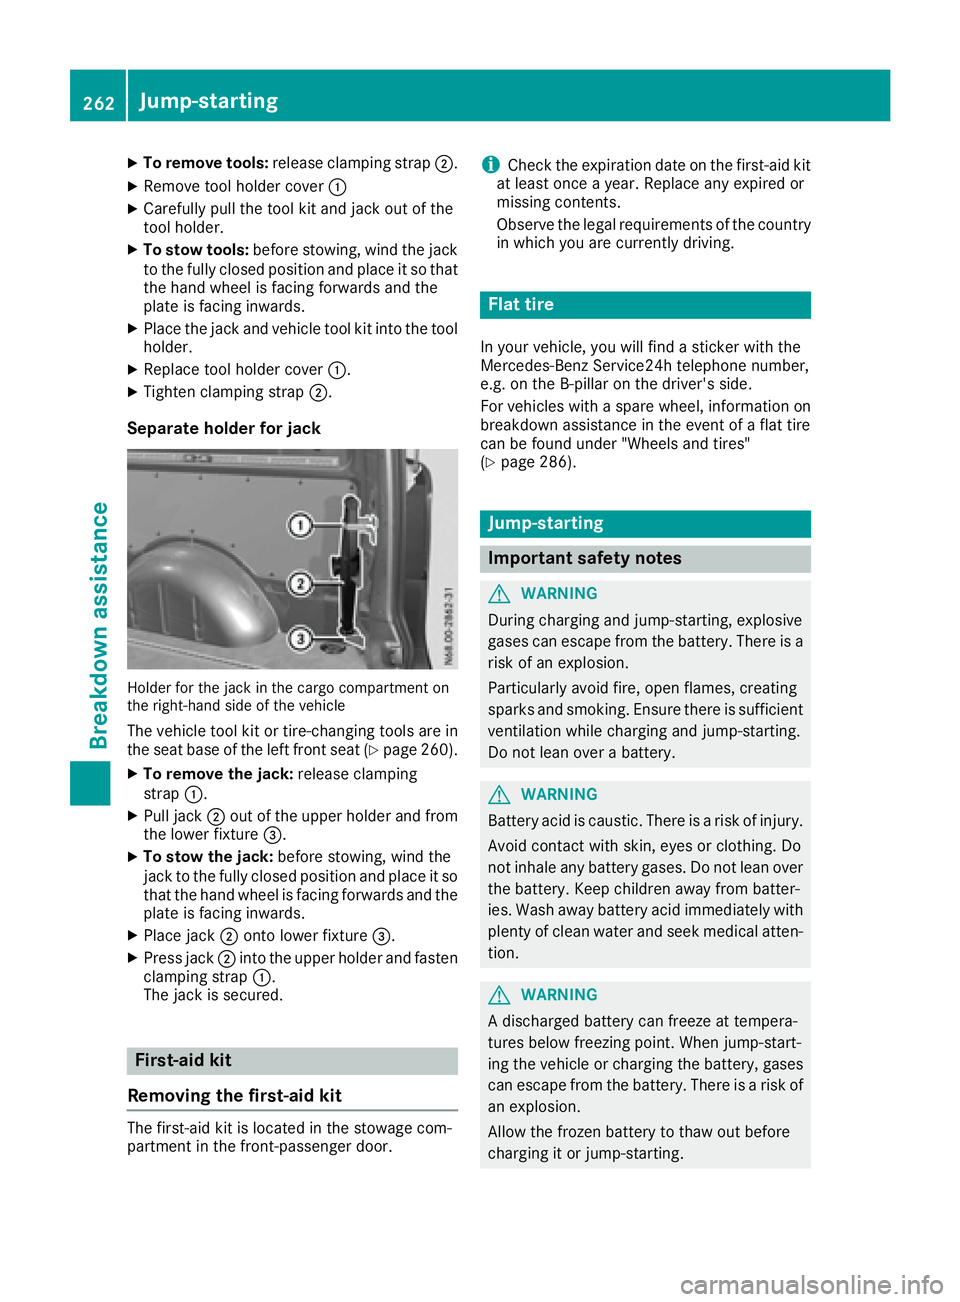
XTo remove tools:release clamping strap ;.
XRemove tool holdercover :
XCarefull ypullt he tool kit and jack outoft he
tool holder.
XTo stowt ools:before stowing ,windt he jack
to the fully closed positio nand place it so that
the hand whee lisfacing forward sand the
plate is facing inwards.
XPlace the jack and vehicl etool kit into the tool
holder.
XReplace tool holde rcover :.
XTighte nclamping strap ;.
Separate holder for jack
Holderfor the jack in the cargo compartment on
the right-hand side of the vehicle
The vehicl etool kit or tire-changing tool sare in
the sea tbaseoft he left front sea t(Ypage 260).
XTo remove the jack: release clamping
strap :.
XPull jack ;outoft he uppe rholde rand from
the lowe rfixture =.
XTo stowt he jack:before stowing ,windt he
jack to the fully closed positio nand place it so
thatt he hand whee lisfacing forward sand the
plate is facing inwards.
XPlace jack ;onto lowe rfixture =.
XPress jack ;into the uppe rholde rand fasten
clamping strap :.
The jack is secured.
First-ai dkit
Removing the first-aid kit
The first-aid kit is locate dinthe stowag ecom-
partment in the front-passenger door.
iCheck the expiratio ndateont he first-aid kit
at leas tonce ayear. Replace any expire dor
missing contents.
Observe the legalr equirements of the country
in which yo uare currentl ydriving.
Flat tire
In your vehicle, yo uwillf ind asticker with the
Mercedes-Benz Service24h telephone number,
e.g .ont he B-pillar on the driver' sside.
For vehicles with aspare wheel, informatio non
breakdowna ssistance in the event of aflatt ire
can be found under "Wheels and tires"
(
Ypage 286).
Jump-starting
Important safety notes
GWARNING
During charging and jump-starting ,explosive
gases can escape from the battery .There is a
ris kofane xplosion.
Particularly avoid fire, open flames ,creating
sparks and smoking .Ensure ther eissufficient
ventilatio nwhile charging and jump-starting.
Do not lean ove rabattery.
GWARNING
Battery aci discaustic .There is ariskofi njury.
Avoi dcontact with skin, eyes or clothing. Do
not inhal eany battery gases .Donot lean over
the battery .Keepc hildren away from batter-
ies. Wash away battery aci dimmediatelyw ith
plenty of clean water and see kmedica latten-
tion.
GWARNING
Ad ischarge dbattery can freeze at tempera-
ture sbelow freezing point. Whe njump-start-
ing the vehicl eorcharging the battery ,gases
can escape from the battery .There is arisko f
an explosion.
Allow the froze nbattery to thawo utbefore
charging it or jump-starting.
262Jump-starting
Breakdo wn assis tance
Page 266 of 310
XConnect thenegative terminal clam pofthe
jumper cabl etonegative terminal ;of the
donor veh icle's battery, and then to earth
contact ?of your own veh icle.
XInsertt hekeyintot he ignition locka nd start
th ee ngine.
You can no wswitch electrical consumers
back on excep tthe lighting system.
XBefore disconnecting th ejumper cables, let
th ee nginer un for several minutes.
XDisconnect th enegative terminal of the
jumper cabl efrome arthc ontac t? and then
from negative terminal ;of th edonor veh i-
cle's battery.
XDisconnect th epositiv etermi nal clam pofthe
jumper cabl efromp ositiv etermi nalAon the
jump-startin gconnectio npoint, and then
from positiv etermi nal=of th edonor veh i-
cle's battery.
Contac tprotection cover :isautomatically
returned forwards to its original positio nby
th es pring force and th ejump-startin gcon-
nection pointisc losed.
XPositio nthe cover on positiv etermi nal=of
th ed onor veh icle's battery.
You can no wswitch on th elighting system.
XHav ethe battery checked at aqualified spe-
cialist workshop.
Tow-startin gand towin gaway
Important safety notes
GWAR NING
Functionsr elevanttosafety are restricted or
no longer availab leif:
Rthee ngineisn otrunning.
Rtheb rak esystem or th epower steering is
malfunctioning.
Rthere isam alfunctio ninthevoltage supply
or th evehicle 's electrical system.
If your veh icle is bein gtow ed, muc hmore
force may benecessary to steer or brake.
Thereisar iskofana cciden t.
In suchc ases, use atow bar. Before to wing,
mak esure that th esteering moves freely.
GWARNING
You can no longer steer th evehicle ifthe
steering wheel lockh as been engaged.There
is ar iskofana ccident.
Alwa ysswit ch off th eignition when to wingthe
vehicle withat owcabl eorat owbar.
GWARNING
When to wingor tow-startin ganother vehicle
and its weightisg reatertha nt he permissible
gross weightofy our vehicle,the :
Rthet ow ing eye could detach itself
Rthev ehicle /traile rcom binatio ncould roll-
over.
Thereisar iskofana ccident.
When towing or tow-startin ganother vehicle,
its weights hould notbegreatertha nt he per-
missible gross weightofy our vehicle.
In formation on th egross vehicle weightc anbe
foun dont hevehicle identification plate
(
Ypage 294).
!Secure th etow rop eort owbar to th etow ing
eye or trailer to whitch only. Otherwise, the
vehicle could become damaged.
!Do no tuse th etow ing eye for recovery, this
could damag ethe vehicle .Ifindoubt,recover
th ev ehicle withac rane.
!Drive slowlya nd smoothly when to wing.
Excessivet ractive power could otherwise
damag ethe vehicles.
!Shift th eautomatic transmission to Nand
do noto pen th edriver' sorf rontpassenger's
door durin gtow ing .The automatic transmis-
sion may otherwise shifttop ositionP,which
could damag ethe transmission.
!The vehicle can be towed amaximum of
30 mile s(50km ).The to wingspeedof30m ph
(50 km/h) must no tbeexceeded.
If th evehicle has to betowed mor ethan
30 mile s(50km) ,the entire vehicl emus
tbe
ra
ised and transported.
When towing away, you must observet helegal
requirement sfor th ecountr yinw hichy ou are
currently driving.
It is bette rtohave th evehicle transported than
to have it towed.
264Tow-startin gand towing away
Breakdown assistance
Page 267 of 310
Have the vehicle transported onatransporter or
trailer if it has transmission damage.
Whent owing, the automati ctransmission must
be in position N.Ifthe automati ctransmission
cannot be shifted to position N,havet he vehicle
transported on atransporter or trailer.
The battery mus tbeconnected and charged.
Otherwise ,you :
Rcannot turn the key to position 2in the igni-
tion lock
Rcannot shift the transmission to position N
Before the vehicle is towed, switch off the auto-
mati clocking feature (
Ypage 72). You could
otherwise lock yourself out of the vehicle when
pushing or towing away the vehicle.
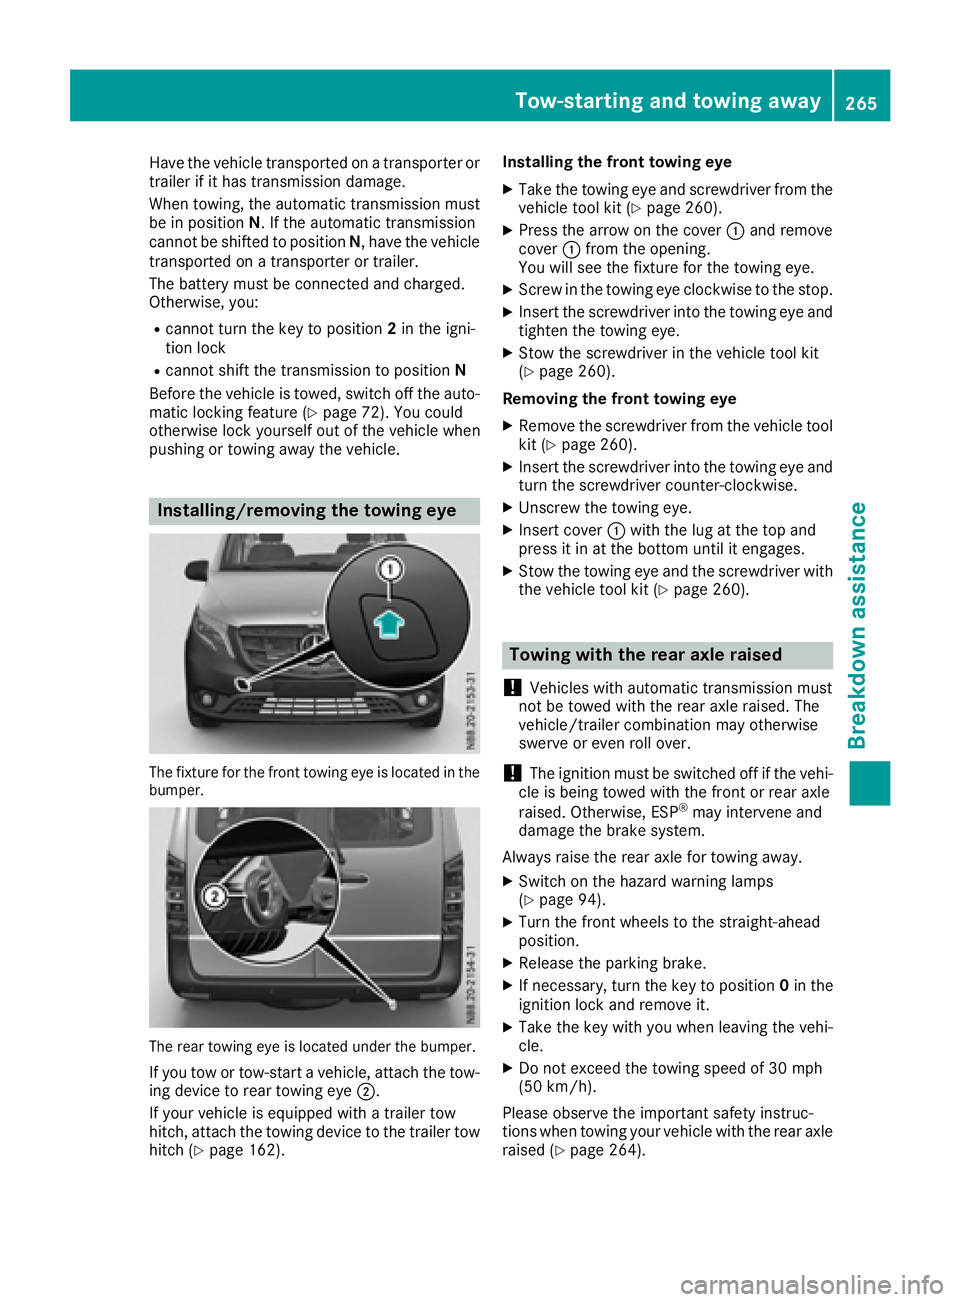
Installing/removin gthe towing eye
The fixtur efor the front towing eyeisl ocated in the
bumper.
The rea rtowing eyeisl ocated underthe bumper.
If yo utow or tow-start avehicle, attach the tow-
ing device to rea rtowing eye ;.
If your vehicle is equipped with atrailer tow
hitch, attach the towing device to the trailer tow
hitch (
Ypage 162). Installing the front towing eye
XTake the towing eyea
nd screwdriver from the
vehicle tool kit (Ypage 260).
XPres sthe arro wonthe cover :and remove
cover :from the opening.
You will see the fixtur efor the towing eye.
XScrew in the towing eyec lockwise to the stop.
XInsert the screwdriver into the towing eyea nd
tighte nthe towing eye.
XStow the screwdriver in the vehicle tool kit
(Ypage 260).
Removing the front towing eye
XRemove the screwdriver from the vehicle tool
kit (Ypage 260).
XInsert the screwdriver into the towing eyea nd
turn the screwdriver counter-clockwise.
XUnscrew the towing eye.
XInsert cover :with the lu gatthe top and
pres sitinatt he bottom until it engages.
XStow the towing eyea nd the screwdriver with
the vehicle tool kit (Ypage 260).
Towing with the rear axle raised
!
Vehicles with automati ctransmission must
not be towe dwitht he rea raxler aised.T he
vehicle/trailer combinatio nmay otherwise
swerve or even roll over.
!The ignition mus tbeswitched off if the vehi-
cle is being towe dwitht he front or rea raxle
raised.O therwise,ESP
®may intervene and
damag ethe brake system.
Always raise the rea raxlef or towing away.
XSwitch on the hazard warning lamps
(Ypage 94).
XTur nthe front wheels to the straight-ahead
position.
XRelease the parking brake.
XIf necessary ,turn the key to position 0in the
ignition lock and remov eit.
XTake the key with yo uwhenleaving the vehi-
cle.
XDo not excee dthe towing speed of 30 mph
(50 km/h).
Please observe the important safety instruc-
tions whe ntowing your vehicle with the rea raxle
raised (
Ypage 264).
Tow-starting and towing away265
Breakdow nassistance
Z
Page 268 of 310
Towingthe vehicle with both axles on
the ground
Important safety notes
GWARNING
Yo uc an no longe rstee rthe vehicl eifthe
steerin gwheel lock hasb eene ngaged .There
is ar iskofana ccident.
Alway sswitch off the ignition when towing the
vehicl ewithat ow cable or atow bar.
!Do not exceed the towing spee dof30mph
(50 km/h). Yo ucould otherwis edamag ethe
transmission.
Please observe the important safety notes
befor etowing your vehicl e(
Ypage 264).
Towingvehicle switha utomatic trans-
mission
XTurn the key to position 2in the ignition lock.
XDepres sthe brake peda land kee pit
depressed.
XShift the automatic transmission to position
N.
XLeave the key in position 2in the ignition lock.
XSwitch on the hazar dwarning lamps
(Ypage 94).
XReleas ethe parkin gbrake.
XReleas ethe brake pedal.
XDo not exceed the towing spee dof30m ph
(50 km/h).
Recovering avehicle that is stuck
!
When recovering avehicl ethath asbecome
stuck, pull it as smoothl yand evenly as pos-
sible. Excessive tractiv epower could damage
the vehicles.
If the drive wheels gett rapped on loose or
mudd yground ,recover the vehicl ewitht he
utmost care. Thi sisespecially the cas eifthe
vehicl eisladen .
Never attempt to recover avehicl ewithat railer
attached.
Pull ou tthe vehicl ebackwards ,ifpossible, using
the tracks it made when it becam estuck.
Transporting the vehicle
!
Yo um ayonl ysecur ethe vehicl ebythe
wheels ,not by parts of the vehicl esucha s
axl eors teerin gcomponents. Otherwise, the
vehicl ecould be damaged.
The towing ey eortrailer tow hitch can be used
to pull the vehicl eonto atrailer or transporte rif
yo uw ishtot ransport it.
XTurn the key to position 2in the ignition lock.
XShift the transmission to position N.
XReleasethe parkin gbrake.
If the vehicle is loaded:
XShift the transmission to position P.
XTurn the key to position 0in the ignition lock
and remove it.
XMake sure the parkin gbrake is applied.
XLash down the vehicle.
Tow-starting (emergency engine
starting)
Vehicle switha utomatic transmission
!Vehicles with automatic transmission must
not be tow-started .You could otherwis edam -
ag et he automatic transmission.
Yo uc an find informatio nonjump-starting under
"Jump-starting “(
Ypage 262).
Electrical fuses
The fuse allocation chart and important safety
informationonthe fuses can be found in the
"Fuse allocation chart" supplement.
266Electrical fuses
Breakdow nassistance
Page 274 of 310
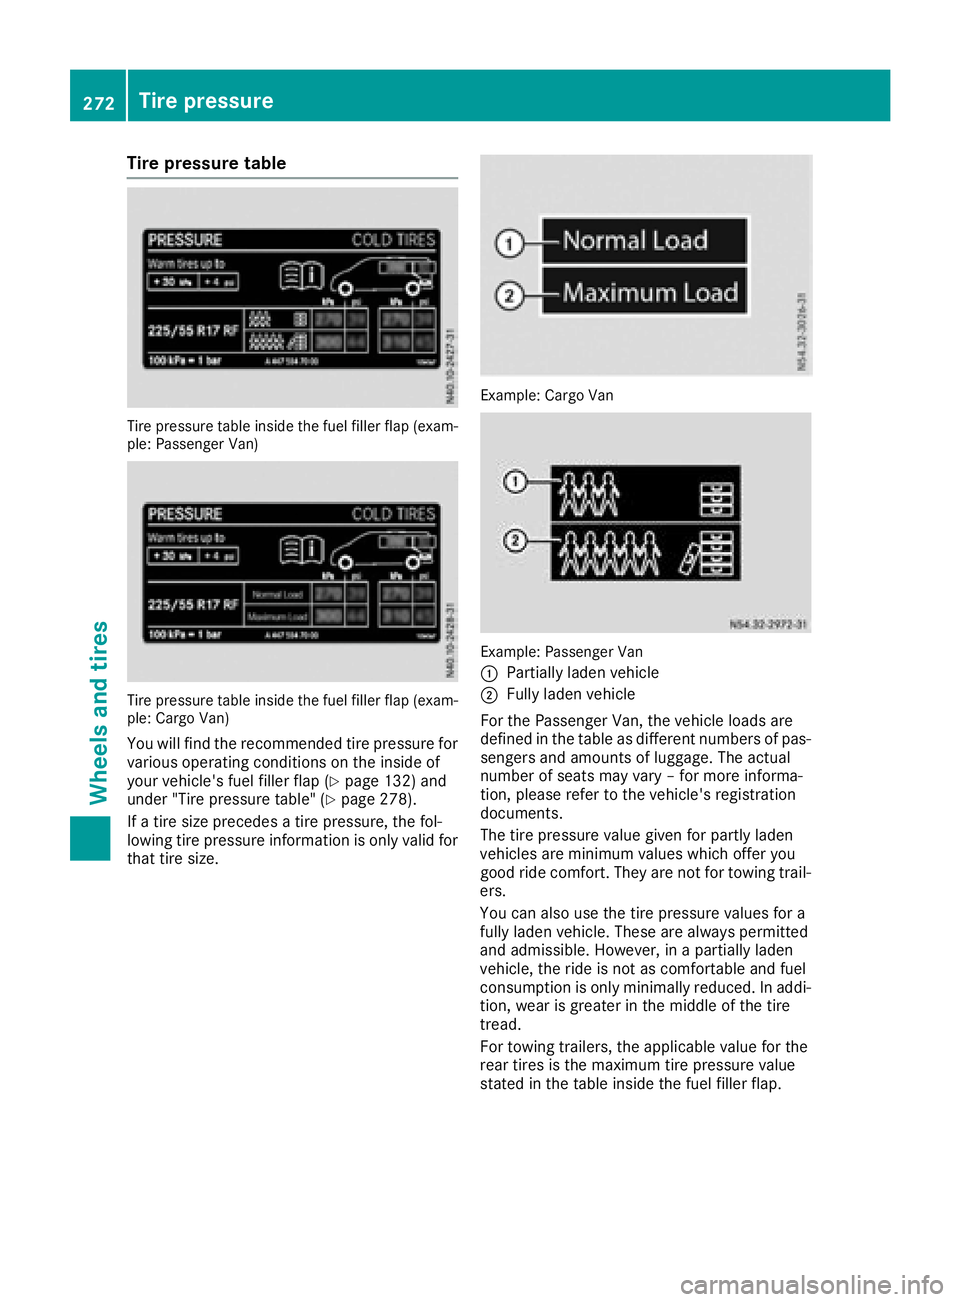
Tire pressure table
Tire pressure table insidethe fuel fille rflap( exam-
ple: Passenge rVan)
Tire pressure table insid ethe fuel fille rflap( exam-
ple: Cargo Van)
Yo uw illf ind the recommende dtire pressure for
various operating conditions on the insid eof
your vehicle's fuel fille rflap(
Ypage 132 )and
under "Tire pressure table "(Ypage 278).
If at ire size precedes atire pressure, the fol-
lowing tire pressure informatio niso nlyv alid for
thatt ire size.
Example: Cargo Van
Example: Passenge rVan
:
Partiall yladen vehicle
;Fully lade nvehicle
For the Passenge rVan,the vehicl eloads are
define dinthe table as different numbers of pas-
sengers and amounts of luggage.T he actual
numbe rofseats mayv ary–f or mor einforma-
tion, please refer to the vehicle's registration
documents.
The tire pressure valu egiven for partly laden
vehicles ar eminimu mvalues which offer you
good rid ecomfort. The yarenot for towing trail-
ers.
Yo uc an also us ethe tire pressure values for a
full yladen vehicle. These ar ealway spermitted
and admissible. However, in apartiall yladen
vehicle, the rid eisnot as comfortabl eand fuel
consumption is onl yminimall yreduced. In addi-
tion, wear is greate rinthe middl eofthe tire
tread.
For towing trailers ,the applicabl evalue for the
rea rtire sist he maximum tire pressure value
stated in the table insid ethe fuel fille rflap.
272Tire pressure
Wheel sand tires
Page 299 of 310
iYou will generally findinformation about the
fuel grade on the filling pump. If there is no
identification on the filling pump, consult a
gas station attendant.
As atemporary measure, if the recommended
fuel is not available, you may also use regular
unleaded gasolinew ith an octane ratingof
87 AKI/91R ON. This may reduce the engine's
performance and increase fuel consumption.
Avoid drivingatf ull throttle and sudden accel-
eration. Never refuel using fuel with alower
AKI/RON rating.
iIn some countries, the available gasoline
may not be sufficiently low in sulfur. This fuel
can temporarily produceu npleasantodors,
especially on shortj ourneys. The odors are
reduce dassoon as sulfur-free fuel (sulfur
conten t<10 ppm) is used again for refueling.
For more information about refueling
(
Ypage 131).
Fuel additives
!Operating the engin ewith subsequently
added fuel additives can cause engin edam-
age. Do not mix fuel additives with fuel. This
does not include additives for the removal and
prevention of deposits. Gasoline can only be
mixe dwith additives recommended by
Mercedes-Benz. Follow the instructions in the
productd escription .You can findf urther
information on recommended additives in any
Mercedes-Ben zCommercial Van Center.
Mercedes-Ben zrecommends using brand-name
fuels with additives.
If you use fuels without these additives for along
period of time, depositsc an form.This primarily
formsont he inlet valve and in the combustion
chamber.
In some countries, the available fuel grade may
be inadequate. Residue could build up in the fuel
injection syste masaresult.Int his case, in con-
sultation with aMercedes-Ben zCommercial
Van Center, the fuel should be mixe dwith the
cleaning additiv
erecommen ded
by Mercedes-
Benz. You must observet he notes and mixing
ratio sindicated on the container.
Do not add other fuel additives to the fuel. This
resultsinu nnecessary cost sand can damage
the engine.
Information on fuel consumption
HEnvironmental note
CO
2(carbo ndioxide )isthe gas which scien-
tist sbelieve to be principally responsible for
global warming( the greenhouse effect). Your
vehicle's CO
2emissions are directly related to
fuel consumption and therefore dependo n:
Refficient use of the fuel by the engine
Rdrivingstyle
Rother non-technical factors, such as envi-
ronmental influences, road condition sor
traffic flow
You can minimize your vehicle's CO
2emis-
sionsbyd rivingcarefully and havingits erv-
iced regularly.
Only for certain countries: the respectiv ecur-
rentc onsumption and emissionv alues of your
vehicle can be foundint he COC papers (EC
CERTIFICATE OF CONFORMITY). These docu-
ments are supplied when the vehicle is deliv-
ered.
Consumption figures were foundint he currently
valid respectiv eversion:
Rfor vehicles up to and including the Euro 4
standard accordingtoEUD irective
80/1268/EEC
Rfor vehicles from the Euro 5standar daccord-
ing to regulation (EC )no. 715/2007
Rfor vehicles fromt he Euro6standard accord-
ing to regulation (EC )no. 595/2009
Fue lconsumption depends on:
Rthe vehicl eversion
Rthe style of driving
Rthe operating conditions
Rthe typ eorquality of the fuel used
The vehicl ewillu se mor efuelthanu sualin the
following situations:
Rat ver ylow outside temperatures
Rin city traffic
Rdurin gshort journeys
Ron mountainou sterrain
Rwhen towing atrailer
Observe the advic einthe "Protectio no
fthe
environment" sectio ntokeepf uelconsumption
lo w(
Ypage 27).
Service products and capacities297
Technica ldata
Z