child seat MERCEDES-BENZ METRIS 2017 MY17 Operator’s Manual
[x] Cancel search | Manufacturer: MERCEDES-BENZ, Model Year: 2017, Model line: METRIS, Model: MERCEDES-BENZ METRIS 2017Pages: 318, PDF Size: 5.01 MB
Page 63 of 318
LATCH-type (ISOFIX) child seat secur-
ing system
GWARNING
LATCH-type (ISOFIX) child restraint systems
do not offer sufficient protection for children
whose weight combined with the child
restraint system is greater than 65 lbs (29 kg) and who are secured using the safety belt
integrated in the child restraint system. In the
event of an accident, a child might not be
restrained correctly. This poses an increased
risk of injury or even fatal injury.
If the child and the child restraint system
together weigh more than 65 lbs (29 kg), only
use LATCH-type (ISOFIX) child restraint sys-
tems with which the child is also secured with
the vehicle seat belt. Also secure the child
restraint system with the Top Tether belt, if
available.
Always comply with the manufacturer's instal-
lation and operating instructions for the child
restraint system used.
Before installing a child seat, move the rear seat
backrest to an upright position. Do not adjust
the backrest of a seat with a LATCH-type (ISO-
FIX) child restraint system installed.
Before every trip, make sure that the LATCH-
type (ISOFIX) child restraint system is engaged
correctly in both LATCH-type (ISOFIX) securing
rings
!When fitting the child restraint system in
vehicles with a rear bench seat, make sure
that the seat belt for the center seat does not
get trapped. Otherwise, the seat belt could be
damaged.
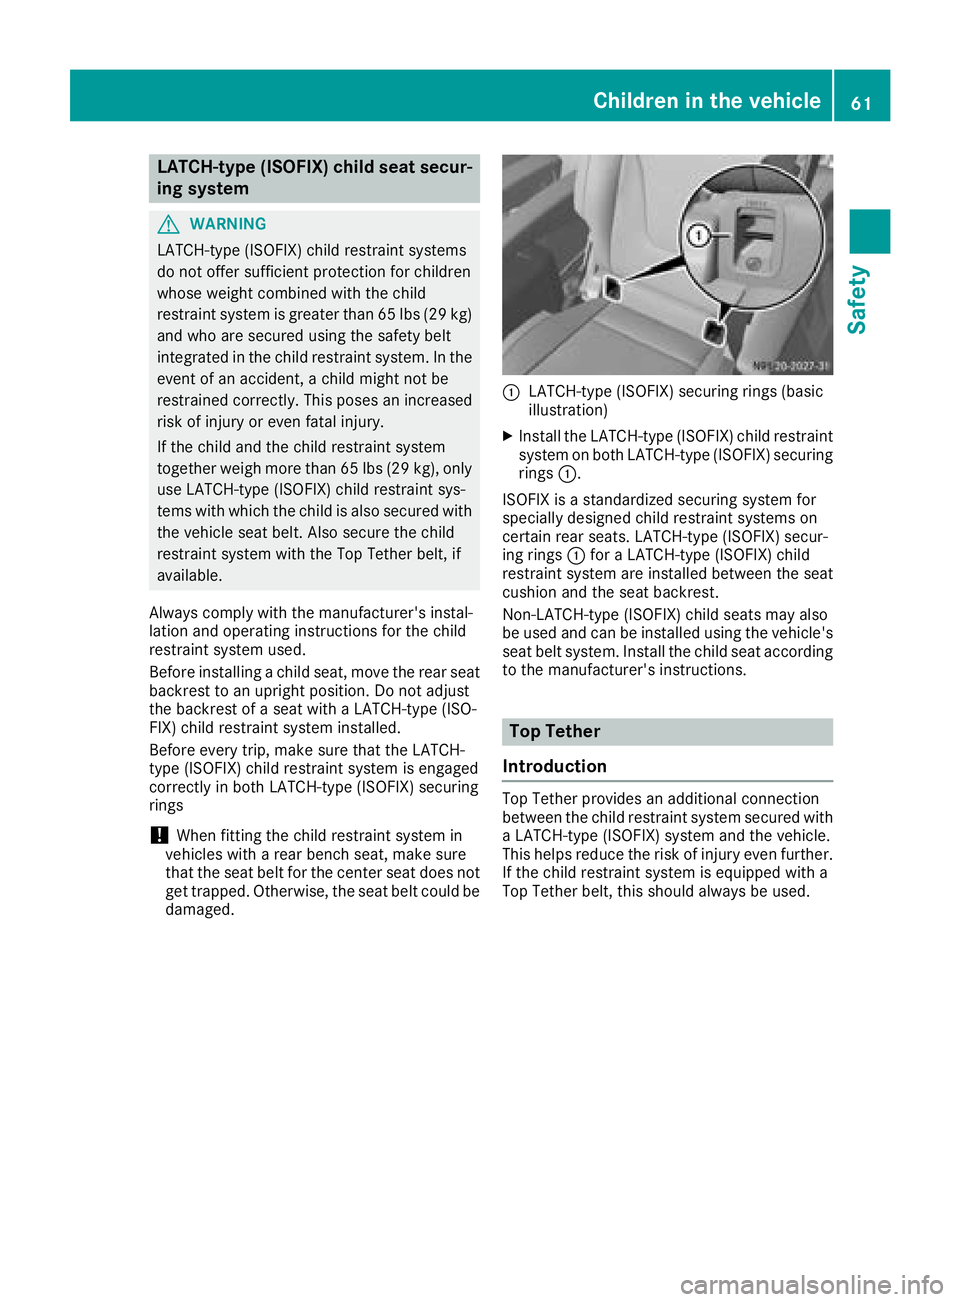
:LATCH-type (ISOFIX) securing rings (basic
illustration)
XInstall the LATCH-type (ISOFIX) child restraint system on both LATCH-type (ISOFIX) securing
rings :.
ISOFIX is a standardized securing system for
specially designed child restraint systems on
certain rear seats. LATCH-type (ISOFIX) secur-
ing rings :for a LATCH-type (ISOFIX) child
restraint system are installed between the seat
cushion and the seat backrest.
Non-LATCH-type (ISOFIX) child seats may also
be used and can be installed using the vehicle's
seat belt system. Install the child seat according to the manufacturer's instructions.
Top Tether
Introduction
Top Tether provides an additional connection
between the child restraint system secured with
a LATCH-type (ISOFIX) system and the vehicle.
This helps reduce the risk of injury even further.
If the child restraint system is equipped with a
Top Tether belt, this should always be used.
Children in the vehicle61
Safety
Z
Page 64 of 318
Top Tether anchorages
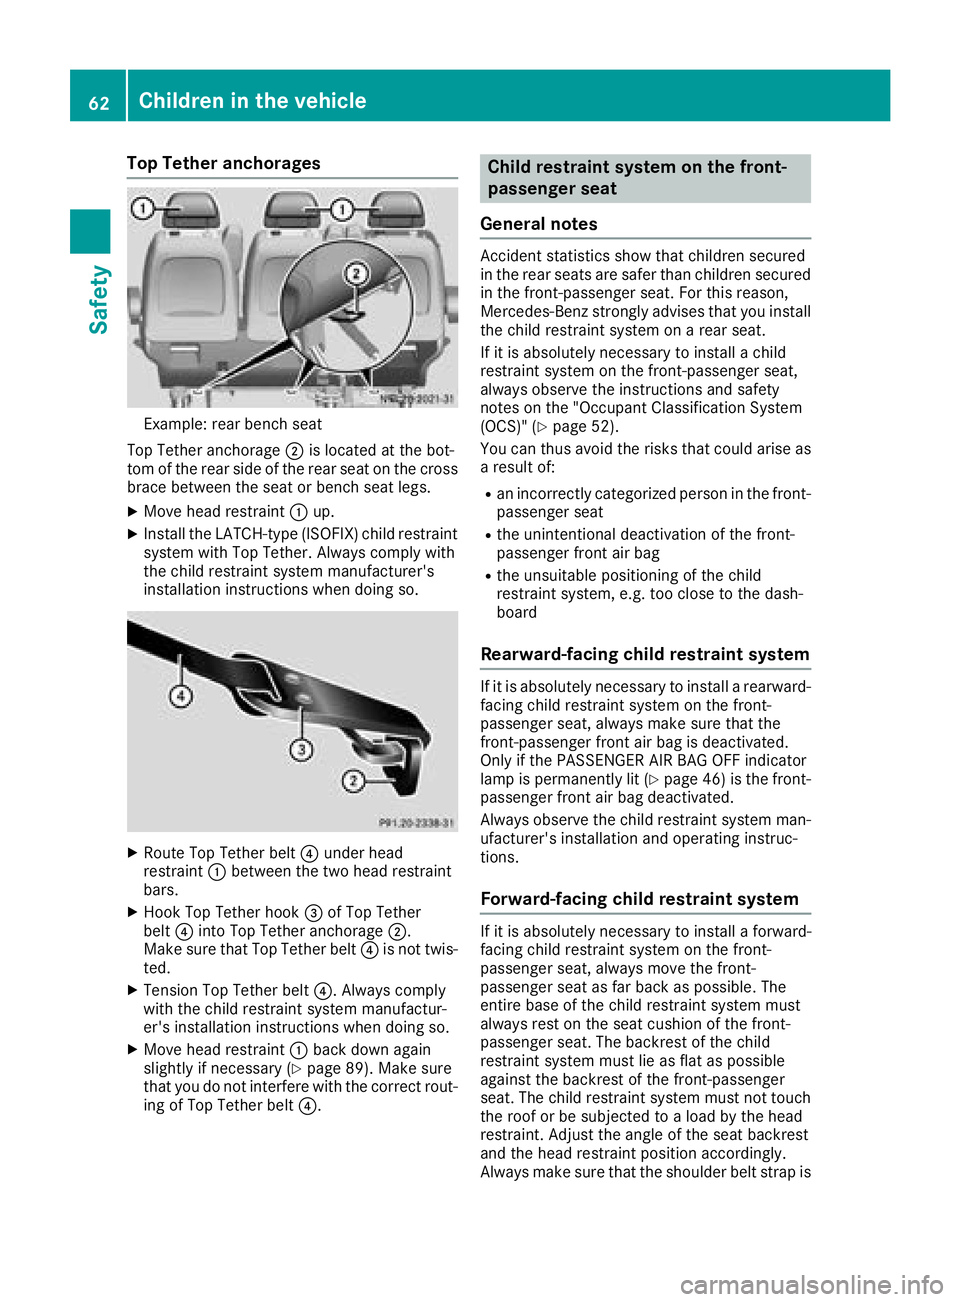
Example: rear bench seat
Top Tether anchorage ;is located at the bot-
tom of the rear side of the rear seat on the cross
brace between the seat or bench seat legs.
XMove head restraint :up.
XInstall the LATCH-type (ISOFIX) child restraint
system with Top Tether. Always comply with
the child restraint system manufacturer's
installation instructions when doing so.
XRoute Top Tether belt ?under head
restraint :between the two head restraint
bars.
XHook Top Tether hook =of Top Tether
belt ?into Top Tether anchorage ;.
Make sure that Top Tether belt ?is not twis-
ted.
XTension Top Tether belt ?. Always comply
with the child restraint system manufactur-
er's installation instructions when doing so.
XMove head restraint :back down again
slightly if necessary (Ypage 89). Make sure
that you do not interfere with the correct rout-
ing of Top Tether belt ?.
Child restraint system on the front-
passenger seat
General notes
Accident statistics show that children secured
in the rear seats are safer than children secured
in the front-passenger seat. For this reason,
Mercedes-Benz strongly advises that you install
the child restraint system on a rear seat.
If it is absolutely necessary to install a child
restraint system on the front-passenger seat,
always observe the instructions and safety
notes on the "Occupant Classification System
(OCS)" (
Ypage 52).
You can thus avoid the risks that could arise as a result of:
Ran incorrectly categorized person in the front-
passenger seat
Rthe unintentional deactivation of the front-
passenger front air bag
Rthe unsuitable positioning of the child
restraint system, e.g. too close to the dash-
board
Rearward-facing child restraint system
If it is absolutely necessary to install a rearward-
facing child restraint system on the front-
passenger seat, always make sure that the
front-passenger front air bag is deactivated.
Only if the PASSENGER AIR BAG OFF indicator
lamp is permanently lit (
Ypage 46 )is the front-
passenger front air bag deactivated.
Always observe the child restraint system man-
ufacturer's installation and operating instruc-
tions.
Forward-facing child restraint system
If it is absolutely necessary to install a forward-
facing child restraint system on the front-
passenger seat, always move the front-
passenger seat as far back as possible. The
entire base of the child restraint system must
always rest on the seat cushion of the front-
passenger seat. The backrest of the child
restraint system must lie as flat as possible
against the backrest of the front-passenger
seat. The child restraint system must not touch
the roof or be subjected to a load by the head
restraint. Adjust the angle of the seat backrest
and the head restraint position accordingly.
Always make sure that the shoulder belt strap is
62Children in the vehicle
Safety
Page 65 of 318
correctly routed from the vehicle belt outlet to
the shoulder belt guide on the child restraint
system. The shoulder belt strap must be routed
forward and down from the vehicle belt outlet. If
necessary, adjust the vehicle belt outlet and the
front-passenger seat accordingly.
Always observe the child restraint system man-
ufacturer's installation and operating instruc-
tions.
Override features/Child-proof locks
Important safety notes
GWARNING
If children are traveling in the vehicle, they
could:
Ropen doors, thus endangering other people
or road users
Rexit the vehicle and be caught by oncoming
traffic
Roperate vehicle equipment and become
trapped
There is a risk of an accident and injury.
Always activate the child-proof locks and
override feature if children are traveling in the vehicle. When leaving the vehicle, always take
the key with you and lock the vehicle. Never
leave children unattended in the vehicle.
Child-proof lock/override feature for:
RSliding doors (Ypage 63)
GWARNING
If you leave children unsupervised in the vehi-
cle, they could set it in motion by, for example:
Rrelease the parking brake.
Rshift the automatic transmission out of the
parking position P.
Rstart the engine.
In addition, they may operate vehicle equip-
ment and become trapped. There is a risk of
an accident and injury.
When leaving the vehicle, always take the
SmartKey with you and lock the vehicle. Never
leave children unsupervised in the vehicle.
GWARNING
If persons, particularly children are subjected to prolonged exposure to extreme heat or
cold, there is a risk of injury, possibly even
fatal. Never leave children unattended in the
vehicle.
GWARNING
If the child restraint system is subjected to
direct sunlight, parts may get very hot. Chil-
dren may burn themselves on these parts,
particularly on the metal parts of the child
restraint system. There is a risk of injury.
If you leave the vehicle, taking the child with
you, always ensure that the child restraint
system is not exposed to direct sunlight. Pro- tect it with a blanket, for example. If the child
restraint system has been exposed to direct
sunlight, let it cool down before securing the
child in it. Never leave children unattended in
the vehicle.
Child-proof lock for sliding door
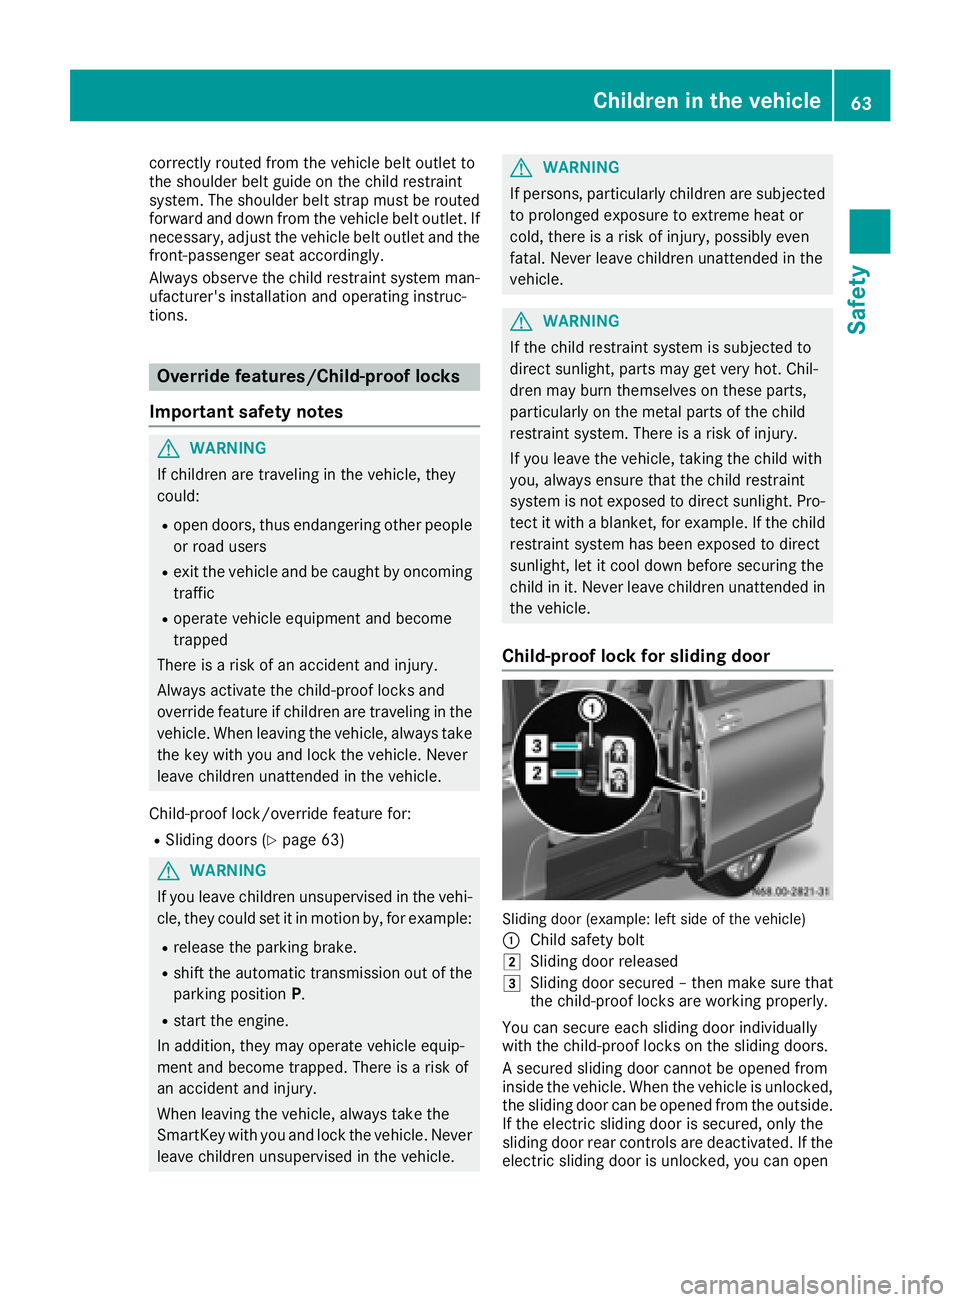
Sliding door (example: left side of the vehicle)
:
Child safety bolt
2Sliding door released
3Sliding door secured – then make sure that
the child-proof locks are working properly.
You can secure each sliding door individually
with the child-proof locks on the sliding doors.
A secured sliding door cannot be opened from
inside the vehicle. When the vehicle is unlocked, the sliding door can be opened from the outside.
If the electric sliding door is secured, only the
sliding door rear controls are deactivated. If the
electric sliding door is unlocked, you can open
Children in the vehicle63
Safety
Z
Page 86 of 318
Useful information
This Operator's Manual describes all models as
well as standard and optional equipment of your
vehicle that were available at the time of going
to print. Country-specific variations are possi-
ble. Note that your vehicle may not be equipped
with all of the described functions. This also
applies to systems and functions relevant to
safety.
Read the information on qualified specialist
workshops (
Ypage 31).
Seats
Driver's and front-passenger seat
Important safety notes
GWARNING
Children could become trapped if they adjust
the seats, particularly when unattended.
There is a risk of injury.
When leaving the vehicle, always take the
SmartKey with you and lock the vehicle. Never
leave children unsupervised in the vehicle.
GWARNING
You could lose control of your vehicle if you do the following while driving:
Radjust the driver's seat, head restraint,
steering wheel or mirrors
Rfasten the seat belt
There is a risk of an accident.
Adjust the driver's seat, head restraint, steer-
ing wheel and mirror and fasten your seat belt before starting the engine.
GWARNING
When you adjust a seat, you or other vehicle
occupants could become trapped, e.g. on the seat guide rail. There is a risk of injury.
Make sure when adjusting a seat that no one
has any body parts in the sweep of the seat.
GWARNING
If the driver's seat is not engaged, it could
move unexpectedly while the vehicle is in
motion. This could cause you to lose control of the vehicle. There is a risk of an accident.
Always make sure that the driver's seat is
engaged before starting the vehicle.
GWARNING
The front-air bags for could also injure the
vehicle occupants in the front If the front
seats are positioned too close to the dash-
board or steering wheel. This poses an
increased risk of injury or even fatal injury.
Always adjust the front seats so that they are
as far from the front air bags as possible. Also
observe the notes on the correct adjustment
of the seats.
GWARNING
The seat belt does not offer the intended level of protection if you have not moved the back-
rest to an almost vertical position. When brak-
ing or in the event of an accident, you could
slide underneath the seat belt and sustain
abdomen or neck injuries, for example. This
poses an increased risk of injury or even fatal injury.
Adjust the seat properly before beginning
your journey. Always ensure that the backrest
is in an almost vertical position and that the
shoulder section of your seat belt is routed
across the center of your shoulder.
GWARNING
If the head restraints are not installed or not
adjusted correctly, they cannot provide pro-
tection as intended. There is an increased risk
of injury in the head and neck area, e.g. in the event of an accident or when braking.
Always drive with the head restraints instal-
led. Before driving off, make sure for every
vehicle occupant that the center of the head
restraint supports the back of the head at
about eye level.
84Seats
Seats, steering wheel and mirrors
Page 87 of 318
!To avoid damage to the seats and the seat
heating, observe the following information:
Rkeep liquids from spilling on the seats. If
liquid is spilled on the seats, dry them as
soon as possible.
Rif the seat covers are damp or wet, do not
switch on the seat heating. The seat heat-
ing should also not be used to dry the seats.
Rclean the seat covers as recommended;
see the "Interior care" section.
Rdo not transport heavy loads on the seats.
Do not place sharp objects on the seat
cushions, e.g. knives, nails or tools. The
seats should only be occupied by passen-
gers, if possible.
Rwhen the seat heating is in operation, do
not cover the seats with insulating materi-
als, e.g. blankets, coats, bags, seat covers,
child seats or booster seats.
Your seat must be adjusted in such a way that
you can wear the seat belt correctly.
Observe the following points:
RPosition the backrest in an almost vertical
position so that you are sitting virtually
upright. Do not drive with the backrest
reclined too far back.
RYour arms should be slightly bent when you
are holding the steering wheel.
RAvoid seat positions that prevent the seat belt
from being correctly routed. The shoulder
section of the belt must be routed over the
middle of your shoulder and be pulled tight
against your upper body. The lap belt must
always pass across your lap as low down as
possible, i.e. over your hip joints.
RAdjust the head restraint so that it supports
the back of the head at eye level.
RThe distance from the pedals should be such
that you can depress them fully.
Please also observe the important safety notes
on "Air bags" (
Ypage 50), "Seat belts"
(Ypage 47) and "Child restraint systems"
(Ypage 59).
Adjusting the seat manually
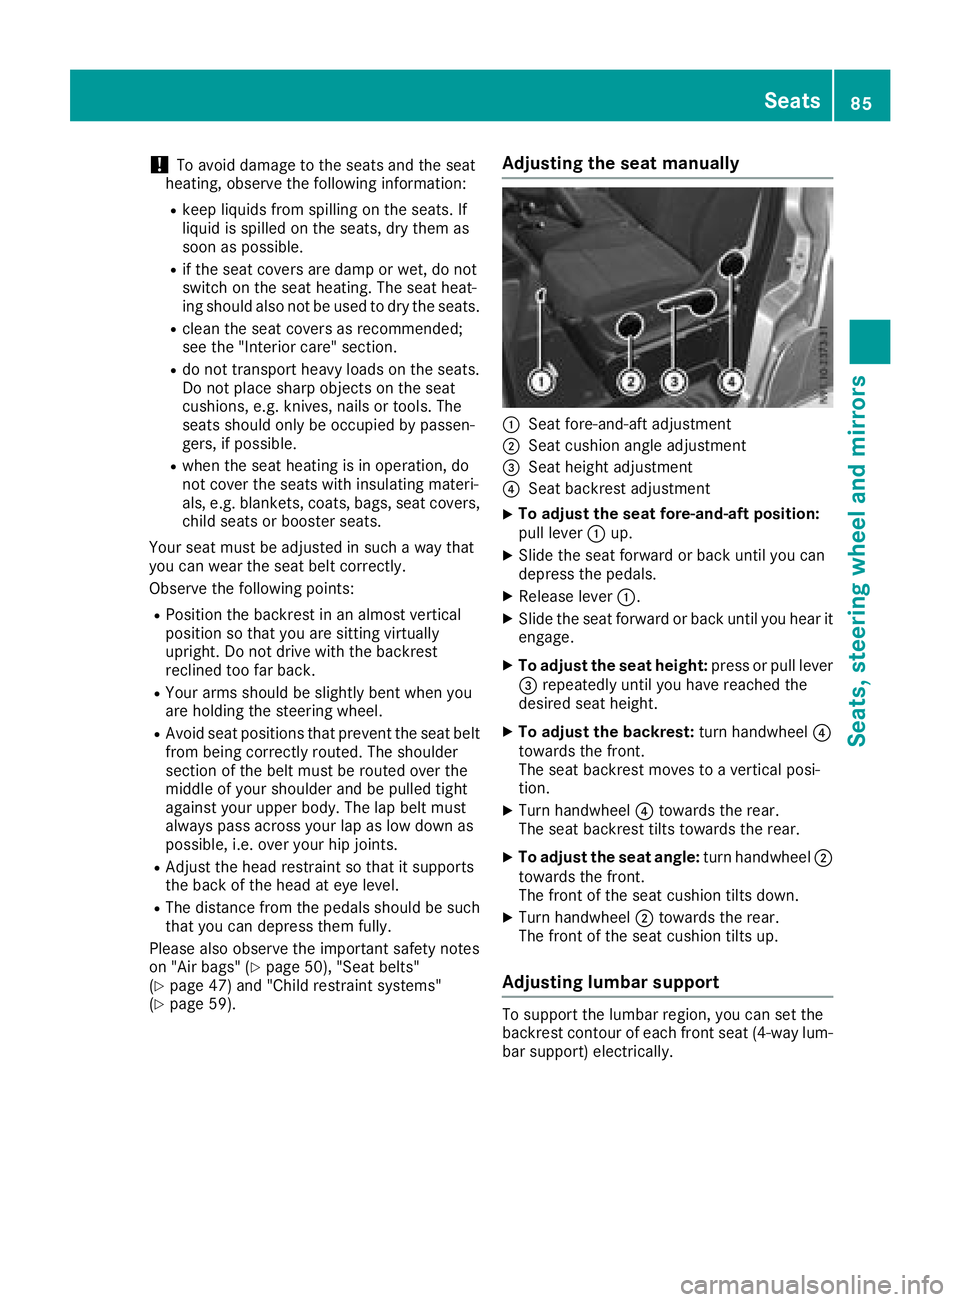
:Seat fore-and-aft adjustment
;Seat cushion angle adjustment
=Seat height adjustment
?Seat backrest adjustment
XTo adjust the seat fore-and-aft position:
pull lever :up.
XSlide the seat forward or back until you can
depress the pedals.
XRelease lever :.
XSlide the seat forward or back until you hear it
engage.
XTo adjust the seat height: press or pull lever
= repeatedly until you have reached the
desired seat height.
XTo adjust the backrest: turn handwheel?
towards the front.
The seat backrest moves to a vertical posi-
tion.
XTurn handwheel ?towards the rear.
The seat backrest tilts towards the rear.
XTo adjust the seat angle: turn handwheel;
towards the front.
The front of the seat cushion tilts down.
XTurn handwheel ;towards the rear.
The front of the seat cushion tilts up.
Adjusting lumbar support
To support the lumbar region, you can set the
backrest contour of each front seat (4-way lum-
bar support) electrically.
Seats85
Seats, steering wheel and mirrors
Z
Page 93 of 318
Steering wheel
GWARNING
You could lose control of your vehicle if you do the following while driving:
Radjust the driver's seat, head restraint,
steering wheel or mirrors
Rfasten the seat belt
There is a risk of an accident.
Adjust the driver's seat, head restraint, steer-
ing wheel and mirror and fasten your seat belt before starting the engine.
GWARNING
If the steering wheel is unlocked while the
vehicle is in motion, it could change position
unexpectedly. This could cause you to lose
control of the vehicle. There is a risk of an
accident.
Before starting off, make sure the steering
wheel is locked. Never unlock the steering
wheel while the vehicle is in motion.
GWARNING
Children could injure themselves if they
adjust the steering wheel. There is a risk of
injury.
When leaving the vehicle, always take the
SmartKey with you and lock the vehicle. Never
leave children unsupervised in the vehicle.
The steering wheel can still be adjusted if the
key has been removed.
Adjusting the steering wheel
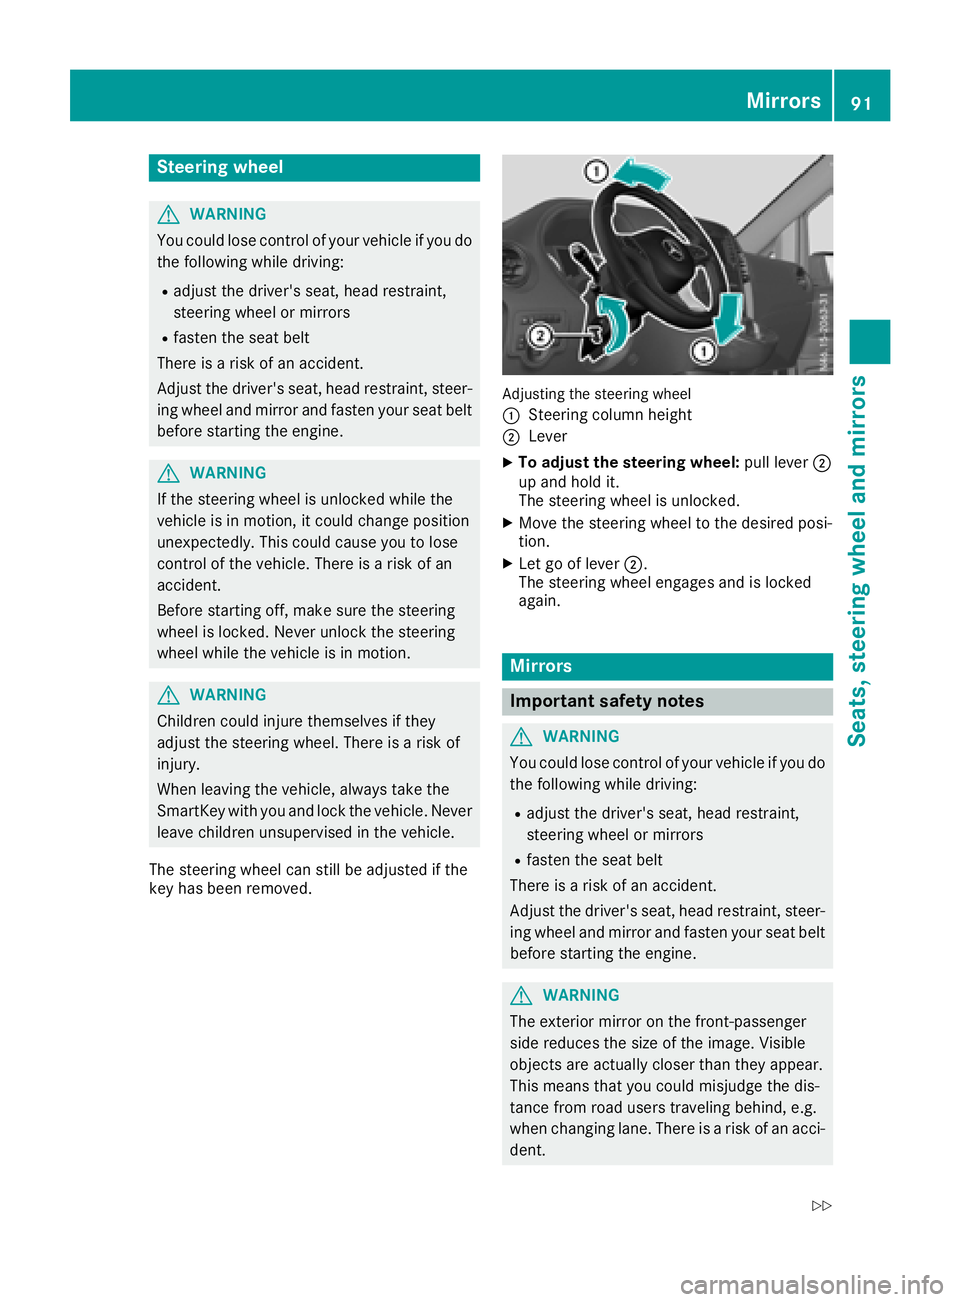
:
Steering column height
;Lever
XTo adjust the steering wheel: pull lever;
up and hold it.
The steering wheel is unlocked.
XMove the steering wheel to the desired posi-
tion.
XLet go of lever ;.
The steering wheel engages and is locked
again.
Mirrors
Important safety notes
GWARNING
You could lose control of your vehicle if you do the following while driving:
Radjust the driver's seat, head restraint,
steering wheel or mirrors
Rfasten the seat belt
There is a risk of an accident.
Adjust the driver's seat, head restraint, steer-
ing wheel and mirror and fasten your seat belt before starting the engine.
GWARNING
The exterior mirror on the front-passenger
side reduces the size of the image. Visible
objects are actually closer than they appear.
This means that you could misjudge the dis-
tance from road users traveling behind, e.g.
when changing lane. There is a risk of an acci-
dent.
Mirrors91
Seats, steering wheel and mirrors
Z
Page 194 of 318
Display messagesPossible causes/consequences andMSolutions
FrontPassengerAir‐bag Enable d
+
The front-passenger fron tair bag is enabled during th ejourney eve n
though th efront-passenger seat :
Ris occupied byachild in achild restrain tsystem, or aperson of small
statur e
or
Ris no toccupied.
The system may detec tobjects or force sthat are addin gto th eweigh t
applie dto th eseat .
GWARNIN G
The front-passenger air bag may deploy unintentionally.
There is an increased ris kof injury.
XStop th evehicl eimmediately, payin gattention to roa dand traffic
conditions.
XSecur eth evehicl eto preven tit from rollin gaway (Ypage 133).
XSwitchoff th eignition .
XOpenth efront-passenger door .
XRemove thechild and th echild restrain tsystem from th efront-
passenger seat .
XMakesur ethere are no objects applyin gadditional weigh tto th e
seat .
The system may otherwise detec tth eadditional weigh tand inter-
pre tth evehicl eseat occupant's weigh tas greate rthan it actually is.
XMak esur ethat th efront-passenger seat is unoccupied ,close th e
front-passenger door and switch on th eignition .
XObserveth ePASSENGER AIRBA GOF Findicator lamp in th ecenter
console and th edisplay and chec kth efollowing:
Seat unoccu
pied and ignition switched on :
RThe PASSENGER AIRBAGOF Findicator lamp mus tligh tup contin-
uously. If th eindicator lamp is on ,th eOccupant Classification Sys -
te m (OCS )has disabled th efront-passenger air bag (
Ypage 53).
RThe display mus tno tsho wthemessage sFrontPassengerAir ‐bag Enable dorFront Passenger Airbag Disabled.
XWait for at least on eminute until th enecessar ysystem checks hav e
been completed.
XEnsur ethat th edisplay does no tsho weither of th etwo display
message sabout th efront-passenger fron tair bag.
If these condition sare met ,th efront-passenger seat can be occupied
again .Observ eth enote son th eOccupant Classification Syste m
(OCS ) (
Ypage 53) .
If these condition sare no tmet ,th eOccupant Classification Syste m
(OCS )is malfunctioning .
XInstall thechild restrain tsystem on asuitable rear seat .
or
XSeat aperson of small statur eon asuitable rear seat .
XVisitaqualified specialist workshop immediately.
192Display messages (vehicles without steering wheelbu ttons)
On-board computer and displays
Page 208 of 318
Display messagesPossible causes/consequences andMSolutions
FrontPassengerAir‐bag Enable dSeeOperator' sManual
The front-passenger fron tair bag is enabled during th ejourney eve n
though th efront-passenger seat :
Ris occupied byachild in achild restrain tsystem, or aperson of small
statur e
or
Ris no toccupied.
The system may detec tobjects or force sthat are addin gto th eweigh t
applie dto th eseat .
GWARNIN G
The front-passenger air bag may deploy unintentionally.
There is an increased ris kof injury.
XStop th evehicl eimmediately, payin gattention to roa dand traffic
conditions.
XSecur eth evehicl eto preven tit from rollin gaway (Ypage 133).
XSwitchoff th eignition .
XOpenth efront-passenger door .
XRemove thechild and th echild restrain tsystem from th efront-
passenger seat .
XMakesur ethere are no objects applyin gadditional weigh tto th e
seat .
The system may otherwise detec tth eadditional weigh tand inter-
pre tth evehicl eseat occupant's weigh tas greate rthan it actually is.
XMak esur ethat th efront-passenger seat is unoccupied ,close th e
front-passenger door and switch on th eignition .
XObserveth ePASSENGER AIRBA GOF Findicator lamp in th ecenter
console and th edisplay and chec kth efollowing:
Seat unoccu
pied and ignition switched on :
RThe PASSENGER AIRBAGOF Findicator lamp mus tligh tup contin-
uously. If th eindicator lamp is on ,th eOccupant Classification Sys -
te m (OCS )has disabled th efront-passenger air bag (
Ypage 53).
RThe display mus tno tsho wthemessage sFrontPassengerAir ‐bag Enable dSee Operator' sManualor Front PassengerAirbag Disabled See Operator' sManual.
XWait for at least on eminute until th enecessar ysystem checks hav e
been completed.
XEnsur ethat th edisplay does no tsho weither of th etwo display
message sabout th efront-passenger fron tair bag.
If these condition sare met ,th efront-passenger seat can be occupied
again .Observ eth enote son th eOccupant Classification Syste m
(OCS ) (
Ypage 53) .
If these condition sare no tmet ,th eOccupant Classification Syste m
(OCS )is malfunctioning .
XInstall thechild restrain tsystem on asuitable rear seat .
or
XSeat aperson of small statur eon asuitable rear seat .
206Display messages (vehicles withsteering whee lbu ttons)
On-board computer and displays
Page 261 of 318
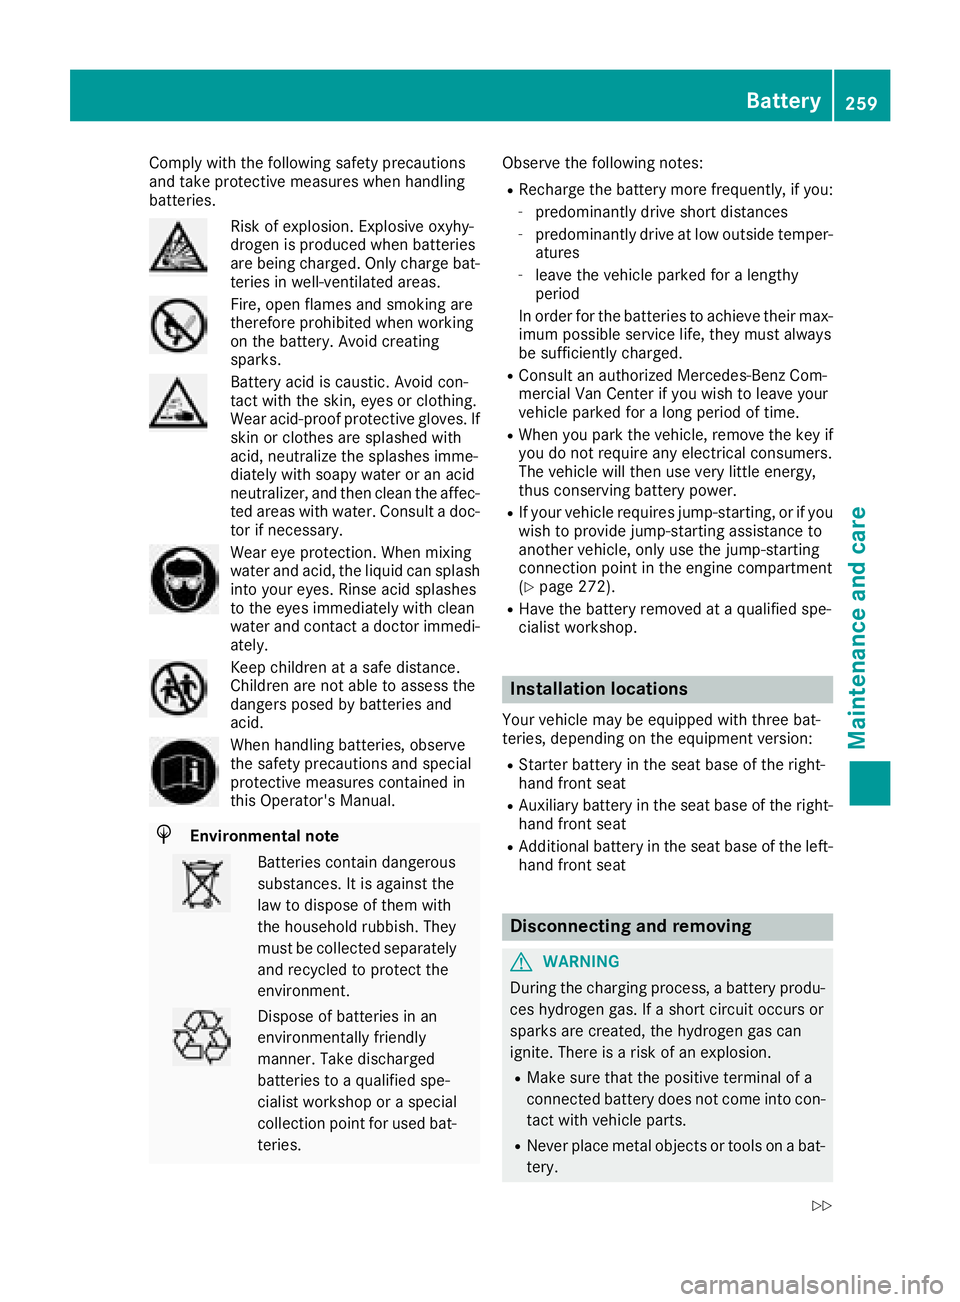
Comply with the foll owing safety precautions
and take protective measures when handlin g
batteries.
Risk of explos ion. Explosive oxyhy-
drogen isproduced when batteries
are bein g charge d.Only charge bat-
teries in well- ventilated areas.
Fire, open flames and smoking are
therefore pro hibited when working
on the battery. Avoid creating
sparks.
Battery acid iscaustic. Avoid con-
tact with the skin, eyes or clothing.
Wear acid-proof protective gloves. If
skin or clothes are splashed with
acid, neutr alize the splashes imme-
diat elywith soapy water or an acid
neutr alizer, and then clean the affec-
ted areas with water. Consult a doc-
tor ifnecessary.
Wear eye protection. When mixing
water and acid, the liquidcan splash
into your eyes. Rinse acid splashes
to the eyes immediately with clean
water and contact a doctor immedi-
ately.
Keep ch ildren at a safe distance.
Childr en are not ableto assess the
dangers posed bybatteries and
acid.
When handlin g batteries, observe
the safety precautions and special
protective measures contained in
th is Operator's Manual.
HEnvironmental note
Batteries contain dangerous
substances. It isagainst the
law to dispose of them with
the household rubbish. They
must becollec ted separate ly
and recycled to protect the
environment.
Dispose of batteries inan
environmentally friendly
manner. Take discharged
batteries to a qualified spe-
cialist workshop or a special
co llec tion point for used bat-
teries. Observe the foll
owing notes:
RRecharge the battery more frequently, if you:
-predominantly drive short distances
-predominantly drive at low outside temper-
atures
-leave the vehicle parked for a lengthy
period
In order for the batteries to achieve their max-
imum possible service life, they must always
be sufficiently charge d.
RConsult an authorized Mercedes-Benz Com-
mercial Van Centerifyou wish to leave your
vehicle parked for a long period of time.
RWhen you park the vehicle, remove the key if
you do not require any electrical consumers.
The vehicle will then use very little energy,
thus conserving battery power.
RIf your vehicle requires jump-starting, or if you
wish to provide jump-starting assistance to
another vehicle, only use the jump-starting
connection point in the engine compartment
(
Ypage 272).
RHave the battery removed at a qualified spe-
cialist workshop.
Installation locations
Your vehicle may be equipped with three bat-
teries, depending on the equipment version:
RStarter battery in the seat base of the right-
hand front seat
RAuxiliary battery inthe seat base of the right-
hand front seat
RAdditional battery inthe seat base of the left-
hand front seat
Disconnecting and removing
GWARNING
During the charging process, a battery produ-
ces hydrogen gas. If a short circuit occurs or
sparks are created, the hydrogen gas can
ignite. There is a risk of an explosion.
RMake sure that the positive terminal of a
connected battery does not come into con- tact with vehicle parts.
RNever place metal objects or tools on a bat-
tery.
Battery259
Maintenance and care
Z
Page 262 of 318
RIt is important that you observe the descri-
bed order of the battery terminals when
connecting and disconnecting a battery.
RWhen jump-starting, make sure that the
battery poles with identical polarity are
connected.
RIt is particularly important to observe the
described order when connecting and dis-
connecting the jumper cables.
RNever connect or disconnect the battery
terminals while the engine is running.
GWARNING
Battery acid is caustic. There is a risk of injury.
Avoid contact with skin, eyes or clothing. Do
not inhale any battery gases. Do not lean over
the battery. Keep children away from batter-
ies. Wash away battery acid immediately with
plenty of clean water and seek medical atten-
tion.
!You should have all work involving the bat-
tery carried out at a qualified specialist work-
shop.
If, in exceptional circumstances, you need to
disconnect the battery yourself, please make
sure that:
RSecure the vehicle to prevent it from rolling
away.
RYou have switched off the engine and
removed the key. Make sure the ignition is
switched off. Check to see that there are no
indicator lamps lighting in the instrument
cluster. Electronic components such as the
alternator may otherwise be damaged.
RAfter the battery has been disconnected,
the parking brake is automatically
engaged. You can then no longer move the
vehicle.
RFor vehicles with automatic transmission,
the transmission is locked in position P
after disconnecting the battery. You can
then no longer move the vehicle.
RYou have first removed the negative termi- nal and then the positive terminal. Never
mix up the terminal clamp disconnection/
connection order and never mix up the ter-
minal clamps. The vehicle's electronics
may otherwise be damaged. The battery and the cover of the positive ter-
minal clamp must be installed securely during
operation.
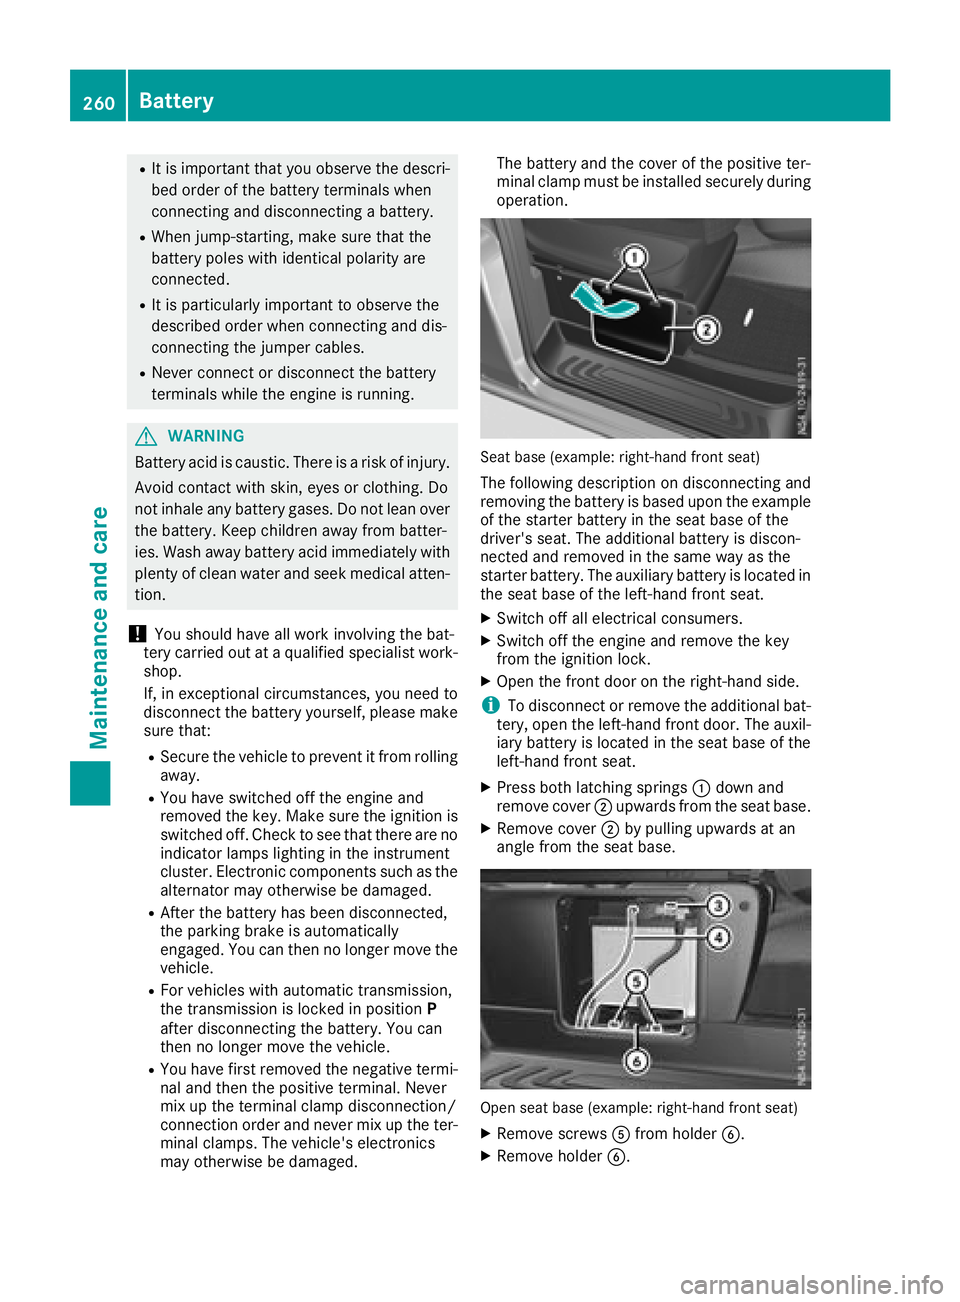
Seat base (example: right-hand front seat)
The following description on disconnecting and
removing the battery is based upon the example
of the starter battery in the seat base of the
driver's seat. The additional battery is discon-
nected and removed in the same way as the
starter battery. The auxiliary battery is located in the seat base of the left-hand front seat.
XSwitch off all electrical consumers.
XSwitch off the engine and remove the key
from the ignition lock.
XOpen the front door on the right-hand side.
iTo disconnect or remove the additional bat-
tery, open the left-hand front door. The auxil-
iary battery is located in the seat base of the
left-hand front seat.
XPress both latching springs :down and
remove cover ;upwards from the seat base.
XRemove cover ;by pulling upwards at an
angle from the seat base.
Open seat base (example: right-hand front seat)
XRemove screws Afrom holder B.
XRemove holder B.
260Battery
Maintenance and care