oil pressure MERCEDES-BENZ METRIS 2018 MY18 Operator’s Manual
[x] Cancel search | Manufacturer: MERCEDES-BENZ, Model Year: 2018, Model line: METRIS, Model: MERCEDES-BENZ METRIS 2018Pages: 318, PDF Size: 5.07 MB
Page 6 of 318
1, 2, 3 ...
12-V socket........................................ 243
A
ABS (anti-lock braking system)
Display message (vehicle with
steering wheel buttons) ................ .206
Display message (vehicle without
steering wheel buttons) ................. 192
Function/notes ................................ 64
Important safety notes .................... 64
Warning lamp ................................. 224
Accident
Automatic measures after an acci-
dent ................................................. 58
Activating/deactivating cooling
with air dehumidification ................. 114
Active Parking Assist
Canceling/stopping active park-
ing assistance ................................ 160
Detecting parking spaces .............. 157
Display message ............................ 216
Exiting a parking space .................. 159
Function/notes .............................1 56
Important safety notes .................. 156
Parking .......................................... 158
Towing a trailer .............................. 156
Add-on equipment ............................... 32
Additional indicators
Replacing bulbs .............................1 04
Additional speedometer
On-board computer (vehicle with
steering wheel buttons) ................. 188
On-board computer (vehicle with-
out steering wheel buttons) ........... 177
Additives
Engine oil ....................................... 310
Gasoline ......................................... 308
Air bag
Display message (vehicle with
steering wheel buttons) ................. 207
Display message (vehicle without
steering wheel buttons) ................. 193
Air bags
Deployment ..................................... 56 Front air bag (driver, front
passenger) ....................................... 51
Important safety notes .................... 50
Introduction ..................................... 49
Occupant Classification System
(OCS) ............................................... 52
PASSENGER AIR BAG OFF indica-
tor lamp ...........................................4
6
Side impact air bag .......................... 51
W
indow curtain air bag .................... 52
Air pressure
see Tire pressure
Air vents
Important safety notes .................. 120
Setting the center air vents ........... 120
Setting the rear-compartment air
vents .............................................. 120
Setting the side air vents ............... 120
Air vents
see Air vents
Air-conditioning system
see Climate control
Alarm system
see ATA (Anti-Theft Alarm system)
Alertness assistant
see ATTENTION ASSIST
Ambient lamp
Changing a bulb (front door) .......... 101
Changing a bulb (tailgate) .............. 101
Changing a bulb (vanity mirror) ...... 101
Anti-lock braking system
see ABS (Anti-lock Braking System)
Anti-skid chains
see Snow chains
Anti-Theft Alarm system
see ATA (Anti-Theft Alarm system)
Armrests .............................................. 92
Ashtray ............................................... 242
ATA (Anti-Theft Alarm system) ........... 68
ATTENTION ASSIST
Activating/deactivating (vehicle
with steering wheel buttons) ......... 187
Activating/deactivating (vehicle
without steering wheel buttons) .... 177
Display messages (vehicle with
steering wheel buttons) ................. 216
Display messages (vehicle with-
out steering wheel buttons) ........... 202
4Index
Page 25 of 318
TIN (Tire Identification Number)
(definition) .....................................298
Tire bead (definition) ......................2 97
Tire pressure (definition) ................ 297
Tire pressures (recommended) ...... 296
Tire size designation, load-bearing
capacity, speed rating .................... 293
Tire tread ....................................... 280
Tire tread (definition) ..................... 297
Total load limit (definition) ............. 298
Traction (definition) ....................... 298
TWR (permissible trailer drawbar
noseweight) (definition) ................. 298
Uniform Tire Quality Grading
Standards (definition) .................... 296
Wear indicator (definition) ............. 298
Wheel and tire combination ........... 302
Wheel rim (definition) .................... 296
Wheel/tire combinations ...............3 02
Tool
see Vehicle tool kit
Top Tether ............................................ 61
Tow-starting
Emergency engine starting ............ 278
Important safety notes .................. 276
Towing
If the vehicle is stuck ..................... 278
Installing/removing the towing
eye ................................................. 277
Towing a trailer
Active Parking Assist ..................... 156
Axle load, permissible .................... 316
Cleaning the trailer tow hitch ......... 269
Coupling up a trailer ......................1 67
Decoupling a trailer ....................... 168
Driving tips ....................................1 65
Notes on retrofitting ......................3 15
Power supply ................................. 170
Trailer loads ................................... 316
Towing away
Important safety guidelines ........... 276
With both axles on the ground ....... 278
With the rear axle raised ................ 277
Towing eye ......................................... 272
Trailer coupling
see Towing a trailer
Trailer loads and drawbar nose-
weights ............................................... 169 Trailer operation
Lights display messages (vehicle
with steering wheel buttons) ......... 211
Lights display messages (vehicle
without steering wheel buttons) .... 198
Trailer towing
Blind Spot Assist ............................ 150
ESP
®................................................ 67
PARKTRONIC ................................. 156
Permissible trailer loads and
drawbar noseweights ..................... 169
Transmission
see Automatic transmission
Transmission oil ........................ 310, 311
Transmission positions
Automatic transmission ................. 129
Display (DIRECT SELECT lever) ...... 130
Transport
Lashing straps ............................... 247
Loading guidelines ......................... 244
Stickers ......................................... 247
Vehicle ...........................................2 78
Transport by rail ................................ 139
Transportation
Rail ................................................ 139
Transportation aids
Load protection net ....................... 249
Transporting
Cargo compartment variations ...... 246
Load distribution ............................ 245
Securing a load .............................. 246
Trim pieces (cleaning instruc-
tions) .................................................. 270
Trip computer
Displaying (vehicle with steering
wheel buttons) ............................... 181
Displaying (vehicle without steer-
ing wheel buttons) ......................... 174
Resetting (vehicle with steering
wheel buttons) ............................... 181
Resetting (vehicle without steer-
ing wheel buttons) ......................... 174
Selecting the display units (vehi-
cle with steering wheel buttons) .... 188
Selecting the display units (vehi-
cle without steering wheel but-
tons) .............................................. 177
Index23
Page 247 of 318
In the event of an accident, have a damaged
cargo compartment floor or loading area, the
cargo tie-down rings and the tie down checked
at a specialist workshop. Otherwise, the load
may not be correctly secured the next time any-
thing is stowed.
Even if you follow all loading guidelines, the load
increases the risk of injury in the event of an
accident. Observe the information in the "Secur-ing a load" (
Ypage 246) and "Load distribution"
(Ypage 245) sections.
You will find information about the maximum
roof load under "Cargo tie-down points and car-
rier systems" (
Ypage 314). You will find infor-
mation about roof carriers under "Carrier sys-
tems" (
Ypage 250).
Before loading
!
The anti-slip mats cannot be used for secur-
ing goods and must be replaced when they
show signs of:
RPermanent deformation and crushing
RCrack formation
RCuts
XTire pressure: check the tire pressure and
correct if necessary (Ypage 282).
XCargo compartment floor: clean the cargo
compartment floor.
The cargo compartment floor must be free
from oil and dust, dry and swept clean to pre-
vent the load from slipping.
XPlace non-slip mats (anti-slip mats) on the
cargo compartment floor if necessary.
During loading
XObserve the gross axle weight rating and per-
missible gross vehicle weight for your vehicle.
Take into account that your vehicle's curb
weight is increased if accessories or optional equipment are installed. The maximum pay-
load is thus reduced.
XObserve the notes on load distribution
(Ypage 245).
The overall center of gravity of the load should
always be as low as possible, centered and
between the axles near the rear axle.
XSecure the load (Ypage 246).
Observe the legal requirements of the country
in which you are currently driving.
Checks after loading
GWARNING
Combustion engines emit poisonous exhaust
gases such as carbon monoxide. If the tail-
gate/rear door is open when the engine is
running, particularly if the vehicle is moving,
exhaust fumes could enter the passenger
compartment. There is a risk of poisoning.
Turn off the engine before opening the tail-
gate/rear door. Never drive off with the tail-
gate/rear door open.
XSecuring luggage/loads: make sure that
the luggage and/or load is secure before
every journey and at regular intervals during a
long journey, and correct it if necessary.
XDoors/tailgate: close the sliding doors and
tailgate/door.
XTire pressure: adjust the tire pressure
according to the vehicle load (Ypage 282).
XDriving style: adapt your driving style
according to the vehicle load.
Load distribution
General notes
!
Excessive loads on individual points of the
cargo floor or on the load surface impair vehi-
cle handling characteristics and could cause
damage to the floor covering.
The overall center of gravity of the load should
always be as low as possible, centered and
between the axles near the rear axle.
Load distribution245
Transporting loads
Z
Page 256 of 318
XHold support strut?and lift the hood
slightly.
XGuide support strut ?towards retainer =
and apply slight pressure to make it engage.
XLower the hood and allow it to fall with
momentum from a height of approximately
1 ft (30 cm).
The hood locks audibly.
XCheck that the hood is correctly locked.
If the hood can be raised slightly, it is not
properly engaged. If the hood is not correctly
engaged, open the hood again. Let the hood
fall with a little more momentum.
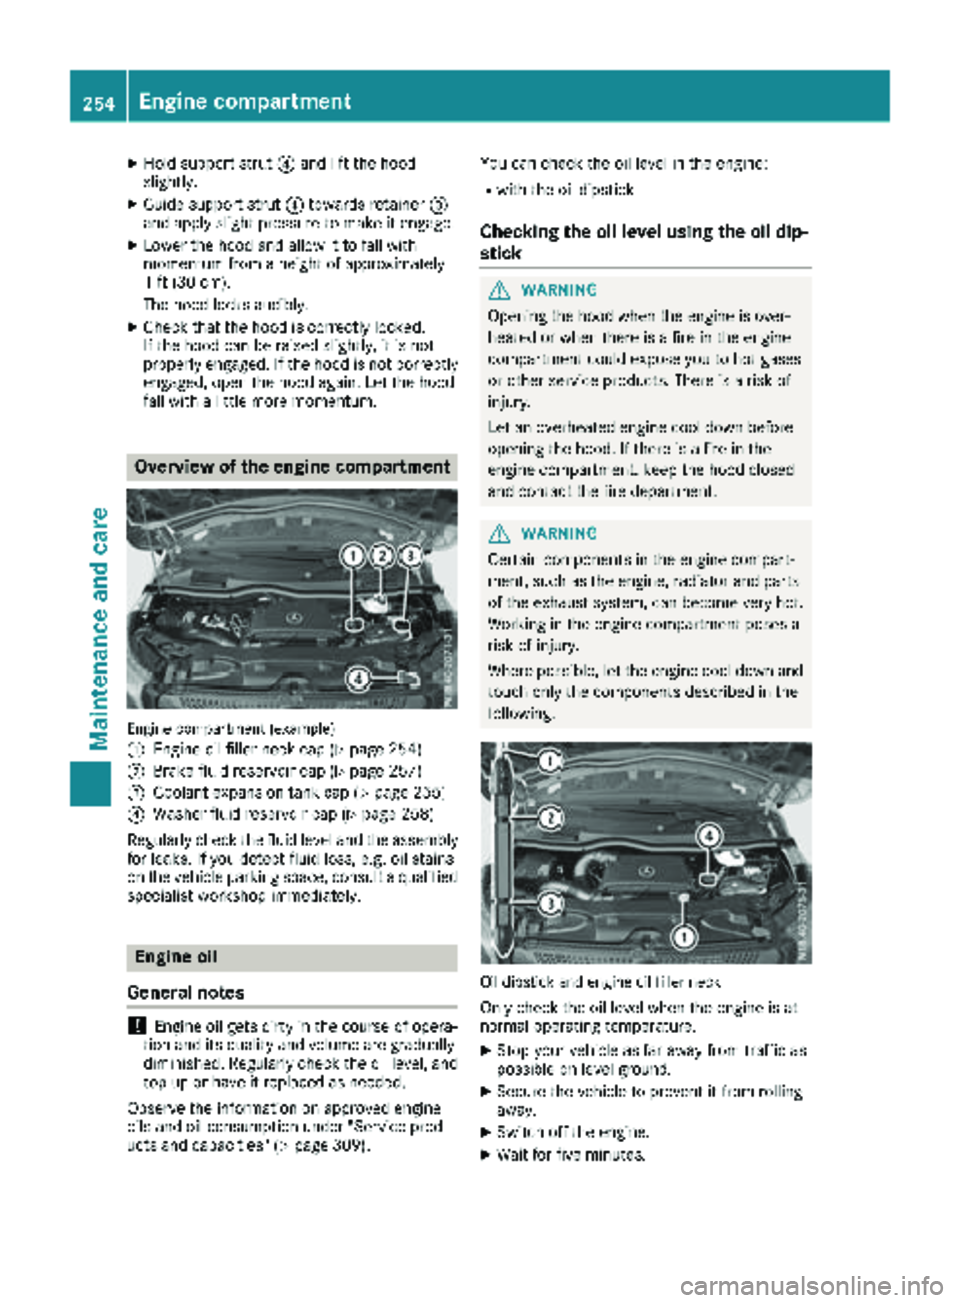
Overview of the engine compartment
Engine compartment (example)
:
Engine oil filler neck cap (Ypage 254)
;Brake fluid reservoir cap (Ypage 257)
=Coolant expansion tank cap (Ypage 255)
?Washer fluid reservoir cap (Ypage 258)
Regularly check the fluid level and the assembly
for leaks. If you detect fluid loss, e.g. oil stains
on the vehicle parking space, consult a qualified
specialist workshop immediately.
Engine oil
General notes
!Engine oil gets dirty in the course of opera-
tion and its quality and volume are gradually
diminished. Regularly check the oil level, and
top up or have it replaced as needed.
Observe the information on approved engine
oils and oil consumption under "Service prod-
ucts and capacities" (
Ypage 309). You can check the oil level in the engine:
Rwith the oil dipstick
Checking the oil level using the oil dip-
stick
GWARNING
Opening the hood when the engine is over-
heated or when there is a fire in the engine
compartment could expose you to hot gases
or other service products. There is a risk of
injury.
Let an overheated engine cool down before
opening the hood. If there is a fire in the
engine compartment, keep the hood closed
and contact the fire department.
GWARNING
Certain components in the engine compart-
ment, such as the engine, radiator and parts
of the exhaust system, can become very hot.
Working in the engine compartment poses a
risk of injury.
Where possible, let the engine cool down and touch only the components described in the
following.
Oil dipstick and engine oil filler neck
Only check the oil level when the engine is at
normal operating temperature.
XStop your vehicle as far away from traffic as
possible on level ground.
XSecure the vehicle to prevent it from rolling
away.
XSwitch off the engine.
XWait for five minutes.
254Engine compartment
Maintenance and care
Page 269 of 318
and associated spray produced by the power
washer could cause extensive damage to thevehicle.
!When using high-pressure cleaning equip-
ment, maintain a minimum distance of
approx. 1 ft (30 cm)betwee nthe spra ynozzle
and th evehicl eparts. Do no tuse apowe r
washer wit h around-jet nozzle. You could
damage th evehicl eor engin eparts.
!Kee pth ewater je tmovin gconstantl ywhile
cleaning .This will avoid causin gdamage to
th evehicle.
Do no tpoin tth ewater je tat:
Rdoo rjoints
Rrear vie wcamera
Rair bellows
Rbrak ehoses
Rwhee lbalance weights
Relectrica lcomponent s
Relectricalconnection s
Rseals
Rdrive train ,especially no tat th eintermedi-
ate bearin gof th epropelle rshaf t
Cleaning the engine
!Water mus tno tente rintak eor ventilation
openings. Whe ncleaning wit hhigh pressur e
water or steam cleaners ,th espray mus tno t
be aime ddirectl yat electrica lcomponent sor
th eterminals of electrica llines.
Preserve th eengin eafter th eengin ehas been
cleaned. Protect th ebelt drive system from
exposure to th epreservative agent.
Also observ eth einformation under "Powe r
washers " (
Ypage 266).
Cleaning the paintwork
!Do notaffix:
Rstickers
Rfilm s
Rmagneti cplates or similar items
to painte dsurfaces. You could otherwise
damage th epaintwork .
Scratches, corrosiv edeposits, area saffecte dby
corrosio nand damage caused by inadequate
car ecanno talways be completely repaired. In
suc hcases, visit aqualified specialist workshop .
XRemove impurities immediately, wher epos -
sible, whils tavoidin grubbin gto ohard.
XSoak insec tremain swit hinsec tremove rand
rinse off th etreated area safterwards .
XSoak birddroppings wit hwater and rinse off
th etreated area safterwards .
XRemove coolant, brak efluid, tree resin ,oils ,
fuel sand greases by rubbin ggentl ywit h a
cloth soaked in petroleum ether or lighte r
fluid.
XUse tar remove rto remove tar stains.
XUse silicon eremove rto remove wax .
Cleaning the windows
GWARNING
You could become trapped by th ewindshield
wiper sif they start movin gwhile cleaning th e
windshield or wiper blades. There is aris kof
injury.
Always switch off th ewindshield wiper sand
th eignition before cleaning th ewindshield or
wiper blades.
!Do no tfol dth ewindshield wiper saway from
th ewindshield unless th ehoo dis closed .Oth-
erwise, you could damage th ehood.
!Hold th ewiper arm securel ywhen foldin g
back. The windshield could be damaged if th e
wiper arm smack sagainst it suddenly.
!Do no tuse dry cloths, abrasiv eproducts ,
solvents or cleaning agents containin gsol-
vents to clean th einside of th ewindows .Do
no ttouch th einside sof th ewindows wit h
har dobjects ,e.g. an ice scrape ror ring. There
is otherwise aris kof damagin gth ewindows .
!Clean thewater drainag echannels of th e
windshield and th erear window at regular
intervals. Deposit ssuc has leaves, petals and
pollen may under certain circumstances pre -
ven twater from draining away. This can lead
to corrosio ndamage and damage to elec -
tronic components.
XClean th einside and outside of th ewindows
wit h a damp cloth and acleaning agen tthat is
recommended and approve dby Mercedes -
Benz .
Care267
Maintenance and care
Z
Page 272 of 318
REnsure sufficient ventilation when clean-
ing.
RMake sure that the vehicle interior is com-
pletely dry after cleaning.
Cleaning the display
!For cleaning, do not use any of the following:
Ralcohol-based thinner or gasoline
Rabrasive cleaning agents
Rcommercially-available household cleaning
agents
These may damage the display surface. Do
not put pressure on the display surface when
cleaning. This could lead to irreparable dam-
age to the display.
XSwitch off the display and let it cool down.
XClean the display surface with a commercially
available microfiber cloth and cleaner for
TFT/LCD displays.
XDry the display surface using a dry microfiber
cloth.
Cleaning the plastic trim
GWARNING
Care products and cleaning agents containing solvents cause surfaces in the cockpit to
become porous. As a result, plastic parts may
come loose in the event of air bag deploy-
ment. There is a risk of injury.
Do not use any care products and cleaning
agents to clean the cockpit.
!Never attach the following to plastic surfa-
ces:
Rstickers
Rfilms
Rperfume oil container or similar
You could otherwise damage the plastic.
!Do not allow cosmetics, insect repellent or
sunscreen to come into contact with the plas-
tic trim. This maintains the high-quality look of
the surfaces.
XWipe the plastic trim and the cockpit with a
damp, lint-free cloth, e.g. a microfiber cloth.
XHeavy soiling: use mild soapy water or care
products and cleaning agents recommended
and approved by Mercedes-Benz.
Cleaning the steering wheel and selec-
tor lever
XThoroughly wipe with a damp cloth.
XVehicles with leather upholstery: after
cleaning, use leather care agents that have
been recommended and approved by
Mercedes-Benz.
Cleaning the trim elements
!Do not use solvent-based cleaning agents
such as tar remover, wheel cleaners, polishes
or waxes. There is otherwise a risk of damag- ing the surface.
XWipe the trim elements with a damp, lint-free
cloth, e.g. a microfiber cloth.
XHeavy soiling: use care products and clean-
ing agents recommended and approved by
Mercedes-Benz.
Cleaning the seat covers
!Do not use microfiber cloths to clean genu-
ine leather or artificial leather covers. If used
often, a microfiber cloth can damage the
cover.
!Clean:
Rartificial leather covers with a cloth mois-
tened with a solution containing 1 %deter-
gent, e.g. dish washing liquid.
Rcloth covers with a microfiber cloth mois-
tened with a solution containing 1 %deter-
gent, e.g. dish washing liquid. Wipe entire
seat sections carefully to avoid leaving visi-
ble lines. Leave the seat to dry afterwards.
Cleaning results depend on the type of dirt
and how long it has been there.
Rgenuine leather covers carefully with a
damp cloth, then wipe the covers down
with a dry cloth. Make sure that the leather does not become soaked. Otherwise, the
leather could become rough or cracked.
Only use leather care agents that have
been tested and approved by Mercedes-
270Care
Maintenance and care
Page 299 of 318
GVW (Gross Vehicle Weight)
The gross vehicle weight includes the weight of
the vehicle including fuel, tools, spare wheel,
accessories installed, occupants, luggage and
the drawbar noseweight if applicable. The gross
vehicle weight must never exceed the permissi-
ble gross weight (GVWR) specified on the
B-pillar on the driver's side (
Ypage 305).
GVWR (Gross Vehicle Weight Rating)
The GVWR is the maximum permitted gross
weight of the fully laden vehicle (weight of the
vehicle including all accessories, occupants,
fuel, luggage and the drawbar noseweight if
applicable). The permissible gross weight is
specified on the vehicle identification plate on
the B-pillar on the driver's side (
Ypage 305).
Maximum weight of the laden vehicle
The maximum weight is the sum of:
Rthe curb weight of the vehicle
Rthe weight of the accessories
Rthe load limit
Rthe weight of the factory installed optional
equipment
Kilopascal (kPa)
Metric unit for tire pressure. 6.9 kPa are the
equivalent of 1 psi. Another tire pressure unit is
bar. 100 kilopascals (kPa) are the equivalent of
1 bar.
Load index
In addition to the load bearing index, a load
index can be stamped onto the sidewall of the
tire. It specifies the load-bearing capacity of the
tire more precisely.
Curb weight
The weight of a vehicle with standard equipment
including the maximum filling capacity of fuel,
oil, and coolant. It also includes the air-condi-
tioning system and optional equipment if these
are installed on the vehicle, but does not include
passengers or luggage.
Maximum tire load
The maximum tire load in kilograms or pounds is
the maximum weight for which a tire is
approved.
Maximum permissible tire pressure
Maximum permissible tire pressure for one tire.
Maximum load on one tire
Maximum load on one tire. This is calculated by
dividing the maximum axle load of one axle by
two.
PSI (Pounds per square inch)
Standard unit of measurement for tire pressure.
Aspect ratio
Relationship between tire height and width in
percent.
Tire pressure
Pressure inside the tire applying an outward
force to every square inch of the tire's surface.
Tire pressure is specified in pounds per square
inch (psi), in kilopascal (kPa) or in bar. Tire pres-
sure should only be corrected when the tires are
cold.
Cold tire pressure
The tires are cold:
Rif the vehicle has been parked for at least
three hours without direct sunlight on the
tires, and
Rif the vehicle has not been driven further than
1 mile (1.6 km)
Tire tread
The part of the tire that comes into contact with
the road.
Tire bead
The tire bead ensures that the tire sits securely
on the wheel. There are several steel wires in the bead to prevent the tire from coming loose from
the wheel rim.
Sidewall
The part of the tire between the tread and the
tire bead.
Weight of optional extras
The combined weight of those optional extras
that weigh more than the replaced standard
parts and more than 2.3 kg (5 lbs). These
optional extras, such as high-performance
brakes, a roof rack or a high-performance bat-
tery, are not included in the curb weight and theweight of the accessories.
What you should know about wheels and tires297
Wheels and tires
Z
Page 300 of 318
TIN (Tire Identification Number)
A unique identification number which can be
used by a tire manufacturer to identify tires, for
example for a product recall, and thus identify
the purchasers. The TIN is composed of the
manufacturer identification code, tire size, tire
model code and manufacturing date.
Load bearing index
The load bearing index (also load index) is a code
that contains the maximum load bearing capa-
city of a tire.
Traction
Traction is the result of friction between the tires
and the road surface.
TWR (permissible trailer drawbar load)
The TWR is the maximum permissible weight
that may act on the ball coupling of the trailer
tow hitch.
Wear indicator
Narrow bars (tread wear bars) that are distrib-
uted over the tire tread. If the tire tread is level
with the bars, the wear limit of áin (1.6 mm)
has been reached.
Distribution of the vehicle occupants
The distribution of vehicle occupants over des-
ignated seat positions in a vehicle.
Maximum permissible payload weight
Nominal load and goods/luggage load plus
68 kg (150 lb s)multiplied by the number of
seats in the vehicle.
Changing wheels
Rotating the wheels
GWARNING
Interchanging the front and rear wheels may
severely impair the driving characteristics if
the wheels or tires have different dimensions. The wheel brakes or suspension components
may also be damaged. There is a risk of acci-
dent.
Rotate front and rear wheels only if the wheels and tires are of the same dimensions.
!On vehicles equipped with a tire pressure
monitor, electronic components are located
in the wheel.
Tire-mounting tools should not be used near
the valve. This could damage the electronic
components.
Only have tires changed at a qualified spe-
cialist workshop.
Always observe the instructions and safety
notes under "Mounting a wheel" (
Ypage 299).
The wear patterns on the front and rear tires
differ, depending on the operating conditions.
Rotate the wheels before a clear wear pattern
has formed on the tires. Front tires typically
wear more on the shoulders and the rear tires in the center.
If your vehicle's tire configuration allows, you
can rotate the tires according to the intervals in
the tire manufacturer's warranty book in your
vehicle documents. If no warranty book is avail-
able, the tires should be rotated every 3,000 to
6,000 miles (5,000 to 10,000 km) or earlier if
tire wear requires. Do not change the direction
of rotation.
Clean the contact surfaces of the wheel and the
brake disc thoroughly every time a wheel is rota-
ted. Avoid oily or greasy cleaning agents.
Check the tire pressure and reactivate the tire
pressure monitor if necessary.
Direction of rotation
Tires with a specified direction of rotation have
additional benefits, e.g. if there is a risk of hydro-
planing. You will only gain these benefits if the
correct direction of rotation is observed.
An arrow on the sidewall of the tire indicates its
correct direction of rotation.
You may mount a spare wheel against the direc-tion of rotation. Observe the time restriction on
use as well as the speed limitation specified on
the spare wheel.
Storing wheels
Store wheels that are not being used in a cool,
dry and preferably dark place. Protect the tires
from contact with oil, grease and fuel.
298Changing wheels
Wheels and tires
Page 311 of 318
The following components of the different vehi-
cle versions influence fuel consumption:
Rtire sizes, tire tread, tire pressure, tire condi-
tion
Rtransmission ratios for the drive assemblies
Radditional equipment (e.g. air-conditioning
system, auxiliary heating system)
For these reasons, the actual consumption fig-
ures for your vehicle may deviate from the con-
sumption figures determined according to EU
Directive 80/1268/EE C.
Details on fuel consumption can be called up in
the on-board computer:
Ron vehicles without steering wheel buttons
(Ypage 174)
Ron vehicles with steering wheel buttons
(Ypage 181)
Engine oil
General notes
When handling engine oil, observe the important
safety notes on operating fluids (Ypage 306).
The quality of the engine oil used is of decisive
importance for the engine's functionality and
operating life. Mercedes-Benz continually
approves engine oils based on complex experi-
ments according to the current state of the art. Therefore, only Mercedes-Benz approved
engine oils may be used in Mercedes-Benz
engines. Mercedes-Benz recommends having
the oil changed at a qualified specialist work-
shop. Information about engine oils approved by
Mercedes-Benz can be obtained:
Rfrom any Mercedes-Benz Commercial Van
Center
Ron the Internet at
http://bevo.mercedes-benz.co
mbyenterin g
th edesignation ,e.g. 229.5.
Mercedes-Ben zapprova lis indicate don th eoil
container by th einscription „MB-Freigabe “or
„MB Approval“ and th ecorrespondin gdesigna-
tion ,e.g. MB-Freigabe or MB Approval 229.5.
Designation sof th eapprove dengin eoils for
your vehicl e
MB-Freigabe or MB
Approval229.5
Mercedes-Ben zrecommends that you only use
approve dmultigrade engin eoils of th eSA E
classe sSA E0W-30 and SA E0W-40 or
SA E5W-30 and SA E5W-40. These engin eoils
ensur eoptimum lubrication eve nat ver ylow
outside temperatures (
Ypage 310).
Whe ntoppin gup, we recommen dthat you only
use engin eoil of th esam egrade (MB-Freigabe
or MB Approval designation )and SA Eclass as
th eoil filled at th elast oil change.
iIf th eengin eoils listed in th etable are no t
available, you may add th efollowin gengin e
oils until th enext oil change:
RMB-Freigabe or MB Approval 229.1, or
ACE AA3
This mus tonly be added once and th eamount
mus tno tbe greate rthan 1qt (1. 0l).
Subsequentl yhav eth eengin eoil changed at
th eearliest possibl eopportunity.
!Using engin eoils of another grade qualit yis
no tpermitted.
Capacities
!Do no tadd to omuc hoil. addin gto omuc h
engin eoil can result in damage to th eengin e
or to th ecatalytic converter. Hav eexcess
engin eoil siphoned off .
Oil change includin goil filter
Engin eoilApprox. 2US gal
(7.75 l)
Service products and capacities309
Technical data
Z