steering wheel adjustment MERCEDES-BENZ METRIS 2018 MY18 Operator’s Manual
[x] Cancel search | Manufacturer: MERCEDES-BENZ, Model Year: 2018, Model line: METRIS, Model: MERCEDES-BENZ METRIS 2018Pages: 318, PDF Size: 5.07 MB
Page 87 of 318
Useful information
This Operator's Manual describes all models as
well as standard and optional equipment of your
vehicle that were available at the time of going
to print. Country-specific variations are possi-
ble. Note that your vehicle may not be equipped
with all of the described functions. This also
applies to systems and functions relevant to
safety.
Read the information on qualified specialist
workshops (
Ypage 31).
Seats
Driver's and front-passenger seat
Important safety notes
GWARNING
Children could become trapped if they adjust
the seats, particularly when unattended.
There is a risk of injury.
When leaving the vehicle, always take the
SmartKey with you and lock the vehicle. Never
leave children unsupervised in the vehicle.
GWARNING
You could lose control of your vehicle if you do the following while driving:
Radjust the driver's seat, head restraint,
steering wheel or mirrors
Rfasten the seat belt
There is a risk of an accident.
Adjust the driver's seat, head restraint, steer-
ing wheel and mirror and fasten your seat belt before starting the engine.
GWARNING
When you adjust a seat, you or other vehicle
occupants could become trapped, e.g. on the seat guide rail. There is a risk of injury.
Make sure when adjusting a seat that no one
has any body parts in the sweep of the seat.
GWARNING
If the driver's seat is not engaged, it could
move unexpectedly while the vehicle is in
motion. This could cause you to lose control of the vehicle. There is a risk of an accident.
Always make sure that the driver's seat is
engaged before starting the vehicle.
GWARNING
The front-air bags for could also injure the
vehicle occupants in the front If the front
seats are positioned too close to the dash-
board or steering wheel. This poses an
increased risk of injury or even fatal injury.
Always adjust the front seats so that they are
as far from the front air bags as possible. Also
observe the notes on the correct adjustment
of the seats.
GWARNING
The seat belt does not offer the intended level of protection if you have not moved the back-
rest to an almost vertical position. When brak-
ing or in the event of an accident, you could
slide underneath the seat belt and sustain
abdomen or neck injuries, for example. This
poses an increased risk of injury or even fatal injury.
Adjust the seat properly before beginning
your journey. Always ensure that the backrest
is in an almost vertical position and that the
shoulder section of your seat belt is routed
across the center of your shoulder.
GWARNING
If the head restraints are not installed or not
adjusted correctly, they cannot provide pro-
tection as intended. There is an increased risk
of injury in the head and neck area, e.g. in the event of an accident or when braking.
Always drive with the head restraints instal-
led. Before driving off, make sure for every
vehicle occupant that the center of the head
restraint supports the back of the head at
about eye level.
Seats85
Seats, steering wheel and mirrors
Z
Page 88 of 318
!To avoid damage to the seats and the seat
heating, observe the following information:
Rkeep liquids from spilling on the seats. If
liquid is spilled on the seats, dry them as
soon as possible.
Rif the seat covers are damp or wet, do not
switch on the seat heating. The seat heat-
ing should also not be used to dry the seats.
Rclean the seat covers as recommended;
see the "Interior care" section.
Rdo not transport heavy loads on the seats.
Do not place sharp objects on the seat
cushions, e.g. knives, nails or tools. The
seats should only be occupied by passen-
gers, if possible.
Rwhen the seat heating is in operation, do
not cover the seats with insulating materi-
als, e.g. blankets, coats, bags, seat covers,
child seats or booster seats.
Your seat must be adjusted in such a way that
you can wear the seat belt correctly.
Observe the following points:
RPosition the backrest in an almost vertical
position so that you are sitting virtually
upright. Do not drive with the backrest
reclined too far back.
RYour arms should be slightly bent when you
are holding the steering wheel.
RAvoid seat positions that prevent the seat belt
from being correctly routed. The shoulder
section of the belt must be routed over the
middle of your shoulder and be pulled tight
against your upper body. The lap belt must
always pass across your lap as low down as
possible, i.e. over your hip joints.
RAdjust the head restraint so that it supports
the back of the head at eye level.
RThe distance from the pedals should be such
that you can depress them fully.
Please also observe the important safety notes
on "Air bags" (
Ypage 50), "Seat belts"
(Ypage 47) and "Child restraint systems"
(Ypage 59).
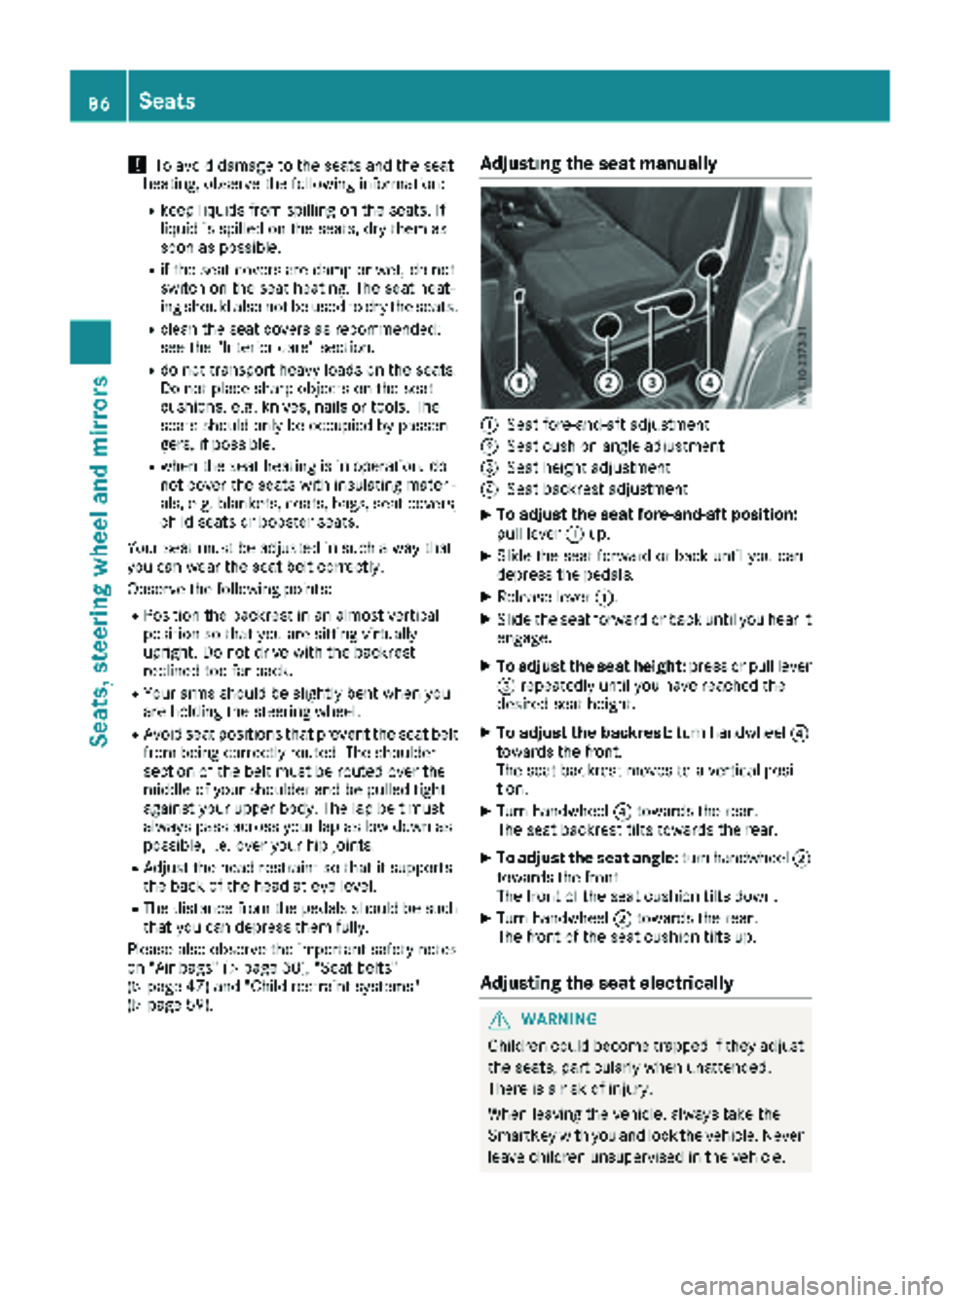
Adjusting the seat manually
:Seat fore-and-aft adjustment
;Seat cushion angle adjustment
=Seat height adjustment
?Seat backrest adjustment
XTo adjust the seat fore-and-aft position:
pull lever :up.
XSlide the seat forward or back until you can
depress the pedals.
XRelease lever :.
XSlide the seat forward or back until you hear it
engage.
XTo adjust the seat height: press or pull lever
= repeatedly until you have reached the
desired seat height.
XTo adjust the backrest: turn handwheel?
towards the front.
The seat backrest moves to a vertical posi-
tion.
XTurn handwheel ?towards the rear.
The seat backrest tilts towards the rear.
XTo adjust the seat angle: turn handwheel;
towards the front.
The front of the seat cushion tilts down.
XTurn handwheel ;towards the rear.
The front of the seat cushion tilts up.
Adjusting the seat electrically
GWARNING
Children could become trapped if they adjust
the seats, particularly when unattended.
There is a risk of injury.
When leaving the vehicle, always take the
SmartKey with you and lock the vehicle. Never
leave children unsupervised in the vehicle.
86Seats
Seats, steering wheel and mirrors
Page 89 of 318
The seats can be adjusted when the key is
removed and the door is open.
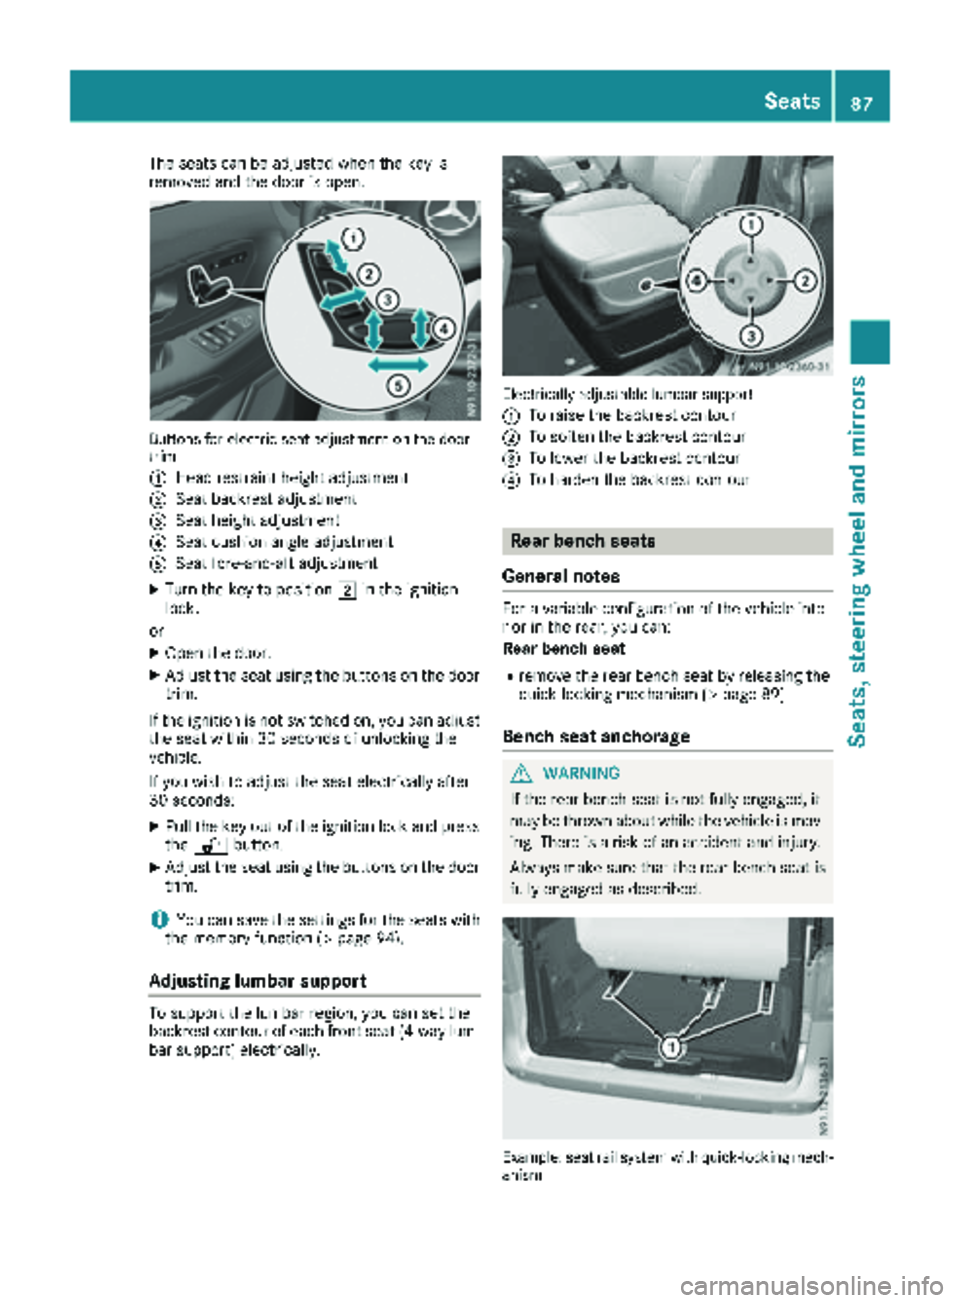
Buttons for electric seat adjustment on the door
trim
:
Head restraint height adjustment
;Seat backrest adjustment
=Seat height adjustment
?Seat cushion angle adjustment
ASeat fore-and-aft adjustment
XTurn the key to position2in the ignition
lock.
or
XOpen the door.
XAdjust the seat using the buttons on the door
trim.
If the ignition is not switched on, you can adjust
the seat within 30 seconds of unlocking the
vehicle.
If you wish to adjust the seat electrically after
30 seconds:
XPull the key out of the ignition lock and press
the % button.
XAdjust the seat using the buttons on the door
trim.
iYou can save the settings for the seats with
the memory function (Ypage 94).
Adjusting lumbar support
To support the lumbar region, you can set the
backrest contour of each front seat (4-way lum- bar support) electrically.
Electrically adjustable lumbar support
:
To raise the backrest contour
;To soften the backrest contour
=To lower the backrest contour
?To harden the backrest contour
Rear bench seats
General notes
For a variable configuration of the vehicle inte-
rior in the rear, you can:
Rear bench seat
Rremove the rear bench seat by releasing the
quick-locking mechanism (Ypage 89)
Bench seat anchorage
GWARNING
If the rear bench seat is not fully engaged, it
may be thrown about while the vehicle is mov-
ing. There is a risk of an accident and injury.
Always make sure that the rear bench seat is
fully engaged as described.
Example: seat rail system with quick-locking mech-
anism
Seats87
Seats, steering wheel and mirrors
Z
Page 97 of 318
ferent people. The position of the seat, seat
backrest and head restraint are stored as a sin-
gle memory preset.
Important safety notes
GWARNING
If you use the memory function on the driver's side while driving, you could lose control of
the vehicle as a result of the adjustments
being made. There is a risk of an accident.
Only use the memory function on the driver's
side when the vehicle is stationary.
GWARNING
When the memory function adjusts the seat,
you and other vehicle occupants – particularly
children – could become trapped. There is a
risk of injury.
While the memory function is making adjust-
ments, make sure that no one has any body
parts in the sweep of the seat. If somebody
becomes trapped, immediately release the
memory function position button. The adjust-
ment process is stopped.
GWARNING
Children could become trapped if they acti-
vate the memory function, particularly when
unattended. There is a risk of injury.
When leaving the vehicle, always take the
SmartKey with you and lock the vehicle. Never
leave children unsupervised in the vehicle.
The memory function can be used at any time,
for example even when the SmartKey has been
removed from the ignition lock.
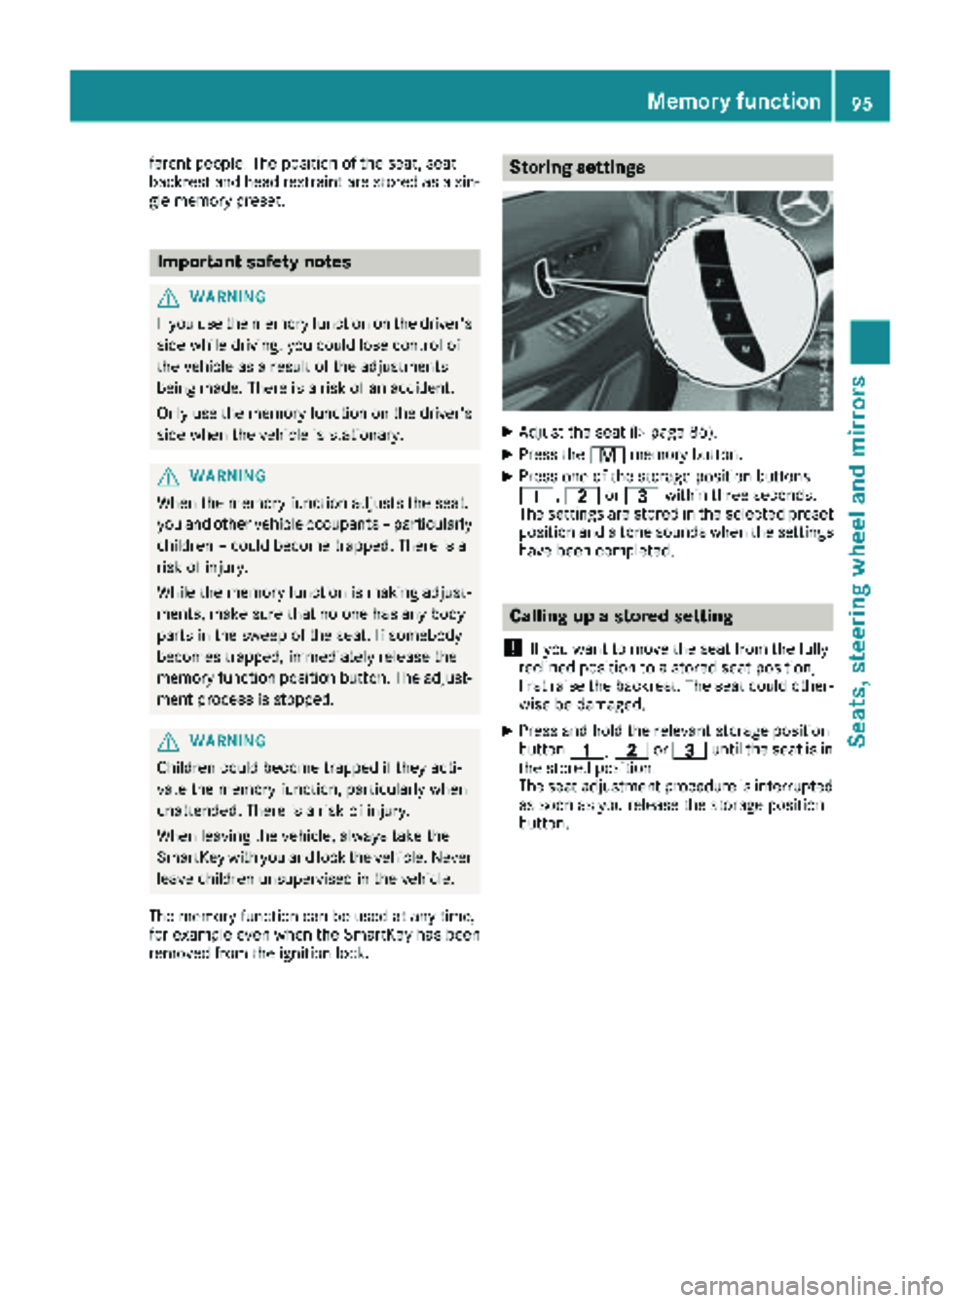
Storing settings
XAdjust the seat (Ypage 86).
XPress the rmemory button.
XPress one of the storage position buttons
4, 5or= within three seconds.
The settings are stored in the selected preset
position and a tone sounds when the settings
have been completed.
Calling up a stored setting
!
If you want to move the seat from the fully
reclined position to a stored seat position,
first raise the backrest. The seat could other-
wise be damaged.
XPress and hold the relevant storage position
button 4,5or= until the seat is in
the stored position.
The seat adjustment procedure is interrupted
as soon as you release the storage position
button.
Memory function95
Seats, steering wheel and mirrors
Z
Page 132 of 318

Transmission position and drive pro-
gram display
:Drive program
;Current transmission position orcurrent gear in drive program M
=Shift range, if restricted
The transmission positions and current drive
program :are shown at the bottom of the
instrument cluster display. The current trans-
mission position is highlighted.
In drive program M, the transmission position
indicator shows the current gear in position D
(
Ypage 132).
If you restrict the shift range, the transmission
position indicator shows the current transmis-
sion position plus restricted shift range =, e.g.
D2 (
Ypage 130).
The arrows in the transmission position display
show how and into which transmission positions
you can change using the DIRECT SELECT lever.
Changing gear
The 7-speed automatic transmission adapts to
your individual driving style by continuously
adjusting its shift points. These shift point
adjustments take into account the current oper-
ating and driving conditions. If the operating or
driving conditions change, the automatic trans-
mission reacts by adjusting the gearshift pro-
gram.
The 7-speed automatic transmission shifts to
the individual gears automatically when it is in
transmission position h. This depends on:
Rthe drive program selected (Ypage 131)
Rany restriction in the shift range
(Ypage 130)
Rthe position of the accelerator pedal
Rthe road speed
You can also change gear manually if you select
drive program M(
Ypage 132).
Shift ranges
:To shift down and restrict the shift range
;To shift up and derestrict the shift range
In transmission position Dand drive programs E
and C, you can use the steering wheel paddle
shifters to change gear yourself and restrict or
derestrict the shift range of the automatic trans-
mission.
XTo shift down and restrict the shift range:
briefly pull left steering wheel paddle
shifter :.
The automatic transmission shifts to the next
gear down, depending on the gear currently
engaged. The shift range is also restricted.
The transmission position indicator also
shows the set shift range, e.g. D2. The auto-
matic transmission shifts only as far as the
relevant gear.
or
XPull and hold left steering wheel paddle
shifter :.
The automatic transmission will shift to a
range which allows easy acceleration and
deceleration. To do this, the automatic trans-
mission shifts down one or more gears and
restricts the shift range.
The transmission position indicator also
shows the set shift range, e.g. D2. The auto-
matic transmission shifts only as far as the
relevant gear.
The automatic transmission does not shift
down if you pull the left steering whee l p
addle
shifter whilst traveling at too high a speed. If
the maximum engine speed for the restricted
shift range is reached and you continue to
depress the accelerator pedal, the automatic transmission will shift up automatically. This
protects the engine from overrevving.
130Automatic transmission
Driving an d parking
Page 173 of 318
Useful information
This Operator's Manual describes all models as
well as standard and optional equipment of your
vehicle that were available at the time of going
to print. Country-specific variations are possi-
ble. Note that your vehicle may not be equipped
with all of the described functions. This also
applies to systems and functions relevant to
safety.
Read the information on qualified specialist
workshops (
Ypage 31).
Important safety notes
GWARNING
If you operate information systems and com-
munication equipment integrated in the vehi-
cle while driving, you will be distracted from
traffic conditions. You could also lose control
of the vehicle. There is a risk of an accident.
Only operate the equipment when the traffic
situation permits. If you are not sure that this
is possible, park the vehicle paying attention
to traffic conditions and operate the equip-
ment when the vehicle is stationary.
GWARNING
If you are driving and reach through the steer- ing wheel to operate the adjustment knob,
you could lose control of the vehicle. There is
a risk of an accident and injury.
Only operate the adjustment knobs when thevehicle is stationary. Do not reach through the
steering wheel when driving.
You must observe the legal requirements for the
country in which you are currently driving when
operating the on-board computer.
GWARNING
If the instrument cluster has failed or mal-
functioned, you may not recognize function
restrictions in systems relevant to safety. The
operating safety of your vehicle may be
impaired. There is a risk of an accident.
Drive on carefully. Have the vehicle checked
at a qualified specialist workshop immedi-
ately.
The on-board computer display only shows mes-
sages and warnings from certain systems. You
should therefore make sure your vehicle is oper-
ating safely at all times. If the operating safety of
your vehicle is impaired, stop the vehicle as
soon as possible, paying attention to road and
traffic conditions. Then consult a qualified spe-
cialist workshop.
The accuracy of the speedometer and odometer
displays is legally prescribed. Determining the
speed is dependent on the wheel size or the
rolling circumference of the wheels. If you
change the wheel size on your vehicle, make
sure it is assigned to the correct wheel size cat-
egory (
Ypage 279). If you change wheel size
category without recoding the control unit, the
speedometer indication will be inaccurate. Driv-
ing safety and driving systems may be impaired
or detect a malfunction and shut down.
An overview of the instrument cluster can be
found under "Instrument cluster":
Rfor vehicles without steering wheel buttons
(Ypage 37)
Rfor vehicles with steering wheel buttons
(Ypage 39)
Display and operation
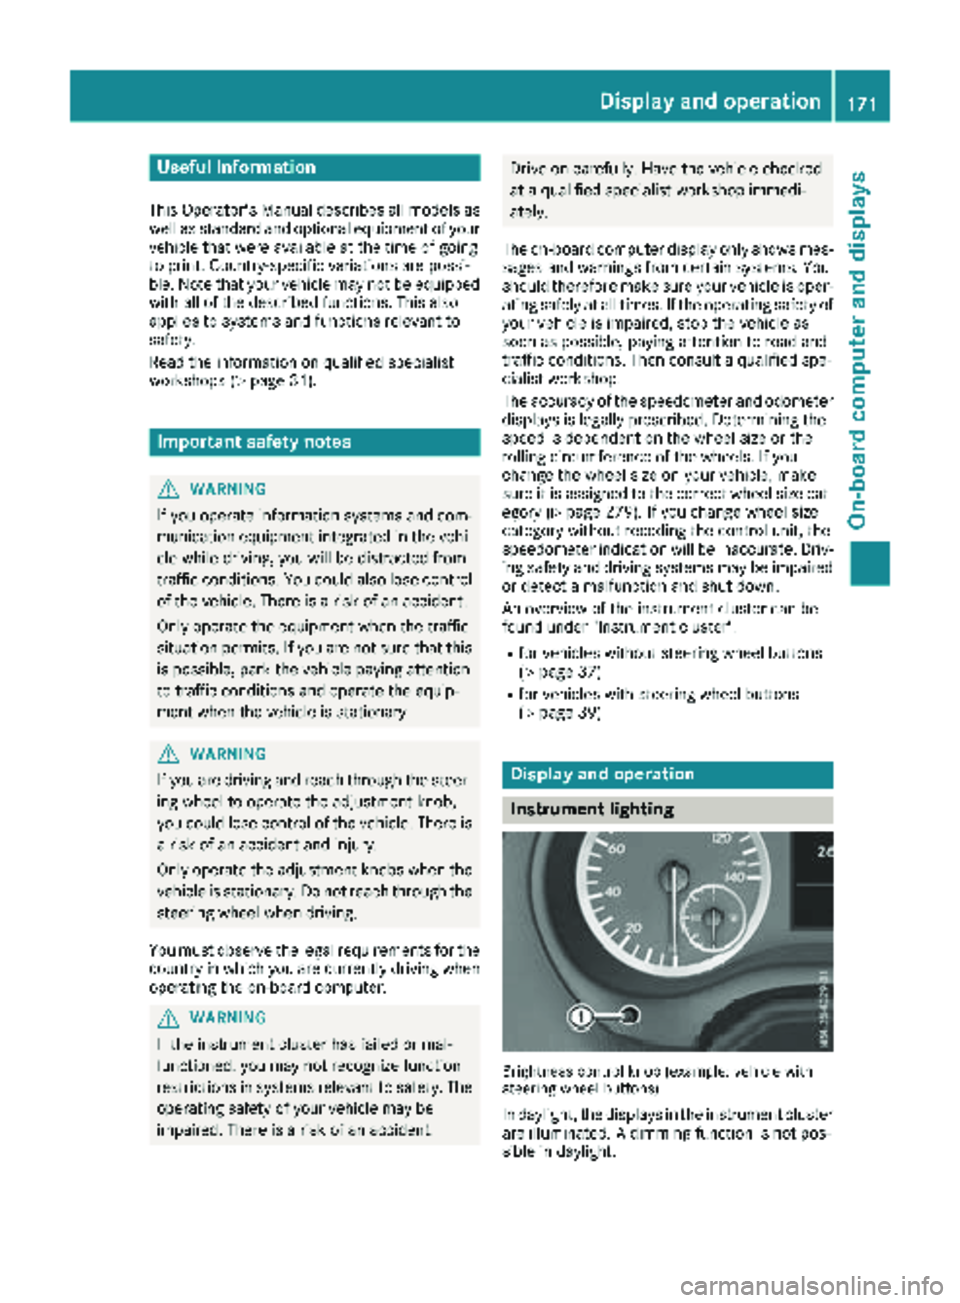
Instrument lighting
Brightness control knob (example: vehicle with
steering wheel buttons)
In daylight, the displays in the instrument cluster
are illuminated. A dimming function is not pos-
sible in daylight.
Display and operation171
On-board computer and displays
Z
Page 175 of 318
On-board computer (vehicles without
steering wheel buttons)
Operating the on-board computer
Overview
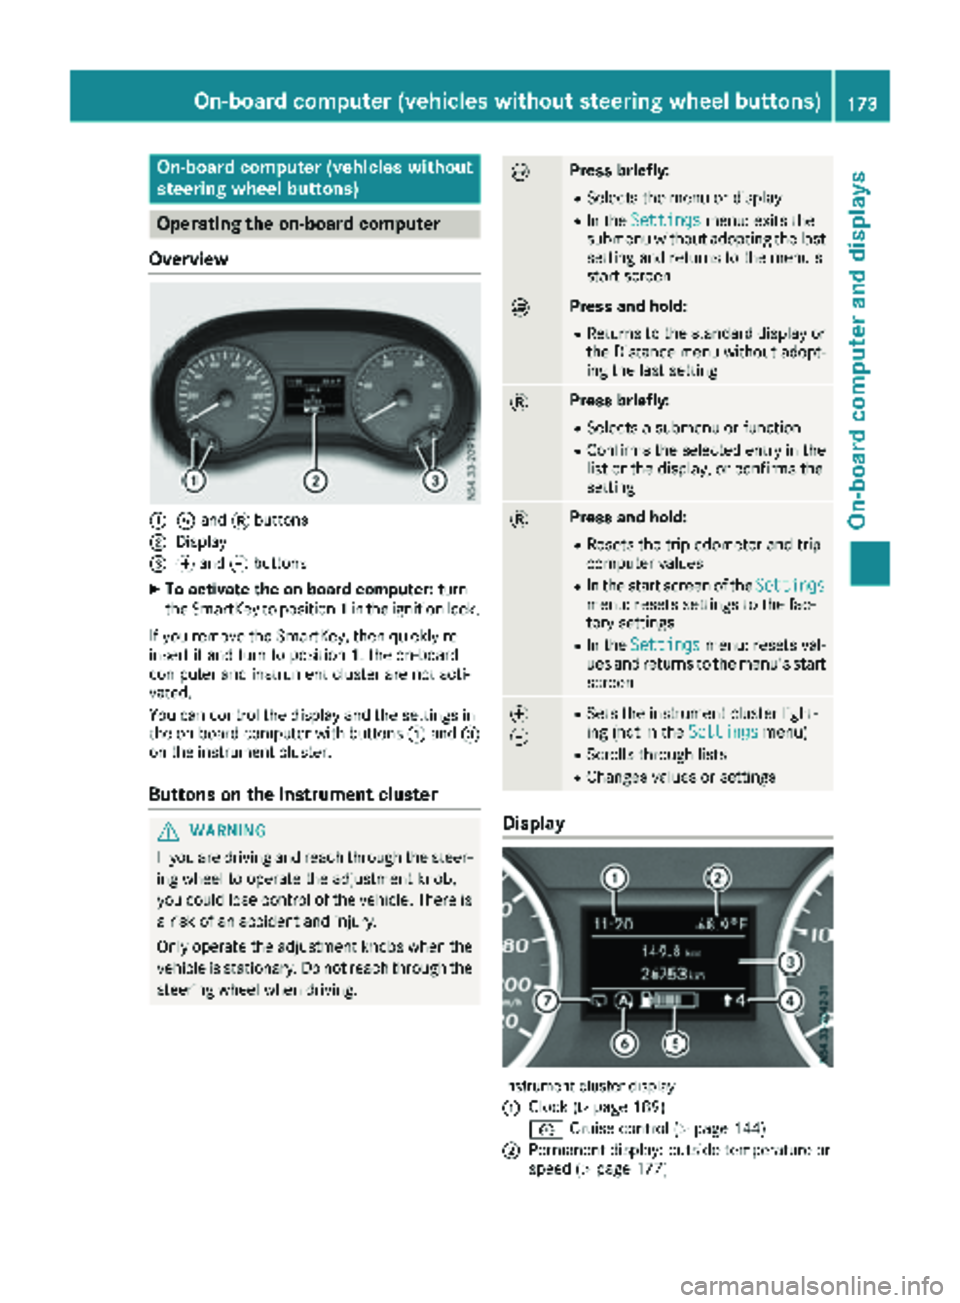
:È and 3buttons
;Display
=f and gbuttons
XTo activate the on-board computer: turn
the SmartKey to position 1in the ignition lock.
If you remove the SmartKey, then quickly re-
insert it and turn to position 1, the on-board
computer and instrument cluster are not acti-
vated.
You can control the display and the settings in
the on-board computer with buttons :and =
on the instrument cluster.
Buttons on the instrument cluster
GWARNING
If you are driving and reach through the steer- ing wheel to operate the adjustment knob,
you could lose control of the vehicle. There is
a risk of an accident and injury.
Only operate the adjustment knobs when thevehicle is stationary. Do not reach through the
steering wheel when driving.
ÈPress briefly:
RSelects the menu or display
RIn the Settingsmenu: exits the
submenu without adopting the last
setting and returns to the menu's
start screen
ÈPress and hold:
RReturns to the standard display or the Distance menu without adopt-
ing the last setting
3Press briefly:
RSelects a submenu or function
RConfirms the selected entry in the
list or the display, or confirms the
setting
3Press and hold:
RResets the trip odometer and trip
computer values
RIn the start screen of the Settingsmenu: resets settings to the fac-
tory settings
RIn theSettingsmenu: resets val-
ues and returns to the menu's start
screen
f
gRSets the instrument cluster light-
ing (not in the Settingsmenu)
RScrolls through lists
RChanges values or settings
Display
Instrument cluster display
:
Clock (Ypage 189)
V Cruise control (
Ypage 144)
;Permanent display: outside temperature or
speed (Ypage 177)
On-board computer (vehicles without steering wheel buttons)173
On-board computer and displays
Z