center console MERCEDES-BENZ METRIS 2019 MY19 Operator’s Manual
[x] Cancel search | Manufacturer: MERCEDES-BENZ, Model Year: 2019, Model line: METRIS, Model: MERCEDES-BENZ METRIS 2019Pages: 318, PDF Size: 5.07 MB
Page 4 of 318
Index....................................................... 4
Introduction......................................... 27
Operating Instructions .......................... .27
Service and vehicle operation ................ 27
Proper use ............................................. 29
Protection of the environment ............... 29
Operating safety and vehicle approval
............................................................... 30
Genuine Mercedes-Benz parts ............... 33
QR code for rescue card ........................ 34
Data stored in the vehicle ...................... 34
At a glance ........................................... 36
Cockpit .................................................. 36
Instrument cluster (vehicles without
steering wheel buttons) ......................... 37
Instrument cluster (vehicles with
steering wheel buttons) ......................... 39
Steering wheel buttons .......................... 41
Center console ...................................... 42
Overhead control panel ......................... 43
Door control panel ................................. 43
Safety ................................................... 45
Useful information ................................. 45
Occupant safety .................................... 45
Children in the vehicle ........................... 58
Pets in the vehicle ................................. 64
Driving safety systems ........................... 64
Theft deterrent locking system .............. 67
Opening and closing ...........................69
Useful information ................................. 69
Key ........................................................ 69
Central locking ...................................... 73
Driver's door and front-passenger
door ....................................................... 74
Sliding door ........................................... 74
Electric sliding door ............................... 75
Tailgate .................................................. 79
Rear doors ............................................. 80
Side windows ......................................... 82
Seats, steering wheel and mirrors ....85
Useful information ................................. 85
Seats ..................................................... 85
Steering wheel ....................................... 93
Mirrors ................................................... 93
Memory function ................................... 94
Lights and windshield wipers ............96
Useful information ................................. 96
Exterior lighting ..................................... 96
Interior lighting ...................................... 99
Replacing bulbs: interior lighting and
ambient lamps ..................................... 100
Replacing bulbs ................................... 102
Windshield wipers ................................ 106
Climate control ................................. 110
Useful information ............................... 110
Overview of climate control systems ... 110
Operating the climate control system .. 113
Adjusting the air vents ......................... 120
Driving and parking ..........................122
Useful information ............................... 122
Breaking-in notes ................................. 122
Driving ................................................. 122
Automatic transmission ....................... 128
Refueling ............................................. 134
Parking ................................................ 135
Driving tips .......................................... 137
Driving systems ................................... 144
Towing a trailer .................................... 165
On-board computer and displays ....171
Useful information ............................... 171
Important safety notes ........................ 171
Display and operation .......................... 171
On-board computer (vehicles without
steering wheel buttons) ....................... 173
On-board computer (vehicles with
steering wheel buttons) ....................... 178
Display messages (vehicles without
steering wheel buttons) ....................... 191
Display messages (vehicles with
steering wheel buttons) ....................... 205
2Contents
Page 9 of 318
Seat cover ..................................... 270
Sensors ......................................... 268
Sliding door ................................... 269
Steering wheel ............................... 270
Trim pieces .................................... 270
Washing by hand ........................... 266
Washing the engine ....................... 267
Wheels ........................................... 268
Windows ........................................ 267
Wiper blades .................................. 268
Cargo compartment
Options .......................................... 246
Seating ............................................ 88
Cargo compartment lamp
Changing bulbs .............................. 101
Cargo compartment lighting
Switching on centrally ................... 100
Switching on locally ....................... 100
Cargo tie-down rings
Permissible tensile load ................. 314
Center console
Controls ........................................... 42
Central locking
Activating/deactivating the
acoustic locking confirmation (on-
board computer) ............................ 190
Automatic locking ............................ 74
Automatic locking (on-board com-puter) ............................................. 190
Emergency unlocking ....................... 70
Locking/unlocking (buttons) ........... 73
Locking/unlocking (SmartKey) ........ 69
Central locking system
see Central locking
Change of address .............................. 28
Change of ownership .......................... 28
Changing a bulb
Ambient lamp in the front door ...... 101
Halogen headlamps ....................... 102
Mirror lamp in the headliner .......... 101
Signal and ambient light in the tail-
gate ............................................... 102
Trunk lamp in the side trim panel .. 101
Changing bulbs
Additional turn signals ................... 104
Ambient lamp in tailgate ................ 101
Backup lamps ................................ 105
Brake lamps ................................... 105 Cargo compartment lamp .............. 101
Daytime running lamps .................. 104
High-beam headlamps ................... 104
Installing/removing a rear lamp
cluster ........................................... 105
Installing/removing
the co
ver in
the wheel arch ............................... 103
Installing/removing the tail lamp ... 105
Interior light ................................... 100
Interior lighting .............................. 100
Low-beam headlamps .................... 103
Overview of lamp types (front
bulbs) ............................................. 103
Overview of lamp types (rear
bulbs) ............................................. 104
Parking lamps ................................ 104
Rear fog lamp ................................ 105
Rear interior light in the headline r..1 01
Standing lamps (front) ................... 104
Standing lamps (rear) .................... 105
Tail lamps ...................................... 105
Trunk lamp in the headliner ........... 100
Turn signals (front) ......................... 104
Turn signals (rear) .......................... 105
see Changing light bulbs
Changing bulbs
see Replacing bulbs
Child
Restraint system .............................. 59
Child seat
Forward-facing restraint system ...... 62
LATCH-type (ISOFIX) child seat
anchors ............................................ 61
On the front-passenger seat ............ 62
Rearward-facing restraint system .... 62
Top Tether ....................................... 61
Child-proof locks
Important safety notes .................... 63
Sliding door ..................................... 63
Children
Special seat belt retractor ............... 59
Children in the vehicle
Important safety notes .................... 58
Cigarette lighter ................................ 242
Cleaning
Trailer tow hitch ............................. 269
Cleaning
see Care
Index7
Page 10 of 318
Climate controlAir conditioning in the rear com-
partment ........................................ 113
Control panel for dual-zone auto-
matic climate control .................... .112
Controlling automatically ...............1 15
Cooling with air dehumidification .. 114
Defrosting the windows ................. 118
Defrosting the windshield .............. 117
Important safety notes .................. 110
Information on dual-zone auto-
matic climate control ..................... 112
Information on TEMPMATIC (air-
conditioning system) ..................... 111
Overview of systems ......................1 10
Problem with the rear window
defroster ........................................ 118
Rear-compartment air condition-
ing ................................................. 113
Refrigerant ..................................... 312
Refrigerant filling capacity ............. 312
Setting the air distribution ............. 116
Setting the air vents ......................1 20
Setting the airflow ......................... 116
Setting the temperature ................ 115
Switching air-recirculation mode
on/off ............................................ 118
Switching on/off ........................... 113
Switching residual heat on/off ...... 119
Switching the rear window
defroster on/off ............................ 118
Switching the synchronization
function on and off ........................ 117
TEMPMATIC control panel (air
conditioning) .................................. 111
Clock
Setting (vehicle without steering
wheel buttons) ............................... 178
Cockpit
Instrument cluster (vehicle with
steering wheel buttons) ................... 39
Instrument cluster (vehicle with-
out steering wheel buttons) ............. 37
Overview .......................................... 36
see Instrument cluster
Coffee cup symbol
see ATTENTION ASSIST COL
LISION PREVENTION ASSIST
Activating/deactivating the dis-
tance warning function .................. 187
Adaptive Brake Assist .................... 147
Display message ............................ 216
Distance warning function ............. 146
Operation/notes ............................ 146
Collision warning
see COLLISION PREVENTION ASSIST
COMAND display
Cleaning ......................................... 270
Combination switch ............................ 98
Communications equipment
Operation ....................................... 243
Type approval/frequency .............. 305
Consumption statistics
Fuel (vehicle with steering wheel
buttons) ......................................... 181
Fuel (vehicle without steering
wheel buttons) ............................... 174
Control panel
Above the windshield ....................... 43
Center console ................................ 42
Climate control ................................ 42
Driver's door ....................................4 3
Convenience closing feature .............. 83
Convenience opening
With the SmartKey ........................ .119
Convenience opening feature ............ 83
Conversions/equipment .................... 32
Coolant (engine)
Adding ...........................................2 57
Checking the level ......................... 255
Display messages (vehicle with
steering wheel buttons) ................. 215
Display messages (vehicle with-
out steering wheel buttons) ........... 200
Displaying the temperature (on-
board computer) ............................ 175
Filling capacity ............................... 312
Notes ............................................. 311
Temperature display in the instru-
ment cluster .................................. 172
Warning lamp ................................. 227
Cooling
see Climate control
Crosswind Assist ................................. 67
8Index
Page 35 of 318
Please observe the information concerning
Mercedes-Benz Genuine Parts (Ypage 33).
You can obtain further information from any
Mercedes-Benz Commercial Van Center.
GWARNING
The function of systems or components can
be affected by conversions or modifications
to the vehicle. They might not function prop-
erly anymore and/or jeopardize the opera-
tional safety of the vehicle. There is an
increased risk of an accident and injury.
Conversions or modifications should always
be carried out at qualified specialist work-
shop.
If you intend to make modifications to your vehi-
cle, we strongly recommend that you contact
the distributor named on the inside of the front
cover. There you will receive all the necessary
information and a charge may be levied.
You alone accept the responsibility if body man-
ufacturers or dealers make modifications that
affect the final certification of the engine, the
vehicle or the equipment. This also applies to
the identification and documentation of modifi-
cations to the affected vehicle components.
You are responsible for certification and confir-
mation that:
Rall the applicable standards and regulations
that are affected by the vehicle modification
are met
Rthe modified vehicle fulfills the vehicle safety standards and emissions laws and regula-
tions
Rthe modifications or installation of accesso-
ries does not affect the safety of the vehicle
We are not responsible for the final certification,
product liability or warranty claims which result
from the modifications. This applies to:
Rthe modified components, assemblies or sys-
tems
Rany resulting noncompliance with any of the
emissions laws and regulations or the motor
vehicle safety standards
Rany consequences arising from the changes
that make the vehicle less safe or even render it defective
We do not assume responsibility as the final-
stage manufacturer or for the consequential
product liability.
Notes on the radiator
Even seemingly small changes to the vehicle,
such as attaching a radiator trim for winter driv-
ing, is not permitted. Do not cover up the radi-
ator. Do not use thermal mats, insect protection
covers or anything similar.
Otherwise, the values of the diagnostic system
may be affected. Some of these values are
legally prescribed and must always be correct.
Genuine Mercedes-Benz parts
!
Air bags and Emergency Tensioning Devi-
ces, as well as control units and sensors for
these restraint systems, may be installed in
the following areas of your vehicle:
Rdoors
Rdoor pillars
Rdoor sills
Rseats
Rcockpit
Rinstrument cluster
Rcenter console
Do not install accessories such as audio sys-
tems in these areas. Do not carry out repairs or welding. You could impair the operating
efficiency of the restraint systems.
Have aftermarket accessories installed at a
qualified specialist workshop.
HEnvironmental note
We supply reconditioned assemblies and
parts which are of the same quality as new
parts. The same New Vehicle Limited War-
ranty applies as for new parts.
The operating safety of the vehicle could be
jeopardized if you use parts, tires and wheels as
well as accessories relevant to safety which
have not been approved by Mercedes-Benz. This could lead to malfunctions in safety-relevant
systems, e.g. the brake system. Only use genu-
ine Mercedes-Benz parts or parts of equal qual-
ity. Only use tires, wheels and accessories that
have been specifically approved for your vehi-
cle.
Introduction33
Z
Page 38 of 318
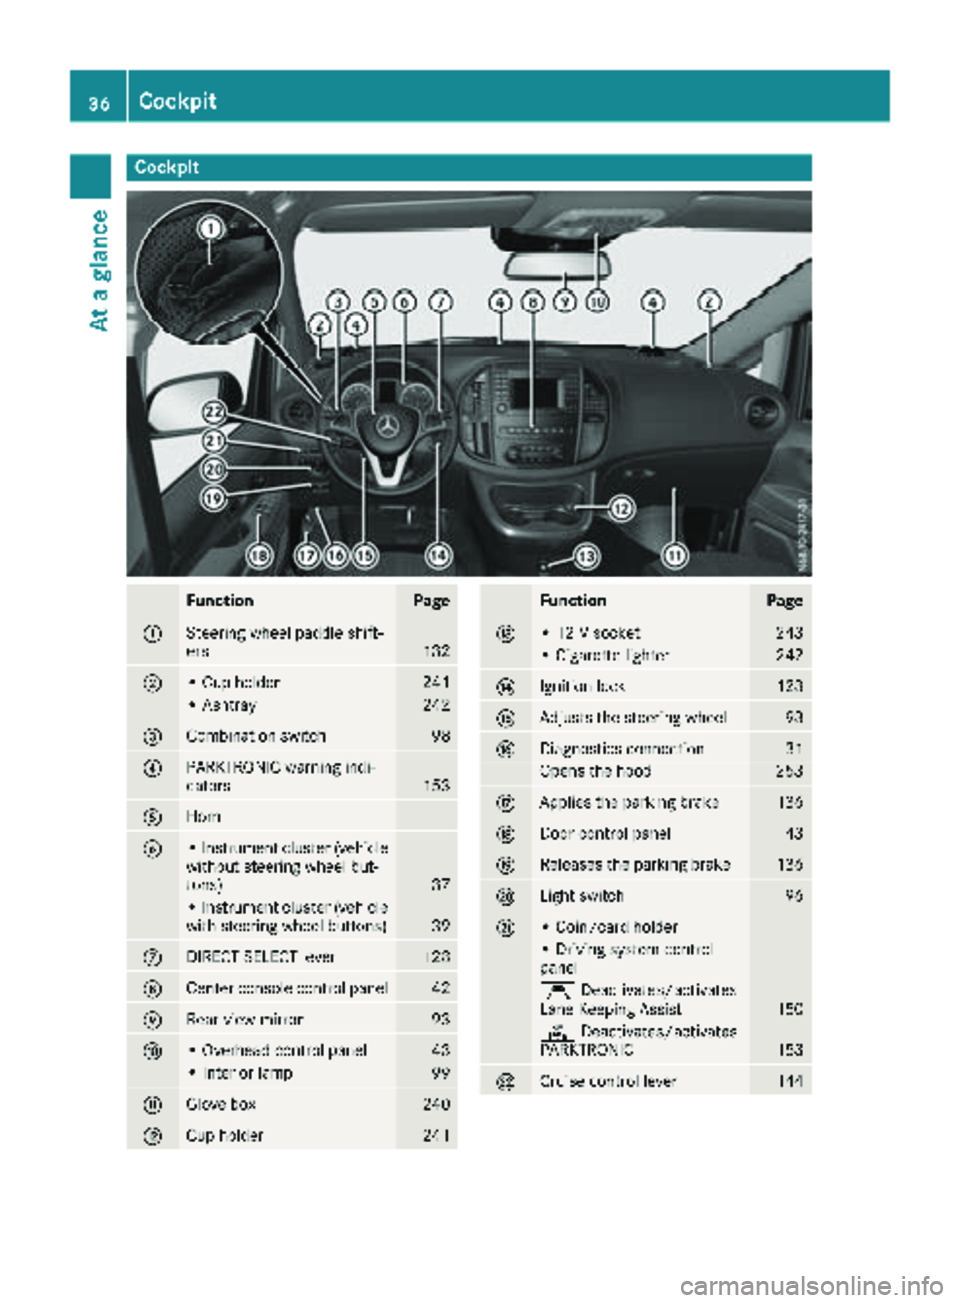
Cockpit
FunctionPage
:Steering wheel paddle shift-
ers132
;• Cup holder241
• Ashtray242
=Combination switch98
?PARKTRONIC warning indi-
cators153
AHorn
B• Instrument cluster (vehicle
without steering wheel but-
tons)
37
• Instrument cluster (vehicle
with steering wheel buttons)39
CDIRECT SELECT lever128
DCenter console control panel42
ERear-view mirror93
F• Overhead control panel43
• Interior lamp99
GGlove box240
HCup holder241
FunctionPage
I• 12 V socket243
• Cigarette lighter242
JIgnition lock123
KAdjusts the steering wheel93
LDiagnostics connection31
Opens the hood253
MApplies the parking brake136
NDoor control panel43
OReleases the parking brake136
PLight switch96
Q• Coin/card holder
• Driving system control
panel
ÇDeactivates/activates
Lane Keeping Assist150
c Deactivates/activates
PARKTRONIC153
RCruise control lever144
36Cockpit
At a glance
Page 44 of 318
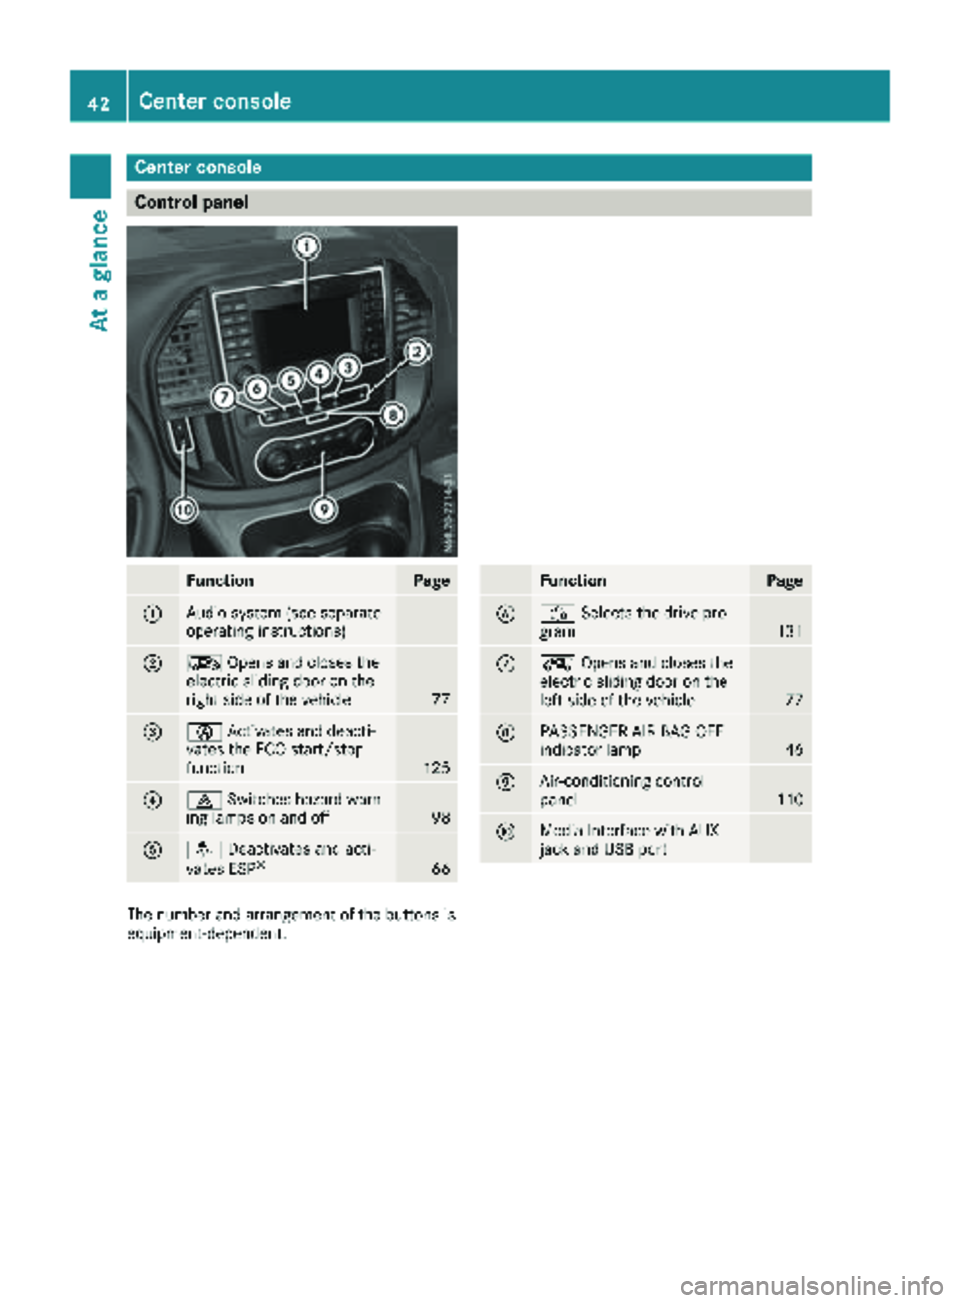
Center console
Control panel
FunctionPage
:Audio system (see separate
operating instructions)
;ÆOpens and closes the
electric sliding door on the
right side of the vehicle
77
=è Activates and deacti-
vates the ECO start/stop
function
125
?£ Switches hazard warn-
ing lamps on and off98
Aå Deactivates and acti-
vates ESP®66
FunctionPage
BÉ Selects the drive pro-
gram131
CÅ Opens and closes the
electric sliding door on the
left side of the vehicle
77
DPASSENGER AIR BAG OFF
indicator lamp46
EAir-conditioning control
panel110
FMedia Interface with AUX
jack and USB port
The number and arrangement of the buttons is
equipment-dependent.
42Center console
At a glance
Page 53 of 318
GWARNING
Sensors to control the air bags are located in
the doors. Modifications or work not per-
formed correctly to the doors or door panel-
ing, as well as damaged doors, can lead to the
function of the sensors being impaired. The air
bags might therefore not function properly
anymore. Consequently, the air bags cannot
protect vehicle occupants as they are
designed to do. There is an increased risk of
injury.
Never modify the doors or parts of the doors.
Always have work on the doors or door pan-
eling carried out at a qualified specialist work-
shop.
Front air bags
!Do not place heavy objects on the front-
passenger seat. This could cause the system
to identify the seat as being occupied. In the
event of an accident, the restraint systems on
the front-passenger side may be triggered
and have to be replaced.
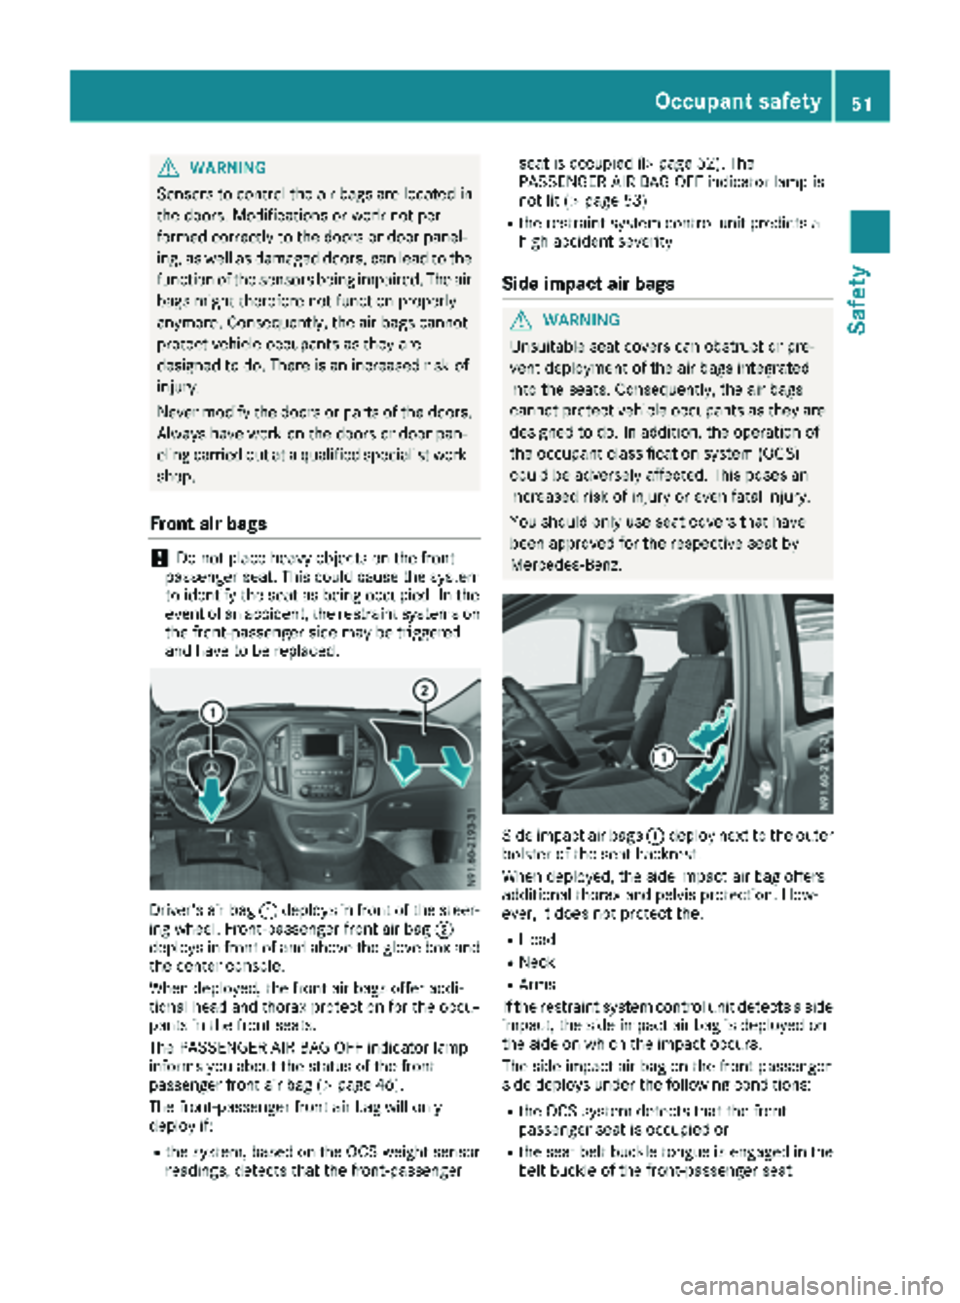
Driver's air bag :deploys in front of the steer-
ing wheel. Front-passenger front air bag ;
deploys in front of and above the glove box and
the center console.
When deployed, the front air bags offer addi-
tional head and thorax protection for the occu-
pants in the front seats.
The PASSENGER AIR BAG OFF indicator lamp
informs you about the status of the front-
passenger front air bag (
Ypage 46).
The front-passenger front air bag will only
deploy if:
Rthe system, based on the OCS weight sensor
readings, detects that the front-passenger seat is occupied (
Ypage 52). The
PASSENGER AIR BAG OFF indicator lamp is
not lit (
Ypage 53)
Rthe restraint system control unit predicts a
high accident severity
Side impact air bags
GWARNING
Unsuitable seat covers can obstruct or pre-
vent deployment of the air bags integrated
into the seats. Consequently, the air bags
cannot protect vehicle occupants as they are designed to do. In addition, the operation of
the occupant classification system (OCS)
could be adversely affected. This poses an
increased risk of injury or even fatal injury.
You should only use seat covers that have
been approved for the respective seat by
Mercedes-Benz.
Side impact air bags :deploy next to the outer
bolster of the seat backrest.
When deployed, the side impact air bag offers
additional thorax and pelvis protection. How-
ever, it does not protect the:
RHead
RNeck
RArms
If the restraint system control unit detects a side impact, the side impact air bag is deployed on
the side on which the impact occurs.
The side impact air bag on the front-passenger
side deploys under the following conditions:
Rthe OCS system detects that the front-
passenger seat is occupied or
Rthe seat belt buckle tongue is engaged in the
belt buckle of the front-passenger seat
Occupant safety51
Safety
Z
Page 66 of 318
the electric sliding door using the corresponding
ÅorÆ sliding door button in the center
console (
Ypage 77).
Pets in the vehicle
GWARNING
If you leave animals unattended or unsecured
in the vehicle, they could press buttons or
switches, for example.
As a result, they could:
Ractivate vehicle equipment and become
trapped, for example
Ractivate or deactivate systems, thereby
endangering other road users
Unsecured animals could also be flung around
the vehicle in the event of an accident or sud-
den steering or braking, thereby injuring vehi-
cle occupants. There is a risk of an accident
and injury.
Never leave animals unattended in the vehi-
cle. Always secure animals properly during
the journey, e.g. use a suitable animal trans-
port box.
Driving safety systems
Overview
In this section, you will find information about
the following driving safety systems:
REBD ( Electronic Brake Force Distribution)
RABS ( Anti-lock Braking System)
RBAS ( Brake Assist System)
RESP®(E lectronic Stability Program)
Important safety notes
If you fail to adapt your driving style or if you are
inattentive, the driving safety systems can nei-
ther reduce the risk of accident nor override the
laws of physics. Driving safety systems are
merely aids designed to assist driving. You are
responsible for the distance to the vehicle in
front, for vehicle speed, braking in good time
and for staying in your lane. Always adapt your driving style to the prevailing road and weather
conditions and maintain a sufficient, safe dis-
tance from other road users. Drive carefully.
Please note that the driving safety systems
described only work optimally when:
Rthere is adequate contact between the tires
and the road surface
Ryou use winter tires (M+S tires), with snow
chains if necessary, when the road conditions
are wintry
Rthe speed information determined by the
vehicle is within the legally prescribed display
accuracy
Pay particular attention to the information
regarding tires, tire tread and winter operation
under "Wheels and tires" (
Ypage 279).
ABS (Anti-lock Braking System)
General notes
ABS regulates brake pressure in such a way that the wheels do not lock when you brake. This
allows you to continue steering the vehicle when
braking.
The ò warning lamp in the instrument cluster
lights up when the ignition is switched on. The
lamp goes out when the engine starts running.
Important safety notes
Observe the important safety guidelines for the
driving safety system (Ypage 64).
ABS works from a speed of about 5 mph
(8 km/h), regardless of road-surface conditions. ABS works on slippery surfaces, even when you
only brake gently.
GWARNING
If ABS is faulty, the wheels could lock when
braking. The steerability and braking charac-
teristics may be severely impaired. Addition-
ally, further driving safety systems are deac-
tivated. There is an increased danger of skid-
ding and accidents.
Drive on carefully. Have ABS checked imme-
diately at a qualified specialist workshop.
If ABS is malfunctioning, the òwarning lamp
(
Ypage 224) lights up while the engine is run-
ning and the display shows a message:
64Driving safet ysystem s
Safety
Page 78 of 318
You must reset the electric sliding door if there
has been a malfunction or an interruption in the
voltage supply (
Ypage 78).
iPlease note, if the child-proof locks have
been activated, you cannot open the sliding
door from the inside. You can only open a
sliding door from the inside if the child-proof
locks have not been activated. Further infor-
mation can be found under "Child-proof locks
for the sliding door" (
Ypage 63) and "Open-
ing/closing from the inside" (Ypage 77).
Obstacle detection with reversing
feature
The sliding door is equipped with automatic
obstacle detection with reversing feature. If a
solid object blocks or restricts the sliding door
during the automatic closing process, the slid-
ing door opens again automatically. If the sliding
door is obstructed during the opening proce-
dure, it moves back a few centimeters in the
opposite direction and stops.
Automatic obstacle detection with reversing
feature is only an aid. It is not a substitute for
your attentiveness when closing the electrical
sliding door.
If an obstacle is detected, the display shows the
Left-hand Electric Sliding Door
ObstructionDetectedmessage for example,
and five warning tones sound.
GWARNING
The reversing feature does not react:
Rto soft, light and thin objects, e.g. small fin-
gers
Rover the last 8 mm of the closing movement
This means that the reversing feature cannot
prevent someone being trapped in these sit-
uations. There is a risk of injury.
When closing, make sure that no-one has any
parts of the body within the closing area.
If someone is trapped:
Rpress the 5button on the SmartKey, or
Rpull the exterior door handle, or
Rpress the corresponding sliding door but-
ton in the center console, or
Rpress the button on the door frame, or
Rpull the rocker switch on door handle
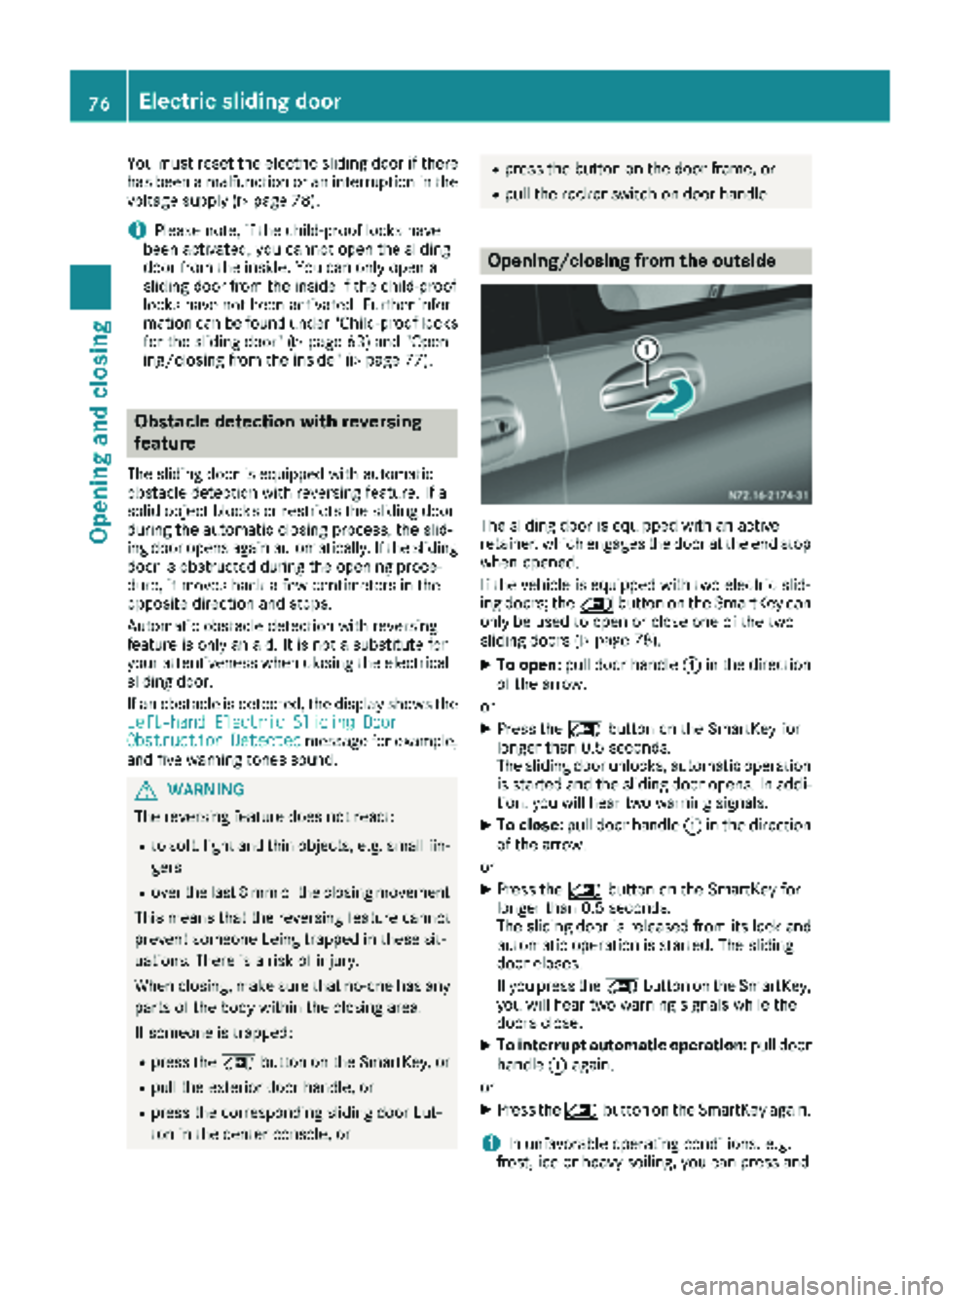
Opening/closing from the outside
The sliding door is equipped with an active
retainer, which engages the door at the end stop
when opened.
If the vehicle is equipped with two electric slid-
ing doors; the 5button on the SmartKey can
only be used to open or close one of the two
sliding doors (
Ypage 78).
XTo open: pull door handle :in the direction
of the arrow.
or
XPress the 5button on the SmartKey for
longer than 0.5 seconds.
The sliding door unlocks, automatic operation
is started and the sliding door opens. In addi-
tion, you will hear two warning signals.
XTo close: pull door handle :in the direction
of the arrow.
or
XPress the 5button on the SmartKey for
longer than 0.5 seconds.
The sliding door is released from its lock and
automatic operation is started. The sliding
door closes.
If you press the 5button on the SmartKey,
you will hear two warning signals while the
doors close.
XTo interrupt automatic operation: pull door
handle :again.
or
XPress the 5button on the SmartKey again.
iIn unfavorable operating conditions, e.g.
frost, ice or heavy soiling, you can press and
76Electric sliding door
Opening and closing
Page 79 of 318
hold the relevant sliding door button. The
electric sliding door moves with increased
force. Observe that, in such circumstances,
the obstacle detection is less sensitive. To
stop the movement, release the sliding door
button.
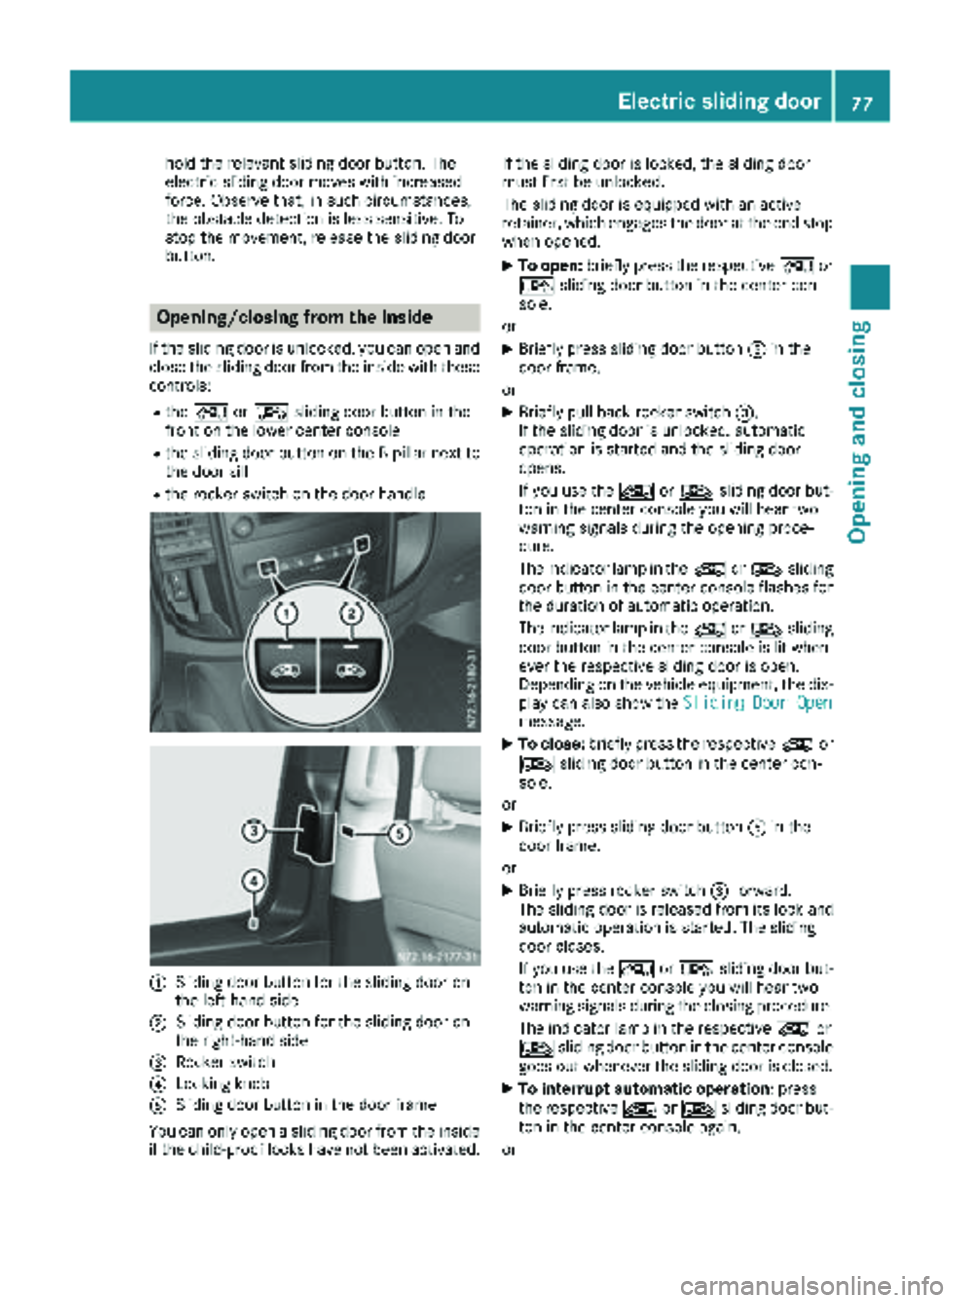
Opening/closing from the inside
If the sliding door is unlocked, you can open andclose the sliding door from the inside with these
controls:
Rthe Å orÆ sliding door button in the
front on the lower center console
Rthe sliding door button on the B-pillar next to
the door sill
Rthe rocker switch on the door handle
:Sliding door button for the sliding door on
the left-hand side
;Sliding door button for the sliding door on
the right-hand side
=Rocker switch
?Locking knob
ASliding door button in the door frame
You can only open a sliding door from the inside if the child-proof locks have not been activated. If the sliding door is locked, the sliding door
must first be unlocked.
The sliding door is equipped with an active
retainer, which engages the door at the end stop
when opened.
XTo open:
briefly press the respective Åor
Æ sliding door button in the center con-
sole.
or
XBriefly press sliding door button Ain the
door frame.
or
XBriefly pull back rocker switch =.
If the sliding door is unlocked, automatic
operation is started and the sliding door
opens.
If you use the ÅorÆ sliding door but-
ton in the center console you will hear two
warning signals during the opening proce-
dure.
The indicator lamp in the ÅorÆ sliding
door button in the center console flashes for
the duration of automatic operation.
The indicator lamp in the ÅorÆ sliding
door button in the center console is lit when-
ever the respective sliding door is open.
Depending on the vehicle equipment, the dis-
play can also show the Sliding Door Open
message.
XTo close:briefly press the respective Åor
Æ sliding door button in the center con-
sole.
or
XBriefly press sliding door button Ain the
door frame.
or
XBriefly press rocker switch =forward.
The sliding door is released from its lock and
automatic operation is started. The sliding
door closes.
If you use the ÅorÆ sliding door but-
ton in the center console you will hear two
warning signals during the closing procedure.
The indicator lamp in the respective Åor
Æ sliding door button in the center console
goes out whenever the sliding door is closed.
XTo interrupt automatic operation: press
the respective ÅorÆ sliding door but-
ton in the center console again.
or
Electric sliding door77
Opening and closing
Z